This category contains some of my older pages which still contains some relevant information.
This is the multi-page printable view of this section. Click here to print.
Archive
This category contains some of my older pages which still contains some relevant information.
Encrypt your Microsoft 365 emails with S/MIME
A great way to encrypt your Microsoft 365 outbound emails using a similar technique as SSL is to use S/MIME. In this guide I will show you how to get certificates and configure S/MIME for your users.
Requirements
- Around 30 minutes of your time
- Exchange Online Powershell module installed
- S/MIME certificate for your mailbox
- Microsoft 365 tenant/mailbox to configure S/MIME
S/MIME explained
S/MIME means Secure / Multipurpose Internet Mail Extensions. It’s an email security standard defined by the Internet Engineering Task Force which allows you to encrypt your email messages and attachments sent. In simple terms:
- It encrypts emails and attachments so only the intended recipient should read them
- It digitally signs emails so the recipient knows:
- who sent the message
- that the content was not altered
S/MIME works using personal certificates (public/private keys), just like SSL certificates for web servers which will be handled automatically by most email clients.
S/MIME versus DKIM
In the beginning, I found S/MIME be really similar to what DKIM does, so I did a little research about the differences, and it has some clear takeaways:
- DKIM proves an email came from a specific domain/mailserver
- Keyword: Verification
- S/MIME proves an email came from a specific person and keeps the content private for Man in the middle attacks
- Keyword: Encryption
And I made a little overview about the features of both security protocols:
| Feature | S/MIME | DKIM |
|---|---|---|
| Encrypts email content | Yes | No |
| Digitally signs messages | Yes | Yes |
| Verifies individual sender | Yes | No |
| Verifies sending domain | No | Yes |
| End-to-end protection | Yes | No |
| Prevents mail server access to content | Yes | No |
| Detects content tampering | Yes | Yes |
| Protects message after delivery | Yes | No |
Step 1: Purchasing your S/MIME certificate(s)
Step 2: Downloading your certificate
Step 3: Installing the certificate
Now we have purchased and downloaded the S/MIME certificate, we need to install this on our Windows machine. You can also do this through Microsoft Intune, but I will do the manual option for now.
Open your local Certificates manager (certmgr.msc)

Open the application.

Navigate to your Personal storage and click “Action -> All tasks -> Import…”

Click “Next”. Now select the certificate you downloaded and purchased.

Click “Next”. Now insert the password if you have received this. If you did not get a password from your certificate issuer, leave this blank.

Click “Next” twice and then finish. The certificate should now be in your Personal certificate storage:

Step 4: Export certificate information to file
We must now export our certificate provider information to a single file. We can use that file to give it to Exchange Online to trust our certificates and be able to setup the secure, encrypted connection.
On the computer where you installed the S/MIME certificate, open PowerShell.
Then paste this simple script:
POWERSHELL
$sst = "C:\JV-Exported-Certs.sst"
$root = Get-ChildItem Cert:\LocalMachine\Root |
    Where-Object { $_.Subject -like "*Actalis Authentication Root CA*" } |
    Select-Object -First 1

$intermediate = Get-ChildItem Cert:\LocalMachine\CA |
    Where-Object { $_.Subject -like "*Client Authentication CA G3*" } |
    Select-Object -First 1

if (-not $root -or -not $intermediate) {
    Write-Host "Root or Intermediate certificate not found"
    return
}

# Build and export sst
$collection = New-Object System.Security.Cryptography.X509Certificates.X509Certificate2Collection
$collection.Add($root) | Out-Null
$collection.Add($intermediate) | Out-Null
$bytes = $collection.Export([System.Security.Cryptography.X509Certificates.X509ContentType]::SerializedStore)
[System.IO.File]::WriteAllBytes($sst, $bytes)
$verify = New-Object System.Security.Cryptography.X509Certificates.X509Certificate2Collection
$verify.Import($sst)
Write-Host "SST contains:"
$verify | Select Subject, Issuer | Format-Table -AutoSize
Write-Host "Certificate count:" $verify.Count
Change the Text CertProviderName to your certificate provider name. It only must contain a part of the name.
This script exports all root certificate information from your certificate provider to a single file. We must upload this file to Exchange Online so Microsoft trusts our certificates.

You can now find the file in the C:\ root directory:

Now we are ready to go to the next step.
Step 5: Upload certificate provider information to Exchange Online
Now we have the file with all the information ready to be uploaded, let’s make a connection to Exchange Online with PowerShell. If you need to install the module, follow this guide: https://www.powershellgallery.com/packages/ExchangeOnlineManagement/3.9.0
POWERSHELL
Connect-ExchangeOnlineThen login to your tenant/account with at least Exchange administrator permissions.
Then execute this command to tell Exchange Online which certificate provider you use.
POWERSHELL
Set-SmimeConfig -SMIMECertificateIssuingCA ([System.IO.File]::ReadAllBytes('C:\JV-Exported-Certs.sst'))This command should run without any output, which means it completed successfully.

After running that command, you can check if the certificate is added succesfully with these commands:
POWERSHELL
$cfg = Get-SmimeConfig

$col = New-Object System.Security.Cryptography.X509Certificates.X509Certificate2Collection
$col.Import($cfg.SMIMECertificateIssuingCA)

$col | Select Subject,Issuer | Format-Table -AutoSize
You will get the complete names of the certificates uploaded:

Wait for around 10 to 15 minutes before changing anything in your Email clients for this new configuration to propagate.
Step 6: Enable digital signatures in Outlook
Now we can go out of PowerShell and actually test if this email encryption works. Open your Outlook, go to Settings, and then Mail -> S/MIME.
First enable the “Digital signatures” option without enabling the Encrypt contents option yet. Enabling this will break your email sending capabilities.

The result
After the certificate is added and trusted and the first email is sent, you will see what happens at the receiver side. They will get an notification that the email is digitally signed:

However, if you want to encrypt the email messages, you must have the public key of your receiver to create a secure channel. This is done by receiving an email from your receiver first with the digital signature. This will be saved into your address book and then you can reply with encryption.
Summary
Sources
These sources helped me by writing and research for this post;
End of the page 🎉
You have reached the end of the page. You can navigate through other blog posts as well, share this post on X, LinkedIn and Reddit or return to the blog posts collection page. Thank you for visiting this post.
If you think something is wrong with this post or you want to know more, you can send me a message to one of my social profiles at: https://justinverstijnen.nl/about/
If you find this page and blog very useful and you want to leave a donation, you can use the button below to buy me a beer. Hosting and maintaining a website takes a lot of time and money. Thank you in advance and cheers :)

The terms and conditions apply to this post.
Skrepr Tech CI - PowerShell
Dit is mijn Collective Intelligence voor mei 2025 over PowerShell. Ik ga hier wat leuke dingen over laten zien, zie de inhoud voor handige links naar de kopteksten.
Aan het einde heb ik nog een leuke praktijkopdracht waarin we een PowerShell module gaan installeren en uitvoeren.
Ik heb mijn best gedaan om de uitleg zo simpel maar duidelijk te geven, ook voor onze niet-technische mensen.
Wat is PowerShell?
Powershell is een shell en script taal en sinds Windows 8/Server 2012 de onderliggende CLI van Windows. Eigenlijk alles in de grafische interface van Windows wordt door Powershell verwerkt, zoals te zien in onderstaande afbeelding:
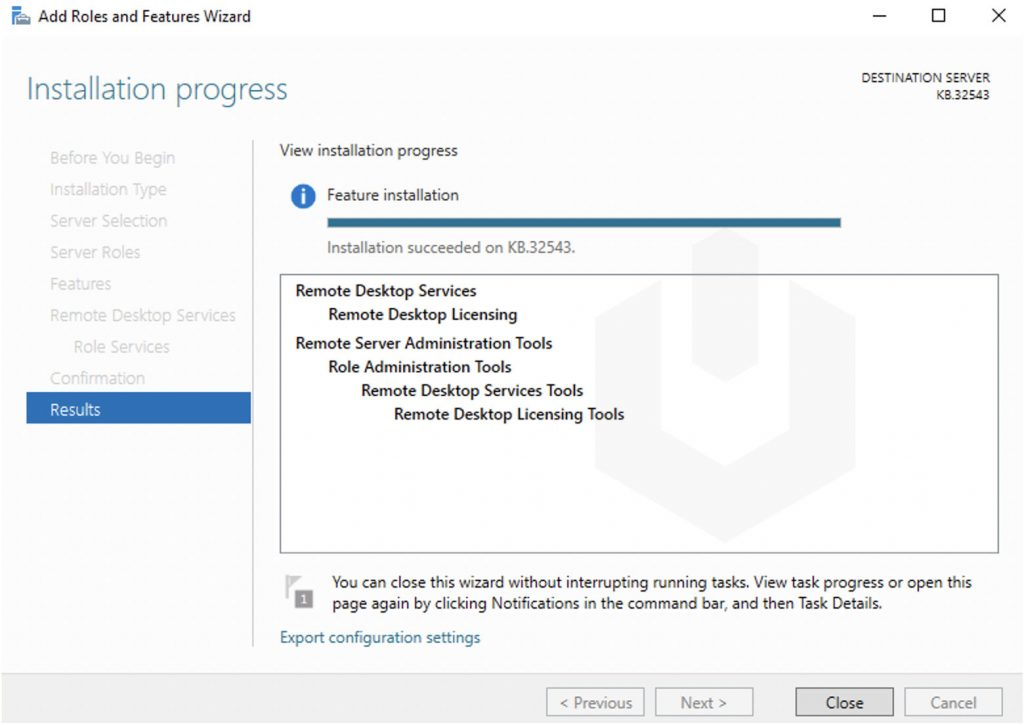
Klik op “Export configuration settings” en je krijgt:
POWERSHELL
# Zorg ervoor dat je PowerShell uitvoert als Administrator
# Installeer RSAT tools
Write-Host "Installing RSAT tools..."
Add-WindowsCapability -Online -Name "Rsat.RemoteAccess.Tools~~~~0.0.1.0"

# Installeer Remote Desktop Services tools
Write-Host "Installing Remote Desktop Services tools..."
Add-WindowsCapability -Online -Name "Rsat.RemoteDesktopServices.Tools~~~~0.0.1.0"

# Wacht tot de installatie voltooid is
Write-Host "De RSAT en Remote Desktop Services tools zijn geïnstalleerd."

# Optioneel: Controleer of de tools correct zijn geïnstalleerd
Write-Host "Controleren van geïnstalleerde tools..."
Get-WindowsCapability -Online | Where-Object {$_.Name -like "Rsat*" -or $_.Name -like "RemoteDesktopServices*"} | Format-Table -Property Name, State
Ziet er leuk uit, maar wat kun je er nu eigenlijk precies mee en wat levert het gebruik van PowerShell jouw precies op?
- Automatiseren
- Uniforme configuraties
- Tijd
- Beveiliging
Hoe werkt Powershell?
Microsoft heeft vanaf de oorsprong zijn best gedaan om de drempel voor het gebruik van Powershell zo laag mogelijk te maken. Vroeger met CMD en bij Linux zijn alle commando’s gekozen op basis van wie de tool maakte. Met Powershell hebben ze hier uniformiteit in gemaakt.
Een Powershell commando ziet er daarom ook altijd als volgt uit:
Werkwoord - Zelfstandig naamword (verb - noun)
Voorbeelden:
- Get-Item
- Install-WindowsFeature
- Test-NetConnection
- Write-Host
Windows PowerShell vs. PowerShell
Tegenwoordig zijn er 2 versies van Powershell beschikbaar:
- Windows Powershell
- Powershell
Het verschil hierin is voornamelijk dat Windows Powershell alle commando’s voor Windows bevat en de andere Powershell meer uniform is. Deze kan namelijk ook op Linux en Apple geinstalleerd worden.
Commando’s vs. Scripts
Nu kunnen we Powershell gebruiken als CLI taal waar we alle taken interactief moeten doen. Hiermee bedoelen we dat je alles zelf moet typen en eventueel een resultaat (output) van commando 1 in een comando 2 of zelfs 3 wil gaan gebruiken. Hiervoor moet je 3 regels typen en op enter klikken. Dit kost tijd en moeite.
Powershell is ook een script-taal en een script is hiermee precies zoals een film ook gemaakt wordt. Er wordt uitgedacht hoe een scene eruit ziet, wat er gebeurd, welke auto er crashed en wie die bestuurt, wie er dood gaat etc. Een Powershell script is niets anders, alleen wat gezelliger.
In een Powershell script kun je bijvoorbeeld alle gebruikers in een systeem ophalen en deze wijzigen. Stel je voor, een bedrijf krijgt naast een .nl domein ook een .com of .be domein en alle gebruikers moeten hierop ook te benaderen zijn.
Nu kun je ervoor kiezen om 500 gebruikers handmatig bij langs te gaan, of een simpel script te maken die dit voor je doet. Om je helemaal over de streep te halen om voor Powershell te gaan:
- Handmatig: 500 x 26 seconden is 13.000 seconden en ongeveer 3,5 uur werk
- Script: Inloggen 5 min, maken script: 25 min, testen 20 min, script 10 min en ongeveer 1 uur werk
Met dit voorbeeld hebben we dus 2,5 uur bespaard door Powershell te gaan gebruiken. Hoe complex ziet zo’n script er dan uit?
POWERSHELL
$allegebruikers     = Get-Mailbox
$nieuwedomeinalias  = "@justinverstijnen.be"

foreach ($user in $allegebruikers) {
  $primaryEmail = $user.PrimarySmtpAddress.ToString()
  $newAlias = $primaryEmail.Split('@')[0] + $nieuwedomeinalias
  Set-Mailbox $user.Identity -EmailAddresses @{Add=$newAlias} }
Lijkt complex maar is redelijk simpel na de uitleg, toch?
Variabelen, Strings en Booleans
Belangrijke componenten in Powershell zijn variabelen, strings en booleans. Vast wel eens van gehoord maar wat zijn het precies?
| Component | Extra uitleg | Voorbeeld |
| Variabele | Een object die steeds anders kan zijn op basis van input of error/succes | $allegebruikers $user $resultaat |
| String | Een stuk tekst. Vaak gebruikt voor output om deze naar een variabele of nieuw commando te schrijven. | “info@justinverstijnen.nl” “Succes” “Error” |
| Boolean | Een waarde die waar of niet waar kan zijn | $true $false |
Scripts vs. Modules
Nu hebben we scripts en modules in Powershell. 2 begrippen die op elkaar lijken maar net iets anders zijn;
- Script: Een script is een enkele harde lijst met taken en zal Powershell altijd van A tot Z uitvoeren
- Module: Een module is een interactieve lijst met taken en kan zich aanpassen aan de gebruiker met eigen functies. Zo kun je zelf commando’s maken met functions die weer onderliggend Powershell eigen commando’s/scripts uitvoeren voor het resultaat.
De taal van een module ziet er ongeveer zo uit:
POWERSHELL
# Functie 1: Welkomstbericht
function Get-WelcomeMessage {
    param (
        [string]$Name
    )
    if ($Name) {
        return "Welkom, $Name!"
    } else {
        return "Welkom, onbekende gebruiker!"
    }
}

# Functie 2: Optellen van twee getallen
function Add-Numbers {
    param (
        [int]$Number1,
        [int]$Number2
    )
    return $Number1 + $Number2
}
Een module moet altijd geinstalleerd worden in Powershell, en scripts kunnen direct vanaf een bestand uitgevoerd worden.
Powershell Tools
Er zijn verschillende tools om Powershell scripts en modules te schrijven. Deze kunnen van simpel naar complex gaan en je bent vrij om te kiezen welke je wilt gebruiken. Ik raad zelf aan om Windows Powershell ISE of VS Code te gebruiken, dit vanwege de ingebouwde foutcorrectie en aanbevelingen die jouw code verbetert alsof je in Word een aantal spelvauten maakt;
Een aantal voorbeelden van gratis software;
- Windows Kladblok
- Notepad++
- Windows Powershell ISE (Integrated Scripting Environment)
- Visual Studio Code
Praktijkvoorbeelden Powershell bij Skrepr Tech
Bij Skrepr Tech gebruik ik voor een paar dingen PowerShell om taken makkelijk uit te voeren en te automatiseren:
- AVD gebruikers Cameranu
- Ik heb hier een script gemaakt om met 1 druk op de knop alle AVD gebruikers te exporteren naar een CSV/Excel bestand voor de facturatie
- Emailadressen toevoegen Cameranu
- Ik heb een script gemaakt die elke nacht alle gebruikers ophaalt en het invoerveld “Email” invult
- Schijfopruiming diverse klanten
- Bij een aantal klanten draait er een script op de server die eenmaal per week bepaalde mappen opschoont en bijvoorbeeld de laatste 90 versies bewaard
- AVD images maken
- Ik gebruik bij het maken van AVD images een script die de machine compleet naar het Nederlands zet, de juiste tijdzone instelt en het optimalisatiescript uitvoert
- AVD images voorbereiden
- Voor het voorbereiden van images, controleren op en verwijderen van pakketten die het voorbereiden verstoren
- Backup als de grafische interface niet werkt om verschillende redenen
De JVCollectiveIntelligenceMay2025 Powershell module
Om een kleine hands-on demo te geven van Powershell heb ik speciaal voor deze CI een Powershell module gemaakt die te installeren is. Dit is niet moeilijk.
Om de module te installeren kun PowerShell starten op je Windows apparaat en de commando’s invullen.
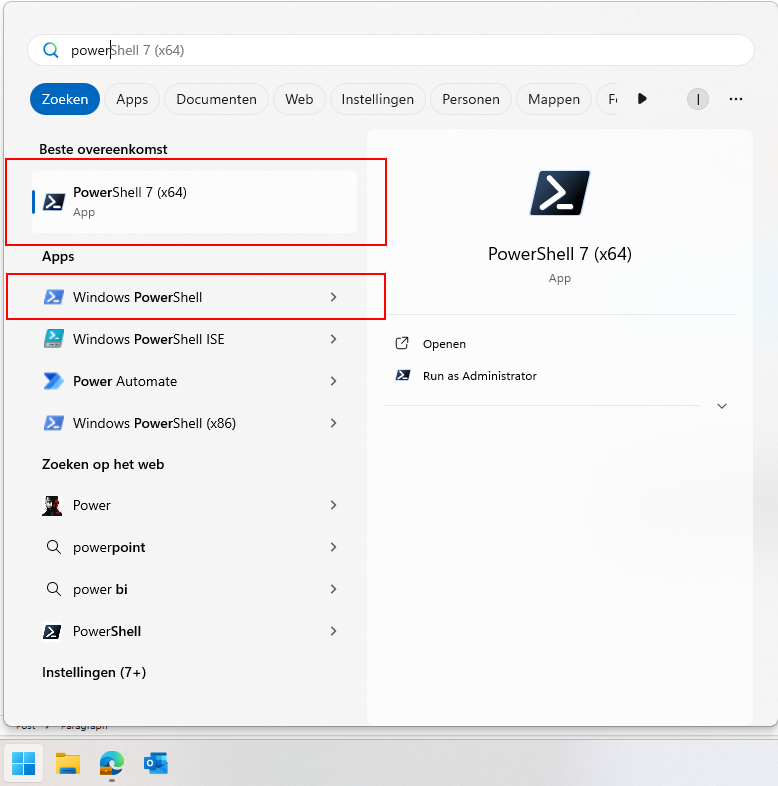
Beide gearceerde versies op Windows kun je hiervoor gebruiken.
In elk zwart vakje op deze pagina heb je rechts bovenin een kopieer-knop waarmee je makkelijk vanuit dit venster de commando’s kan kopieren en in PowerShell plakken. Om tekst te plakken in een PowerShell venster hoef je alleen maar in het venster de rechtermuisklik in te drukken. Na het plakken druk je op Enter en het commando wordt uitgevoerd.
Heb je een Apple apparaat? Balen voor jou. Je kan Powershell 7 dan hier downloaden: https://learn.microsoft.com/en-us/powershell/scripting/install/installing-powershell-on-macos?view=powershell-7.5#installation-via-direct-download
Let op: de werking op Mac is niet getest.
Stap 1: De module installeren
Open Powershell en voer het volgende commando uit:
POWERSHELL
Install-Module JVCollectiveIntelligenceMay2025 -Scope CurrentUserPowershell zal nu vragen of je zeker weet of de module geïnstalleerd mag worden. Druk eenmaal of tweemaal op y en druk op Enter.
Dit installeert de module die ik gemaakt heb waarmee we wat leuke commando’s kunnen uitvoeren die het verduidelijken wat Powershell doet op basis van de input.
Stap 2: Uitvoeren toestaan
Standaard heeft PowerShell een zogeheten uitvoerings-restrictie. Deze zorgt ervoor dat een gebruiker niet zomaar van alles kan uitvoeren op de computer. Zie het als een toegangscontrole voordat je een gebouw in mag in het echte leven.
Deze kunnen we voor de tijd van onze CI tijdelijk uitschakelen met het volgende commando:
POWERSHELL
Set-ExecutionPolicy Unrestricted -Scope ProcessDit schakelt de toegangscontrole tijdelijk uit voor alleen ons venster. Bij wegklikken van het venster staat deze controle weer aan.
Stap 3: De module laden
Nu kunnen we echt beginnen met de module inladen. Zie dit als het openen van een Word bestand waarna je eraan kan werken.
Dit doe je met dit commando:
POWERSHELL
Import-Module JVCollectiveIntelligenceMay2025Als dit gelukt is zonder foutmeldingen, dan kunnen we de commando’s van de module gebruiken.
Krijg je bij deze stap een foutmelding, roep dan even.
Stap 4: De module testen
Laten we nu eens testen of de module succesvol ingeladen is:
POWERSHELL
Test-ModuleJVCIAls je nu een bericht voor je krijgt dat de module succesvol geladen is kunnen we beginnen. Wordt de module niet gevonden, dan is er iets mis en roep dan even.
Stap 5: De module informatie verlenen
Je mag er bij deze stap voor kiezen om niet je echte gegevens te gebruiken. Vul hier dan neppe informatie in, dit verandert verder niets aan de uitkomst.
Wanneer de module wel succesvol geladen is kun je het onderstaande commando uitvoeren. Powershell vraagt nu om je naam:
POWERSHELL
Set-NameJVCIPowerShell reageert nu terug met jouw ingevulde naam omdat je hem dit hebt verteld. Dit wordt opgeslagen in een variabele.
Daarna kun je het volgende commando invullen. Powershell vraagt nu om je geboortejaar:
POWERSHELL
Set-BirthYearJVCINu weet Powershell hoe oud je bent en kan hiermee verdere berekeningen uitvoeren.
Daarna kun je het volgende commando invullen:
POWERSHELL
Set-FavoriteColorJVCINu weet Powershell ook jouw favoriete kleur, en kan daardoor de tekst hierop aanpassen.
Stap 6: De resultaten uitdraaien
Nu we PowerShell van alles over onszelf hebben verteld kunnen we dit uitdraaien. Dit doe je door het laatste commando uit te voeren:
POWERSHELL
Write-SummaryJVCIJe krijgt nu een overzicht met alles wat je hebt ingevuld, in jouw aangegeven favoriete kleur. Dit geeft weer wat je met Powershell onder andere zou kunnen doen. Informatie ophalen op basis van input, weergeven, dupliceren en berekeningen op uitvoeren.
Deze module geeft op een vrij simpele manier weer wat de mogelijkheden zijn van PowerShell, maar is wel rekening gehouden om dit zo snel en makkelijk mogelijk te doen. In echte gevallen zal een module of script veel uitgebreider zijn.
Bedankt voor het bijwonen van mijn CI, en de informatie blijft voorlopig beschikbaar op deze website. Mocht je nog een keer deze gids en de bijbehorende informatie willen volgen kan dat!
End of the page 🎉
You have reached the end of the page. You can navigate through other blog posts as well, share this post on X, LinkedIn and Reddit or return to the blog posts collection page. Thank you for visiting this post.
If you think something is wrong with this post or you want to know more, you can send me a message to one of my social profiles at: https://justinverstijnen.nl/about/
If you find this page and blog very useful and you want to leave a donation, you can use the button below to buy me a beer. Hosting and maintaining a website takes a lot of time and money. Thank you in advance and cheers :)
The terms and conditions apply to this post.