Email security is becoming more and more important, because email is still one of the main ways attackers try to get access to organizations.
Attackers know that email can be a very direct route to sensitive data, systems, and sometimes even privileged access. This often happens through users who are not aware of the risks, or who accidentally click something, share information, or approve access they should not.
To reduce the most basic risks, I’ve created a dedicated category with essential email security settings that should be applied to every domain we own. This also includes domains that are not actively used for sending or receiving email, because attackers can still abuse those domains for spoofing or impersonation.
In the pages in this category, I dive into how to configure different security mechanisms to enhance your email security, get the lowest amount of possible messages marked as spam and minimize the risk of your domain(s) being spoofed in various attacks happening every minute of the day.
Check you domains’ email security posture
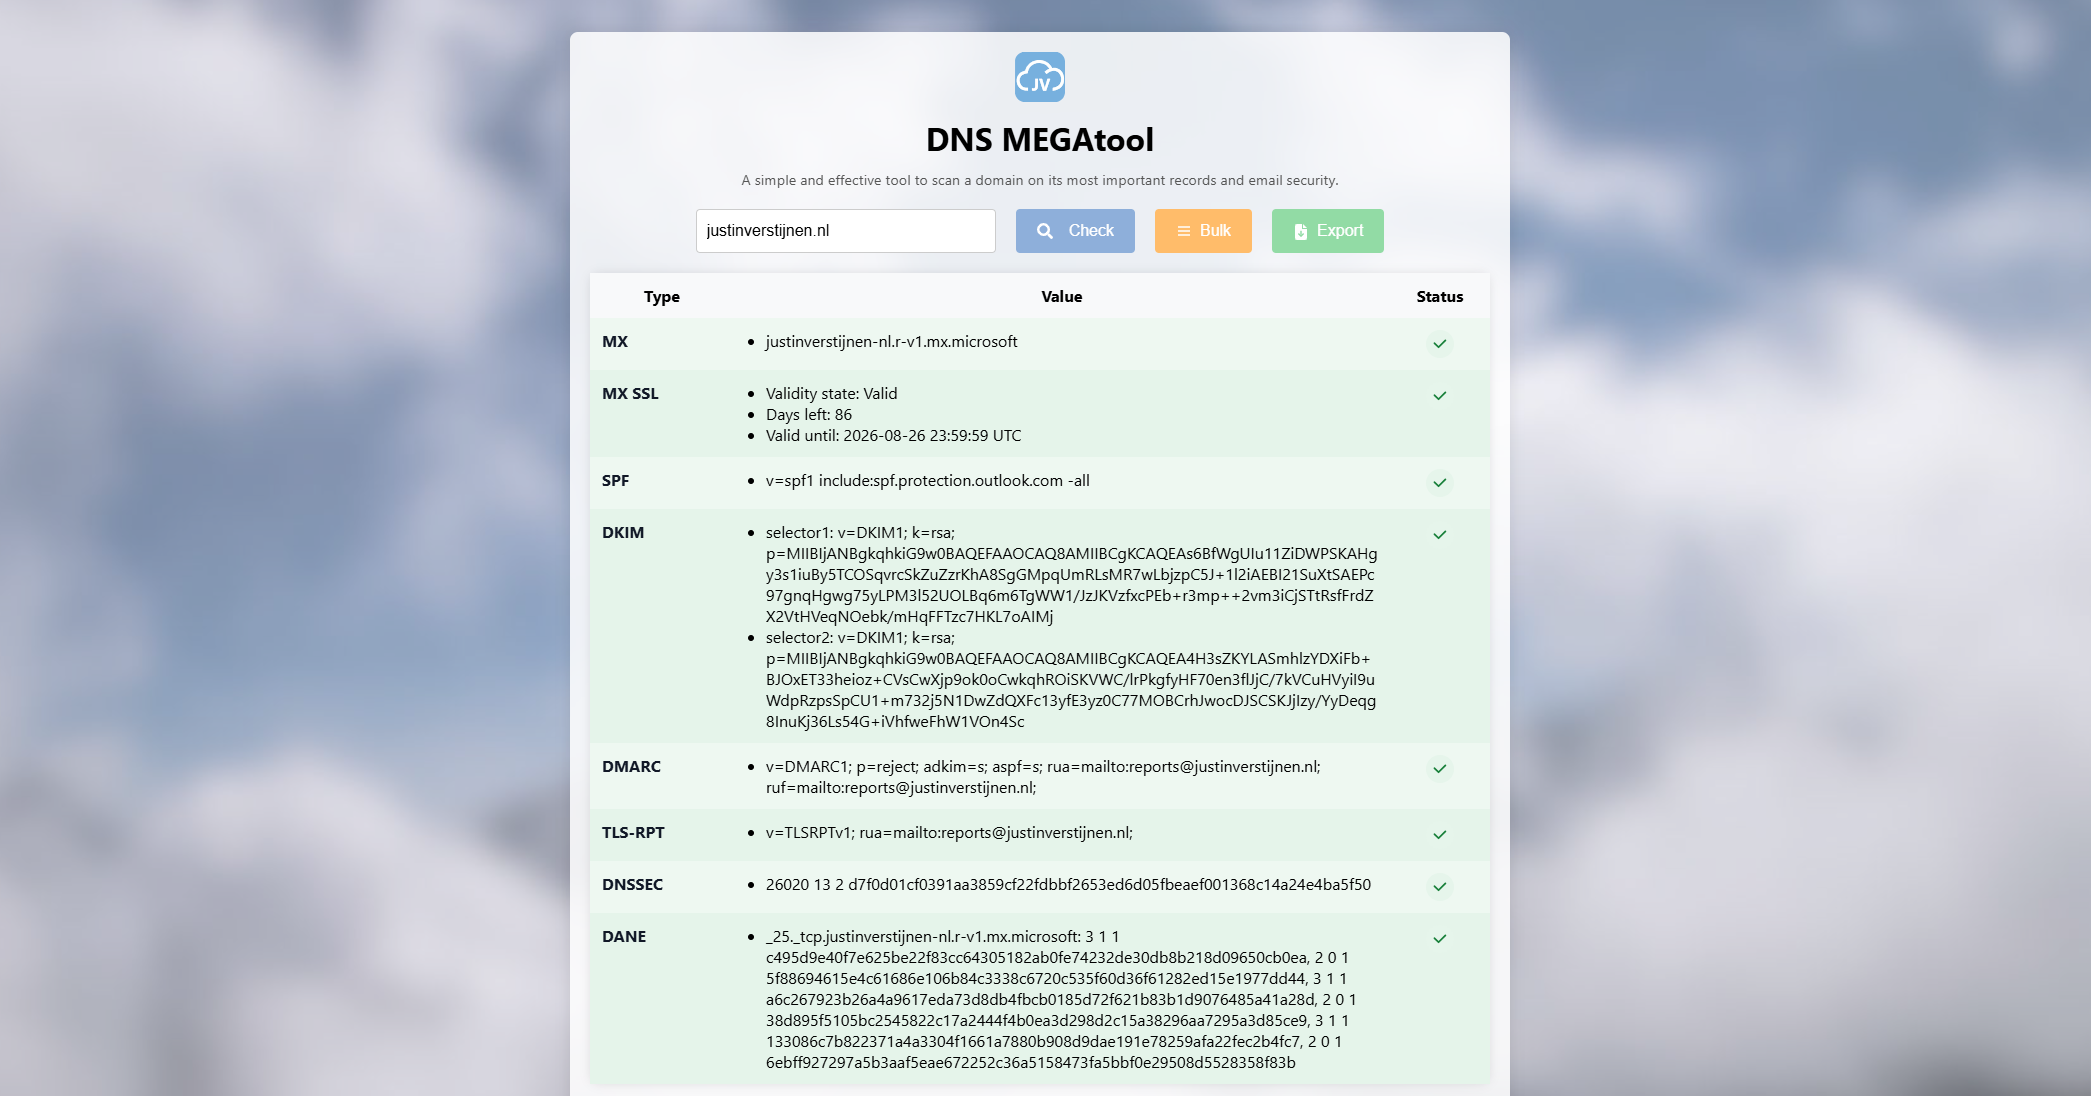
To check your domains’ email security posture based on configurations, I have made the DNS MEGAtool where you get an overview of the configuration within seconds.
The underlying security mechanisms must be configured on any domain you own in my opinion. Most companies have various stale/stand-by domains. Even there you should configure at least the basics. This will help you prevent spoofing and similar attacks.
1. SPF record
On all your domains, make sure you use an SPF record with a Hardfail policy active. If having stale/stand-by domains, configure the following:
Plain text
v=spf1 -all
This says that no entity is trusted to send through your domain. Without this record, every entity on the internet is possibly trusted as you did not release any list of trusted senders. This depends on the configuration of recipients.
To configure SPF records for active domains, refer to my SPF guide:
On all your domains, make sure you use an DMARC record with a reject policy active. If having stale/stand-by domains, configure the following:
Plain text
v=DMARC1; p=reject;
This will ensure that your domain is not available for spoofing anymore, as you released a policy that says: “If this domain is being used outside of my SPF and DKIM mechanisms, reject the email messages”.
To configure DMARC records for active domains, refer to my DMARC guide:
These records only have to be configured on domains where you send and receive email messages. They are all related to sending and receiving email messages.
3. DKIM record
Configure DKIM records for every service that sends email on your domain. Refer to my setup guide on to how to configure this and how DKIM helps you preventing man in the middle attacks by email.
Configure a TLS-RPT record to receive TLS deliverability reports by senders to your domain to detect possible email deliverability problems before they cost you customers and possible projects.
What is MTA-STS and how to use it to protect your email flow
In this post I will be configuring MTA-STS for better email security alongside the theoretical explaination including different hosting options you can use.
Requirements
Around 30 minutes of your time
Access to your domains’ DNS hosting to create DNS records
An Azure Subscription if you want to publish your policy with a Static Web App
A Github account if you use this option
An Azure Subscription if you want to publish your policy with a Function App
Basic knowledge of DNS records
Basic knowledge of Email security
MTA-STS versus SMTP DANE
MTA-STS overlaps with the newer SMTP DANE option, and they both help securing your email flow but each in its own manner. Some differences:
MTA-STS
SMTP DANE
Requires DNSSEC at DNS hosting
No
Yes
Requires hosting a TXT file
Yes
No
Secures inbound and outbound
Yes
Yes
Fallback option if DANE is not supported
Yes
No
The conclusion is;
If you want to secure your email flow at all times: Configure both
If you want to secure your email flow but your DNS hosting doesnt support DNSSEC: Configure MTA-STS
If you want to secure your email flow without too much configuration and dependencies: Configure SMTP DANE
My advice is to configure both when possible, because not every email service does support SMTP DANE and MTA-STS is much more broadly supported. This will be used then as fallback. If the sender does not support MTA-STS, email will not be delivered and the sender gets an error message.
Deep dive into how MTA-STS works
MTA-STS (Mail Transfer Agent Strict Transport Security) is a standard that improves email security by always using SMTP TLS encryption and validating certificates during email transmission. It’s designed to prevent man-in-the-middle (MitM) attacks, ensuring email servers cannot be tricked into falling back to insecure delivery. This increases security and protects your data.
Info
MTA-STS works very similar to how HSTS works for webservers.
MTA-STS consists of the following components:
Policy publication : A domain publishes its MTA-STS policy by using a DNS record and a TXT file which is publicly accessable to publish its policy
Policy fetching : A mailserver that sends to our protected domain checks our DNS record and then our policy from the published TXT file
Policy enforcement : A mailserver that sends to our protected domain ensures that it matches our policy.
If it doesn’t match, we can reject the mail based on the policy settings
Steps to configure MTA-STS
Like described in the previous section, we must configure 2 things for MTA-STS to work:
A DNS record
A policy/TXT file
For the policy we can use Azure Static Web Apps or Azure Functions to publish the policy, but you can use any webhosting/HTTP service of choice. The steps will be different of course.
Configure the DNS record
We log into our DNS hosting environment and we have to create a TXT record there. This must look like this:
The domain is automatically added by the DNS protocol and from v=STSv1 to the 0’s and the Z; is the value part.
Configure the Policy
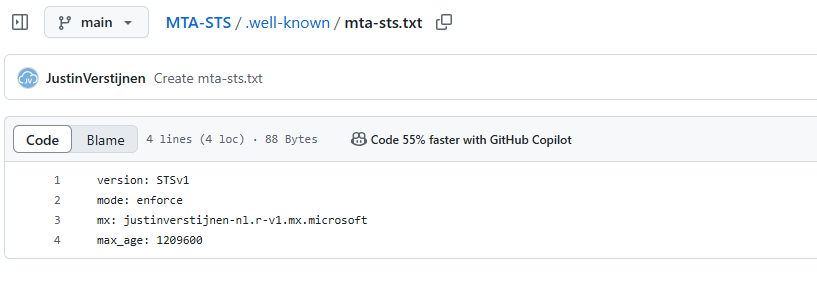
Now we must configure the policy for MTA-STS. We start by creating the TXT file and defining our policy. The TXT file must contain the information below:
The mode can be enforce , testing or none . Use enforce to get the most out of the configuration and we will use it for the purpose of this guide
MX record : this is the MX record for your domain. You can copy and paste this from your DNS hosting panel. Make sure you dont copy the “priority” part
Max_age: This is the time in seconds a sender may cache your MTA-STS in their policy. Best practice is to use between 7 and 30 days. I use 14 days here (3600 seconds x 24 hours x 14 days)
As we must host our MTA-STS .txt file in a public place, we can host it in several ways. I will give a step-by-step guide for 3 hosting options which are GitHub and Azure minded. You can also host this on your own public web server, as long as it complies with the DNS and policy requirements and is publicly available. The whole world must know what your domains policy is of course.
GitHub Pages (recommended option)
Azure Static Web Apps (Or Azure App Service)
Azure Functions
Hosting option 1: GitHub Pages
The most easiest way to host an MTA-STS policy is to host it on GitHub Pages. This is a very easy way to host static websites directly from your repository. To learn more about GitHub Pages, check out this guide.
For now, I will give you the steps to place and host your MTA-STS policy from GitHub, assuming you already have an account.
Creating the repository on GitHub
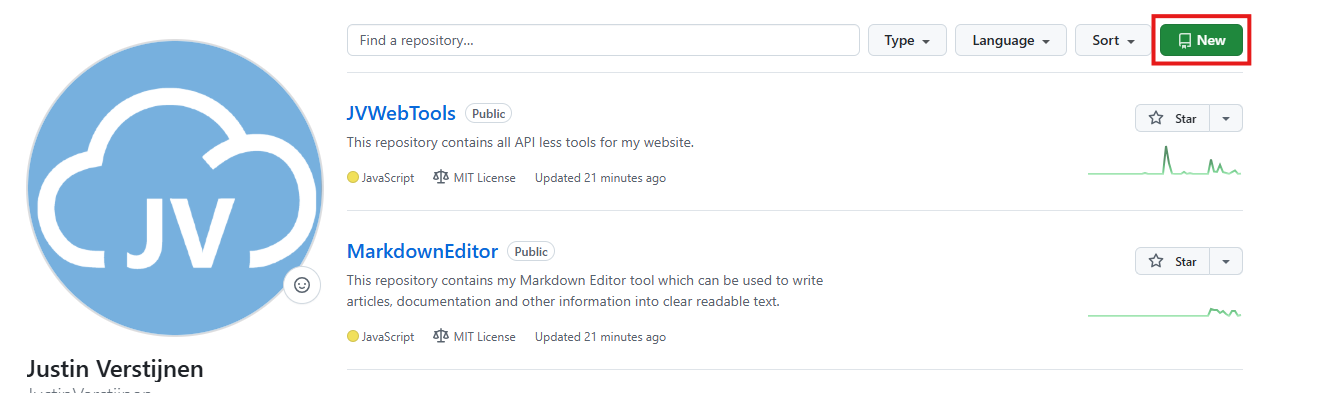
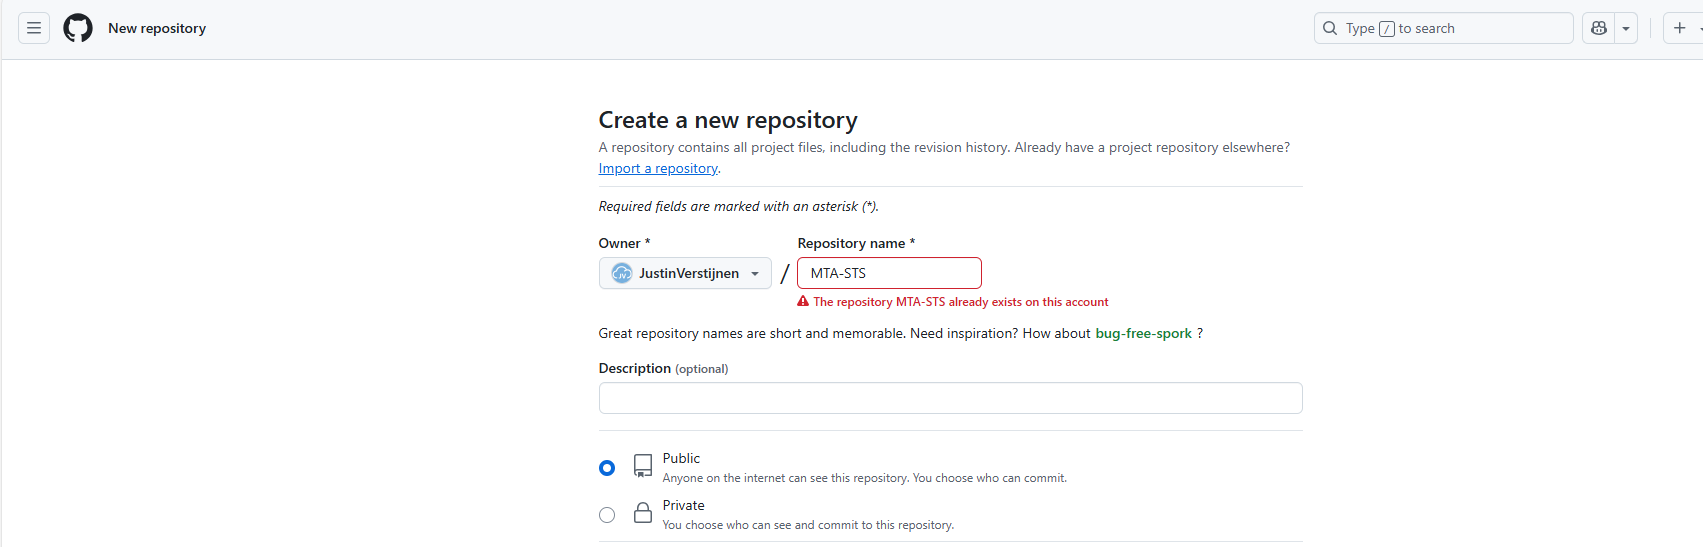
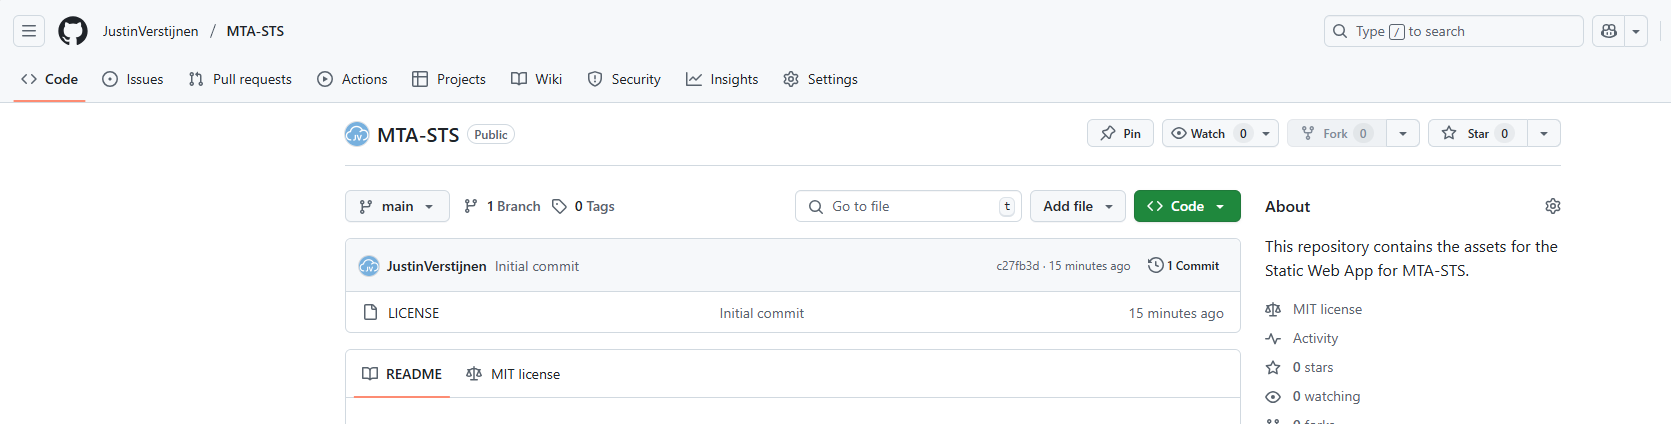
Login to GitHub at https://github.com. Then create a new repository for your MTA-STS policy if not already have one. Navigate to “Repositories” and click “New”.
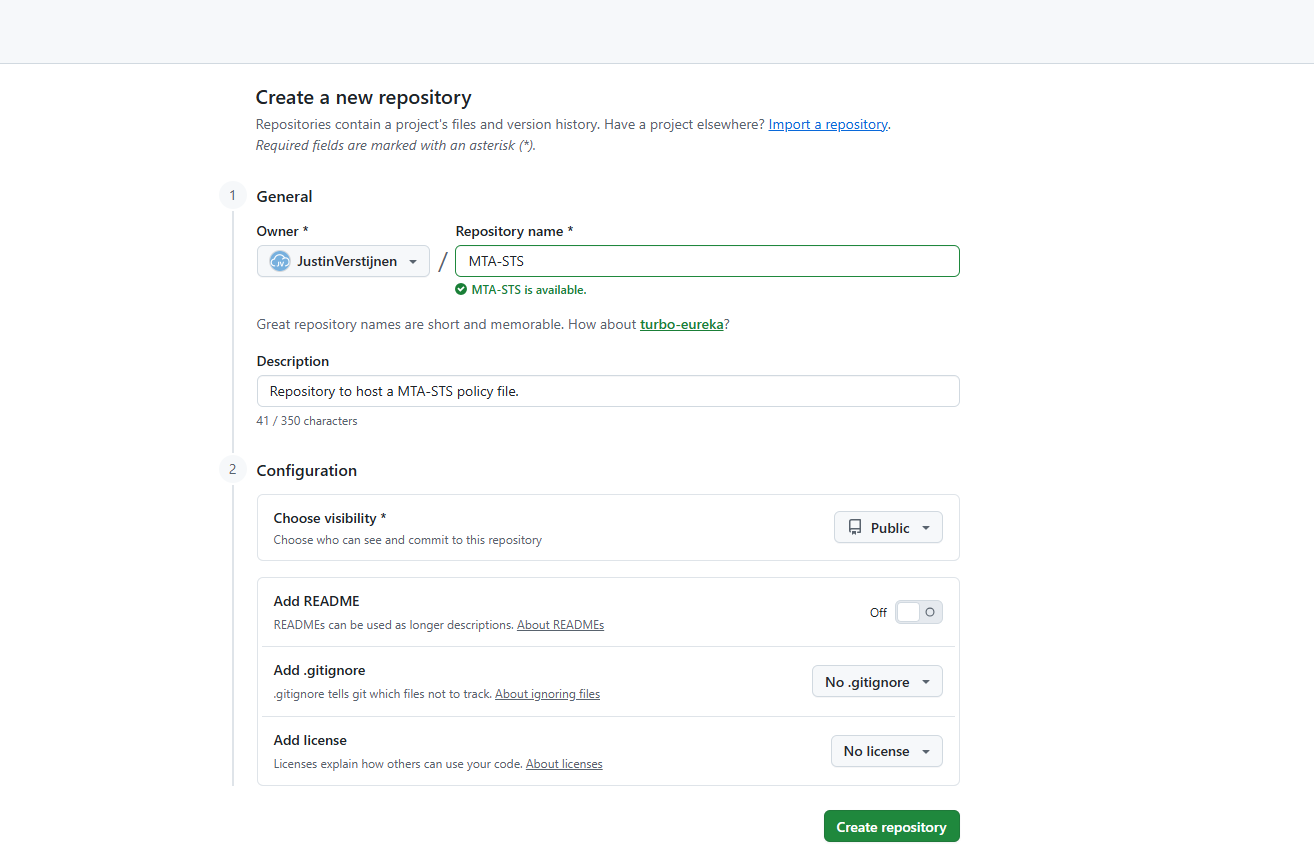
Give it a clear name, which is not relevant but must be something you can recognize yourself. The visibility must be public, as free GitHub Pages instances must be public. Sharing is caring :)
Then create the repository and navigate to it.
Preparing the repository
We must now create te required files for the instance to work, but as it is a web server, it also needs at least one web-file.
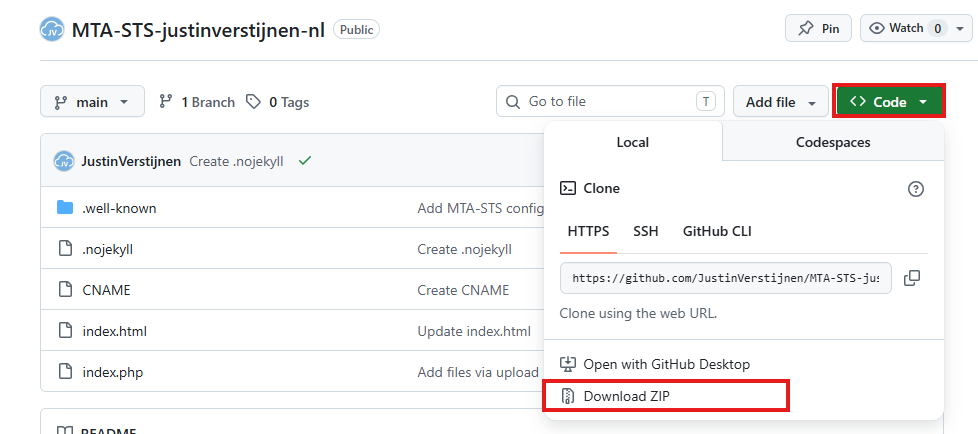
You can download my example code to easily prepare your repository. The web files in my repository automatically redirect any request to the domain to the correct file. Download my repository from here:
On my repository, click on “<> Code” and then on “Download ZIP”. This downloads my whole example repository which is ready to use after some minor changes.
Unzip the file and change these file: Index.html: change the domain-name on line 5 and 7
After that, we can upload the files in your goal-repository:
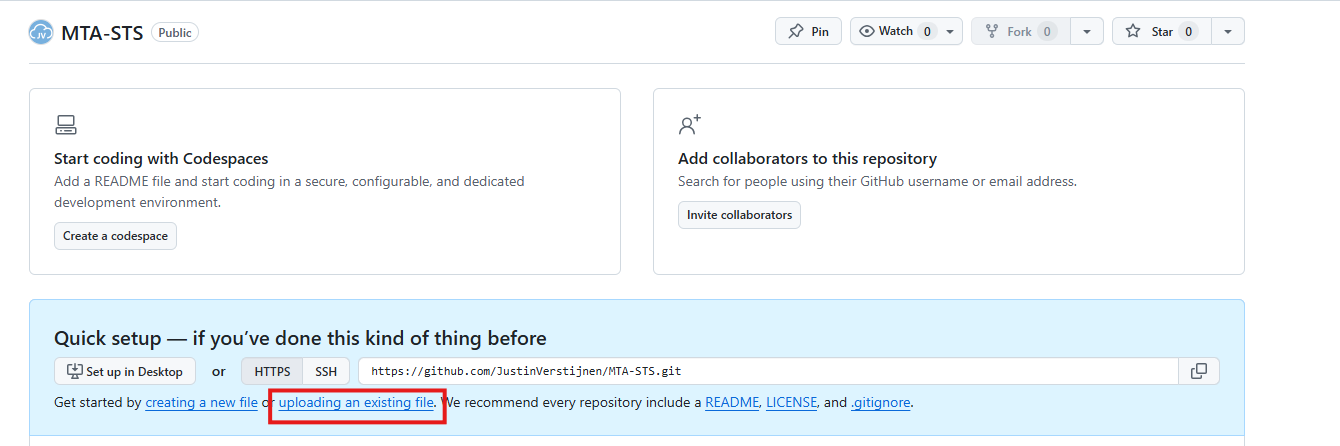
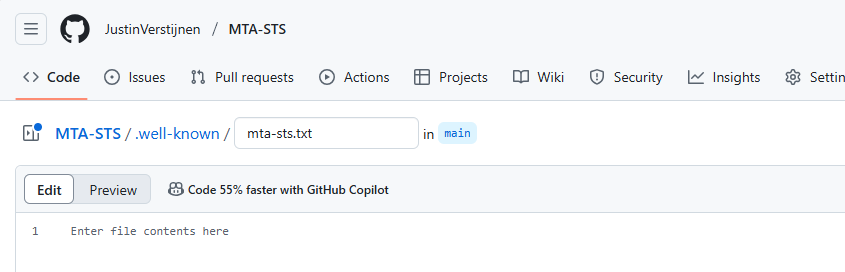
You now need to create another file, which is the policy file itself. Create a new file:
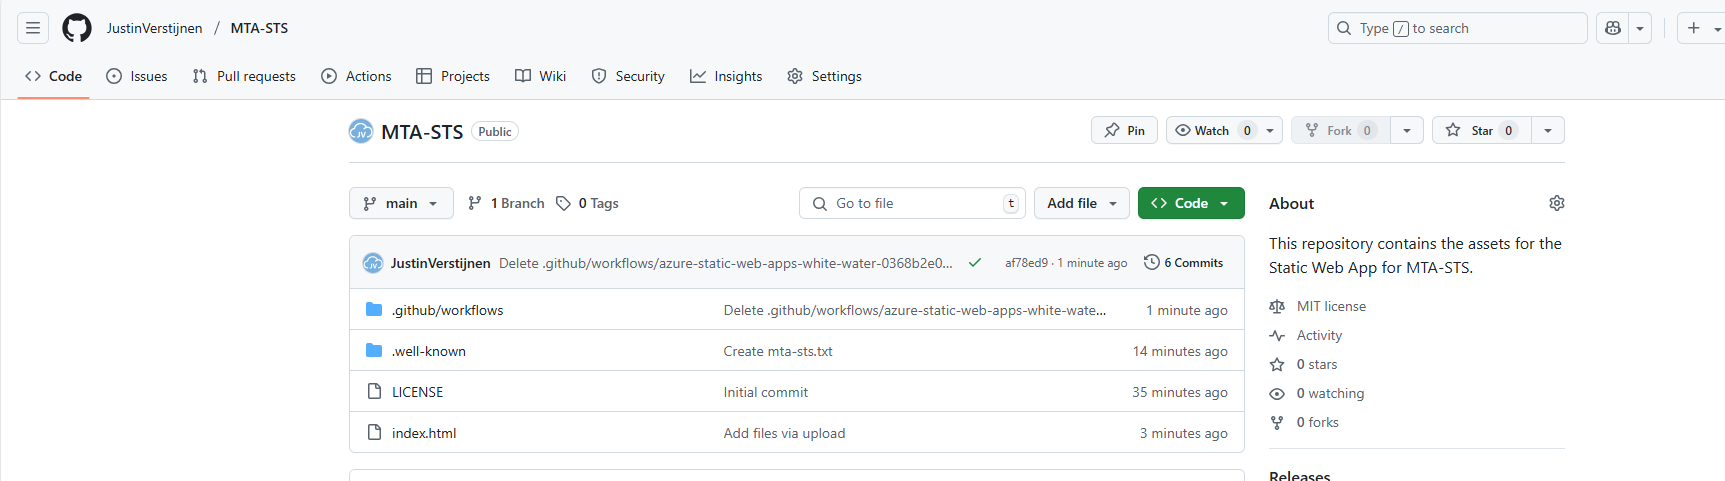
Name it: .well-known/mta-sts.txt where GitHub will automatically create a folder and the file. Paste the MTA-STS policy there as text. Now commit the changes which is “saving” the file.
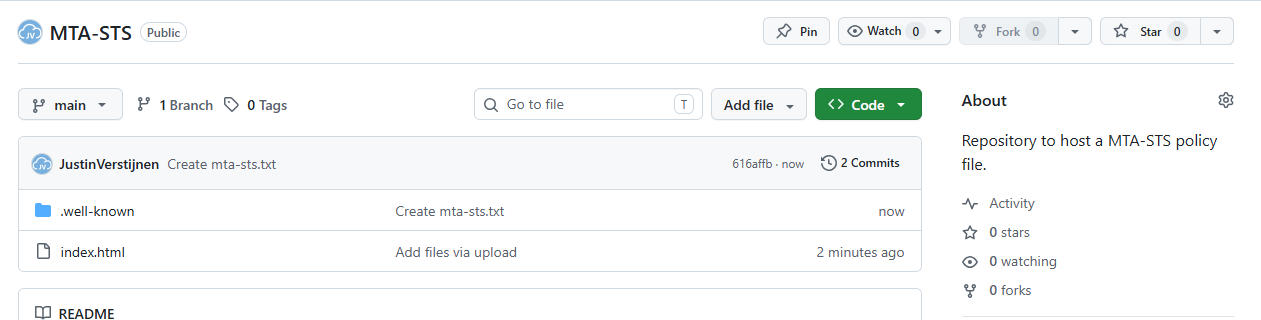
The repo must now look like this, having a index.html and a folder .well-known and a file called mta-sts.txt in that folder.
Creating the GitHub Pages website
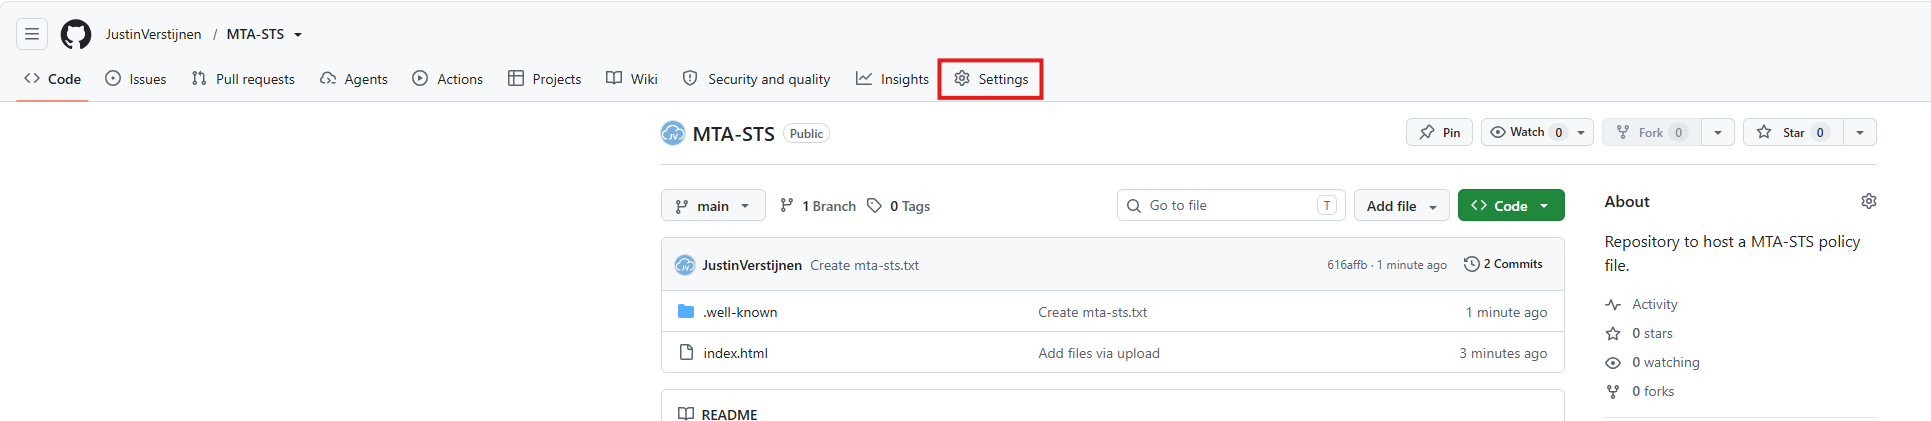
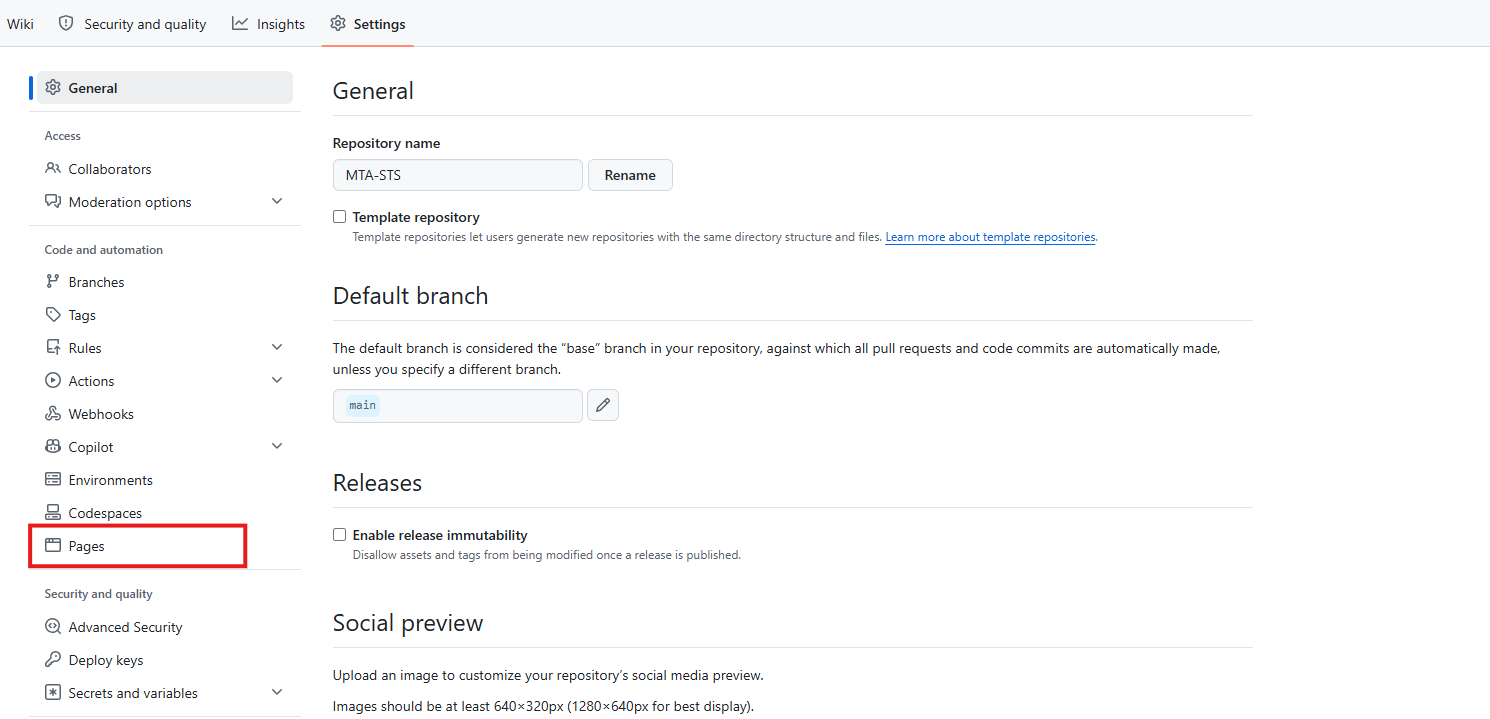
Now that our repository is ready, let’s create the GitHub Pages instance to host the policy file. Go to the “Settings” tab on the repository:
From the left, click on “Pages”.
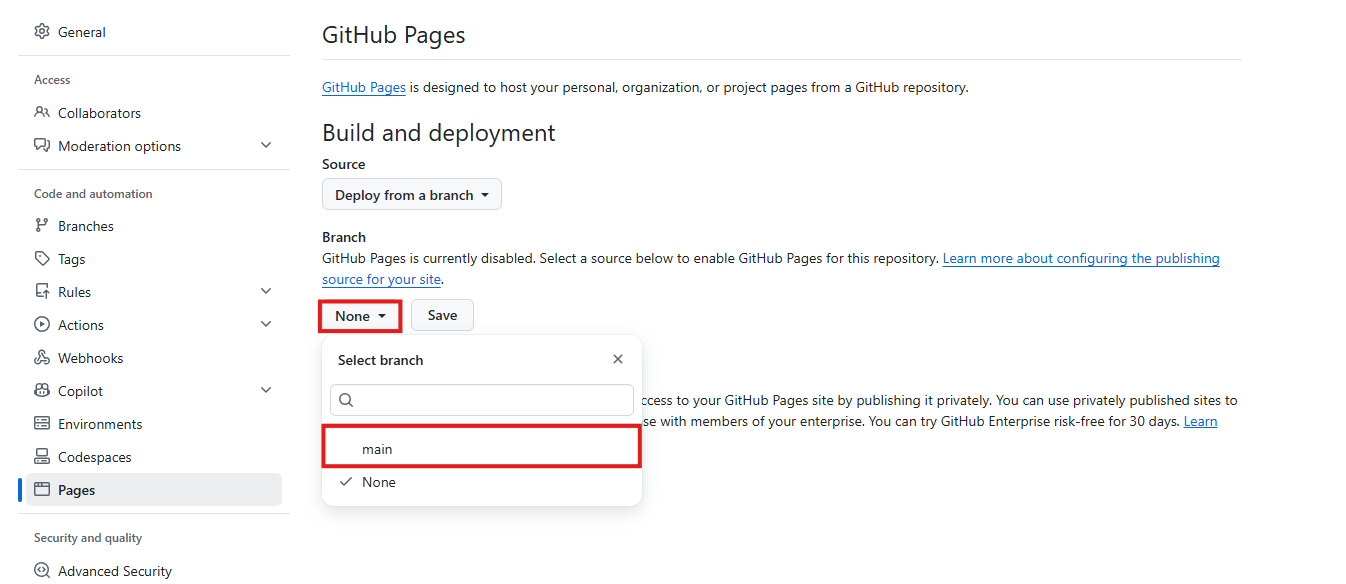
On the “Pages” section, click on the branch to deploy the website from which should be the “main” branch. Then save the configuration which automatically creates the website.
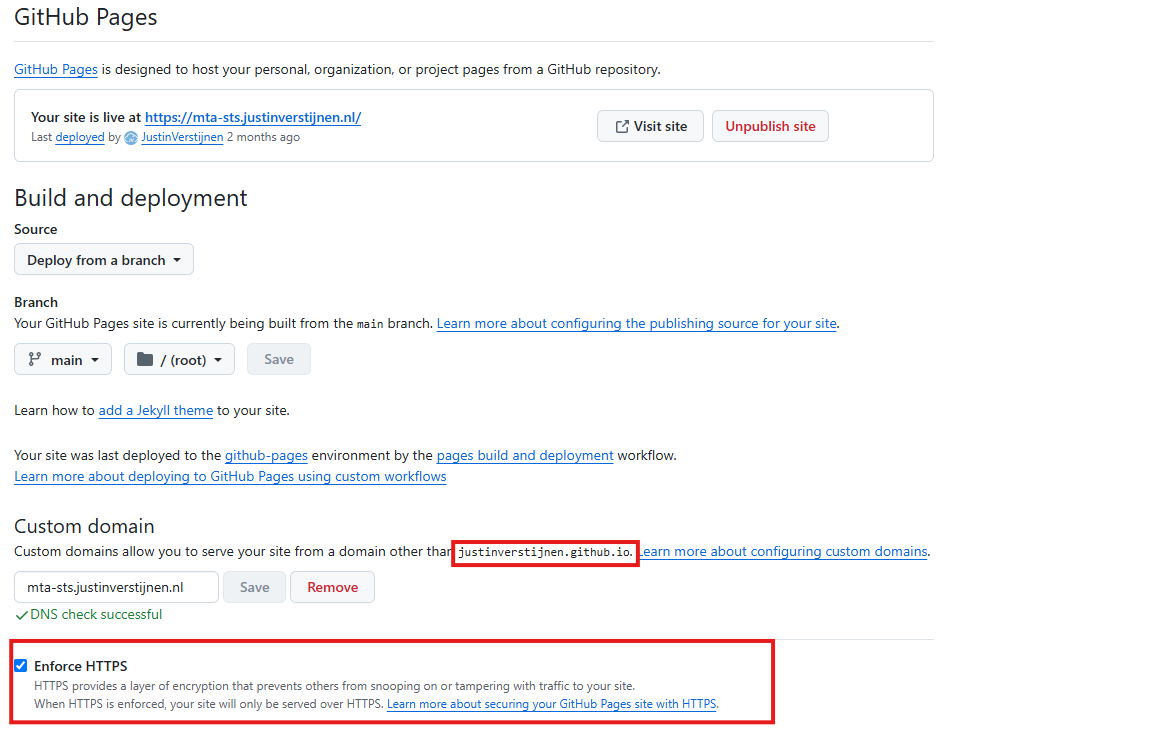
Now we are able to connect our custom domain name to the GitHub Pages instance, which should be mta-sts.yourdomain.com, or mta-sts.justinverstijnen.nl in my case. Then we need to create another DNS record to point the mta-sts host to Github Pages.
Record name
Type
Value
mta-sts
CNAME
justinverstijnen.github.io.
It will show on your end what the GitHub.io domain exactly is, but in most cases its your username added with github.io.
Here I have created the DNS record at my DNS hosting service:
As this is an external CNAME, you may have to end the value with a trailing dot as I already done.
Now go back to GitHub and verify the domain. After around 15-30 minutes it should be validated and we can set “Enforce HTTPS”.
After the MTA-STS policy is up, you can check this by going to your domain name, and then navigating to the .txt file you just created.
This should show your policy directly in your browser:
Hosting option 2: Azure Static Web Apps
Another option to host your TXT file for your MTA-STS policy is through Azure Static Web Apps. We will do this with GitHub, where we create a repository with our file and then connect the Static Web App instance to our repository. Then any change to your repository will also be pushed to Azure.
Creating the repository on GitHub
Before we dive into Azure, we will start by creating a reposiroty on GitHub. This is a space where all files of your application resides. In this case, this will only be the TXT file.
Create an account on Github or login to proceed.
Create a new repository:
Give it a name and description and decide if you want the repository to be public. Note that the TXT will be public in any case.
Create the repository.
Prepare the repository
I have my repository public, and you can check out that to have an example of the correct configuration. We must download the index.html file from here: https://github.com/JustinVerstijnen/MTA-STS
Click on the index.html file and download this. You can also copy the content and create the file with this content in your own repository.
Now go back to your own, newly created repository on Github.
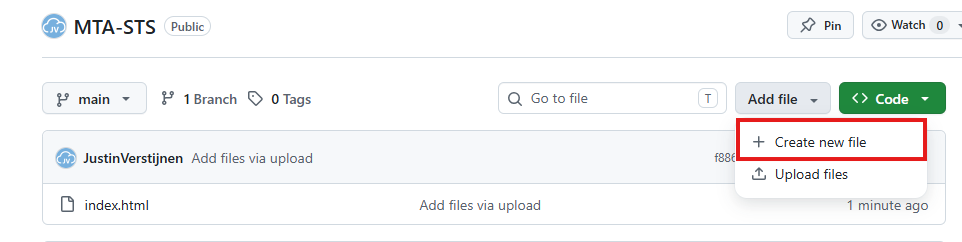
Click on the “Add file” button and then on “Create a new file”.
Now we must create the folder and the TXT file. First type in: “.well-known”, then press “/” and then enter “mta-sts.txt”. This creates the folder and then the file.
Now we can paste in the information of our defined policy:
Now commit the changes, which is basically saving the file.
Upload simple redirect page
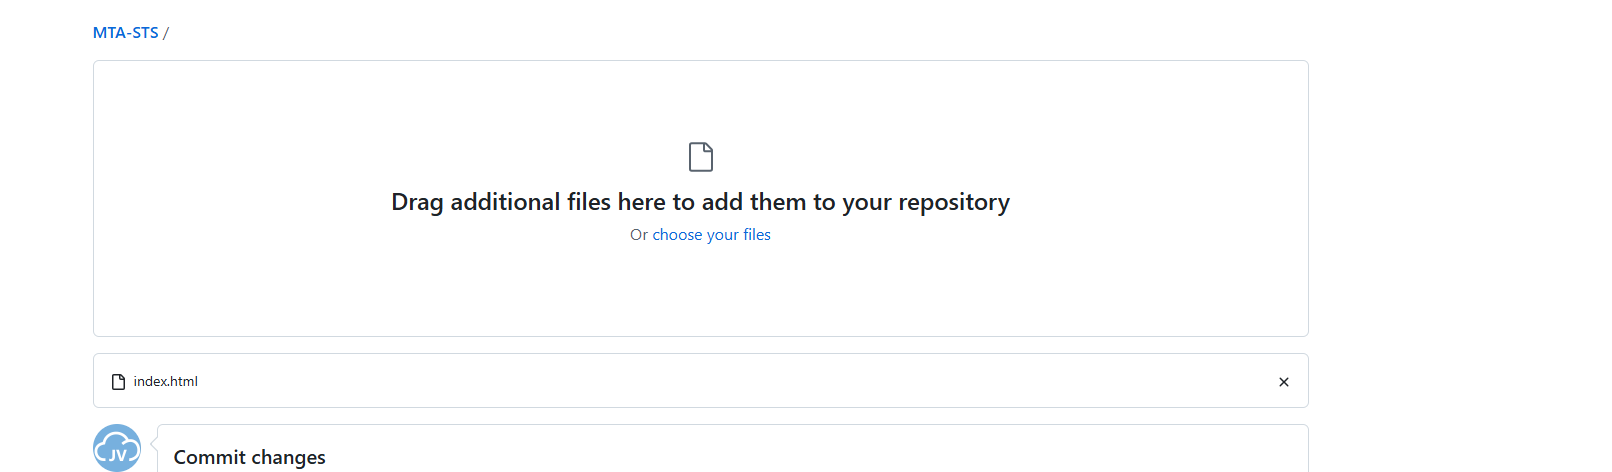
Now because a Static Web App requires you to have a Index.html at all time (because it is a website), we need to upload the prepared Index.html from my repository you downloaded earlier.
Click on “Add file” and then on “Upload files”. Then click on “Select your files” and select the downloaded Index.html file.
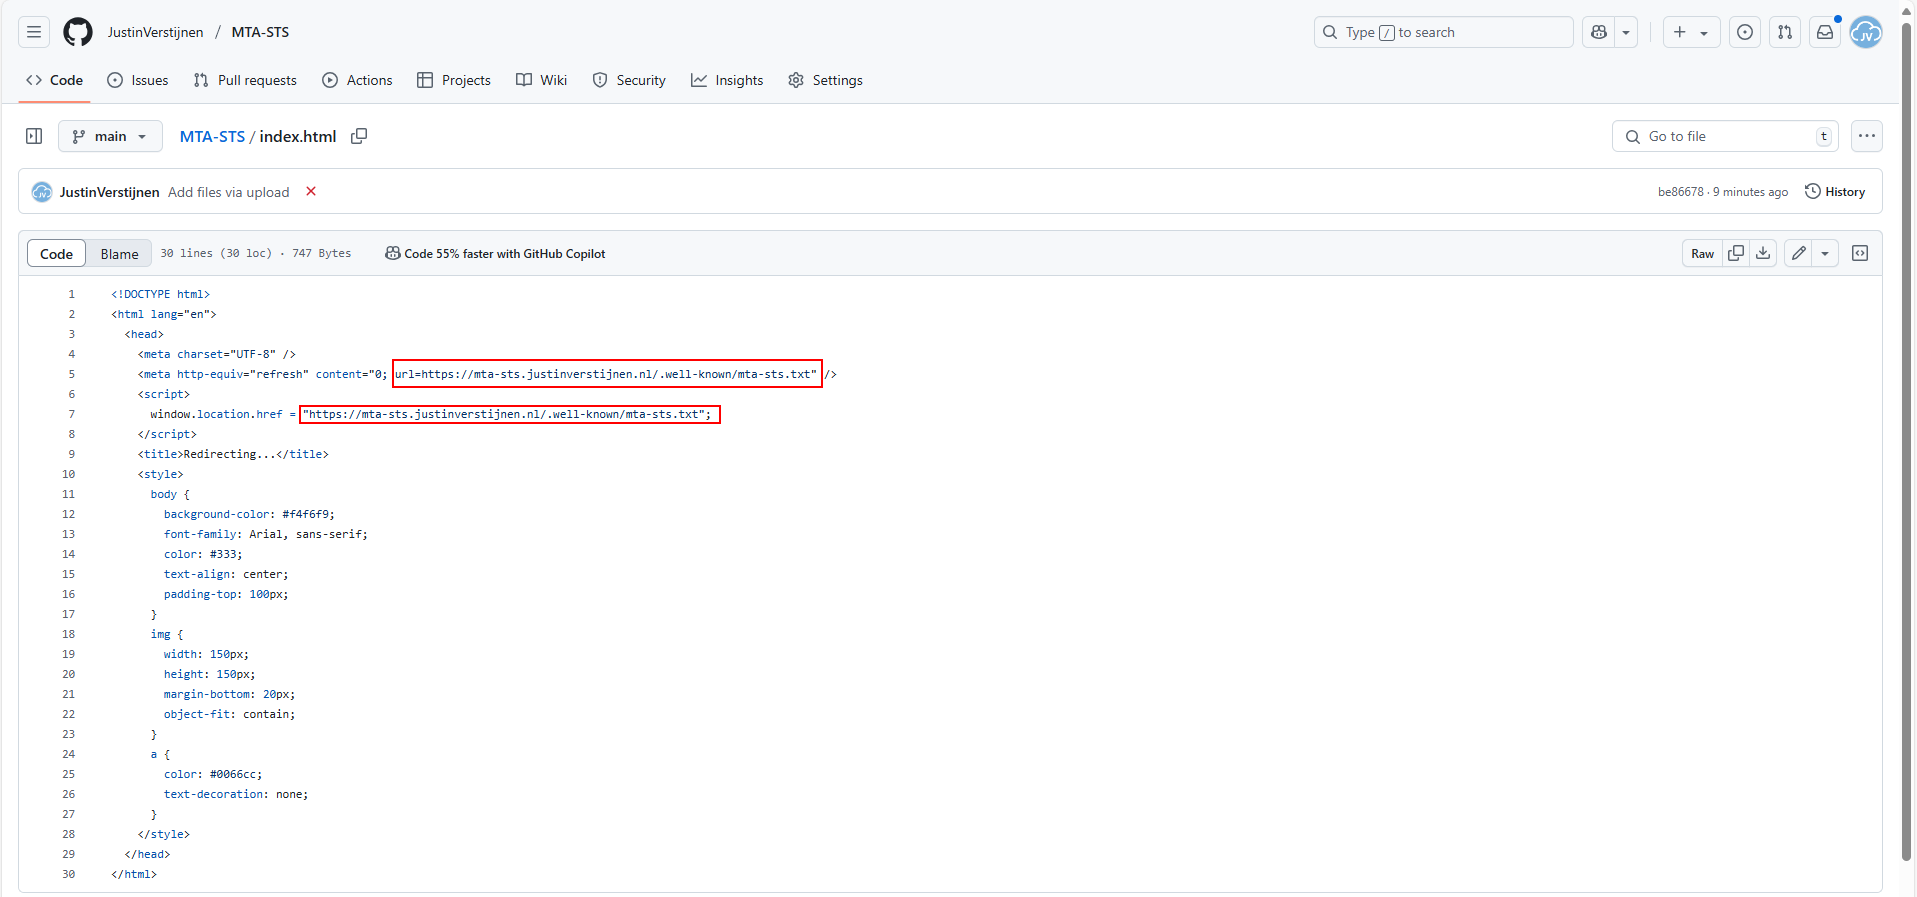
Commit the change. After committing the change, click on the Index.html file. We must make some changes to this file to change it to your own website:
Change the URLs on line 5 and 7 to your own domain. the mta-sts part on the beginning must stay intact and the part from .well-known too.
As you can see, its a simple HTML file that redirects every visitor directly to the correct file in the .well-known folder. This is purely for Azure which always must have a index.html but it makes your life a bit easier too.
Proceed to the next steps in Azure.
Create the Azure Static Web App
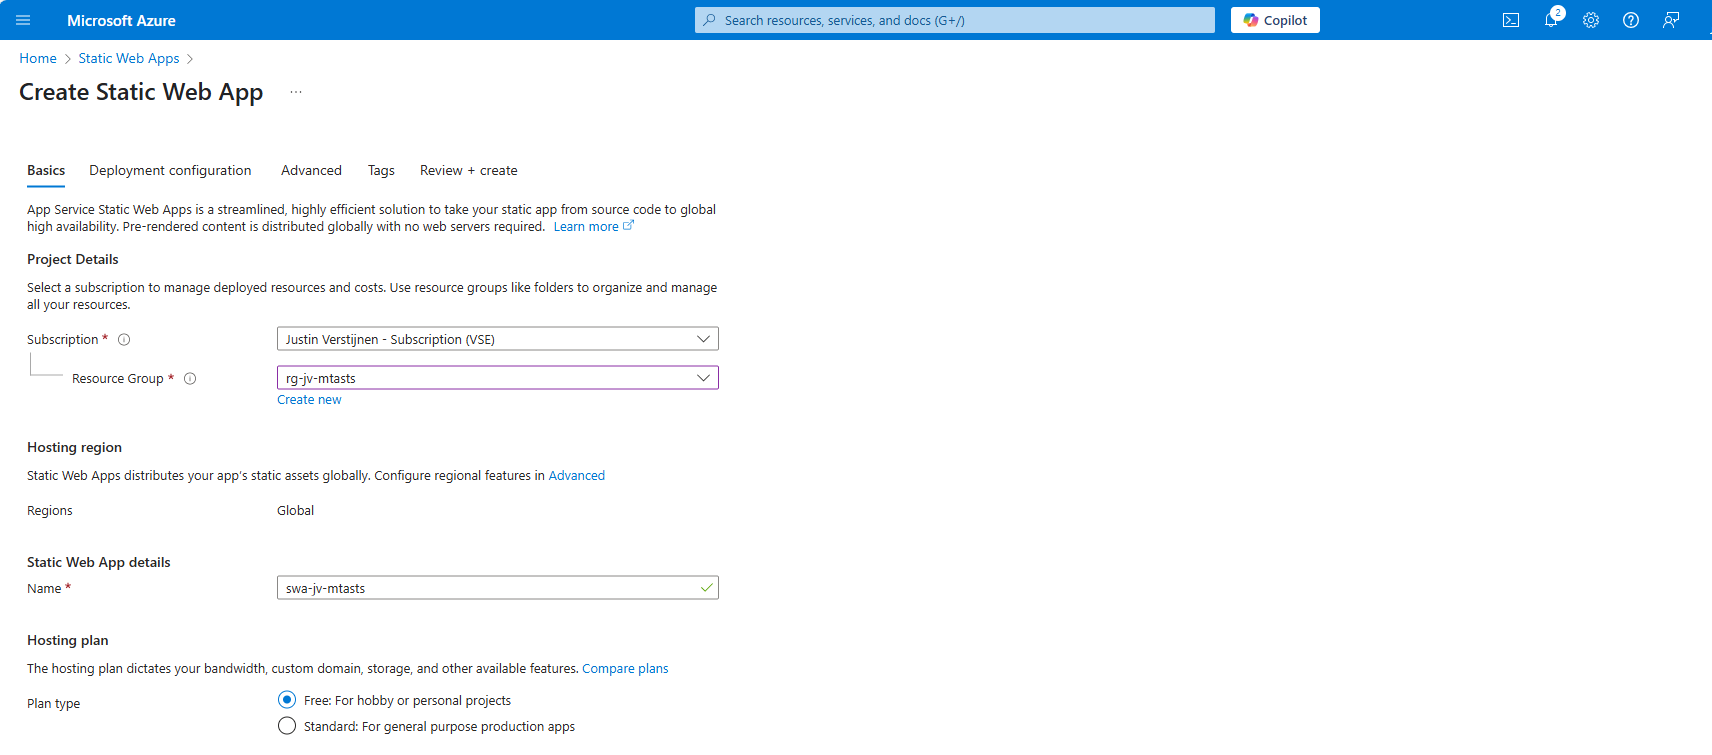
Now we must create the Azure Static Web App in Azure to host this file. Search for “Static Web Apps” in the Azure Portal and create a new app:
Place it in the desired resource group, give it a name (cannot be changed) and select a plan. You can use a free plan for this. The only limit is the custom domains you can link, which is 2 custom domain names per app.
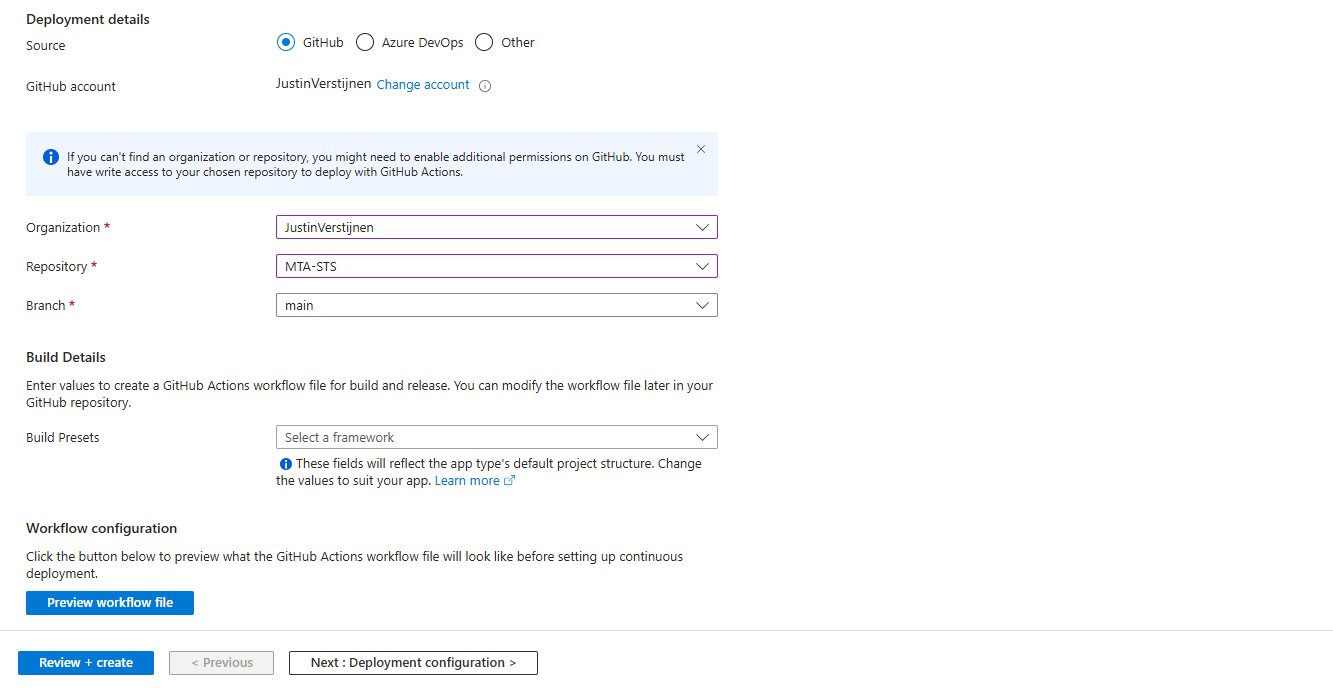
Then scroll down on the page till you see the Deployment type:
Link your Github account to Azure so Azure can get the information from your repository and put it in the Static Web App. Select your Repository after linking and complete the wizard. There is no need to change anything else in this wizard to make it work.
After completing the wizard, the app will be created and then your repository files will be placed onto the Static Web App Host. This process completes in about 3 minutes.
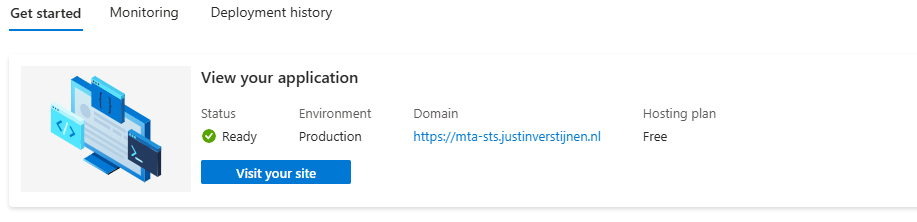
After around 3 minutes, your website is uploaded into Azure and it will show:
If you now click on “visit your site”, it will redirect you to the file. However, we didn’t link our custom domain yet, so it will not show our policy yet. The redirection will work fine.
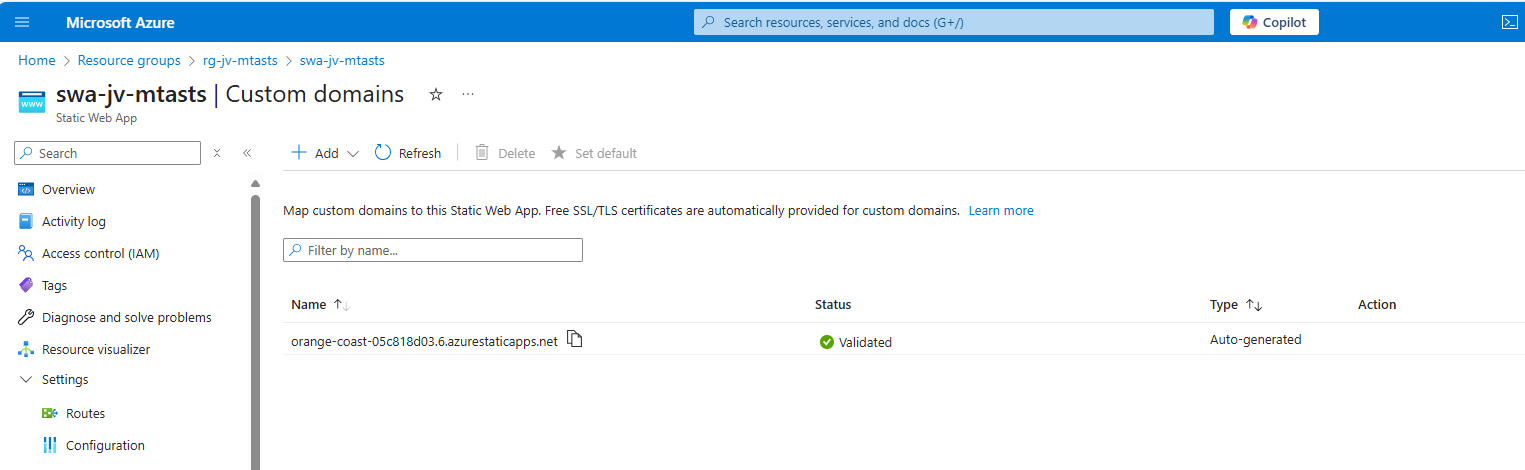
Linking our custom domain to Azure Static Web App
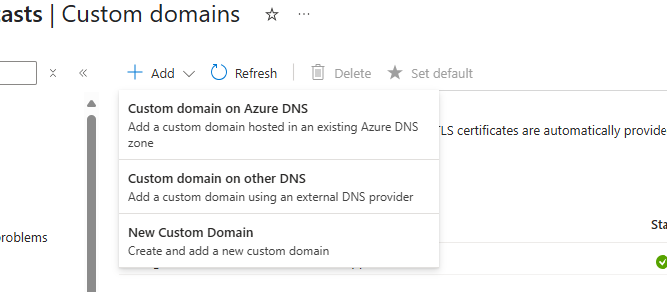
Now we can link our custom domain to our created Azure Static Web App in the Azure portal. Go to “Custom domains” in the settings of the Static Web App and click on “+ Add”.
Select the option “Custom domain on other DNS”, the middle option.
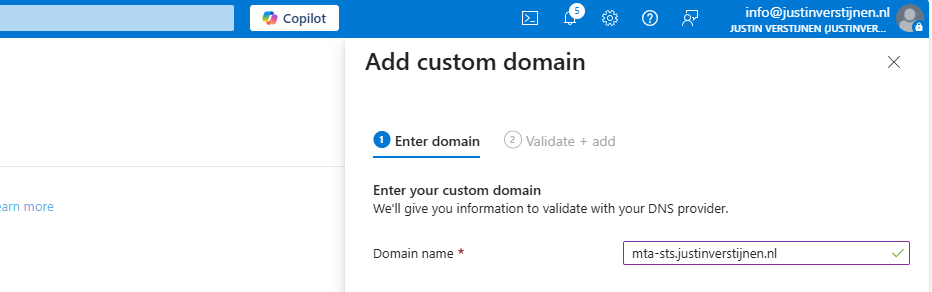
Now fill in mta-sts.yourdomain.com, for my environment this will be:
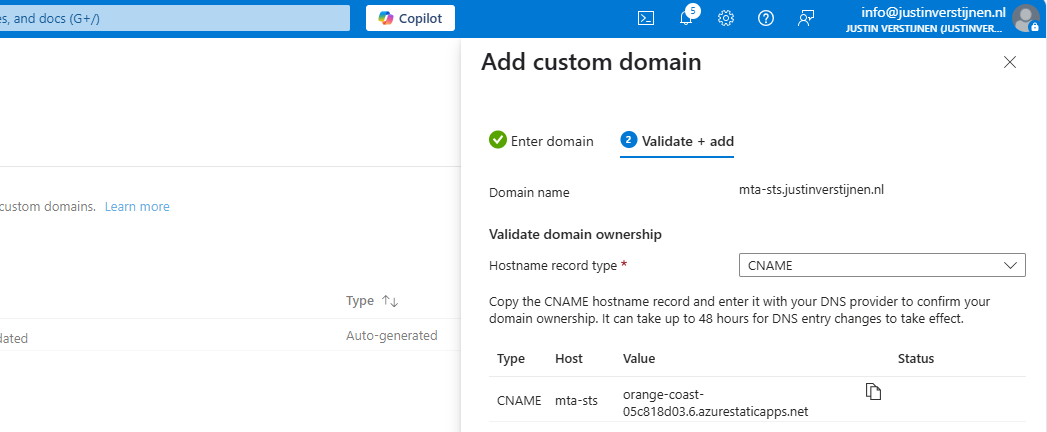
Click on “Next”. Now we have to validate that we are the owner of the domain. I recommend the default CNAME option, as this is a validation and alias/redirection in one record.
Copy the Value of the CNAME record which is the project-name of the Static Web App and we now have to create a DNS record for our domain.
Go to your DNS hosting service and login. Then go to your DNS records overview.
Create a new CNAME record with the name “mta-sts” and paste the value you copied from the Azure Portal. Add a dot “.” to the value of the record because it is a external domain. In my case, the value is:
v
orange-coast-05c818d03.6.azurestaticapps.net.
Save the DNS record and go back to Azure, and click “Add” to validate the record. This process will be done automatically and ready after 5 minutes most of the time.
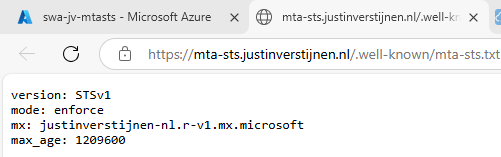
Now we can test our site in the Azure Portal by again using the “Visit your site” button:
Now the website will show your MTA-STS policy:
We are now succesfully hosting our MTA-STS policy on a Azure Static Web App instance. We also using a mandatory index.html to redirect to the correct sub-location. If your repository doesn’t have a index.html file in the root, the upload to Azure action will fail.
My third and hardest option is to host the TXT file with an Azure Function. This is a bit more complicated than the other options, but I will guide you through.
Creating the Azure Function
In this guide I will use an Azure Function to publish the MTA-STS policy to the internet.
Let’s go to the Azure Portal and create a new Function App:
Here you can select:
Operating system: Windows
Runtime stack: .NET
Version: 10 LTS (Or newer, this enables editing in the portal for easy access)
Region: Of your choice
Create the app by finishing the wizard.
After creating the app, we must do a change to the host.json file in the Azure Function. Paste the code below on the first part of the json file:
Save the file, and now it is prepared to host a MTA-STS policy for us.
Publishing the MTA-STS policy
Create a new Function in the function app:
Select the HTTP trigger, give it a name and select the “Anonymous” authorization level.
Now we can paste some code into the function. We have to wrap this into a .NET website:
csharp
#r"Newtonsoft.Json"usingSystem.Net;usingMicrosoft.AspNetCore.Mvc;usingMicrosoft.Extensions.Primitives;usingNewtonsoft.Json;publicstaticasyncTask<IActionResult>Run(HttpRequestreq,ILoggerlog){log.LogInformation("C# HTTP trigger function processed a request.");stringresponseMessage="version: STSv1\nmode: enforce\nmx: justinverstijnen-nl.r-v1.mx.microsoft.\nmax_age: 1209600";returnnewOkObjectResult(responseMessage);}
On line 12 there is the policy where you need to paste your settings in. Paste the final code into the Azure Portal and save/publish the function.
Now go to the “Integration” tab:
Click in the “Trigger” section on “HTTP(req)”.
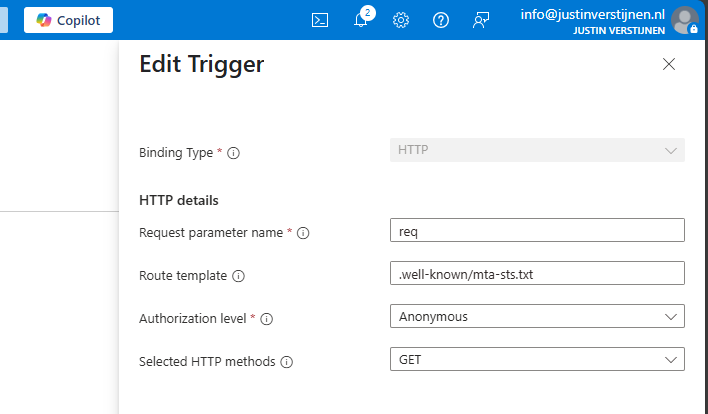
Here we can define how the HTTP trigger is and the file/path of the MTA-STS policy:
Change the values as below:
req (Dont change this)
Route template: .well-known/mta-sts.txt
Authorization level: Anonymous
Selected HTTP methods: GET
We are have bound the URL WEBSITE/.well-known/mta-sts.txt to our function and that kicks off our code which contains the policy. Very creative solution for this use case.
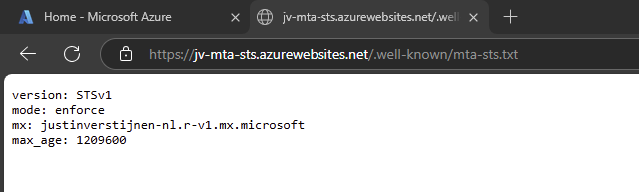
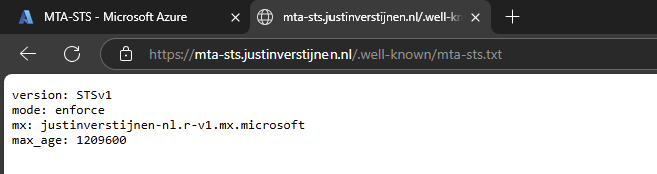
We can now test if this works by forming the URL with the function app and the added route:
It works not by going to the Function App URL but we now need to add our custom domain.
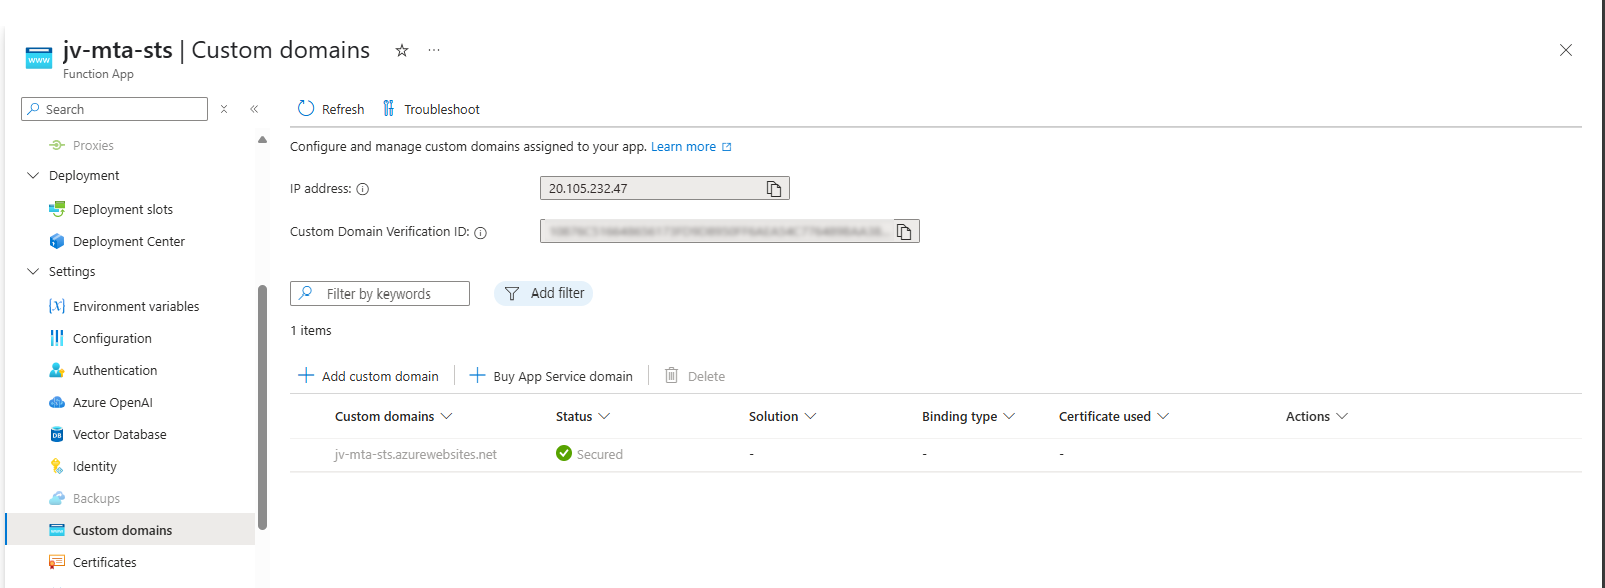
Redirect your custom domain to Function App
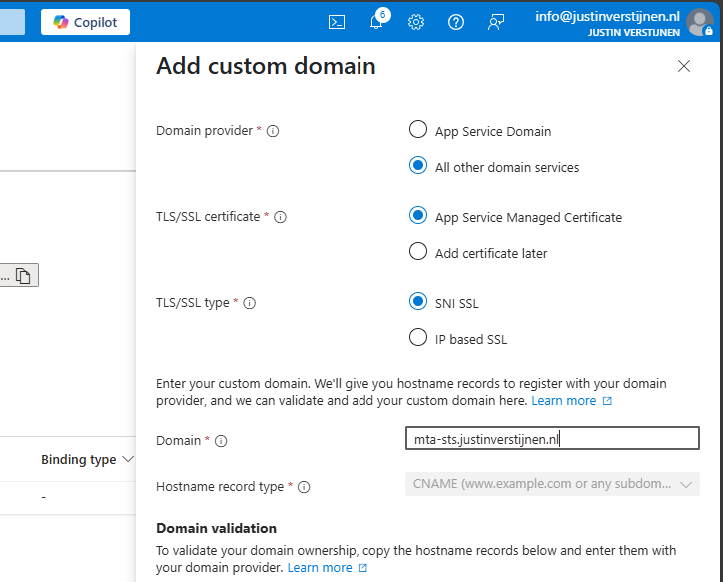
Now we need to link our domain to the function app. Go to “Custom domains” and add your custom domain:
Choose “All other domain services” at the Domain provider part.
Fill in your custom domain, this must start with mta-sts because of the hard URL requirement for MTA-STS to work.
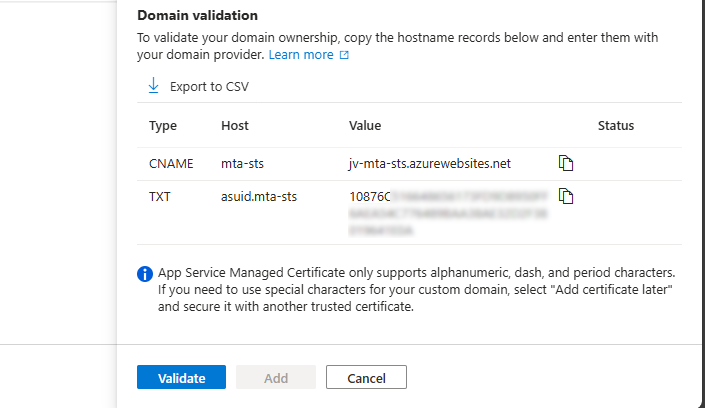
We now get 2 validation records, these must be created at your DNS hosting provider.
Here I created them:
Now hit “Validate” and let Azure check the records. This can take up to 1 hour before Azure knows your records due to DNS propagation processes. In my case, this worked after 3 minutes.
This tests our configuration of MTA-STS and tells us exactly what is wrong in case of an error:
The tool checks MTA-STS for both the TXT record value and the website. In my case, everything is green so good to go and this means you did the configuration correctly.
After configuring everything, it can take up to 60 minutes before everything shows green, please have a little patience.
Knowledge check
Knowledge check This quiz needs JavaScript to show the questions and feedback.
Summary
MTA-STS is a great way to enhance our email security and protect them from being stolen or read in transit. It also offers a great way of protection when DNSSEC/SMTP DANE is no option in your domain.
Thank you for reading this guide and I hope it was helpful.
End of the page 🎉
You have reached the end of the page. You can navigate through other blog posts as well, share this post on X, LinkedIn and Reddit or return to the blog posts collection page. Thank you for visiting this post.
If you think something is wrong with this post or you want to know more, you can send me a message to one of my social profiles at: https://justinverstijnen.nl/about/
If you find this page and blog very useful and you want to leave a donation, you can use the button below to buy me a beer. Hosting and maintaining a website takes a lot of time and money. Thank you in advance and cheers :)
In this post I will explain TLS-RPT which is an email security reporting mechanism that gives you reports about TLS encryption problems for incoming email to your domain. In this guide, I will explain what TLS-RPT is, how it works and how you can configure it easily for your domains.
What is TLS-RPT
TLS-RPT stands for SMTP TLS Reporting. It is an email security reporting mechanism that gives you reports about TLS encryption problems for incoming email to your domain. The main goal is simple: it helps you see if other mail servers can securely connect to your mail environment using TLS and where problems happen. In simple terms, TLS-RPT is a reporting layer for secure mail transport.
We can enable SMTP TLS Reporting by publishing a TXT record on our domain, stating on what email address the external sender can deliver the reports to. TLS-RPT is handy in cases where you use DANE and MTA-STS security options to be notified about possible delivery problems. Email delivery problems can of course lead to loss of money in companies.
TLS-RPT as defined in RFC 8460.
TLS-RPT is commonly used together with MTA-STS. MTA-STS basically says:
“Mail for my domain must use TLS, a valid certificate and the correct MX servers.”
TLS-RPT says:
“Send me reports if this succeeds or fails.”
Microsoft describes MTA-STS as a method where a domain publishes TLS support, expected MX records and certificate requirements through DNS and an HTTPS policy file.
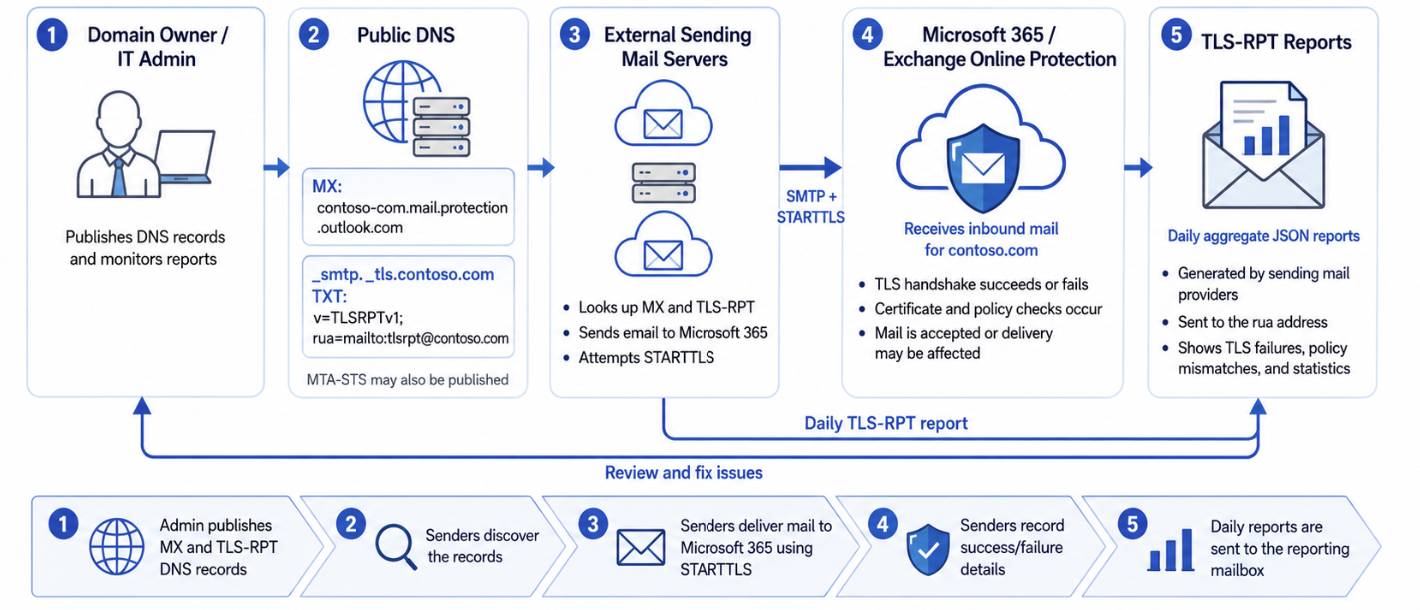
How TLS-RPT works
When another mail server tries to send email to your domain, it can detect your TLS-RPT DNS record. If that sending server supports TLS-RPT, it can send periodic reports, usually daily, to the address or HTTPS endpoint you configured. These reports contain information like:
Information
Meaning
Successful TLS sessions
Secure connection worked
Failed TLS sessions
TLS failed or certificate issues happened
MTA-STS status
Which policy was detected and applied
MX host
Which mail server received the mail
Error type
Certificate issue, validity, DNS issue or policy mismatch
Counts
How many successful or failed connections happened
Reports can also include issues related to:
DNS resolution
STARTTLS negotiation
DANE validation
MTA-STS validation
Routing problems
To use TLS-RPT, you publish a DNS TXT record on your domains:
The configured SMTP TLS record for this websites’ domain, justinverstijnen.nl
The rua value defines where the reports should be sent. TLS-RPT supports these reporting options:
mailto:
https:
Possible TLS-RPT problems
TLS-RPT helps you understand if email delivery to your domain is secure and working correctly. The common problems you can detect with using TLS-RPT are:
Problem
Example
Expired certificate
External servers no longer trust your certificate
Wrong certificate
Certificate name does not match the MX host
MTA-STS issue
Policy contains different MX records than your actual mail flow
TLS unavailable
Receiving server does not support proper TLS
DNS or configuration issue
External servers cannot find your policy or mail server correctly
How to configure TLS-RPT for your domain
TLS-RPT can be configured for any public domain, where your email service doesn’t really matter. My advice is to have an email address for specific reports, where you can use the same email address as you already use for DMARC reports. This ensures you receive the reports and can read them if needed and possible deliverability problems are assumed. My advice is to only configure TLS-RPT on domains where you expect to receive email messages. For domains at rest/stand-by domains it’s not neccesary.
To configure the record needed for TLS-RPT, open up your DNS hosting of your public domain. Then navigate to the section where you can create DNS records.
Now create a new TXT record with these parameters:
Name
Plain text
_smtp._tls
TTL
1 hour or provider-default
Type
TXT
Value
Bash
v=TLSRPTv1;rua=mailto:reports@yourdomain.com;
And change the email address at the end to your own reporting email address. Then save the configuration. Here my configured record for example:
You can then check this configuration by using my DNS MEGAtool, a tool created to check all security mechanisms for email security for a specific domain:
This should show green/passed for the TLS-RPT check of your domain:
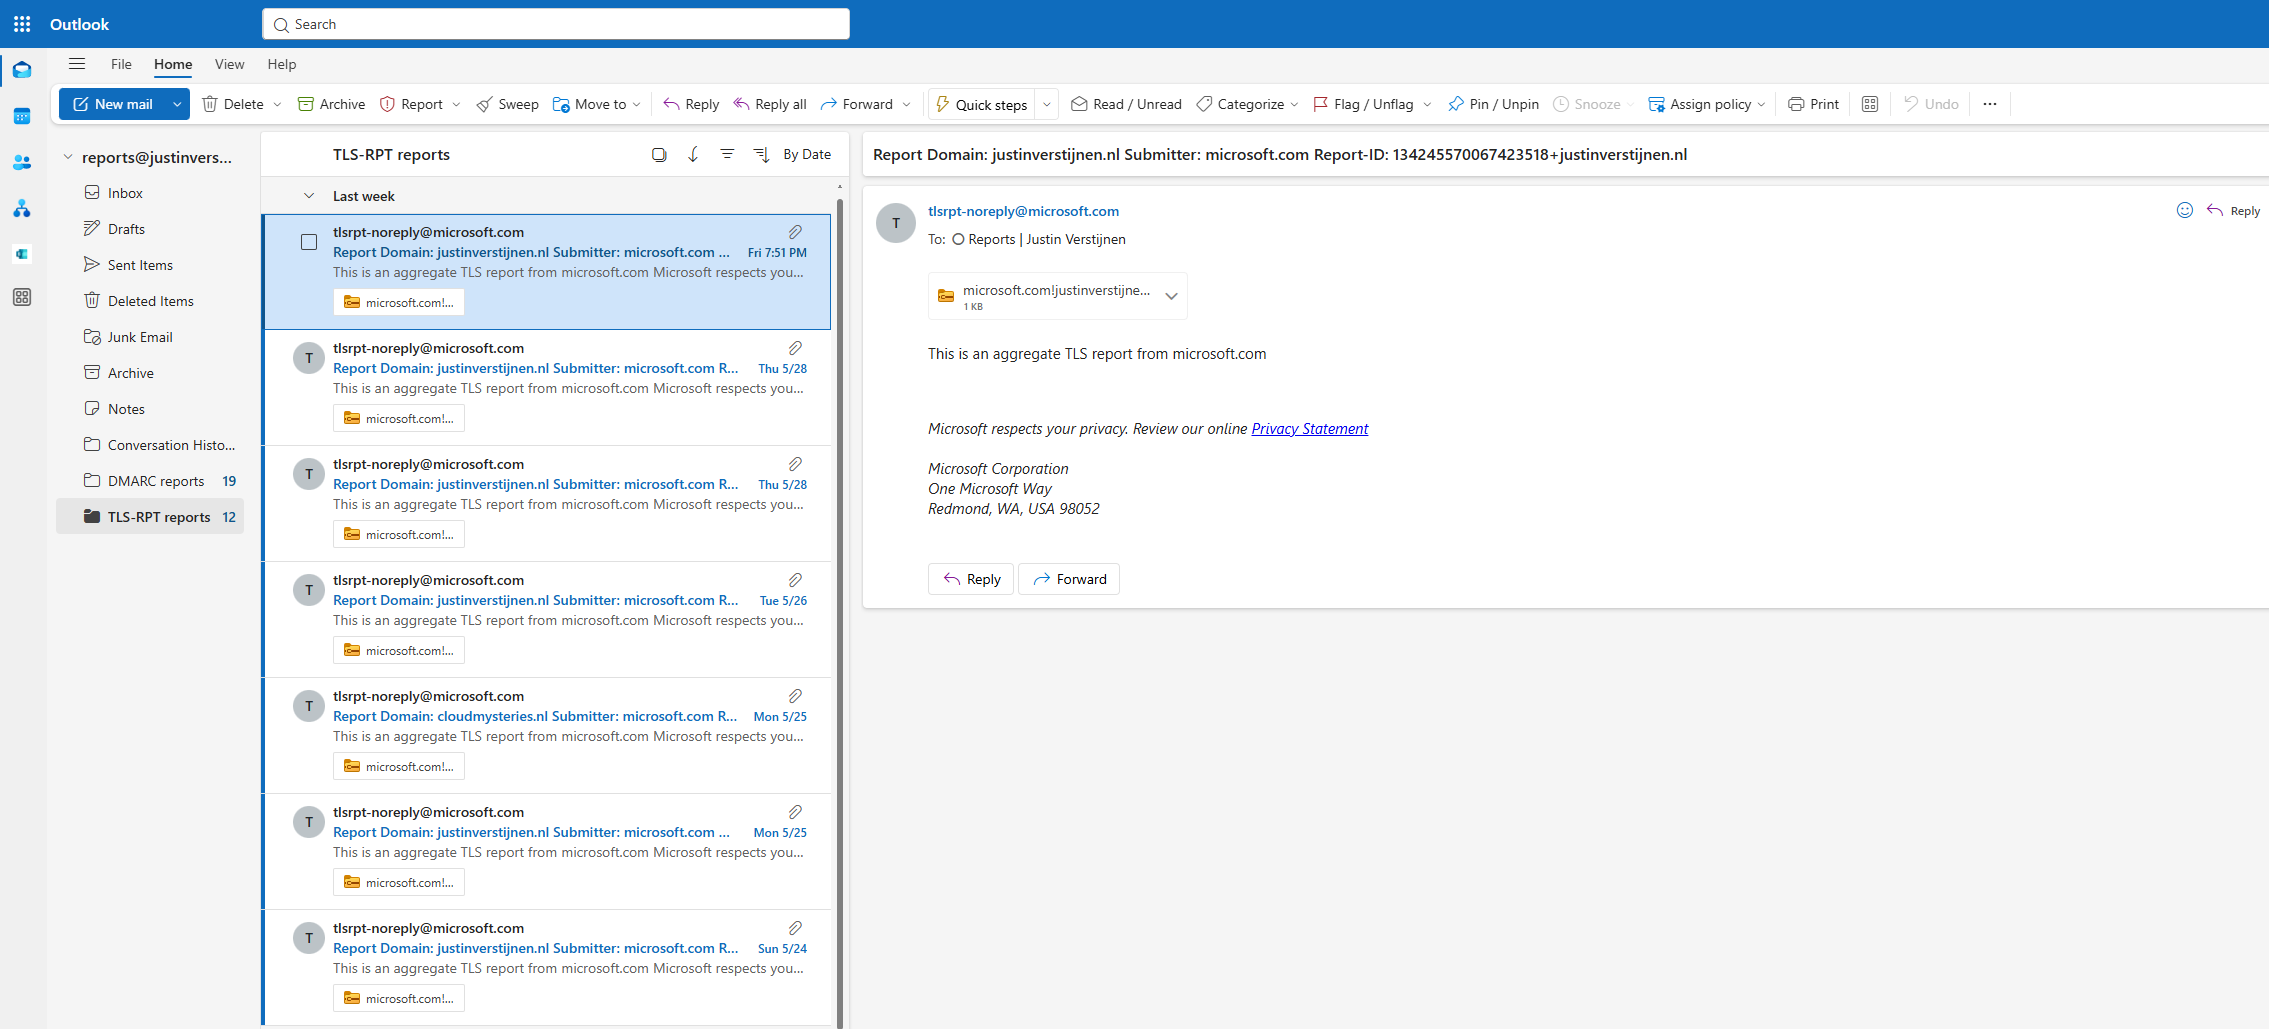
TLS-RPT reports
After we configured the TXT record and waited for around a week, we will start to receive daily email reports about other email senders over the internet about the deliverability of your domain:
In the emails we get a report zipped into a compressed archive file. In the file we have a JSON file with the raw data, but we can format this to a table of course. This will immediately show the most important information.
Report Overview
This table shows the TLS-RPT reports from Microsoft and Google as senders and show that all sessions are succesful. Successful sessions are defined as “successful connections to your emailing server”. If assuming email deliverability problems and the information shows failed sessions, then a good point to start is your MTA-STS/TLS-RPT records/hosting configuration. If managing your own emailing server, then the validity of your servers’ SSL certificate is also a great guess.
This table shows the results of the MTA-STS policy being enforced and the TLSA records. As I am using Microsoft 365, I don’t have to manage the TLSA records. This is managed by the emailserver (MX) service, in this case Microsoft.
Overall, the reports show a healthy TLS reporting status. Both MTA-STS and TLSA/DANE-related reporting looks to be functioning correctly for the reporting sources shown. There are no failed sessions in the deliverability and all sessions are succesful, showing a healthy deliverability to your domain and email server.
Knowledge check
Knowledge check This quiz needs JavaScript to show the questions and feedback.
Summary
TLS-RPT is basically DMARC-style reporting for TLS and secure mail transport. It helps you understand whether other mail servers can securely deliver email to your domain using TLS. TLS-RPT itself does not stop attacks or enforce encryption, but it gives visibility into certificate problems, downgrade risks, DNS issues and MTA-STS problems. Enabling the option therefore does not make your environment more secure. Its more a reporting mechanism for more insights of possible delivery failures.
Thank you for reading this post and I hope it was helpful!
Sources
These sources helped me by writing and research for this post;
You have reached the end of the page. You can navigate through other blog posts as well, share this post on X, LinkedIn and Reddit or return to the blog posts collection page. Thank you for visiting this post.
If you think something is wrong with this post or you want to know more, you can send me a message to one of my social profiles at: https://justinverstijnen.nl/about/
If you find this page and blog very useful and you want to leave a donation, you can use the button below to buy me a beer. Hosting and maintaining a website takes a lot of time and money. Thank you in advance and cheers :)
When it comes to basic email security, we have 3 techniques that can enhance our email security and delivery by some basic initial configuration. Those are called SPF, DKIM and DMARC. This means, configure, monitor and almost never touch again.
Microsoft announced that starting from May 5, 2025: SPF, DKIM and DMARC will become mandatory for inbound email delivery. Not configuring all three can result in your emails not being delivered correctly.
These 3 techniques are:
SPF: Sender Policy Framework
DKIM: Domain Keys Identified Mail
DMARC: Domain-based Message Authentication Reporting and Conformance
In this guide, we will cover those 3 techniques, how they work, how they can help you and your company to reduce email delivery problems and how we can configure those in Microsoft 365. By configuring SPF, DKIM and DMARC right you help creating a more safe internet. Not only for your own company but also for other companies.
Why bother about those techniques
You will recognise this in your work. You send an email to a party or expecting an incoming email, but it appears in your junk folder. Or you send a advertisement email to your customers but most of the customers will not receive this properly and the mail will appear in the junk folder which will not be checked that regularly. This can result in some huge income loss.
This will happen because the receiving party checks reputation of the sending party. Based on that reputation there will be a decision on the receiving email service which can place the email in the normal folder or in the junk folder.
In the last 3 years, almost every emailing service (Hotmail/Exchange Online/Gmail/Yahoo) has forced to have SPF configured. If not configured properly, all received email will be placed in the junk folder at the recipient side. In addition to this, also configuring DKIM can further reduce the odds of an email received in the junk folder so configuring these protocols is key to good deliverability of your sent email messages.
Every domain on the internet can have multiple MX records. This record tells a sender on which server the email message must be delivered. A MX record for 365 can look like this:
V
0justinverstijnen-nl.mail.protection.outlook.com
After configuring DNSSEC and SMTP DANE from this guide, your MX record looks like this:
V
0justinverstijnen-nl.r-v1.mx.microsoft
MX records have a priority number in front of them, this tells the priority of the servers. Messages will be delivered first at the number closest to “0” which represents a higher priority. After this server doesn’t accept the message or a outage is ongoing, other servers will be tried to deliver the message.
If managing your own emailing server, the SSL certificate must be valid at all times which may sound logical. If using 3rd party services to send and receive emails like Microsoft 365, Google Workspace or such solutions, then this certificate will be automatically renewed.
SPF - Sender Policy Framework
Sender Policy Framework (SPF) is an email authentication method designed to prevent email spoofing. It allows domain owners to specify which mail servers are permitted to send emails on behalf of their domain. Receiving mail servers use SPF records of the sending party to verify if an incoming email comes from an authorized source.
It works by publishing a DNS record as a sending party that states when an email from the sending domain can be trusted. The receiving party then can lookup the sending party if the email is send through a trusted service. This DNS record is an TXT-type record and looks like this:
In this record you state all the emailing services, emailserver as IP address or add “mx” to always trust mails sent from your primary MX record-service.
SPF policies
In a SPF record, you always have a ~all, ?all or -all at the end of the record. This is the policy of what the SPF record will do:
SPF Policy
Description
Effect
Security level
?all
No action taken
All emails are delivered normally without intervention
Low
~all
Softfail
All email is still being sent and delivered, but in the Junk folder
Low to moderate
-all
Hardfail
Email sent from your domain but not by trusted service in SPF means a very high spam score and most of the time rejecting the email.
High
My advice is to always use the Hardfail (-all) and ensuring your emailsystems are always trusted by SPF. This means almost nobody could misuse your domain to send unauthorized email. Of course, this excludes security breaches into accounts.
Advantages of configuring SPF
The advantages of configuring SPF records are:
Spoofing attacks through your domain name is much harder
Much less false positives
Higher chance of your email actually reaching the receiver
DKIM - Domain Keys Identified Mail
DKIM (Domain Keys Identified Mail) is an email authentication method that allows senders to digitally sign their emails using cryptographic signatures. This helps receiving partys verify that an email was sent from an authorized source and that it was not altered during transit.
Exactly like in SPF, the sending party publishes a DNS record with an public key for the receiving party. Every email then will be signed with an private key so an receiver can match those keys and check if the message is altered on it’s way. The last what we want is an virus of other threat injected into an email and getting that in our inbox.
DKIM records must be configured for every sending domain, and every service that sends email from the domain. Basically, it’s a TXT record (or CNAME) that can look like this:
This record is stating that it uses DKIM version 1 (no new version available) and has a public key. In this example case, it is “justinverstijnen.nl” in SHA1.
When using Microsoft 365, DKIM consists of 2 DNS records which has to be added to the DNS records of your domain. After adding those records, we still need to activate DKIM for every domain. I will show this in depth further in this guide.
Advantages of configuring DKIM
Man in the middle attack-detection
Better security
Higher chance of your email actually reaching the receiver
DMARC - Domain-based Message Authentication Reporting and Conformance
DMARC is an email verification and reporting protocol that helps domain owners prevent email spoofing, phishing, and unauthorized use of their domains for sending emails by attackers. It takes advantage of the SPF and DKIM checks to ensure that only legitimate emails are delivered while unauthorized emails are rejected or flagged.
DMARC policies
DMARC uses the SPF and DKIM checks as a sort of top layer to determine if a sender is spoofing a domain. If the SPF check or DKIM check fails, we can decice what to do then by configuring one of the 3 available DMARC policies to decide what to do:
DMARC Policy
Description
Effect
p=none
No action taken, just collect reports
All emails are delivered normally
p=quarantine
Suspicious emails are sent to spam
Reduces phishing but still delivers spoofed emails to end users Junk box
p=reject
Strict enforcement: email sent without SPF or DKIM check are blocked
Maximum protection against spoofing and phishing
So DMARC isn’t really a protocol that states what email inbound on your emailing service should be blocked. It tells other servers on the internet when they receive an email from your domain, what they should do. You then can choose to receive reports from other emailing services what
DMARC is configured per domain, just as all other techniques and helps reducing the amount of SPAM emails that can be sent from your domains. My advice is to configure a reject policy on all domains you own, even when not using for any email. If every domain on the world configures a reject policy, spoofing will be decreased by at least 95%.
Configuring DMARC
DMARC must be configured by configuring a TXT record on your public DNS. An example of a very strict DMARC record looks like this:
In production domains, I highly recommend only using the “reject” policy. Each email that does not pass through SPF and DKIM must not be delivered in a normal manner to employees as they will click on anything without proper training.
Monitoring using DMARC
We can get 2 types of reports from DMARC which can be used for monitoring malicious activity or to get an better understanding about rejected email-messages:
Aggregate Reports (RUA): Provides an overview of email authentication results, showing which sources sent emails on behalf of your domain and whether they passed SPF and DKIM checks
Forensic Reports (RUF): Contains detailed information on individual failed messages, including sender IP, authentication failures, and subject lines
You can configure this by adding the options to the DMARC record:
For Aggegation Reports (RUA): rua=mailto:rua-reports@justinverstijnen.nl;
For Forensic Reports (RUF): ruf=mailto:ruf-reports@justinverstijnen.nl;
When using forensic reports, also add fo=1; to receive SPF and DKIM fails
Of course replace with your own email adresses and add the options to the DMARC record, my record will look like this:
To configure SPF for your domain with Microsoft 365, follow these steps:
Log in to your DNS-hosting service where you can create and change DNS records.
Now check if there is already an existing SPF record, otherwise create a new one. This is always the same for each domain:
Type
Name
Value
TXT-record
@
v=spf1 include:spf.protection.outlook.com -all
When using more than only Microsoft 365 for emailing from your domain, ensure that you don’t overwrite the record but add those services into the record. Also, the maximum number of DNS lookups in your SPF record is 10.
This configuration must done for all your domains.
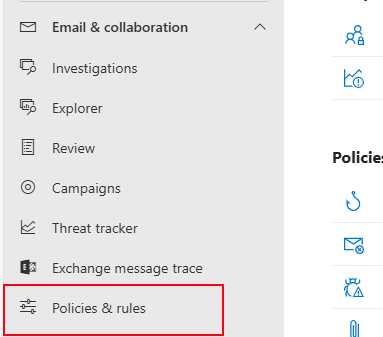
Then, under “Email & Collaboration” go to “Policies & Rules”.
Click on “Threat policies”.
Then on “Email authentication settings”.
Here you will find all your domains added to Microsoft 365 and the status of DKIM. In my case, I already configured all domains to do DKIM signing.
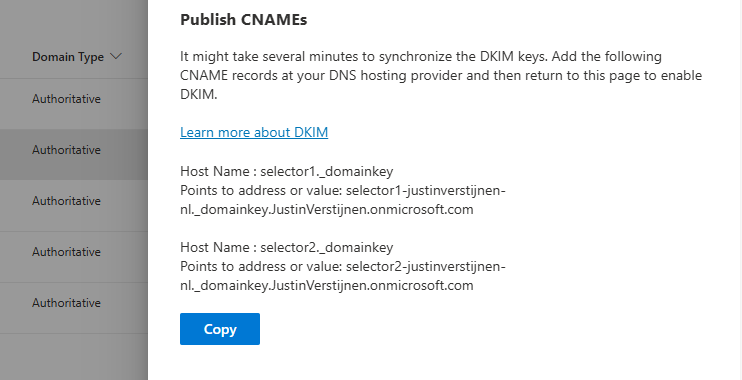
If you have a domain that has DKIM disabled, you can click on the domain-name. This opens an fly-in window:
The window tells us how to configure the records in our DNS service. In my case I have to configure 2 CNAME type DNS records. Microsoft 365 always use this 2 CNAME-configuration.
Log in to your DNS-hosting service where you can create and change DNS records.
Create those 2 records in your DNS hosting service. In my case this configured:
Some DNS hosting providers requires you to end external domain-record values with a dot “.”
Save the DNS records, and check in Microsoft 365 if DKIM can be enabled. This may be not directly but should work after 15 minutes.
This configuration must done for all your domains.
Configuring DMARC step-by-step
Configuring DMARC is done through DNS records. This guide can be used to configure DMARC for most emailing services.
Log in to your DNS-hosting service where you can create and change DNS records
Now determine, according to the information in the theoretical part how you want to configure the record
In my case, this will be the most restricting option, because we don’t want failed SPF or DKIM emails delivered to the normal inbox of our collegues
Also, I don’t use any reporting tools for DMARC
My record looks like this:
V
v=DMARC1;p=reject;
We have to create or change an existing record to make this DMARC policy effective. The full record can look like this:
Type
Name
Value
TTL
TXT-record
_dmarc
v=DMARC1; p=reject;
Provider default
My configured record for reference:
This configuration must done for all your domains.
When implementing the reject policy in real world domains, double check all systems who send email from your domain, as this change can disrupt deliverability when not configured correctly.
Ensure all systems are defined in SPF and use DKIM.
Configure DMARC for your .onmicrosoft.com domain(s)
It’s also possible to configure DMARC on your Microsoft Online Email Routing Address (MOERA) domain, which is more widely known as your .onmicrosoft.com domain. I highly recommend doing this as this is practically also a domain that looks like your brand.
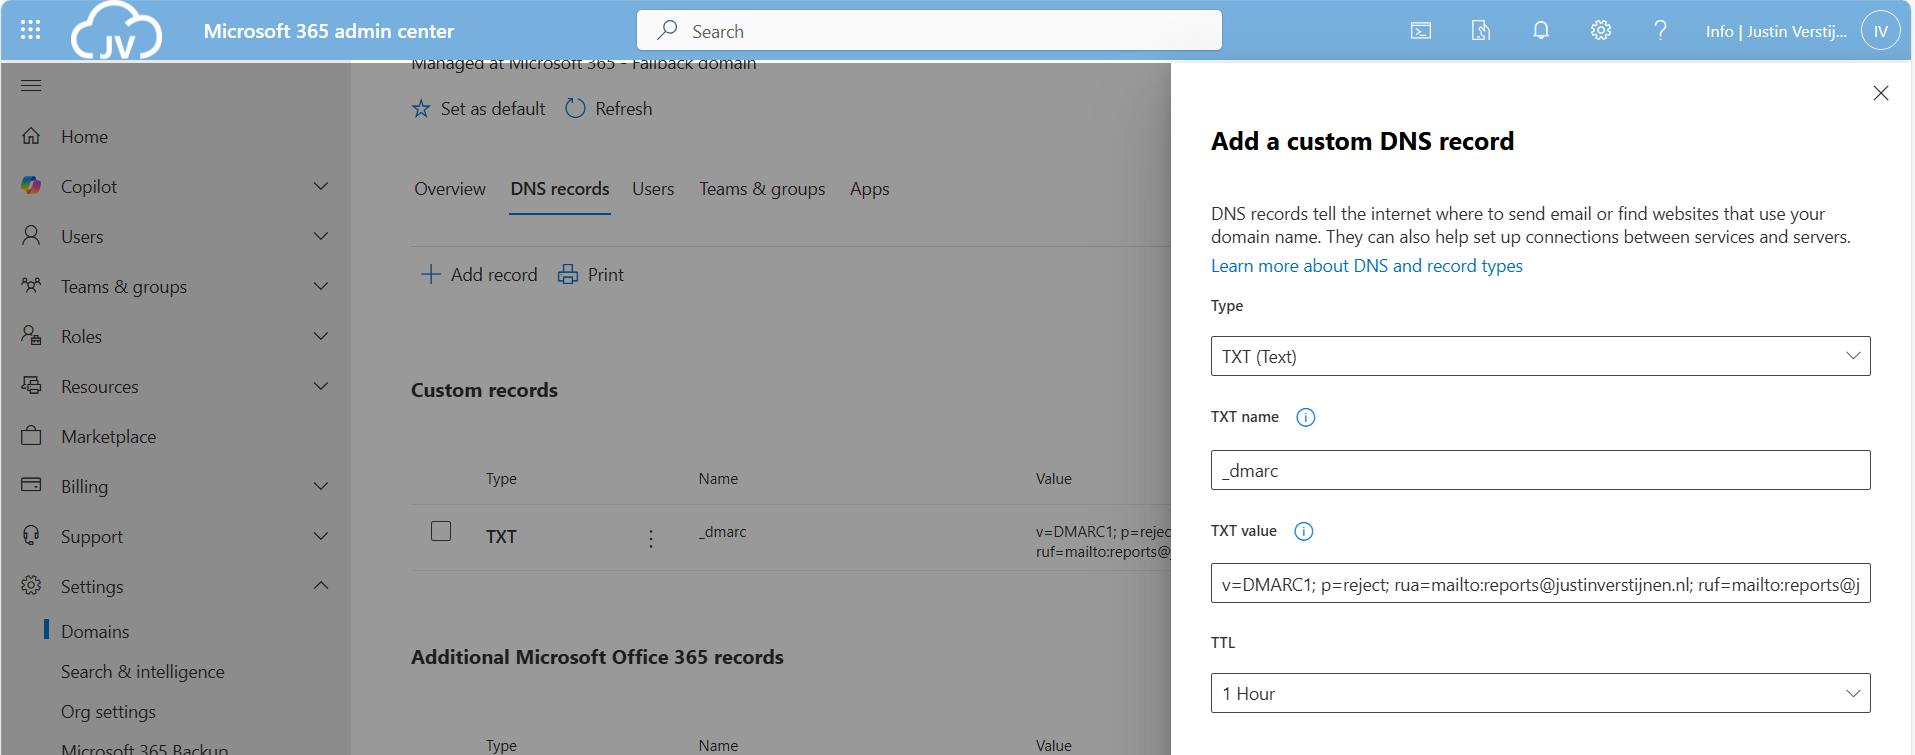
To configure this, go to Microsoft 365 Admin Center and head to the domains section:
Open your domain and then open the “DNS records” tab. Create a new record here:
Use the following parameters:
Type: TXT
TXT name: _dmarc
TXT value: your constructed DMARC record
Then save your configuration.
Knowledge check
Knowledge check This quiz needs JavaScript to show the questions and feedback.
Summary
Configuring SPF, DKIM and DMARC nowadays must to be a standard task when adding a new domain to your email sending service like Microsoft 365. Without them, almost all of your sent email will be delivered to “Junk” or even rejected. In larger companies, this can directly result in income loss which we definitely want to avoid.
For short, these 3 techniques do:
SPF is a “trusted sender” whitelist for a domain. Only if a server is in the SPF record -> its trusted
DKIM is a PKI system that signs your sent email so a receiver can check if an email really came from the domain it says by verifying the public key in DNS
DMARC is a top-level system where you can decide what other emailing servers on the internet must do if an email from your domain fails the SPF or DKIM check
Thank you for reading this page and I hope I helped you.
End of the page 🎉
You have reached the end of the page. You can navigate through other blog posts as well, share this post on X, LinkedIn and Reddit or return to the blog posts collection page. Thank you for visiting this post.
If you think something is wrong with this post or you want to know more, you can send me a message to one of my social profiles at: https://justinverstijnen.nl/about/
If you find this page and blog very useful and you want to leave a donation, you can use the button below to buy me a beer. Hosting and maintaining a website takes a lot of time and money. Thank you in advance and cheers :)
Recently, Microsoft announced the general availability of 2 new security protocol when using Microsoft 365 and the service Exchange Online in particular. SMTP DANE and DNSSEC. What are these protocols, what is the added value and how can they help you secure your organization? Lets find out.
Domain Name System Security Extensions (DNSSEC)
DNSSEC is a feature where a client can validate the DNS records received by a DNS server to ensure a record is originated from the DNS server and not manipulated by a Man in the Middle attack.
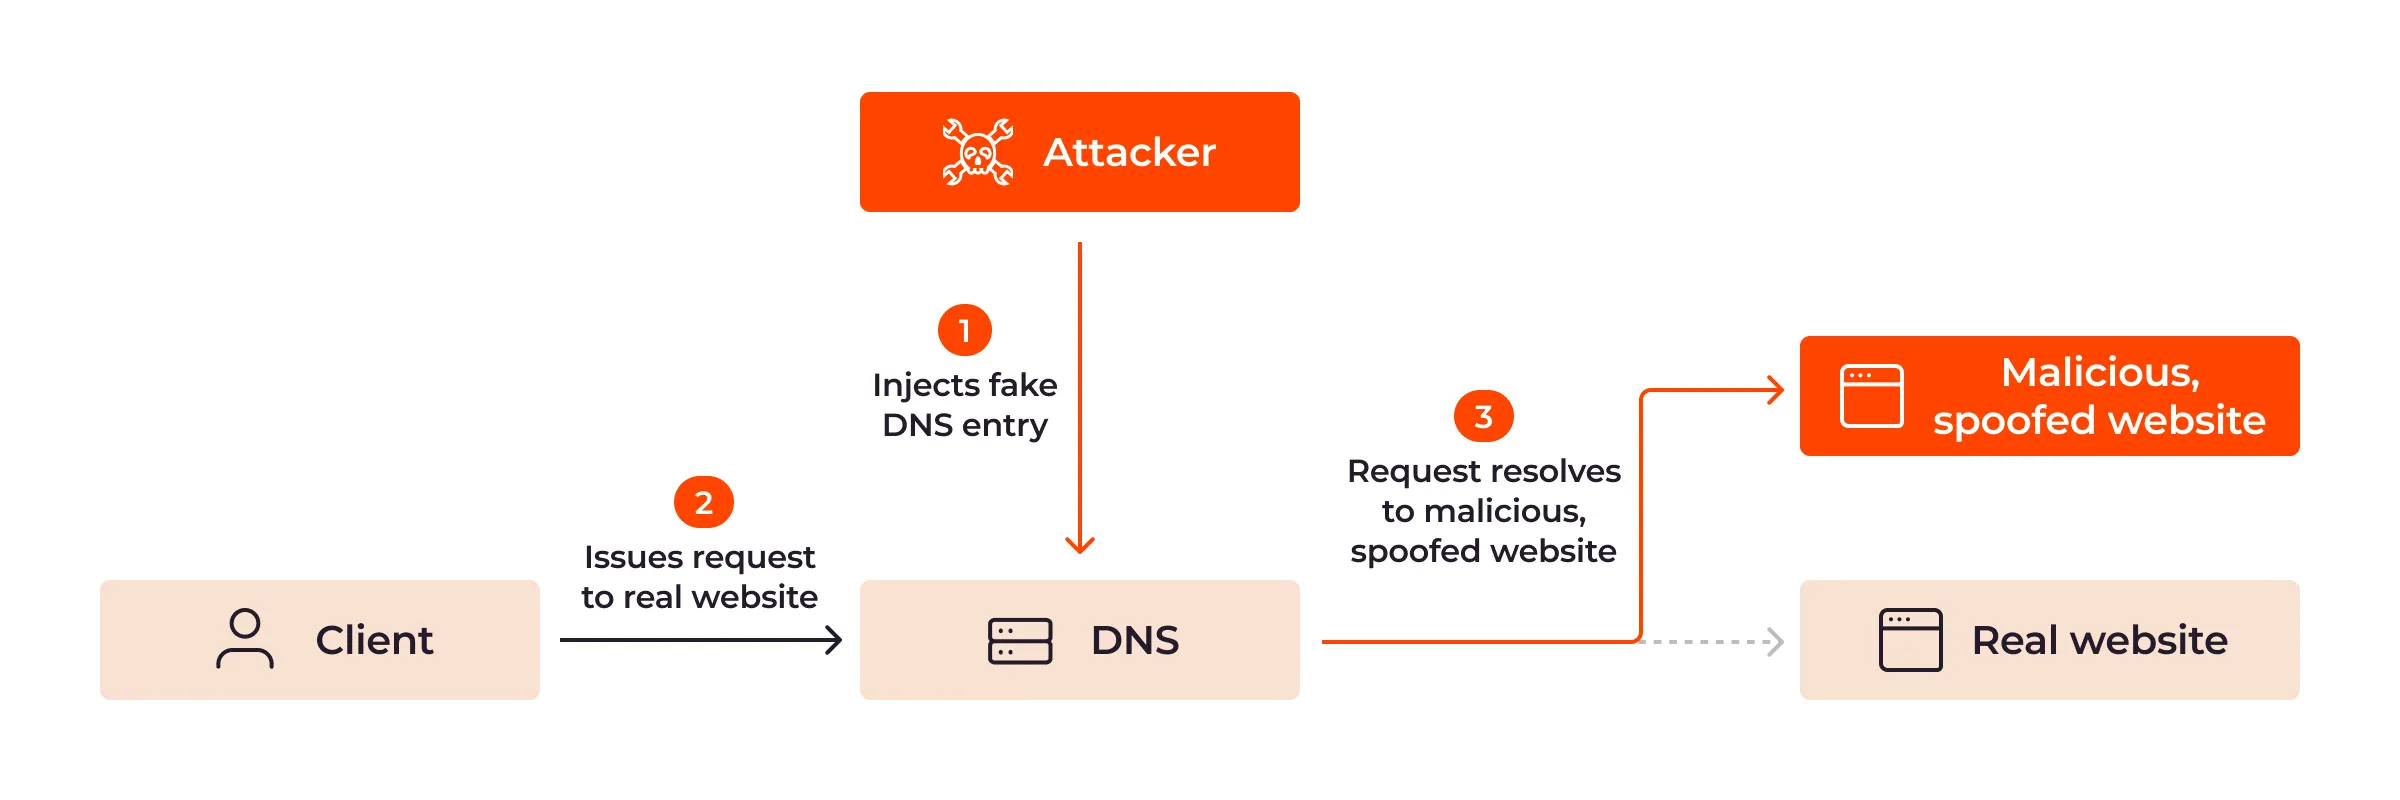
DNSSEC is developed to prevent attacks like in the topology below:
Here a attacker injects a fake DNS record and sends the user to a different IP-address, not the actual IP-address of the real website but a fake, mostly spoofed website. This way, a user sees for example https://portal.azure.com in his address bar but is actually on a malicious webserver. This makes the user far more vulnerable to credential harvesting or phising attacks.
With DNSSEC, the client receives the malicious and fake DNS entry, validates it at the authorative DNS server for the domain and sees its fake. The user will be presented a error message and we have prevented just another breach.
SMTP DNS Authentication of Named Entities (DANE)
SMTP DANE is an addition to DNSSEC which actually brings the extra security measures to sending email messages. It helps by performing 3 steps:
When sending an email message, SMTP DANE requires a TLS connection and certificate and doesn’t send email when this is not possible
SMTP DANE validates the emailserver to ensure an email message originates from the server of the given domain
SMTP DANE doesn’t use external Certificate Authorities but uses the systems available to generate certificates which the receiver can validate.
SMTP DANE and DKIM (DomainKeys Identified Mail)
SMTP DANE and DKIM sounded the same security to me when I first read about it. However, both are needed to secure your outbound email traffic, but they help in another way:
DKIM helps by generating a signature at sending the email which a receiver can validate through a public DNS record
The receiver knows that the message is not modified by an attacker
SMTP DANE helps securing the transport of the email, and ensures the connection itself is secure. See this like a HTTPS connection
The receiver knows that the message and connection is not re-routed by an man in the middle.
When starting out, your DNS hosting must support and enabled DNSSEC on your domain. Without this, those protocols don’t work. You can check out your domain and DNSSEC status with my DNS MEGAtool:
My domain is DNSSEC capable and a DS record is published from the registrar to the DNS hosting and is ready to go to the next phase:
You can find this on the last row of the table in the DNS MEGAtool. If the status is red or an error is in the value field, the configuration of your domain is not correct.
Step 2: Login into Microsoft Exchange Online Powershell
The only way to enable those features at this moment are to configure those on Exchange Online Powershell. The good part is, it is not that hard. Let me show you.
First, login into Exchange Online Powershell:
POWERSHELL
Connect-ExchangeOnline
Login with your credentials, and we are ready.
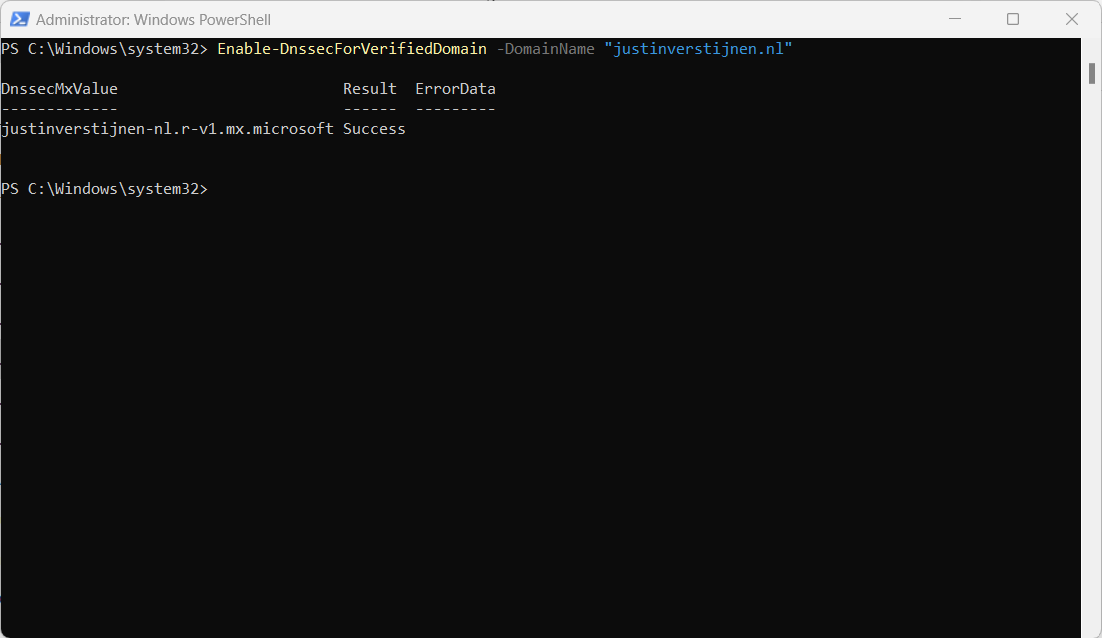
Step 3: Enable DNSSEC
We have to enable DNSSEC to each of our domains managed in Microsoft 365. In my environment, I have only one domain. Run the following command to enable DNSSEC:
Let’s change this in the DNS hosting of your domain and it has to be the new primary MX-record (the one with the highest priority -> lowest number). I added it to the list of DNS records with a priority of 5, and switched the records outside of business hours to minimize service disruption.
Here an example of my configuration before switching to the new DNSSEC enabled MX record as primary.
When you change your MX record it can take up to 72 hours before the whole world knows your new MX record.
This is only a command to enable SMTP DANE for inbound email, here is no additional DNS change needed.
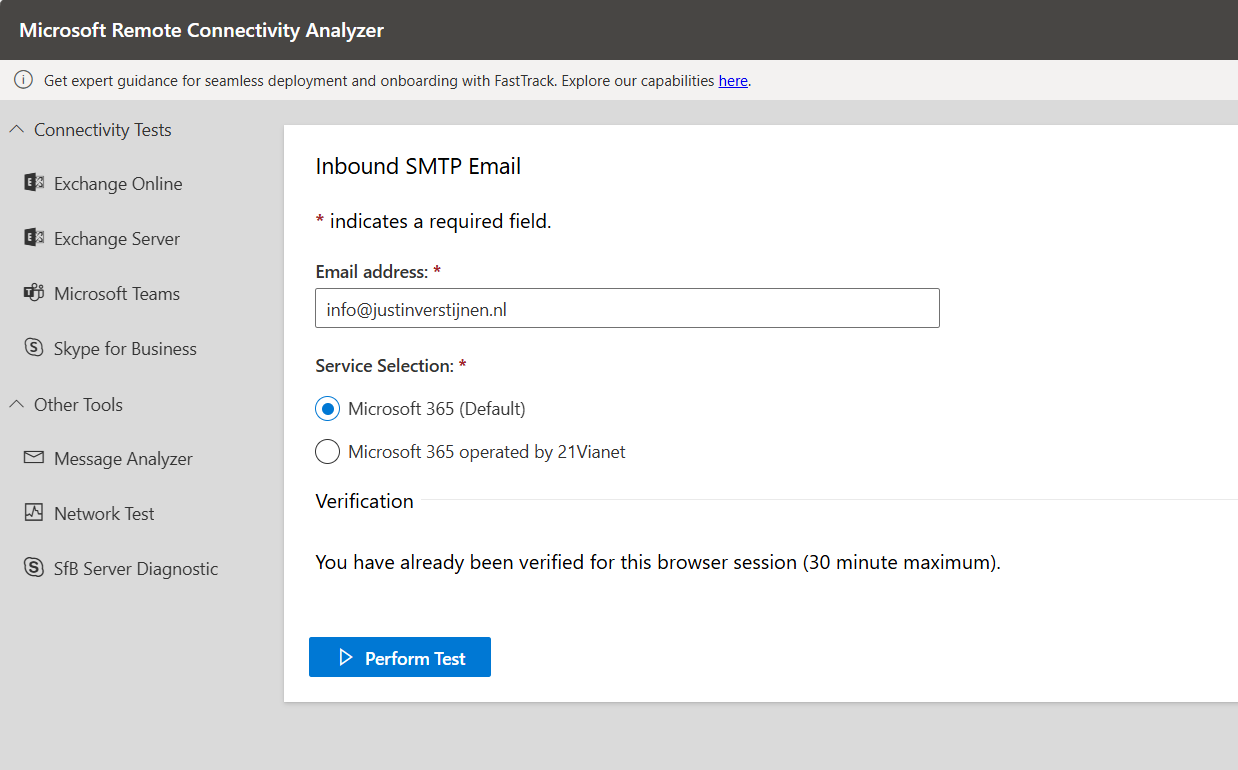
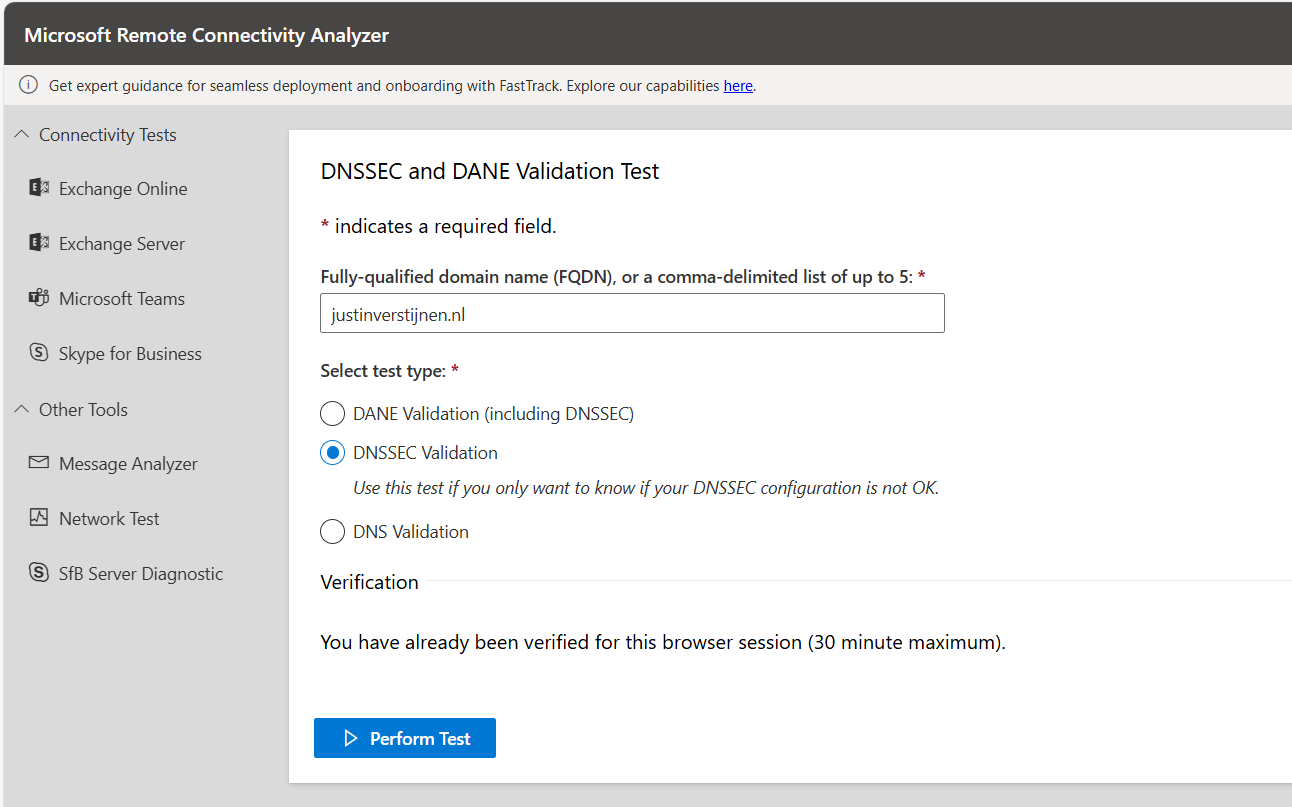
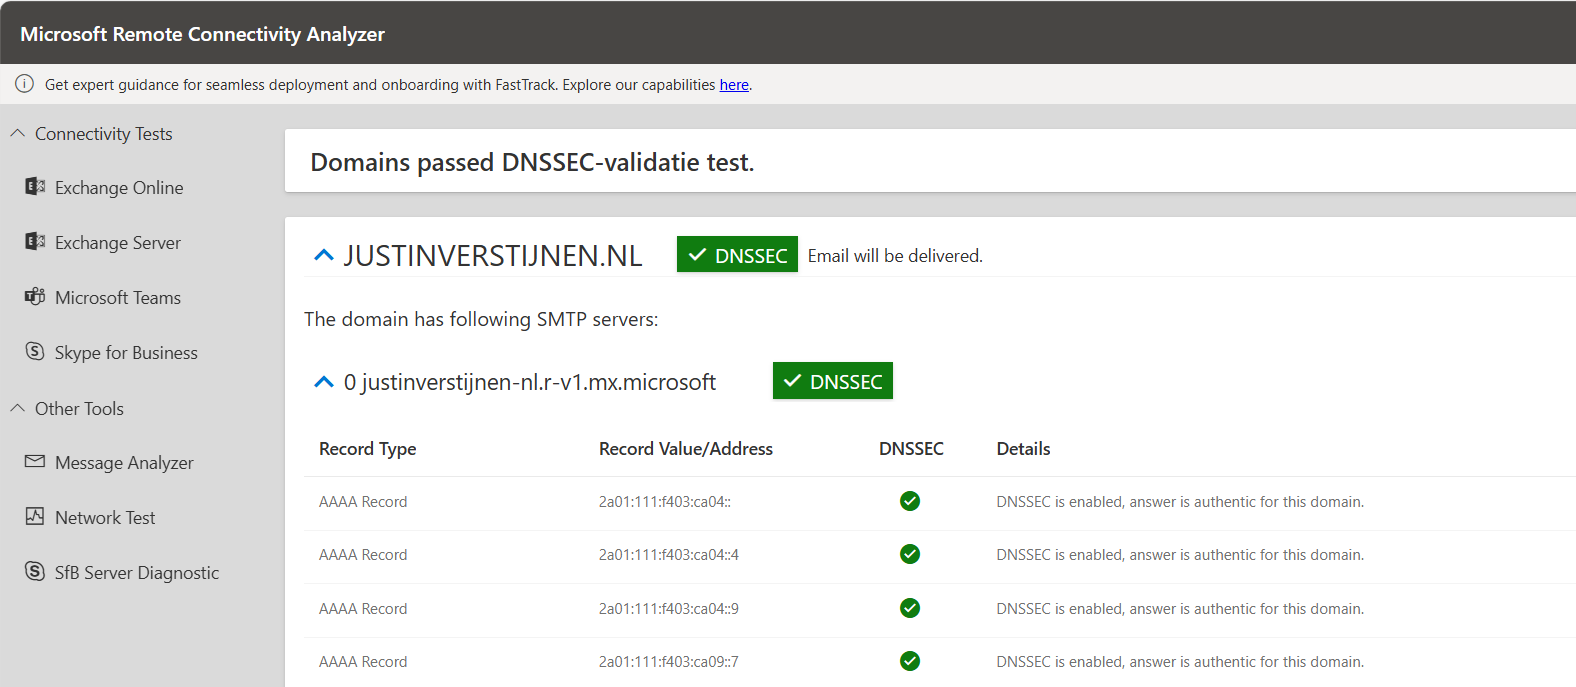
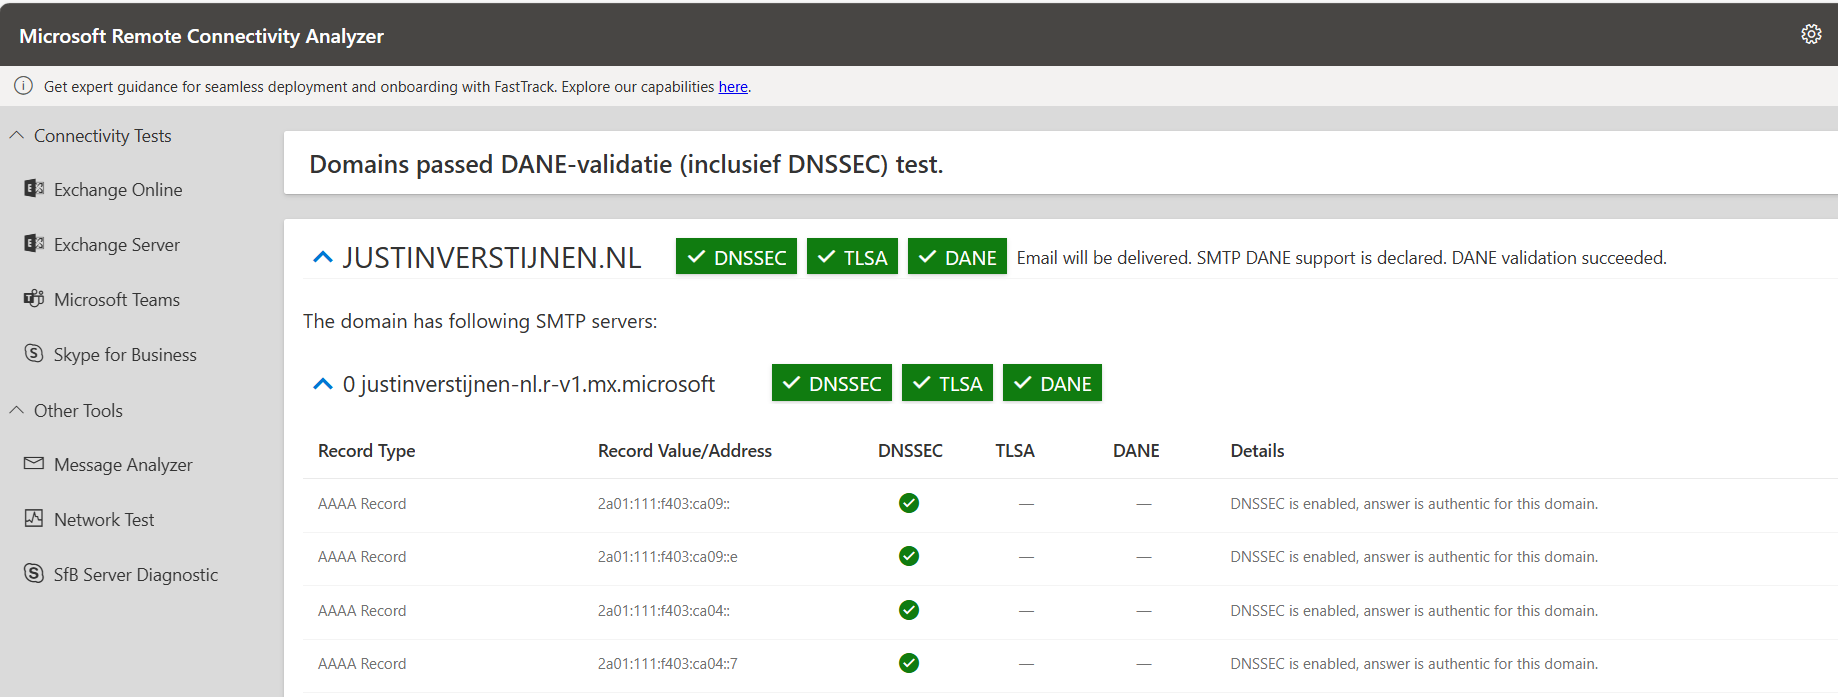
Step 7: Test inbound SMTP DANE
After enabling the SMTP DANE option, you will have to wait some time to fully enable and make it work on the internet. It can take up to an hour, but in my case it took around 10 minutes.
Fill in your domain, and select the “DANE-validation” including DNSSEC to test both of your implemented mechanisms:
Knowledge check
Knowledge check This quiz needs JavaScript to show the questions and feedback.
Summary
After this guide you are using DNSSEC and SMTP DANE on your Exchange Online environment. This improves your security posture at that point. My advice is to enable this options when possible. When DNSSEC is not an option, I highly recommend to configure this: https://justinverstijnen.nl/what-is-mta-sts-and-how-to-protect-your-email-flow/
Thank you for reading this post and I hope I helped you out securing your email flow and data in transfer.
End of the page 🎉
You have reached the end of the page. You can navigate through other blog posts as well, share this post on X, LinkedIn and Reddit or return to the blog posts collection page. Thank you for visiting this post.
If you think something is wrong with this post or you want to know more, you can send me a message to one of my social profiles at: https://justinverstijnen.nl/about/
If you find this page and blog very useful and you want to leave a donation, you can use the button below to buy me a beer. Hosting and maintaining a website takes a lot of time and money. Thank you in advance and cheers :)