All pages referring or tutorials for Microsoft Entra.
This is the multi-page printable view of this section. Click here to print.
Microsoft Entra
- Entra ID Custom CSS styling
- CWL Azure Red Team Certification - What I learned
- Get notifications when Entra ID break glass admins are used
- How to properly secure Break Glass Accounts in your Entra ID
- Remove Universal Print Devices/Connectors
- Solved - ADSync service stopped (Entra Connect Sync)
- Match AD users using Entra Connect Sync and MSGraph
- Implement Certificate-based authentication for Entra ID scripts
- Audit your Entra ID user role assignments
- Audit your privileged Entra ID applications
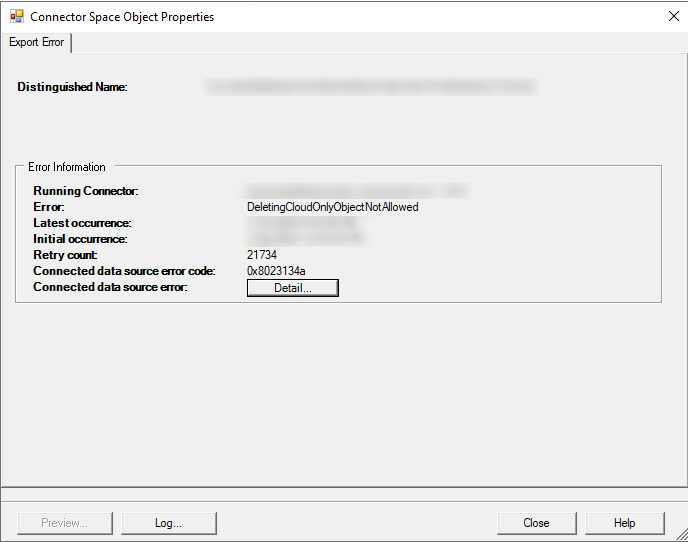
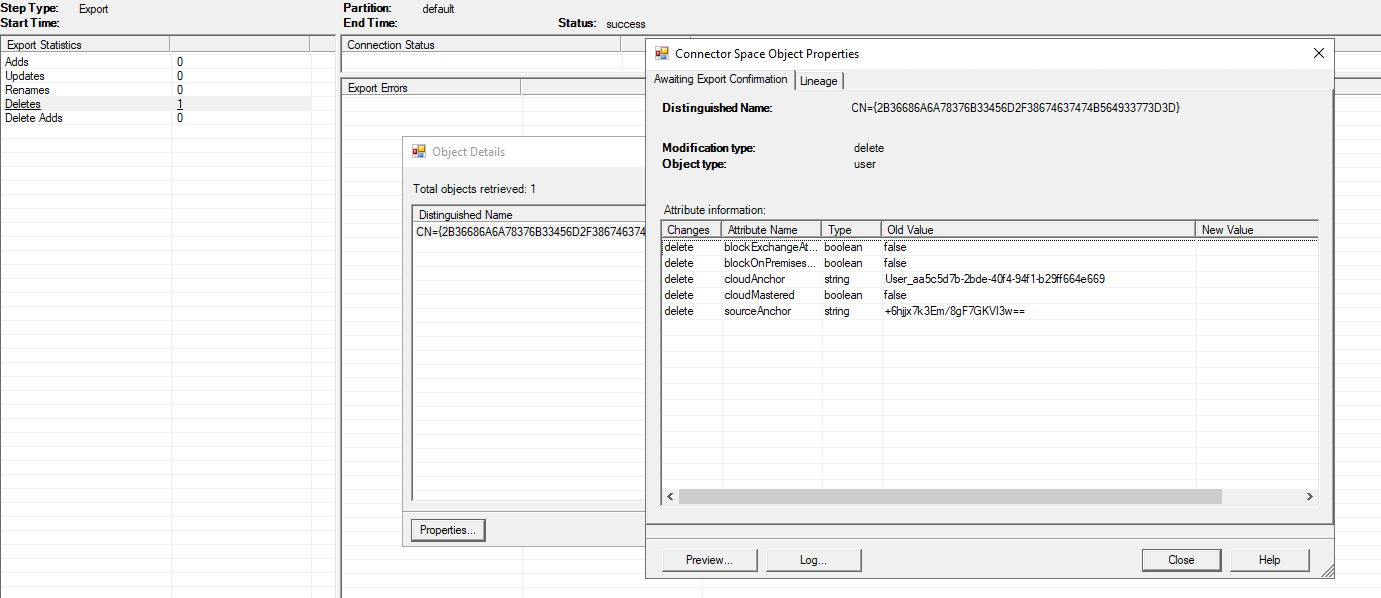
- How to solve DeletingCloudOnlyObjectNotAllowed error Entra Connect Sync
- Disable Active Directory synchronization in Microsoft Entra ID (company-wide)
- Dynamic group for access to Windows 365
Entra ID Custom CSS styling
On this page I will show the advanced and custom CSS controls available for Entra ID prompts to style this to your likings or organization branding.
Everybody who is managing Entra ID tenants ever saw this Custom CSS option during the wizard:
With this option, you can style some options in your sign-in pages to your own likings, enabling you to virtually use any CSS control available. In this guide I will show you how I have leveraged this option to change the sign-in pages to my own style. After some hours of trying different options, my sign-in page looks like this:
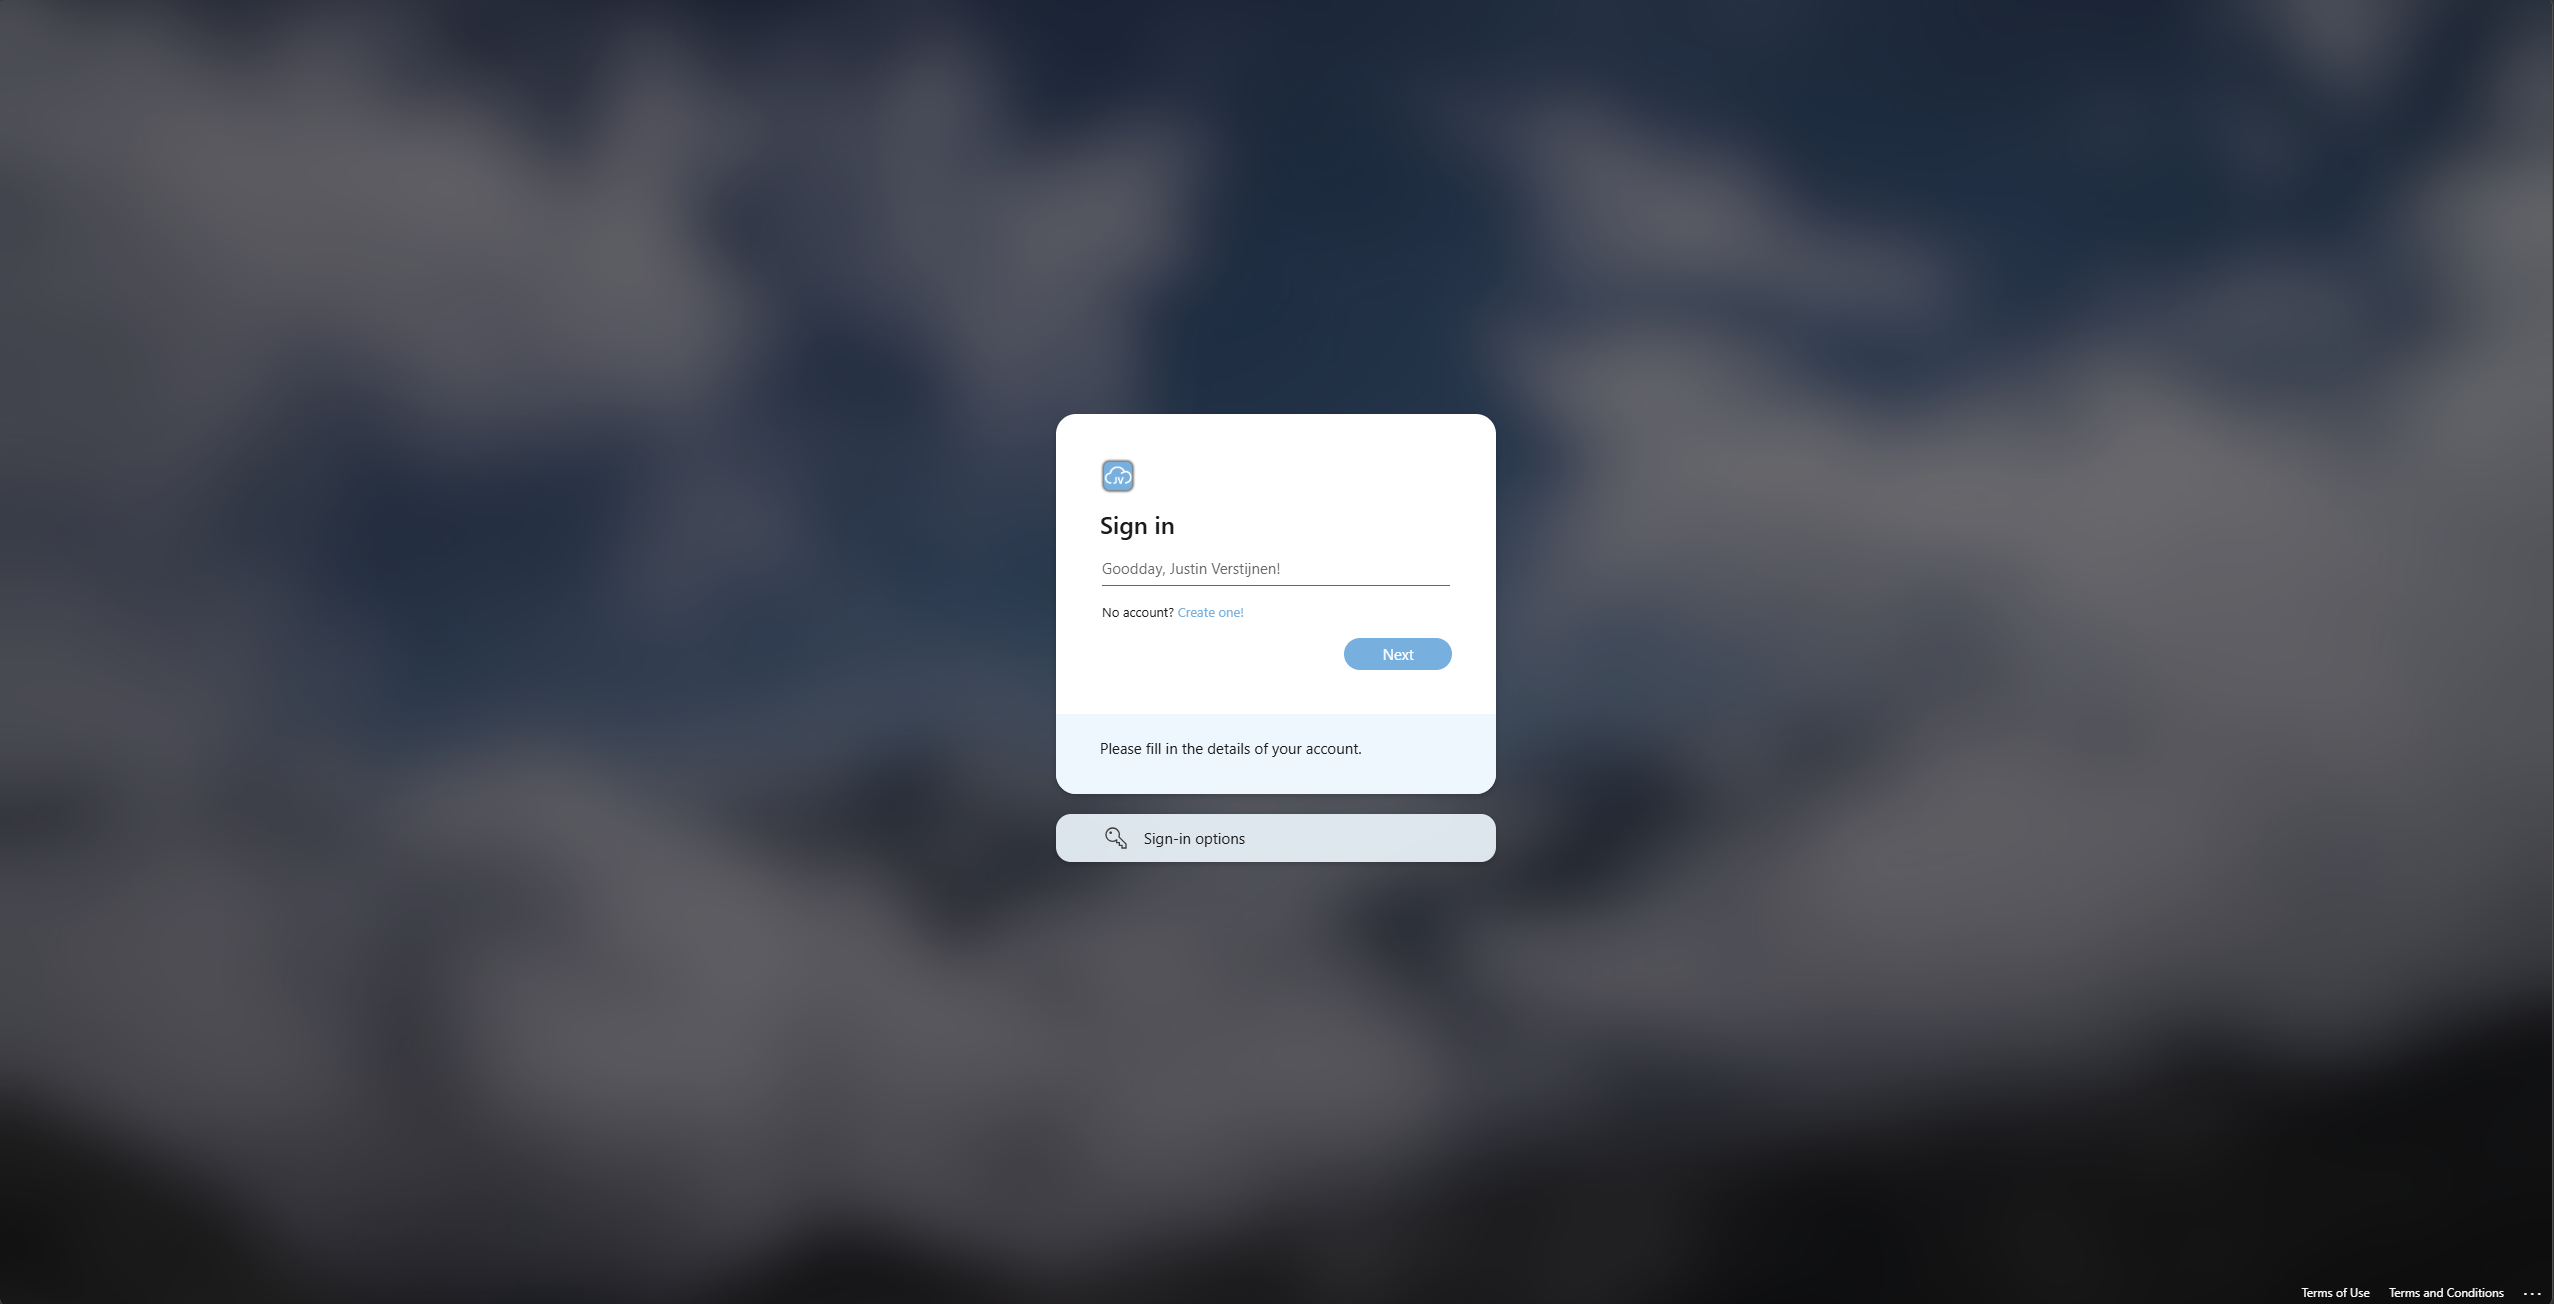
What has been changed in this sign-in prompt opposing the original:
- Custom color for links
- Custom color for buttons
- Custom color for the “Sign-in page text” block
- Custom color for the “Sign-in options” block
- Rounded Sign-in block
- Rounded buttons
Let’s take a look at how I achieved this step-by-step. However, I need you to understand that this guide dives into the custom CSS section only. The normal tenant branding options are pretty straight forward.
Requirements
The requirements of following this guide are:
- An Entra ID tenant created before January 5 2026 (tenants created after that date doesnt have this option available)
- Some knowledge about HTML and CSS
- Around 20 minutes of your time
Step 1: Defining the Custom CSS code
Let’s start by defining your CSS template. I have made an somewhat simpler template than the version of Microsoft, but the Microsoft version shows what elements can be customized. However, even that comprehensive list is very limited unfortunately so I picked out the most noticable options.
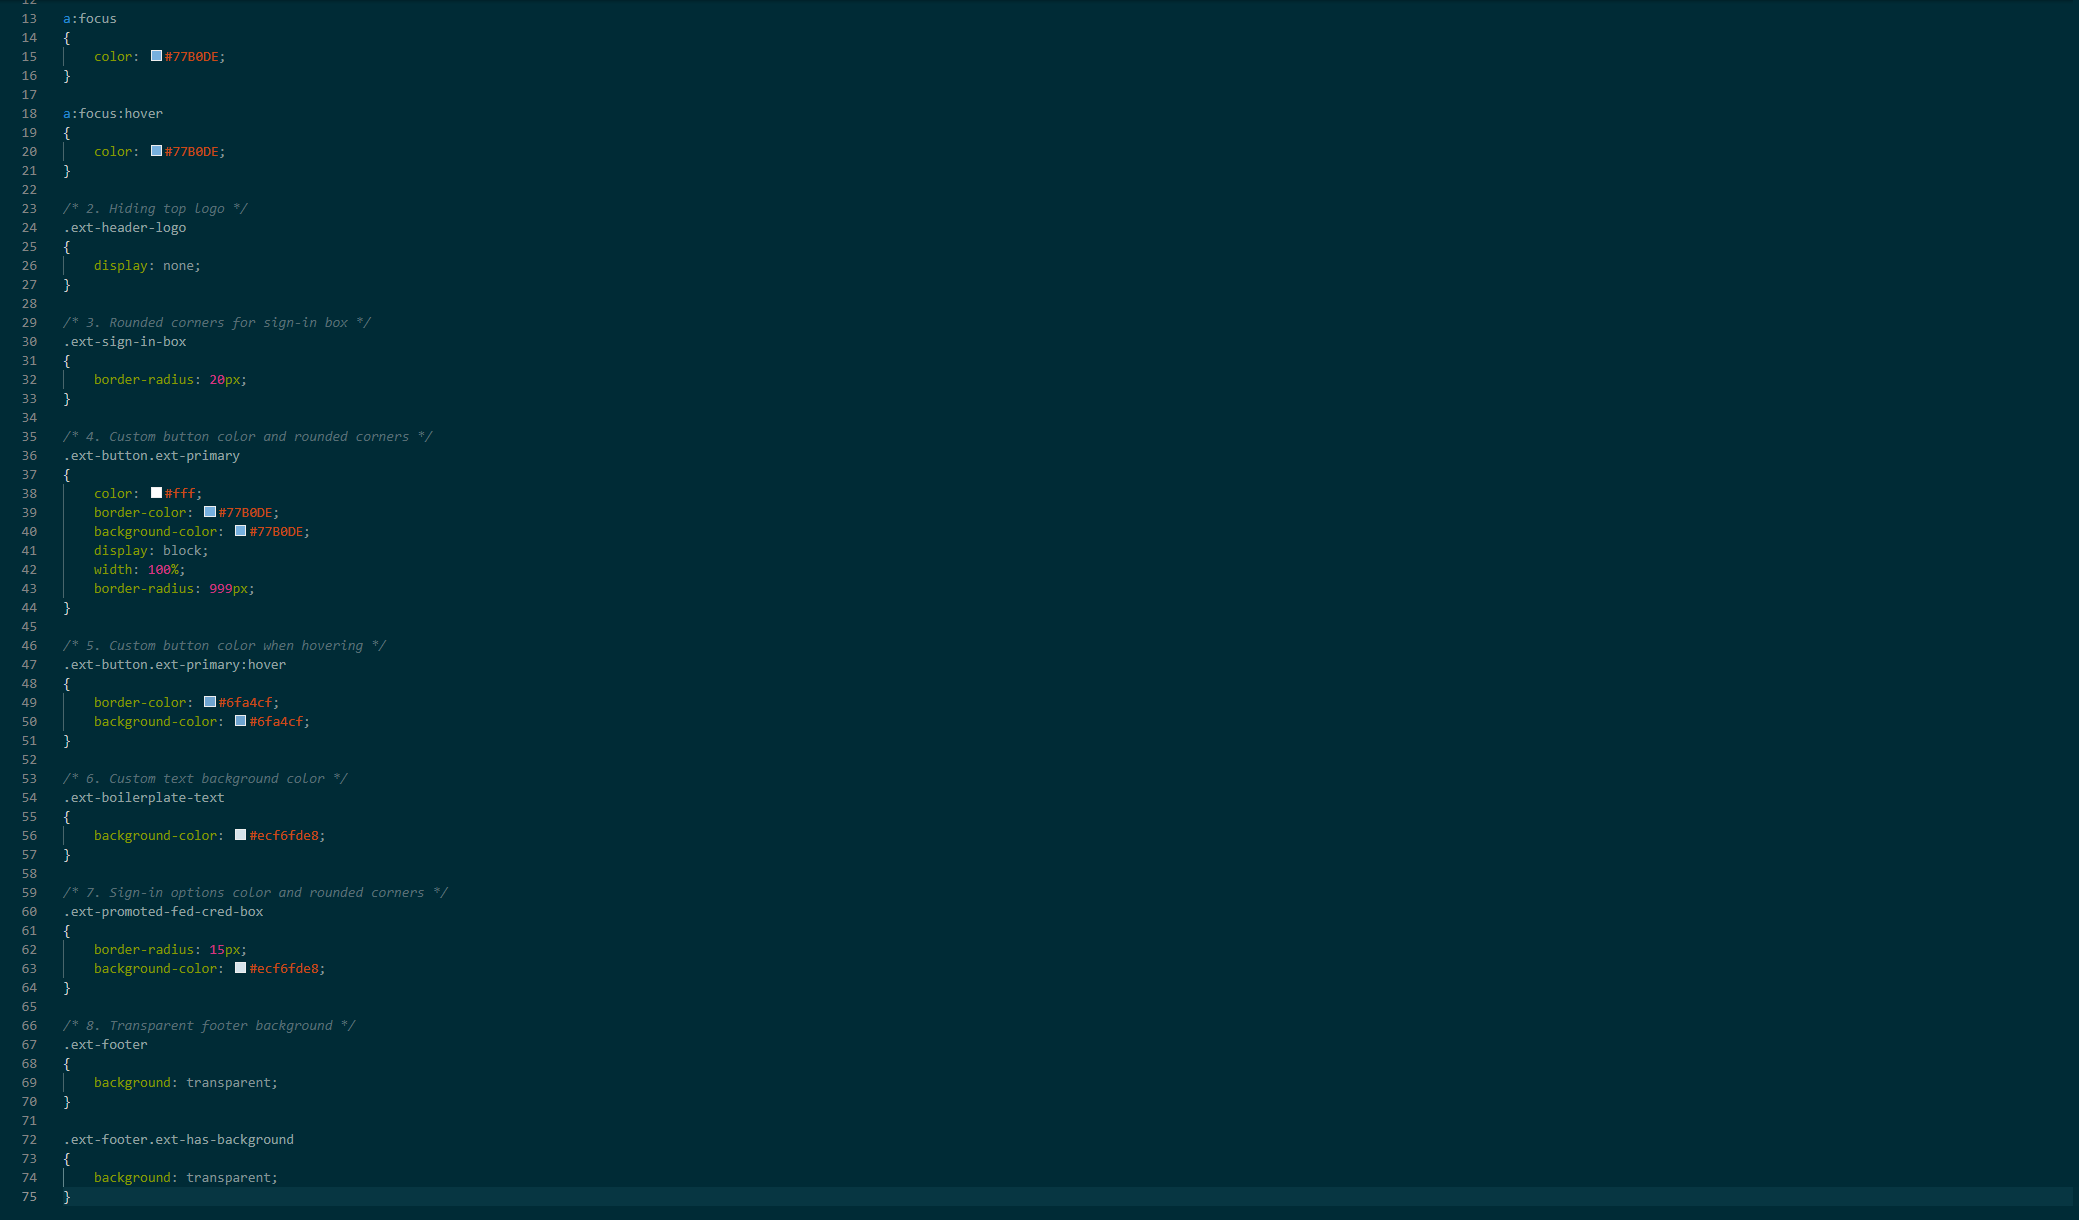
This is my full CSS file, where I have commented and so numbered the sections to show what options/classes define what on the page:
CSS
/* 1. Link colors */
a,
a:link
{
    color: #77B0DE;
}

a:hover
{
    color: #77B0DE;
}

a:focus
{
    color: #77B0DE;
}

a:focus:hover
{
    color: #77B0DE;
}

/* 2. Hiding top logo */
.ext-header-logo
{
    display: none;
}

/* 3. Rounded corners for sign-in box */
.ext-sign-in-box
{
    border-radius: 20px;
}

/* 4. Custom button color and rounded corners */
.ext-button.ext-primary
{
    color: #fff;
    border-color: #77B0DE;
    background-color: #77B0DE;
    display: block;
    width: 100%;
    border-radius: 999px;
}

.ext-button.ext-secondary
{
    color: #fff;
    border-color: #77B0DE;
    background-color: #77B0DE;
    display: block;
    width: 100%;
    border-radius: 999px;
}

/* 5. Custom button color when hovering */
.ext-button.ext-primary:hover
{
    border-color: #6fa4cf;
    background-color: #6fa4cf;
}

.ext-button.ext-secondary:hover
{
    border-color: #6fa4cf;
    background-color: #6fa4cf;
}

/* 6. Custom text background color */
.ext-boilerplate-text
{
    background-color: #ecf6fde8;
}

/* 7. Sign-in options color and rounded corners */
.ext-promoted-fed-cred-box
{
    border-radius: 15px;
    background-color: #ecf6fde8;
}

/* 8. Transparent footer background */
.ext-footer
{
    background: transparent;
}

.ext-footer.ext-has-background
{
    background: transparent;
}
Copy this full CSS contents and paste it into your favorite CSS editor. My pick is Visual Studio Code, as it has built-in error correction and color pickers. Now I will show you what setting changes what:
| CSS section | CSS classes definitions | Extra information |
|---|---|---|
| 1. Link colors | a a:link a:hover a:focus a:focus:hover | These settings define the color of the clickable links on the full website. |
| 2. Hiding top logo | .ext-header-logo | This setting hides the logo on the top-left corner. |
| 3. Rounded corners for sign-in box | .ext-sign-in-box | This setting makes the corners of the Sign-in box rounded. |
| 4. Custom button color and rounded corners | .ext-button.ext-primary | These settings changes the color of the buttons. |
| 5. Custom button color when hovering | .ext-button.ext-primary:hover | These settings changes the color of the buttons while hovering. |
| 6. Custom text background color | .ext-boilerplate-text | This setting changes the background of the custom sign-in text block. |
| 7. Sign-in options color and rounded corners | .ext-promoted-fed-cred-box | These settings changes the Sign-in options block, altering the corners and the background color. |
| 8. Transparent footer background | .ext-footer .ext-footer.ext-has-background | These settings remove the colored bar at the bottom of the page. |
To visualize this on the sign-in page:

Step 2: Changing the custom CSS
Now that we know what settings can be changed and what changes certain styles on the sign-in page, let’s customize the custom CSS to your likings. Copy/paste the CSS code from Step 1 if not already done and determine what colors you want to use.
Info
Tip: use my HTML Color Picker tool if needing inspiration for colors.
Now I have opened the custom CSS file into Visual Studio Code. Now determine your main color, secondary and slightly darker color and a lighter color and replace these into the existing color fields. You can use the CTRL + H option, find and replace.
- Main color: #77b0de
- Secondary (darker) color: #6fa4cf
- Tertiary (lighter) color: #ecf6fde8
The border-radius values defines the rounded corners. You could also change that, but thats up to you.
Save the file to a CSS file and let’s head to Entra ID.
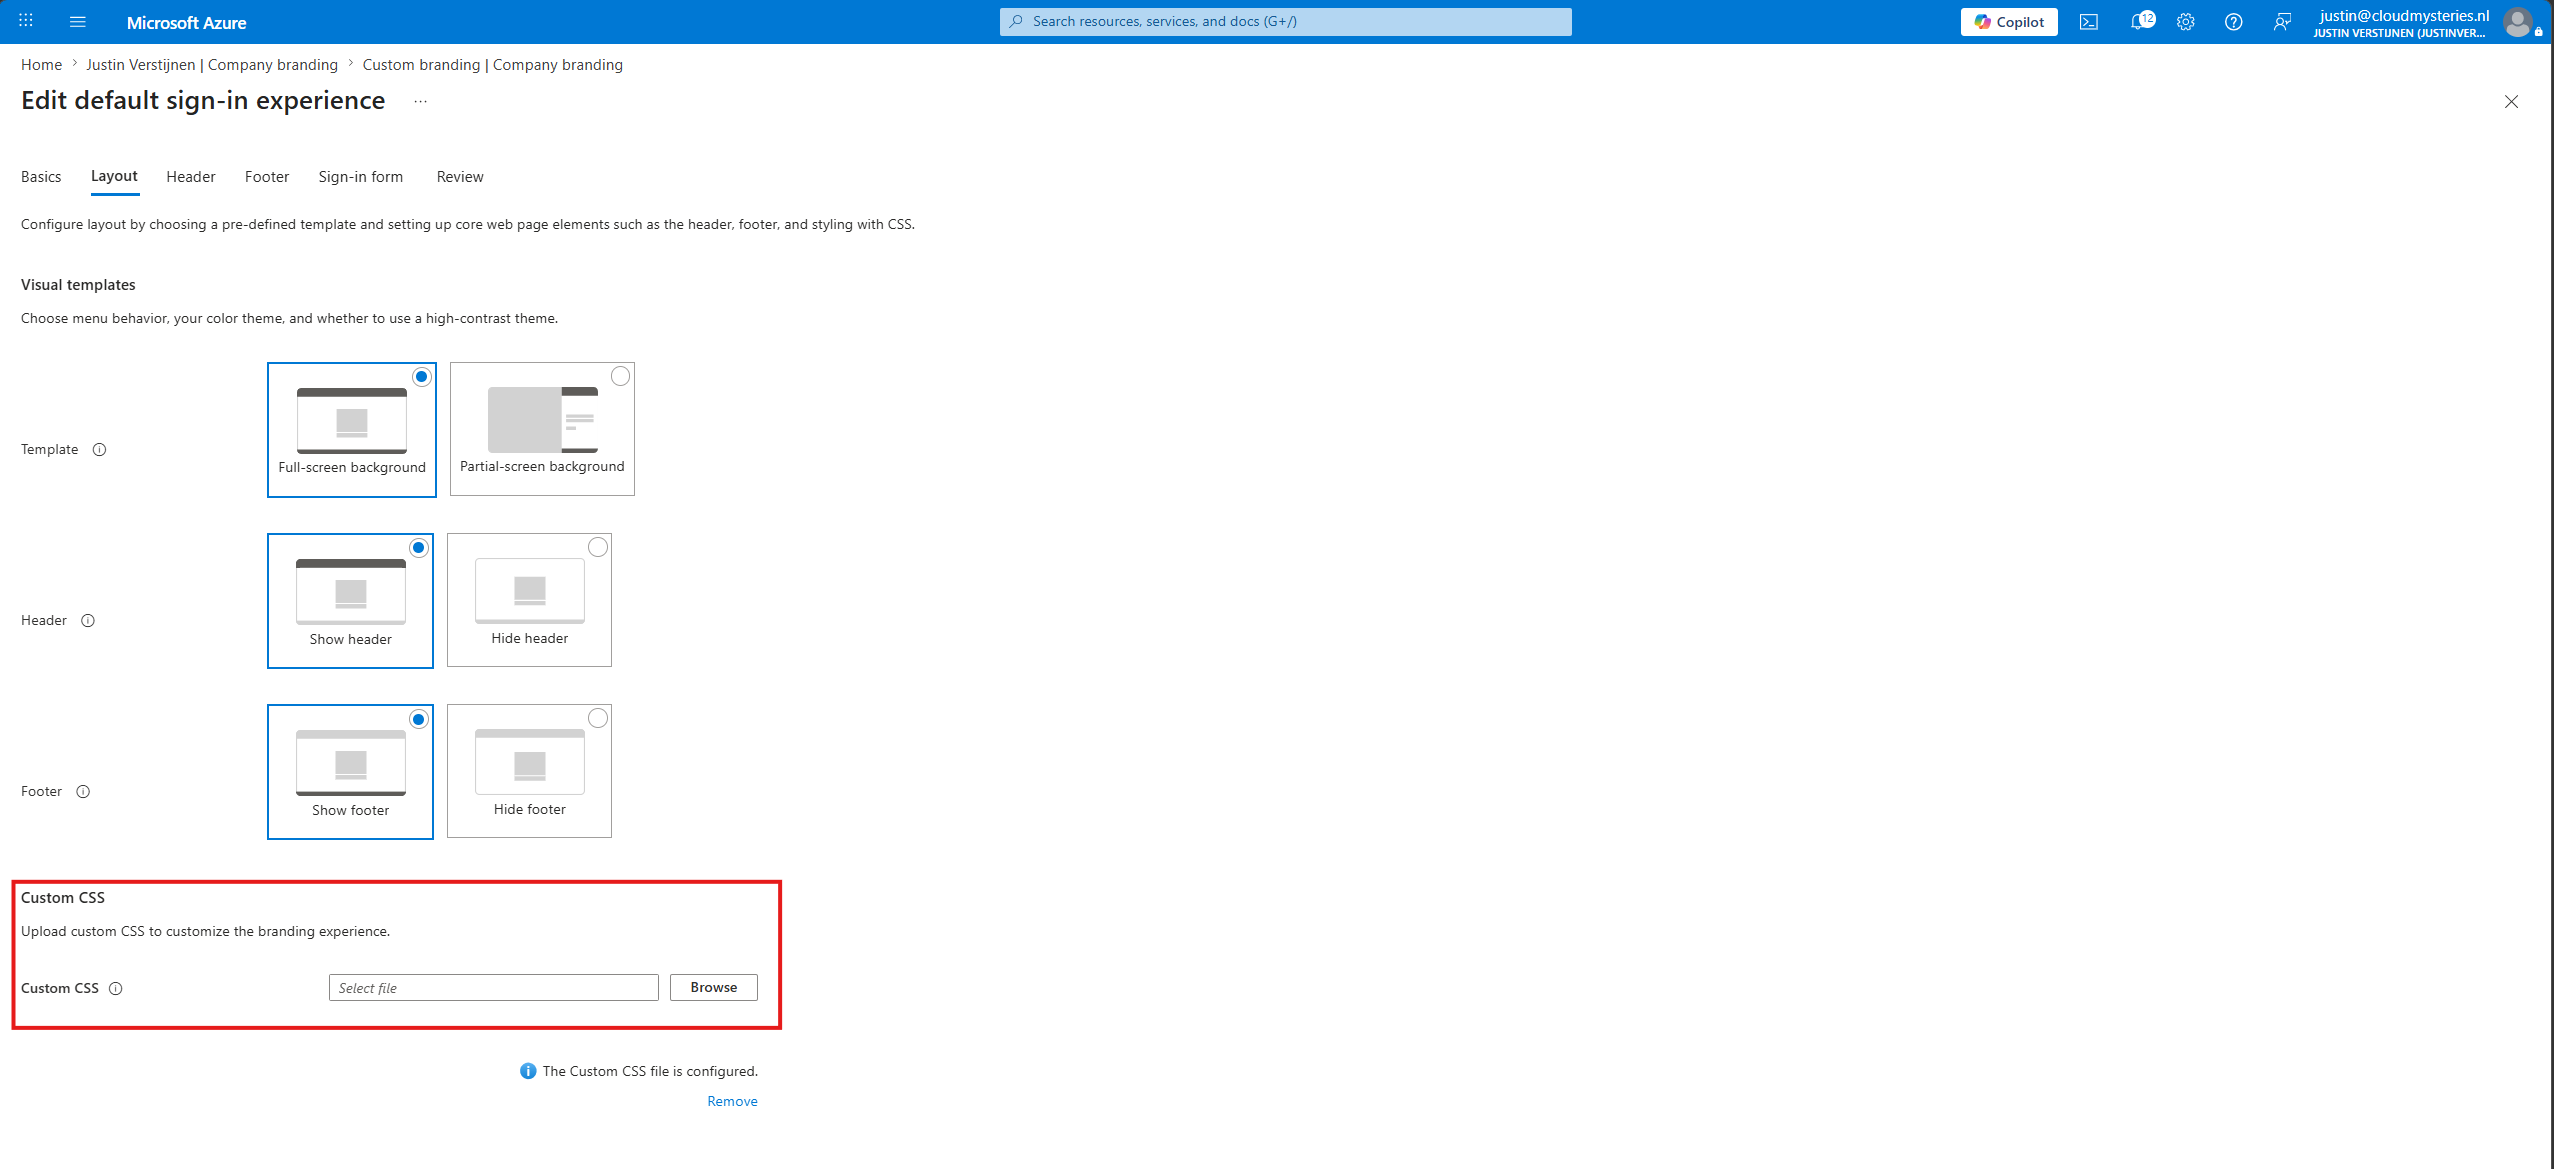
Step 3: Uploading the CSS file into Entra ID
Now that we have defines our CSS file, let’s upload this new file. Open up Entra ID (https://entra.microsoft.com)
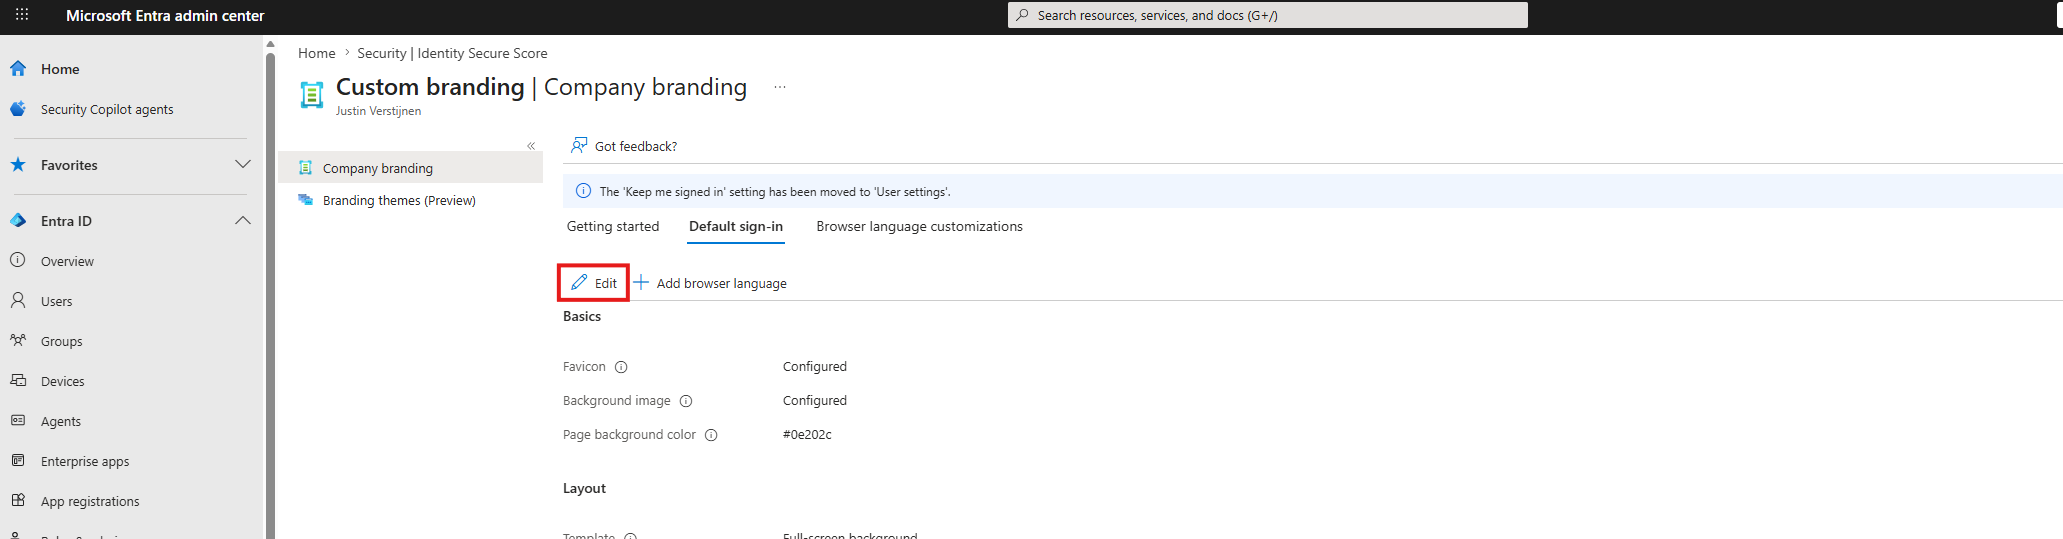
Then on the left, select “Custom branding”
On the tab “Default sign-in”, edit your branding configuration by clicking “Edit”.
Click on the “Layout” tab and scroll down to the Custom CSS option.
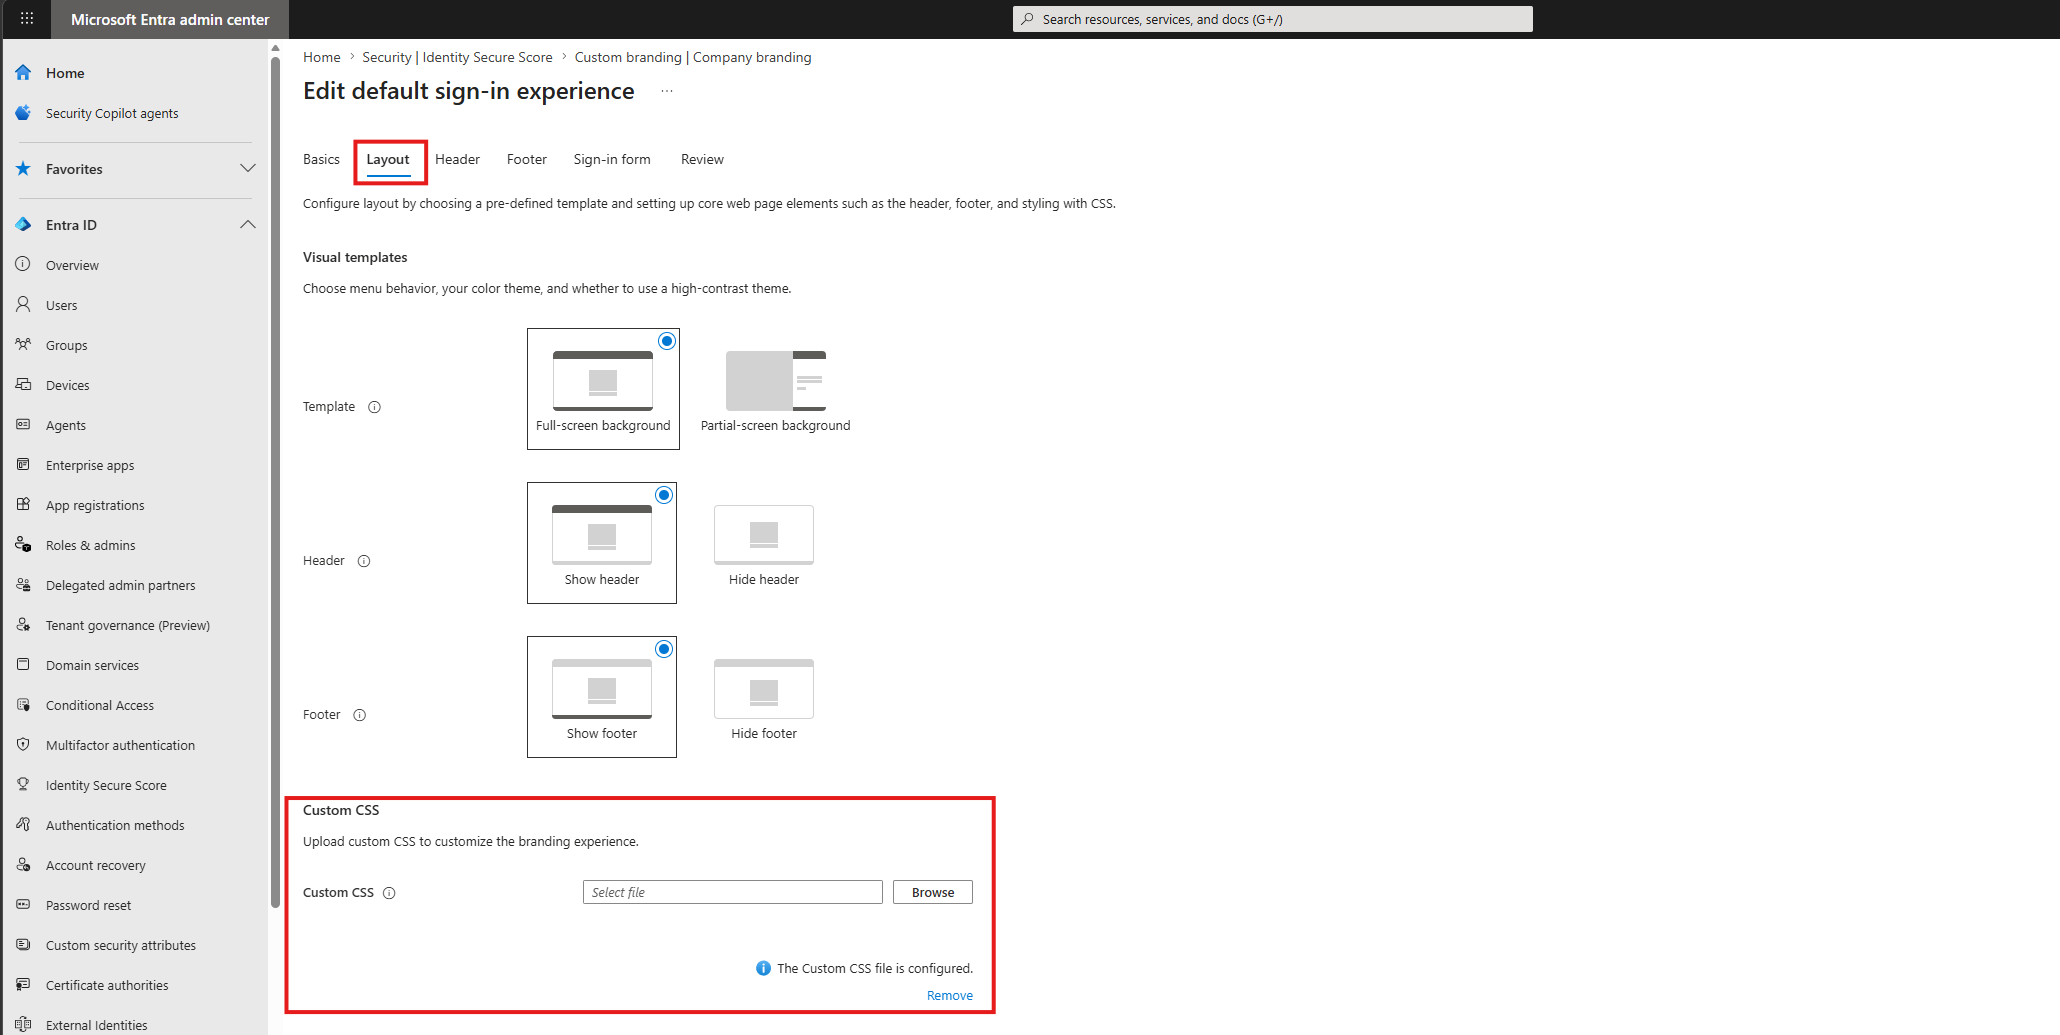
Click browse and select your just created CSS file. Then save the settings and let the system apply the changes.
Step 4: Let’s review the results
Now that we have applied our customized CSS, we can check the changes by opening a sign-in prompt of our tenant. The fastest way I know is to open up this link:
outlook.com/justinverstijnen.nlChange the domain-name after the “/” to your own primary domain name (like example.com). This automatically redirects to your tenants-login page immediately showing your company branding.
This should show the new branding within a few minutes.
Troubleshooting and customizing
Some things that could help you troubleshooting and possibly further customizing the sign-in experience:
- CSS are heavily cached, so you can expect different outcomes directly after changes, also across multiple devices
- Not every CSS control is correctly picked up as Microsoft does not support all options
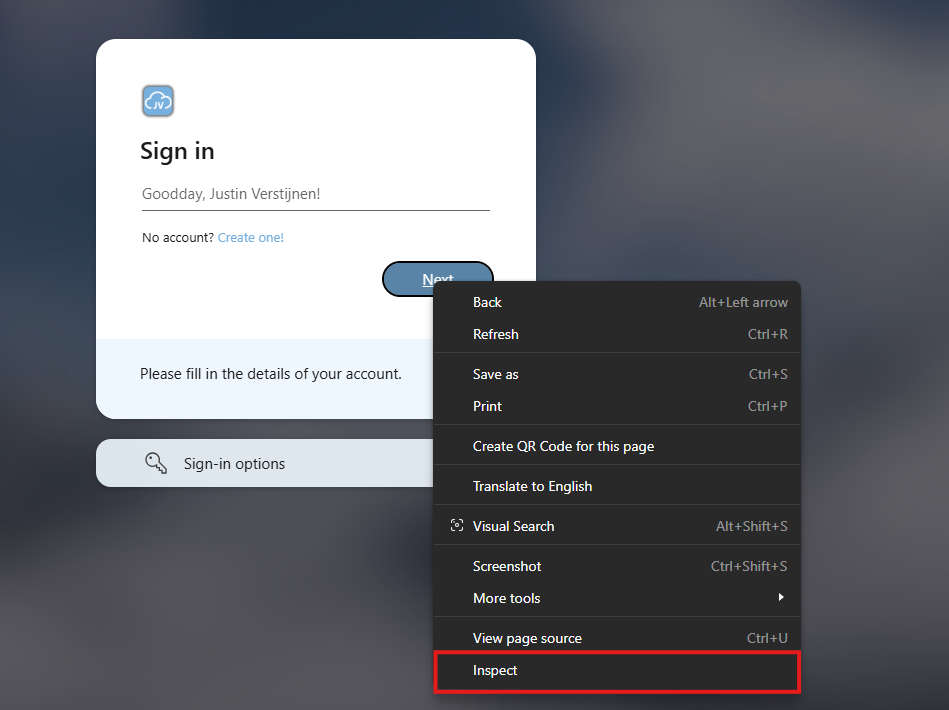
- If you want to live test some changes, you can use the “Devtools” of your browser. On Chrome and Edge browsers, this works like this:
Right-click the element (for example: the button) you want to customize and click on “Inspect”.
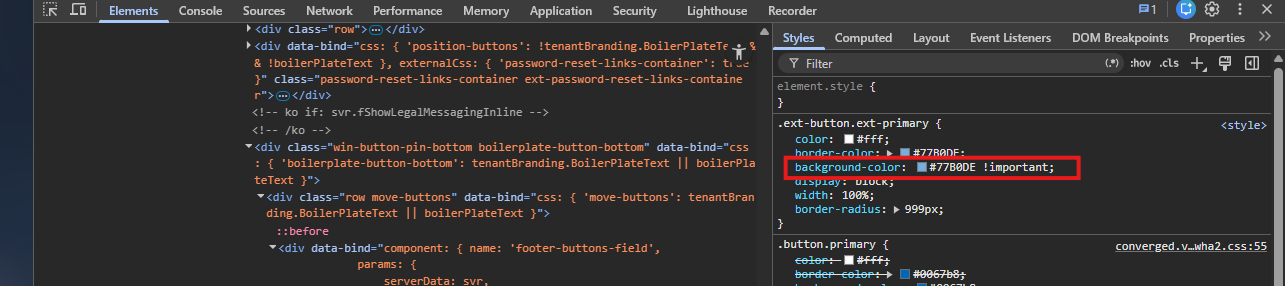
This opens up the Devtools where you can review the front-end code which makes up this page. The browser automatically shows the CSS on the right, exactly as we defined in our file:
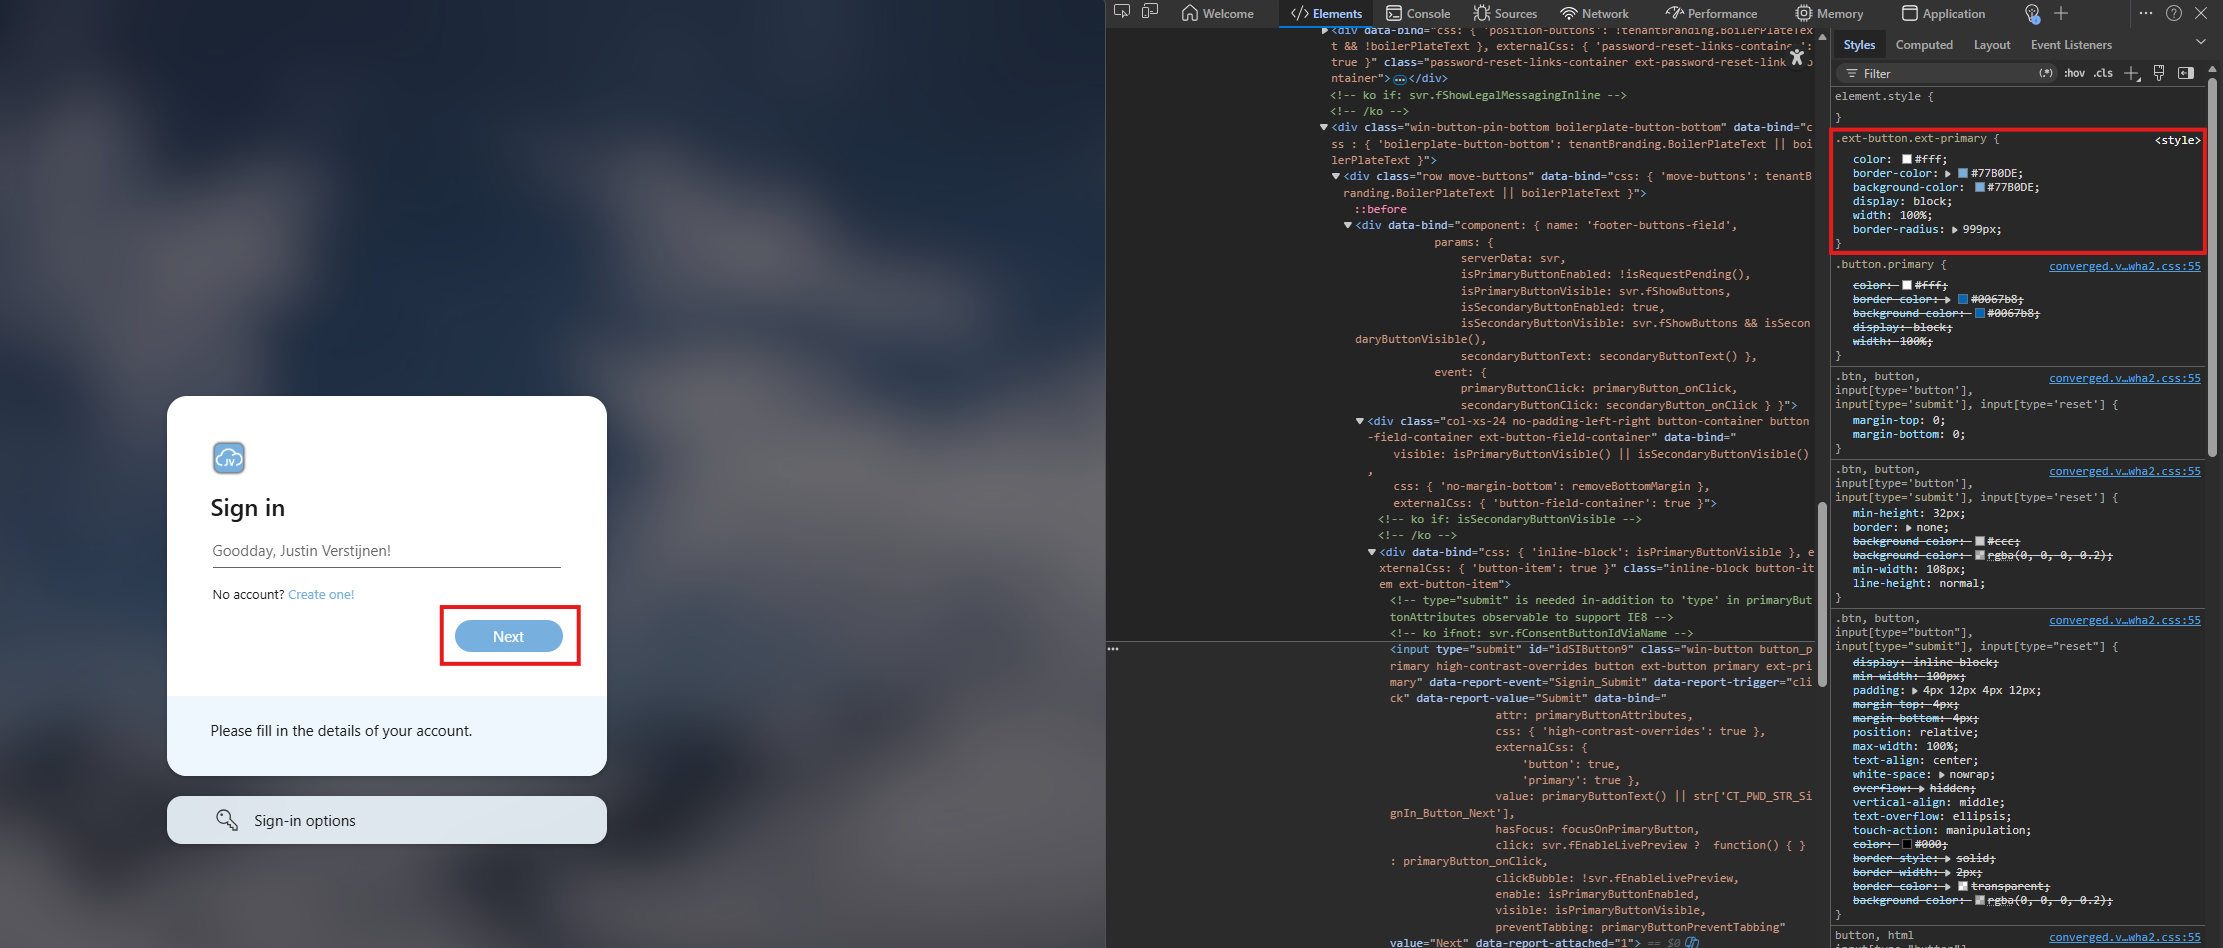
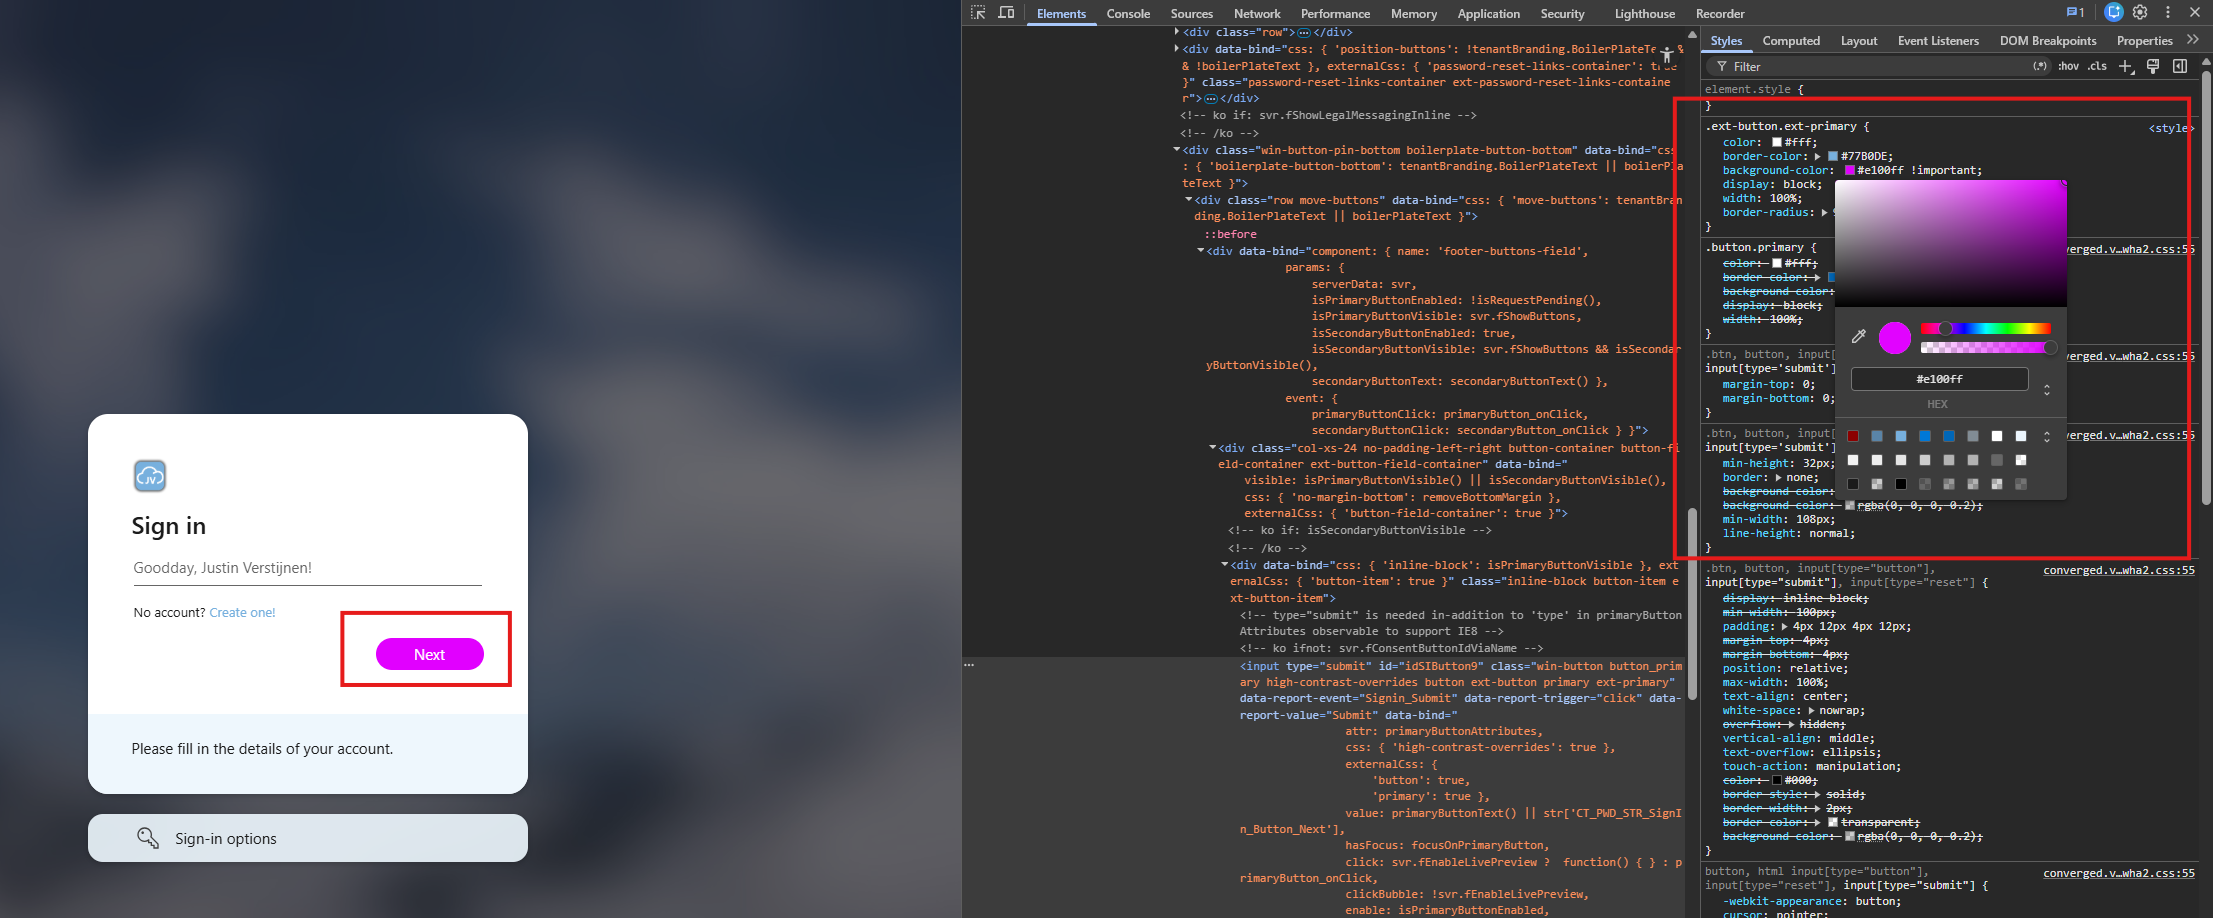
Now you can click the background-color option, but we cannot select a color yet. As we are using a color override, we need to add “!important” after the color code:
Now you can click the color-block before the HTML color code and live select the right color. If you have the right color, copy the value and paste that in the CSS file according to step 2.
Summary
This guide described how we can change some advanced appearance settings in Entra ID sign-in prompts. I really like to customize such things into the branding of an organization and end-users like that too.
Thank you for visiting this page and I hope it was helpful!
Sources
End of the page 🎉
You have reached the end of the page. You can navigate through other blog posts as well, share this post on X, LinkedIn and Reddit or return to the blog posts collection page. Thank you for visiting this post.
If you think something is wrong with this post or you want to know more, you can send me a message to one of my social profiles at: https://justinverstijnen.nl/about/
If you find this page and blog very useful and you want to leave a donation, you can use the button below to buy me a beer. Hosting and maintaining a website takes a lot of time and money. Thank you in advance and cheers :)

The terms and conditions apply to this post.
CWL Azure Red Team Certification - What I learned
In the first half of 2026 I followed a paid course on Cyberwarfare.live. The CWL Certified Azure Red Team Specialist (AzRTS) course. On this page I will not dive deep into the topics themselves or step by step hacking but took some notes from what I have learned from doing the course.
“If you don’t test your infrastructure as an attacker, someone else will.”
The CWL Azure Red Team course
I started on the site cyberwarfare.live by purchasing the course. I found this very fun looking and interesting to use that information to further secure environments. Learn to attack environments also gains knowledge in how to defend yourself. During 2026 as the amount of cyberincidents explosively increases we need to keep our environments safe and I found this course to be very interesting gaining some extra knowledge to achieve this.
The full name of the course was: CWL Certified Azure Red Team Specialist (AzRTS).
Cyberwarfare offers some courses which you can buy or do free and they take advantage of giving you lab assessments that you have to take. In different scenarios you need to find certain information like which IP or account did the attackers use to breach your environment and check your input. All of this must be done through a honeypot Azure environment they deliver for you. You only can proceed if you submit the right information (called Flags) which makes it really fun and helpful.
This course gives you access to an environment with theory about the Microsoft Entra, Azure and Entra Connect Sync topics. Then it gives you guidance about how these services can be abused, giving you enough details on why you should stick with best practices, least privileges, zero trust and simply removing test configurations or permissions after testing is done.
You get demonstrations about 4 different attack approaches which are known to be abused in the industry.
After that you get your own lab environment, a Microsoft Entra tenant with Azure Subscription where you have to complete 16 objectives.
Certification subjects
The objectives of the certification are:
- Develop a strong understanding of Microsoft Azure cloud architecture from an offensive security perspective
- Gain practical knowledge of how attackers target core cloud services such as Microsoft Entra ID, Azure Resource Manager, and Microsoft 365
- Understand the Azure attack lifecycle, including initial access, privilege escalation, persistence, and lateral movement
- Identify and analyze security misconfigurations and weak access controls within Azure environments
- Learn techniques to simulate real-world red team attack scenarios in cloud infrastructures
- Perform identity-based attack techniques against Microsoft cloud identity services
- Understand how attackers pivot between on-premises infrastructure and cloud environments in hybrid setups
- Map cloud attack techniques to frameworks such as the MITRE ATT&CK Cloud Matrix
- Develop the ability to conduct structured cloud threat research and adversary emulation
- Gain hands-on experience through practical lab exercises simulating Azure attack scenarios
The overall key objective is to gain knowledge to defend your environmen from those attackers.
Key learning points
During and after completing this course, these were my key takeaways. While many of these points were already familiar, the course helped reinforce why they matter even more.
Watch your Service Principal and Managed Identity permissions and always apply least privileges + audit them periodically
When having a hybrid environment, apply hybrid security
Attacks and escalation happen due to these major factors
- Misconfigurations or non-removed testing configurations
- Failure to apply basic access controls
- Ease of use over security
- Untrained employees who don’t understand what they do
Read-only access is more deadly than it looks
OAuth apps are very sensitive for hacks and backdoors and mostly hiding in plain sight
Basic Endpoint and Server security software and rules are highly needed to block from running malicious software
Again, watch your Service Principal and Managed Identity permissions and always apply least privileges + audit them periodically
Attacker motives
Hacks happen very often, but what exactly are the motives of hacking other people?
- Stealing personal information
- Selling personal information
- Increase their reach by bulk sending phishing emails
- Loss of face for companies
1: Red Team Operations in Microsoft Entra ID
We have two types of applications in Microsoft Entra ID:
- App registrations : Application Instance
- Enterprise Application (Service Principals): Application Identity which has the permissions
If an App Registration is created using the Azure Portal, you also get a Service Principal. This is the identity who has the permissions and can exists in multiple tenants if configured to do so. Both the App Registration and Service Principal may represent the same app, they are two different objects in Entra ID.
An attack described
An attacker these days wants to target normal users. They doesn’t seem valuable but they really are. With a correct login with an user an attacker has read access to the whole tenant. This means it can enumerate different users, groups, applications, devices and roles which it can use to escalate its privileges. The ultimate goal is to breach into a Global Administrator account of an organization which can do a LOT of harm.
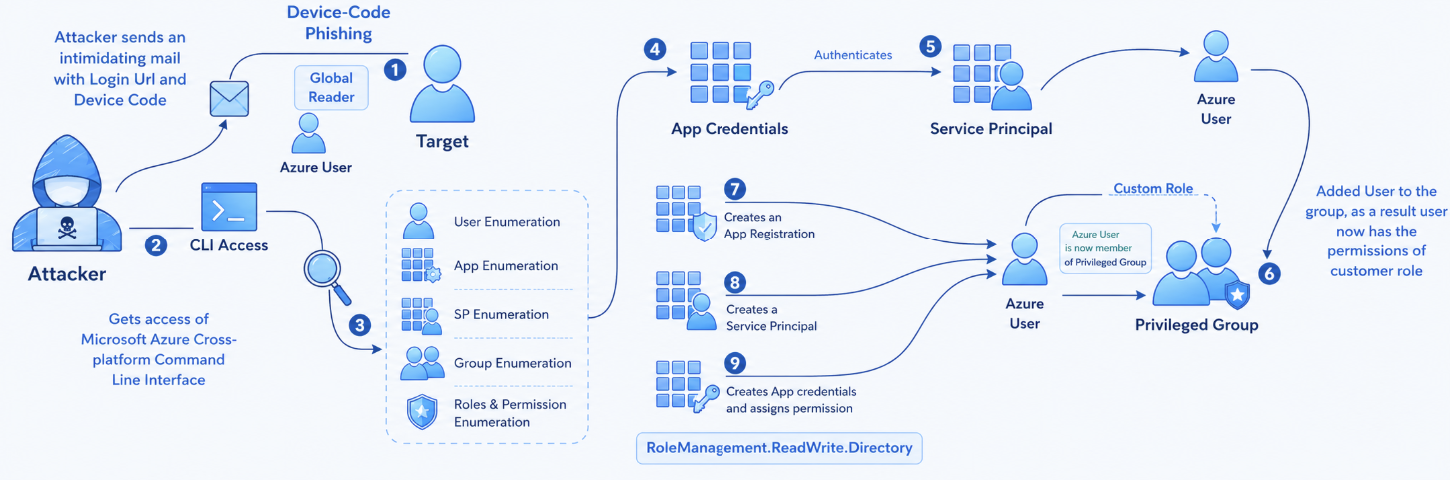
The fun fact is that administrator accounts are normally secured properly but normal users a lot less.
- Initial target: Employee
- Information about an employee
- Access method: Device Code, Credential Harvesting, Shoulder Surfing
- Target environment: Microsoft Entra ID
- Motive: Gaining access with an access token and perform lateral movement
- Enumeration: The attacker will inventory the environment for possible users, devices and service principals to breach/attack
- End goal: Gaining Global Administrator privileges
Attackers will mostly contact users by phone or email, and will push them at the needed action is high priority. This pushes the end user even more to do things they normally don’t and shouldn’t.
High Risk permissions
Attacker will inventory your environment and search for permissions which gives them a lot of power. These permissions can be:
- Global Administrator (user role) -> can do everything
- RoleManagement.ReadWrite.Directory (API permission) -> Can all assign roles to principals, even Global Administrator role making privilege escalation easy
- Global Reader -> Can read everything, so complete attack surface is visible to hacker in a few minutes
Conditional Access and Targets
High risk targets for attackers are users that are excluded from Conditional Access policies. These users doesn’t need further authentication like trusted locations, MFA or session/token limitations. They can just perform a password spray attack to try and breach into this account. Now they have the real gold in their hands.
Access tokens
Microsoft Azure uses Microsoft Entra ID as Identity Provider. This identity provider is basically a system that checks the users’ credentials and then assigns a token where the user can login to all authorized applications and resources. By default, this token is valid for 90 days.
Every principal which is being authenticated by Entra ID gets this token. We speak of principals every object that can get roles and scopes assigned:
- Users
- Groups
- Service Principals (App registration)
- Managed Identity
An access token looks like this and can be further defined with this tool:
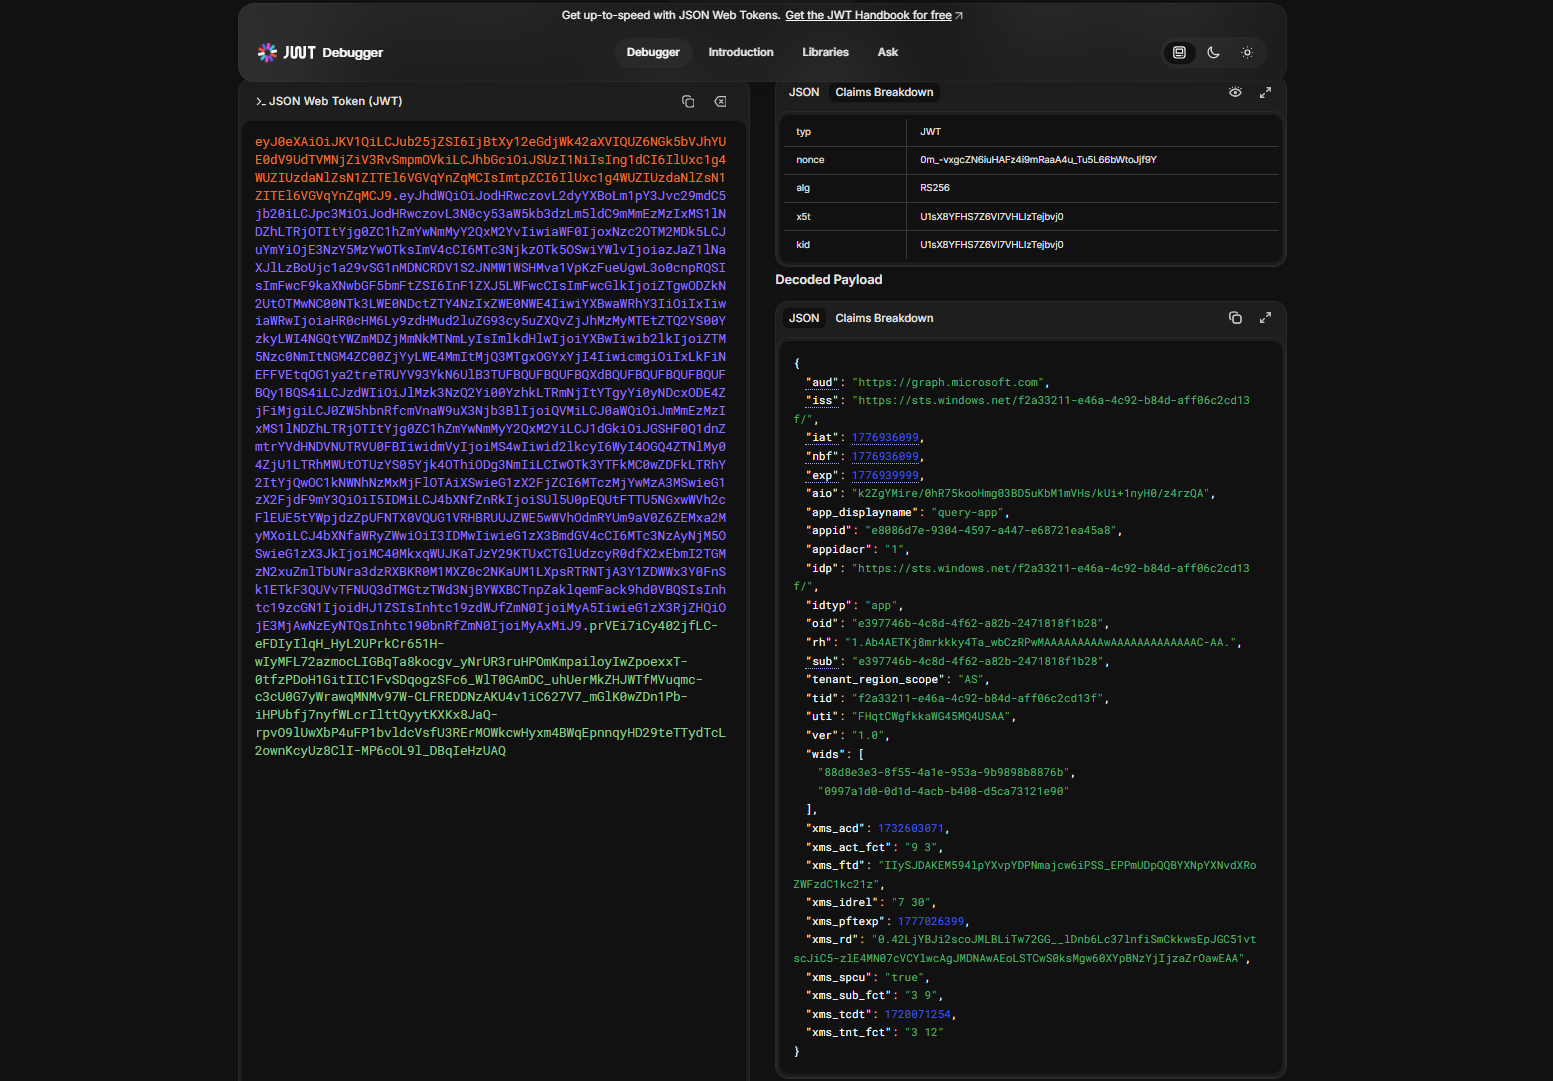
This token is then saved into the cache of the browser so the user does not have to reauthenticate for every resource or application.
Control plane and Data plane
Some resources in Azure needs security on both the control and data planes of the resource:
- Control plane : What users can access the resource, during what time windows and what are their privileges?
- Data plane : What users can access what data of the resources, during what time windows and what are their privileges? Dataplanes are also more vulnerable as secrets are a possibility, which are just longer passwords
2: Red Team Operations in Azure Resource Manager
Azure Resource Manager is the control plane of Microsoft Azure. Everything you do in the Portal, PowerShell and Azure CLI works with Azure Resource Manager by API calls. This makes viewing, creating and deleting resources pretty easy as the mechanism works the same across multiple platforms.
An attack on Azure Resource Manager can look like this:
- Initial target: Publicly exposed web app
- Information about the organization
- Access method: Public facing web portal
- Target environment: Microsoft Azure Resource Manager
- Motive: Gaining access to organizations cloud environment
- End goal: Data exfiltration (steal)
You see, we use newer cloud solutions but attack vectors still are using techniques like SQL injection.
The MicroBurst PowerShell module
The MicroBurst PowerShell module can be used to execute assessments of your Microsoft Azure environment. This checks the security and possible attack surfaces like Web apps. You can find this here:
Managed Identities
Managed Identities are a great target for hackers as they have always have standing permissions. Managed Identities are used in links between Azure Resources, like a Logic App that needs permissions to turn on and off a virtual machine or a Logic App that needs permissions to a Storage Account. The actual identity used in these processes is a Managed Identity.
To learn more about Logic Apps and Managed Identities, check out this article
3: Red Team Operations in Microsoft 365
Attacks in Microsoft 365 are often performed by abusing OAuth 2.0 consent/grant flows. An attack flow for Microsoft 365 can look like this:
- Initial target: Employee of an organization
- Information about employees, organization details
- Access method: OAuth Consent Grant attack
- Target environment: Microsoft Entra ID and Microsoft 365
- Motive: Gaining access to organization
- End goal: Data exfiltration (steal)
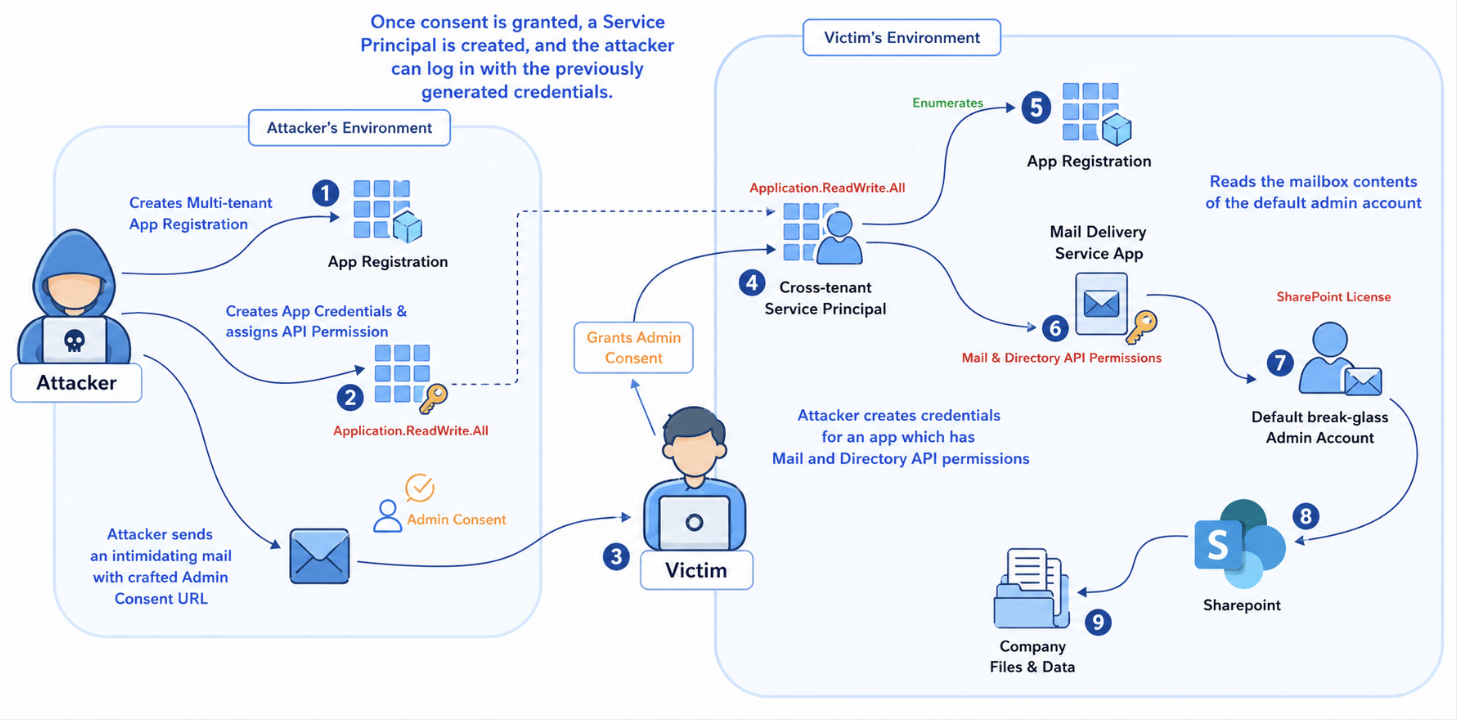
OAuth 2.0 consents and results
An OAuth 2.0 consent window looks like this:
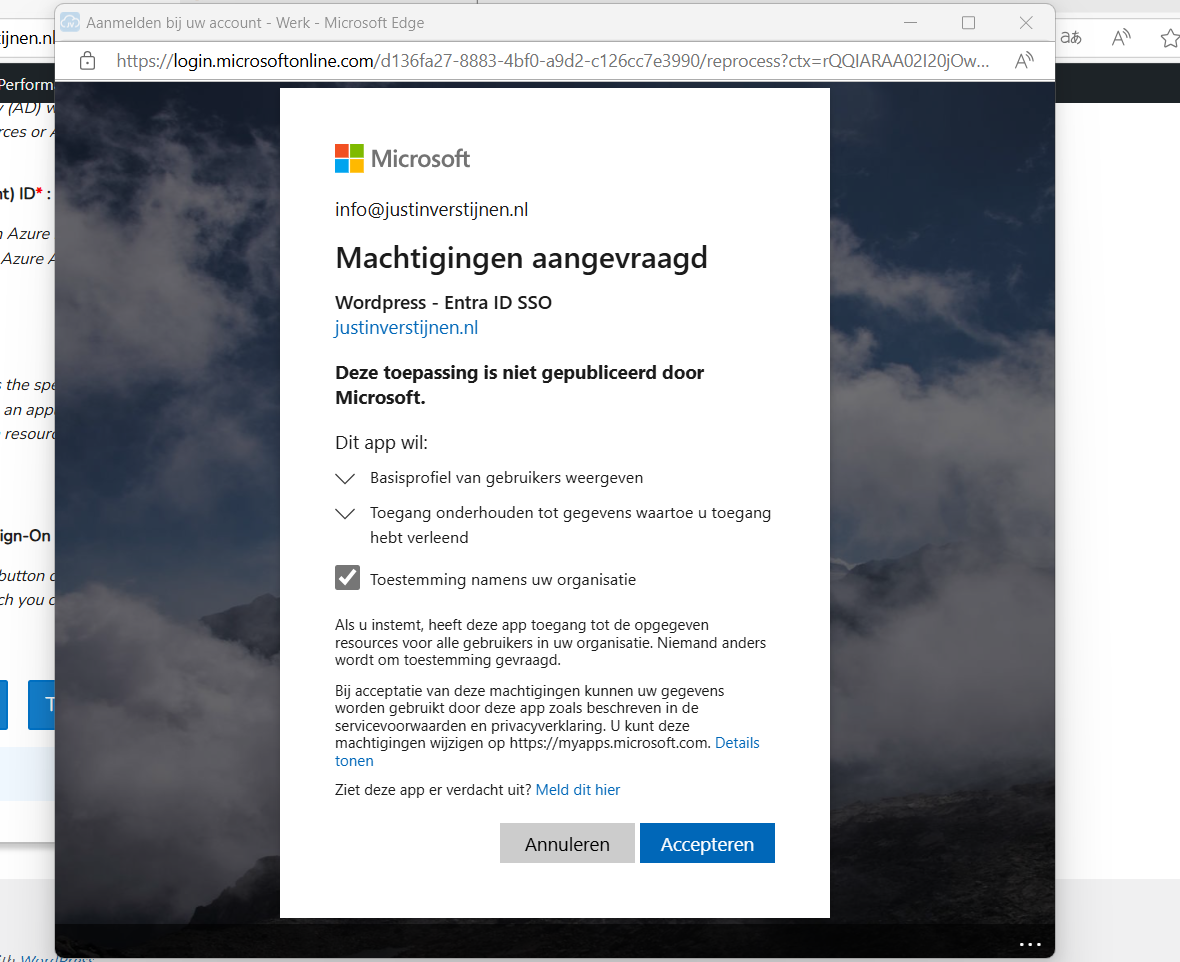
This is an consent request of an application to gain information about the user and organization where this is possible by default. We administrators often want to disable this for standard users because of this attack surface. Why these apps are also highly useable to the attackers is that they bypass the needs for credentials as the user gave permissions themselves. Attackers can create some malicious app in their tenant and creates them “multi-tenant”. This makes it possible to publish this app to multiple organizations like the victims.
When the victim accepts the application, an Service Principal is created in the victims tenant. This means we as the attacker have permissions in the victims tenant. The good part for us attackers is that these Service Principals are often hiding in plain sight as they are missed by administrators. Especially if we make the app good looking with a logo and such.
When an attacker assigns the right permissions to the OAuth 2.0 applications, it can escalate its privileges to higher permissions without the need of an administrator. Then it can target administrator accounts to have even more gold.
4: Primary Refresh Token attacks
Attacks on hybrid environments often happen and a breach of one of the systems can easily result in a breach of both.
- Initial target: Client device
- Access method: Pass the Primary Refresh Token
- Target environment: Active Directory and Microsoft Entra ID
- Motive: Gaining access to organizations’ Entra ID
- End goal: Access Entra ID resources
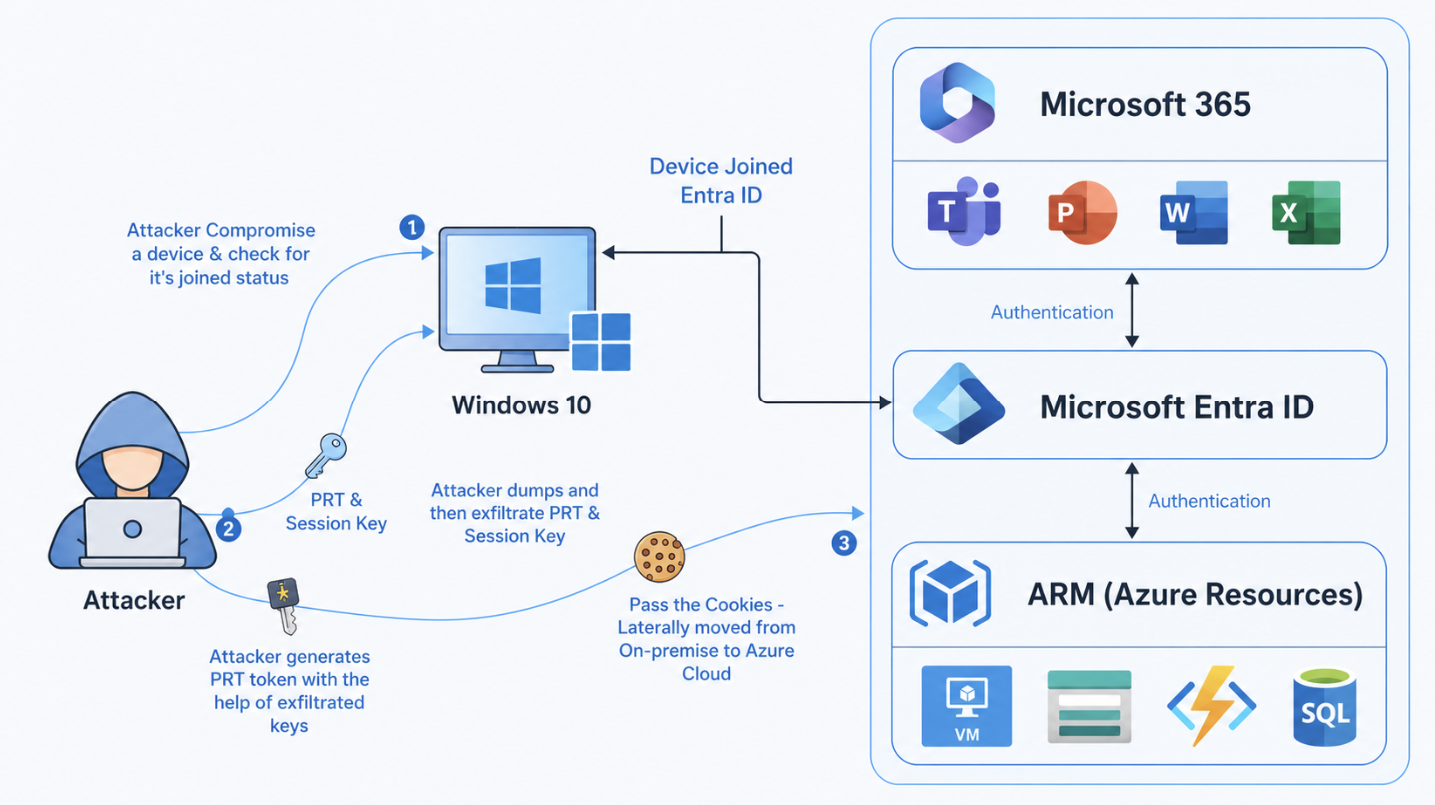
Attacks with the Primary Refresh Token has huge advantages for attackers. This bypasses:
- Password Authentication
- Multi Factor Authentication
- Conditional Access Policies
Primary Refresh Token (PRT)
To understand this attack, we need to first look at what a Primary Refresh Token is. This token is provided by Microsoft Entra ID to a device that allows it to do MFA. This PRT is device-bound and is given to the device after enrolling into Entra ID or Hybrid Entra join.
The PRT is different to an Access token, where the PRT is device bound till a new enrollment is the access token a provided token for a specific application. This PRT token is then used to tell Entra ID “Hey im this device, give me a new access token for Microsoft SharePoint”.
An session key is encrypted and linked to the Primary Refresh Token which can be seen as a private key to the PRT, the public key. By passing both of these keys, Entra ID will trust your login attempt. This session key is secured by the Trusted Platform Module (TPM) chip of your device.
Enumeration device
To get all the needed information, we can use this command on the compromised Windows device:
POWERSHELL
dsregcmd /statusThis tells us to what kind of identity service the computer is linked including more information like the tenant. Attackers will often use this command to search for this: AzureAdPrt : YES
Extract PRT
To extract PRT’s you can use the tool mimikatz, which you can find here:
This tool you can run on a Windows device and it extracts the PRT and session key which can be used on another device to pass this new token.
5: Entra Connect Password Hash Synchronization attacks
Attacks can also perform reverse attacks if having access to the Entra Connect server first.
- Initial target: Entra Connect server
- Access method: Password Hash Synchronization
- Target environment: Active Directory and Microsoft Entra ID
- Motive: Gaining access to organizations’ Entra ID
- End goal: Access Entra ID resources

On the Entra Connect Server, the attacker can extract the connect credentials to use to authenticate to Microsoft Entra ID. This only works if the Password Hash Sync (PHS) option is selected in Entra Connect which is by default. The password are stored in an entrypted SQL instance on the Entra Connect server which can be extracted by administrators in plain text.
With this command you can view the complete configuration of the Entra Connect instance:
POWERSHELL
Get-ADSyncConnectorMy exam/lab experience
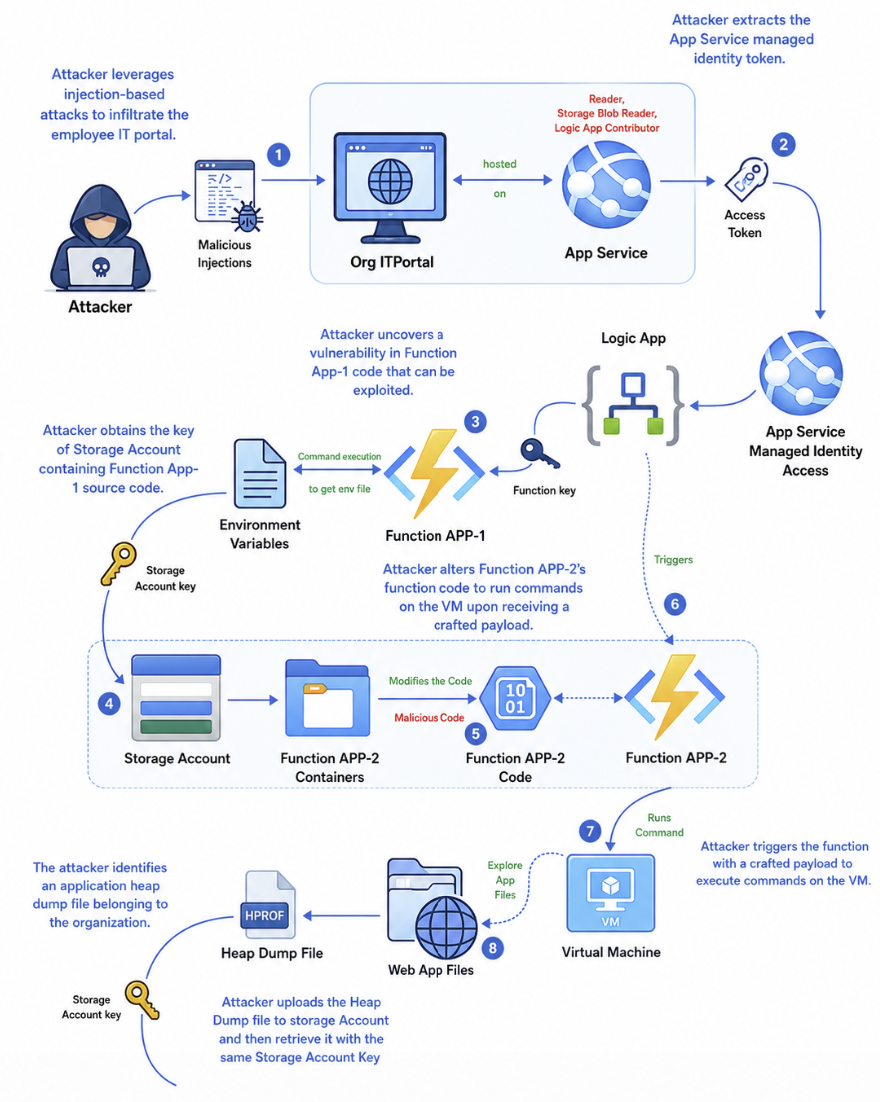
As we have to pass the exam/lab by actually breaching an environment, which was really fun by the way, we needed to think like an attacker like shown and demonstrated in the course. Because everyone has to learn like they describe in the course, I will not dive into the details of the course and the objectives themselves but give an overview of how I completed the breach from access to full blown access.
1. Initial access
Initial access to the lab is gained by a simulated device code flow misabuse. It works like, you retieve a code from your local Powershell window and paste that into a field simulating a phishing attack that always work.
Then I gained access to a user that had no roles and some small API permissions.
2. Enumeration
We start by checking for any leads by enumerating every object in the tenant. I did this using some commands and eventually found a high-privileged Service Principal with Global Administrator permissions. By enumerating every part of the tenant, these leads come into view which can be missed if a person or team daily manages a tenant.
We look for highly privileged roles and API permissions in this part.
3. Privilege escalation
The best part is, the user which is simulated to be phished is owner of this application/service principal so we can create a new client secret to gain access using that service principal. This is how easy this can get.
4. Signed in using Service Principal
Now I had a second PowerShell window with the Service Principal logged in, with Global Administrator permissions. This makes it very easy to create a new user and also assign that user this Global Administrator role. We can now login as a user and full privilege escalation is completed.
5. Azure Subscription
As we are now logged in using Global Administrator permissions in Entra ID, we can easily also get every Azure RBAC permission we want. Global Administrator can assign the User Access Administrator role to themselves, using this checkmark at the Entra ID properties:

Now we have gone from a simple user, to a Service Principal, to a newly created user with Global Administrator permissions to also extend that access into Azure Subscriptions.
While this sounds pretty cool, as I now did this around 2 times, this costed me around 5-6 hours but professional hackers will do this much faster.
Summary
In this post, I share my experiences of the CWL Certified Azure Red Team Specialist (AzRTS) training by cyberwarfare.live and the key lessons learned. By approaching Azure and Microsoft 365 environments from an attacker’s perspective, it becomes clear how misconfigurations, weak access controls failure to use least privileges and unaware users can lead to successful compromises. COmpromises who can cost companies a lot of money in terms of outage, employees not able to do work or loss of face and indirectly customers and work.
I hope I gave you a good understanding of my experience with this course and would recommend it to everyone interested.
Sources
End of the page 🎉
You have reached the end of the page. You can navigate through other blog posts as well, share this post on X, LinkedIn and Reddit or return to the blog posts collection page. Thank you for visiting this post.
If you think something is wrong with this post or you want to know more, you can send me a message to one of my social profiles at: https://justinverstijnen.nl/about/
If you find this page and blog very useful and you want to leave a donation, you can use the button below to buy me a beer. Hosting and maintaining a website takes a lot of time and money. Thank you in advance and cheers :)
The terms and conditions apply to this post.
Get notifications when Entra ID break glass admins are used
As we want to secure our Break Glass Accounts as good as possible, we cloud want to get alerts when break glass admins are used to login. Maybe they are used on a daily basis, or are being attacked. When we configure notifications, we instantly know when the accounts are being used and can check why a login has taken place. In this guide we will configure this without Microsoft Sentinel. If you already have a Sentinel workspace, the recommended action is to configure it there and to configure a automation rule/playbook.
The alert solution described
The solution we will configure looks like this:
- Log Analytics Workspace
- Set diagnostic settings for Entra ID sign in logs to write to Log Analytics
- Set query to find successful or non-succesful sign in attempts (based on your needs)
- Set Azure Monitor alert to alert admins of the attempts taking place
- After all this we will test this to test if this works as excpected
Here we use all the features inside Azure only, and no 3rd party solutions.
Step 1: Configure Log Analytics Workspace
We will start configuring our Log Analytics Workspace in Azure. This can be simply described as database for logs and metrics. Using specific queries, we can pull data our of it to use in dashboards, workbooks and like we do now; Alert rules.
Login to the Azure Portal and search for “Log Analytics Workspace”:
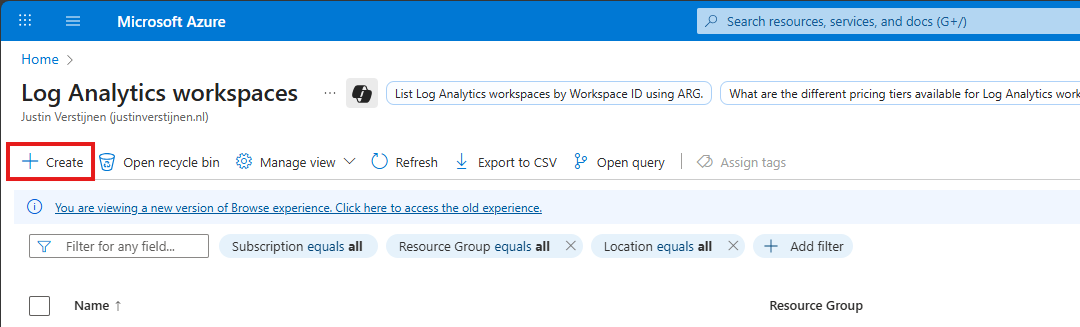
Click on “+ Create” to create a new workspace.
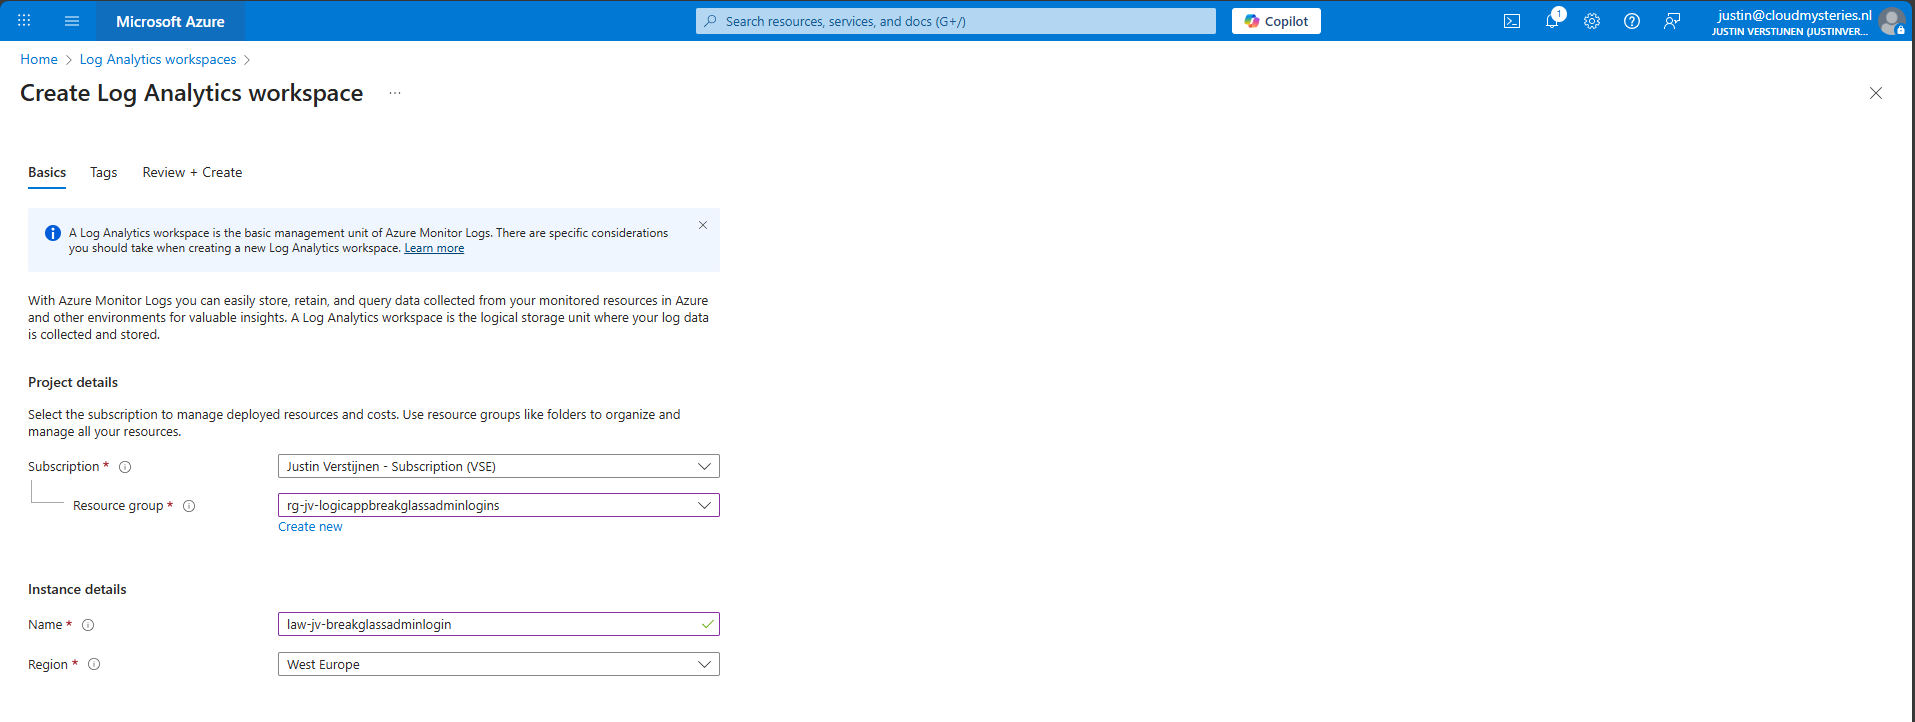
Select the desired resource group and give it a name and create the workspace.
After the workspace is configured, we can configure the data retention and daily cap of the Log Analytics Workspace. As ingesting a lot of data could be very expensive at the end of the month, you could configure some caps. Also, we will only ingest the data needed for this solution, and nothing more.
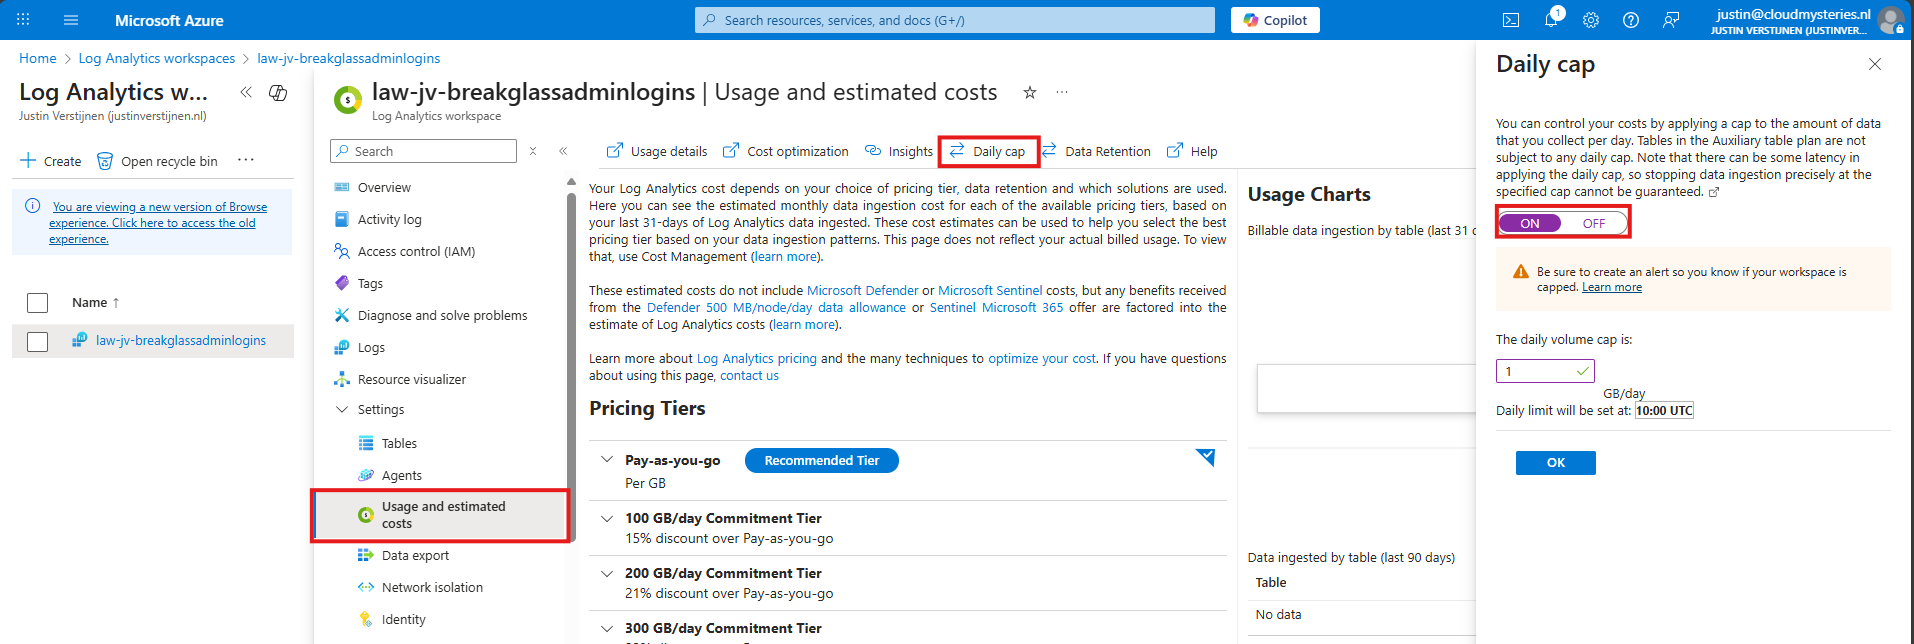
Here I have set the daily cap to 1 gigabyte max per day, which would be more than enough for this solution in my case. In bigger environments, you could set this to a higher value.
Step 2: Configure Sign in logs to Log Analytics
Now we need to configure the Sign in logs writing to our Log Analytics Workspace. We will do this through the Entra admin center: https://entra.microsoft.com.
Go to “Monitoring and Health” and then to “Diagnostic Settings”
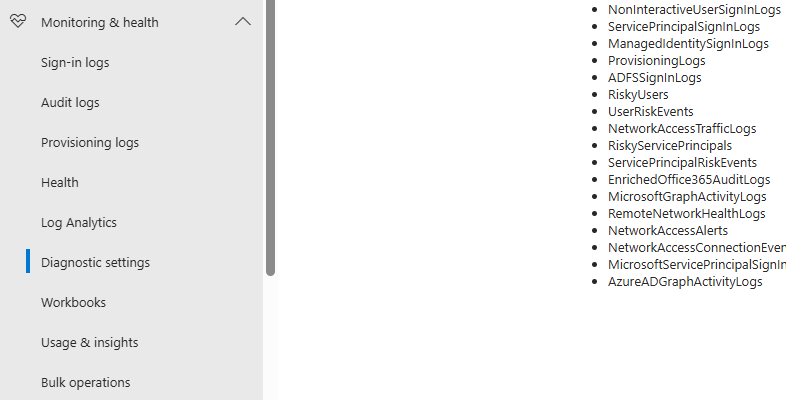
On there, click on “+ Add diagnostic setting”

On this page, give the connector a describing name, select SignInLogs on the left and on the right select “Send to Log Analytics workspace” and then select your just created workspace there.
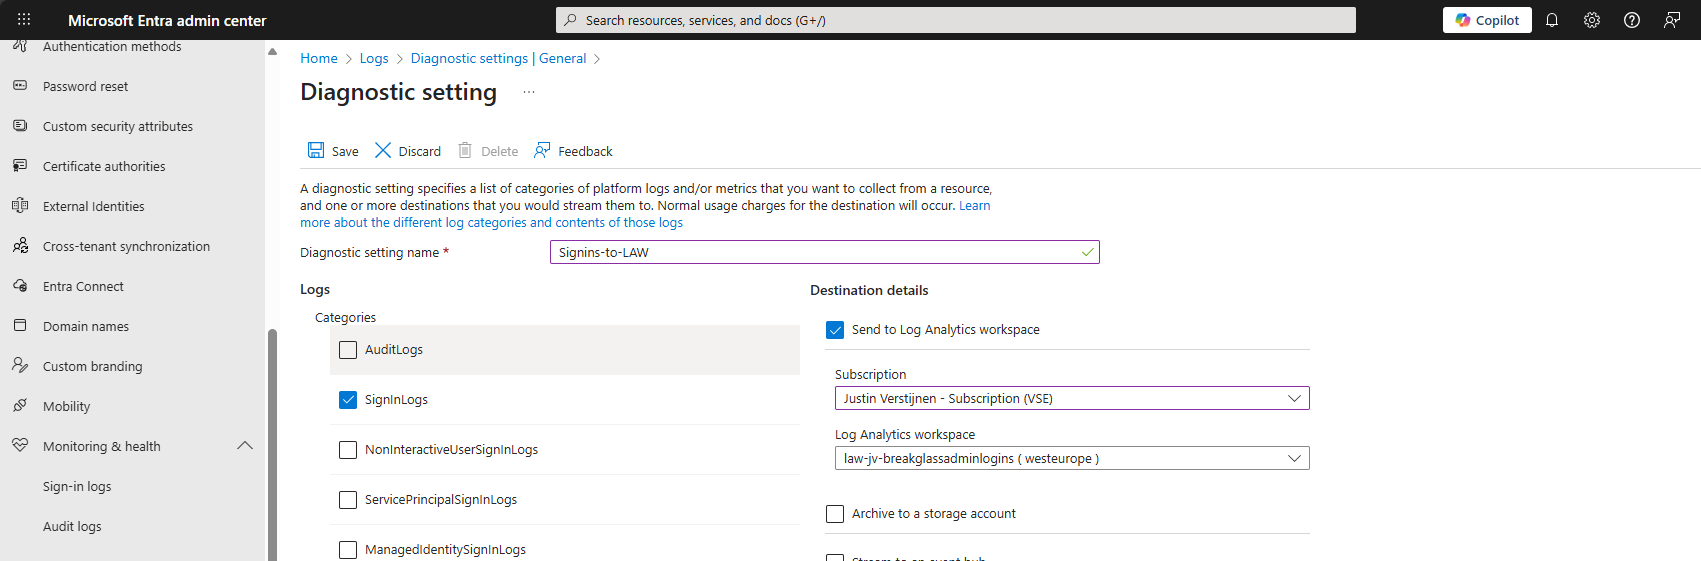
Then click the “Save” button to save this configuration. Now newly created sign in logs will be written to our Log Analytics workspace, so we can do further investigation.
Data ingestion notes
Quick note before diving into the log analytics workspace and checking the logs. When initially configuring this, it can take up to 20 minutes before data is written to the workspace.
And another note, sign in logs take up to 5-10 minutes before showing in the Portal and before written to Log Analytics.
Step 3: Configure the query
In this step we need to configure a query to search login attempts. We can do this by going to our Log Analytics Workspace in Azure, and the go to “Logs”.
We can select a predefined query, but I have some for you that are specific for this use case. You can always change the queries to your needs, these are for example what you could search for.
- To get all successful login attempts for one specific account:
KUSTO
SigninLogs
| where UserPrincipalName == "account@domain.com"
| where ResultType == 0
| project TimeGenerated, UserPrincipalName, IPAddress, Location, ResultType, ResultDescription, ConditionalAccessStatus, AuthenticationRequirement
| sort by TimeGenerated desc- To get all unsuccesful login attempts for one specific account:
KUSTO
SigninLogs
| where UserPrincipalName == "account@domain.com"
| where ResultType != 0
| project TimeGenerated, UserPrincipalName, IPAddress, Location, ResultType, ResultDescription, ConditionalAccessStatus, AuthenticationRequirement
| sort by TimeGenerated desc- To get all login attempts, successful and unsuccesful:
KUSTO
SigninLogs
| where UserPrincipalName == "account@domain.com"
| project TimeGenerated, UserPrincipalName, IPAddress, Location, ResultType, ResultDescription, ConditionalAccessStatus, AuthenticationRequirement
| sort by TimeGenerated desc
Now we know the queries, we can use this in Log Analytics and set the query type to KQL. Paste one of the queries above and change the username to get the results in your tenant:
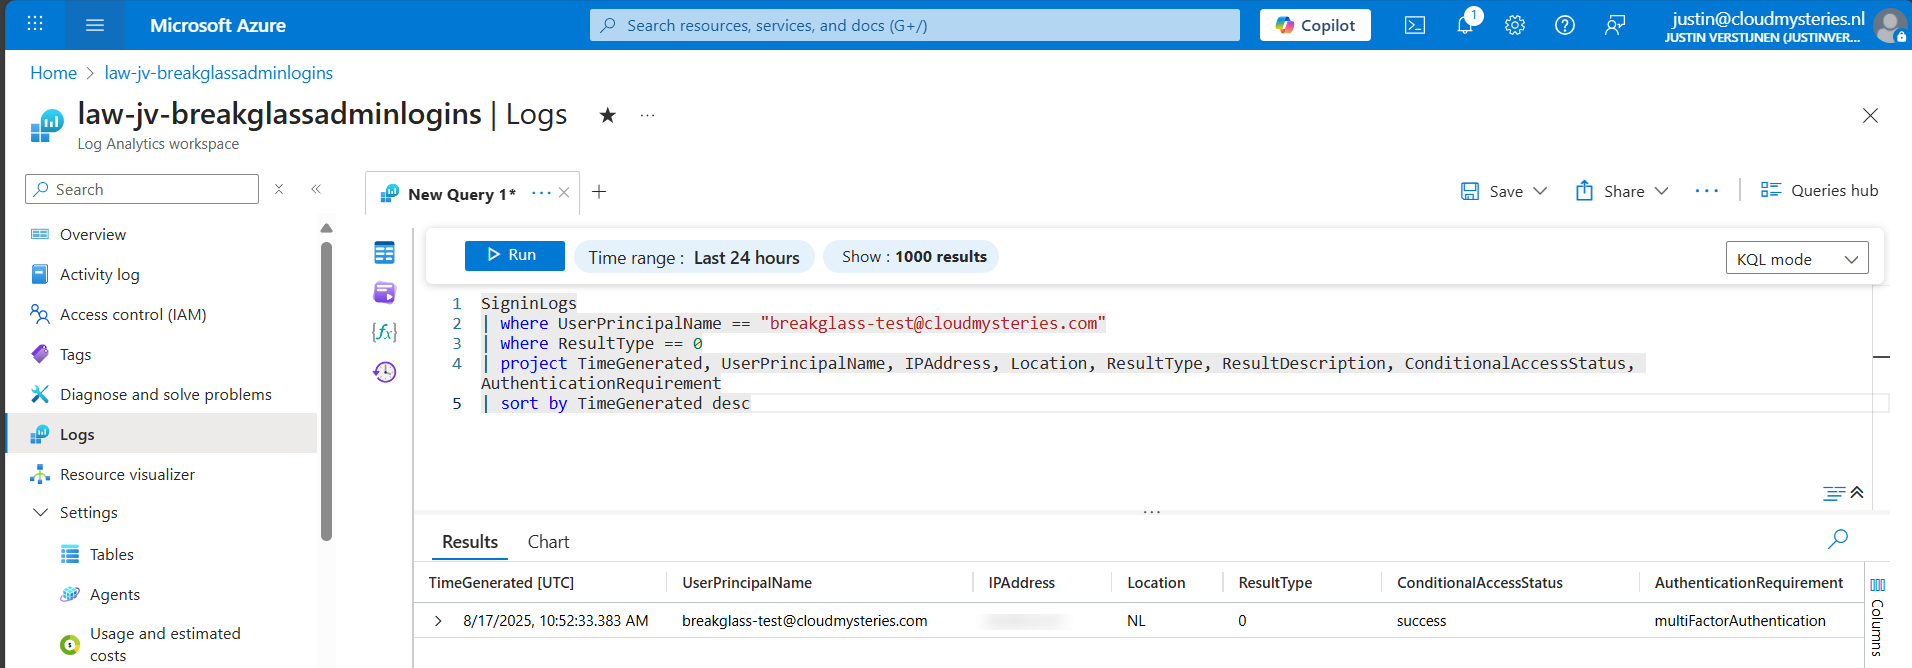
Now we have a successful login attempt of our testing account, and we can see more information like the source IP address, location, if Conditional Access was applied and the resulttype. Resulttype 0 means a successful login.
You could also use the other queries, but for this solution we need to use query one where we only search for successful attempts.
Step 4: Configure the Alert
Now that we have a successful query, we need to configure a alert rule. We can do this while still being in the Log Analytics query pane:
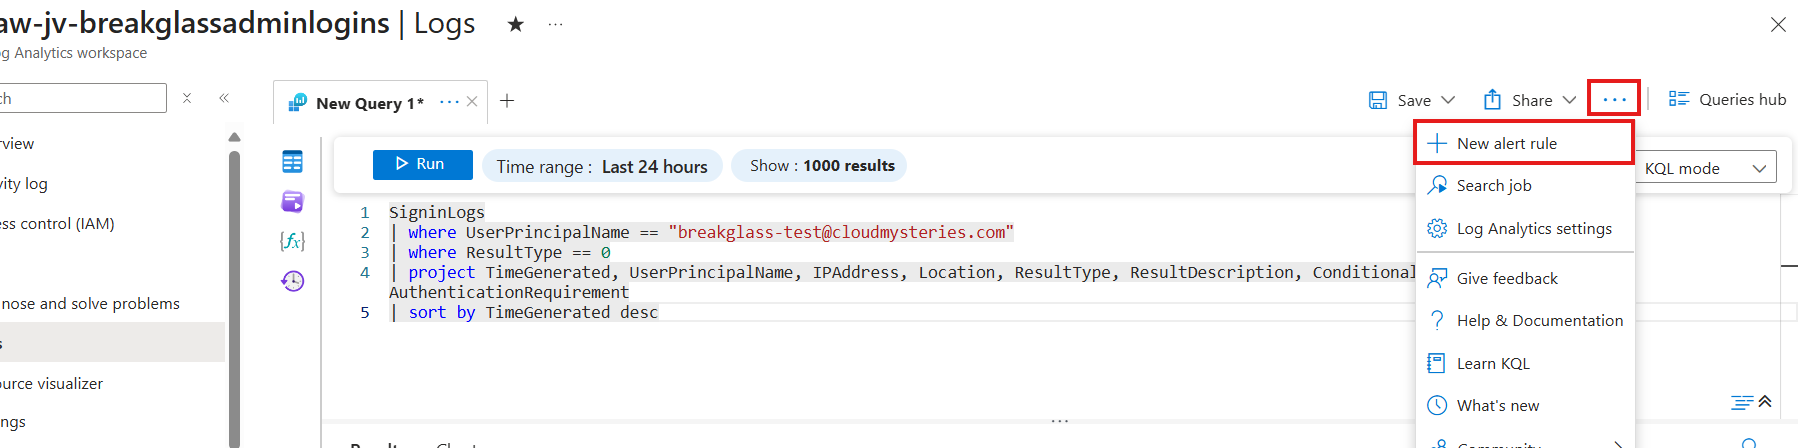
Click on the 3 dots and then on “+ New alert rule”. This creates an alert rule completely based on the query we have used.
On this page, scroll down to “Alert logic” and set the following settings:
- Operator: Greater than or equal to
- Threshold value: 1
- Frequency of evaluation: 5 minutes
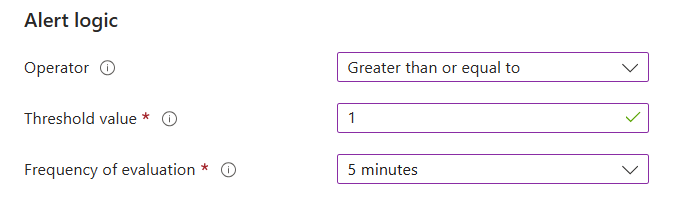
This means the alert is triggered if the query finds 1 or more successful attempts. You can customize this is needed.
Now go to the “Actions” tab. We now need to create an Action group, where we define what kind of notification to receive.
Create a action group if you don’t already have one.
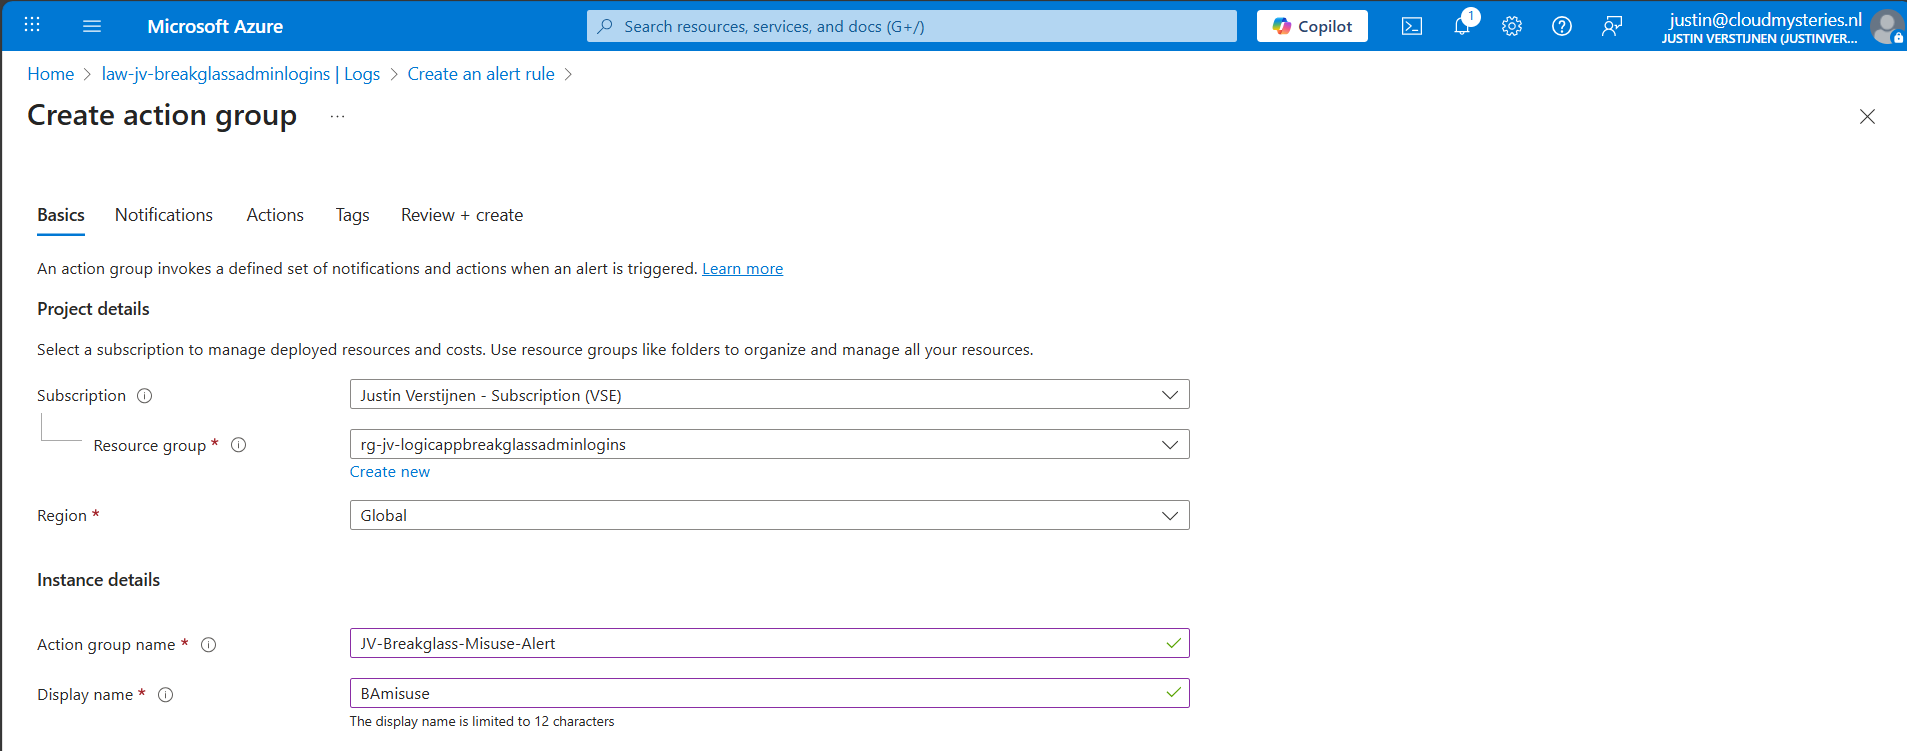
Give it a name and displayname. Good practice is to use a different action group for this alert, as you can define per action group what kind of notification and receivers you want to use.
Now go to the “Notifications” tab. Select “Email/SMS message/Push/Voice” and configure the alert. This is pretty straight forward.
I have configured Microsoft to call me when this alert is triggered:
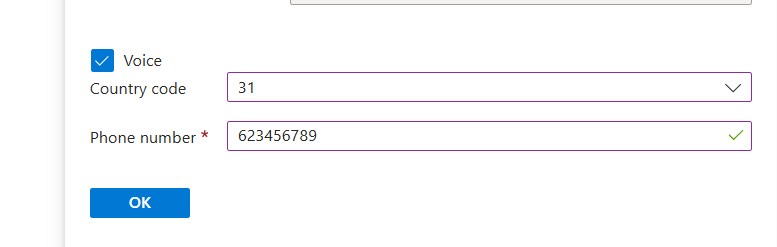
Advance to the next tab.
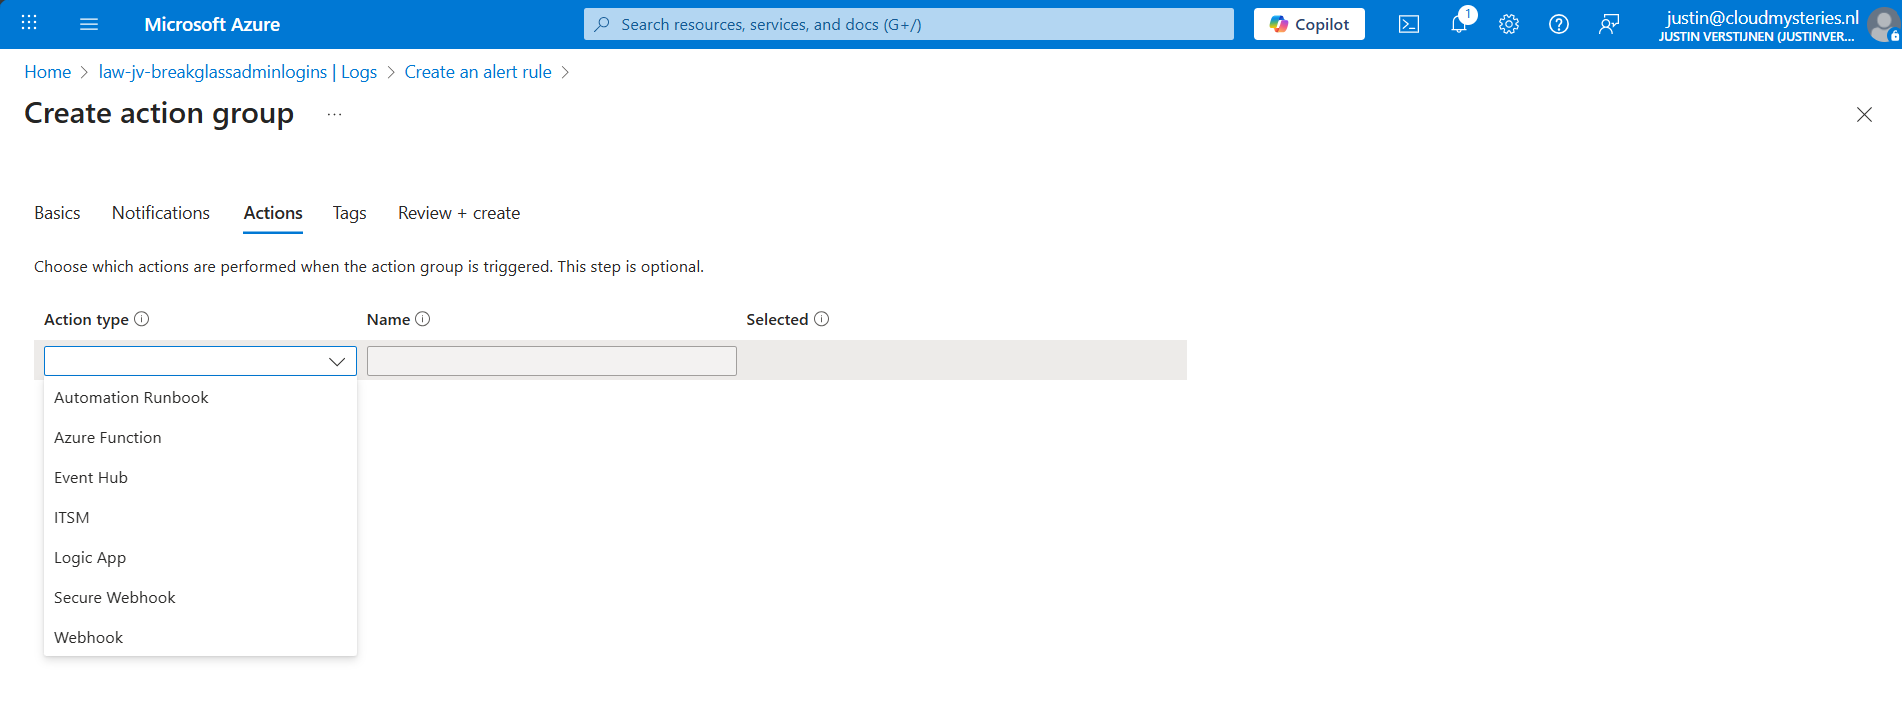
You could also run an automated action against this trigger. As this includes Webhook, you could get customized messages for example on your Microsoft Teams account.
Finish the creation of the Action group.
Step 5: Let’s test the solution
Now we have configured everything, we can test the working of this alert. Let’s prepare an InPrivate window to login to the account:
I have logged in seconds from 13:20:08 hours. Let’s wait till I receive the alerting phone call.
And at 13:27, 7 minutes later, I got an call from Microsoft that the alert was triggered:

This way we will know in a very direct way our break glass account is possibly misused. We could also choose to only get messages from this or use the webhook option which will be less rigorous than getting a phone call. But hey, at least the option exists.
Summary
Monitoring the use of your Break Glass Admins is very important. Those accounts should be a last resort of managing Azure when nothing else and personal accounts doesn’t work. They should be tested at least twice a year and good monitoring like this on the accounts is preferred.
Thank you for reading this post and I hope it was helpful.
Sources
These sources helped me by writing and research for this post;
- https://azure.microsoft.com/en-us/pricing/details/monitor/
- https://learn.microsoft.com/en-us/entra/identity/monitoring-health/howto-analyze-activity-logs-log-analytics
End of the page 🎉
You have reached the end of the page. You can navigate through other blog posts as well, share this post on X, LinkedIn and Reddit or return to the blog posts collection page. Thank you for visiting this post.
If you think something is wrong with this post or you want to know more, you can send me a message to one of my social profiles at: https://justinverstijnen.nl/about/
If you find this page and blog very useful and you want to leave a donation, you can use the button below to buy me a beer. Hosting and maintaining a website takes a lot of time and money. Thank you in advance and cheers :)
The terms and conditions apply to this post.
How to properly secure Break Glass Accounts in your Entra ID
In our environment, we will do everything to secure it as much as possible. We give users only the permissions they need and only at given times, we enable Conditional Access to limit access to our data as much as possible. But we also create Break Glass administrator accounts as our last resort, a method to login if everything else doesn’t work. Security wise, this sounds against all rules but we prefer a account to login in emergency situations over a complete tenant lockout. To help you secure break glass administrator accounts, I have 10 generic industry-known guidelines for these accounts which you can implement relatively easy. These help you on top of all other security mechanisms (CA/MFA/PIM/Least privilege) securing, decreasing the chance of lockouts and decrease the value for possible attackers.
List of recommendations
The list of recommendations which I will describe further:
- Have at least 2 accounts
- Have the accounts cloud only -> not synced from Active Directory
- Use the .onmicrosoft.com domain and no license
- Exclude from all Conditional Access policies
- Do not use licenses on Administrator accounts
- Passwords must be at least 64 and max 256 characters
- Avoid “break glass admin” or any tip to a high privileged account
- Register FIDO2 key for the account
- Setup Monitoring for login alerts
- Test the accounts twice per year
1: Have at least 2 accounts with Global Administrator permissions
Very important to have at least 2 accounts (with a maximum of 4) with Global Administrator permissions. Most of the time, we will limit the amount of privileges but we need to have at least 2 accounts with those permissions.
- If one of the accounts won’t work, the other mostly will
2: Use cloud only accounts
For administrator accounts, it is recommended to use cloud only accounts. This way, any compomise in local or cloud accounts doesn’t mean the attack flows into the other direction.
If attackers manage to break into a active directory account, they will also get into your cloud environment which we want to limit.
3: Use .onmicrosoft.com domain only
For administrator accounts, and especially break glass administrator accounts, it is recommended to only use the .onmicrosoft.com domain. This domain is the ultimate fallback if something happens to your domain, or someone managed to make a (big) mistake in the DNS records. It can happen that user accounts fall back to the .onmicrosoft.com domain.
I have seen this happening in production, and so using the .onmicrosoft.com domain helps you gaining quicker access in case of emergency.
4: Exclude Break Glass administrator accounts from Conditional Access
To ensure Break Glass administrators are always permitted to login, ensure they are excluded from all blocking conditional access policies. If you make a sudden mistake in obe of the policies, and your Break glass administrator is included, there is no way to sign in anymore, and you’ll be lcoked out.
5: Do not use licenses on Administrator accounts
Do not use licenses on Administrator accounts. Using licenses potentially make them a bigger target in recoinassance stages of an attack, they are easier to find and the licenses expose services of M365 further.
6: Use strong and big passwords
A great recommendation is to use long and strong passwords. Strong passwords consists of all 4 possible character types:
- Lowercase characters
- Uppercase characters
- Numbers
- Special characters
Use anywhere between 64 and 256 characters passwords for break glass administrator accounts. Save those in a safe place like an encrypted password storage.
Tip: use my Password generator for generatng passwords: https://password.jvapp.nl/
7: Ensure proper naming
We have to name our break glass administrators well. During breaches, attackers will search for possible high-value targets to shift their attack to.
- Avoid terms like “admin”, “breakglass” or “emergency”, the attacker will instantly know where their gold is at
A good advice is to name break glass accounts to a person, a product you and your company likes or to a movie. Let you creativity be king on this one.
8: Register FIDO2 key for break glass adminstrators
You can also register FIDO2 keys for break glass administrators. These are a hardware key used as second factor which we can put in a safe or store somewhere else really safe. It must also be audited if anyone in the company gains access to the security key so everyone knows who, when and why it was last used.
9: Setup monitoring alerts for Break Glass administrators
As we don’t want break glass administrator accounts to be used on a daily basis and being actively attacked, you might want to setup alerts for people logging in to the account.
To setup notifications like phone calls, I have this guide for you: https://justinverstijnen.nl/get-notifications-when-entra-id-break-glass-admins-are-used
10: Test Break Glass administrator accounts twice per year
We create the break glass administrator accounts, but mostly never test them properly. It is important to test break glass accounts at least twice per year, and know exactly if they work properly and the correct roles and permissions are active.
To test this, login to the account and check if you still have the correct roles and that they are “Active”, instead of the PIM “Eligible”.
Summary
It is really important to have back-up/break glass accounts available in your environment. You’ll never know when someone makes a mistake or a account doesn’t work because of some outage or other problem. Maybe your account is brute-forced and locked out for 30 minutes.
I hope this guide was helpful and thank you for reading.
Sources
These sources helped me by writing and research for this post;
End of the page 🎉
You have reached the end of the page. You can navigate through other blog posts as well, share this post on X, LinkedIn and Reddit or return to the blog posts collection page. Thank you for visiting this post.
If you think something is wrong with this post or you want to know more, you can send me a message to one of my social profiles at: https://justinverstijnen.nl/about/
If you find this page and blog very useful and you want to leave a donation, you can use the button below to buy me a beer. Hosting and maintaining a website takes a lot of time and money. Thank you in advance and cheers :)
The terms and conditions apply to this post.
Remove Universal Print Devices/Connectors
In this guide, I’ll show you how to remove Universal Print connectors using PowerShell, because this cannot be done from the Universal Print portal.
Introduction
In Universal Print, a connector is the link between your local print environment and Universal Print. Over time, you may end up with connectors that are no longer used. For example, after replacing a print server, changing your print setup, or cleaning up old test configurations. These connectors will store your devices in Entra ID, so over time this list will fill up with old devices and connectors.

Universal Print portal does not provide an option to eventually remove connectors in the portal at https://aka.ms/UPPortal. So if you want to clean them up, you need to use PowerShell.
In this guide, I’ll walk you through the steps to remove a Universal Print connector.
Step 1: Install the Universal Print PowerShell module
First, we need to install the Universal Print PowerShell module. This module contains the cmdlets we need to manage Universal Print from PowerShell.
Open up your PowerShell window and execute this command to install this module:
PowerShell
Install-Module UniversalPrintManagement -Scope CurrentUserIf PowerShell asks you to trust the repository, confirm this if you trust the source.
The Module installation can take up to some minutes, in my case this was around 3 minutes to completely finish.
Step 2: Connect to Universal Print
Now that we have our module installed, we are ready to connect your PowerShell session to Universal Print. Run this command to connect to your Microsoft Entra tenant:
PowerShell
Connect-UPServiceA sign-in window will appear. Sign in with an account that has the required permissions to manage Universal Print in your tenant.
If the sign-in was succesful, you will not receive any further error messages and we are ready to go to the next step.
Step 3: Remove the connector
Before we can remove the connector, make sure you have the correct ConnectorId. You can find the ConnectorId in the Universal Print connector details in the Azure portal (https://aka.ms/UPPortal).
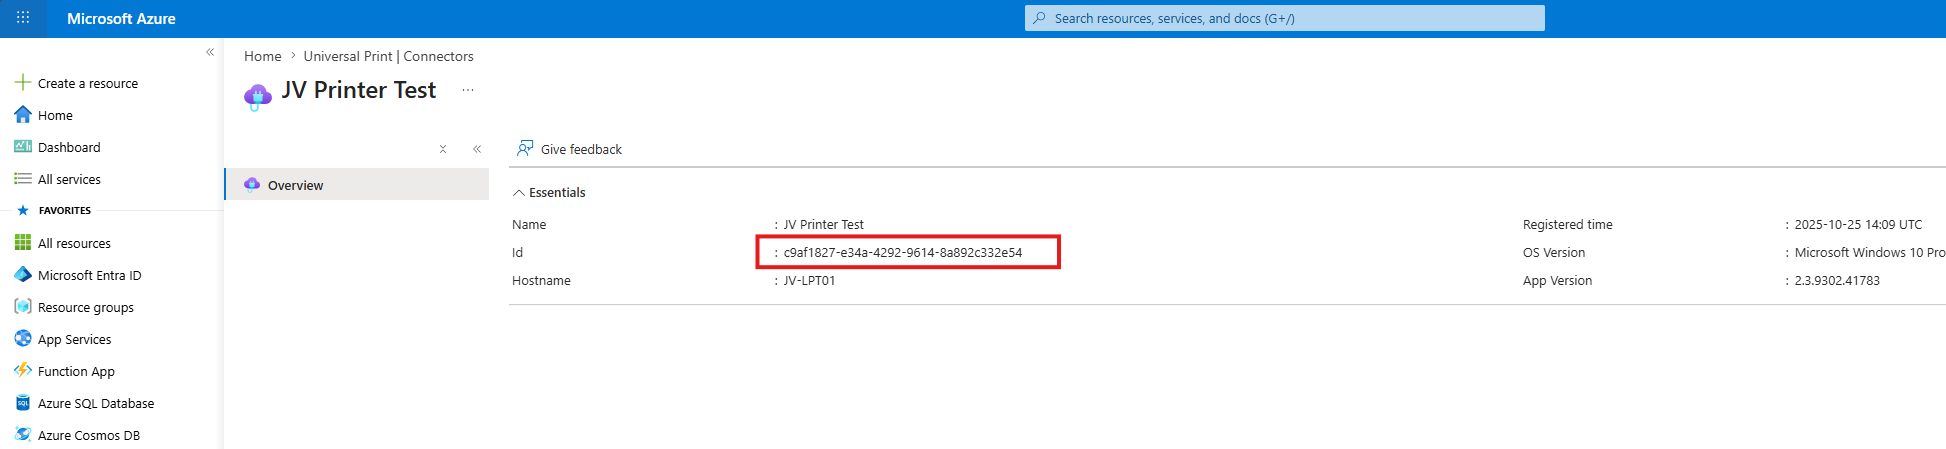
Copy this value as we will need this Id in our PowerShell command. Please double check if you have the right connector in case of multiple connectors.
Now remove the connector by running the command below. Replace the example ConnectorId with the ConnectorId of the connector you want to remove.
PowerShell
Remove-UPConnector -ConnectorId c9af1827-e34a-4292-9614-8a892c332e54
After running the command, the connector will be removed from the Universal Print portal:
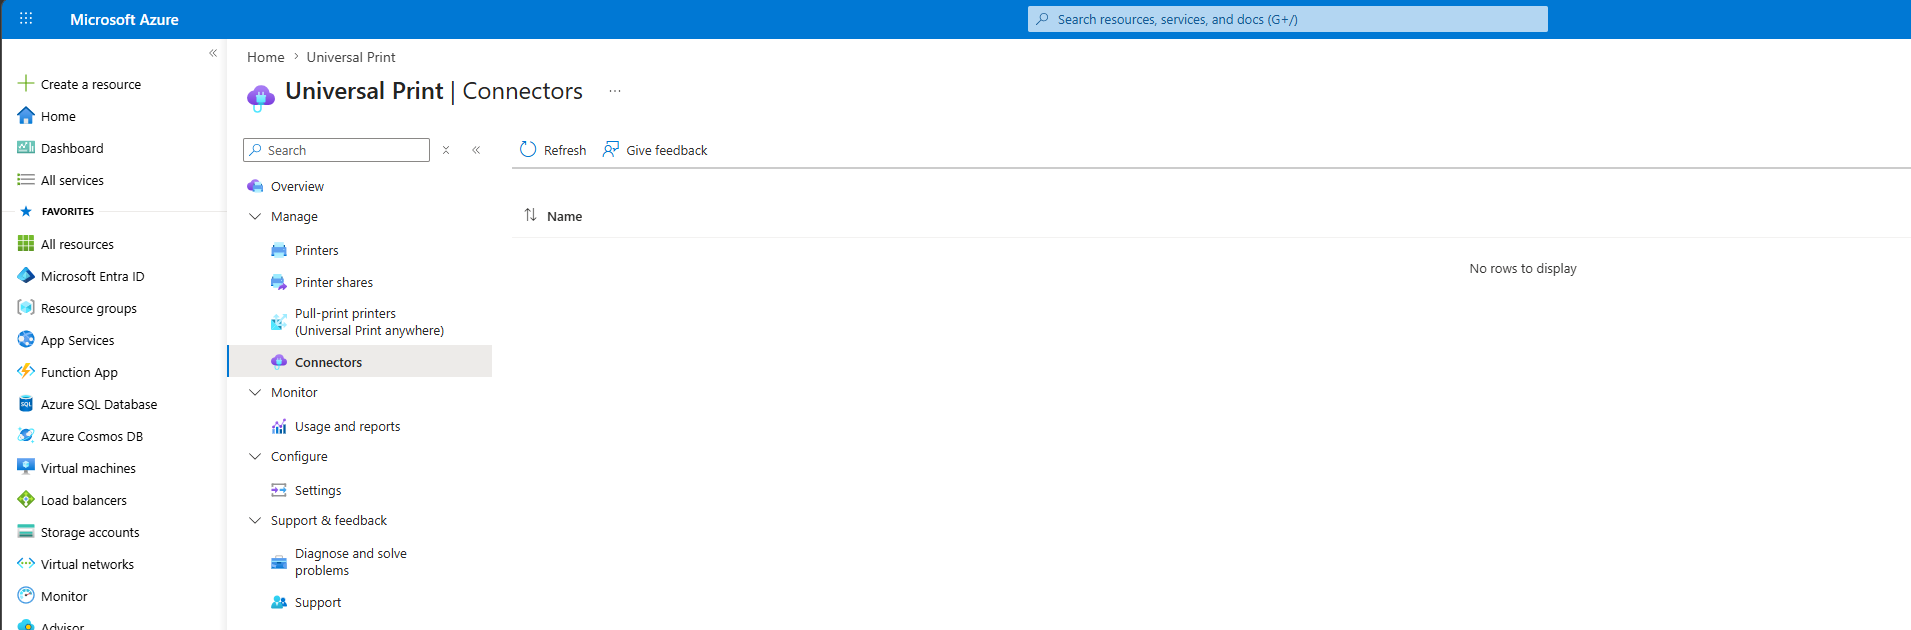
That’s it. Your unused Universal Print connector should now be removed!
Summary
Universal Print connectors cannot be removed from the Universal Print portal. If you want to clean up old or unused connectors, you need to remove them with PowerShell. In this guide we followed the relatively easy steps to achieve this goal.
The process is simple:
- Install the Universal Print PowerShell module.
- Connect to Universal Print.
- Find the correct ConnectorId.
- Remove the connector with the Remove-UPConnector command.
Thank you for reading this post and I hope it was helpful!
Sources
These sources helped me with writing and research for this post:
End of the page 🎉
You have reached the end of the page. You can navigate through other blog posts as well, share this post on X, LinkedIn and Reddit or return to the blog posts collection page. Thank you for visiting this post.
If you think something is wrong with this post or you want to know more, you can send me a message to one of my social profiles at: https://justinverstijnen.nl/about/
If you find this page and blog very useful and you want to leave a donation, you can use the button below to buy me a beer. Hosting and maintaining a website takes a lot of time and money. Thank you in advance and cheers :)
The terms and conditions apply to this post.
Solved - ADSync service stopped (Entra Connect Sync)
This blog post helps you to make the ADSync service more stable by utilizing a script that checks the service regularly and starting it when needed.
Sometimes, the ADSync service stops without further notice. You will see that the service has been stopped in the Services panel:

In this guide I will explain how I solved this problem using a simple PowerShell script.
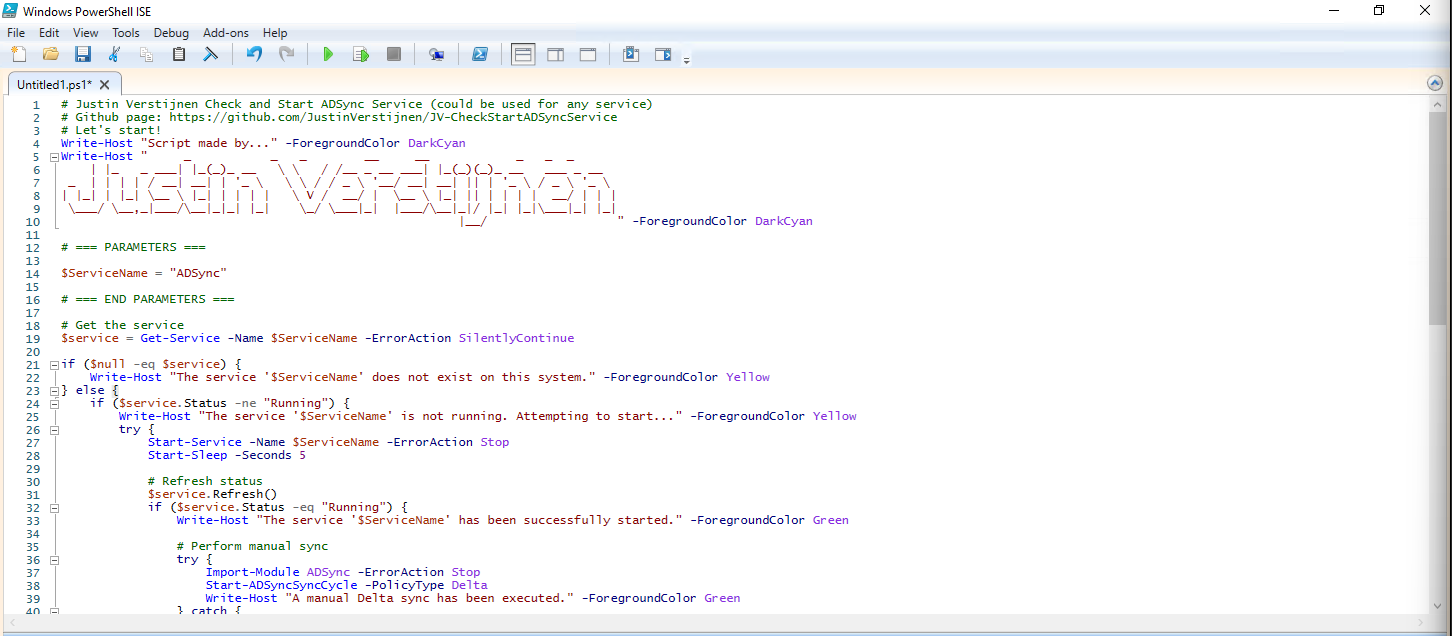
The Check ADSync script
The PowerShell script that fixes this problem is on my GitHub page:
The script simply checks if the service is running, if this is the case the script will be terminated. If the service is not running, the service will be started.
The problem and possible causes
The problem is caused after a server restart, then the service will not start itself automatically, even when this is selected in Windows. This is enabled by defaut by the installation wizard.
In the Event Log there will be these events:
- Event 7000: The Microsoft Azure AD Sync service failed to start due to the following error: The service did not start due to a logon failure.
- Event 7031: The Microsoft Azure AD Sync service terminated unexpectedly. It has done this 1 time(s). The following corrective action will be taken in 0 milliseconds: Restart the service.
The fun part is that it cannot login according to the Entra Connect Sync tool but after some minutes it does.
Running the script
We can run the script manually using the PowerShell ISE application.
After running the script, the service does run:

Installing the clean script automatically
For installation with Task Scheduler I included an installation script that, by default, configures a task in the Windows Task Scheduler that runs it;
- Every first day of the month
- At hour 03:00
If these settings are great for you, you can leave them as-is.
The Installation script creates a folder in C:\ named “Scripts” if not already there and places the cleaning script there.
Installation
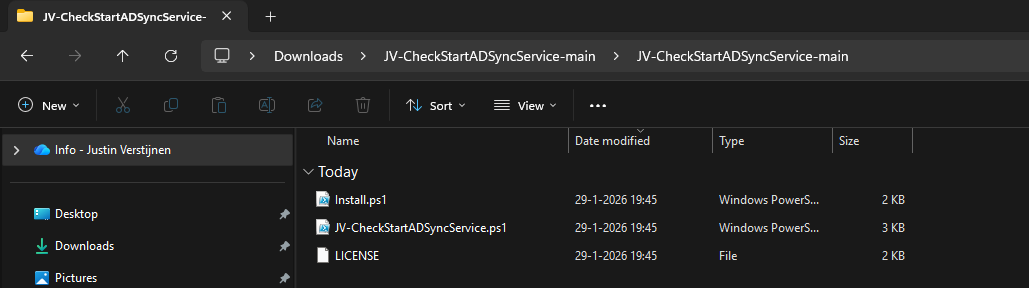
Click on the blue button above. You now are on the Github page of the script.
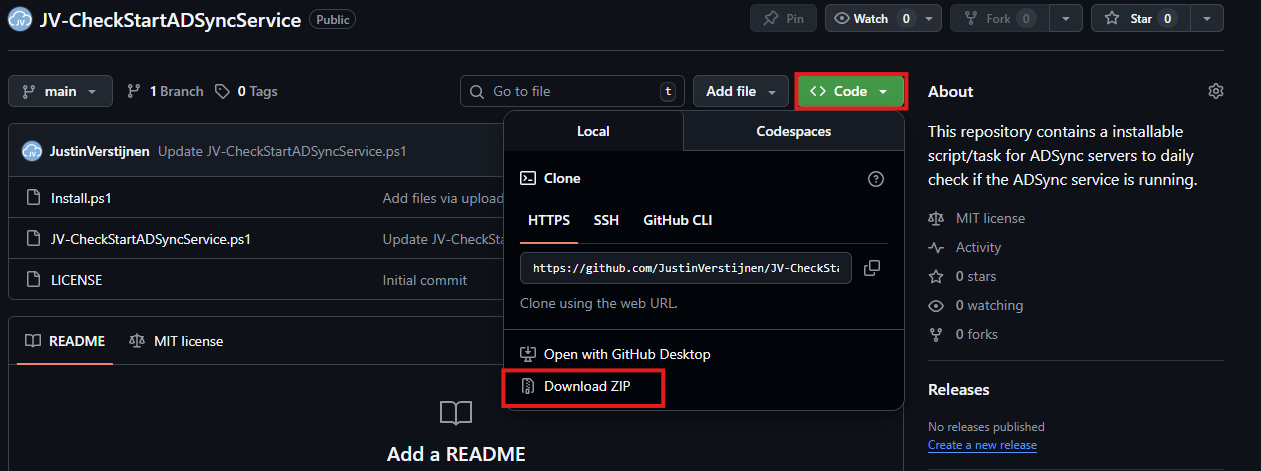
Click on “Code” and then “Download ZIP”.
Then place the files on the server where you want to install the script.
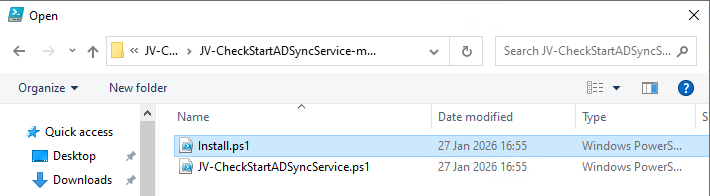
Open Powershell ISE as administrator.
Now open the “Install” script.
Review it’s default settings and if you feel at home in PowerShell, review the rest of the script to understand what it does.
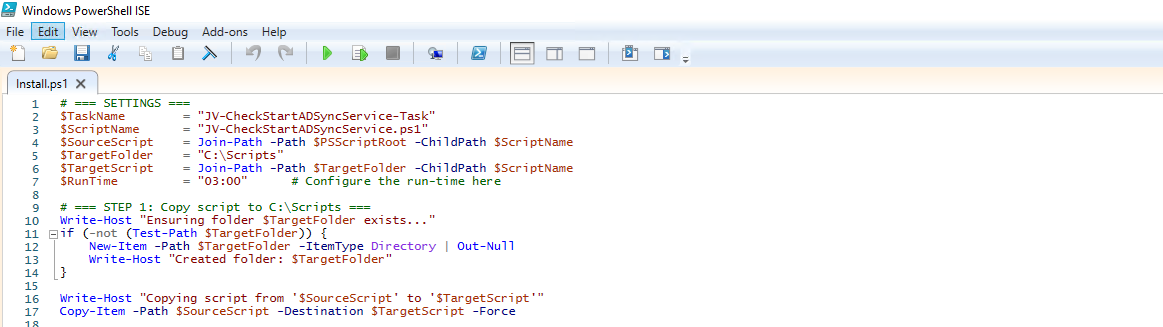
You can change the schedule very easily by changing the runtime: 0:00 till 23:59 and the day of month to specify the day number of the month (1-31).
After your schedule is ready, let’s ensure we temporarily bypass the Execution Policy by typing the command in the blue window below:
POWERSHELL
Set-ExecutionPolicy Unrestricted -Scope Process -ForceThis way the execution policy stays enabled but for this session only it’s been lowered. When you close the window, you have to type this again before be able to run scripts.
Execute the command, and when prompted to lower the policy, click Yes.
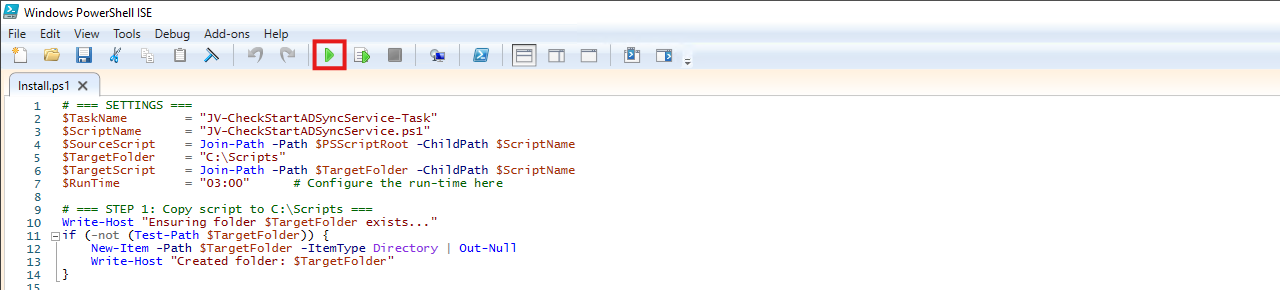
Now execute the Install script by clicking the green “Run” button:
After executing the script, we get the message that the task has been created succesfully:

Let’s check this in the Windows Task Scheduler:
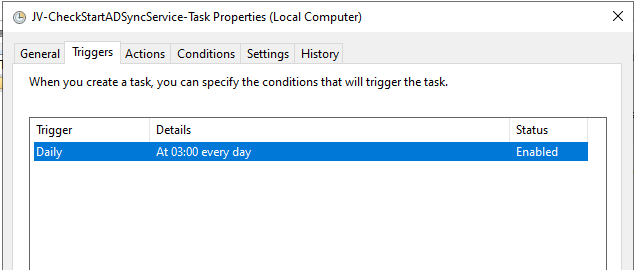
As you can see, the script is succesfully installed to Task Scheduler. This ensures it runs every first of the month at 03:00 (or at your own defined schedule). Also, the script has been placed in C:\Scripts for a good overview of the scripts of the system.
Summary
This simple script resolved me a lot of problems, checking the service automatically and starting it. A Entra Connect Sync not running is very stable. Users can get different types of errors, de-synchronisations and passwords that are not working.
Thank you for visiting this page and I hope it was helpful.
Sources
These sources helped me by writing and research for this post;
- None
End of the page 🎉
You have reached the end of the page. You can navigate through other blog posts as well, share this post on X, LinkedIn and Reddit or return to the blog posts collection page. Thank you for visiting this post.
If you think something is wrong with this post or you want to know more, you can send me a message to one of my social profiles at: https://justinverstijnen.nl/about/
If you find this page and blog very useful and you want to leave a donation, you can use the button below to buy me a beer. Hosting and maintaining a website takes a lot of time and money. Thank you in advance and cheers :)
The terms and conditions apply to this post.
Match AD users using Entra Connect Sync and MSGraph
Sometimes, it is necessary to match an existing local Active Directory (AD) user through Entra Connect with an existing Entra ID user (formerly known as Azure AD). This process ensures that the account in both environments is aligned and maintains the same underlying configurations and settings across systems.
The difference between soft and hard matching
Most of the time the system itself will match the users automatically using soft-matching. Here the service will be matching users in both Entra ID and Active Directory by using known attributes like UserPrincipalName and ProxyAddresses.
In some cases, especially when you use different Active Directory and Entra ID domains, we need to give the final tip to Entra ID to match and AD user to an Entra ID users. We will tell Entra ID what the GUID of the on-premises user is by getting that value and encode it into Base64. Then we pass Entra ID this value so it understands what local user to link with what cloud user. This process is called “hard-matching”, as we have to do this by hand or by scripting.
The process described
The steps to hard-match an Entra ID and Active Directory user are in short:
- Determine the local and cloud user you want to match
- On the on-premises Active Directory, run the command “Get-ADUser *username*”
- Copy the GUID value
- Run the command “[Convert]::ToBase64String([guid]::New(”*GUID*").ToByteArray())" with *GUID* replaced by the GUID from step 3
- Copy the Base64 value
- Connect to Microsoft 365 by using “Connect-MSOLService”
- Run the command “Set-MsolUser -UserPrincipalName user@domain.com -ImmutableId *BASE64*
- Run a Entra Connect Sync
Step 1: Fetching Active Directory GUID
To merge an existing on-premises user and an existing cloud user into one unified user account under the hood, follow these steps:
Log in to your Active Directory management server
Open PowerShell.
Execute the following command:
POWERSHELL
Get-ADUser -Identity *username*Replace *username* by the username of the user you want to match.
The output of the command above will be something like this:
POWERSHELL
DistinguishedName : CN=administrator,OU=Users,DC=justinverstijnen,DC=nl
Enabled           : True
GivenName         : Administrator
Name              : administrator
ObjectClass       : user
ObjectGUID        : c97a6c98-ded8-472c-bfb6-87ed37d324f5
SamAccountName    : administrator
SID               : S-1-5-21-1534517208-3616448293-1356502261-1244
Surname           : Administrator
UserPrincipalName : administrator@justinverstijnen.nl
Copy the value of the ObjectGUID, in this case:
POWERSHELL
c97a6c98-ded8-472c-bfb6-87ed37d324f5Because Active Directory uses GUID for a unique identifier of the user and Entra ID uses a Base64 value for a unique identifier, we need to convert the GUID string to a Base64 string. We can do this very easy with Powershell too:
POWERSHELL
[Convert]::ToBase64String([guid]::New("c97a6c98-ded8-472c-bfb6-87ed37d324f5").ToByteArray())We get a value like this:
POWERSHELL
mGx6ydjeLEe/toftN9Mk9Q==Now we have the identifier Entra ID needs. We change the ID of the cloud user to this value. This way the system knows which on-premises user to sync with which cloud user.
Step 2: Logging into Entra ID with Microsoft Graph
To actually match the users, we need to login to Microsoft Graph in PowerShell, as we can there perform the actions. For installation instructions of the Microsoft Graph PowerShell module: https://www.powershellgallery.com/packages/Microsoft.Graph
Run the following command to login to Microsoft Entra ID with Microsoft Graph:
POWERSHELL
Connect-MgGraph -Scopes "User.ReadWrite.All"Login with your Microsoft Entra ID administrator account.
Step 3: Set the new Immutable ID in Microsoft Entra
After succesfully logging into Microsoft Graph, run the command to set a (new) Immutable ID for your cloud user:
POWERSHELL
Update-MgUser -UserId "administrator@justinverstijnen.nl" -OnPremisesImmutableId "mGx6ydjeLEe/toftN9Mk9Q=="Now the user is hard matched. You need to run a Entra Connect synchronization to finish the process.
Log in to the server with AD Connect/Entra Connect sync installed and run the command:
POWERSHELL
Start-ADSyncSyncCycle -PolicyType DeltaNow your on-premises user and cloud user have been matched!
Summary
Hardmatching users is relatively easy, but requires some steps that are good to know. After doing this around 3 times you will perform this completely on “auto-pilot”.
Sources
These sources helped me by writing and research for this post;
End of the page 🎉
You have reached the end of the page. You can navigate through other blog posts as well, share this post on X, LinkedIn and Reddit or return to the blog posts collection page. Thank you for visiting this post.
If you think something is wrong with this post or you want to know more, you can send me a message to one of my social profiles at: https://justinverstijnen.nl/about/
If you find this page and blog very useful and you want to leave a donation, you can use the button below to buy me a beer. Hosting and maintaining a website takes a lot of time and money. Thank you in advance and cheers :)
The terms and conditions apply to this post.
Implement Certificate-based authentication for Entra ID scripts
When using Entra ID, we can automate a lot of different tasks. We can use a script processing server for this task but doing that normally means we have to save credentials or secrets in our scripts. Something we don’t want. Today I will show how to implement certificate-based authentication for App Registrations instead of using a client secret (which still feels like a password and matches it’s unsafety).
Requirements
- Around 20 minutes of your time
- An Entra ID environment if you want to test this
- A prepared Entra ID app registration
- A server or workstation running Windows to do the connection to Entra ID
- Some basic knowledge about Entra ID and certificates
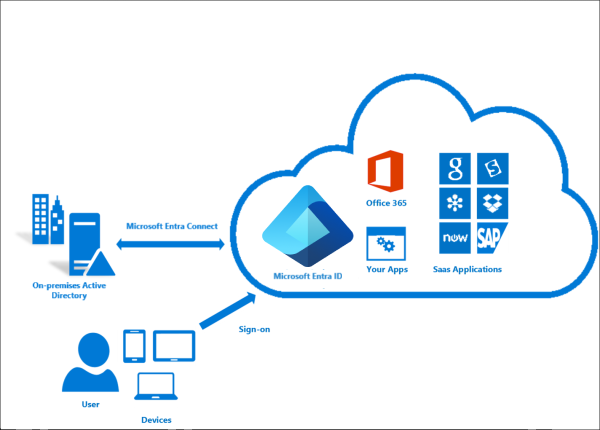
How does these certificates work?
Certificate based authentication means that we can authenticate ourselves to Entra ID using a certificate instead of user credentials or a password in plain text. When using some automated scripts it needs permissions to perform its actions but this means storing some sort of authentication. We don’t want to store our credentials on the server as this decreases our security and a potential risk of compromise.
Certificate based authentication works by generating a certificate (SSL/Self-signed) and using that for authentication. The certificate has to be enabled and on both sides, like described in the picture above.
This means that if an client doesn’t have a allowed certificate installed, we can never connect. This is great, so we can store our certificates in a digital safe and only install this on our script processing server. When generating a self signed certificate, a private key is also generated by the computer which means this also has to be in hands of an attacker to abuse your certificate.
After authenticating, we have the permissions (API or Entra Roles) assigned to the Enterprise Application/App Registration, which we will call a “Service Principal”.
Note: Self Signed certificaties will expire after 365 days (1 year).
Why this is more safe than secrets/credentials?
In the old Windows Server days, we could sometimes find really unsecure jokes like these:
This is something that is really unsecure and I advice you to never do actions like these. With certificate-based authentication we eliminate the need for this by a lot.
Generating a self signed certificate
On our server or workstation where you want to setup the connection, we can generate a self signed certificate. The server then generates a certificate which is unique and can be used for the connection.
Let’s open PowerShell to generate a new Self Signed certificate. Make sure to change the *certificatename to your own value:
POWERSHELL
New-SelfSignedCertificate -Subject *certificatename* -CertStoreLocation Cert:\CurrentUser\MyThen we have to get the certificate to prepare it for exporting:
POWERSHELL
$Cert = Get-ChildItem -Path Cert:\CurrentUser\My | Where-Object {$_.Subject -eq "CN=*certificatename*"}Then give your certificate a name:
POWERSHELL
$CertCerPath = "Certificate.cer"And then export it to a file using the settings we did above:
POWERSHELL
Export-Certificate -Cert $Cert -FilePath $CertCerPath -Type CERTWe now have generated a self signed certificate using the settings of the server. We now must import this into Entra ID. This file doesn’t include a private key and this is stored on the server.
Adding a certificate to a Entra ID app registration
Now head to the Entra ID portal and go to your already created App registration, and then to “Certificates & Secrets”.
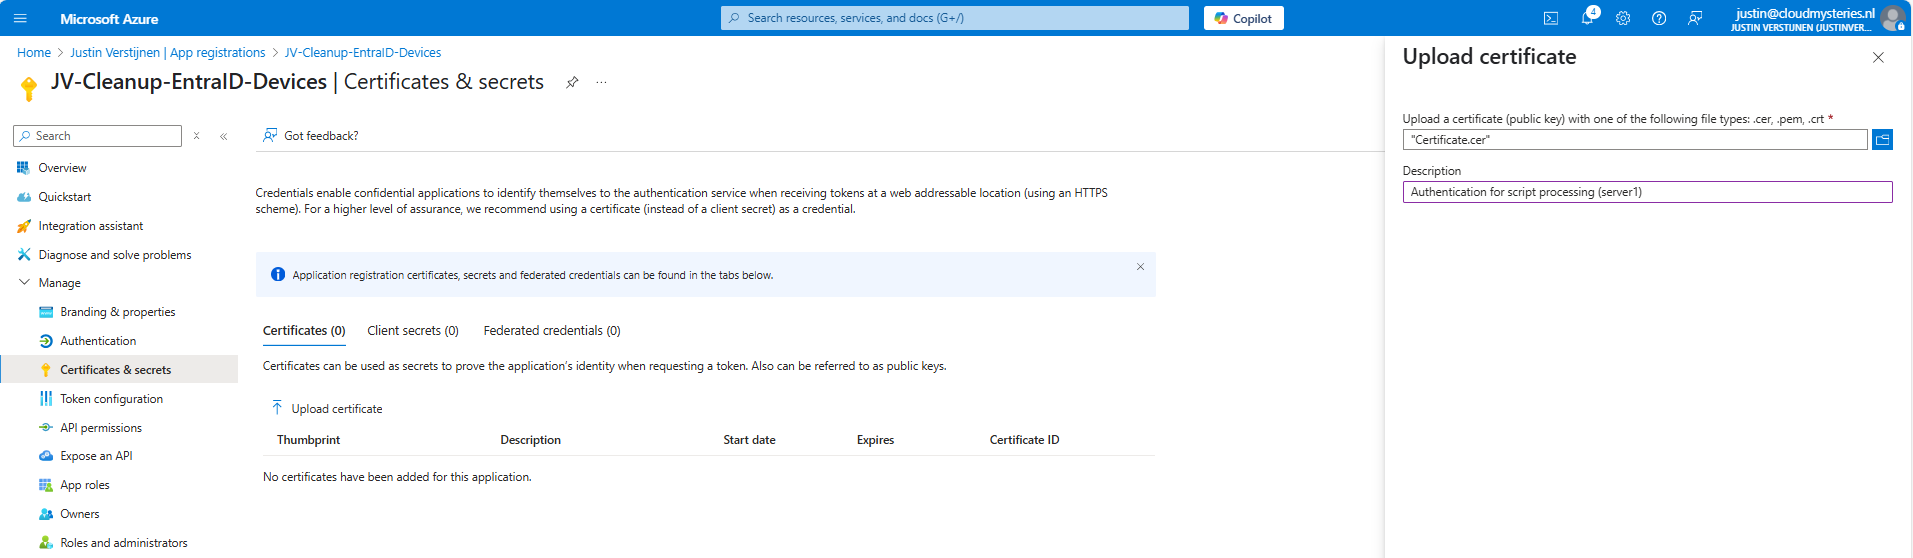
Upload the .cer file there to assign it to the app registration and get the assigned roles.
Now you will see the certificate uploaded:

Now we have the thumbprint of the certificate, which is a identifier of the certificate. You can also get this on the server where you just generated the certificate:
POWERSHELL
$cert.ThumbprintConnecting to Entra ID using a certificate
Installing the Microsoft Graph Powershell module can be done with:
PowerShell
Install-Module Microsoft.Graph -Scope CurrentUser -Repository PSGallery -Force
We can now logon to Microsoft Graph using this certificate, we must first fill in the parameters on your server:
POWERSHELL
$clientId = "your client-id"
$tenantId = "your tenant-id"
$thumbprint = "your thumbprint"

$cert = Get-ChildItem -Path Cert:\CurrentUser\My | Where-Object { $_.Thumbprint -eq $thumbprint }
Make sure you use your own client ID, Tenant ID and certificate thumbprint.
Now let’s connect to Graph with your certificate and settings:
POWERSHELL
Connect-MgGraph `
    -ClientId $clientId `
    -TenantId $tenantId `
    -Certificate $cert
Now you should be logged in succesfully:
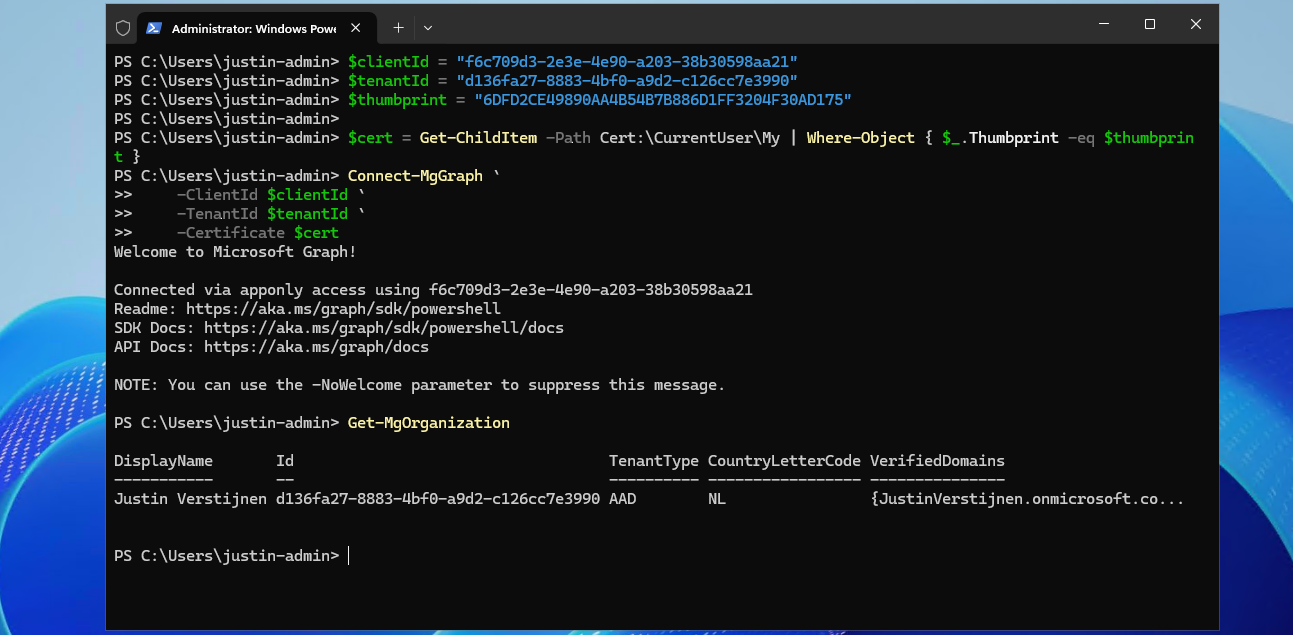
I double checked if we were able to get our organization and that was the case. This is a command that doesn’t work when not connected.
Connecting to Entra ID without a certificate (test)
As we should not be able to connect without the certificate installed, we will test this for sure on another device:

Powershell cannot find our certificate in the store. This is as expected as we didn’t install it. But let’s try another method:

With Exchange Online Powershell, this also doesn’t work because we don’t have the certificate installed. Working as intended!
Summary
Implementing Certificate based authentication is a must for unattended access to Entra ID and app registrations. Its a great authentication method when having a script processing server that needs access to Entra ID or any Microsoft 365/Azure service and not wanting to hard-code credentials which you shouldn’t do either.
This can also be used with 3rd party applications when supported. Most of the applications will only support Client ID and secrets, as this is much easier to implement.
Sources
These sources helped me by writing and research for this post;
- Create a self-signed public certificate to authenticate your application - Microsoft identity platform | Microsoft Learn
- Install the Microsoft Graph PowerShell SDK | Microsoft Learn
End of the page 🎉
You have reached the end of the page. You can navigate through other blog posts as well, share this post on X, LinkedIn and Reddit or return to the blog posts collection page. Thank you for visiting this post.
If you think something is wrong with this post or you want to know more, you can send me a message to one of my social profiles at: https://justinverstijnen.nl/about/
If you find this page and blog very useful and you want to leave a donation, you can use the button below to buy me a beer. Hosting and maintaining a website takes a lot of time and money. Thank you in advance and cheers :)
The terms and conditions apply to this post.
Audit your Entra ID user role assignments
Today I have a relatively short blog post. I have created a script that exports all Entra ID user role assignments with Microsoft Graph. This can come in handy when auditing your users, but then realizing the portals doesn’t always show you the information in the most efficient way. Therefore, I have created a script that only gets all Entra ID role assignments to users of every role and exports it to a nice and readable CSV file.
Requirements
- Microsoft Graph PowerShell module
- Entra P2 or Governance license for PIM
- Only required for fetching PIM specific data. Script can run without licenses.
Entra ID User role assignments script
To start off with the fast pass, my script can be downloaded here from my Github page:
Using the Entra ID User role assignments script
I have already downloaded the script, and have it ready to execute:
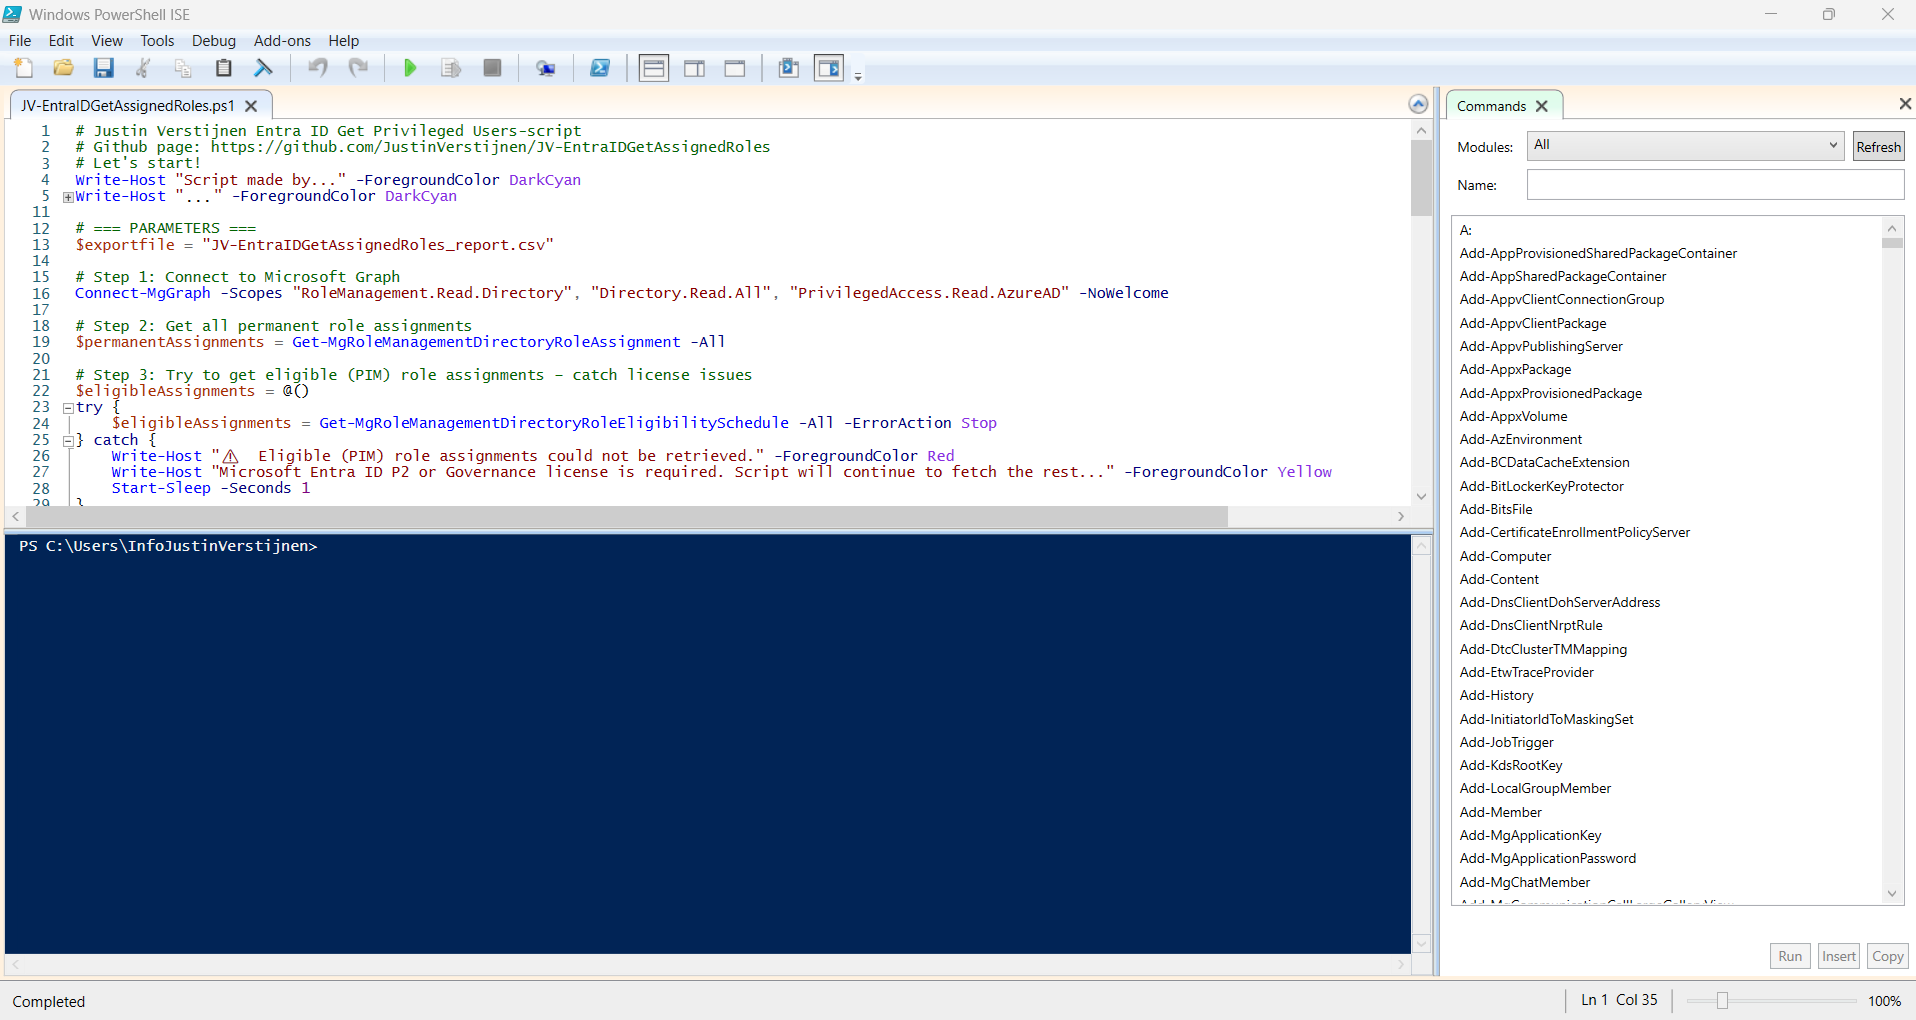
When executed, it asks to login to a tenant. Here you have to login to the tenant you want to audit. After that it will be performing the checks. This can take a while with several users and role assignments.
When prompted that the Execution Policy is restricted, you can use this command for a one-time bypass (till the window closes):
Set-ExecutionPolicy Unrestricted -Scope Process
After the script finishes all the checks, it puts out a CSV file in the same folder as the script which we can now open to review all the Entra ID user role assignments:

As you can see, this shows crystal clear what users and assigned roles this environment has.
Using the script without PIM licenses
If your environment doesn’t have any licenses for Privileged Identity Management (PIM), we can still use the script, but an error will be printed in the processing of the script:
POWERSHELL
⚠️  Eligible (PIM) role assignments could not be retrieved.
Microsoft Entra ID P2 or Governance license is required. Script will continue to fetch the rest...
Summary
This very short blog post shows the capabilities of this users script. In my opnion, the GUI shows most of the information, but is not particularly good at summarizing information from multiple pages. Powershell is, as we can get information from everywhere and put it in one single file.
Sources
These sources helped me by writing and research for this post;
I hope my script is useful and thank you for reading.
End of the page 🎉
You have reached the end of the page. You can navigate through other blog posts as well, share this post on X, LinkedIn and Reddit or return to the blog posts collection page. Thank you for visiting this post.
If you think something is wrong with this post or you want to know more, you can send me a message to one of my social profiles at: https://justinverstijnen.nl/about/
If you find this page and blog very useful and you want to leave a donation, you can use the button below to buy me a beer. Hosting and maintaining a website takes a lot of time and money. Thank you in advance and cheers :)
The terms and conditions apply to this post.
Audit your privileged Entra ID applications
In Microsoft Entra ID it’s possible to create App registrations and Enterprise applications who can get high privileges if not managed and monitored regularly. We do our best with Identities to be secure, with security processes like MFA, access reviews and such, but most of the companies don’t care that much about the Enterprise applications. In this post, I will try to convince you that this is as much as important as identities. For helping you to solve this I built a PowerShell script to get a complete overview of all the applications and their permissions.
Entra ID Privileged Applications report script
To start off with the fast pass, my script can be downloaded here from my Github page:
This script can be used to get a report of all high privileged applications across the tenant. Go to this section for instructions of how to use the script and the output.
What are Enterprise Applications?
Enterprise Applications in Entra ID are the applications which will be registered when users need them. Somethimes, it can be for a add-on of Outlook or Teams, but other times this can be to enable Single Sign On to 3rd party applications.
In terms of Entra ID and Identity, we call a Enterprise Application a “Service Principal”. A principal for a service to give permissions to.
Enterprise applications are mostly pre-configured by the 3rd party publisher of the application that needs permission. However, a user can be prompted to give their information to a application. This looks like this:
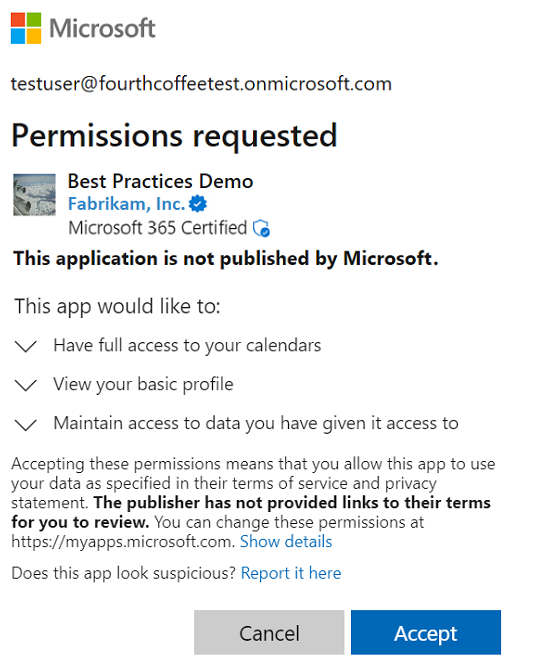
As we can see, the application gets the information of the calendars, the profile of the user and gets data. These alone aren’t not that much privileged, but this can be much worse. Let’s take a look at “App Registrations”.
What are App Registrations?
App Registrations are applications who are mostly custom. These can be used for Single Sign On integration with 3rd party applications or to provide access from another application to Microsoft Entra ID and subservices.
App Registrations are commonly more privileged and can be dangerously high privileged, even not having a requirement for MFA. The only thing you need to use an app registration is:
- Client ID
- Tenant ID (public available: https://tenantlookup.jvapp.nl)
- Secret/Certificate
App registrations can have permissions far above “Global Administrator”, but we don’t handle them like global administrators or even higher accounts. The Microsoft Secure Score also doesn’t report them and they can be hard to find.
These applications are used in practice by hackers to leave backdoors in tenants to remain in the tenant. If they do this right, they can be unseen for months while still stealing company information.
What to do to prevent unauthorized access through apps?
We can do several things to avoid being hacked by this sort of things:
- Audit all applications every X days, deleting apps that aren’t needed
- You can use my script to help you audit
- Saving App registration information in safe places only, don’t transfer them in plain-text over email
- Treat these applications as passwords and certificates
Let’s create a High privileged App registration
We will now create a high privileged app registration, purely to showcase the permissions and to show you how much of a deal this could be.
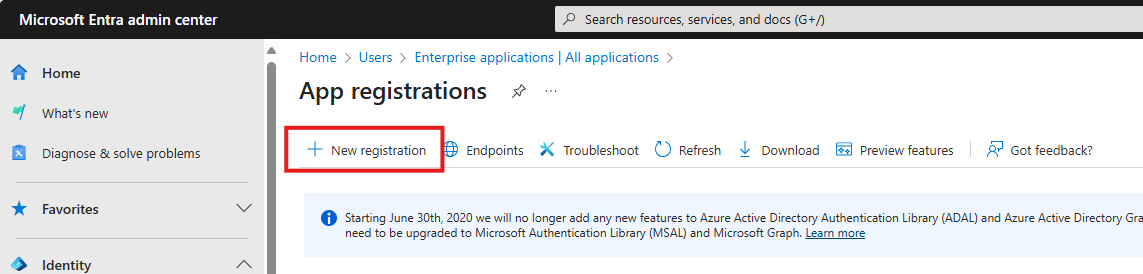
Open the Microsoft Entra admin center and go to: Applications -> App registrations
Click on “+ New registration”:
Fill in a name and the rest doesn’t care for testing purposes. You can leave them default.
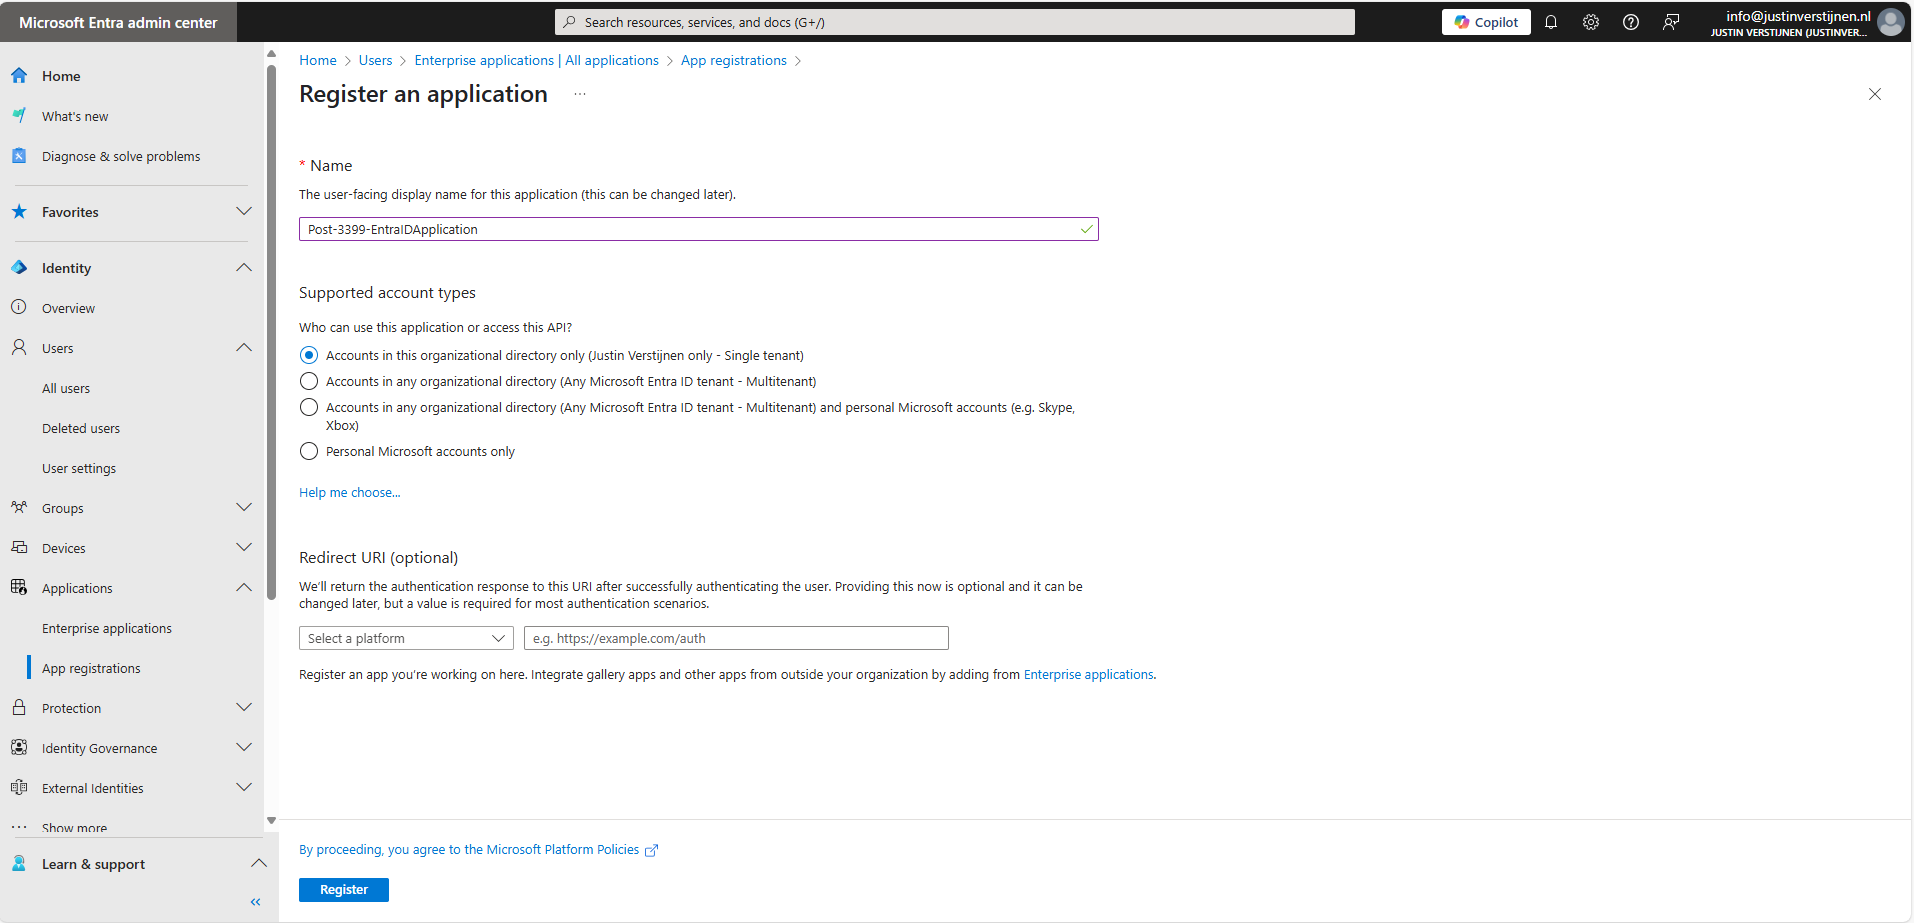
Click Register.
Permissions and Assignment
Now the application is created. Open it if not already redirected. Write down the “Client ID” and the “Tenant ID” because we will need them in a short moment. Then go to the section “API permissions”.
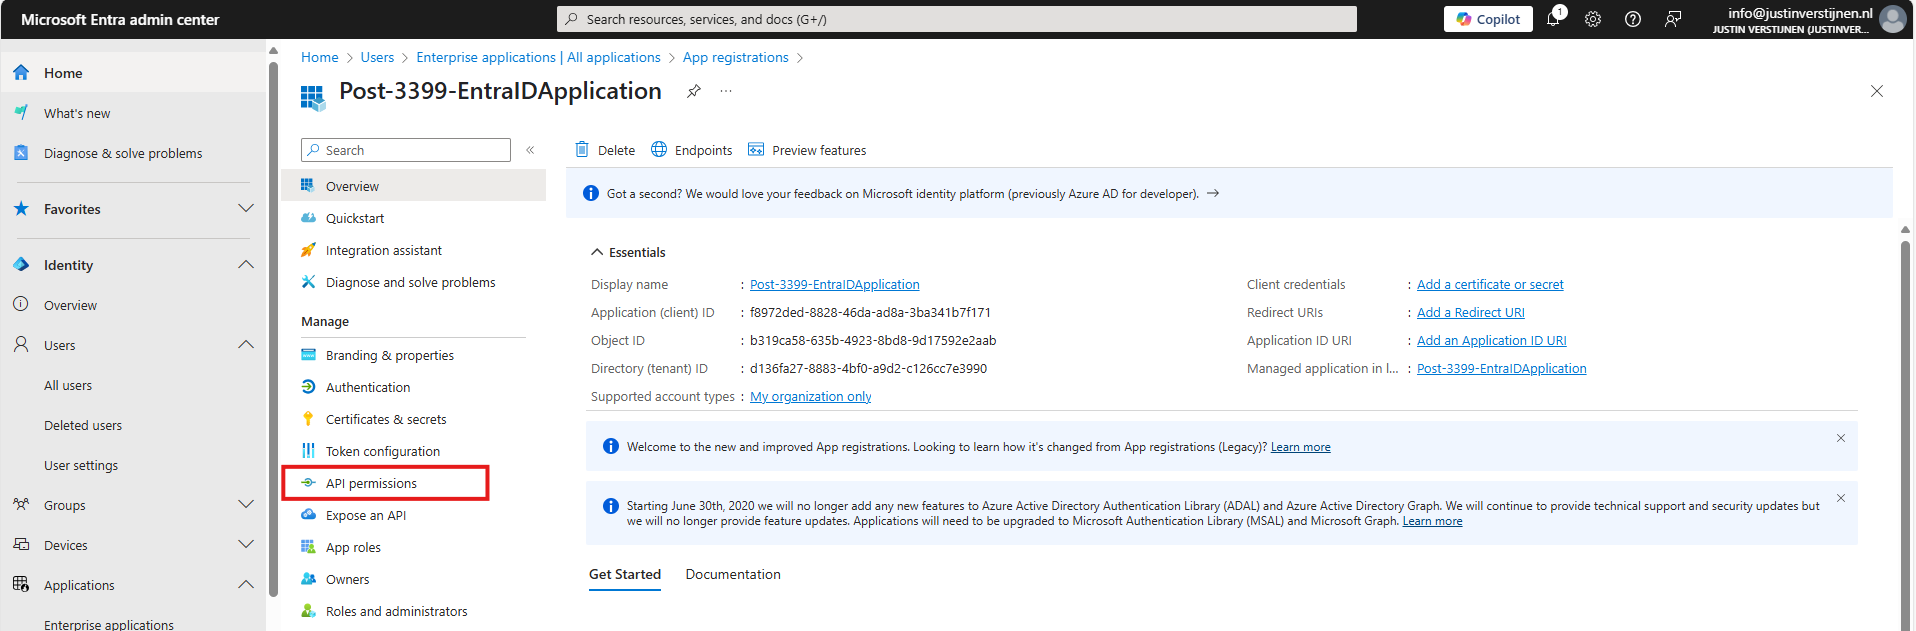
Here you find all assigned permissions to the application. Click on “+ Add a permission” to add permissions to this application. Then click on “Microsoft Graph”.
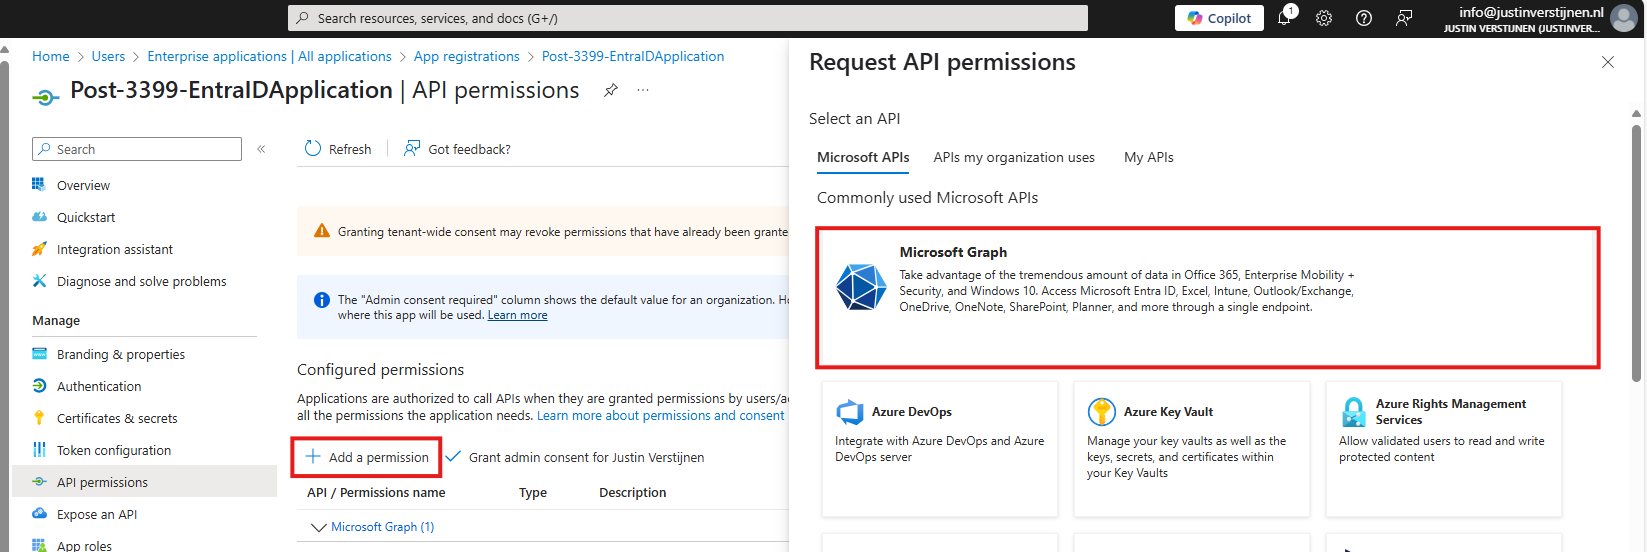
Microsoft Graph is the new API of Microsoft that spans across most of the Microsoft Online services.
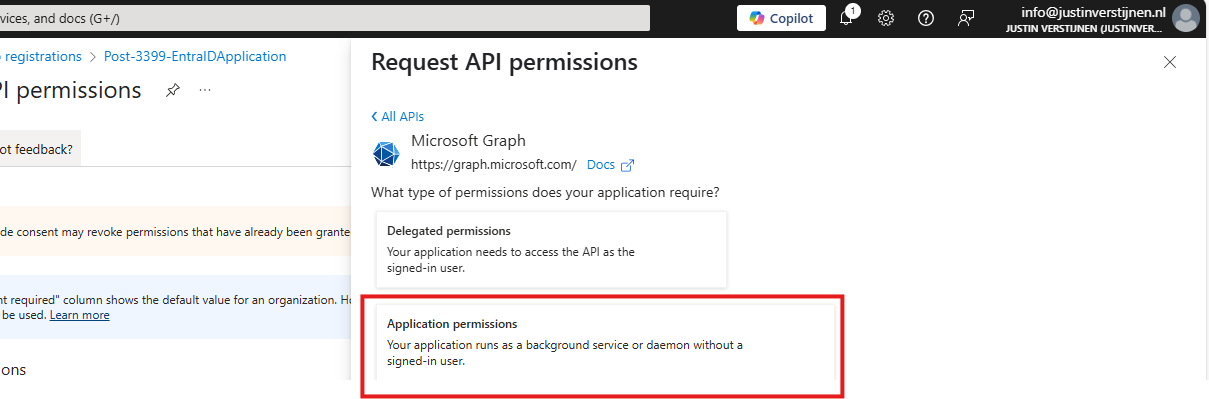
Then click on “Application permissions”:
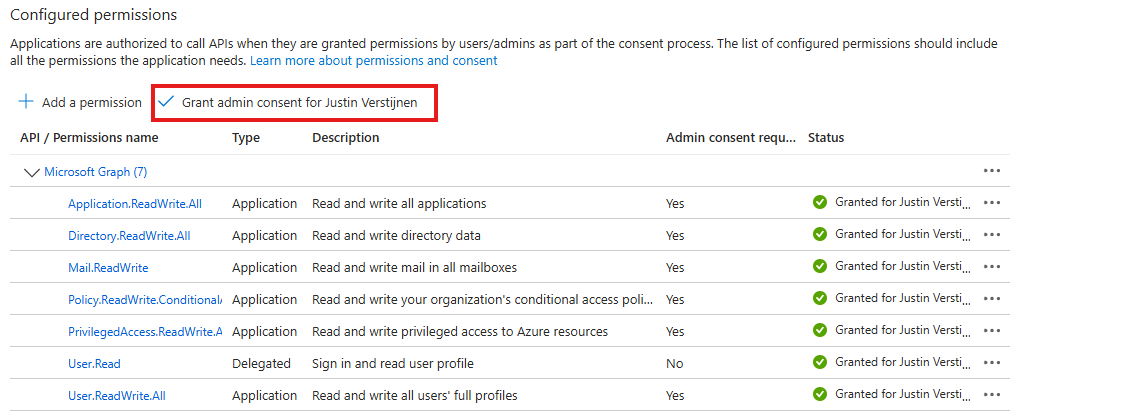
Now we can choose several permissions that the application gets. You can search for some of the High privileged apps, for example these:
| Permission name | Action |
|---|---|
| Directory.ReadWrite.All | Read and write directory data |
| User.ReadWrite.All | Read and write all users’ full profiles |
| Policy.ReadWrite.ConditionalAccess | Read and write your organization’s conditional access policies |
| Mail.ReadWrite | Read and write mail in all mailboxes |
| Application.ReadWrite.All | Read and write all applications |
| PrivilegedAccess.ReadWrite.AzureResources | Read and write privileged access to Azure resources |
As you can see; if I create the application with these permissions I have a non-monitored account which can perform the same tasks as a Global Administrator, disabling MFA, exporting all users, reading contents of all mailboxes, creating new backdoors with applications and even escalate privileges to Azure resources.
Create the application with your permissions and click on “Grant admin consent for ‘Tenant’” to make the permissions active.
Create Client secret for application
We can now create a Client secret for this application. This is a sort of master password for accessing the service principal. This can also be done with certificates, which is more preferred in practice environments, but it works for the demo.
In Entra, go to the application again, and the to “Certificates & secrets”:
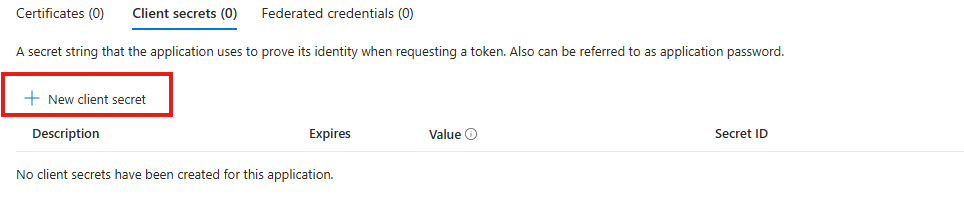
Create a new secret.
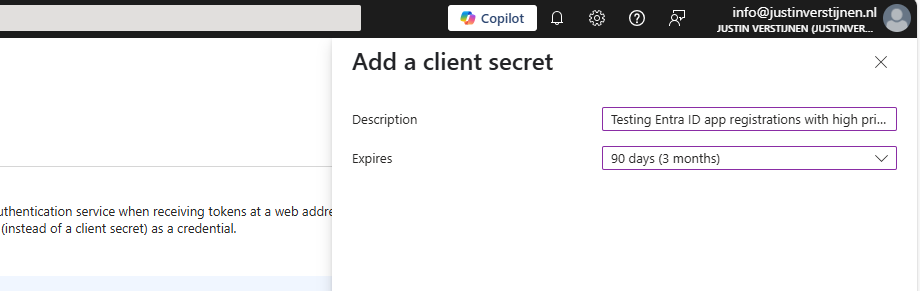
Specify the period and the lifetime and click on “Add” to create the secret.

Now copy both the Value, which is the secret itself and the Secret ID and store them in a safe place, like a password manager. These can be viewed for some minutes and then will be concealed forever.
Using this application to login on Microsoft Graph
We can now use the application to login to Microsoft Graph with the following script:
Refer to my GitHub page for the requirements for using the script and Microsoft Graph.
POWERSHELL
# Fill in these 3 values
$ApplicationClientId = '<your-app-client-id>'
$TenantId = '<your-tenant-id>'
$ApplicationClientSecret = '<your-client-secret>'

Import-Module Microsoft.Graph.Authentication

# Create a ClientSecretCredential object
$ClientSecretCredential = [Microsoft.Graph.Auth.ClientCredentialProviderFactory]::CreateClientSecretCredential(
    $TenantId,
    $ApplicationClientId,
    $ApplicationClientSecret
)

# Connect to Microsoft Graph without the welcome banner
Connect-MgGraph -ClientSecretCredential $ClientSecretCredential -NoWelcome
Here we can fill in the Client ID and Tenant ID from the previous steps and the Secret from the created client secret. Then run it with PowerShell. I advice to use the Windows PowerShell ISE for quick editing of the script and executing + status for debugging.
After logging in we can try to get and change information:
Get all Users:
POWERSHELL
Get-MgUserCreate user:
POWERSHELL
$PasswordProfile = @{
  Password = 'Pa$$w)rd!'
}
New-MgUser -Displayname "Test" -MailNickname "test" -Userprincipalname "test@justinverstijnen.nl" -AccountEnabled -PasswordProfile $PasswordProfile
Remove user:
POWERSHELL
Remove-MgUser -UserId "247f8ec8-c2fc-44a0-9665-48b85c19ada4" -ConfirmWatch the demo video here:
Now a user isn’t that destructive, but given the scopes we assigned: we can do a lot more. For more Microsoft Graph commands, visit: https://learn.microsoft.com/en-us/powershell/module/microsoft.graph.users/?view=graph-powershell-1.0
Using my script to Audit all high privileged applications
Now that we have created and abused our demo application, let’s use my script to get a report where this application must be reported.
You can, once again, download the script here:
I have already downloaded the script, and have it ready to execute:
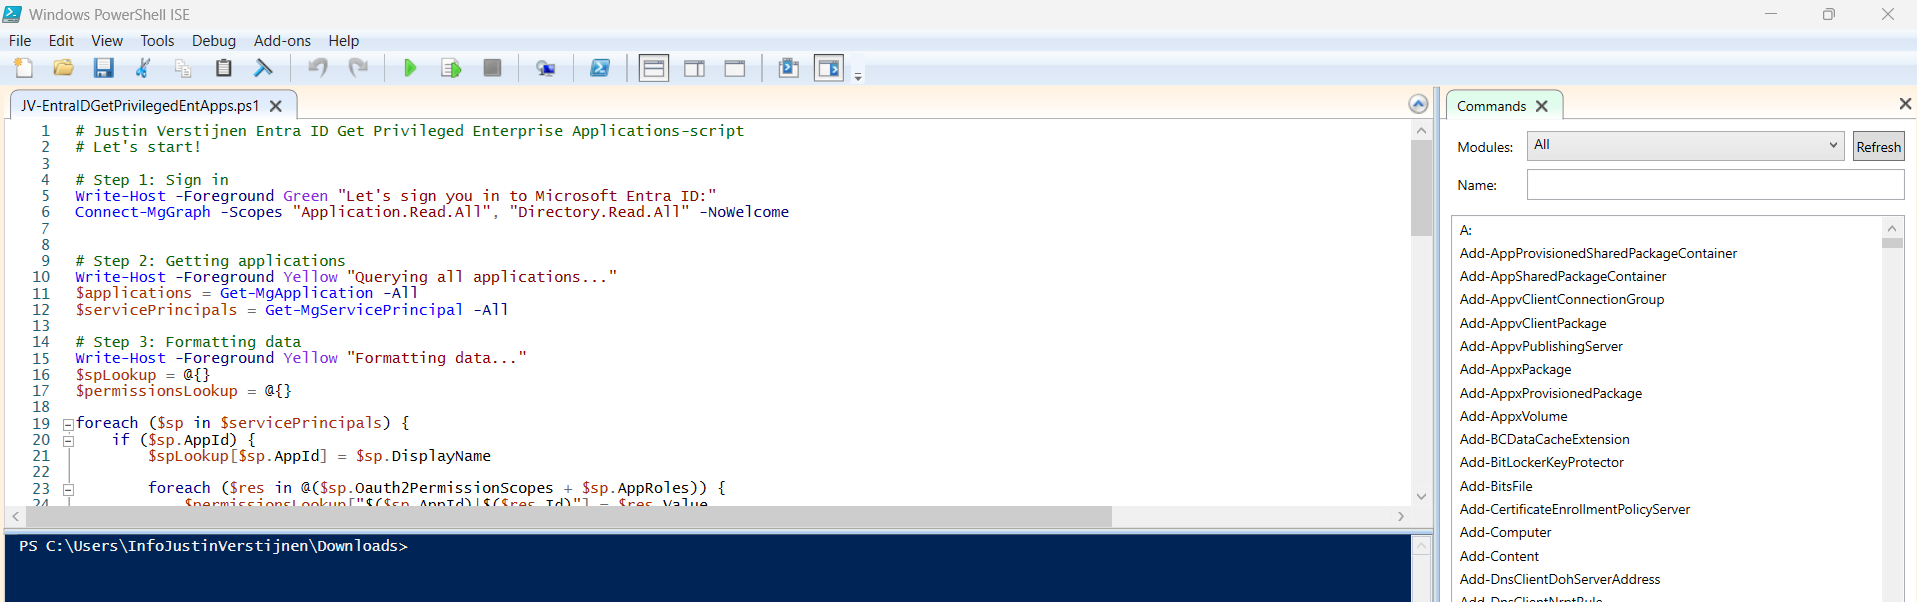
When executed, it asks to login to a tenant. Here you have to login to the tenant you want to audit. After that it will be performing the checks. This can take a while with several applications.
When prompted that the Execution Policy is restricted, you can use this command for a one-time bypass until the window closes:
<div class="td-card card border me-4">
POWERSHELL
Set-ExecutionPolicy Unrestricted -Scope ProcessAfter the script finishes all the checks, it puts out a CSV file in the same folder as the script which we can now open to review the applications and their permissions:

As we can see, this must be a far too much privileged application, and everything must be done to secure it:

It also queries if the applications has active secrets or certificates:

So this way we know within minutes which applications we must monitor and even deleted or seperated into more, smaller, less privileged applications.
Summary
I hope I convinced you with this guide how much of an risk the applications in Microsoft Entra ID really can be. They can be used by threat actors, as Break glass application or by attackers to leave backdoors in a tenant after a breach.
Sources
These sources helped me by writing and research for this post:
- https://learn.microsoft.com/en-us/entra/identity-platform/application-consent-experience
- https://learn.microsoft.com/en-us/graph/permissions-overview?tabs=http#comparison-of-delegated-and-application-permissions
- https://learn.microsoft.com/en-us/powershell/microsoftgraph/authentication-commands?view=graph-powershell-1.0#use-client-secret-credentials
- https://learn.microsoft.com/en-us/powershell/module/microsoft.graph.users/?view=graph-powershell-1.0
I hope I informed you well with this post and thank you for reading. I also hope my PowerShell script comes in very handy, because I couldn’t find a good one working online.
End of the page 🎉
You have reached the end of the page. You can navigate through other blog posts as well, share this post on X, LinkedIn and Reddit or return to the blog posts collection page. Thank you for visiting this post.
If you think something is wrong with this post or you want to know more, you can send me a message to one of my social profiles at: https://justinverstijnen.nl/about/
If you find this page and blog very useful and you want to leave a donation, you can use the button below to buy me a beer. Hosting and maintaining a website takes a lot of time and money. Thank you in advance and cheers :)
The terms and conditions apply to this post.