All pages referring or tutorials for Microsoft Secure Score.
This is the multi-page printable view of this section. Click here to print.
Secure Score
- How I bumped up Microsoft Secure Score towards 100%
- Microsoft Secure Score - Data
- Microsoft Secure Score - Apps
- Microsoft Secure Score - Devices
- Microsoft Secure Score - Identity
How I bumped up Microsoft Secure Score towards 100%
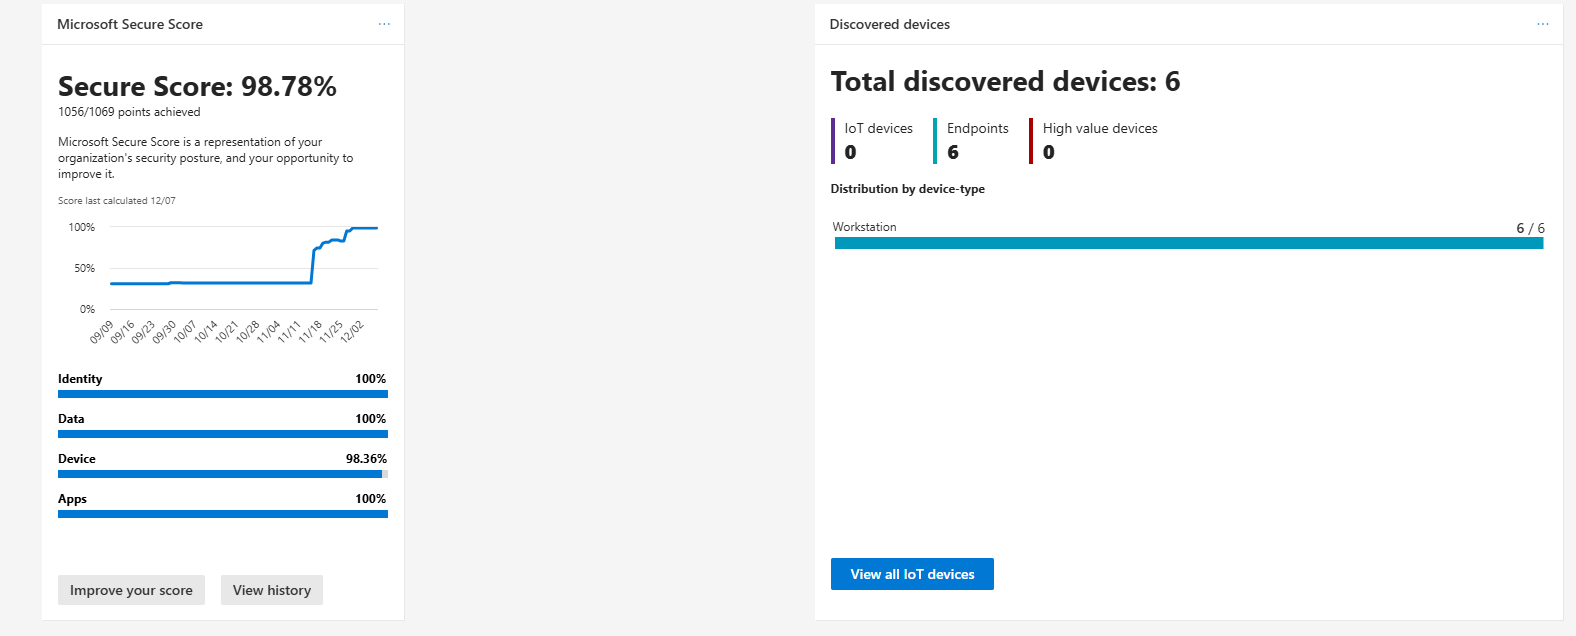
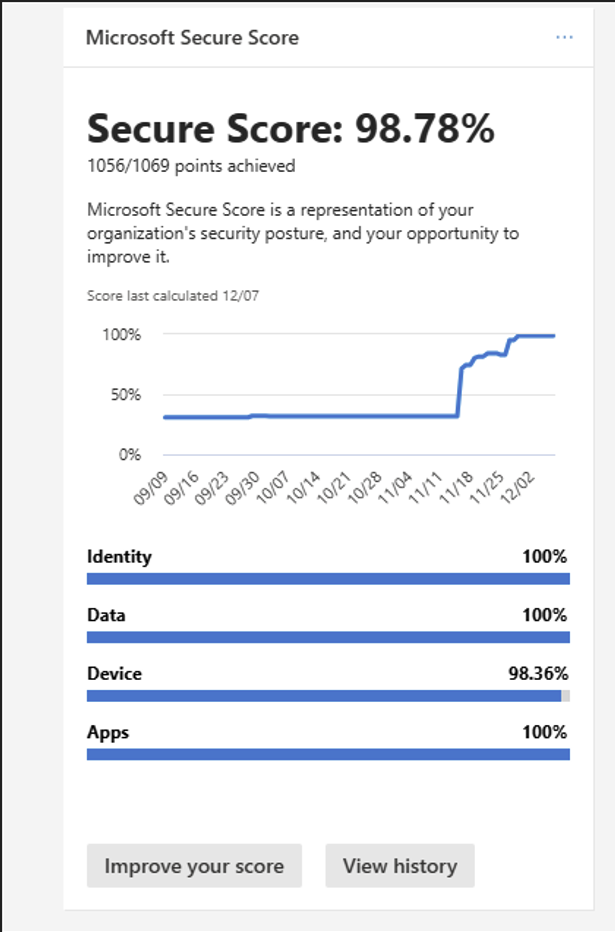
In this post series, I will demonstrate how I bumped up the Microsoft Secure Score of my tenant up to 100% (98,78% to be exact). This can be used to change the settings of your own tenant and have a better security posture.However, 100% secure score will definitely not mean that you are not hackable. It only means you use 100% of the Microsoft toolbox to defend your digital fortress. Spending more resources on awareness training for employees is a good approach on top of these settings. They are often the weakest factor.
My Microsoft Secure Score subpages
These subpages contains the different pillars to address:
On these pages I did the recommendations step-by-step and added some non-counting advices of myself and some things I found out in my work. You can also find all pages on the left side in the sidebar under “Secure Score”.
What is the Microsoft Secure Score?
The Microsoft Secure Score is a dynamic index number on scale of 0% to 100% that automatically scans your Microsoft tenant for possible enhancements on the security area. It gives several recommendations for us administrators to strengthen the security, based on zero trust, and based on those 4 pillars:
- Identity
- Data
- Devices/Endpoints
- Apps
The recommendations Microsoft gives are based on years of experience, cybersecurity trends and industry accepted benchmarks (like CIS). Some of the recommendations arrived from the older Active Directory era, but also from modern solutions and 3rd party community benchmarks like CIS and ISO 27001. The recommendations will dive into several different attack vectors:
- Protection against insider risks
- Protection against attackers
- Disabling unsafe protocols or features
- Blocking unsafe logins
- Classify your sensitive data
By getting your Secure Score to 100% means you are using 100% of the Microsoft Security toolbox. This doesn’t mean that you are unhackable, which you technically would never be able to achieve.
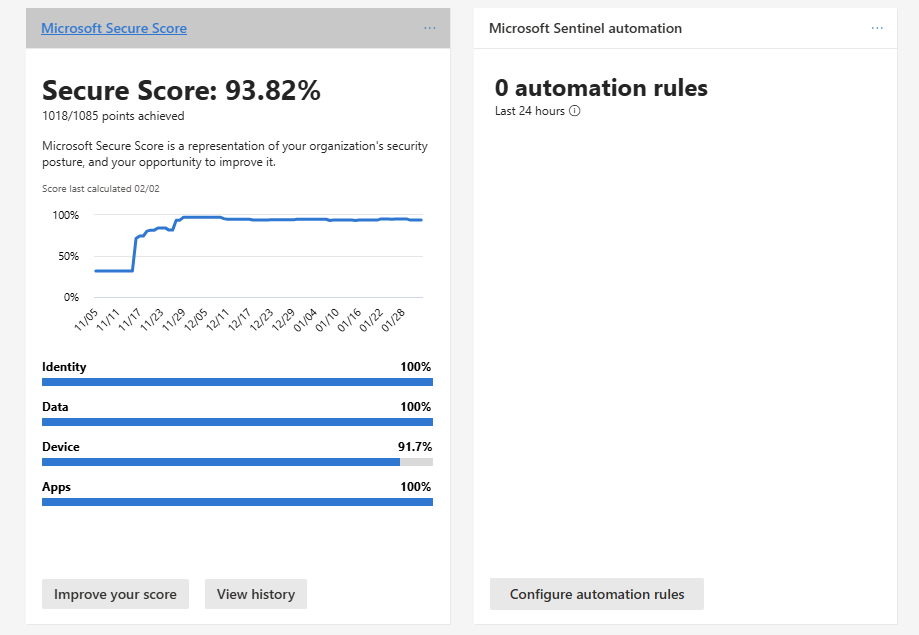
Starting point
When started out, my tenant contained around 8 users and 2 devices and have Business Premium licenses assigned to the users with Entra P1 included. My total secure score was 31,65% and the Identity pillar was 42,42%:
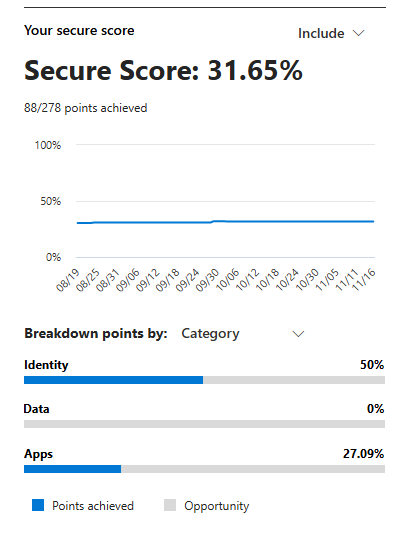
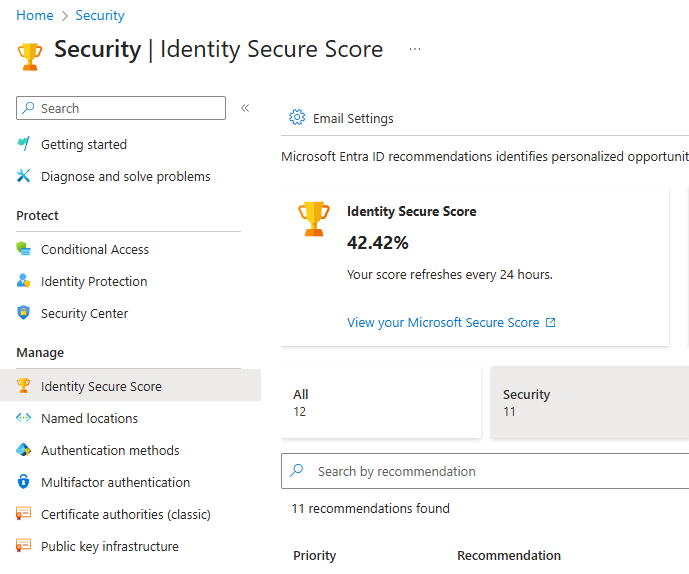
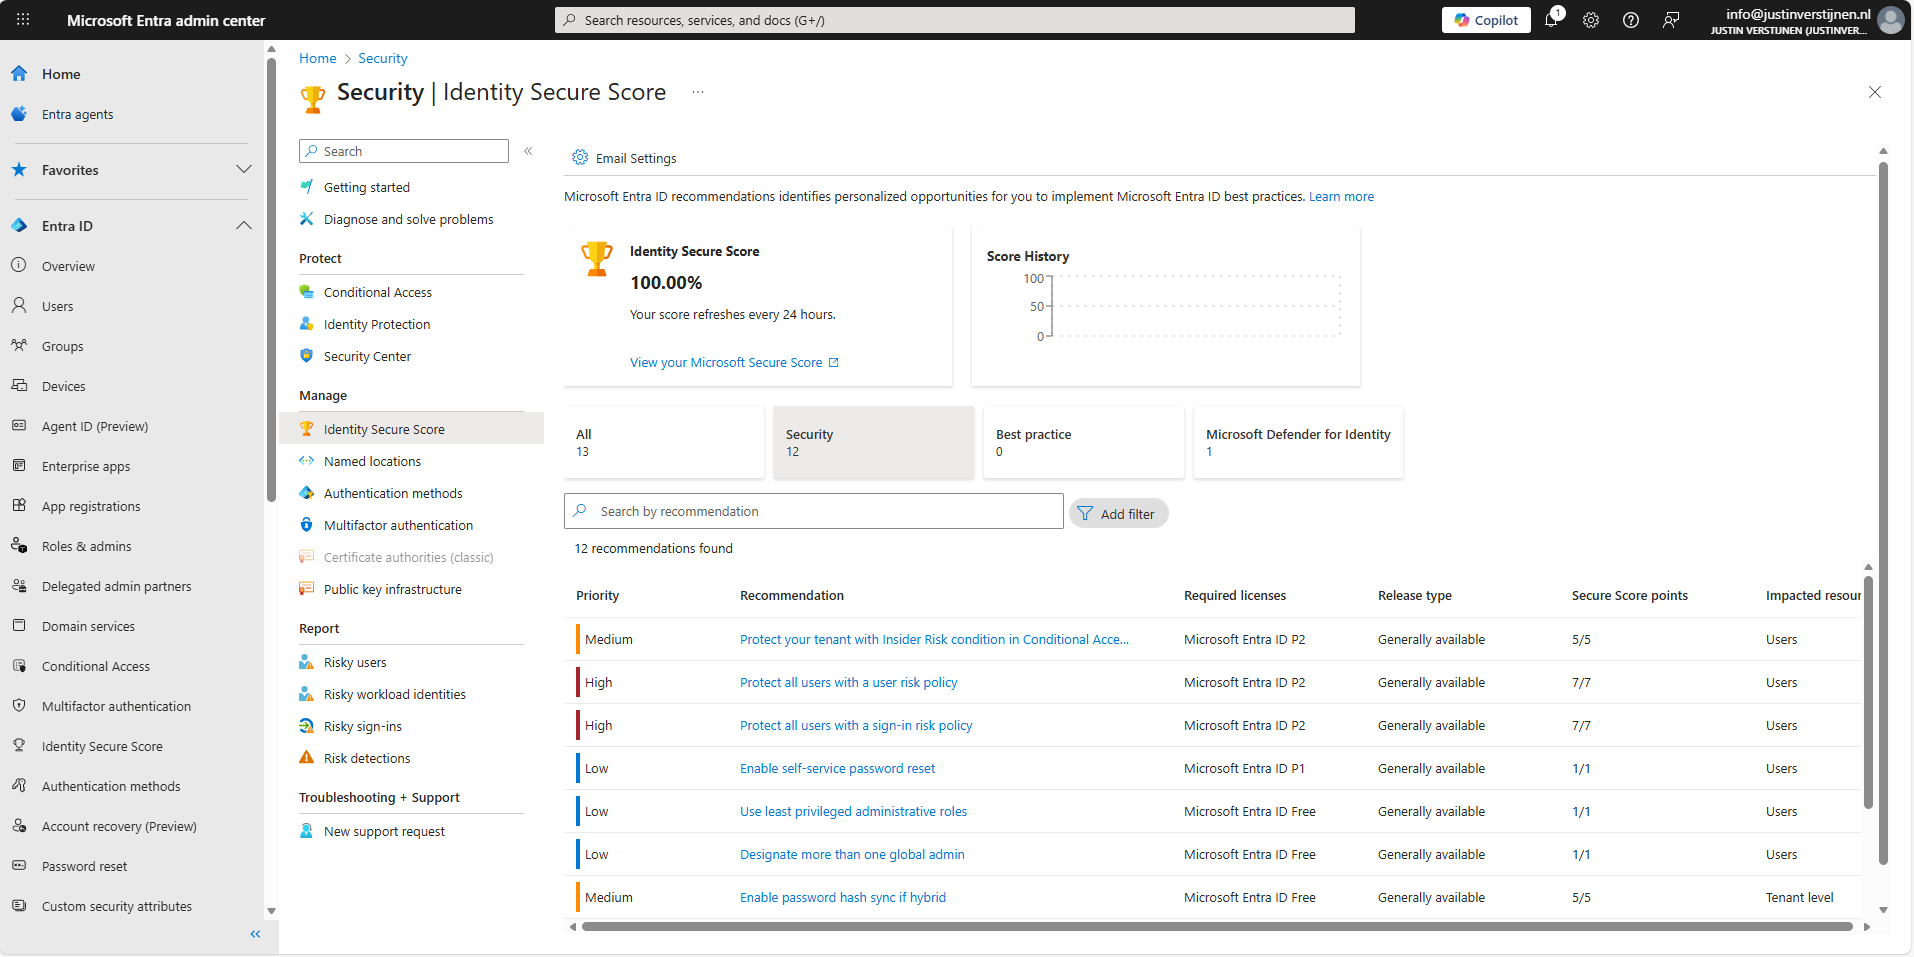
While I mostly use the Secure Score of the security.microsoft.com portal, as this contains every pillar we also have the secure score from the Entra portal. As you can see, they are a bit inconsistent. For Zero Trust to work, we have to defend ourselves on every pillar.
Licensing requirements
All the stuff we do on this pages needs the following licenses:
- Microsoft 365 Business Premium
- Windows 11 Enterprise / Education licenses
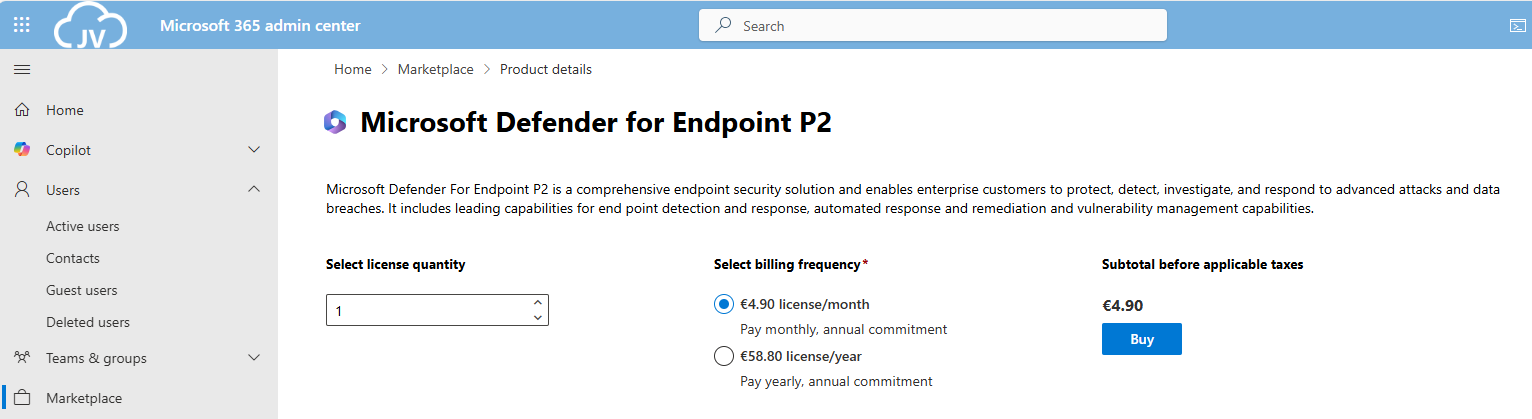
- Microsoft Defender for Endpoint P2
- Microsoft Entra ID P2
- Microsoft 365 E5 for the Apps recommendations (optional)
We can do most of the stuff with Business Premium licenses, which most small and bigger business should use. For the guides I ordered some standalone licenses to gain access to every setting available.
And for optimal Identity security, we need Entra ID Premium Plan 2 licenses assigned to every user:
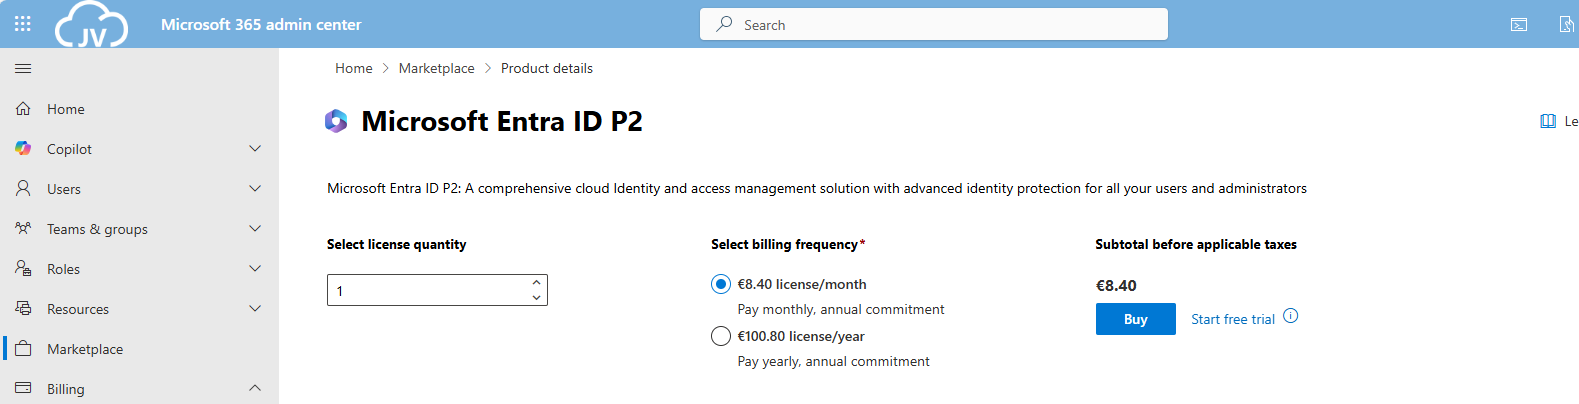
It is not essentially required to have those licenses, but it will drastically expand our toolbox to secure all Zero Trust pillars.
My final Microsoft Secure Score (after the guides)
As I did not implement every single setting, my Secure Score was hanging at 98,7% which is still a great score. In my environment, I did not have any Windows Enterprise or Education devices, so some of the recommendations were not achievable.
Summary
Getting the Secure Score of my tenant was a very fun and interesting experience. Still I found out some settings I have never heard about before and did understand some admin centers a bit better.
Altough, some settings feel more like a compliance thing than actually getting your security level up, but nevertheless it was very fun.
Thank you for visiting this page and I hope it was helpful.
End of the page 🎉
You have reached the end of the page. You can navigate through other blog posts as well, share this post on X, LinkedIn and Reddit or return to the blog posts collection page. Thank you for visiting this post.
If you think something is wrong with this post or you want to know more, you can send me a message to one of my social profiles at: https://justinverstijnen.nl/about/
If you find this page and blog very useful and you want to leave a donation, you can use the button below to buy me a beer. Hosting and maintaining a website takes a lot of time and money. Thank you in advance and cheers :)

The terms and conditions apply to this post.
Microsoft Secure Score - Data
This guide explains how I configured the Secure Score recommendations related to Microsoft Information Protection and Purview. Make sure that to target those recommendations, you will need at least Microsoft 365 E5 licenses (or separate licenses that do the job).
Before we begin
I collected all the options of the Microsoft Entra ID Identity Secure Score on this page, and we will address them all. I also added some industry-accepted options which are not in the secure score framework but are really helpful in avoiding or minimizing attacks in your environment.
You can use all options, or only use a subset of the options. This is up to you :)
Remember, having a secure score of 100% doesn’t mean 100% security. This only means you are using 100% of the security toolbox.
Starting this page, my Secure Score overview is this:
The Data pillar recommendations
Let’s check first which requirements we have to address. Go to https://security.microsoft.com/securescore and select the Data recommendations only:

This gives us these four recommendation we must address:
- Data #1: Ensure DLP policies are enabled
- Data #2: Publish M365 sensitivity label data classification policies
- Data #3: Extend M365 sensitivity labeling to assets in Microsoft Purview data map
- Data #4: Ensure that Auto-labeling data classification policies are set up and used
Let’s solve them step-by-step.
Data #1: Ensure DLP policies are enabled
Data Loss Prevention (DLP) policies help prevent sensitive information from being shared outside your organization or used improperly. Examples of using DLP are to forbid sending creditcard information, personal information or to notify users of the potential data they sent, creating a little extra awareness.
To create and enable an DLP policy, let’s open the Purview Compliance Portal (https://purview.microsoft.com).
Then navigate to Data loss prevention:
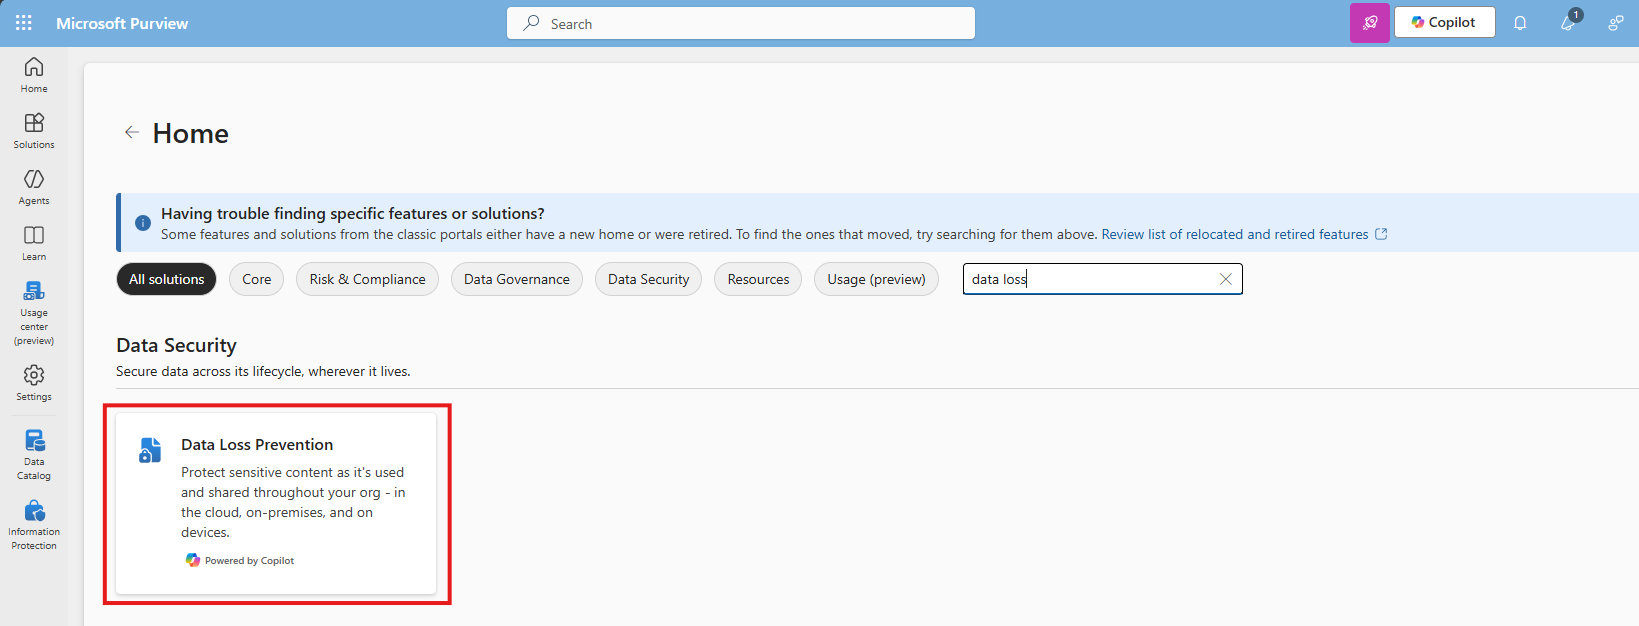
Click “+ Create policy” to create a new DLP policy.

Choose the option “Enterprise & devices”
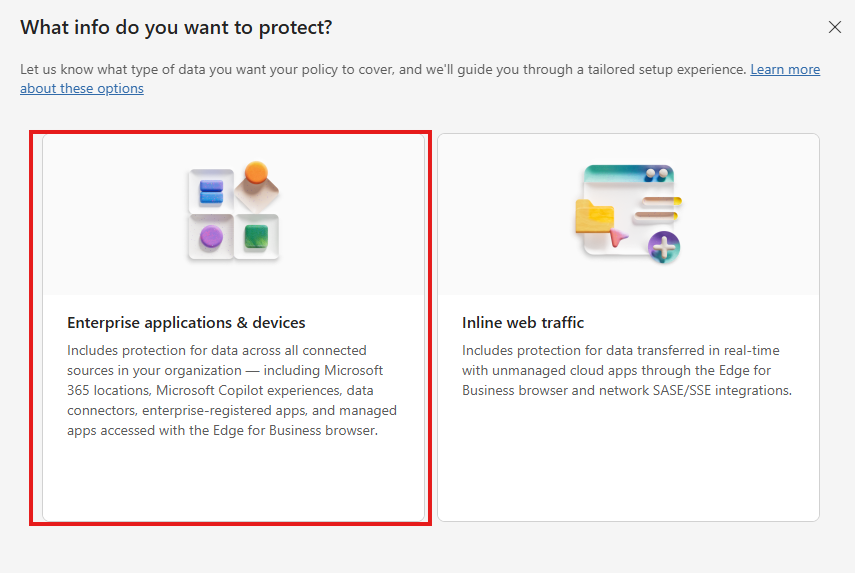
You can start from a template or start from scratch at the first step. Think of what you want to do.
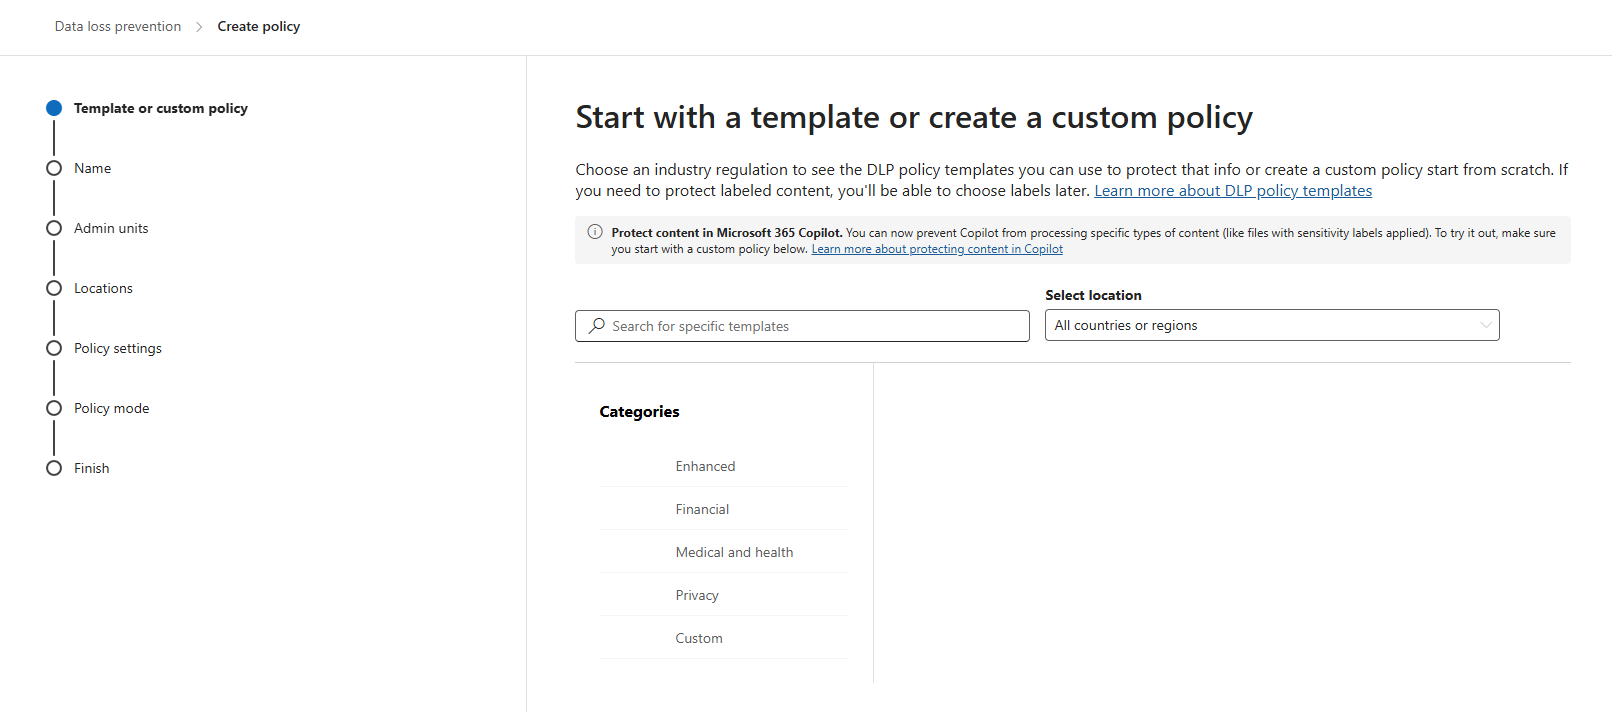
Click “Next”. Give the policy a name and description according to your documentation.
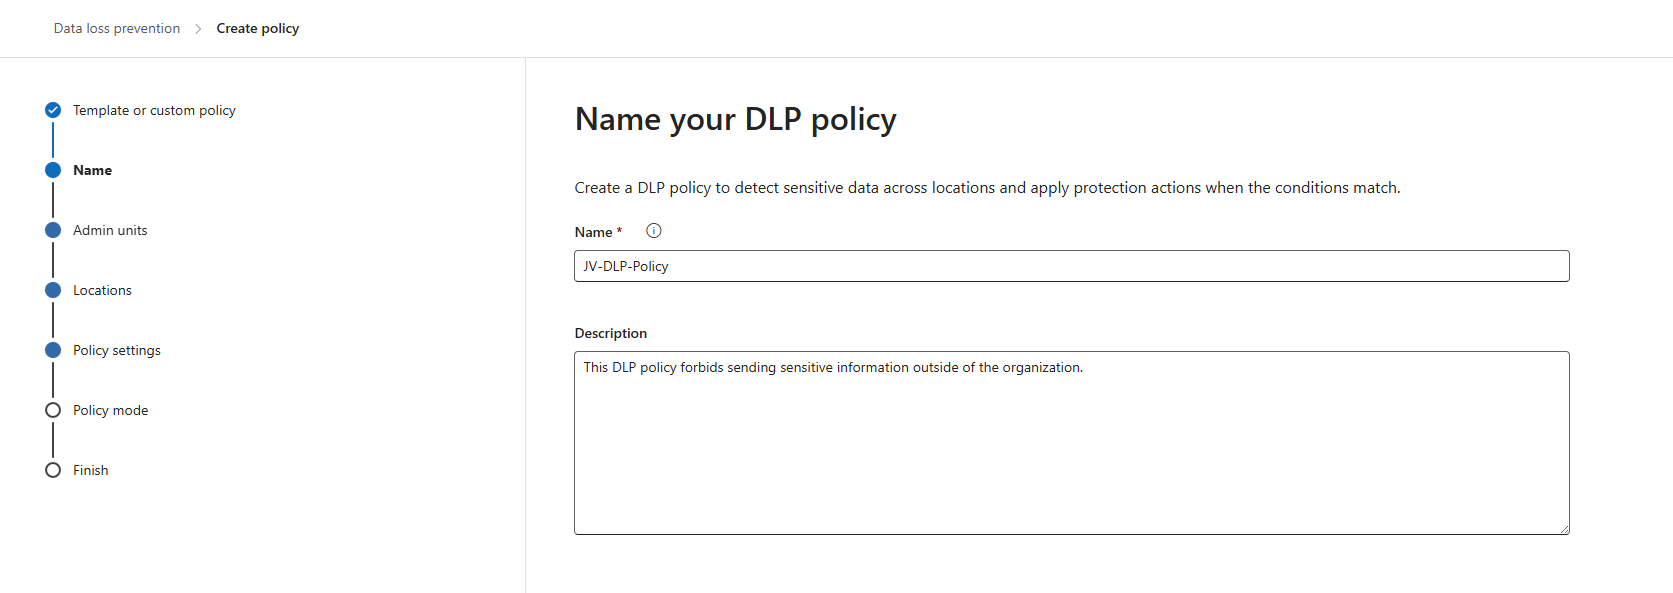
Click “Next”. You can now decide if you want to use administrative units of Entra ID. In my case, I skipped this step.
Now you can decide where to apply the policy. To make it the most effective, assign it to all locations, which is by default.
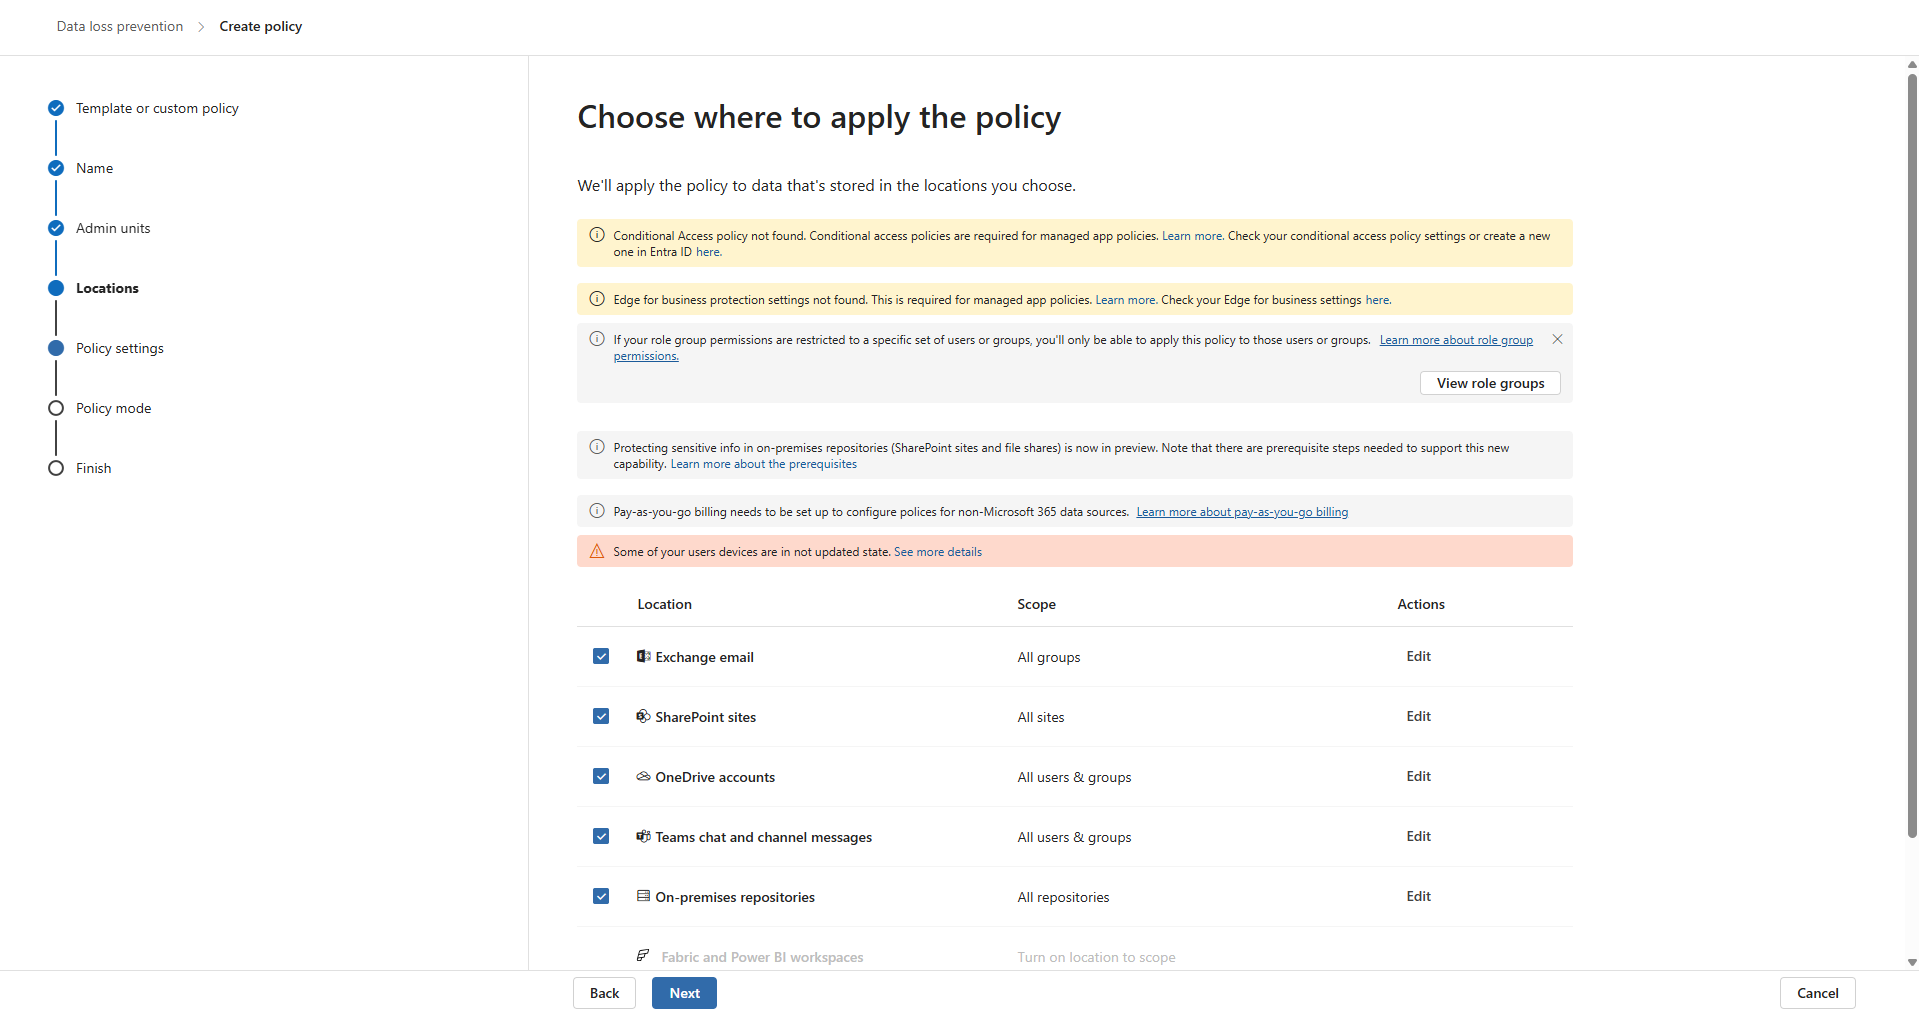
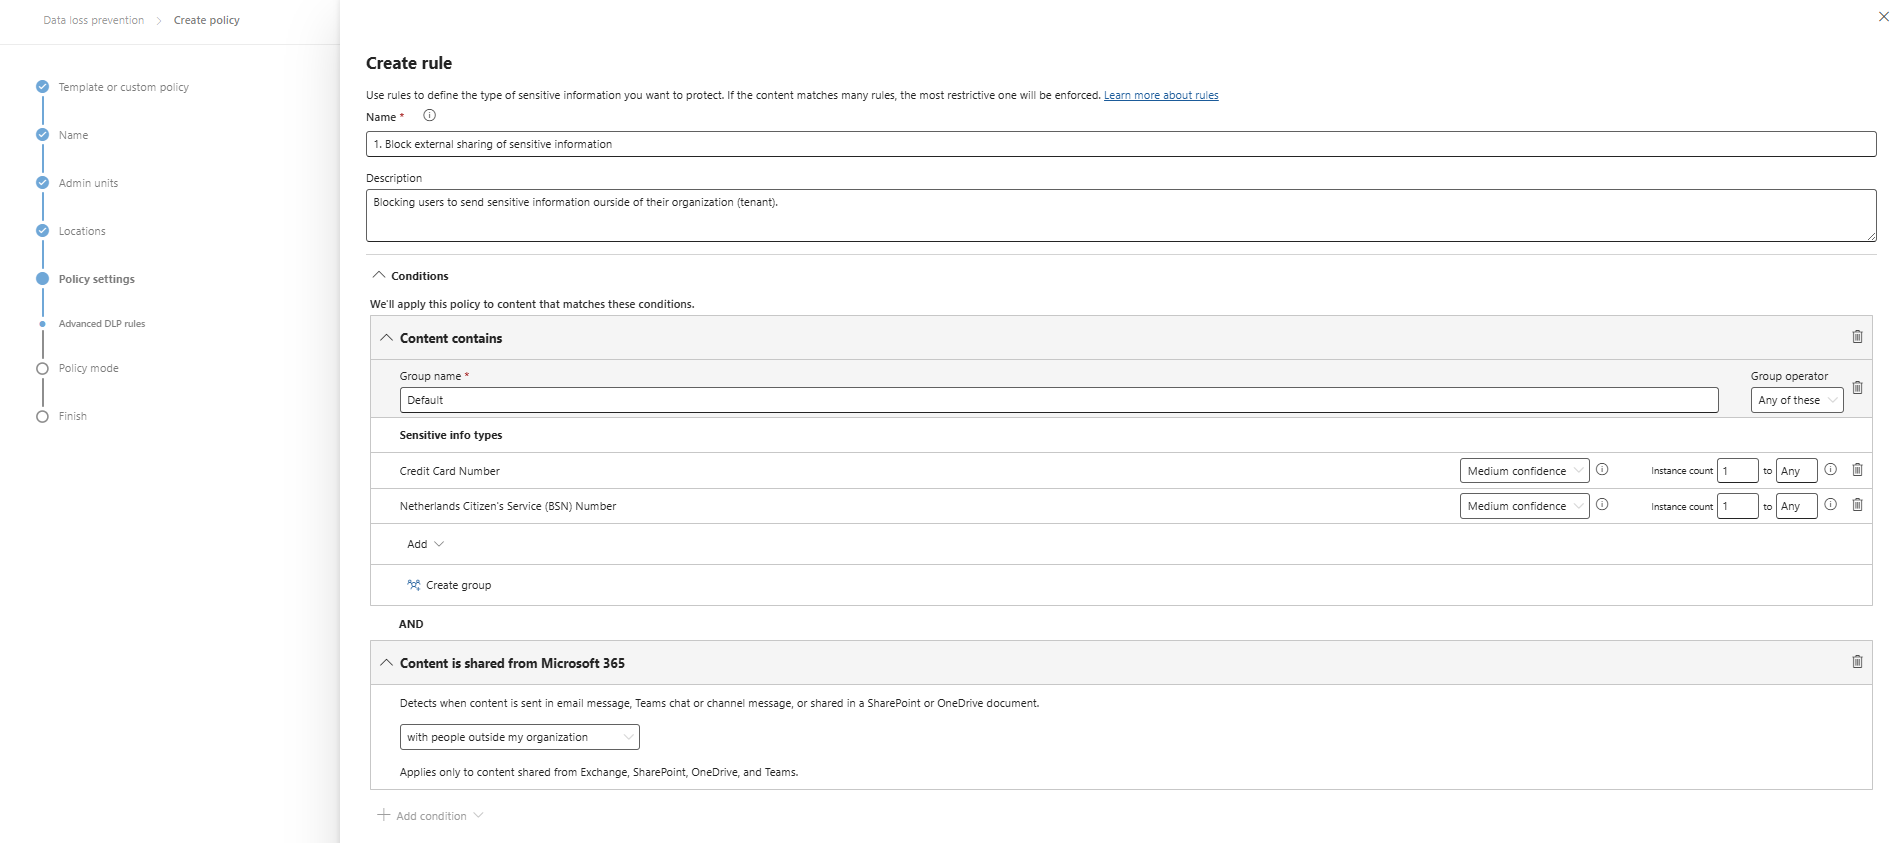
Click “Next” twice. Now we can create some advanced rules. This is up to you of course, but I will make some rules to give a basic example of the possibilities.
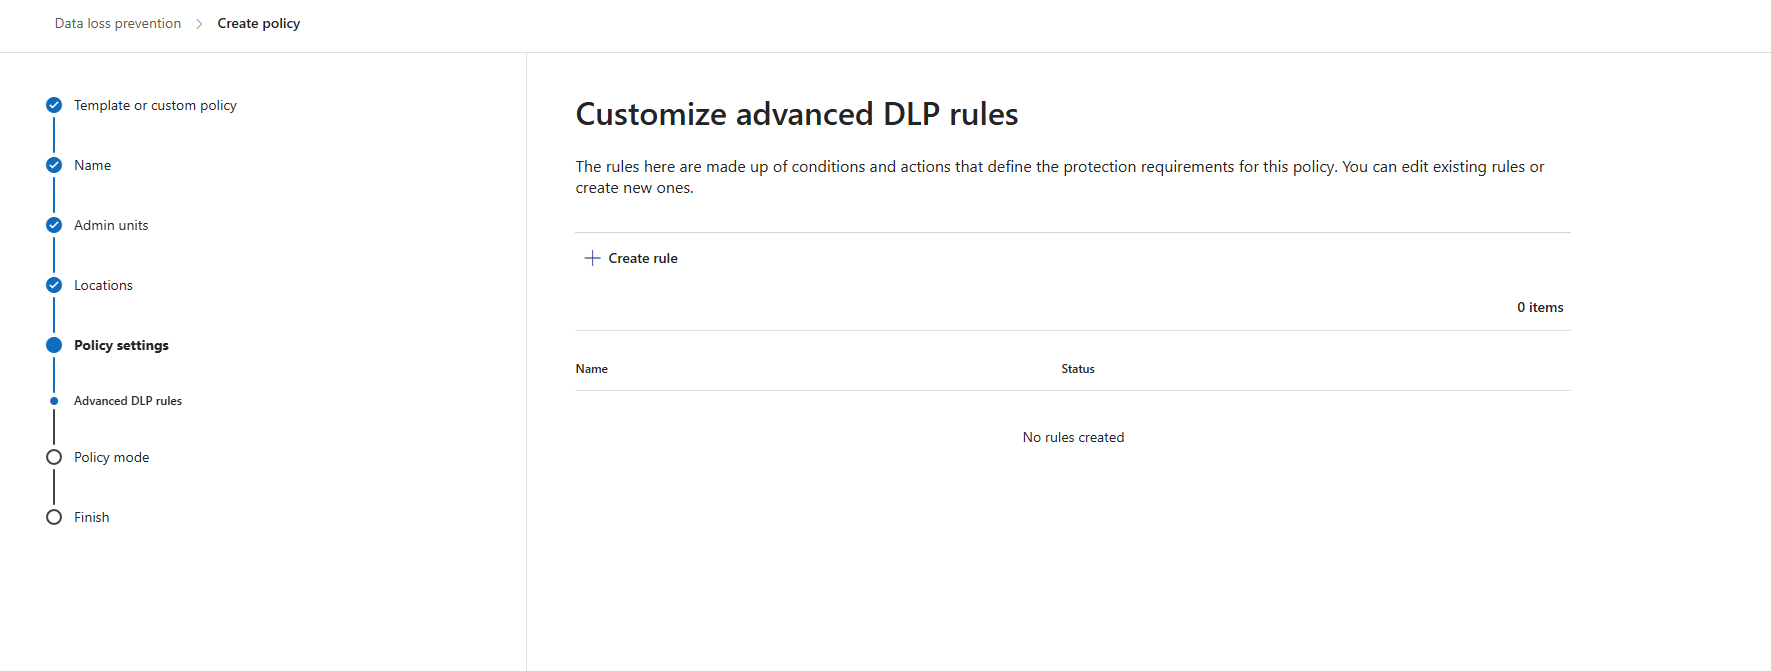
I clicked “+ Create rule” and gave it a name and description. Then I added 2 sensitive information types and stated that they are sent externally:
At the “Actions” section, we are able to block the action:
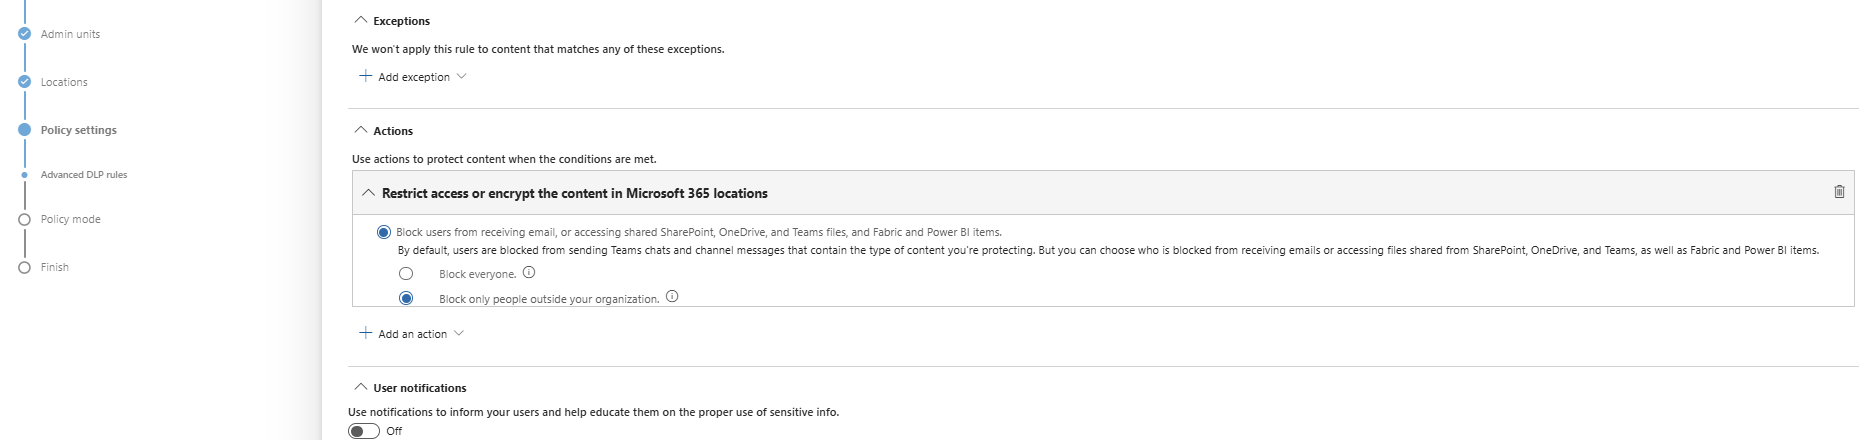
Save the policy, assign it to a group of users (All company group) and that should be it for this recommendation.
Data #2: Publish M365 sensitivity label data classification policies
Sensitivity labels are used to classify content (Public, Internal, Confidential) and apply protection based on the classification. This means users must label their documents, or we can do this with automatic policies.
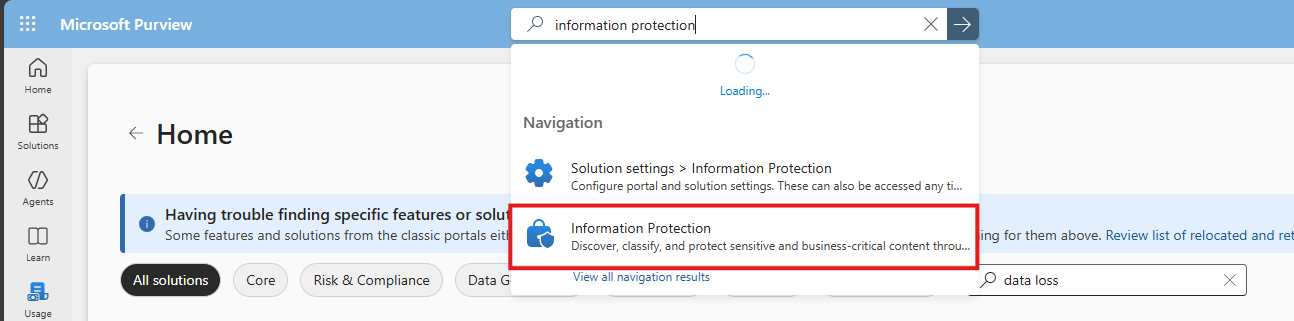
To create and enable sensitivity label, let’s open the Purview Compliance Portal (https://purview.microsoft.com).
Then navigate to: Information protection
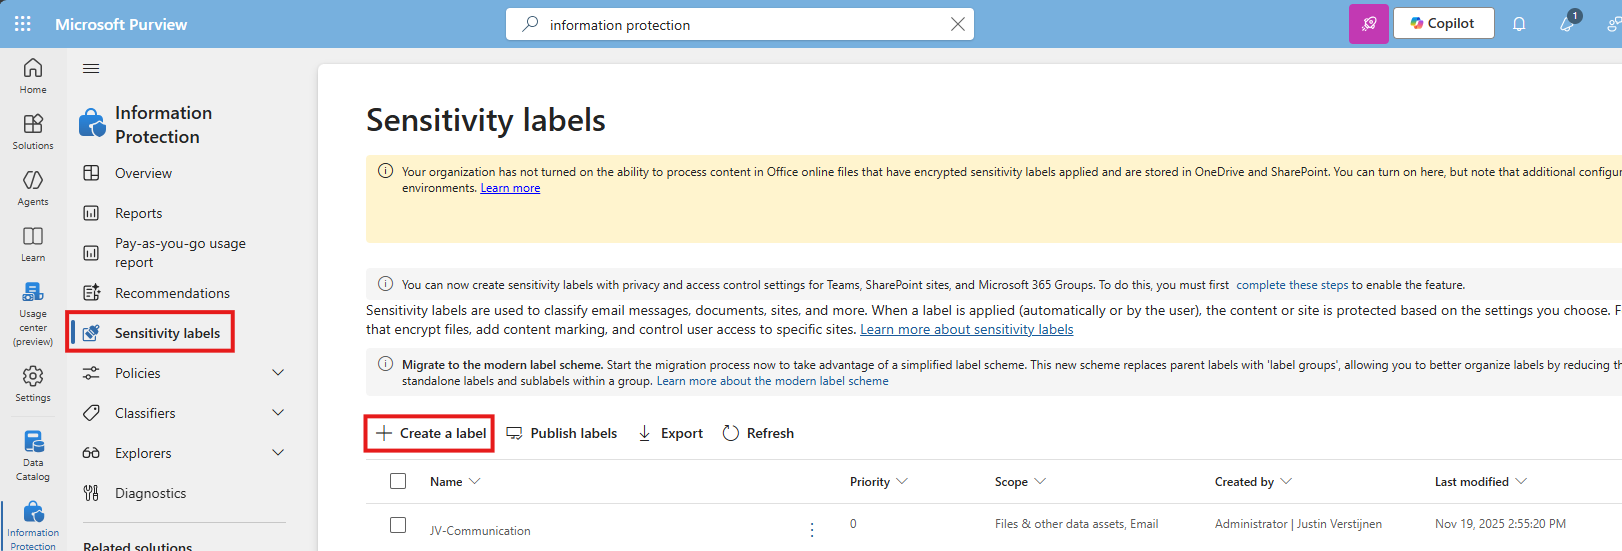
Then select “Sensitivity labels” from the left and click “+ Create a label”
You must now create a label to classify certain data to a certain type of information. Some examples of things you can do are:
- Public content
- Confidential -> Business Secrets
- Confidential -> Personally Identifiable Information (PII)
For this guide, I will make a label for Personally Identifiable Information (PII).
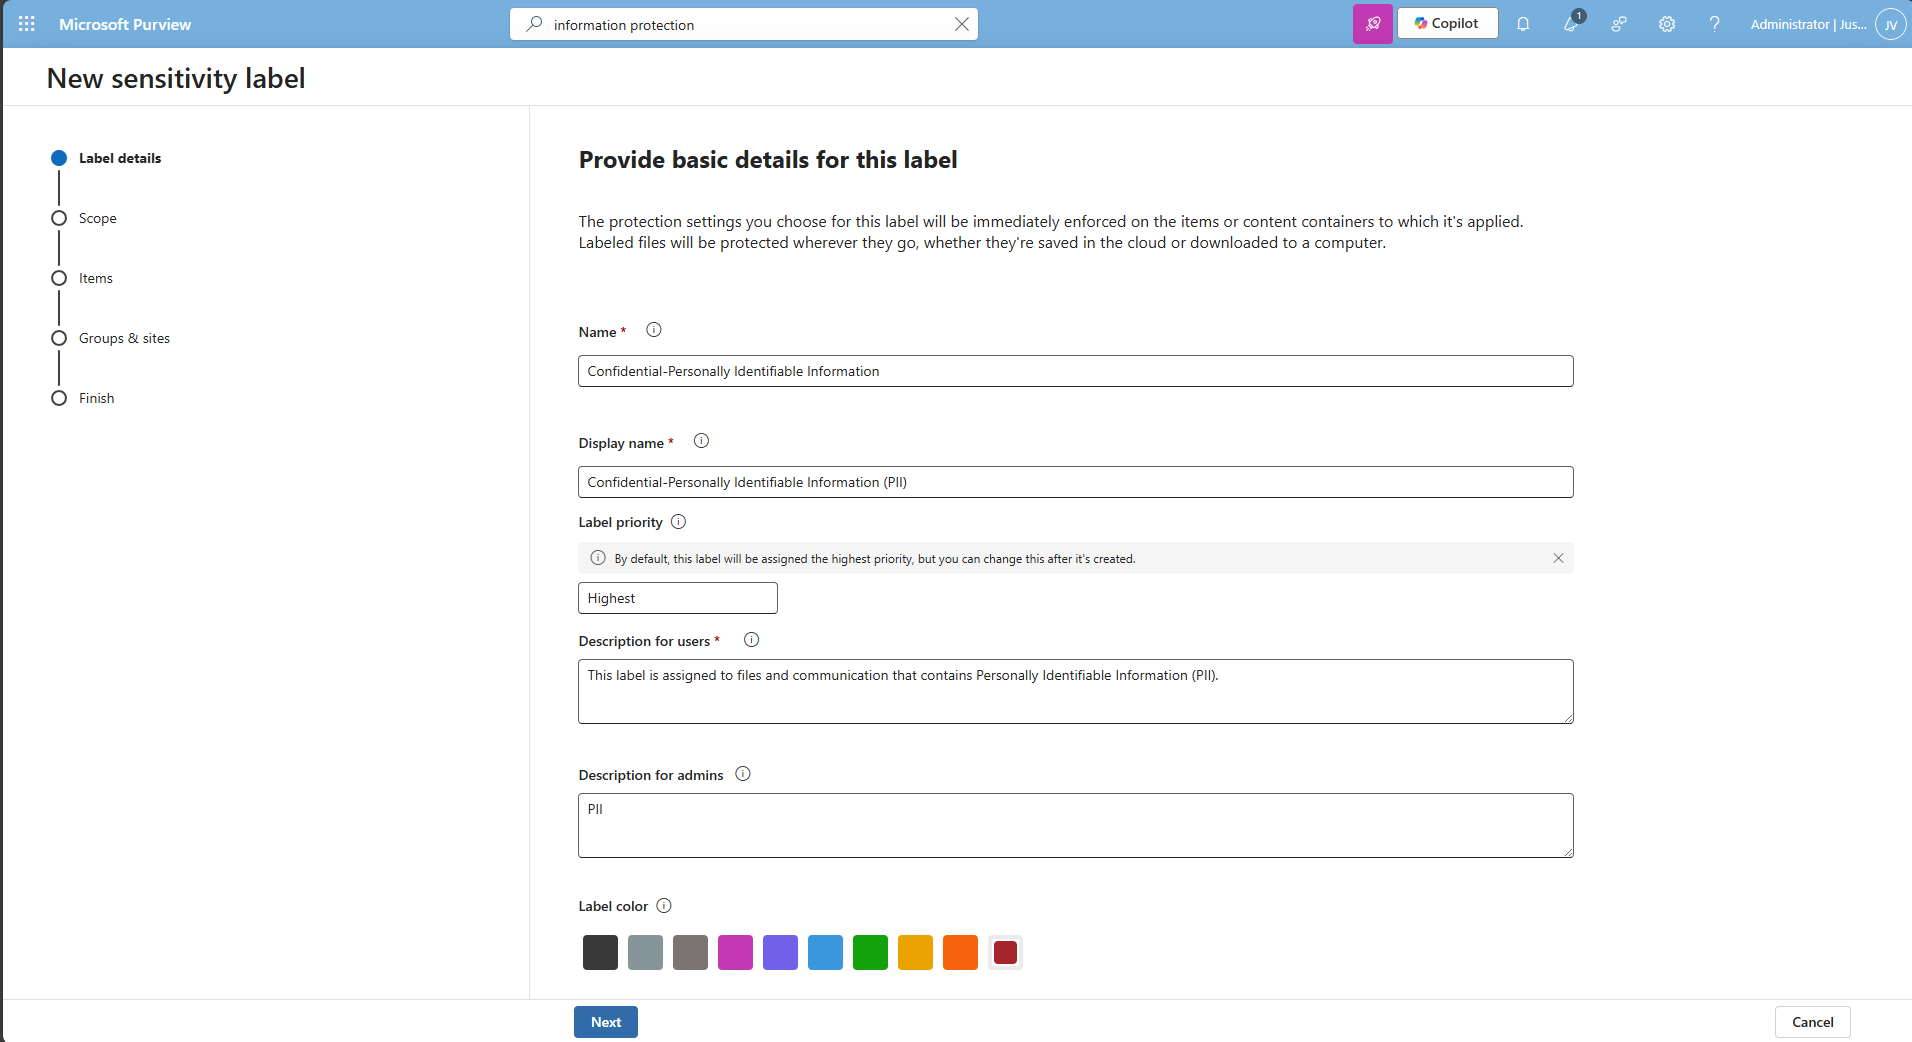
I also selected the red color as color of danger. Then click “Next” twice.
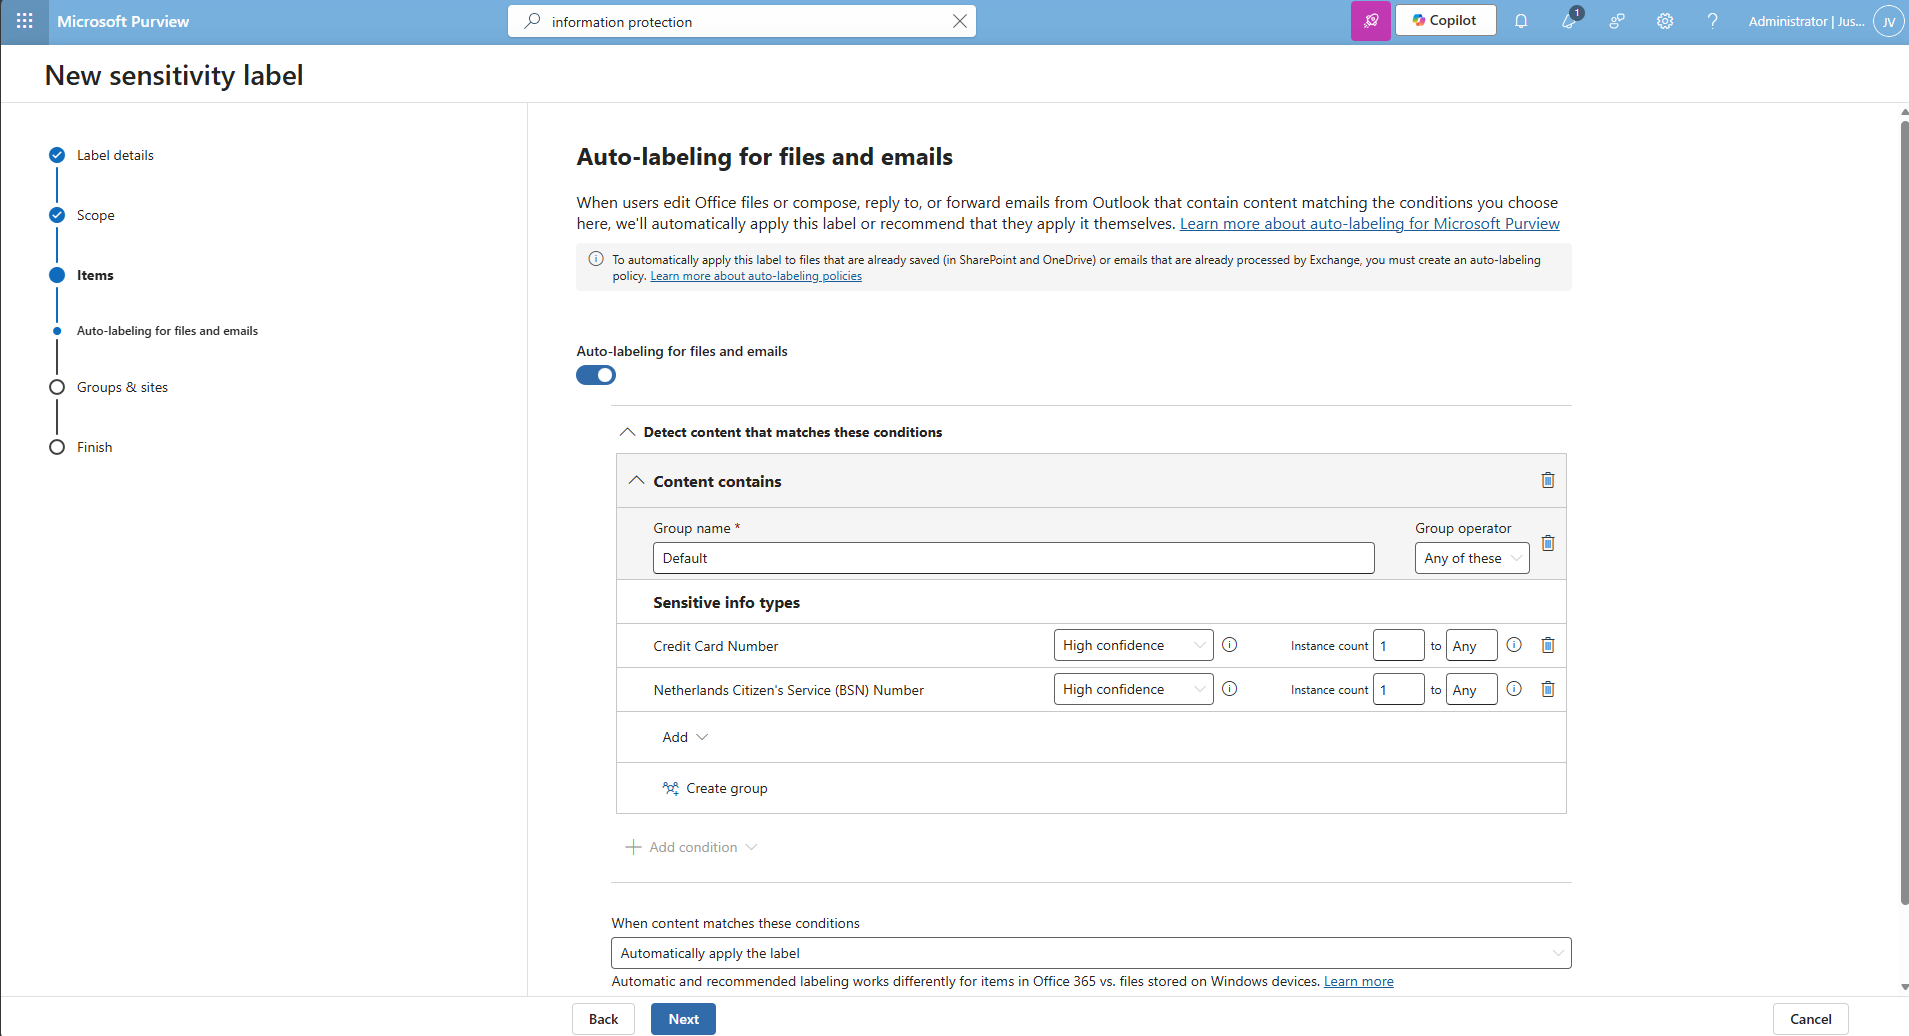
Then I selected the credit card and Netherlands Citizen (BSN) number as information that it must contain before auto labeling the documents, but you can customize this to your own needs.
Finish the wizard.
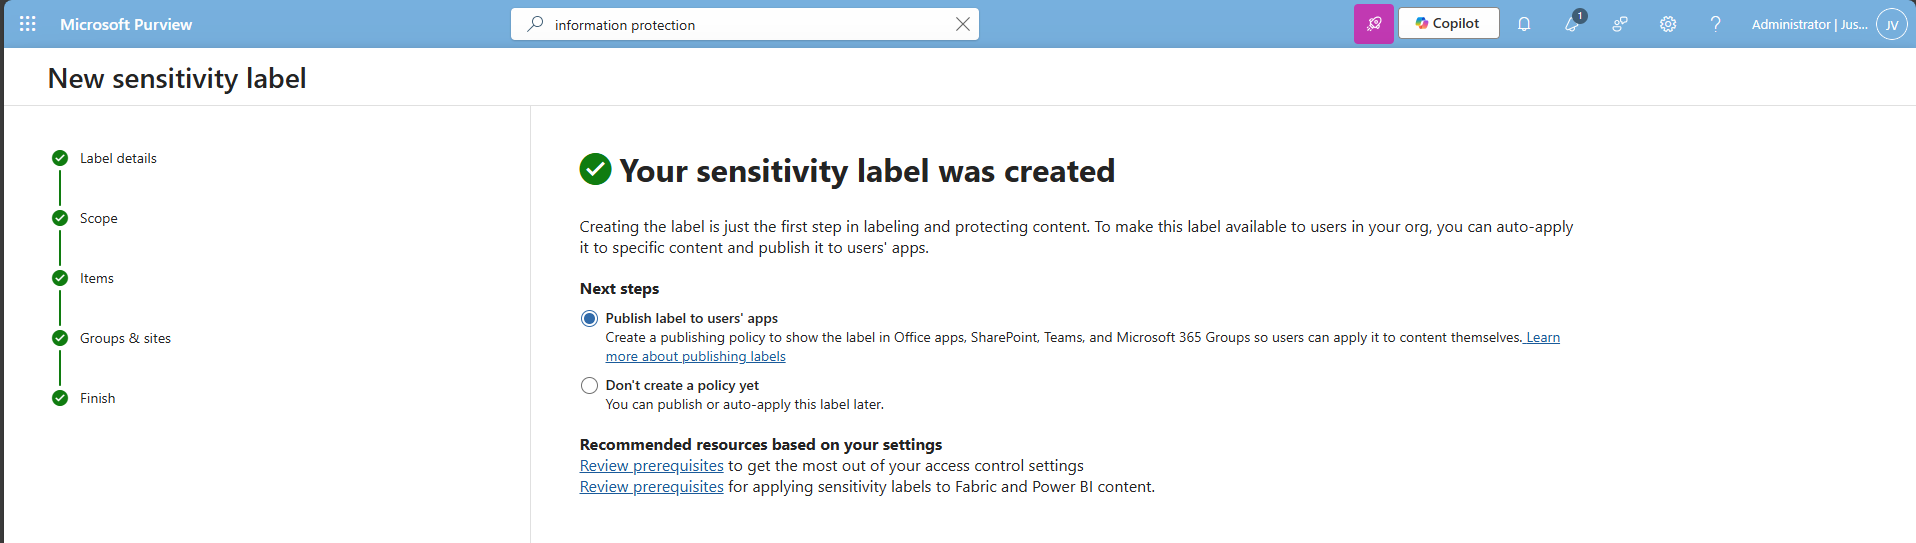
After creating the label, Purview asks you if you want to publish the label, which is a requirement for succeeding in this recommendation.
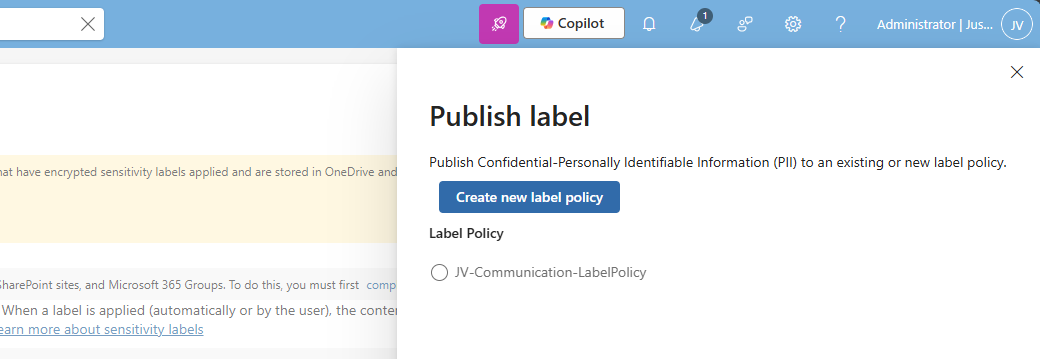
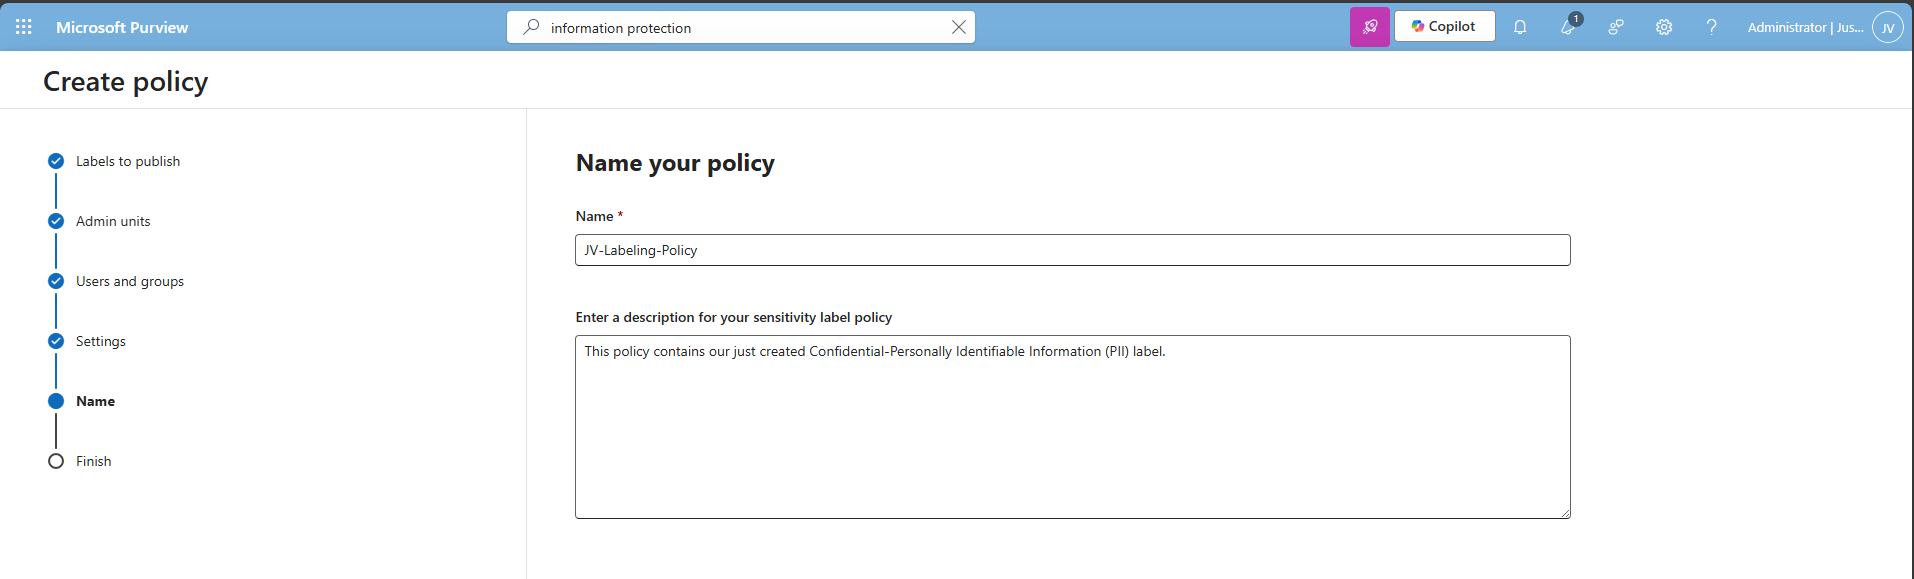
Select an existing label policy or create a new one by clicking “Create new label policy”. For finishing this guide, I will create a new label policy.

Select the labels to publish and click “Next”.
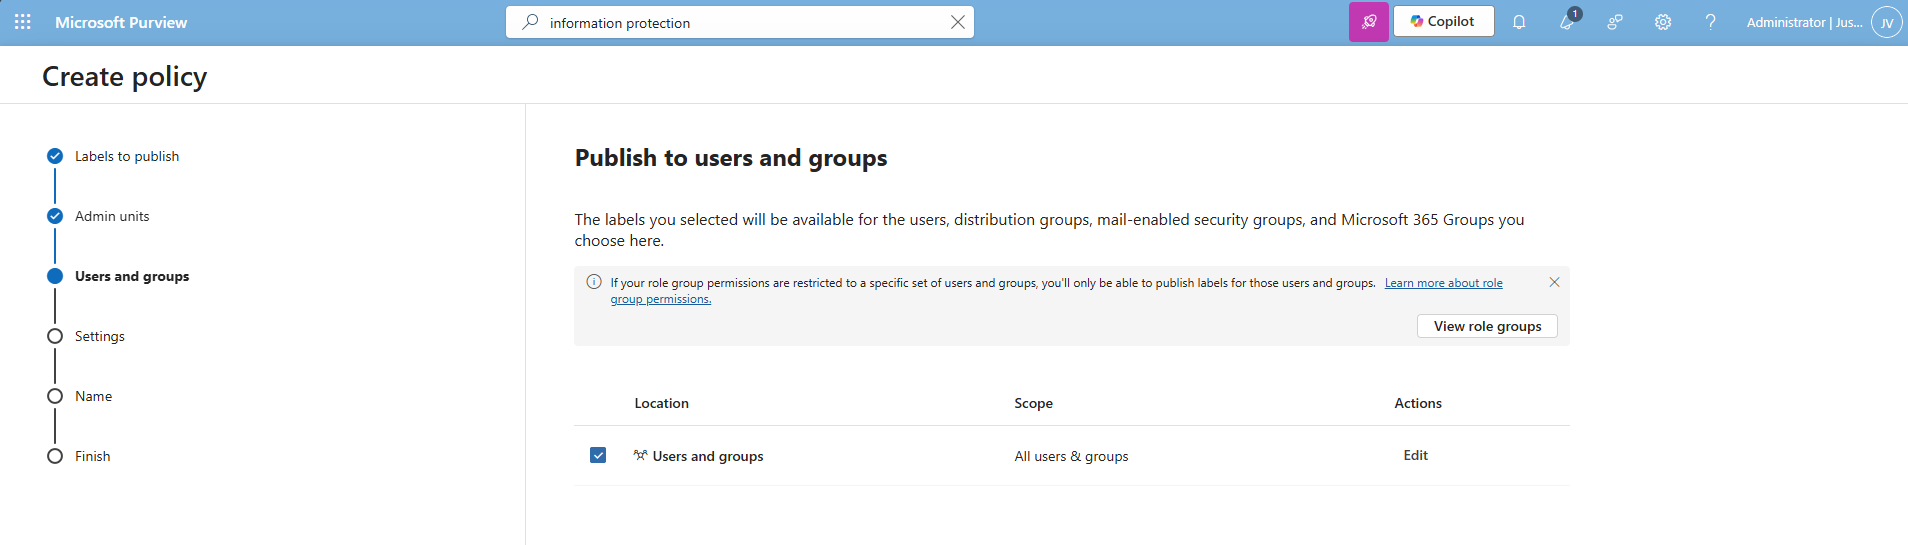
Select the users and groups for the label to apply and click “Next”.
You can now decide to use one of these advanced options:
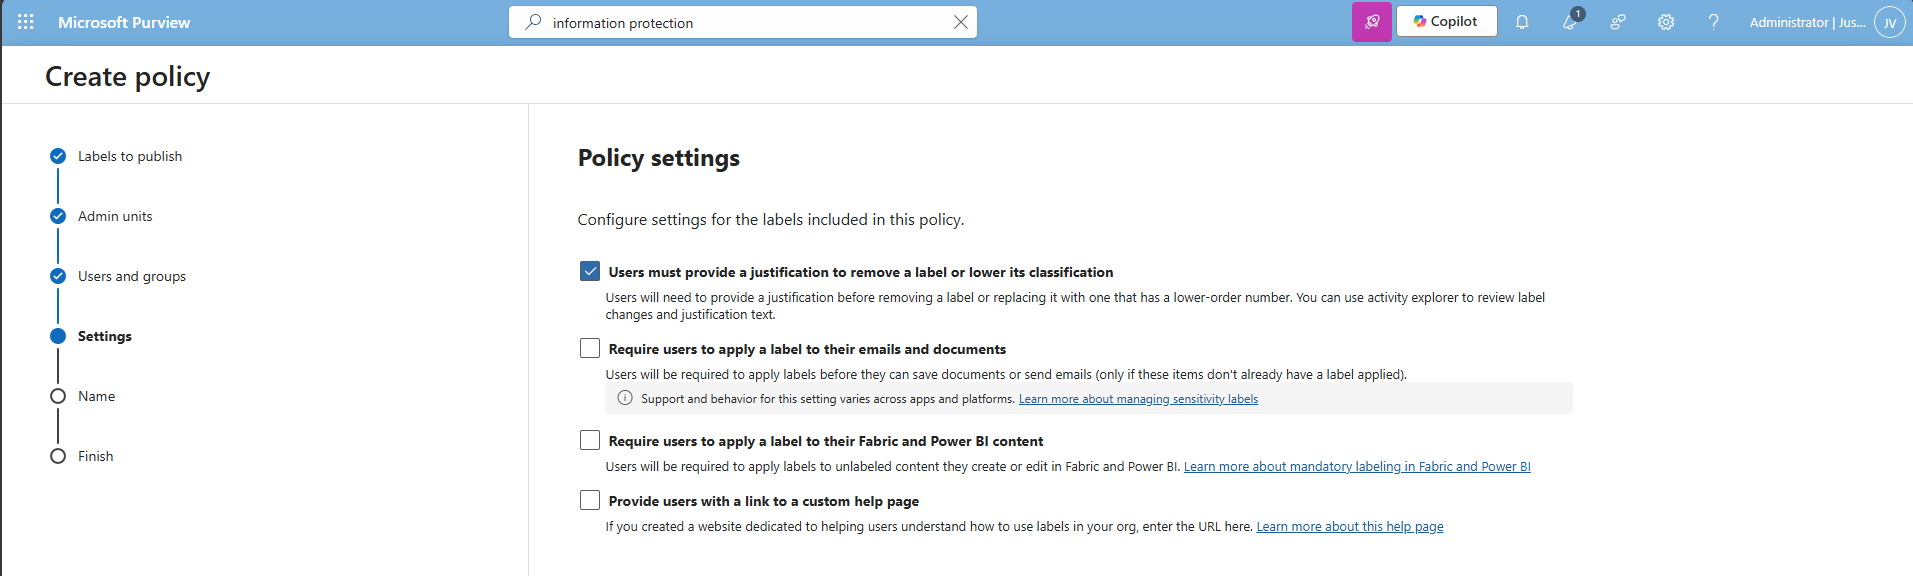
I chose the first option, because we want that for complaince and auditing reasons. Then click “Next”.

Select the label just created, and repeat this for every type on the left. You can use “Same as document” for a speedy finishing of the wizard.
Click “Next” and after that “Finish” to publish the label. That should be it for this recommendation.
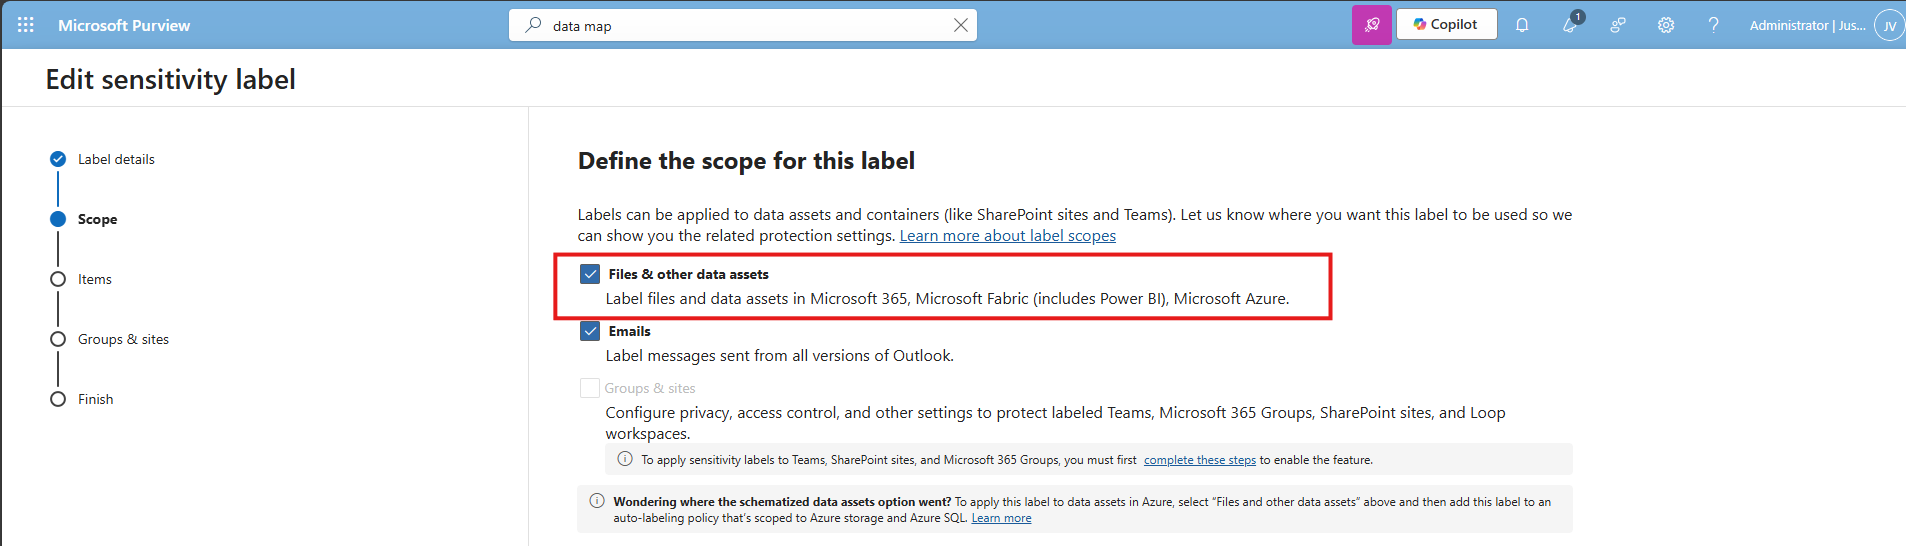
Data #3: Extend M365 sensitivity labeling to assets in Microsoft Purview data map
This recommendation allows sensitivity labels to apply to data sources discovered in Purview (Azure SQL, Storage, etc.). The fun fact is that if you followed the guide till here, you already configured it.
In the label itself, you must have this enabled:
And in the labeling policy, you must have the label selected at this page:
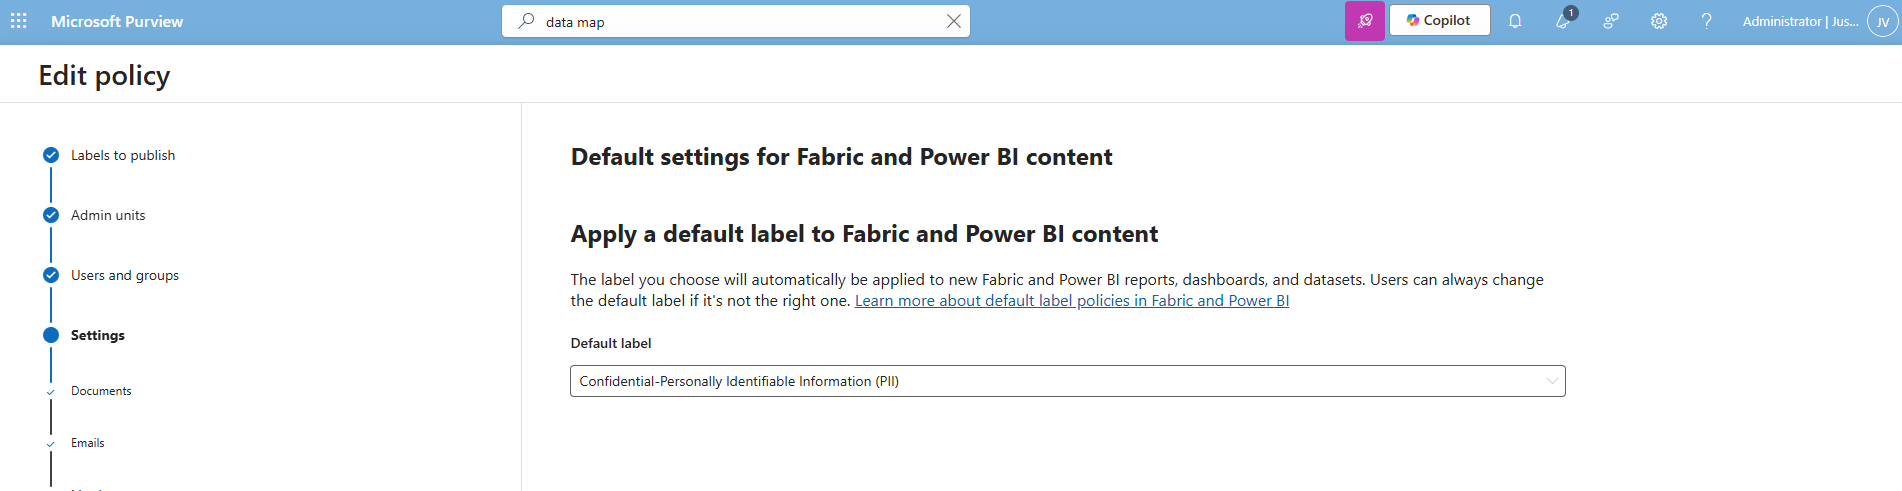
Data #4: Ensure that Auto-labeling data classification policies are set up and used
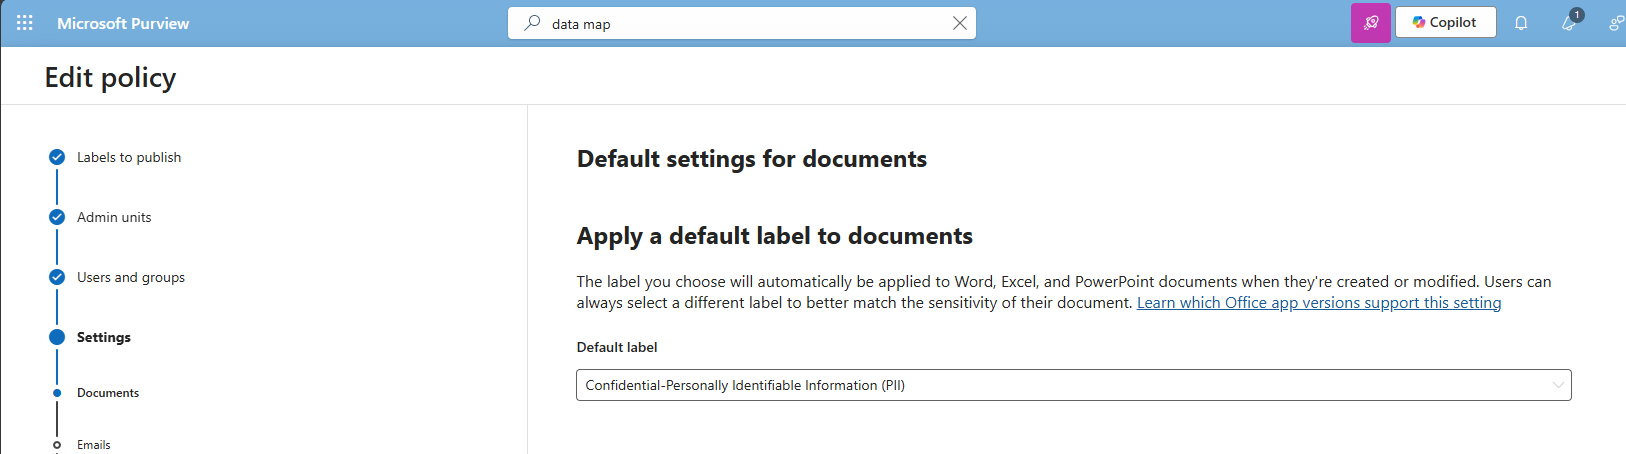
This recommendation wants us to configure automatically applying sensitivity labels based on detected content. The fun fact is again, we already configured this in recommendation 1 and 2:
In the labeling policy, we must configure this:
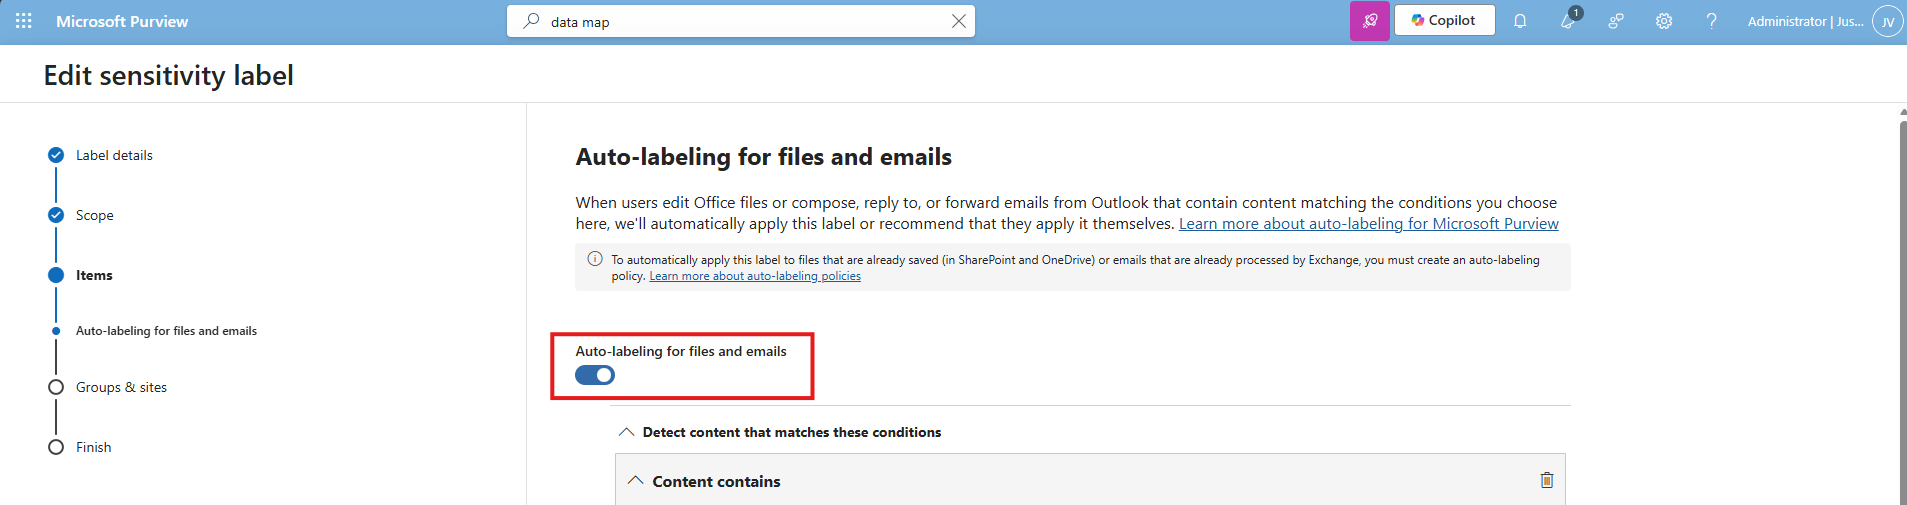
And in the label itself, we must configure this:
The result
After I did all the configurations described on this page, my Data secure score was at the full max, 100%:

Summary
Configuring these data protection measures is an important step in preventing data leaks and protecting sensitive information. It also helps you become more aware of which data needs extra care, and where users should be more cautious in their daily work. The last thing anyone wants is to lose personal or business-critical data, especially with all the compliance implications and potential damage that can follow.
Thank you for taking the time to read this guide. I hope it was helpful and gives you a solid starting point for improving your data protection setup.
Sources
These sources helped me by writing and research for this post:
- https://learn.microsoft.com/en-us/purview/data-map-sensitivity-labels
- https://learn.microsoft.com/en-us/purview/data-map-sensitivity-labels-apply
- https://learn.microsoft.com/en-us/purview/dlp-overview-plan-for-dlp
End of the page 🎉
You have reached the end of the page. You can navigate through other blog posts as well, share this post on X, LinkedIn and Reddit or return to the blog posts collection page. Thank you for visiting this post.
If you think something is wrong with this post or you want to know more, you can send me a message to one of my social profiles at: https://justinverstijnen.nl/about/
If you find this page and blog very useful and you want to leave a donation, you can use the button below to buy me a beer. Hosting and maintaining a website takes a lot of time and money. Thank you in advance and cheers :)
The terms and conditions apply to this post.
Microsoft Secure Score - Apps
On this page, I will describe how I implemented my current Microsoft Secure Score on the Apps pillar. This means altering mostly the options of Microsoft Defender for Office 365 but also for Exchange Online, Teams and SharePoint. I have categorized all of the requirements, so the reader cam implement the settings very easily using the least administrative effort.
Before we begin
I collected all the options of the Microsoft Secure Score for Apps on this page, and we I address them all. I also added some industry-accepted options which are not in the secure score framework but are really helpful in avoiding or minimizing attacks in your environment. You can use all options, or only a subset. The more of the options you implement, the higher your score.
Remember, having a secure score of 100% doesn’t mean 100% security. This only means you are using 100% of the security toolbox of Microsoft.
At the start of this page, my current Secure Score overview looks like this:
The Apps recommendations
Let’s check first which requirements we have to address. Go to https://security.microsoft.com/securescore and select Apps to only get the “Apps” category recommendations.
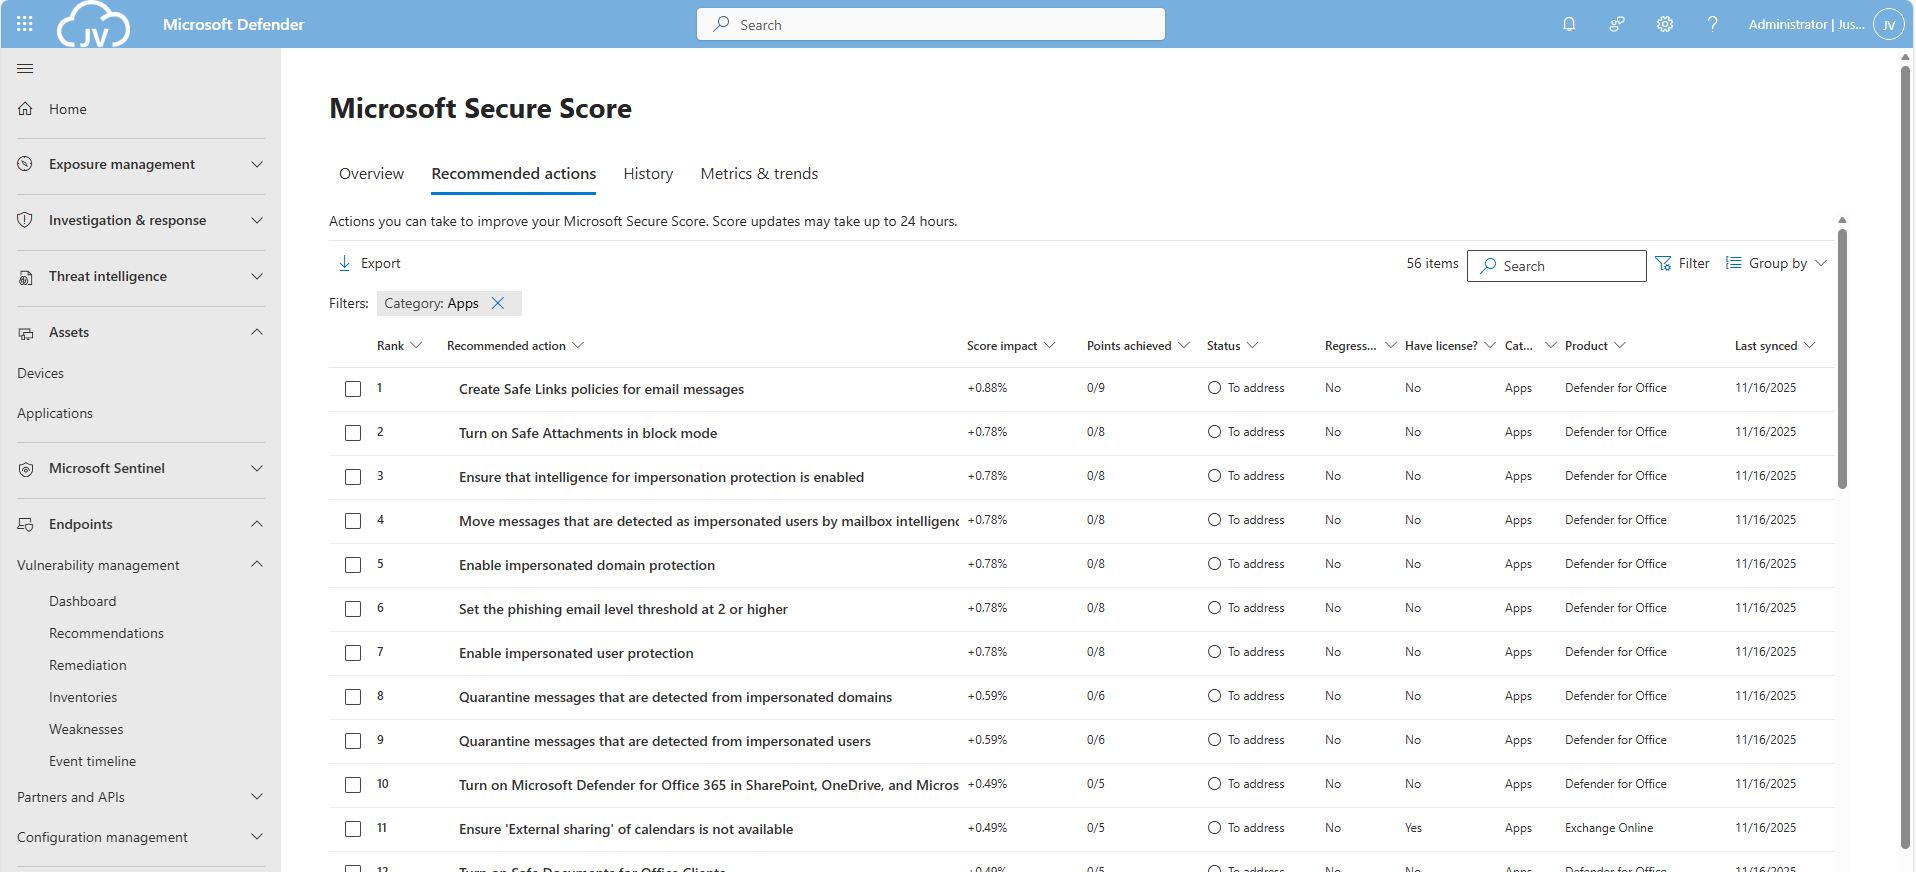
This gets us 56 recommendations, where around 20 are already addressed by the default settings. We still have 36 recommendations to so which we will do per application.
The Exchange Online recommendations
We can select the Exchange Online recommendations only in the filter:
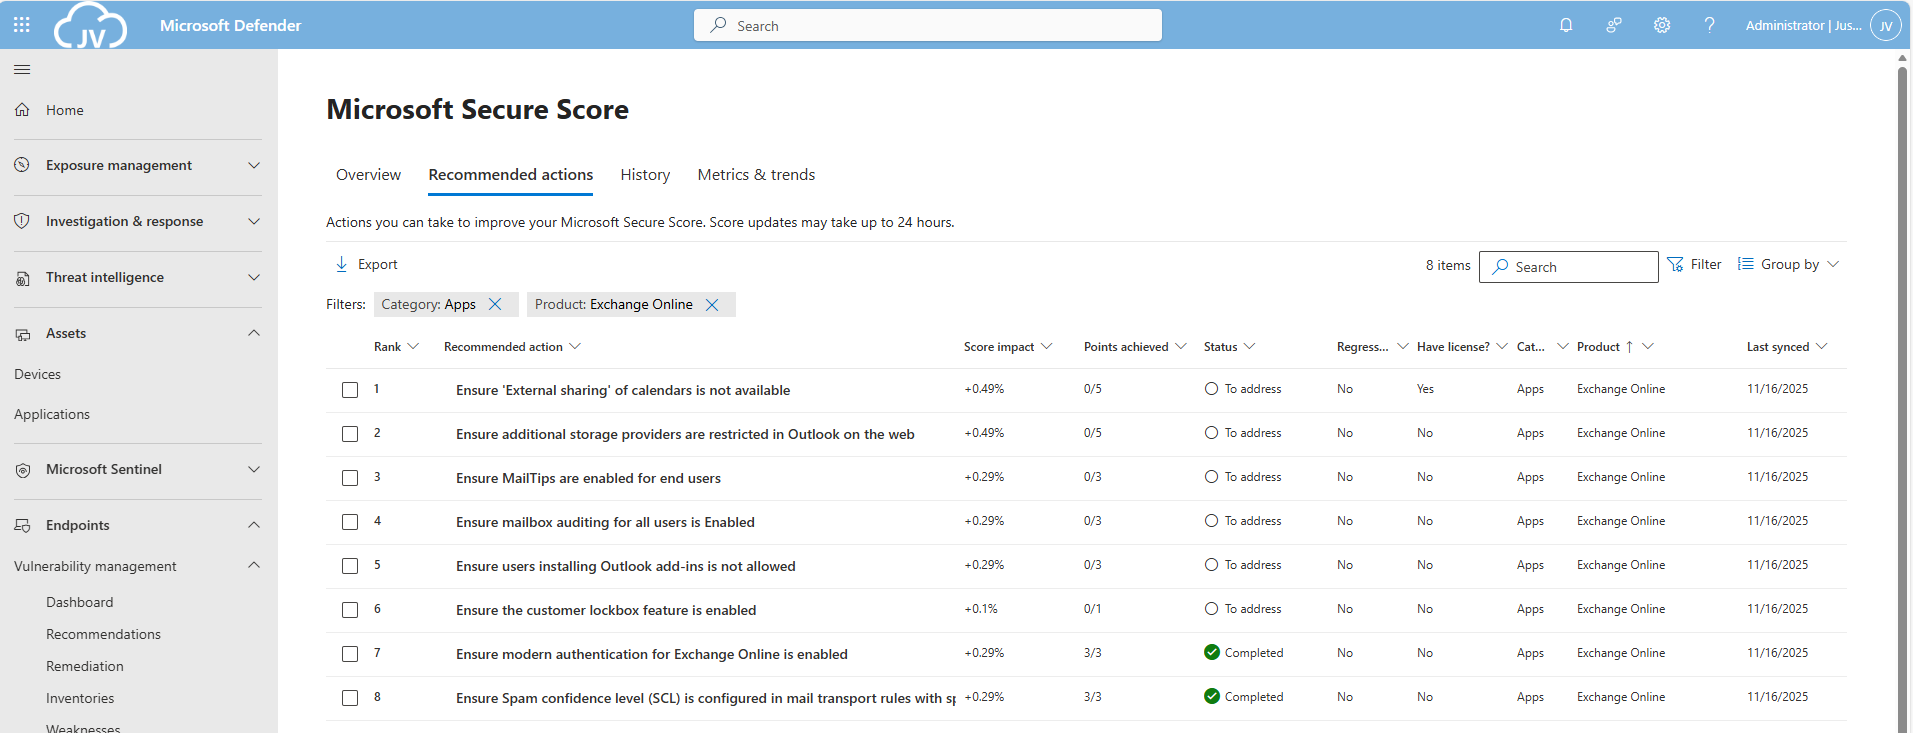
This are 8 recommendations which we will perform now. Most of these recommendations are setting which we will have to set. They can have impact on end-users so be aware of that.
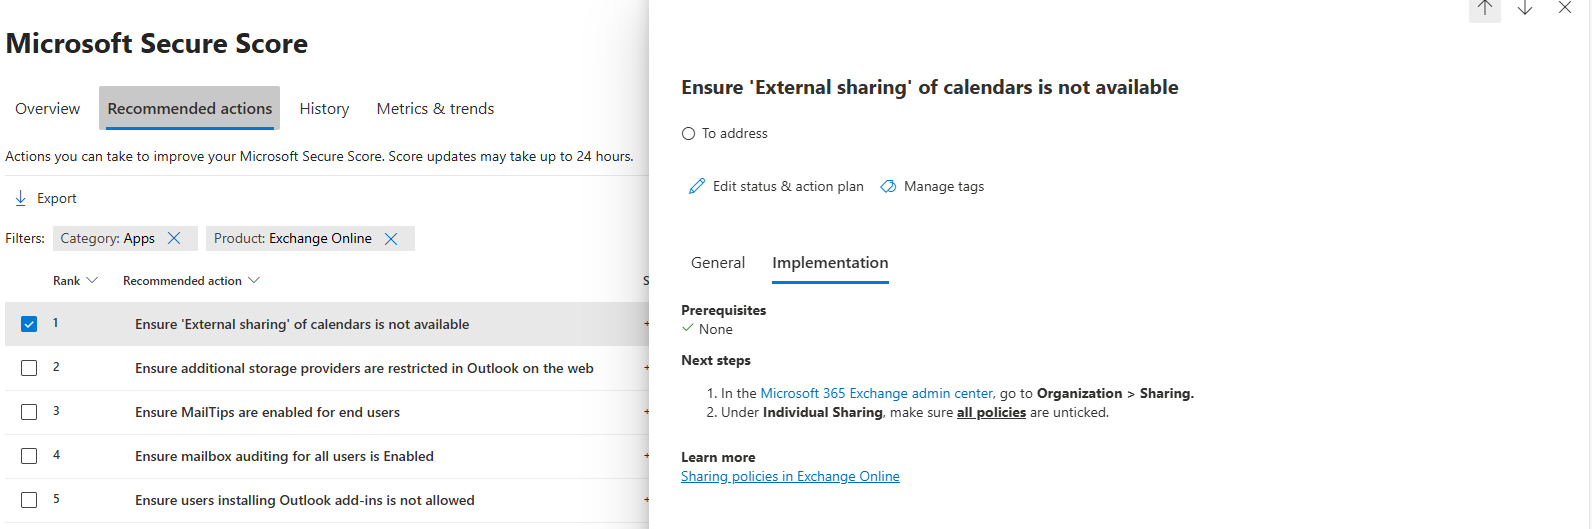
EO 1: Ensure ‘External sharing’ of calendars is not available
Go to the Exchange Online admin center: https://admin.exchange.microsoft.com
Then head to “Organization” and then “Sharing”. Open the tab “Individual Sharing”.
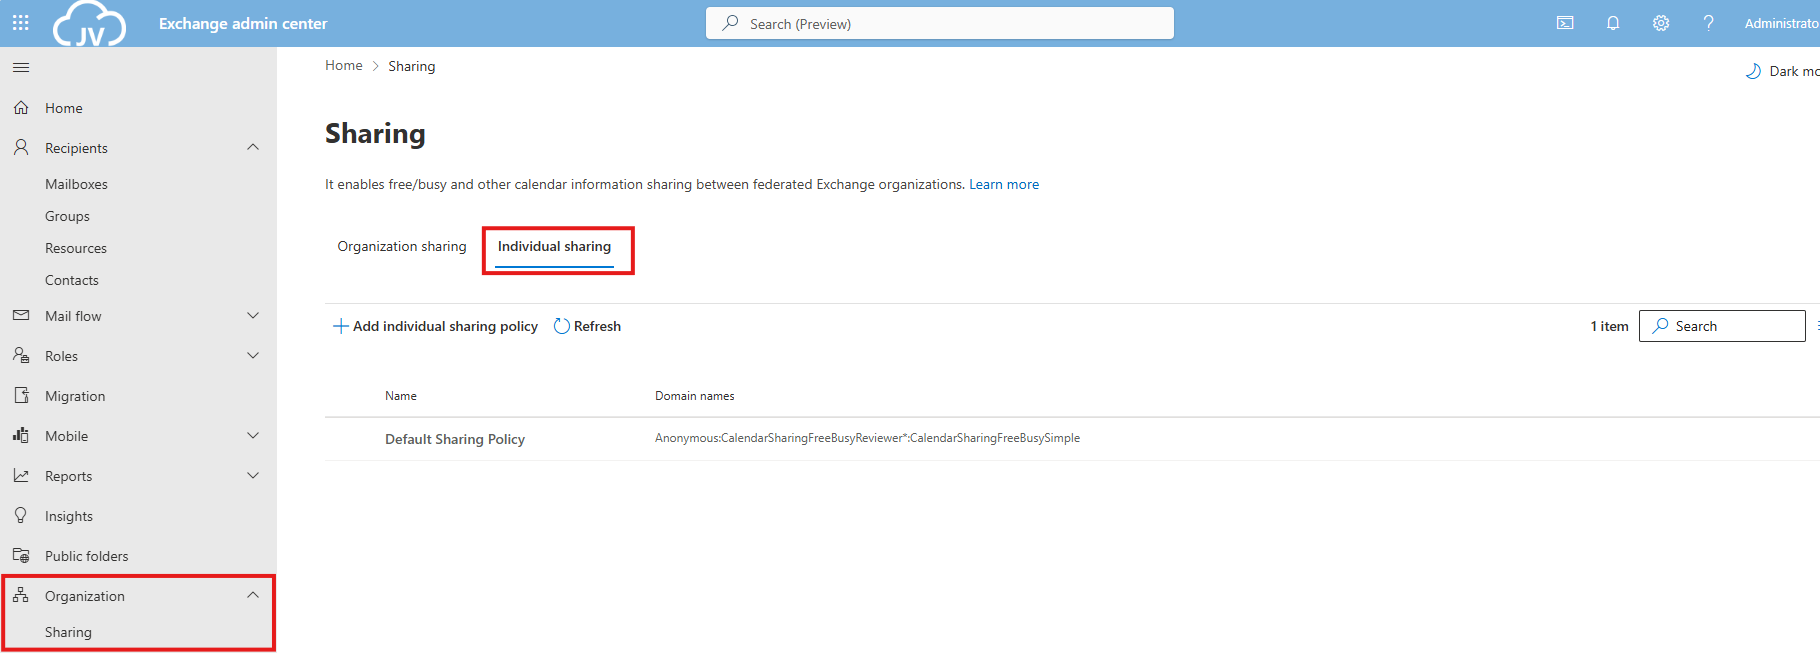
Select the default Sharing Policy, then click on “Manage domains”.
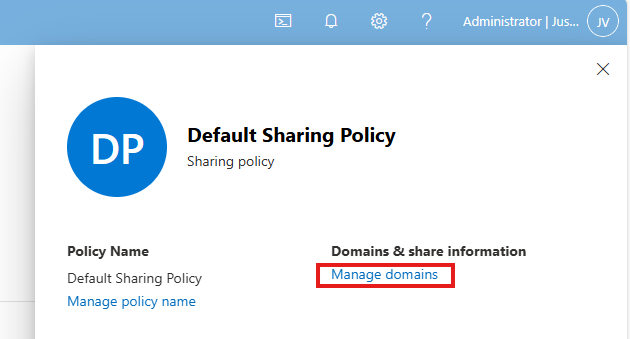
Delete every rule and select the Anonymous rule. Then deselect every option and save the policy. This disables the possibility to share calendars and contacts with users from other tenants. This can be potentially dangerous and even leak (sensitive) data.
EO 2: Ensure additional storage providers are restricted
This recommendation states that users are unable to use other storage providers in Outlook Web App. They can only use OneDrive/SharePoint after this is done.
This recommendation requires us to fire up Exchange Online PowerShell. You can install this module if you don’t already have it: https://www.powershellgallery.com/packages/ExchangeOnlineManagement/3.2.0
POWERSHELL
Connect-ExchangeOnlineThen execute this command:
POWERSHELL
Set-OwaMailboxPolicy -Identity OwaMailboxPolicy-Default -AdditionalStorageProvidersAvailable $falseThis will if runned correctly give no feedback. You can then check if this worked like we wanted:
POWERSHELL
Get-OwaMailboxPolicy | Format-Table Name, AdditionalStorageProvidersAvailableThis will return the actual state of this command.

Keep the Exchange Online PowerShell window opened, as we have to do more in that PowerShell session.
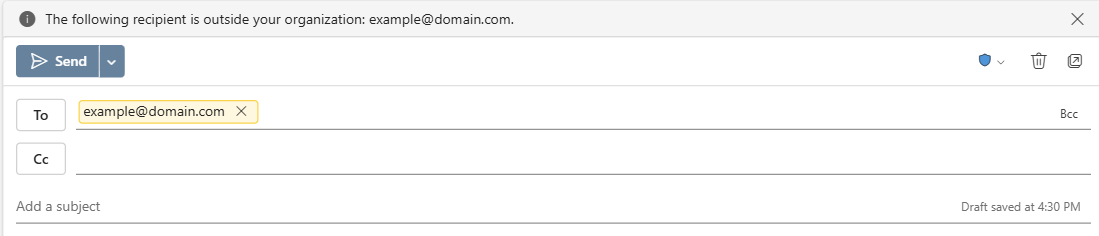
EO 3: Ensure MailTips are enabled for end users
MailTips are information boxes in Outlook that warn users about possible actions. For example; they will send an email to 300 recipients, or send email messages to external email addresses. With Mailtips enabled, Outlook will hint the user that this is not possible.
This recommendation requires us to fire up Exchange Online PowerShell. You can install this module if you don’t already have it: https://www.powershellgallery.com/packages/ExchangeOnlineManagement/3.2.0
POWERSHELL
Connect-ExchangeOnlineThen execute this command:
POWERSHELL
Set-OrganizationConfig -MailTipsAllTipsEnabled $true -MailTipsExternalRecipientsTipsEnabled $true -MailTipsGroupMetricsEnabled $true -MailTipsLargeAudienceThreshold '100'This command is now perfectly in line with the maximum outbound emails setting I described on the Identity page. Selecting more than 100 recipients will now warn the user that the email will be blocked. Perfectly in line with my recommendation here: https://justinverstijnen.nl/?p=5338&preview=true&_thumbnail_id=5707#tip-3-restrict-amount-of-outbound-email-messages

Keep the Exchange Online PowerShell window opened, as we have to do more in that PowerShell session.
EO 4: Ensure mailbox auditing for all users is Enabled
Mailbox auditing ensures every action within a mailbox is audited. This is very useful for Shared Mailboxes where multiple users can access one single mailbox. For example; move or delete actions will be recorded.
This recommendation requires us to fire up Exchange Online PowerShell. You can install this module if you don’t already have it: https://www.powershellgallery.com/packages/ExchangeOnlineManagement/3.2.0
POWERSHELL
Connect-ExchangeOnlineThen execute this command:
POWERSHELL
Set-OrganizationConfig -AuditDisabled $falseThen enable Auditing for every current shared mailbox:
POWERSHELL
Get-Mailbox -Filter * | Set-Mailbox -AuditEnabled $true
Keep the Exchange Online PowerShell window opened, as we have to do more in that PowerShell session.
EO 5: Ensure users installing Outlook add-ins is not allowed
This recommendations states that a user may not install any Outlook add-ins. These add-ins are mostly made by 3rd parties and are potentially harmful and can steal sensitive data from your users and organization.
To disable this, go to Exchange Online admin center: https://admin.exchange.microsoft.com
Then go to “Roles” and then “User Roles”.

Click on the “Default Role Assignment Policy” and click on “Manage permissions”.
Uncheck the following three options:
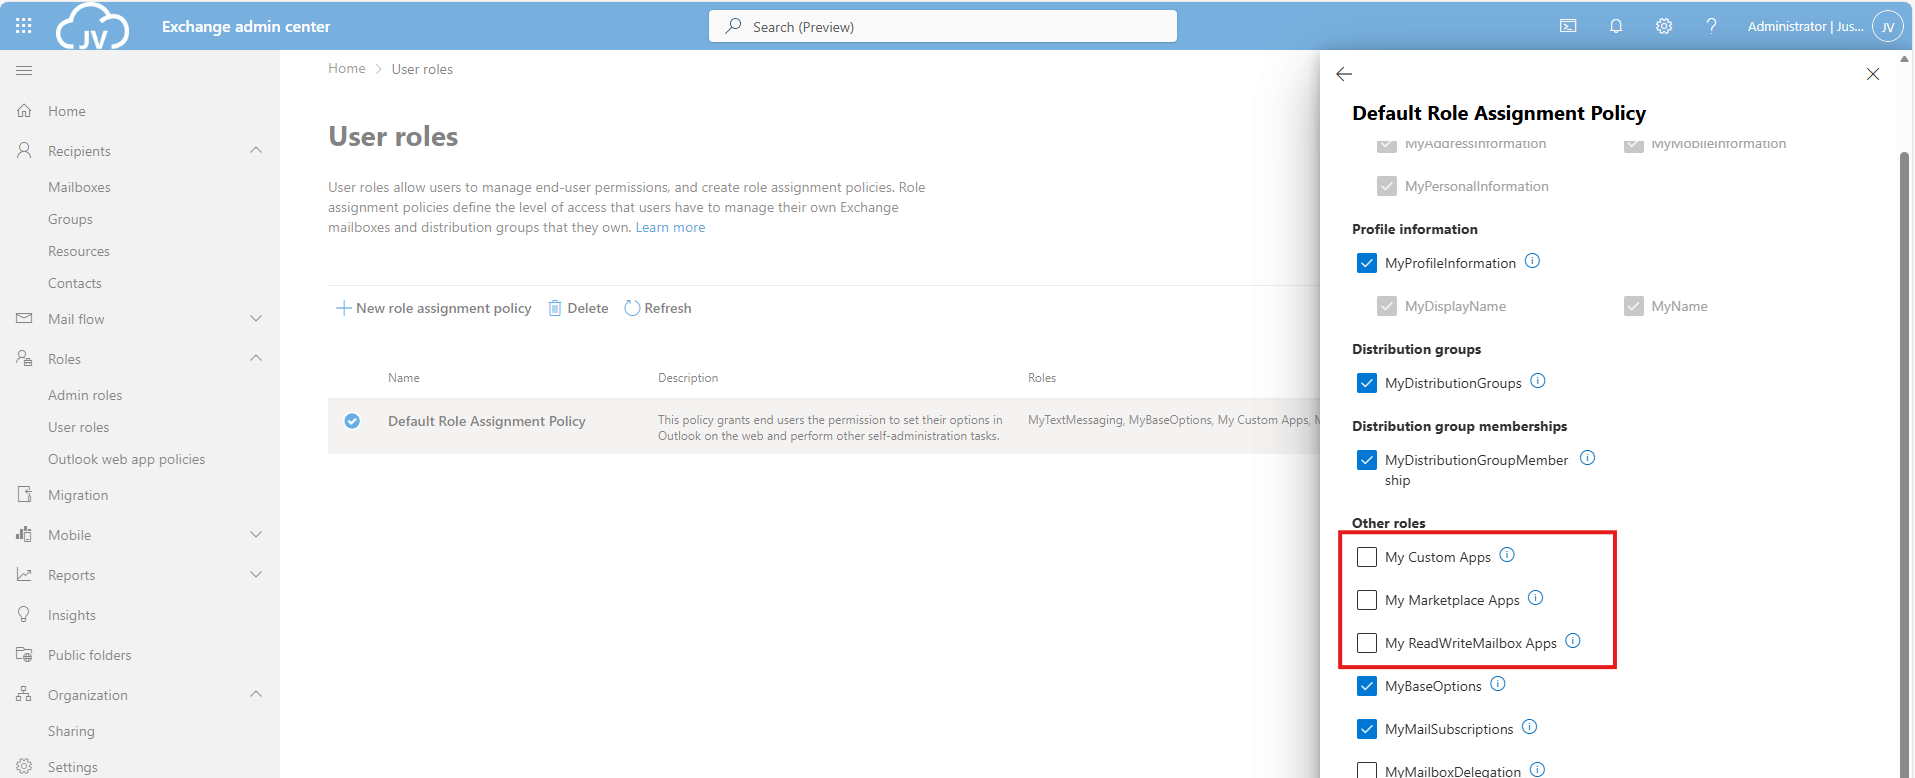
- My Custom Apps
- My Marketplace Apps
- My ReadWriteMailbox Apps
Then save the policy.
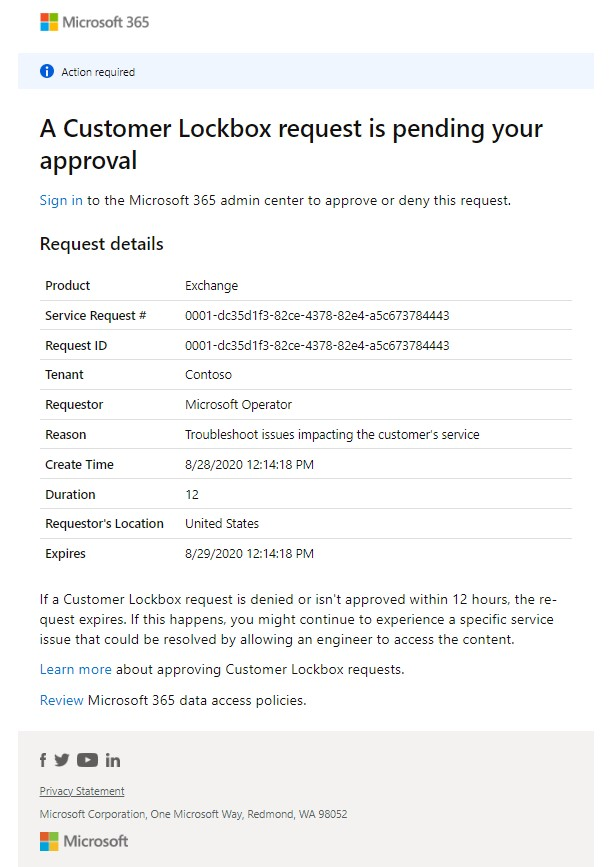
EO 6: Ensure the customer lockbox feature is enabled
The Customer Lockbock feature is a feature that allows Microsoft Engineers to access your tenant and data in case of support is needed. Without this enabled, Microsoft will always have access to your data, of course using strict policies and security. This feature greatly enhanced data security of your tenant, and also those requests are audited.
It is true that before a support engineer can access your data, you must approve this access request and this request is given temporarily.
This recommendation requires us to fire up Exchange Online PowerShell. You can install this module if you don’t already have it: https://www.powershellgallery.com/packages/ExchangeOnlineManagement/3.2.0
POWERSHELL
Connect-ExchangeOnlineThen execute this command to enable it:
POWERSHELL
Set-OrganizationConfig -CustomerLockboxEnabled $trueOr execute this command to disable it:
POWERSHELL
Set-OrganizationConfig -CustomerLockboxEnabled $falseThe Microsoft Teams recommendations
We can find the Microsoft Teams recommendations in the same window by selecting “Apps” in the filter and then “Microsoft Teams”:
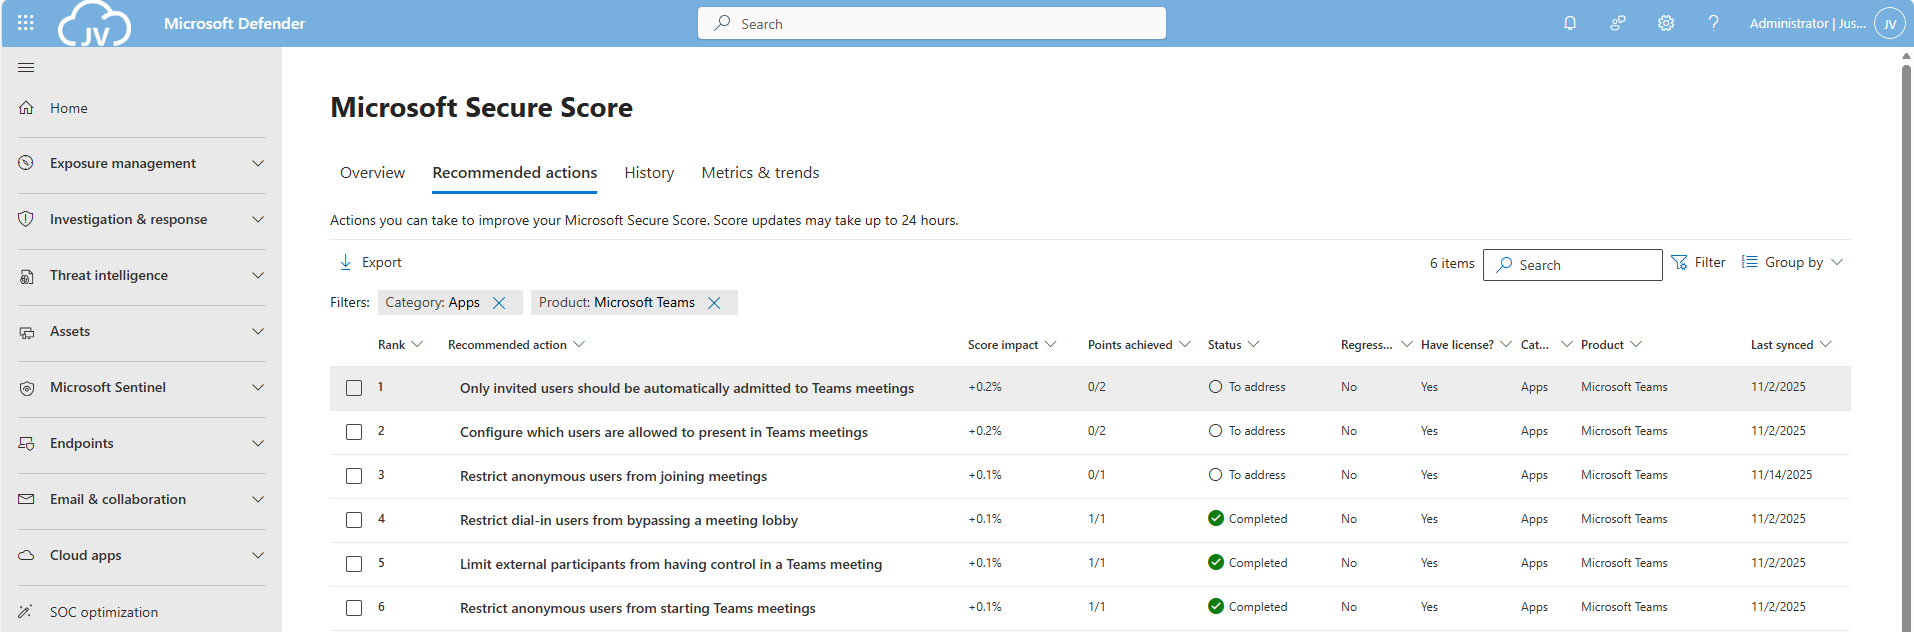
Teams 1: Only invited users should be automatically admitted to Teams meetings
This option disables that uninvited people can join your teams meeting. Only invited people can join your Teams meeting and are admitted automatically.
This recommendation requires us to fire up Microsoft Teams PowerShell. You can install this module if you don’t already have it: https://www.powershellgallery.com/packages/MicrosoftTeams/7.3.0
POWERSHELL
Connect-MicrosoftTeamsTo see the status of this setting, run the following command:
POWERSHELL
Get-CsTeamsMeetingPolicy -Identity Global | Format-List AutoAdmittedUsersThen execute this command to set the option to match the recommendation:
POWERSHELL
Set-CsTeamsMeetingPolicy -Identity Global -AutoAdmittedUsers InvitedUsers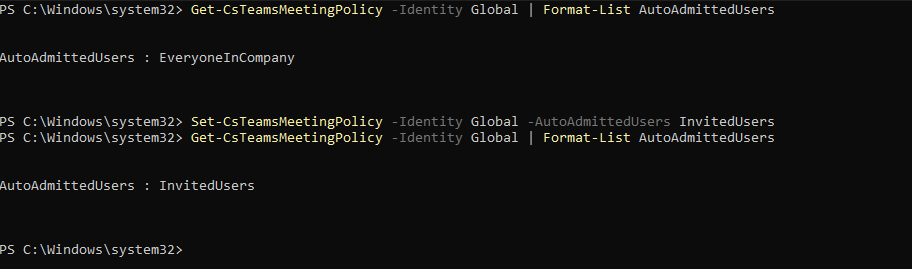
Now only invited users will be admitted to the Team meetings.
Keep the MS Teams PowerShell window opened, as we have to do more in that PowerShell session.
Teams 2: Configure which users are allowed to present in Teams meetings
This recommendation says that only the organizer of the meeting may present/share content in Teams meetings. This can reduce the risk of sensitive data loss.
This recommendation requires us to fire up Microsoft Teams PowerShell. You can install this module if you don’t already have it: https://www.powershellgallery.com/packages/MicrosoftTeams/7.3.0
POWERSHELL
Connect-MicrosoftTeamsTo see the status of this setting, run the following command:
POWERSHELL
Get-CsTeamsMeetingPolicy | Format-Table Identity, DesignatedPresenterRoleModeTo actually restrict other users from presenting in your Teams meetings, run this command:
POWERSHELL
Set-CsTeamsMeetingPolicy -Identity Global -DesignatedPresenterRoleMode "OrganizerOnlyUserOverride"Keep the MS Teams PowerShell window opened, as we have to do more in that PowerShell session.
Teams 3: Restrict anonymous users from joining meetings
This recommendation restricts other users than invited users from joining your meetings. As Teams meeting URLs are public, they could be intercepted or accidentaly sent to 3rd parties. We want to restrict this for only the users we have invited.
This recommendation requires us to fire up Microsoft Teams PowerShell. You can install this module if you don’t already have it: https://www.powershellgallery.com/packages/MicrosoftTeams/7.3.0
POWERSHELL
Connect-MicrosoftTeamsTo see the status of this setting, run the following command:
POWERSHELL
Get-CsTeamsMeetingPolicy -Identity Global | Select-Object AllowAnonymousUsersToJoinMeetingThen execute this command to set the option to match the recommendation:
POWERSHELL
Set-CsTeamsMeetingPolicy -Identity Global -AllowAnonymousUsersToJoinMeeting $False
This now forbids uninvited users from accessing your Teams meetings.
The Microsoft SharePoint recommendations
We can find the Microsoft Teams recommendations in the same window by selecting “Apps” in the filter and then “SharePoint Online”:
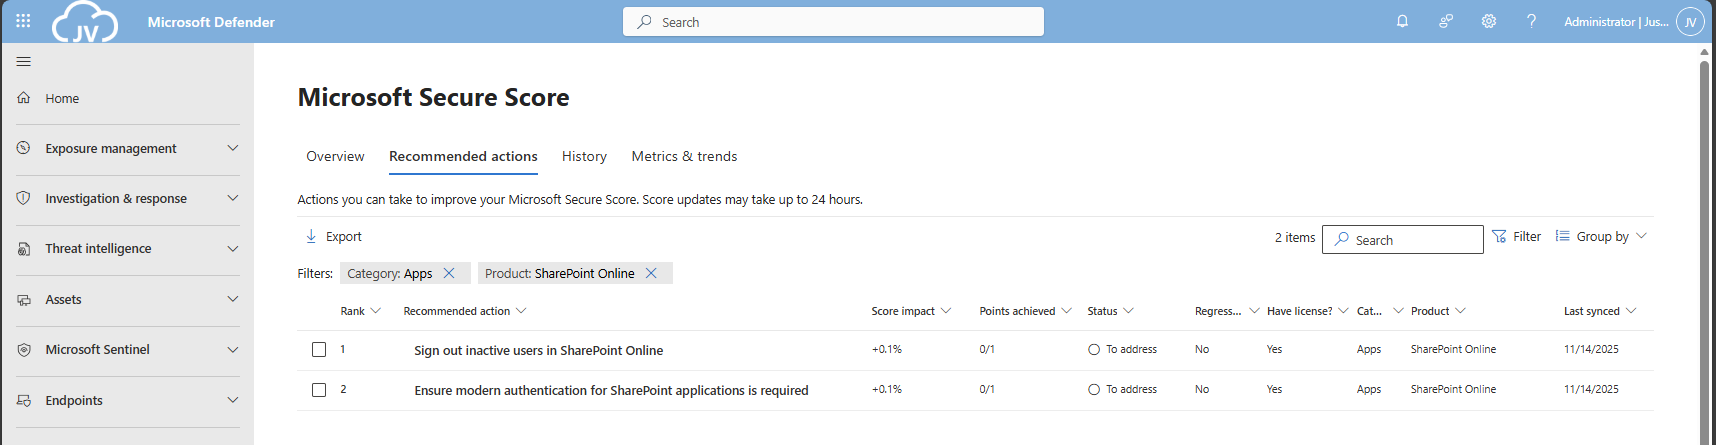
These are only 2 recommendations we have to solve, which will take about 5 minutes.
SharePoint 1: Sign out inactive users in SharePoint Online
The first recommendation states that we have to automatically sign-out inactive users from SharePoint Online. This means if they have the SharePoint Online window opened, they will be automatically signed-out after X time of inactivity.
We can configure this using the SharePoint Online Admin center. As administrator, head to https://portal.office.com/sharepoint
You will be directed to the SharePoint admin center. Open up “Policies” and then “Access control”.
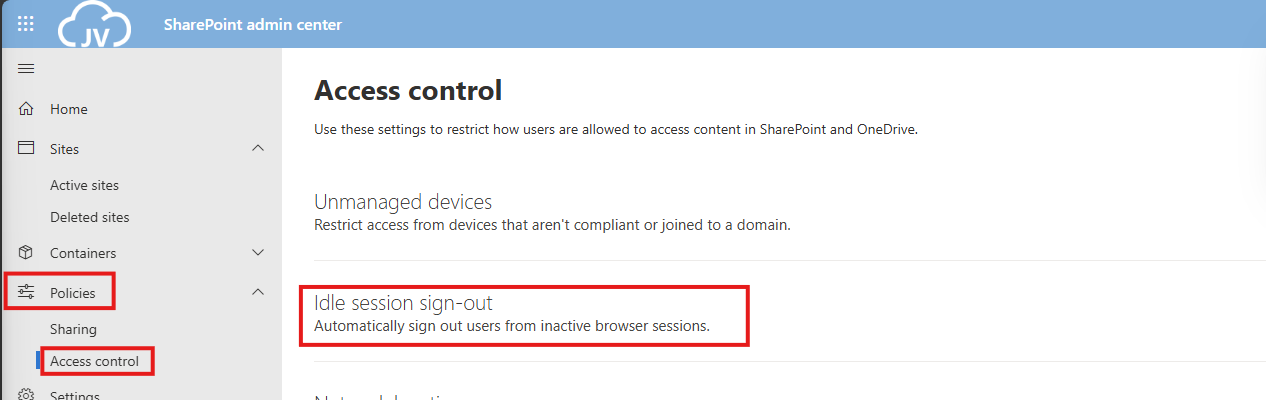
Click on “Idle session sign-out”. and enable this option.
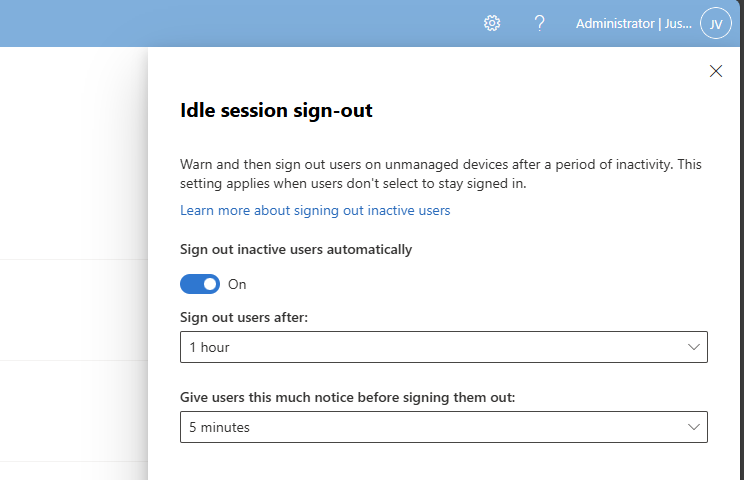
You can define yourself how strict this policy must be. The default is sign ou after 1 hour, but for businesses this could be somewhat short.
In my case, I will use the default options and save the settings.
SharePoint 2: Ensure modern authentication is required
This recommendation states that if you use SharePoint Applications, the authentication being used must be Modern Authentication. For example, If you still had Office 2010 or older apps that do not support Modern Authentication, we can block this application from being used.
Now this sounds like something we already tackle using Conditional Access, but disabling this also on application level is a good idea.
We can configure this using the SharePoint Online Admin center. As administrator, head to https://portal.office.com/sharepoint
You will be directed to the SharePoint admin center. Open up “Policies” and then “Access control”.
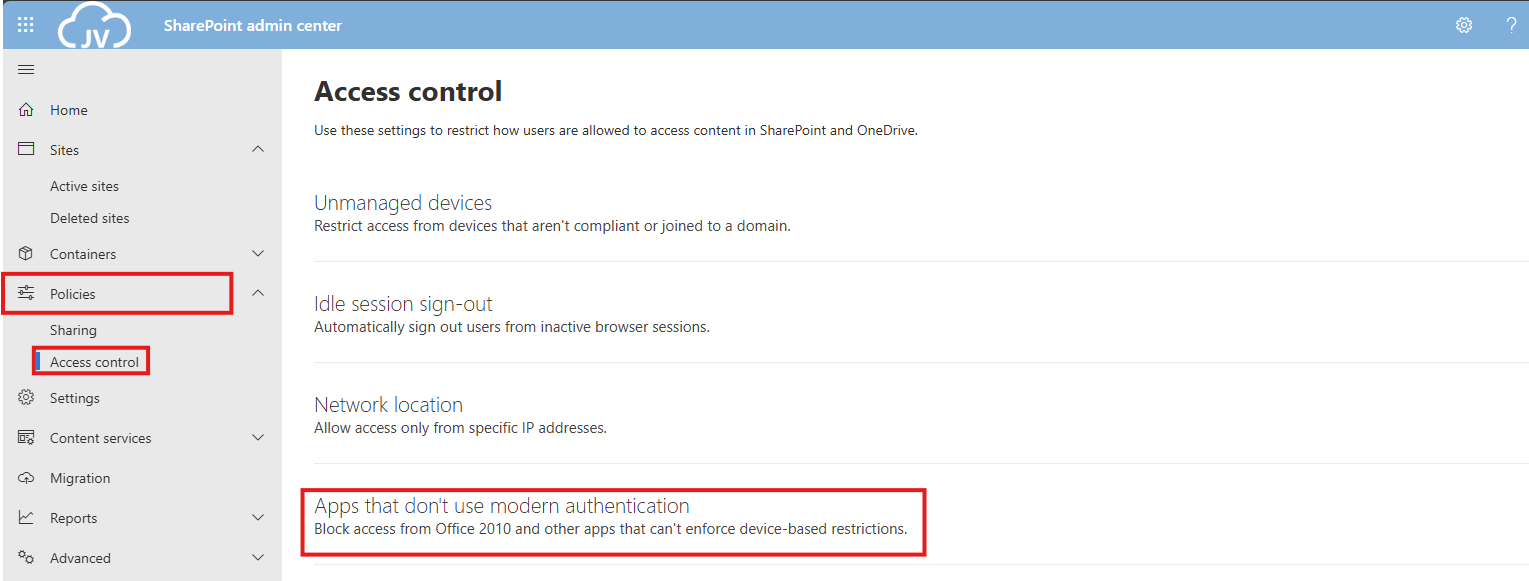
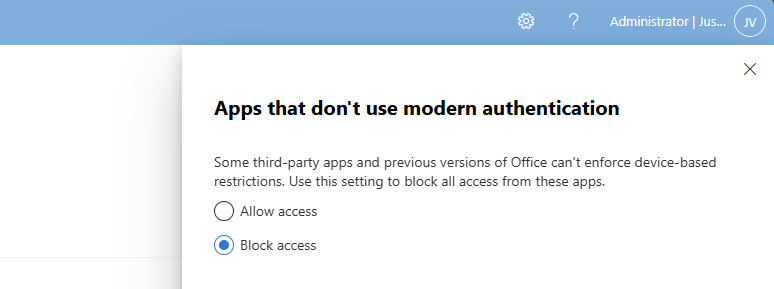
Click on “Apps that don’t use modern authentication”.
Select “Block access” and save the settings to make them active.
The Defender for Office 365 recommendations
For Defender for Office 365 recommendations, I enabled the Strict policies tenant-wide to do a great part of the job already, but I will also manually configure all of the recommendations to give a better understanding of what Microsoft has to offer.
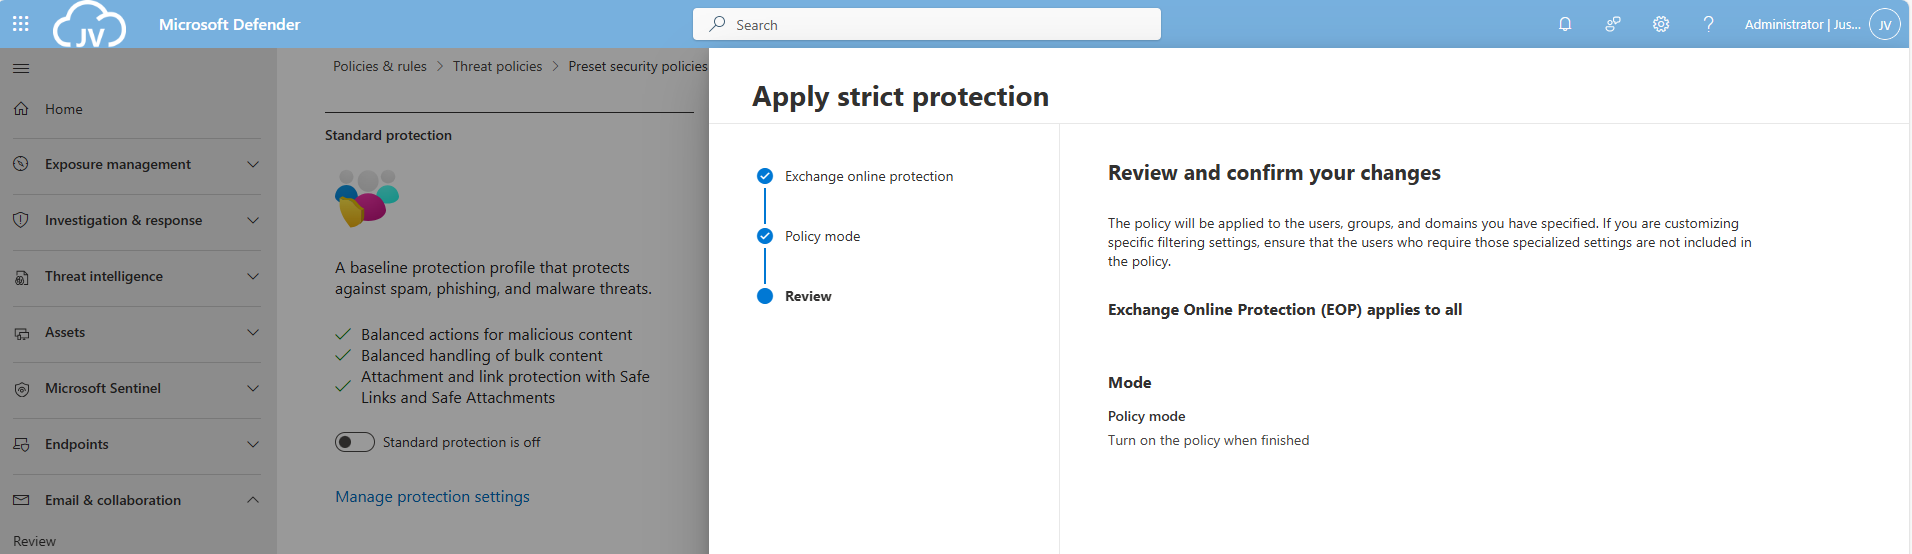
After that, let’s take a look into the specific recommendations:
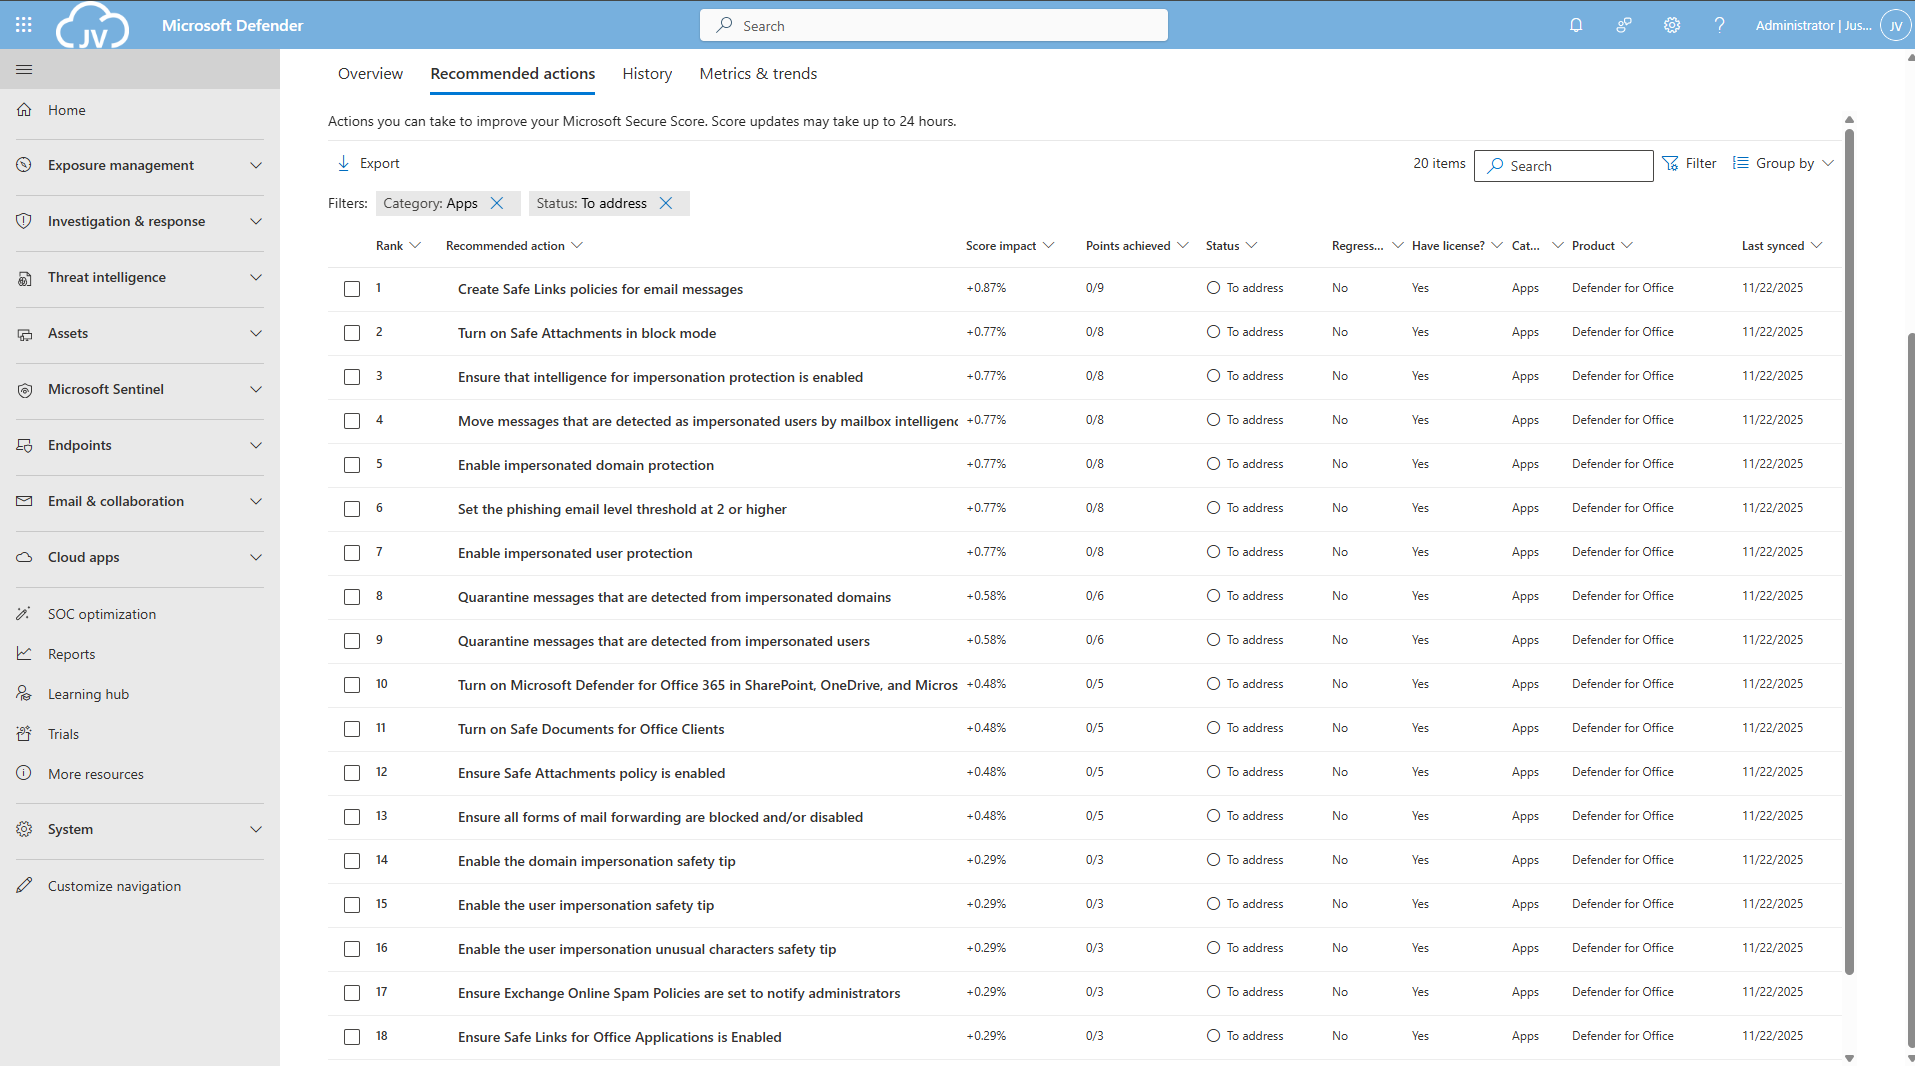
There are still around 20 items that have to be configured manually. I have categorized them by hand to make it easy to configure them all if you want. I also placed the headings of the policies so you can choose which requirement to configure.
Safe Links recommendations
- DO365 #1: Create Safe Links policies for email messages
- DO365 #2: Ensure Safe Links for Office Applications is Enabled
Safe Attachments recommendations
- DO365 #3: Turn on Safe Documents for Office Clients
- ****DO365 #4: Turn on Microsoft Defender for Office 365 in SharePoint; OneDrive; and Microsoft Teams
- DO365 #5: Ensure Safe Attachments policy is enabled
- DO365 #6: Turn on Safe Attachments in block mode
Anti-phishing recommendations
- DO365 #7: Ensure that an anti-phishing policy has been created
- DO365 #8: Set the phishing email level threshold at 2 or higher
- DO365 #9: Enable impersonated user protection
- DO365 #10: Enable impersonated domain protection
- DO365 #11: Ensure that intelligence for impersonation protection is enabled
- DO365 #12: Quarantine messages that are detected from impersonated users
- DO365 #13: Quarantine messages that are detected from impersonated domains
- DO365 #14: Move messages that are detected as impersonated users by mailbox intelligence
- DO365 #15: Enable the user impersonation safety tip
- DO365 #16: Enable the domain impersonation safety tip
- DO365 #17: Enable the user impersonation unusual characters safety tip
Anti-spam recommendations
- DO365 #18: Ensure all forms of mail forwarding are blocked and/or disabled
- DO365 #19: Ensure Exchange Online Spam Policies are set to notify administrators
DO365 #1: Create Safe Links policies for email messages
This requirement wants us to create policies for safe links in email messages. This means that links you’ll receive will automatically be scanned.
Open the Microsoft Defender portal (https://security.microsoft.com)
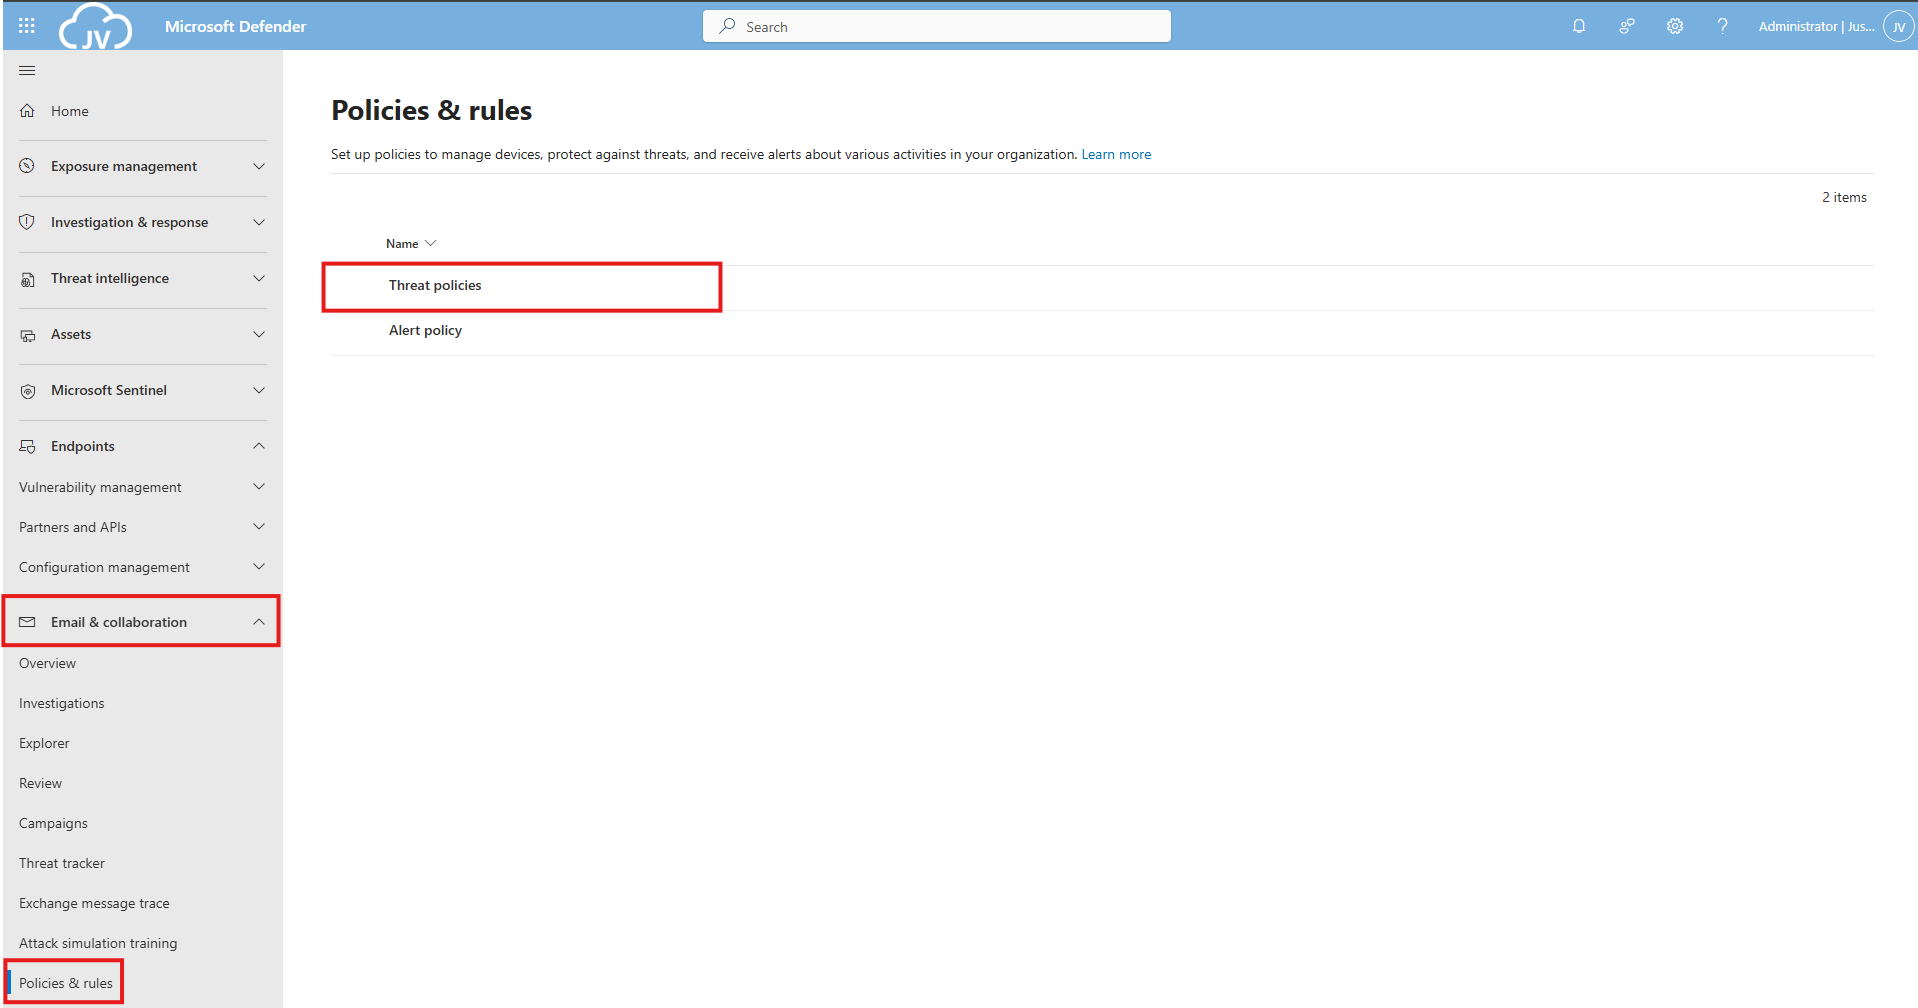
Go to “Email & collaboration” and click on “Policies & rules”, then click on “Threat policies”
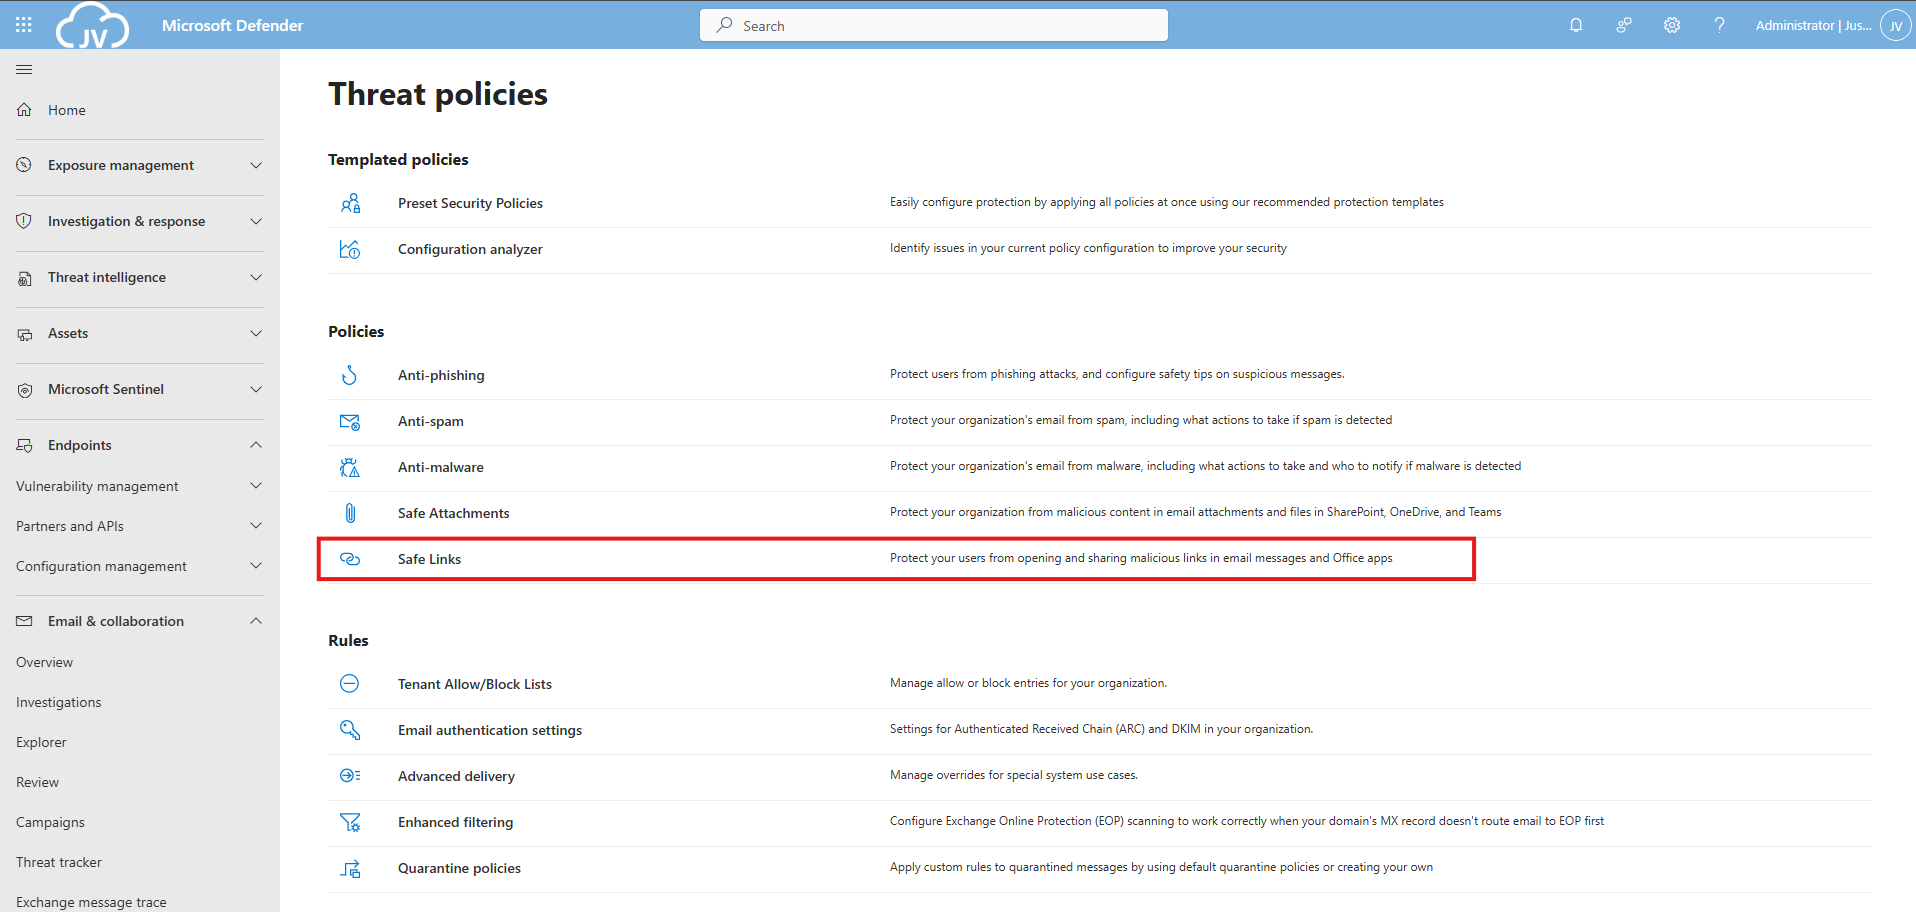
Then click on “Safe Links”.
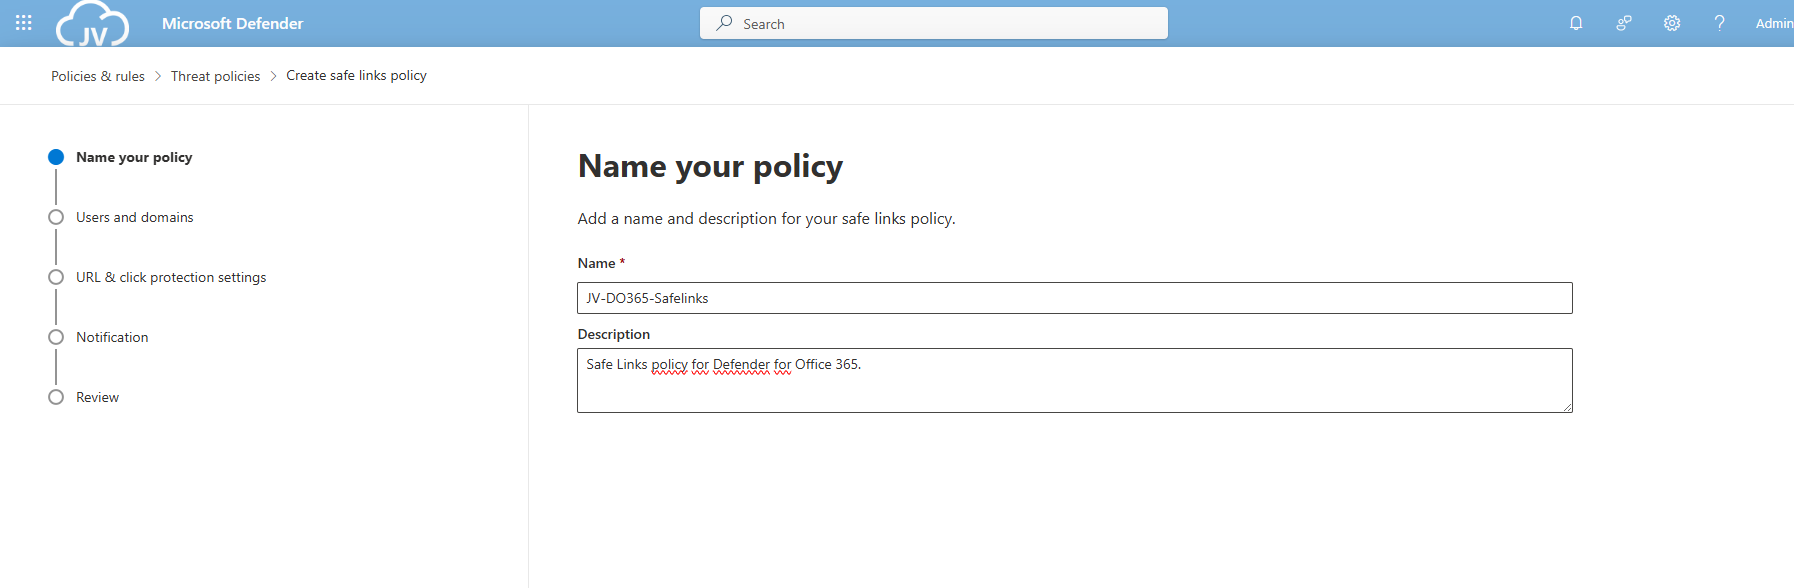
Create a new policy here. Give this a good name and description:
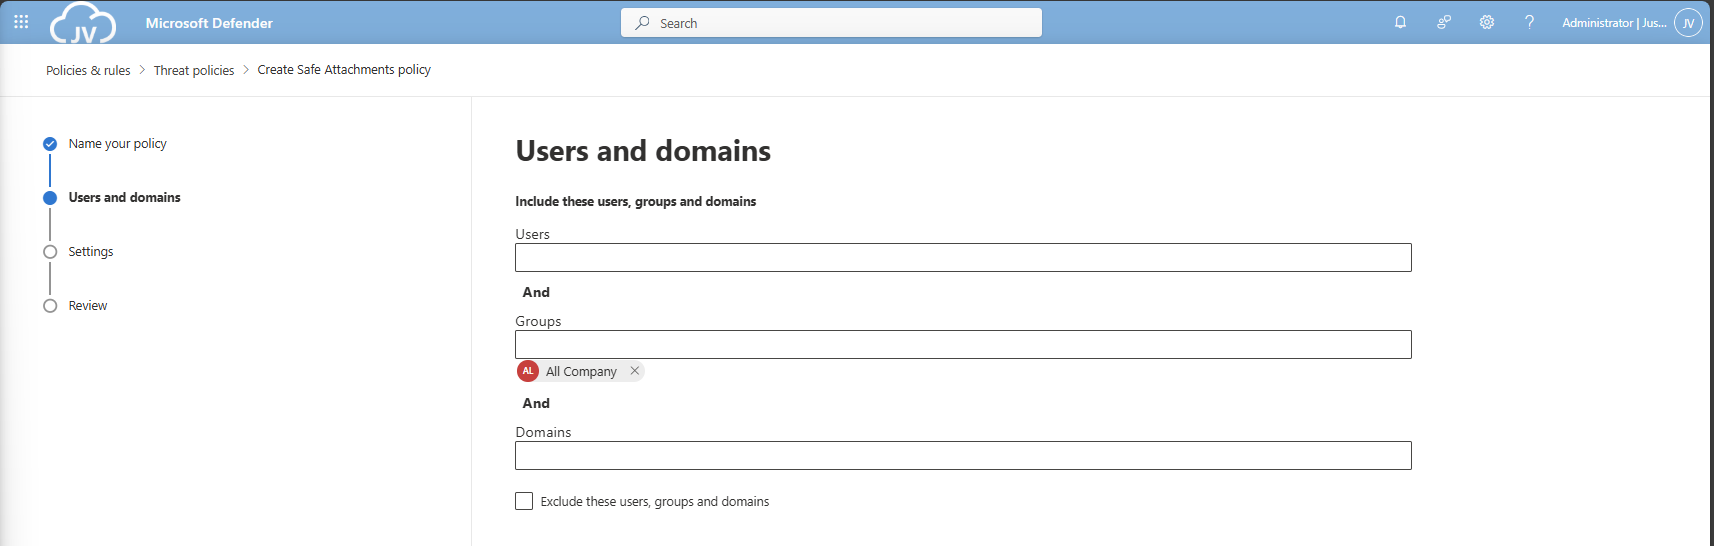
Advance to the next page. My advice here is to link this to the “All Company” default dynamic group. This makes the policy active for newly created users and domains as well.
Click to the next page. Here is where all the settings are presented to you. Most of the default settings are okay which you can review. For my environment, I only enabled “Display the organization branding” at the bottom.
DO365 #2: Ensure Safe Links for Office Applications is Enabled
Make sure you enable the Safe Links for Teams and Office 365 Apps at this page for requirement DO365 #2. Then click “Next”.
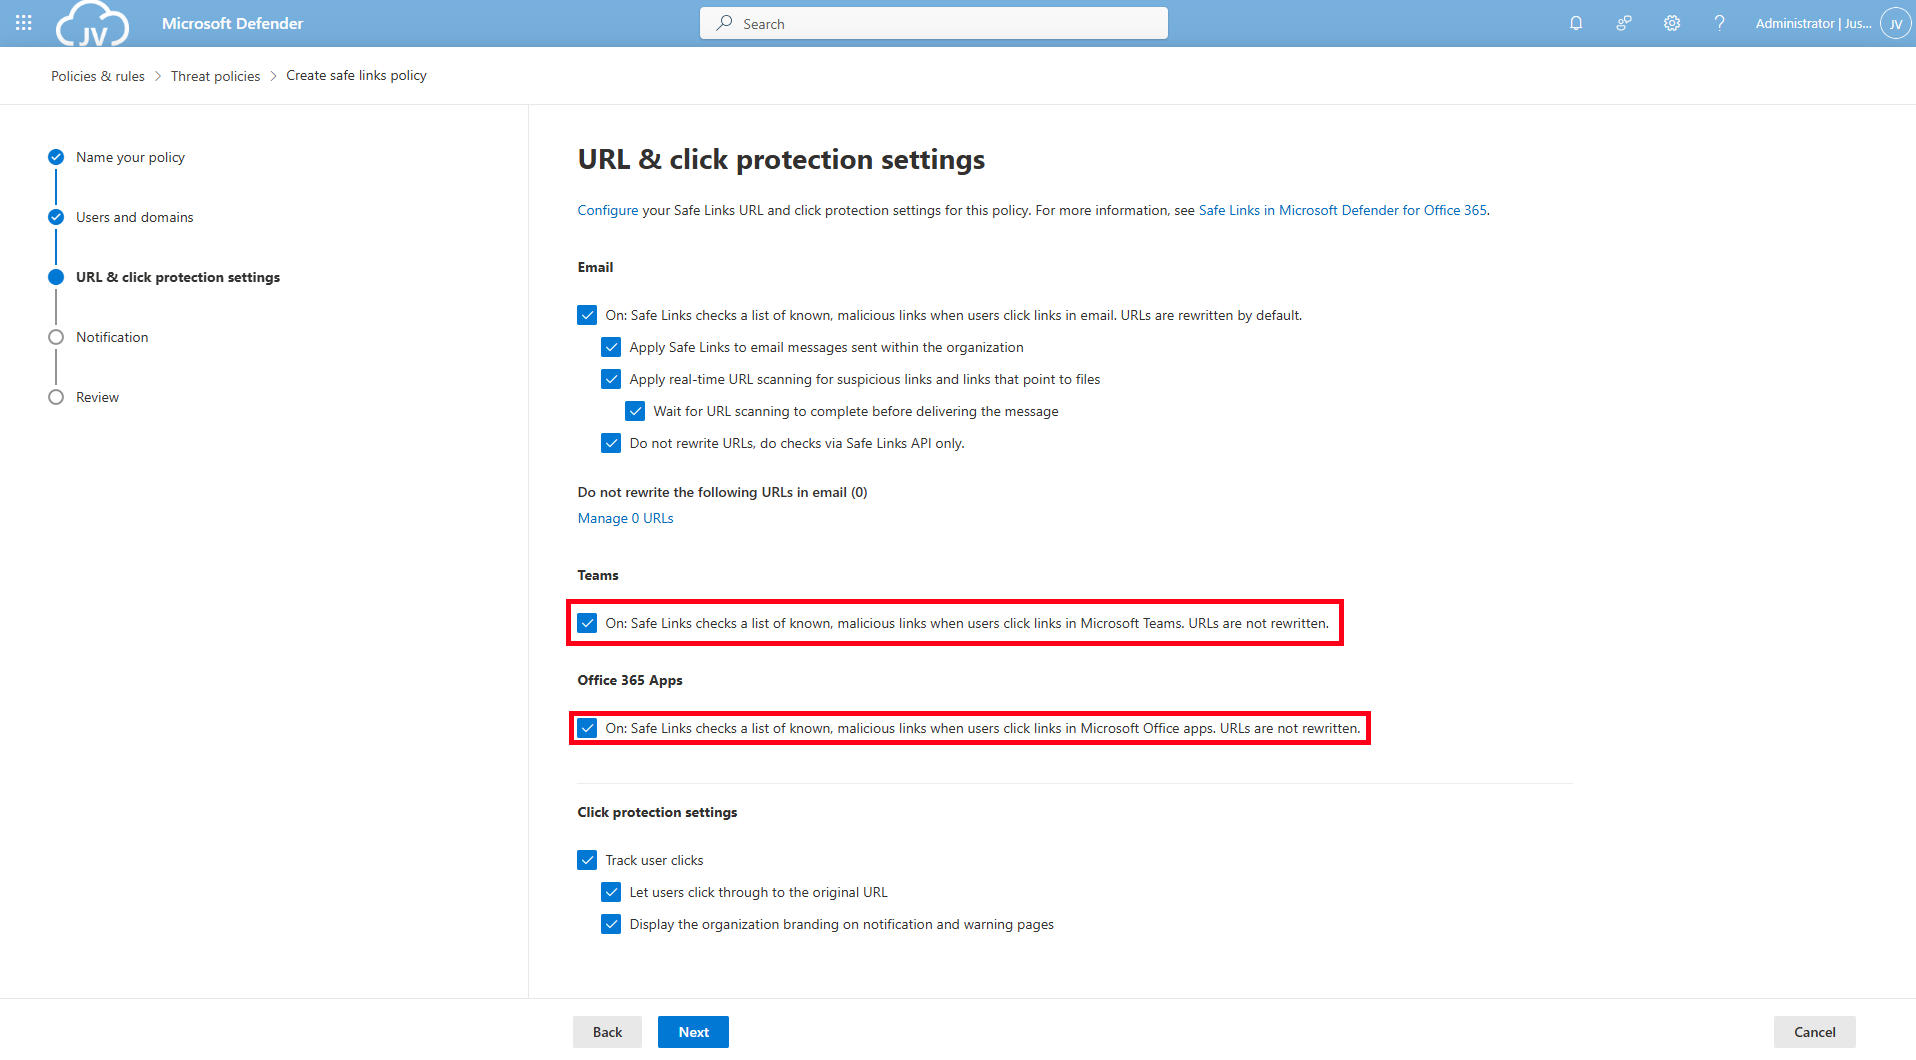
On this page you could put in a custom text for your users for warning about links in their email before opening them and potentially harm their devices and accounts or even worse.
Then finish creating the policy, and that should be it for the first 2 requirements.
DO365 #3: Turn on Safe Documents for Office Clients
This requirement wants us to enable a setting that enables Safe Documents for Office Clients. This setting can be found by following the steps below (or the fast pass: https://security.microsoft.com/safeattachmentv2)
Open the Microsoft Defender portal (https://security.microsoft.com)
Go to “Email & collaboration” and click on “Policies & rules”, then click on “Threat policies”. Open the “Safe attachments” menu here.
Click on “Global Settings”

Enable this option and that should be it for this requirement.
DO365 #4: Turn on Microsoft Defender for Office 365 in SharePoint, OneDrive and Microsoft Teams
If you are on this page already, also enable “Turn on Microsoft Defender for Office 365 in SharePoint, OneDrive and Microsoft Teams”.

DO365 #5: Ensure Safe Attachments policy is enabled
This requirement wants us to enable an Safe Attachments policy in our tenant. This means we configure what will happen to attachments sent through email and teams. Potentially malicious content can be removed and according to requirement DO365 #5, we must block this to get the highest secure score.
Open the Microsoft Defender portal (https://security.microsoft.com)
Go to “Email & collaboration” and click on “Policies & rules”, then click on “Threat policies”. Open the “Safe attachments” menu here.
Create or modify an existing policy here.
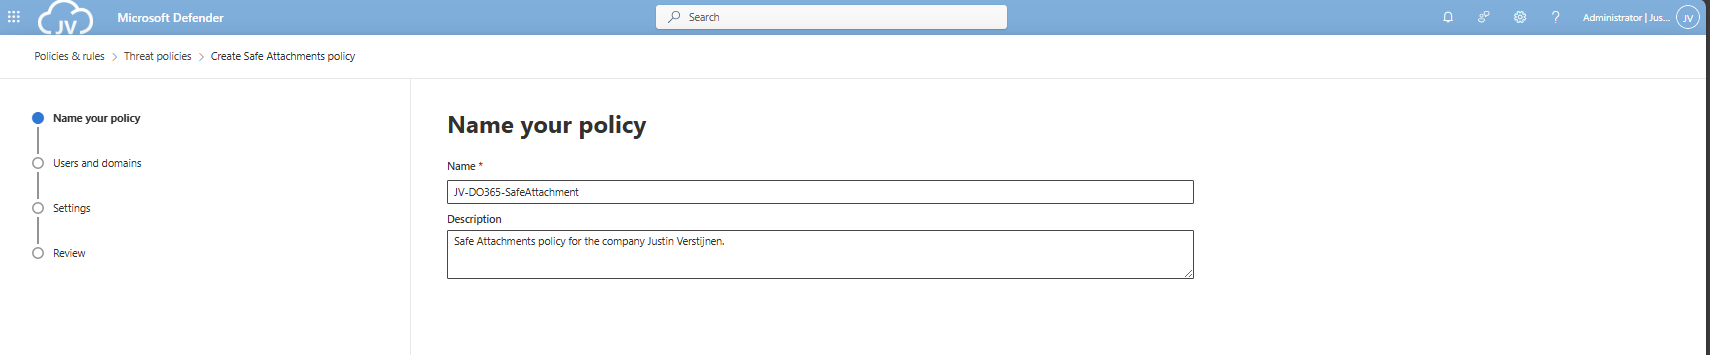
Give the policy a name and a description.
Advance to the next page. My advice here is to link this to the “All Company” default dynamic group. This makes the policy active for newly created users and domains as well.
Click “Next”.
DO365 #6: Turn on Safe Attachments in block mode
On the next tab we have to select the Block mode of Safe Attachments, and the best quarantine policy here would be AdminOnly.
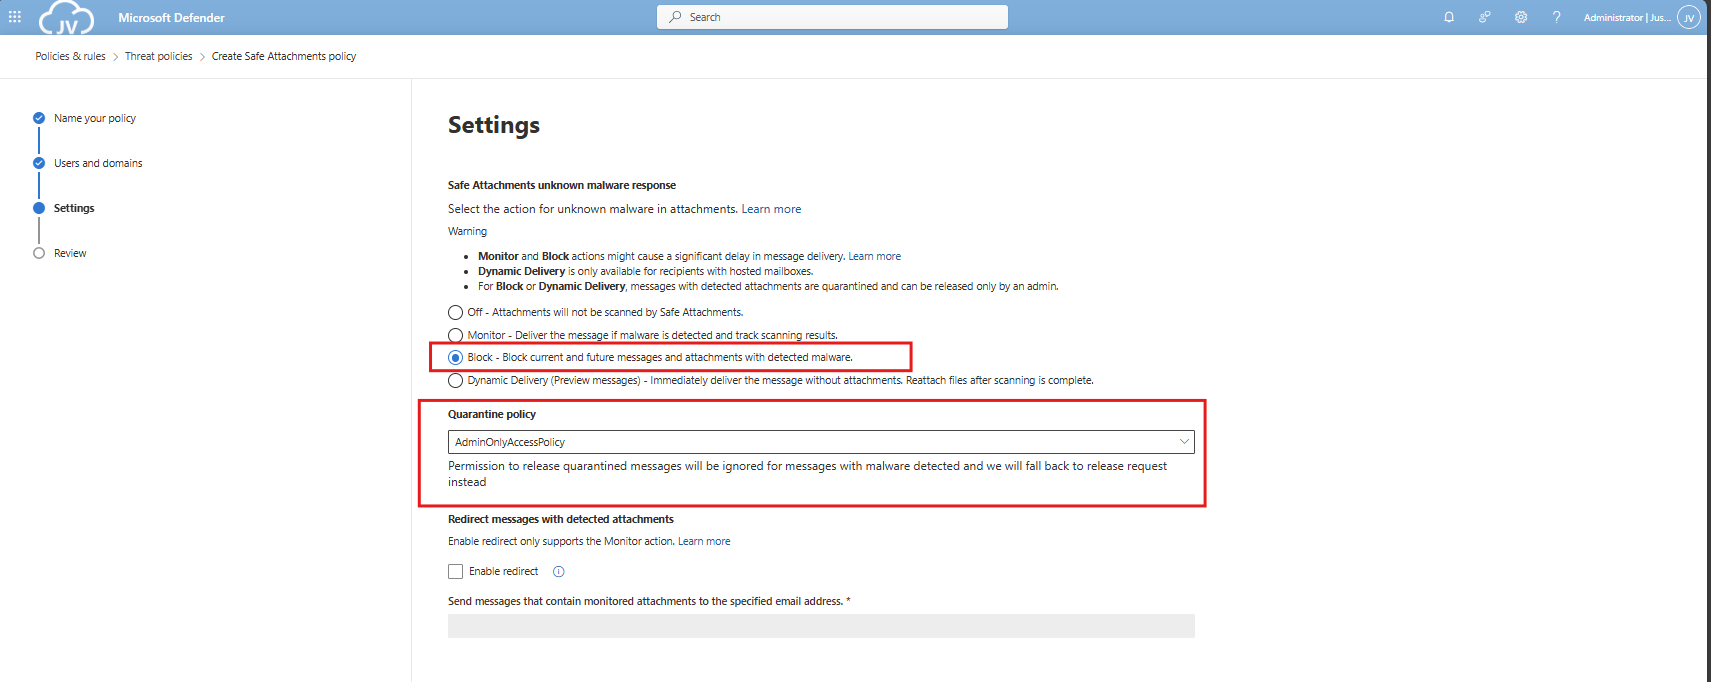
Finish the policy and make sure its enabled.
DO365 #7: Ensure that an anti-phishing policy has been created
Now we will have to create one policy to rule all anti-phishing requirements. This will also be the policy where we will configure all the anti-phising requirements in (DO365 #7-#17). You can also choose to create multiple policies, but for demonstration and managability, one policy is better.
This requirement wants us to enable mailbox intelligence and impersonation protection for email messages.
Open the Microsoft Defender portal (https://security.microsoft.com)
Go to “Email & collaboration” and click on “Policies & rules”, then click on “Threat policies”
Then click on “Anti-phishing”.
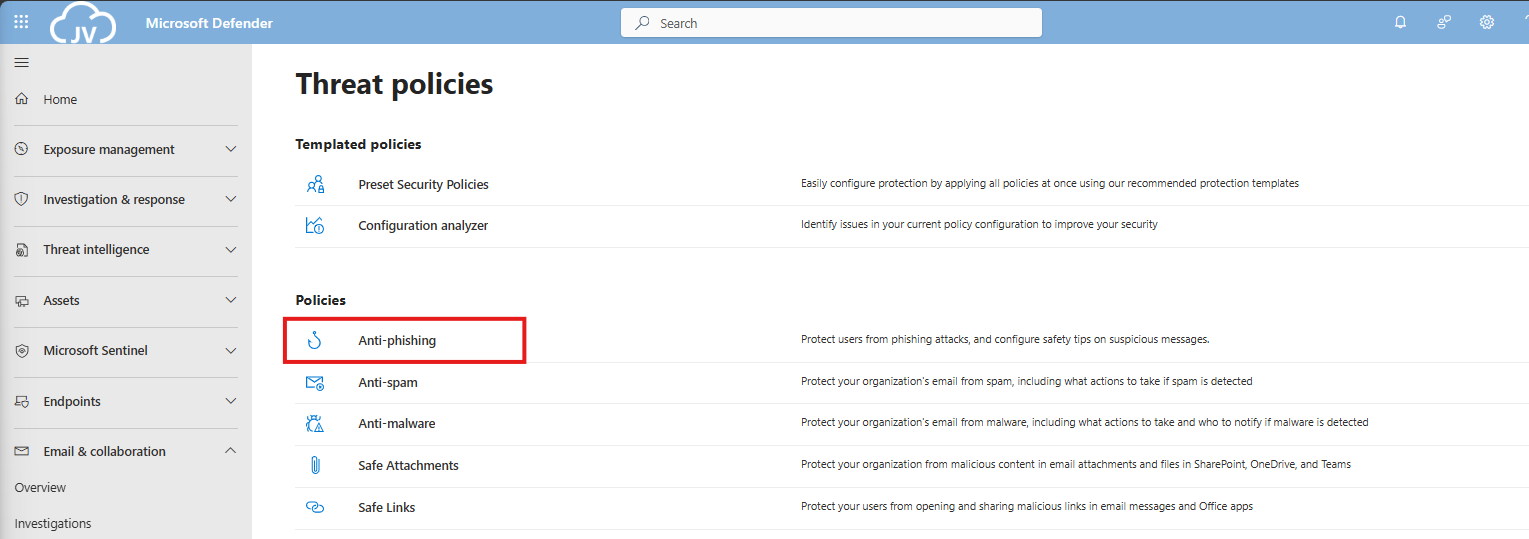
Create a new policy here, and give it a good name and description, and click “Next”.
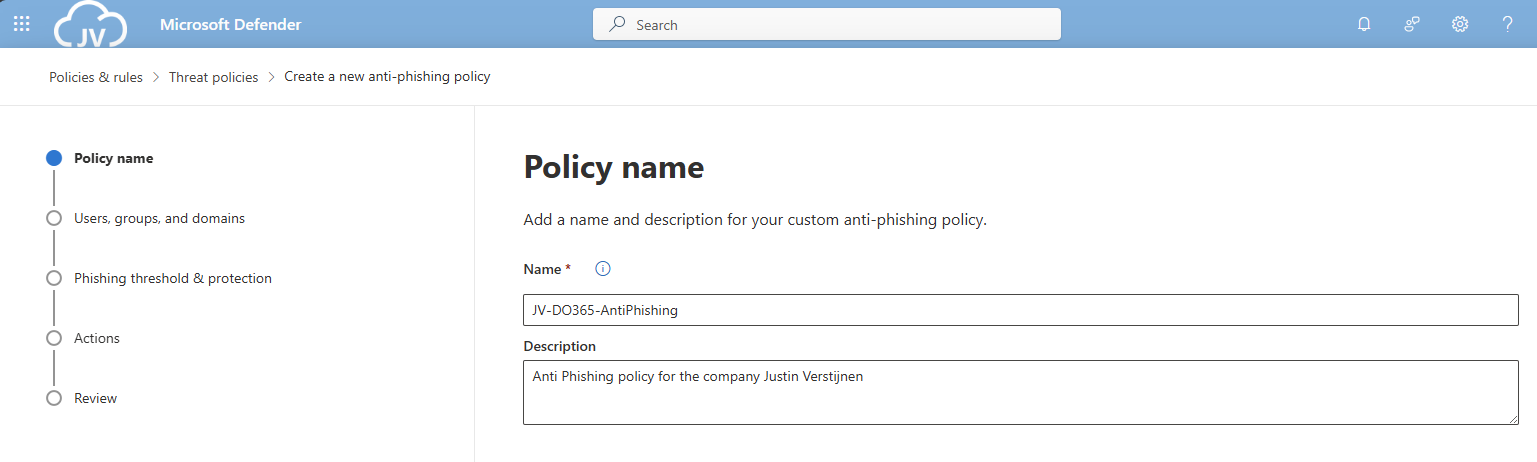
Advance to the next page. My advice here is to link this to the “All Company” default dynamic group. This makes the policy active for newly created users and domains as well.
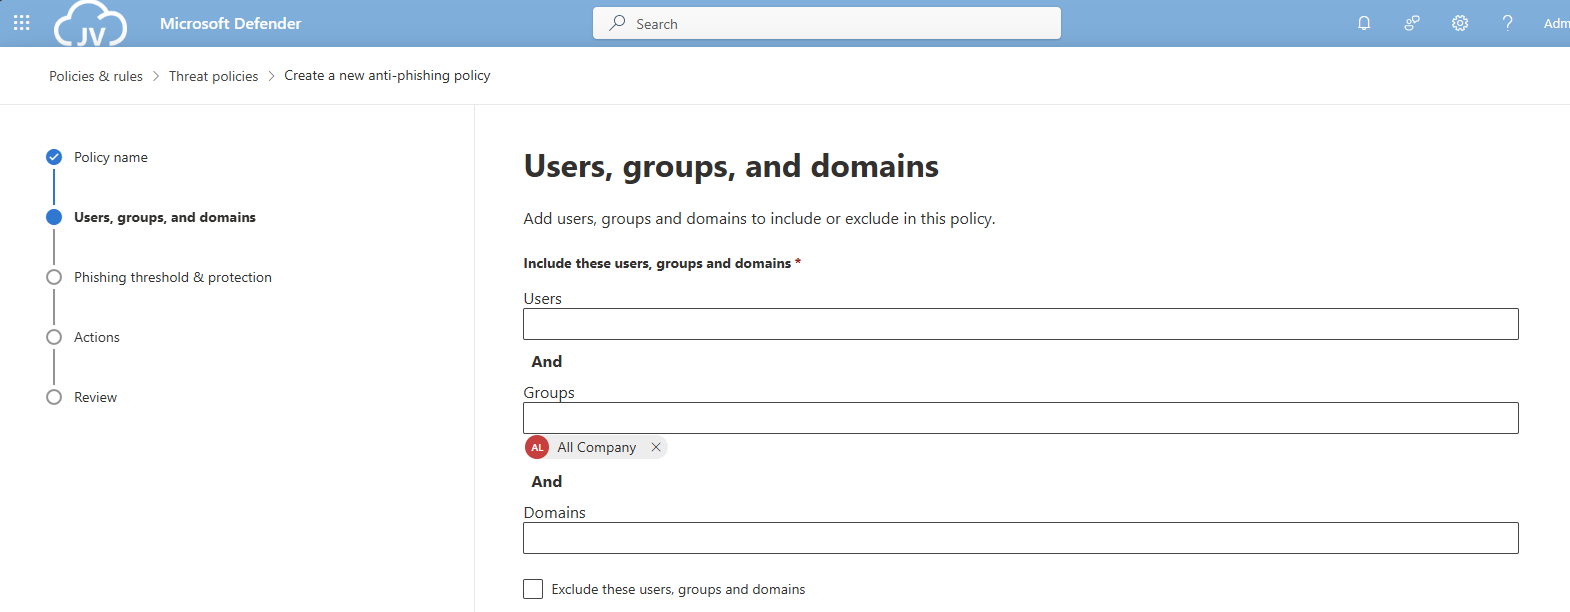
Click “Next”.
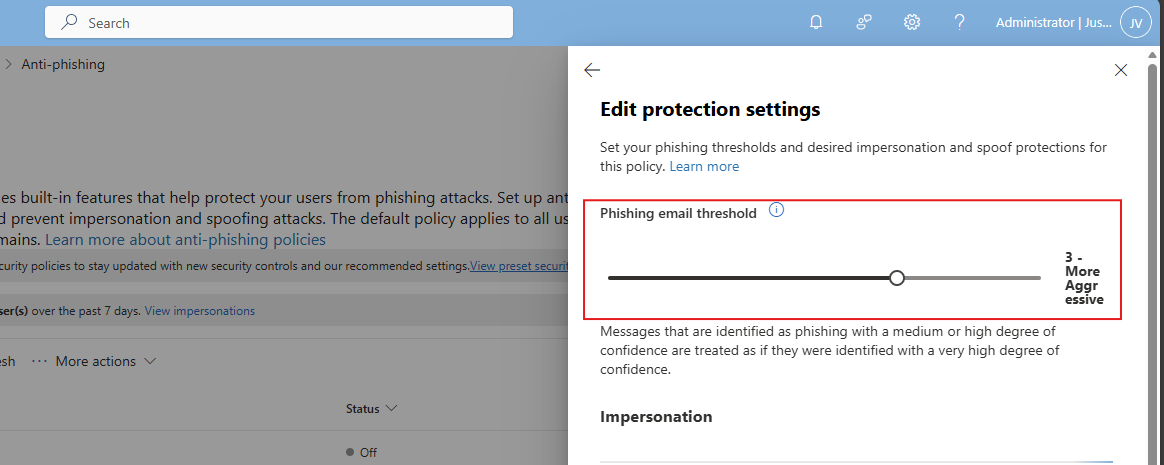
Set the Phishing email threshold to at least 3, and select the users/domains to protect using this setting. Ensure that the “Mailbox intelligence” setting is enabled.
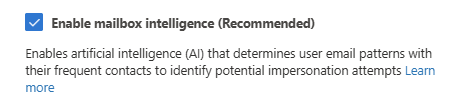
Then create the policy.
DO365 #8: Set the phishing email level threshold at 2 or higher
This requirement wants us to set the Phishing email slider to at least 2. In my environment, I have set this to 3.
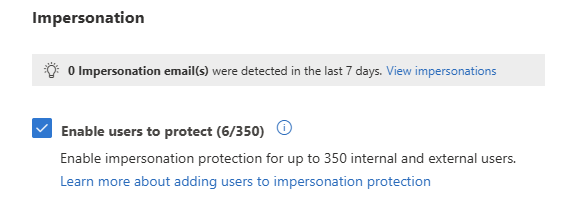
DO365 #9: Enable impersonated user protection
This requirement wants us to enable impersonated user protection. This enables us to decide what to do if impersonation happens and so true-like email is sent to our users.
Enable this setting here:
DO365 #10: Enable impersonated domain protection
This requirement wants us to enable impersonated domain protection. This is somewhat the same as our users but then on domain-level.
Enable this setting here:
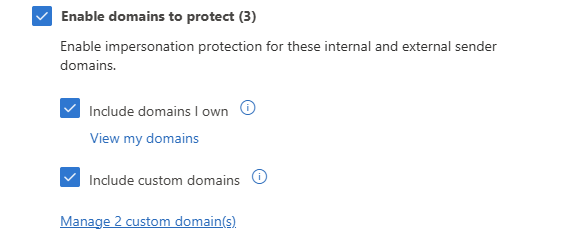
You can also add custom domains to trust them also, or enable the 2 suboptions to make it active for all domains.
DO365 #11: Ensure that intelligence for impersonation protection is enabled
This requirement wants us to enable the Intelligence option for impersonation protection, which can be found here:
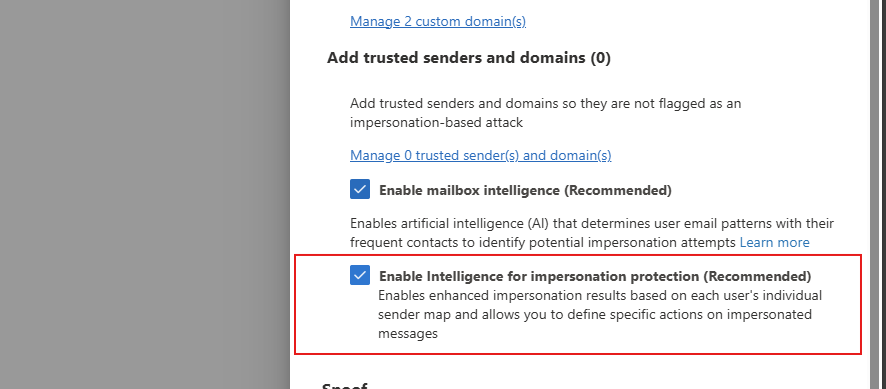
Enable this option in your policy to get the score.
DO365 #12: Quarantine messages that are detected from impersonated users
This requirement wants us to change the quarantine policy of messages received by impersonated users. These can be changed in the anti-phishing policy here:
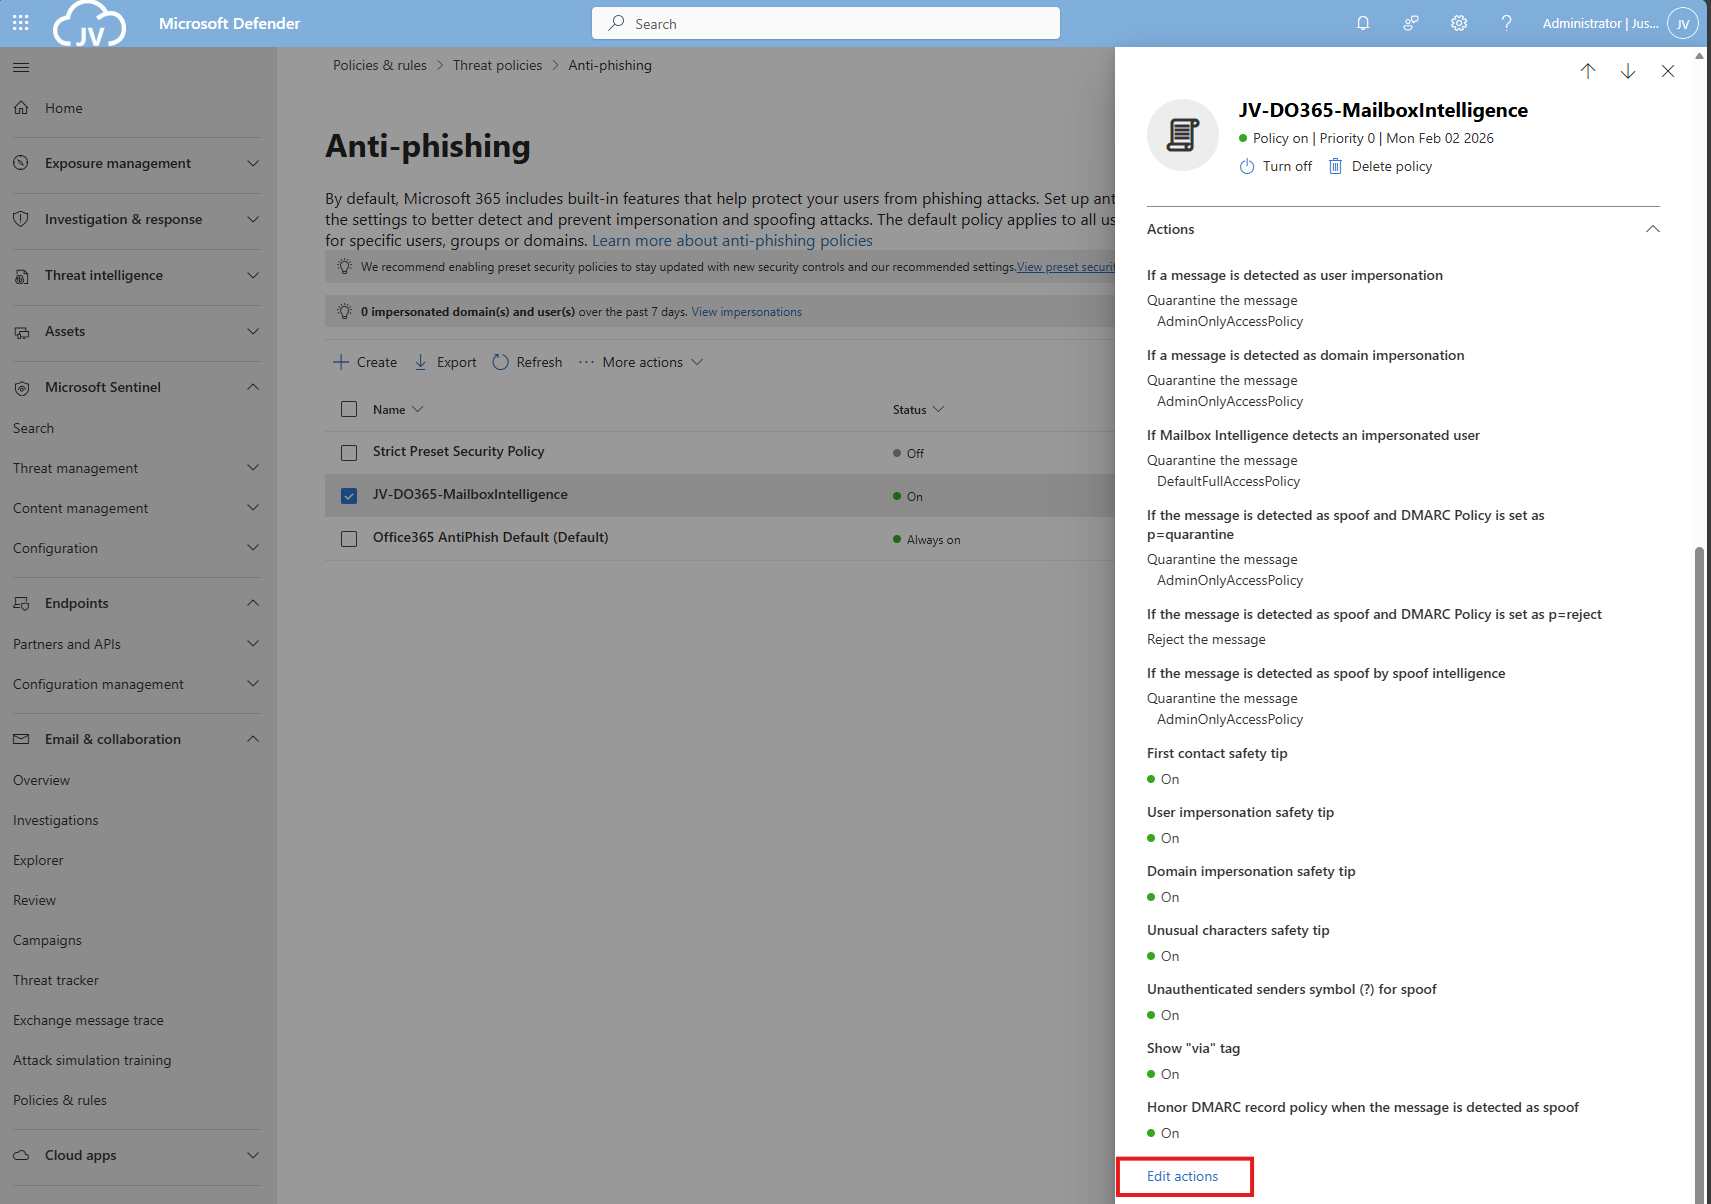
Then search for this option, and set it als following:
- If a message is detected as user impersonation: Quarantine the message
- Apply quarantine policy: AdminOnlyAccessPolicy
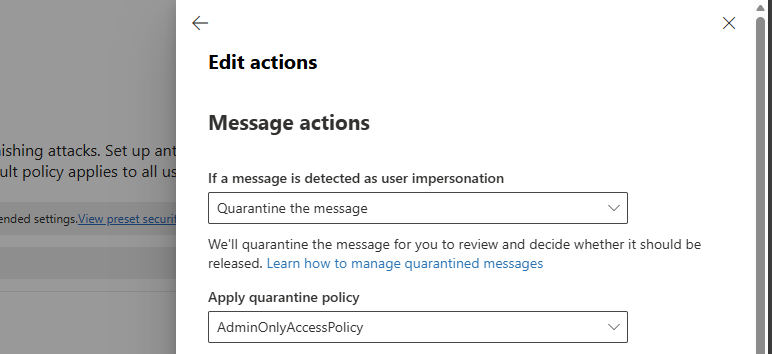
Thats all for this requirement, but do not click this window away yet.
DO365 #13: Quarantine messages that are detected from impersonated domains
This requirement wants us to set the settings directly below DO365 #12.
Search for this option, and set it als following:
- If a message is detected as domain impersonation: Quarantine the message
- Apply quarantine policy: AdminOnlyAccessPolicy
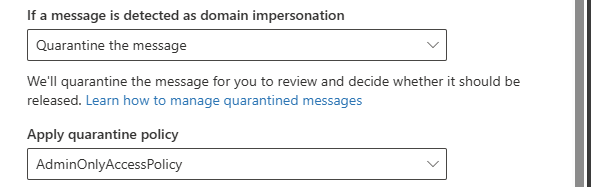
Thats all for this requirement, but do not click this window away yet.
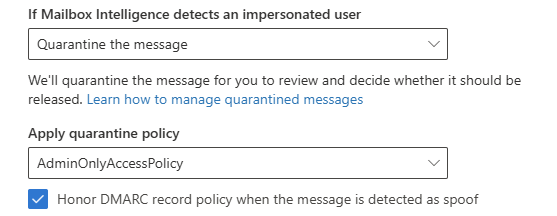
DO365 #14: Move messages that are detected as impersonated users by mailbox intelligence
This requirement wants us to set the settings directly below DO365 #13.
Search for this option, and set it als following:
- If Mailbox Intelligence detects an impersonated user: Quarantine the message
- Apply quarantine policy: AdminOnlyAccessPolicy
- Honor DMARC record policy: Enabled
DO365 #15: Enable the user impersonation safety tip
This requirement wants us to set the settings below DO365 #14. Scroll down to “Safety tips & indicators” for this setting.
Enable this setting:

- Show user impersonation safety tip
DO365 #16: Enable the domain impersonation safety tip
This requirement wants us to set the settings below DO365 #15.
Enable this setting:
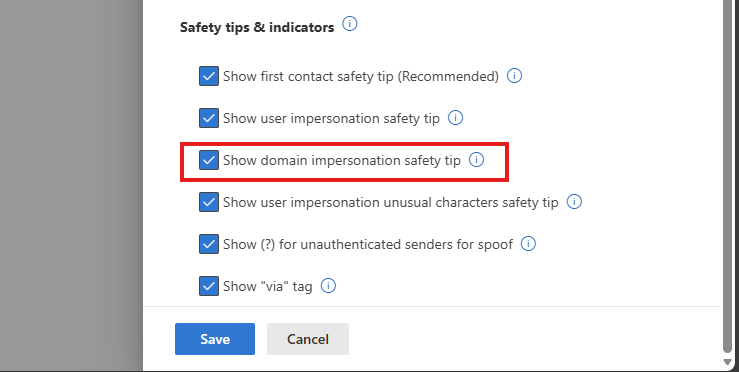
- Show domain impersonation safety tip
DO365 #17: Enable the user impersonation unusual characters safety tip
This requirement wants us to set the settings below DO365 #16.
Enable this setting:
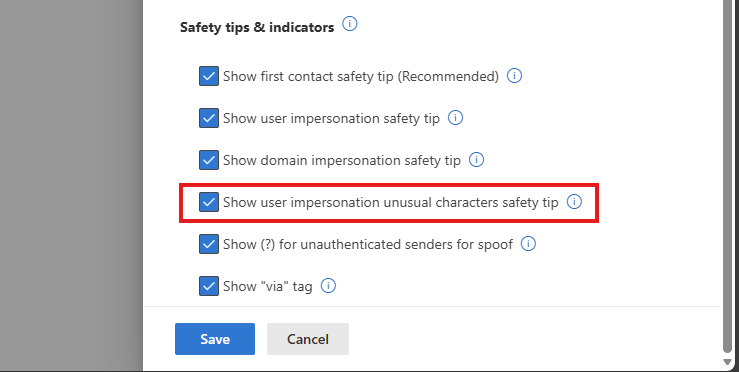
- Show user impersonation unusual characters safety tip
Thats all for the anti-phishing recommendations, you can save the policy now.
DO365 #18: Ensure all forms of mail forwarding are blocked and/or disabled
This requirement wants us to disable forwarding to outbound emailaddresses, which means email addresses outside of the organization/tenant.
Open the Microsoft Defender portal (https://security.microsoft.com)
Go to “Email & collaboration” and click on “Policies & rules”, then click on “Threat policies”. Open the “Anti-spam” menu here.
Click the “Anti-spam outbound policy” and make sure this setting is disabled:
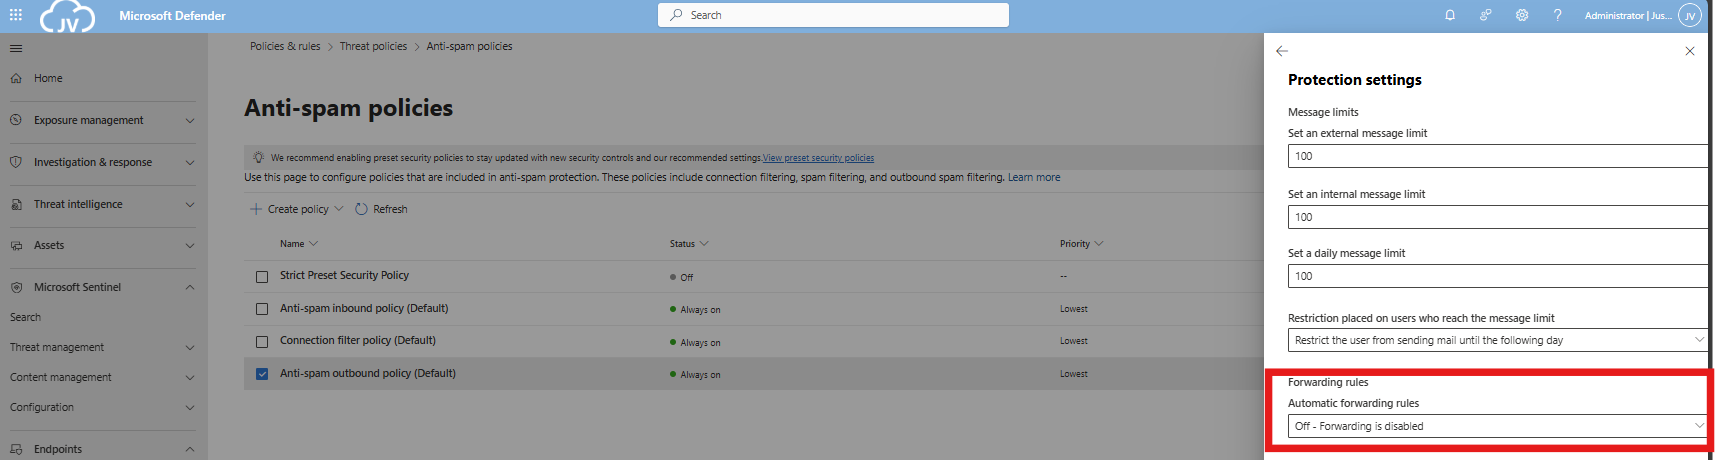
You can also define here the limits of email that a user can send every hour/day. My advice is to limit this down to around 100 or 200. For more information about this: https://justinverstijnen.nl/microsoft-secure-score-identity/tip-3-restrict-amount-of-outbound-email-messages
DO365 #19: Ensure Exchange Online Spam Policies are set to notify administrators
In this requirement we hae to set notifications for certain spam that is being sent by users in your organization. You can do this also on the same page as requirement DO 365 #18.
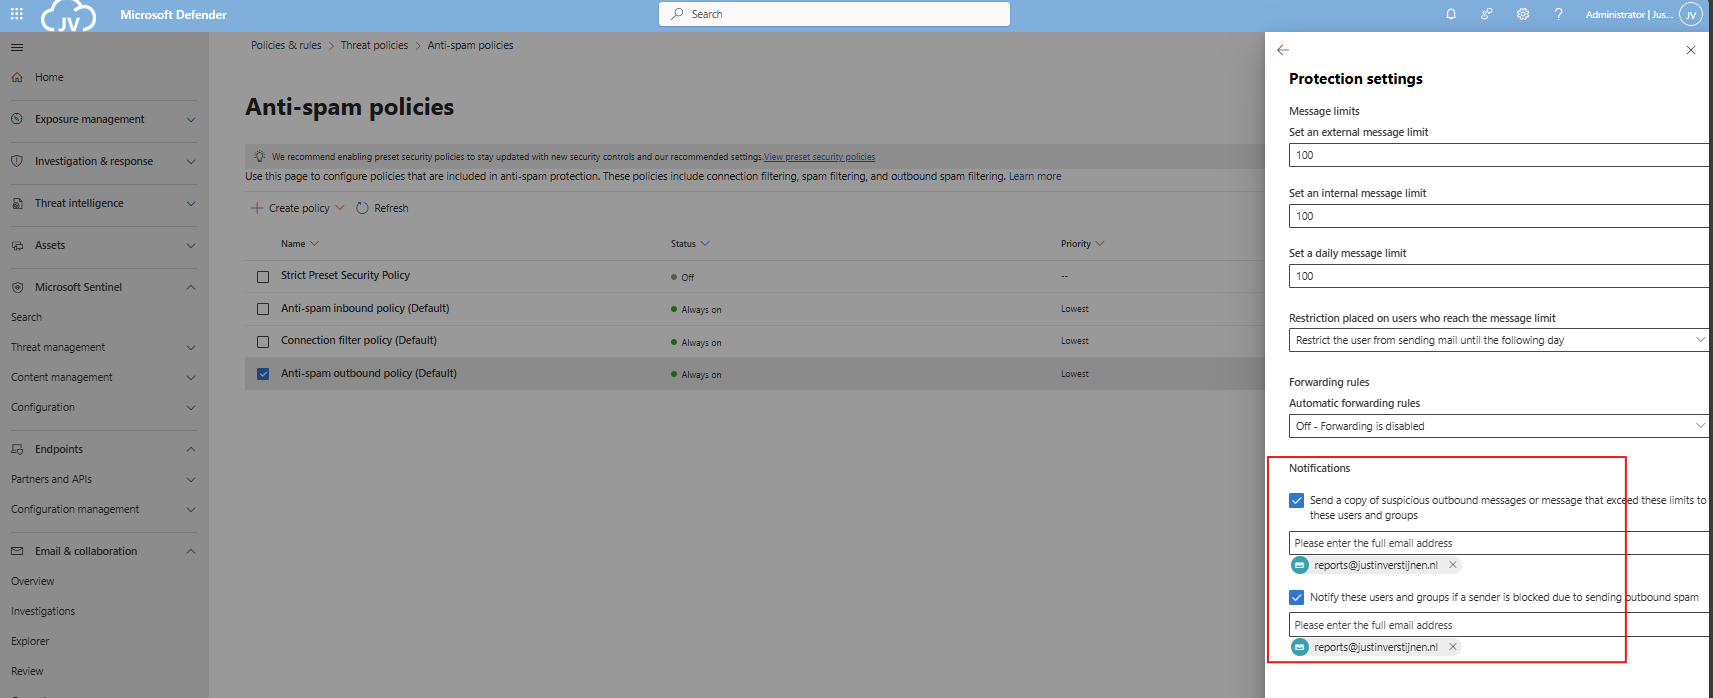
You can set here some email addresses to receive notifications about users exceeding their limits and sending spam. This is great for SOCs.
Secure score after the recommendations
In my environment, the secure score looks like this after setting all these recommendations.
At least 100% for the Apps section :)
End of the page 🎉
You have reached the end of the page. You can navigate through other blog posts as well, share this post on X, LinkedIn and Reddit or return to the blog posts collection page. Thank you for visiting this post.
If you think something is wrong with this post or you want to know more, you can send me a message to one of my social profiles at: https://justinverstijnen.nl/about/
If you find this page and blog very useful and you want to leave a donation, you can use the button below to buy me a beer. Hosting and maintaining a website takes a lot of time and money. Thank you in advance and cheers :)
The terms and conditions apply to this post.
Microsoft Secure Score - Devices
On this page, I will describe how I implemented my current Microsoft Secure Score on the Devices pillar. This means altering mostly the options of Microsoft Defender and Intune.
Before we begin
I collected all the options of the Microsoft Device Secure Score on this page, and we will address them all. I also added some industry-accepted options which are not in the secure score framework but are really helpful in avoiding or minimizing attacks in your environment.
You can use all options, or only use a subset of the options. This is up to you :)
Remember, having a secure score of 100% doesn’t mean 100% security. This only means you are using 100% of the security toolbox.
Starting this page, my Secure Score for Devices overview is already at 80% (due to strict policies I already created myself to play around):
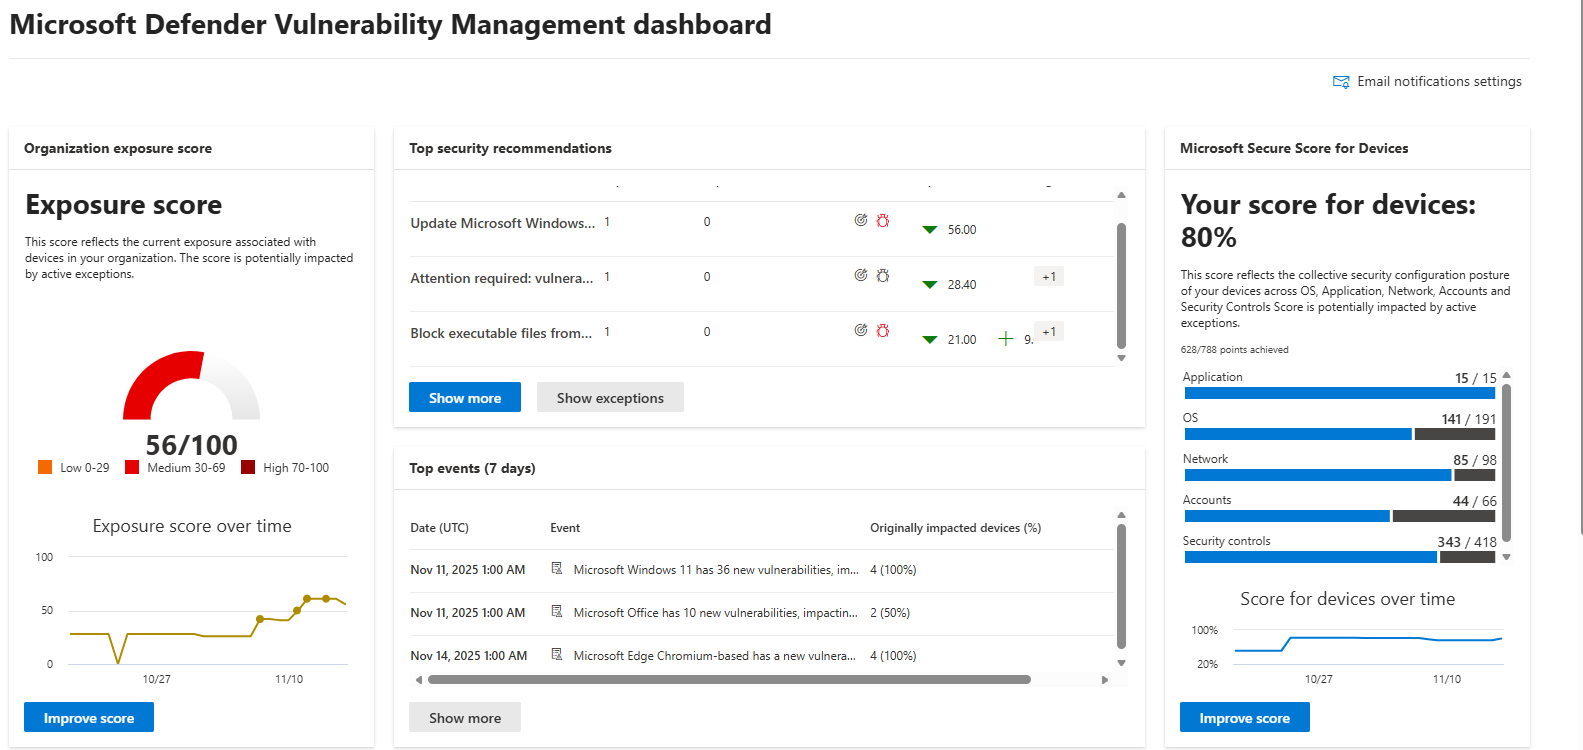
The recommendations to address:
The current recommendations that I have to address are 20 of the 104 total items:
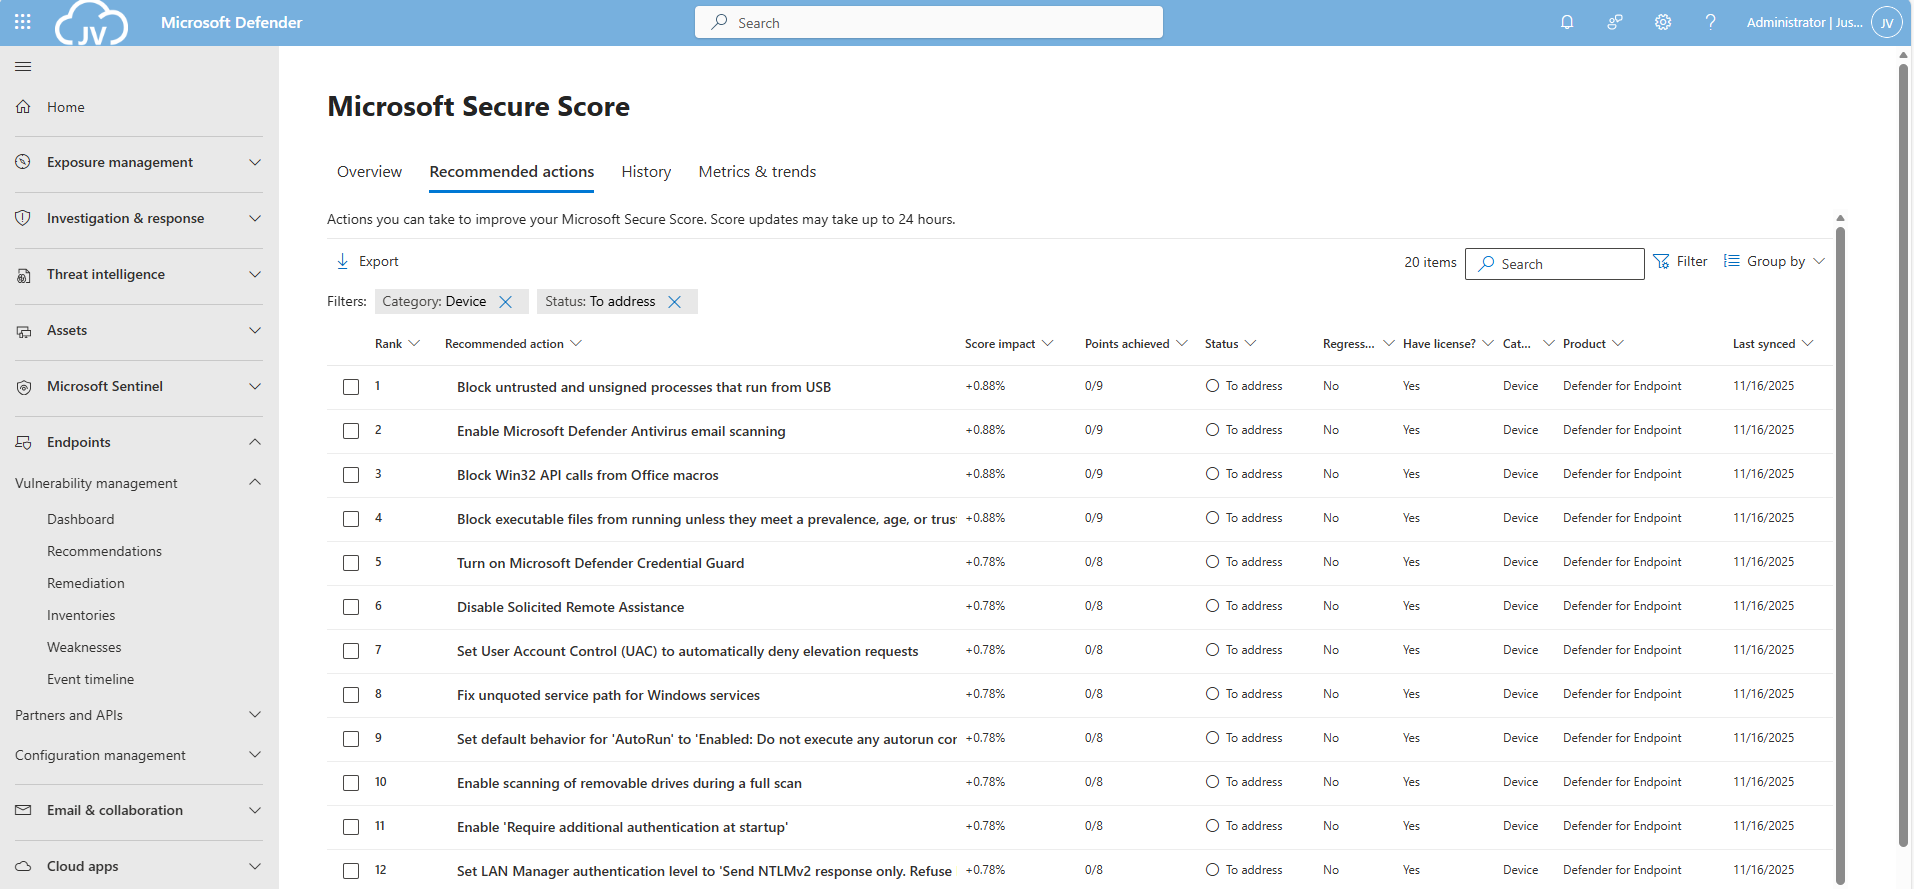
For the devices pillar, we have the Endpoints/Vulnerability Management overview which also gives us the action to take to resolve them: https://security.microsoft.com/security-recommendations
Addressing the recommendations
On this page, I will show how to address the recommendations of the Microsoft Device Secure Score. You can choose which items to implement, if you want to use one or multiple policies and such. I will put everything in a single policy and will export the policy for your use.
It may be very boring to do this by hand, but is actually very useful to learn. I am sorry for the bitwhat boring page this time, but my focus is on the reader to set all settings easily.
Task 1: Update Windows
The first recommendation was to update Windows. This was indeed the case for my device:
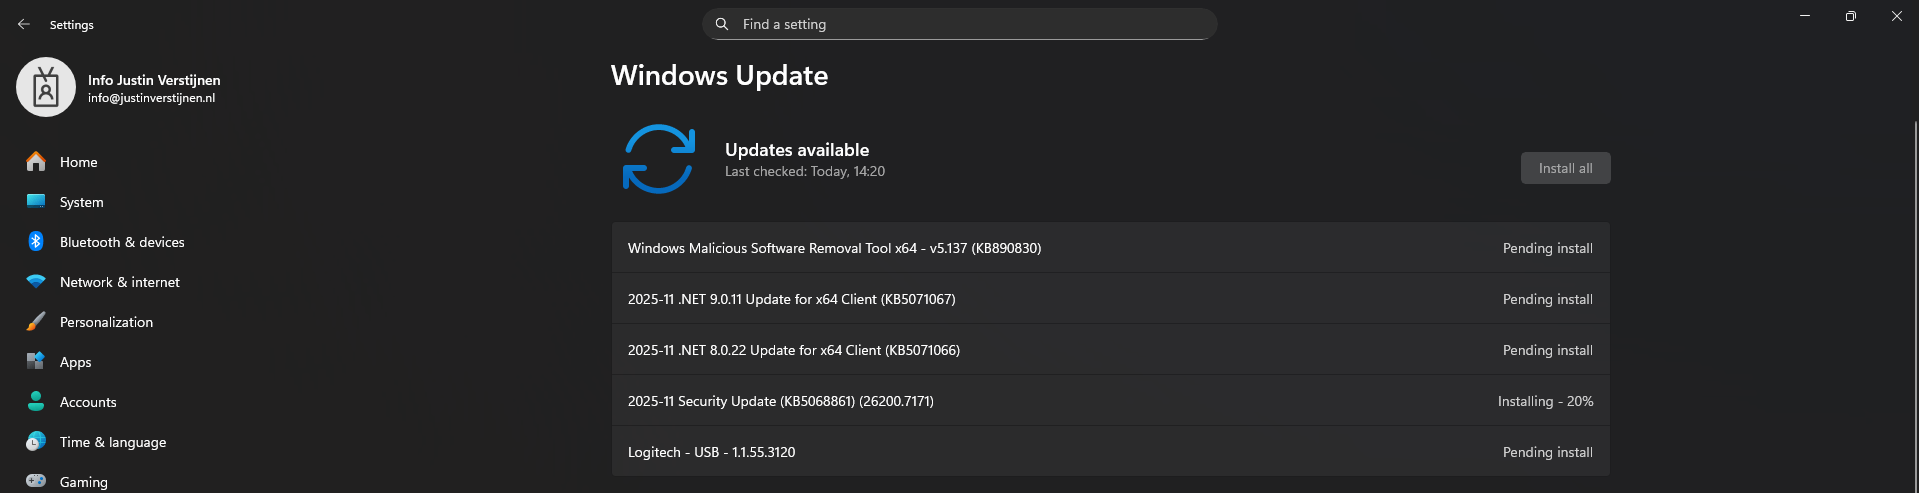
This is pretty straight forward and doesn’t need further explaination I think. You can automate this process using Windows Update Rings in Intune.
Task 2: Disable the local storage of passwords and credentials
This recommendation states we may not store credentials locally, actually disabling the Windows Credential Manager on your devices.
Open Microsoft Intune, create a new policy for Windows or use an existing one and find this option:

Select the setting, and then set it to “1” to enable forbidding to store credentials.
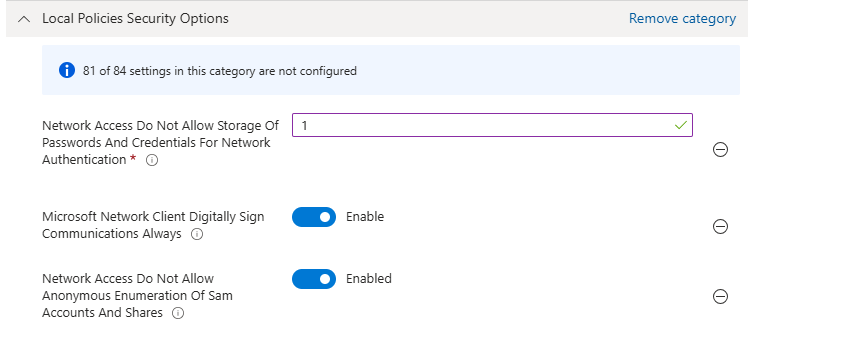
Save the policy and assign this to your devices.
Task 3: Set IPv6 source routing to highest protection
This recommendation wants us to set IPv6 source routing to the highest protection. This means IPv6 source routing is locked down to the highest level, blocking source-routed packets so attackers can’t influence how traffic moves through the network.
You can achieve this by searching for this option:
- DisableIPSourceRouting IPv6
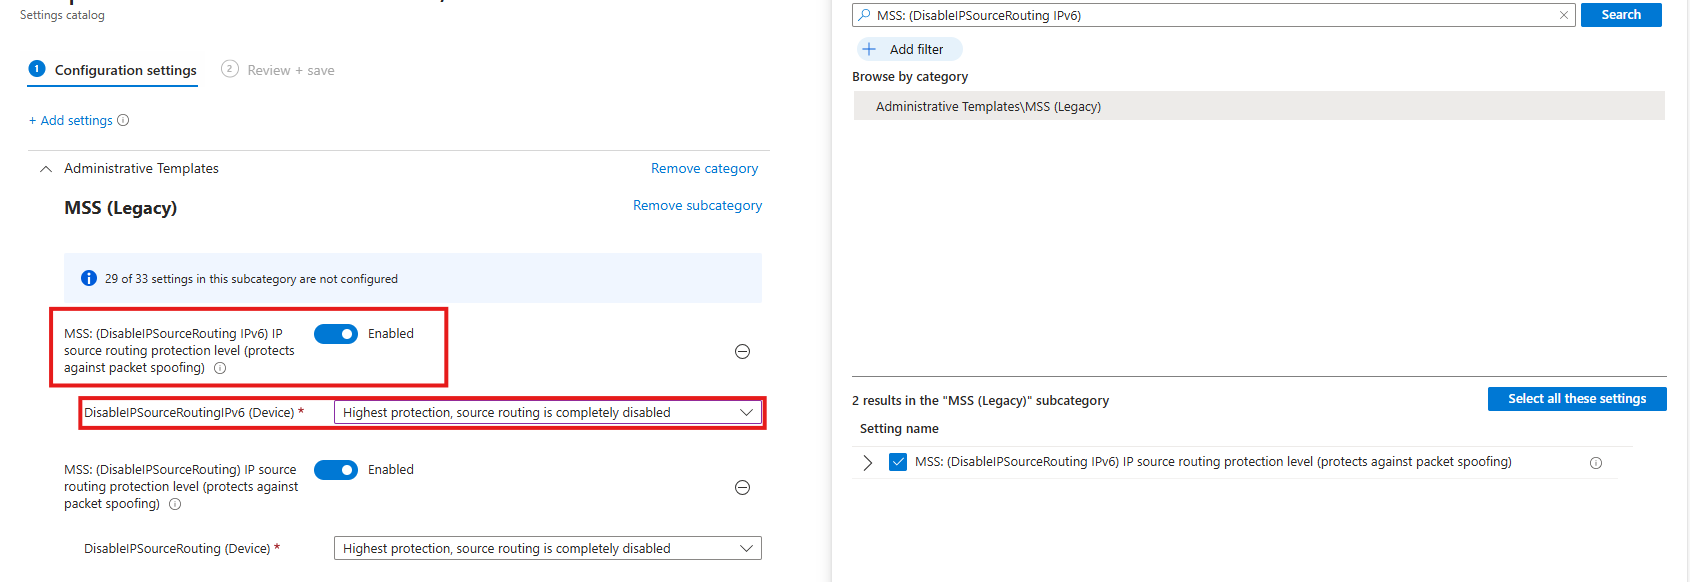
Then select the option and enable it, then set it to the highest protection as the recommendation states.
Task 4: Enable ‘Apply UAC restrictions to local accounts on network logons’
This recommendation wants us to apply restrictions on User Account Control to local accounts. Extra UAC checks are applied to local accounts when they log in over the network, limiting their permissions and reducing the risk of misuse or lateral movement.
You can find this setting by searching for:
- Apply UAC restrictions to
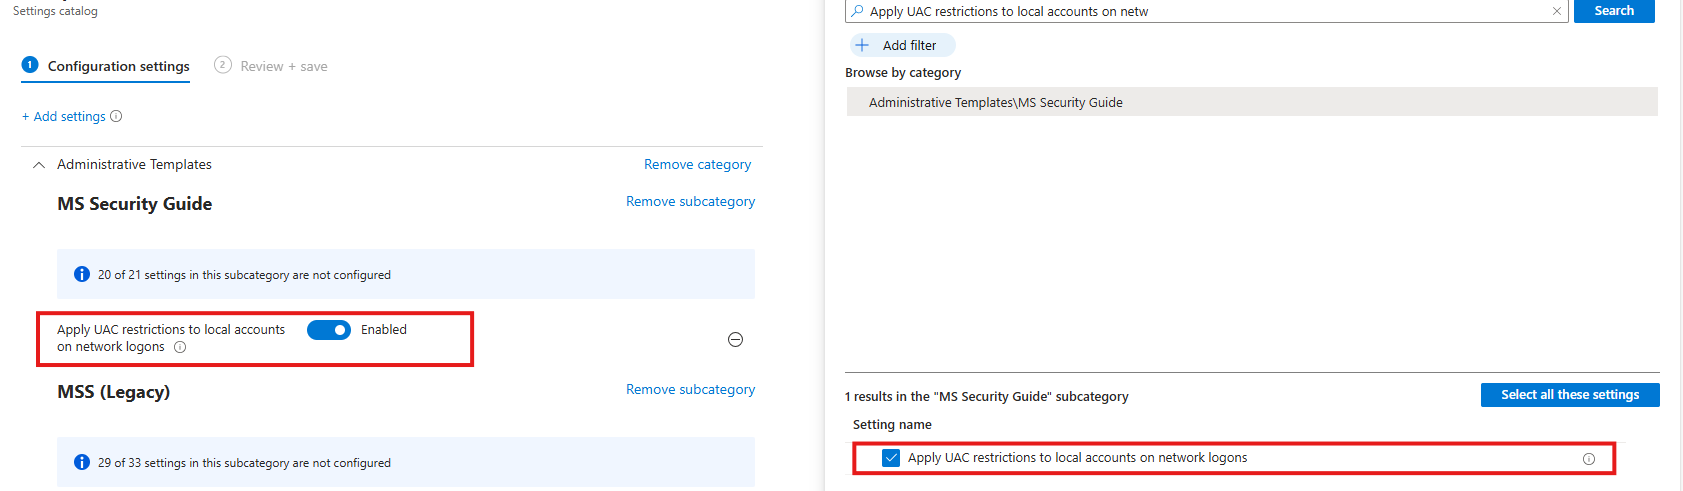
Select the option on the right and then enable it on the left.
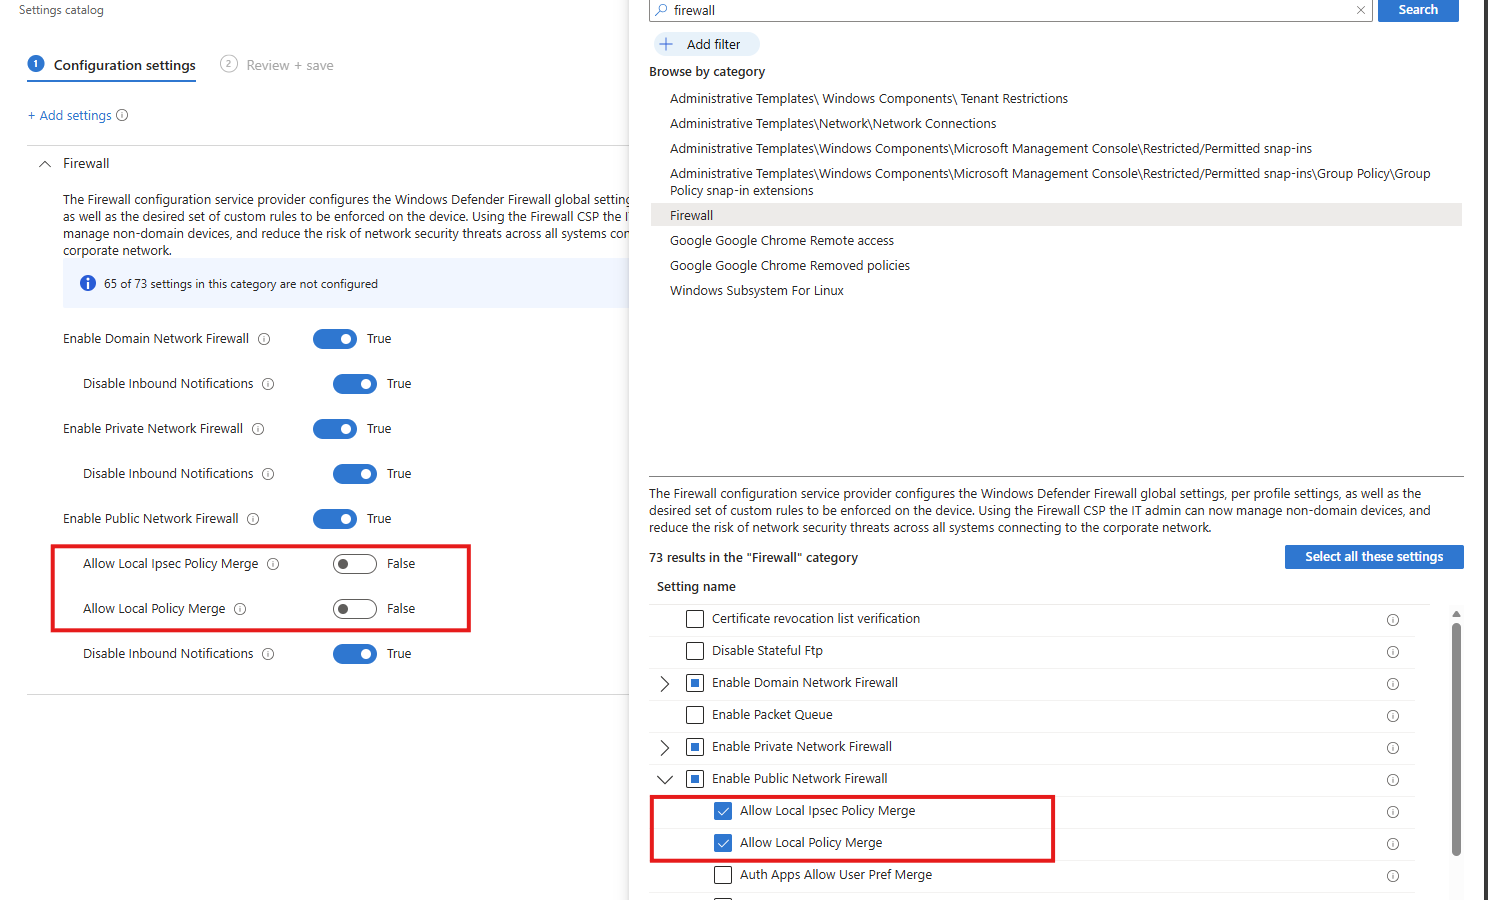
Task 5: Disable merging of local Microsoft Defender Firewall rules with group policy firewall rules for the Public profile
This recommendation wants us to disable merging of Windows Firewall rules. Local Microsoft Defender Firewall rules are ignored for the Public profile, so only centrally managed Group Policy rules apply, preventing users or apps from weakening firewall protection.
Search for the Windows Firewall settings, and select these two settings:
- Allow local Ipsec Policy Merge: Disable
- Allow local policy merge: Disable
Task 6: Enable scanning of removable drives during a full scan
This recommendation wants us to enable Windows Defender to scan removable devices after they are connected. They also can contain malicious files or software and we don’t want to be compromised that way.
Search for:
- Scan removable devices
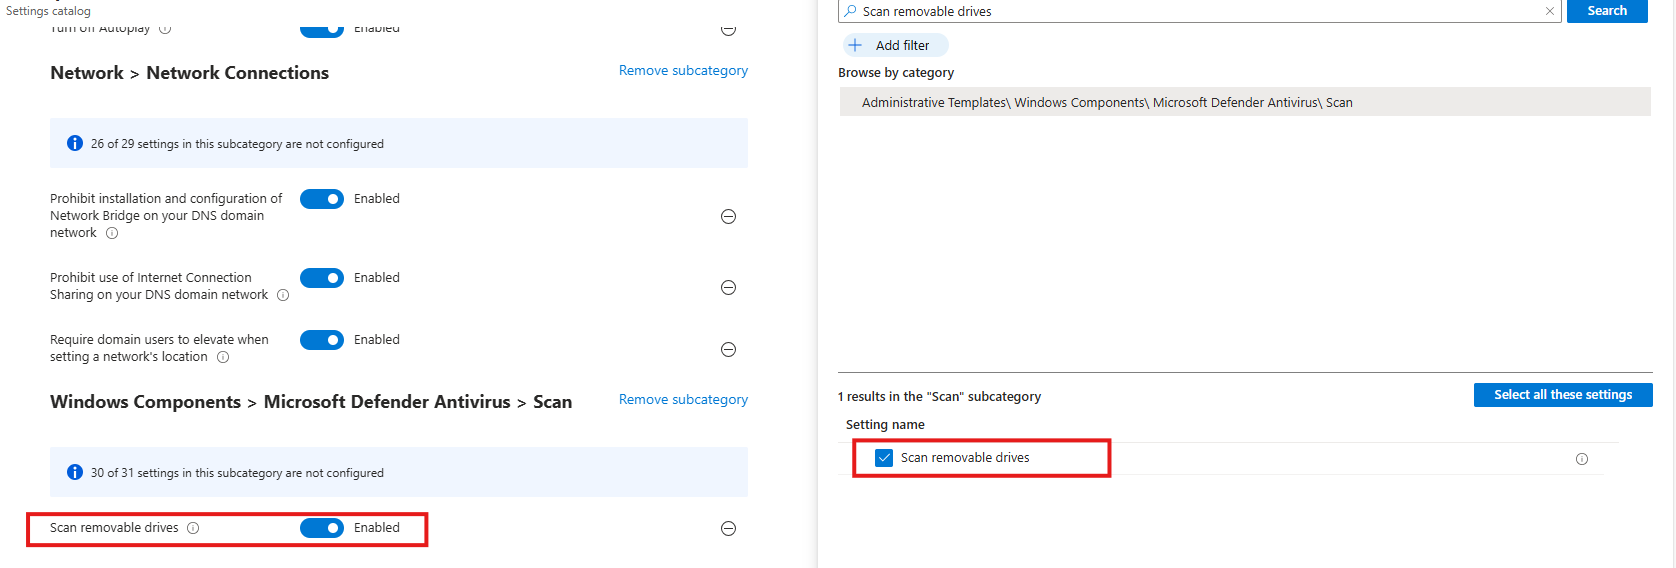
Select the option on the right and then enable it on the left.
Task 7: Disable Solicited Remote Assistance
This recommendation wants us to disable Remote Assistance without user intervention. Solicited Remote Assistance is disabled to prevent users from granting remote access to their system, reducing the attack surface and the risk of unauthorized control or social-engineering abuse.
Search for:
- Configure Solicited Remote Assistance
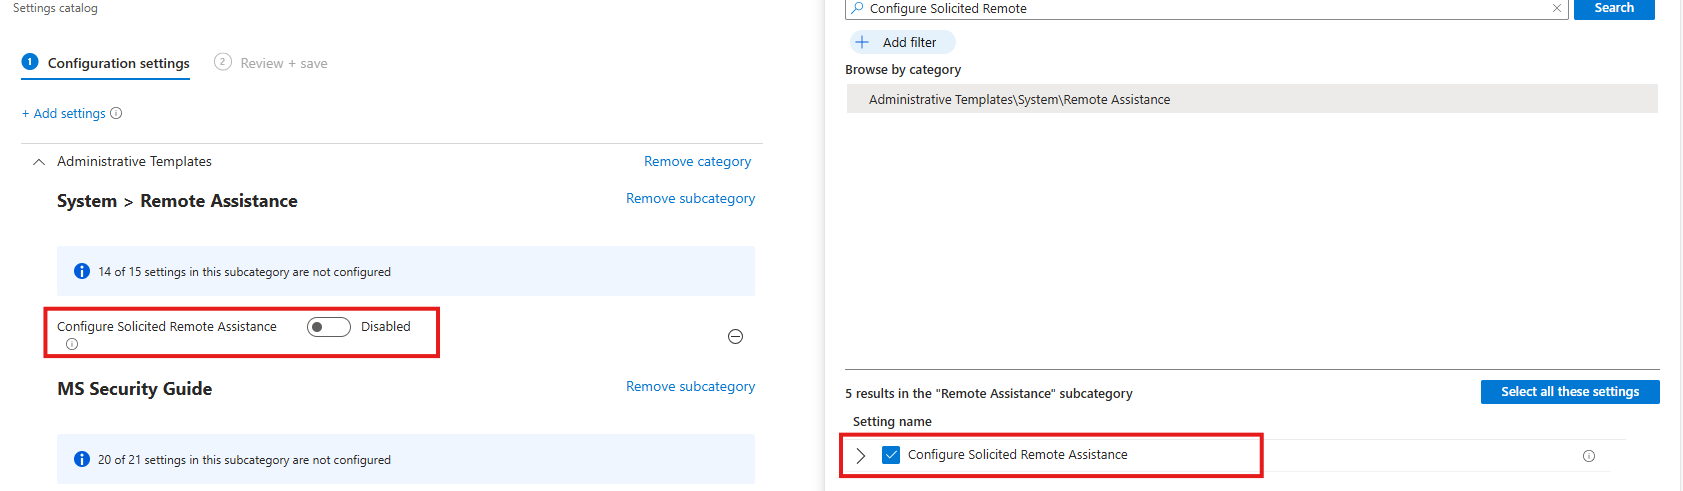
Select the option on the right and then disable it on the left.
Task 8: Network Security LAN Manager Authentication Level
This recommendation wants us to disable LM and NTLM authentication methods, forcing the use of stronger, modern authentication methods and reducing exposure to credential theft, relay, and downgrade attacks.
Search for:
- Network Security LAN Manager Authentication Level
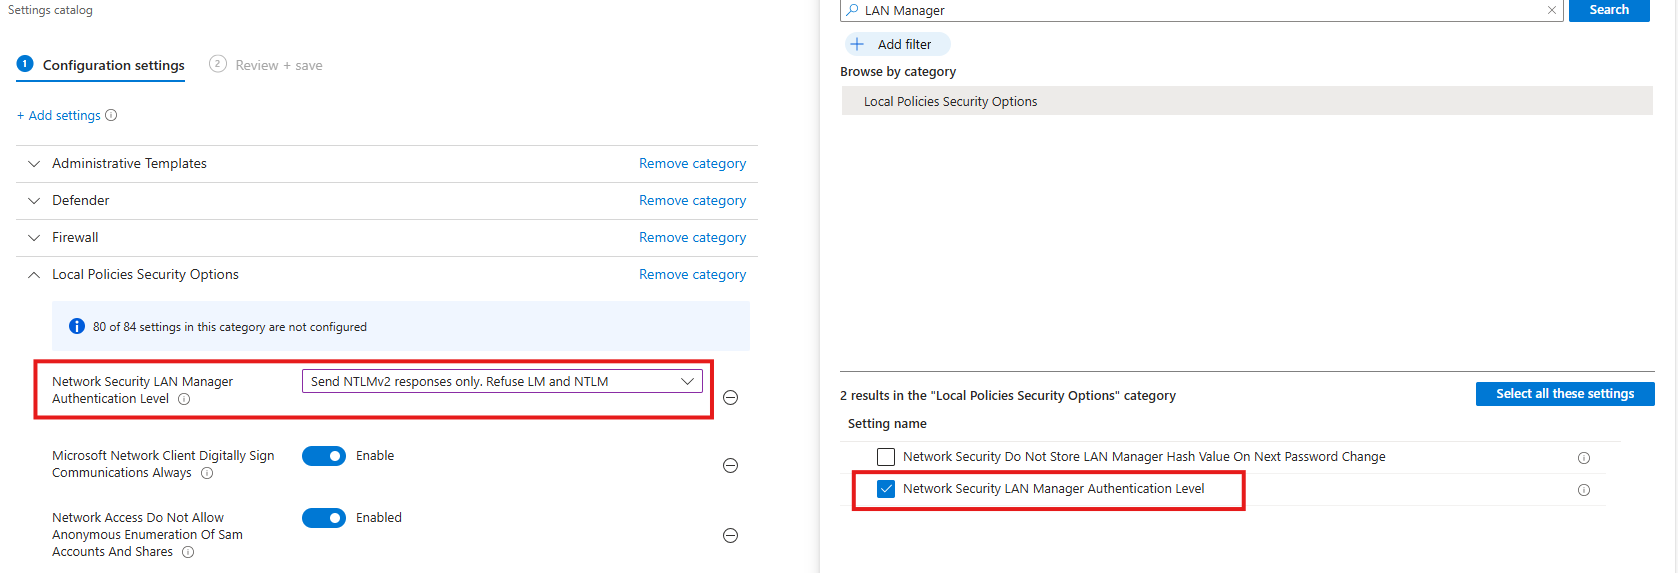
Select the option on the right and then select “Send NTLMv2 responses only. Refuse LM and NTLM”.
Task 9: Set default behavior for ‘AutoRun’ to ‘Enabled: Do not execute any autorun commands’
This recommendation wants us to set the AutoRun behaviour to “Disabled”. AutoRun is configured to block all automatic execution of commands from removable or external media, preventing malware from running automatically without user interaction.
- Search for Autoplay
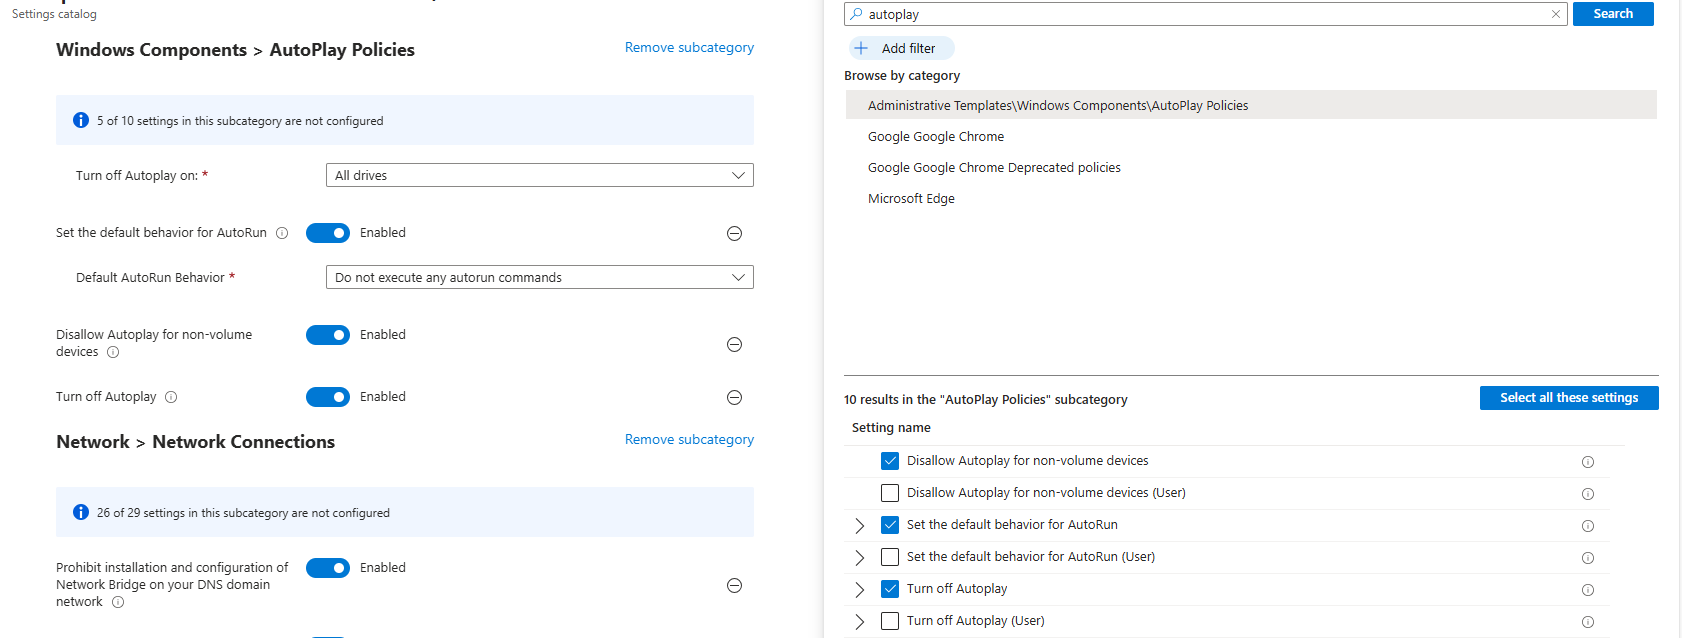
Then set the settings as follows:
- Turn off Autoplay on: All drives
- Set the default behaviour for AutoRun: Enabled
- Default AutoRun Behaviour: Do not execute any autorun commands
- Disallow Autoplay for non-volume devices: Enabled
- Turn off autoplay: Enabled
This might sound strange, but yea, we have to actually enable some settings to fully disable the feature.
Task 10: Block untrusted and unsigned processes that run from USB
This recommendation wants us to block untrusted and unsigned processes from running when launched from USB devices, reducing the risk of malware execution and unauthorized code running from removable media.
- Search for “Block untrusted and unsigned processes that run from USB”
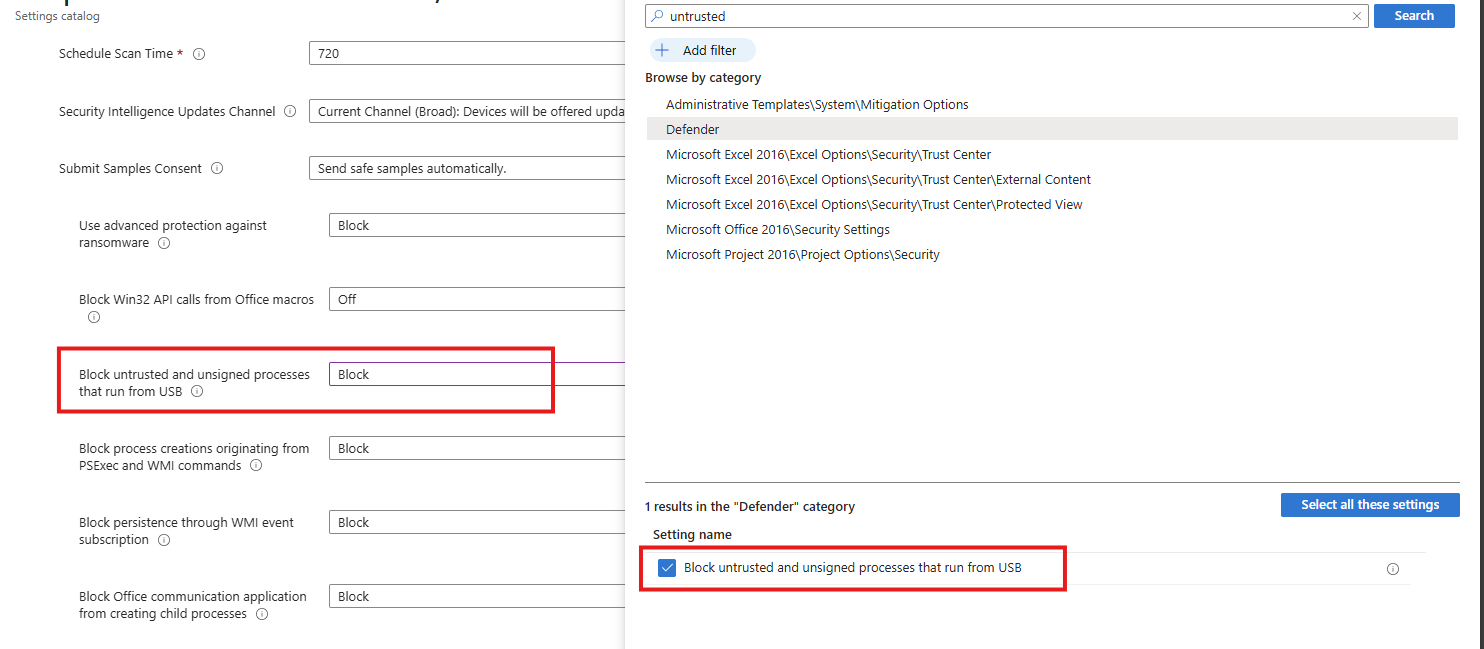
Select the option on the right and then Block it on the left.
Task 11: Enable Microsoft Defender Antivirus email scanning
This recommendation wants us to enable Microsoft Defender for scanning your email messages.
Search for the setting:
- Turn on e-mail scanning
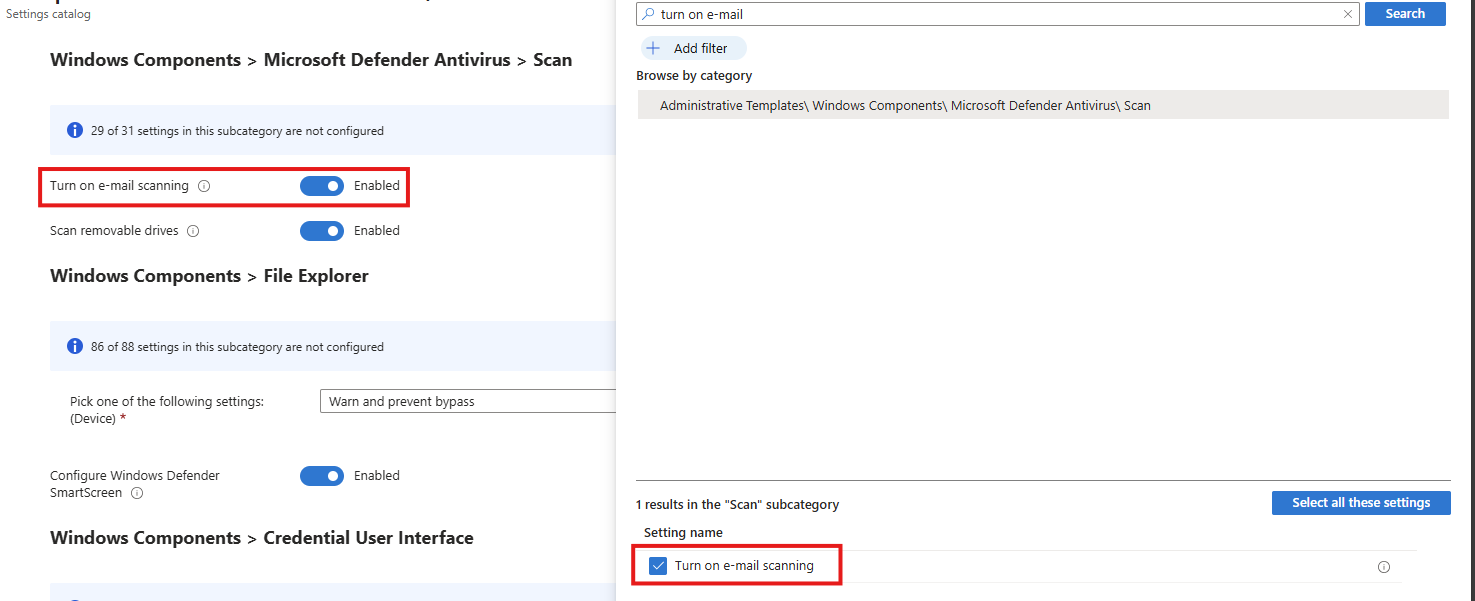
Select the option on the right and then enable it on the left.
Task 12: Block Win32 API calls from Office macros
This recommendation wants us to block Office macros from calling Win32 APIs, limiting their ability to execute system-level actions and significantly reducing the risk of macro-based malware and abuse.
Search for the setting:
- Block Win32 API calls from Office macros
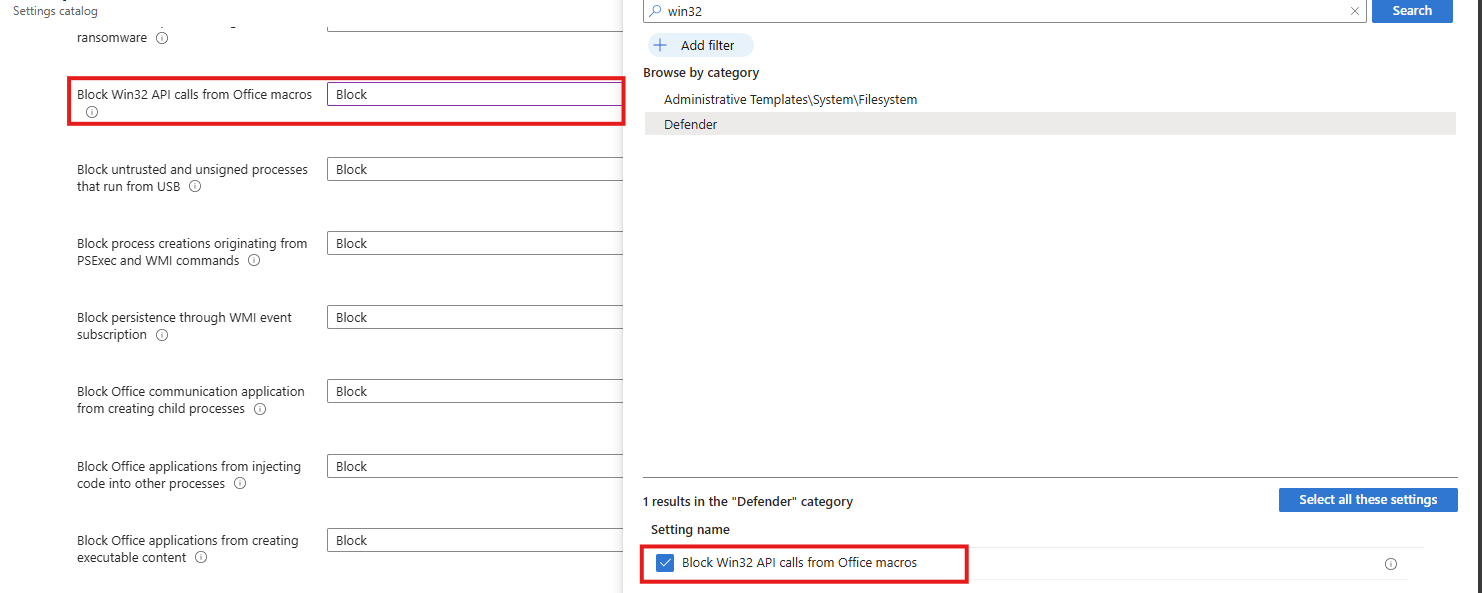
Select the option on the right and then Block it on the left.
Task 13: Block executable files from running
This recommendation wants us to block executable files from running, preventing unauthorized or malicious software from being launched and reducing the risk of malware execution.
Search for the setting:
- Block executable files from running unless they meet a prevalence, age or trusted list criterion
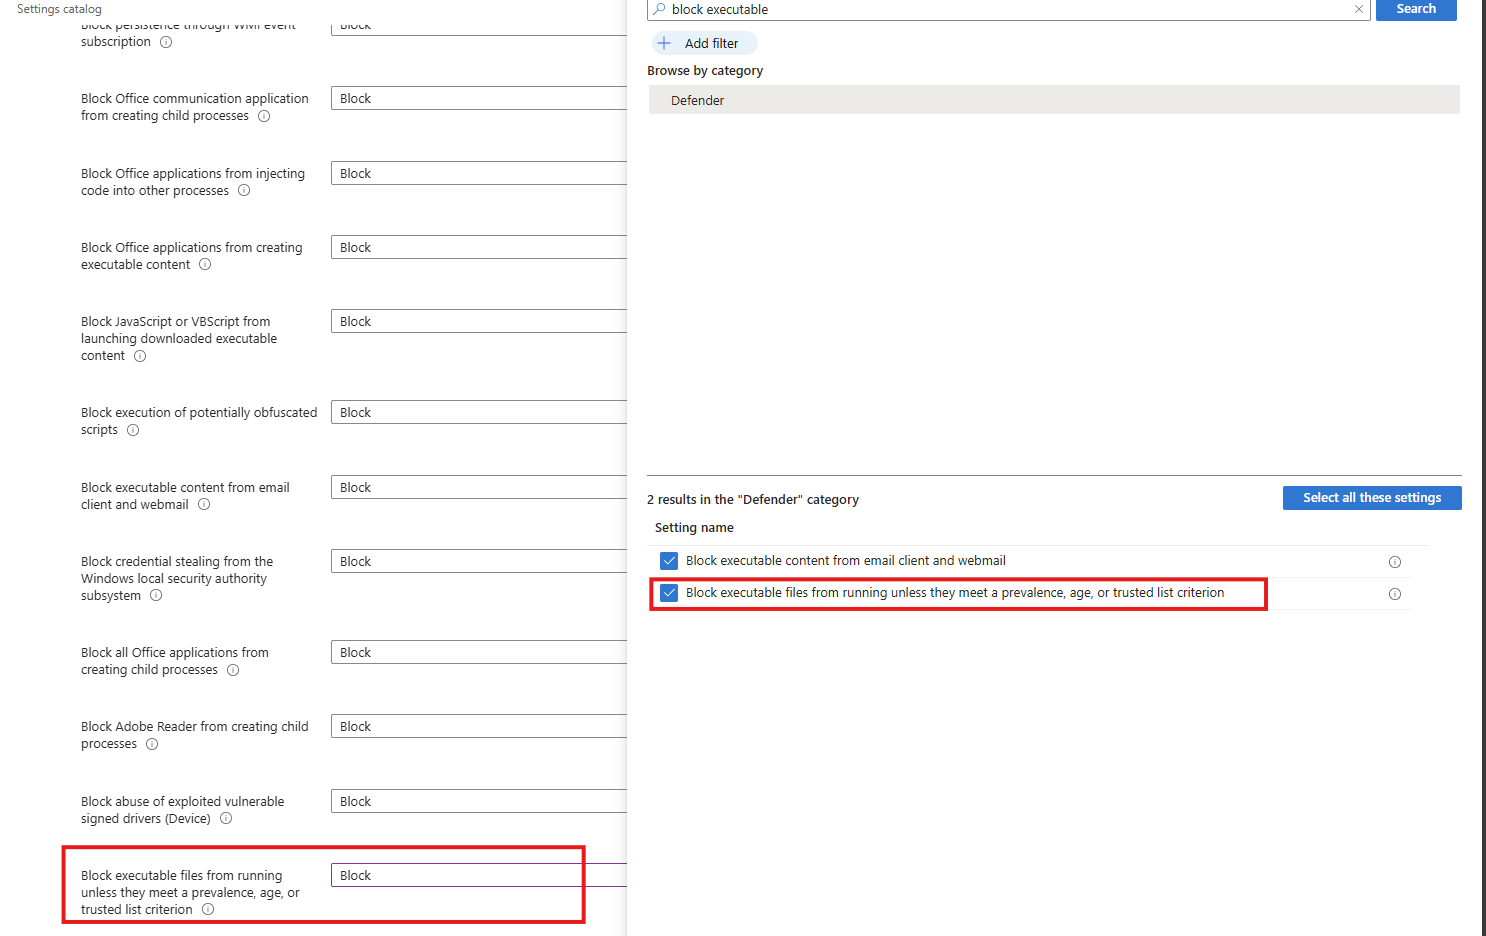
Select the option on the right and then block it on the left.
Task 14: Turn on Microsoft Defender Credential Guard
This recommendation wants us to enable the Microsoft Defender Credential Guard. Microsoft Defender Credential Guard is enabled, isolating credentials in a protected virtualization-based environment to reduce the risk of credential theft from memory by malicious software.
Search for the setting:
- Credential Guard

Select the option on the right and then enable it on the left (with or without UEFI lock)
Task 15: Set UAC to automatically deny elevation requests
This recommendation wants us to configure User Account Control to automatically deny elevation requests for non-admins, preventing users and malware from gaining administrative privileges and reducing the risk of privilege escalation. This blocks windows they don’t have permission to either.
Search for the setting
- User Account Control Behaviour Of The Elevation Prompt For Standard Users
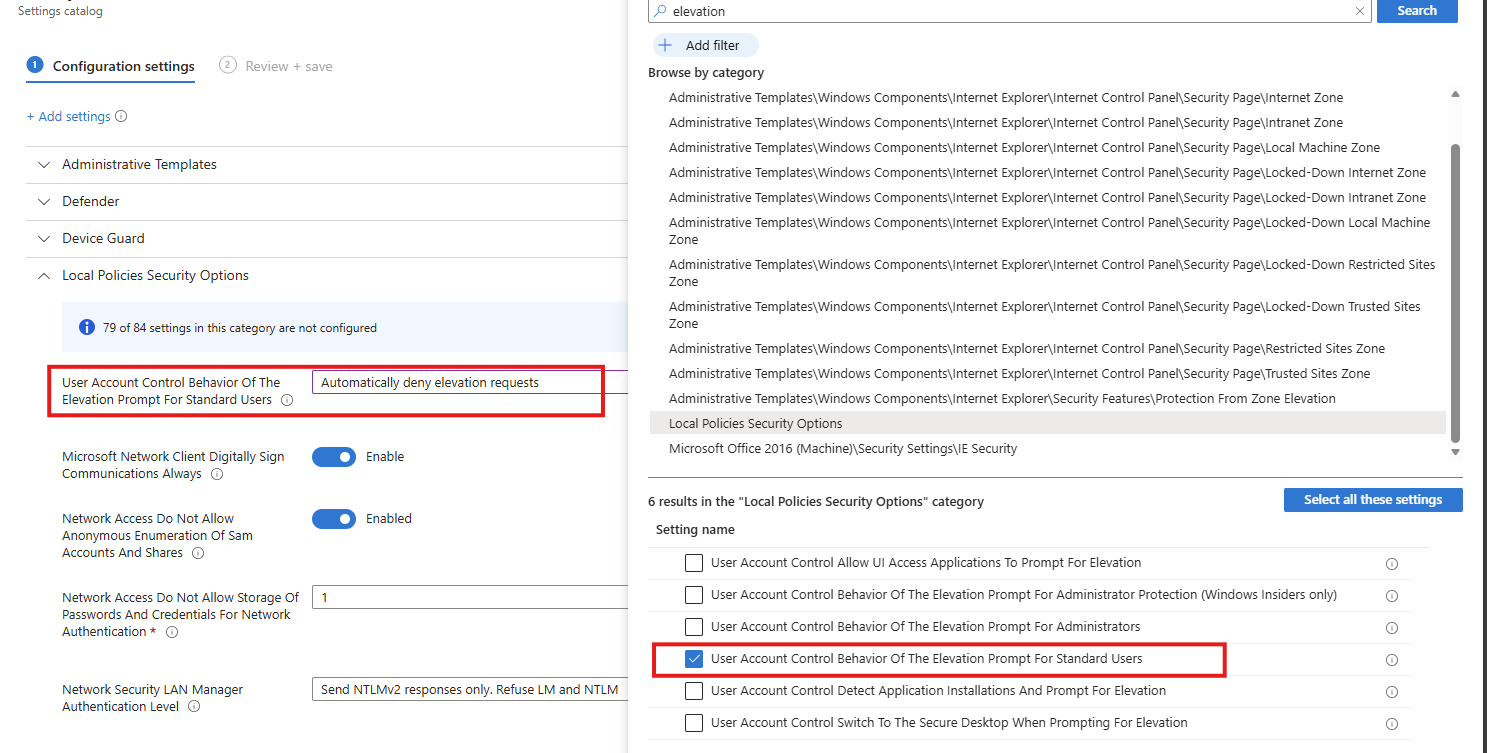
Select the option on the right and then enable it on the left.
Task 16: Enable scanning of removable drives during a full scan
This recommendation wants us to enable removable drives to be included in full antivirus scans, increasing the chance of detecting and blocking malware introduced via USB or other external media.
Search for the setting
- Allow Full Scan Removable Drive Scanning
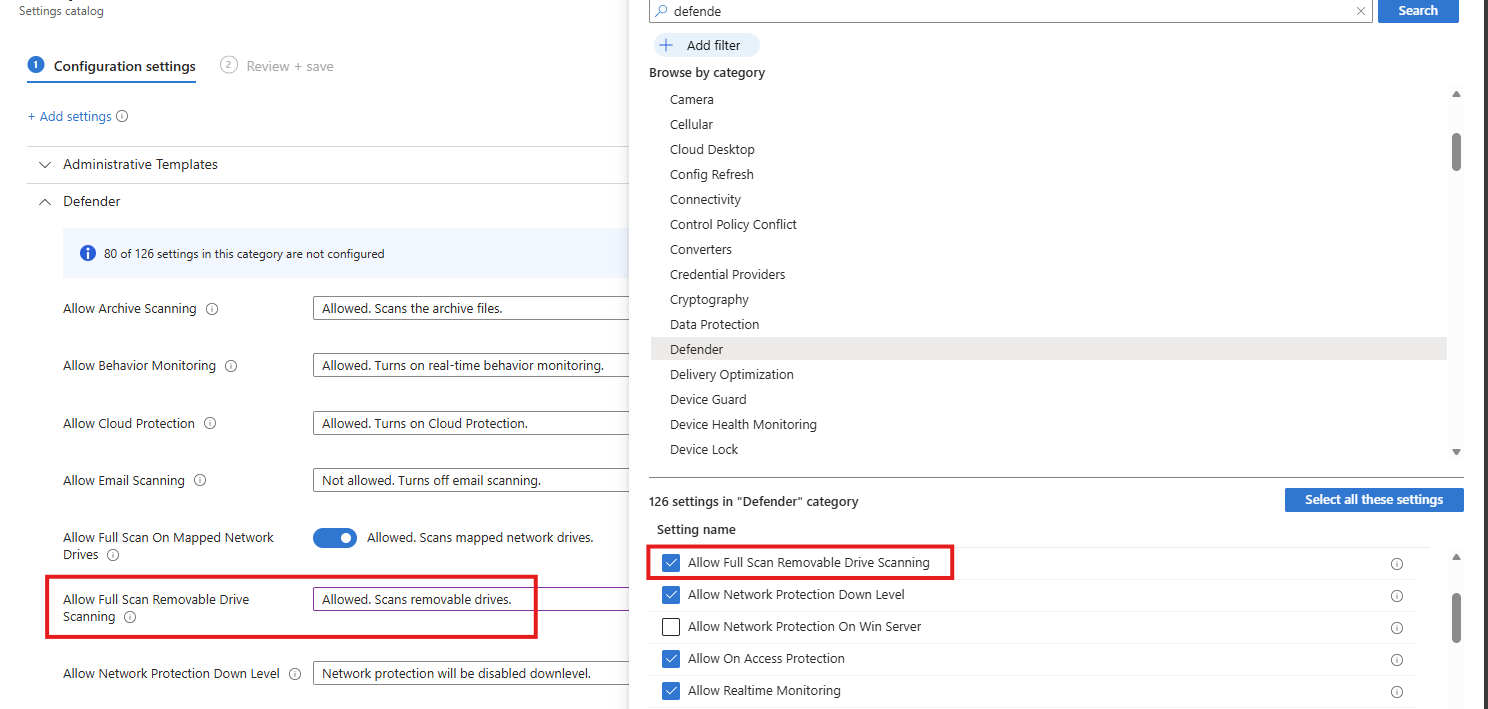
Select the option on the right and then enable it on the left.
Task 17: Enable ‘Require additional authentication at startup’
This recommendation wants us to enable additional authentication to be required at system startup, ensuring the device cannot boot without user verification and reducing the risk of unauthorized access if the device is lost or stolen.
Search for the setting
- Require additional authentication on startup

Select the option on the right and then enable it on the left.
Task 18: Set Minimum PIN length for startup to 6 or more characters
This recommendation wants us to enforce a minimum Windows PIN of 6 characters. A minimum startup PIN length of six characters is enforced, increasing resistance to brute-force and guess-based attacks during pre-boot authentication.
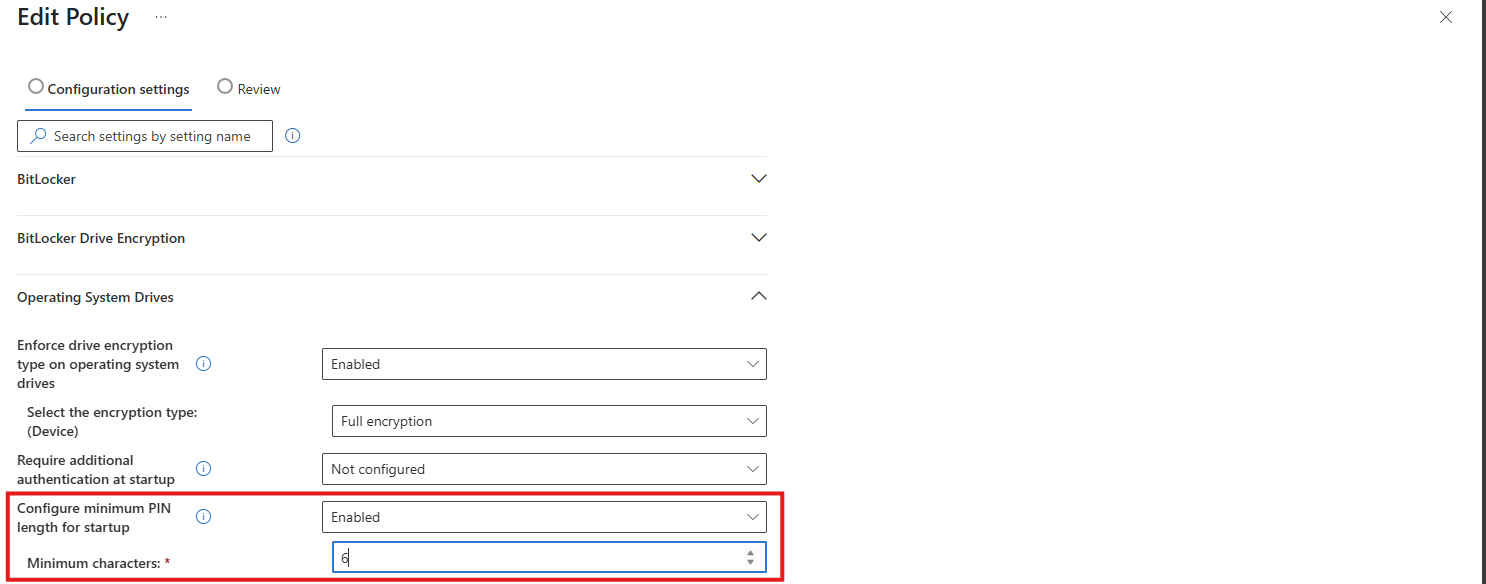
This can be found under the Drive Encryption settings:
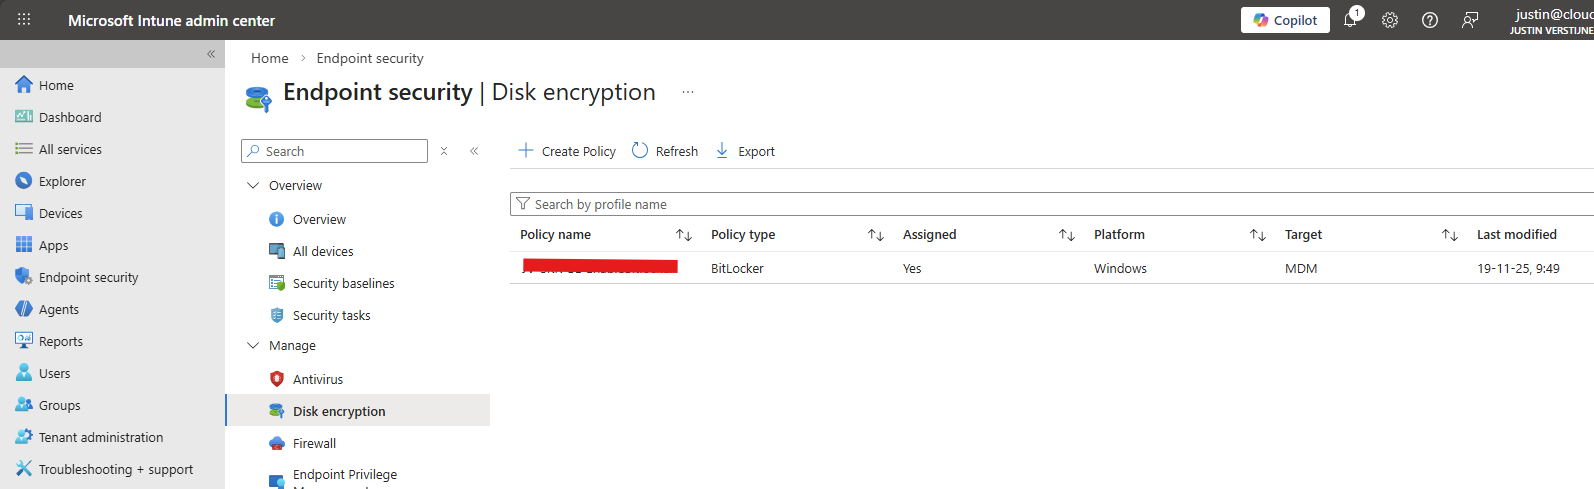
Download my Intune configuration policy
To be generous and if you don’t want to click through the Intune portal, I have my Intune configuration policy here to download:
Download Configuration policy from GitHub
End of the page 🎉
You have reached the end of the page. You can navigate through other blog posts as well, share this post on X, LinkedIn and Reddit or return to the blog posts collection page. Thank you for visiting this post.
If you think something is wrong with this post or you want to know more, you can send me a message to one of my social profiles at: https://justinverstijnen.nl/about/
If you find this page and blog very useful and you want to leave a donation, you can use the button below to buy me a beer. Hosting and maintaining a website takes a lot of time and money. Thank you in advance and cheers :)
The terms and conditions apply to this post.
Microsoft Secure Score - Identity
On this page, I will describe how I implemented my current Microsoft Secure Score on the Identity pillar. This means altering mostly the…
On this page, I will describe how I implemented my current Microsoft Secure Score on the Identity pillar. This means altering mostly the options of Microsoft Entra ID.
Before we begin
I collected all the options of the Microsoft Entra ID Identity Secure Score on this page, and we will address them all. I also added some industry-accepted options which are not in the secure score framework but are really helpful in avoiding or minimizing attacks in your environment.
You can use all options, or only use a subset of the options. This is up to you :)
Remember, having a secure score of 100% doesn’t mean 100% security. This only means you are using 100% of the security toolbox.
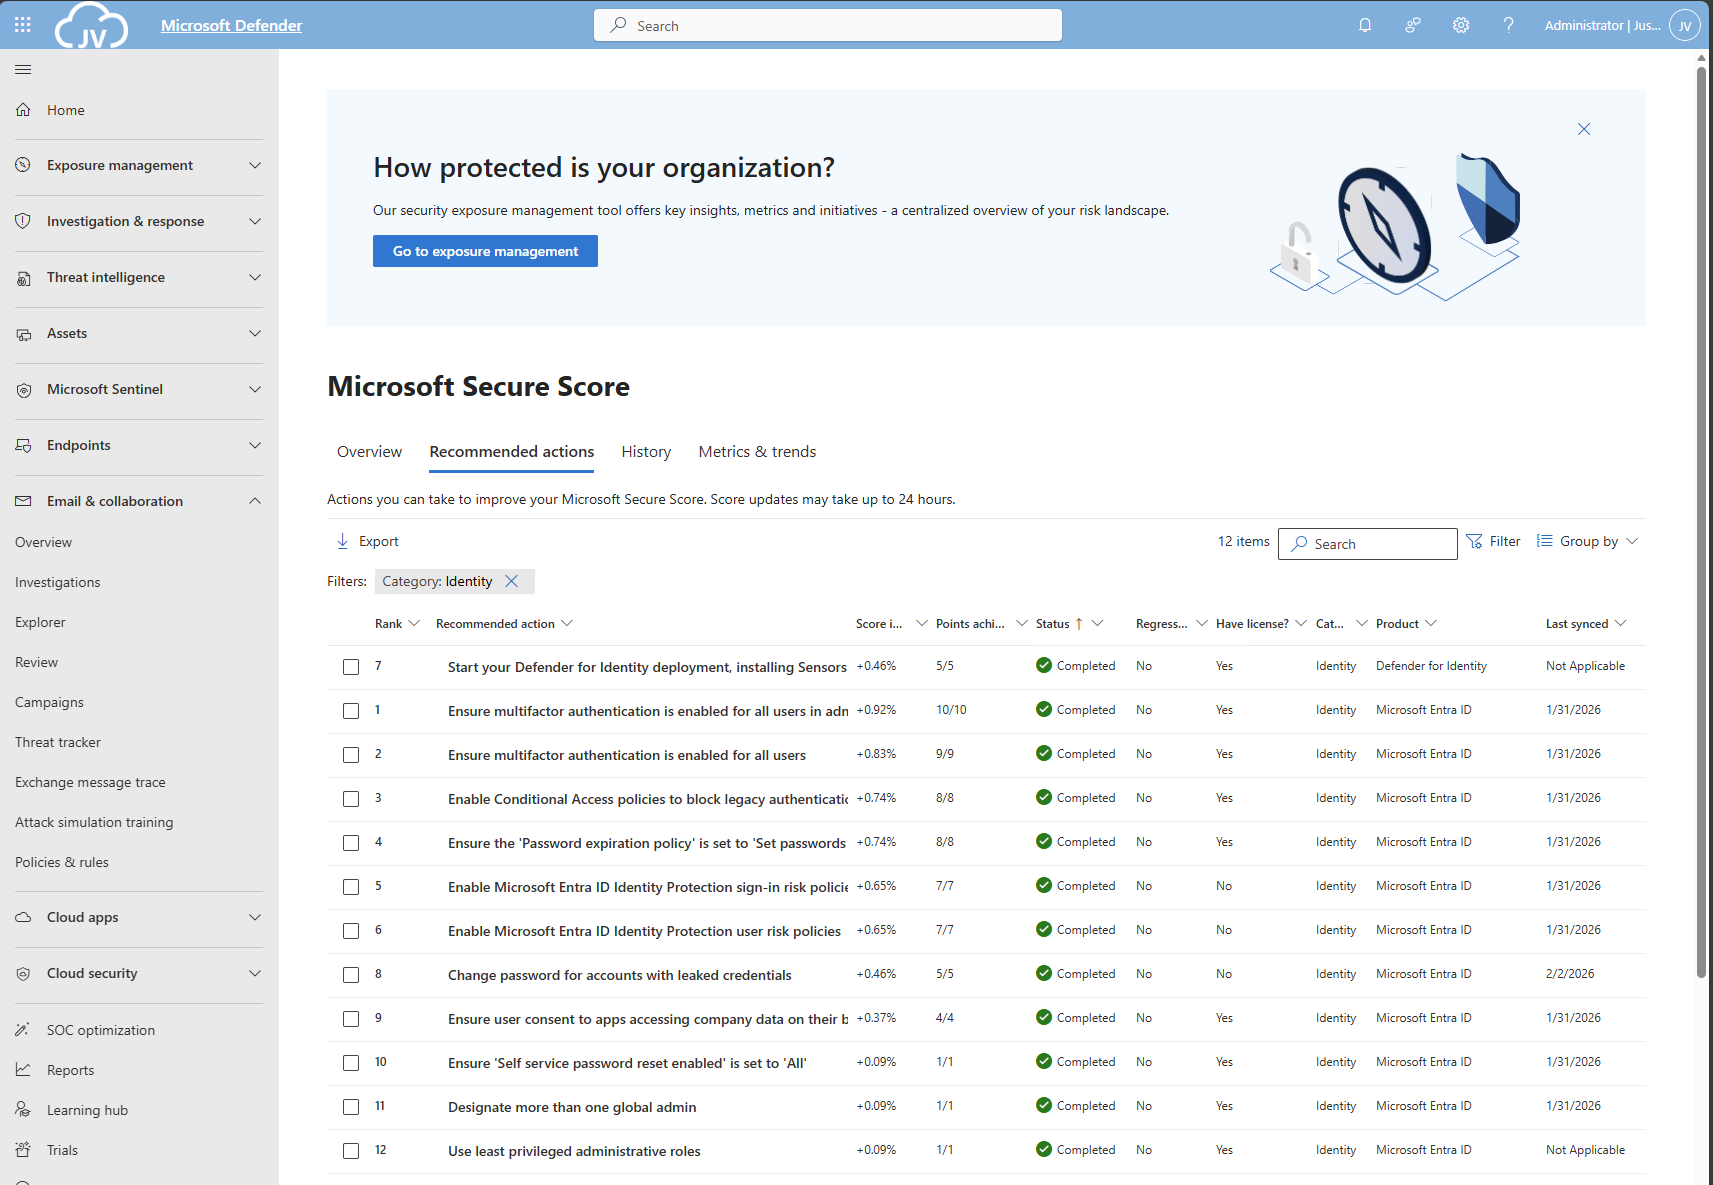
Starting this page, my Secure Score overview is this:
The Microsoft Entra ID recommendations
Let’s check first which requirements we have to address. Go to https://security.microsoft.com/securescore and select Microsoft Entra ID.
We then will get this list of items:
As you can see, the bottom 4 items are already done. The top 4 items must be addressed but I will explain how to address them all.
| Recommendation | Entra Information |
| 1. Enable Microsoft Entra ID Identity Protection sign-in risk policies | Ensure you block Medium and High sign-in risks with Conditional Access |
| 2. Enable Microsoft Entra ID Identity Protection user risk policies | Ensure you block High user risks with Conditional Access |
| 3. Ensure multifactor authentication is enabled for all users | Register MFA for all users and enforce it with Conditional Access. Registering is only making sure the user can use MFA. Enforcing it means we will actually use it. |
| 4. Ensure multifactor authentication is enabled for all users in administrative roles | Pretty straight forward |
| 5. Enable Conditional Access policies to block legacy authentication | Pretty straight forward |
| 6. Use least privileged administrative roles | Use less privileged roles for those who need it. Someone only managing billing options or resetting passwords doesn’t need Global Administrator access. |
| 7. Ensure ‘Self service password reset enabled’ is set to ‘All’ | Make sure everyone is able to reset their password themselves, so they can change it when needed, or enforce users to change them with Conditional Access. |
| 8. Ensure the ‘Password expiration policy’ is set to ‘Set passwords to never expire | Never expire passwords, as users will not select stronger passwords. They will mostly choose their birth month/place of birth and add a ascending number like 1, 2, 3 etc. Also those passwords will appear on post-its on their desk. |
| 9. Change password for accounts with leaked credentials | Entra ID will scan regularly with Identity Protection if users’ passwords are leaked. The users with a leaked password must change their password to be compliant with this recommendation. |
| 10. Ensure user consent to apps accessing company data on their behalf is not allowed | Disable users to have permissions to allow 3rd party apps accessing their data. |
| 11. Designate more than one global admin | Always ensure you have one or two back-up accounts. This is to avoid being locked out. Also always exclude on of the accounts from all policies with a very strong password and use this as “break-glass” account. |
1/2: Create a Risk-based Conditional Access policy
As 1 and 2 are mostly to achieve the same goal, I really like to create one policy to address them both. Go to Microsoft Entra, then to “Security” and then to “Conditional Access”. (or use this link).
First, check the list of users that might be blocked due to the results of this new policy: https://entra.microsoft.com/#view/Microsoft_AAD_IAM/SecurityMenuBlade/~/RiskyUsers/menuId/RiskyUsers/fromNav/
Then proceedd creating the policy.
In my environment, I use a very clear naming scheme for Conditional Access. I start with JV, then state if this policy allows or blocks users and then some more information. I call this new policy “JV-Block-RiskyUsersSignins”.
Create a new policy and name it to your desired naming scheme.
Then select “Users” and include all users.
After that, click on “Exclude”, select “Users and groups” and select your break-glass administrator account to have this account excluded from this policy. This ensures if you make any mistake, you have still access to the tenant with this account. Great recommendation, can save you weeks from support of Microsoft who wants to know in 5 different ways that its actually you.
For “Target Resources”, select “All resources”.
At “Conditions”, select the following options, according to Microsoft’s best practices (source)
- Users risk: High
- Sign-in risk: Medium and High
You can set this more tight, but expect false positives among users who are unable to sign in.
Then at “Grant”, set “Block access”. This ensures if users are at risk they are unable to sign in to their account and they need the skilled helpdesk to regain access to their account. It’s up to the helpdesk to confirm if the account is compromised, to collect sign-in actions, to take action and most of the time enforce a password change.
Now the policy can be created and ready to be enforced:
3/4: Enable Multi Factor Authentication for all users
Make sure you have a Conditional Access policy in place where you enforce Multi Factor Authentication for all users for this to work:
I have a policy in place that requires MFA or sign-in from a compliant device. This generally is a good approach. Make sure to exclude your break-glass administrator from the policy if making errors and/or not having a compliant device and/or having problems with your normal account.
Then proceed by logging into all of your user accounts, go to aka.ms/mfasetup and register at least 2 methods. You can enforce this using a registration policy. Users then must register for MFA otherwise they will be rejected to access any data.
5: Disable Legacy authentication for all users
Microsoft really recommends us to disable legacy authentication for all users, as they are protocols without MFA and any additional security. These are protocols like SMTP/IMAP/POP.
We can actually create one Conditional Access policy to do this. Let’s head back to Conditional Access to create a new policy.
Select “All Users” and exclude your break-glass administrator account.
Select all target resources.
Under “Conditions”, select “Client Apps” and select the options:
- Exchange ActiveSync clients
- Other clients
Then under “Grant”, select “Block access” to block any legacy authentication protocols from being used.
6: Use least privileged administrative roles
Make sure you use lower-privileged administrative roles for your users. This is not particularly a setting but more a process and teamwork to achieve.
Microsoft Entra ID has some lower-privileged roles which we must utilize. I will give some good examples of practice use of lower privileged roles, to minimize the Global Administrator role.
| Requirement | Correct role |
| User must be able to export users for billing purposes | User Administrator |
| User must be able to change licenses and add new products | Billing Administrator |
| User must be able to invite guest users | Guest Inviter |
| User must be able to manage applications and give consent | Cloud Application Administrator |
For a comprehensive list of Entra ID roles, check out this Microsoft page: https://learn.microsoft.com/en-us/entra/identity/role-based-access-control/permissions-reference
7: Ensure Self Service Password Reset (SSPR) is enabled and to all users
Microsoft recommends us that users have the Self Service Password Reset (SSPR) option enabled for all users. You can find this in Microsoft Entra -> Password reset (or use this link: https://entra.microsoft.com/#view/Microsoft_AAD_IAM/PasswordResetMenuBlade/~/Properties/fromNav/
Set this switch to “All” to enable this for all users. After a users logging in after this change, they will have to register for this new feature. Make sure you also set the methods needed to reset a password is “2” to enhance security.
8: Never expire passwords
A good recommendation is to let passwords of users never expire. This was a best practice in IT for around 15 years, but multiple researches pointed out that they will not work. Users will use a weak base password and will only add ascending numbers to that.
To disable this option (which is already disabled by default), go to Microsoft 365 Admin Center.
Then go to “Settings”, “Org settings”, then the tab “Security & privacy” and then search for “Password expiration policy”. Then check the box to disable this option.
9: Change password for accounts with leaked credentials
Microsoft Entra ID Protection will automatically scan for users with leaked credentials. If any user have leaked credentials, the user risk will be “High” and will be blocked by the policy we created in step 1. Changing the password of the user will be enough to give them access again.
You can check pro-actively in this dashboard for risky users or sign ins:
10: Ensure user consent to apps is not allowed
It is generally a good approach to disable users to give 3rd parties access to their profile and organization data. https://entra.microsoft.com/#view/Microsoft_AAD_IAM/ConsentPoliciesMenuBlade/~/UserSettings
- Do not allow user consent (recommended): This makes sure a user cannot give any 3rd party access and is the most restrictive option and also my recommendation.
- Allow user consent for apps from verified publishers, for selected permissions: Really broad setting and not something you want any user to do. Unfortunately, this is the default setting.
- Let Microsoft manage your consent settings: This option means Microsoft can dynamically change this option to new guidelines.
Setting this to “Do not allow user consent” will give your users a prompt where they can request access. Let’s configure that to make sure we have this flow correctly.
Go to “Admin consent settings” and configure the following options:
Select “Yes” to the “Users can request…” option and select users, groups or roles who are able to allow the consent. Then save the new configuration.
Now if users get any request from 3rd party applications, they can do a request to their admins to allow the application:
The request will then popup into this window: https://portal.azure.com/#view/Microsoft_AAD_IAM/StartboardApplicationsMenuBlade/~/AccessRequests/menuId~/null
11: Designate more than one global admin
It’s always recommended to have a break-glass administrator account. Secure this break-glass account in multiple ways, like:
- Have at least 2 accounts
- Have the accounts cloud only -> not synced from Active Directory
- Use the .onmicrosoft.com domain and no license
- Exclude from all Conditional Access policies
- Do not use licenses on Administrator accounts
- Passwords must be at least 64 and max 256 characters
- Avoid “break glass admin” or any tip to a high privileged account
- Register FIDO2 key for the account
- Setup Monitoring for login alerts
- Test the accounts twice per year
Give this administrator account Global Administrator account and only use it as last-resort from accessing your tenant.
Tip 1: Disable manual login of shared mailboxes
Something that is in no Secure Score check, but very important is to block manual sign in of your Shared Mailbox accounts. As we only want to delegate access to those using Manage/SendAs/Send on behalf permissions, we don’t need to expose those accounts.
Open up the Microsoft 365 Admin Center, search for the shared Mailbox and click on “Block Sign-in”.
Tip 2: Disable these user settings
Something that is also in no Secure Score check, is to disable some user settings. By default, simple users have some really high permissions to do certain actions.
In Microsoft Entra Admin Center, go to “Users” and the “User Settings”.
Set the following options:
- User can register applications: No
- Restrict non-admin users from creating tenants: Yes
- Users can create security groups: No
- Guest user restrictions: Most restrictive
- Restrict Access to Microsoft Entra Admin center: Yes
- Show keep user signed in: No
This must look like this for the highest level of security:
Tip 3: Restrict amount of outbound email messages
On this page we did everything to defend ourselves from certain identity attacks. However, being 100% secure is a fairy tale and attackers mostly will break into accounts to send phishing emails, as this must look very legit to other users.
This type of attack is described as such by the MITRE ATTACK framework:
| Category | Technique Name | Technique ID | Notes |
|---|---|---|---|
| Identity Attacks | Credential Harvesting | T1589 / T1557 / T1552 | Used to collect or intercept credentials. |
| Identity Attacks | Valid Accounts | T1078 | Using a compromised legitimate account. |
| Phishing from Compromised Accounts | Internal Spearphishing | T1534 | Sending phishing emails from a legitimate internal account to increase credibility. |
| Phishing from Compromised Accounts | Masquerading | T1036 | Impersonating a legitimate user. |
A good recommendation I can give is to limit the amount of outbound email messages a user can send per hour or day. We can do this in Microsoft Denfender with an Outbound anti-spam policy:
In this policy, I was very strict and set the maximum limit of every user to 100 messages. You can set this higher, but be aware that an attacker can send thousands of messages within minutes. The Exchange Online default limit is 10.000 messages which can cause devastating damage if being breached. Not only financial damage, but your good name is being abused too.
The result
After I did all the configurations described on this page, my Identity secure score was at a whopping 98.48%.
And the result on the overview pages:

Summary
This page contains all the recommendations to enhance your Secure Score for the Identity pillar. This really helps defending your identities from several attacks and utilizing as much as 100% of the toolbox on this, somewhat fragile pillar.
Thank you for reading this post and I hope it was helpful.
Sources
These sources helped me by writing and research for this post;
End of the page 🎉
You have reached the end of the page. You can navigate through other blog posts as well, share this post on X, LinkedIn and Reddit or return to the blog posts collection page. Thank you for visiting this post.
If you think something is wrong with this post or you want to know more, you can send me a message to one of my social profiles at: https://justinverstijnen.nl/about/
If you find this page and blog very useful and you want to leave a donation, you can use the button below to buy me a beer. Hosting and maintaining a website takes a lot of time and money. Thank you in advance and cheers :)
The terms and conditions apply to this post.