All pages referring or tutorials for Windows Server.
This is the multi-page printable view of this section. Click here to print.
Windows Server
- Fixing CVE-2026-41089 on Windows Server
- Active Directory FSMO roles
- Managing Hyper-V server without Active Directory
- Solved: August 2024 updates breaks GPO Item level targeting - user in group
- Migrate Group Policies to a new server or domain like a pro
- Windows Server Backup Retention
- Change Evaluation version to Standard/Datacenter version
Fixing CVE-2026-41089 on Windows Server
Microsoft released security updates for multiple Windows Server versions to address CVE-2026-41089. This vulnerability is rated as important and affects all supported Windows Server versions, including ESU editions of Windows Server 2012 and 2012 R2. This vulnerability affects the Windows Netlogon service, a core component used for authentication and secure communication between domain-joined systems and Domain Controllers. Successful exploitation could allow an attacker to execute arbitrary code on a vulnerable system.
How would an attacker be able to use this? An attacker would send specially crafted Netlogon requests to a vulnerable server. By manipulating the way the Netlogon service processes these requests, the attacker may be able to trigger remote code execution (RCE) without requiring prior authentication. Something we must prevent at all costs.
The potential impact of this CVE being unresolved is:
- Remote code execution on the target server
- Full system compromise if the attack succeeds
- Privilege escalation to SYSTEM level access
- Lateral movement within the network
- Compromise of Active Directory infrastructure if a Domain Controller is affected
In this post I will quickly go through what systems are impacted and how you can install the required updates to remediate the vulnerability.
Affected Windows Server versions
The following updates are currently released by Microsoft for CVE-2026-41089:
| Windows Server Version | KB Number | PowerShell check |
|---|---|---|
| Windows Server 2025 | KB5087539 | Get-HotFix -Id KB5087539 |
| Windows Server 2025 Azure Edition / Hotpatch | KB5087423 | Get-HotFix -Id KB5087423 |
| Windows Server 2022 | KB5087545 | Get-HotFix -Id KB5087545 |
| Windows Server 2022 Azure Edition / Hotpatch | KB5087424 | Get-HotFix -Id KB5087424 |
| Windows Server 23H2 | KB5087541 | Get-HotFix -Id KB5087541 |
| Windows Server 2019 | KB5087538 | Get-HotFix -Id KB5087538 |
| Windows Server 2016 | KB5087537 | Get-HotFix -Id KB5087537 |
| Windows Server 2012 R2 ESU | KB5087471 | Get-HotFix -Id KB5087471 |
| Windows Server 2012 ESU | KB5087470 | Get-HotFix -Id KB5087470 |
To perform an all-in-one check that works on all Windows Server versions from 2012 and higher, use this command:
PowerShell
Get-HotFix -Id KB5087539,KB5087423,KB5087545,KB5087424,KB5087541,KB5087538,KB5087537,KB5087471,KB5087470This must return an update, where the number matches with the version of Windows Server:

This server is already patched, so shows the installed update.
Important
Windows Server 2012 and 2012 R2 require an active ESU license via Azure Arc to receive these security updates. Without these licenses, they stay pretty vulnerable.
Step 1: Check if the update is already installed
Before installing updates manually, it is good to check if the KB is already present on the server. Lookup your version of Windows Server, and copy the KB number. Then open up PowerShell as Administrator and run:
PowerShell
Get-HotFix | Sort-Object InstalledOn -DescendingYou can also search directly for a specific KB number by using this command and changing the KB number on the end:
PowerShell
Get-HotFix -Id KB5087539Replace the KB number with the update matching your Windows Server version. If the update is installed already, PowerShell will return the installed update information. If PowerShell returns an error like the one below, then the update might not be installed yet, and action is needed.
Failure
Get-HotFix : Cannot find the requested hotfix on the ’localhost’ computer. Verify the input and run the command again.
If this shows the update without returning an error on all your servers, you are secured against this CVE.
Step 2: Install the Windows Update
The easiest and recommended way is through Windows Update or Azure Update Manager. In you like manual updates, you can use the Windows Server GUI or PowerShell for example to install the updates.
- Open Settings
- Go to Windows Update
- Click on “Check for updates”
- Install the latest cumulative update
- Reboot the server
For demonstration purposes, here I am installing the fix for Windows Server 2025 on my testing server:
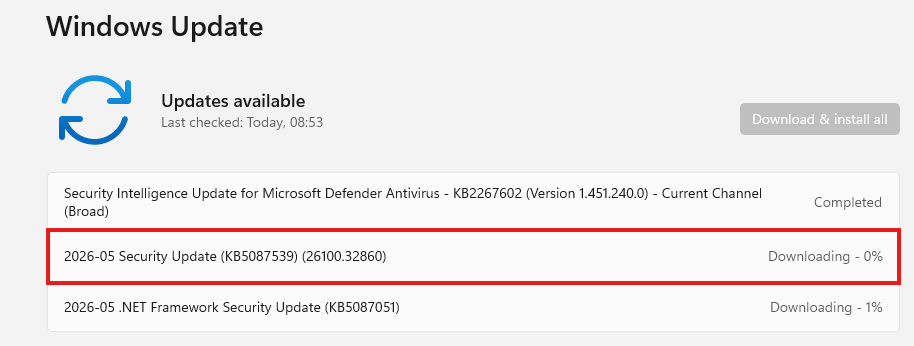
On older Windows Server versions like 2016 or 2019, use the classic Windows Update interface through Server Manager or Control Panel. If you manage multiple Azure or Arc-enabled servers, Azure Update Manager is a great option to deploy these updates centrally.
After installing the update, the server must be restarted to apply the patches and to secure you from this exploit.
Step 3: Check the installation
After rebooting the server, verify the KB installation again to confirm the installation was successful. Run the command you ran earlier too see if the correct update has been installed:
PowerShell
Get-HotFix -Id KB5087539If the update is installed correctly, you will see output similar to this:

You can also verify this through:
- Settings > Windows Update > Update history
- Control Panel > Programs and Features > Installed Updates

Summary
CVE-2026-41089 impacts multiple Windows Server versions and Microsoft already released security updates to mitigate the vulnerability. Installing the latest cumulative update for your Windows Server version is currently the recommended remediation. Installing the update like described in this guide is enough from defending you from at least this exploit. A huge recommendation is to use Azure Update Manager for your Azure VMs and Azure Arc joined servers.
The installation itself is relatively straight forward, but always validate the update afterwards and test important workloads after rebooting production systems. If this update wasn’t installed by now, I would highly recommend reviewing your updating processes, as its not worth waiting so long for vulnerabilities to be actively abused and then fix it. A good updating process will fix many things before they can be abused.
Thank you for reading this post and I hope it was helpful!
Sources
These sources helped me by writing and research for this post;
- https://msrc.microsoft.com/update-guide/vulnerability/CVE-2026-41089
- https://nvd.nist.gov/vuln/detail/cve-2026-41089
- https://learn.microsoft.com/en-us/powershell/module/microsoft.powershell.management/get-hotfix
End of the page 🎉
You have reached the end of the page. You can navigate through other blog posts as well, share this post on X, LinkedIn and Reddit or return to the blog posts collection page. Thank you for visiting this post.
If you think something is wrong with this post or you want to know more, you can send me a message to one of my social profiles at: https://justinverstijnen.nl/about/
If you find this page and blog very useful and you want to leave a donation, you can use the button below to buy me a beer. Hosting and maintaining a website takes a lot of time and money. Thank you in advance and cheers :)

The terms and conditions apply to this post.
Active Directory FSMO roles
Active Directory Domain Controllers are assigned 5 different FSMO roles, which all have their own function. We can separate them over multiple servers to create more redundancy, but make sure to handle those all as servers. All roles neeed a 24/7 uptime for your environment to work properly. In this guide, I will give a brief explaination of the roles, what their function is and how to move them to different servers to enhance availability and redundancy.
What are the FSMO roles of Active Directory?
FSMO stands for Flexible Single Master Operations. Active Directory is normally multi-master, meaning changes can be made on any domain controller. However, some operations must be handled by one specific domain controller at a time to avoid conflicts. These special responsibilities are called the FSMO roles.
There are five FSMO roles:
- Two forest-wide roles
- Three domain-wide roles
Let’s look at them all and explain what their function is:
| FSMO Role | Scope | Primary Responsibilities |
|---|---|---|
| Schema Master | Forest | Manages Schema updates |
| Domain Naming Master | Forest | Adds/removes domains |
| PDC Emulator | Domain | Time service, password updates, Group Policy |
| RID Master | Domain | Assigns RID pools for unique SIDs |
| Infrastructure Master | Domain | Maintains cross-domain references |
For more information about the specifics of the roles, check out the official Microsoft page: https://learn.microsoft.com/en-us/troubleshoot/windows-server/active-directory/fsmo-roles
Depending on your environment, these roles can run on one or multiple domain controllers. If having an environment with a single domain controller, all roles will be done by that single server. As you might already guess, this is a single point of failure.
According to the table, the PDC Emulator is the role with the highest user impact. Outage will mean no NTP, no password updates which happens daily in bigger environments and no Group Policy updates are possible.
An effective distribution of FSMO roles
In my environment, I have 3 domain controllers. This means we can separate all roles over the 3 servers. I also use Microsoft Azure to run them, and so placed the 3 servers into 3 availability zones.
| Server | Roles | Availability Zone |
| JV-DC01.justinverstijnen.nl | Primary Domain Controller (PDC) & Infrastructure master | Zone 1 |
| JV-DC02.justinverstijnen.nl | Domain naming master & RID Master | Zone 2 |
| JV-DC03.justinverstijnen.nl | Schema Master & Entra Connect Sync | Zone 3 |
Because Entra Connect Sync is also a critical function of my domain, I placed this on my third server to give all 3 servers 2 dedicated roles.

Get the actual separation of roles
To view how the roles are separated at this time, run this command at one of your AD management servers (or domain controllers):
POWERSHELL
netdom query fsmoYou will get an output like this:
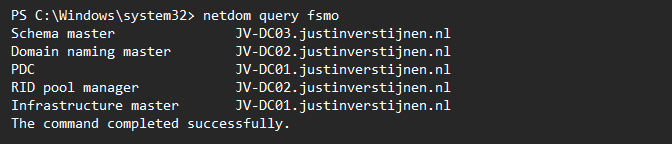
Here I have separated the roles onto 3 different servers. In Microsoft Azure, I have the servers set-up in different availability zones to also defend my environment to datacenter-outages.
Move FSMO roles with PowerShell (one by one)
We can move those roles with PowerShell by using those commands:
POWERSHELL
Move-ADDirectoryServerOperationMasterRole -Identity *server* -OperationMasterRole PDCEmulator -Confirm:$falseMake sure to change the *server* placeholder to your server name.
Move FSMO roles with PowerShell (bulk)
To move all roles to predetermined servers, you can also run all commands at once:
POWERSHELL
Move-ADDirectoryServerOperationMasterRole -Identity *server* -OperationMasterRole PDCEmulator -Confirm:$false
Move-ADDirectoryServerOperationMasterRole -Identity *server* -OperationMasterRole InfrastructureMaster -Confirm:$false
Move-ADDirectoryServerOperationMasterRole -Identity *server* -OperationMasterRole RIDMaster -Confirm:$false
Move-ADDirectoryServerOperationMasterRole -Identity *server* -OperationMasterRole DomainNamingMaster -Confirm:$false
Move-ADDirectoryServerOperationMasterRole -Identity *server* -OperationMasterRole SchemaMaster -Confirm:$false
Make sure to change the *server* placeholder to the correct server names in your environment.
Knowledge check
Knowledge check
This quiz needs JavaScript to show the questions and feedback.
This quiz needs JavaScript to show the questions and feedback.
Summary
Every now and then, we need to move some FSMO roles to other servers or we need this when setting up. Dividing the roles onto multiple servers ensure not the whole domain is interrupted with one server failing and so creates redundancy and availability for your users.
Sources
These sources helped me by writing and research for this post;
End of the page 🎉
You have reached the end of the page. You can navigate through other blog posts as well, share this post on X, LinkedIn and Reddit or return to the blog posts collection page. Thank you for visiting this post.
If you think something is wrong with this post or you want to know more, you can send me a message to one of my social profiles at: https://justinverstijnen.nl/about/
If you find this page and blog very useful and you want to leave a donation, you can use the button below to buy me a beer. Hosting and maintaining a website takes a lot of time and money. Thank you in advance and cheers :)
The terms and conditions apply to this post.
Managing Hyper-V server without Active Directory
When you use Hyper-V server, you want to manage this with the management tools. However, by default Hyper-V only allows connections…
When you use Hyper-V server, you want to manage this with the management tools. However, by default Hyper-V only allows connections from domain-joined machines by design because of security and trust reasons.
We can bypass this requirement by building these trust ourselves and so managing the server from a machine that isnt even in a domain but Entra ID Joined or in a workgroup.
Installing Hyper-V management tools
When you use Windows 11 Pro/Education/Enterprise, you have the option to install Hyper-V on your machine. This can be done through the features on demand window:
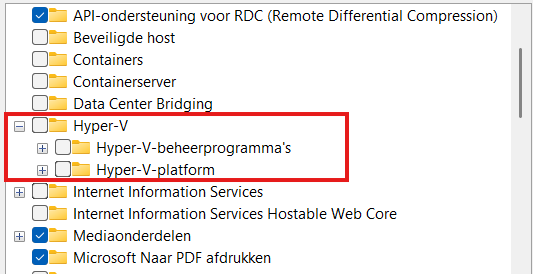
Here select the management tools and you are good to go.
Configurations we need to do
Before we can manage Hyper-V server from our non-domain joined machine, we need to configure some things on both sides. Both has to trust each other before we can make the connection.
Hyper-V server side configuration steps
- Configure Remote Management
- Configure PowerShell Remote
- Configure a hostname
Client side configuration steps
- Configure the NIC to use “Private” profile
- Adding the server to the “TrustedHosts” file
Let’s dive into these steps to make the connection work.
Hyper-V Server side configuration
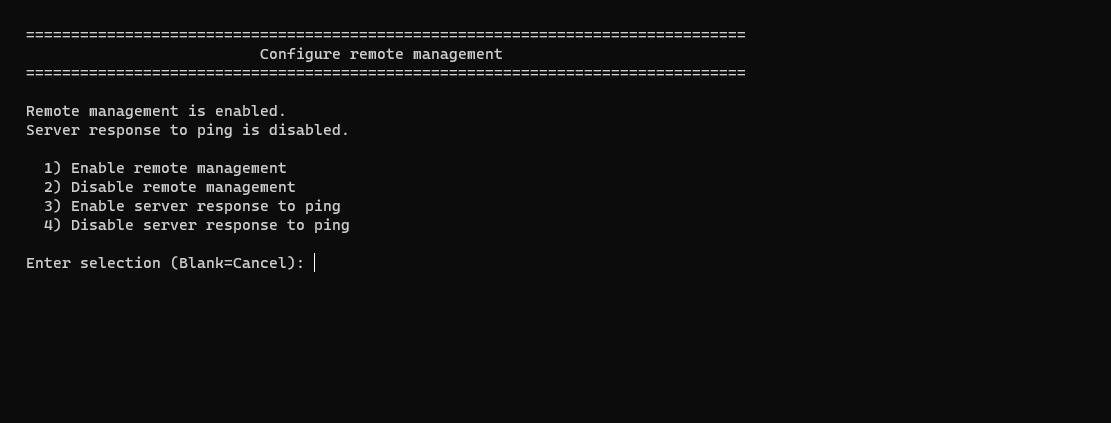
When using Hyper-V server and logging in will present you this “sconfig” window:
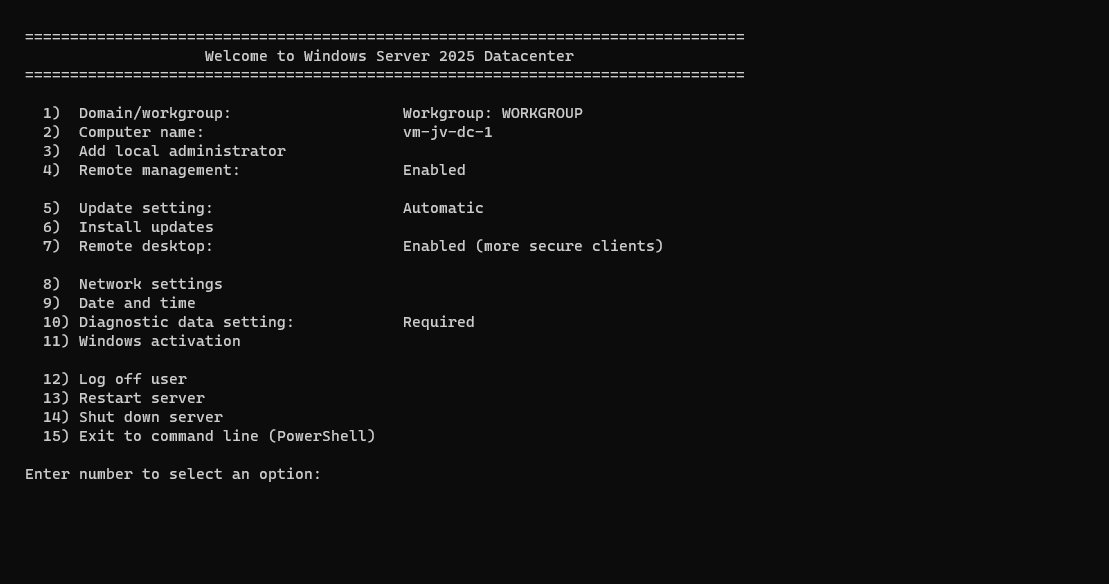
Press number “4” here to open the “Configure Remote Management” menu. Check if “Remote Management is enabled, otherwise enable it by pressing number “1”. Then press number “3” here to optionally enable ping response.
Then back on the home page, press number “2” to configure a hostname. This will be the hostname of your Hyper-V server. Do not reboot yet.
Then go back to the home of the sconfig menu, and press number “15” to go to Powershell.
In Powershell, type in the following command:
POWERSHELL
Enable-PSRemotingThis enables PowerShell to listen to remote sessions. Then type in a second command:
POWERSHELL
Enable-WSManCredSSP -Role serverThis enables CredSSP authentication and accepts local users on the server to authenticate from remote. Now reboot the server.
We can now head over to our client workstation for some configurations and the Hyper-V server can reboot in the meanwhile.
Client side configuration
On your workstation where you want to connect with Hyper-V, we need to execute some commands for checks and changes.
Open PowerShell as Administrator here and run this command:
POWERSHELL
Get-NetAdapter | Get-NetConnectionProfileThis will return the configuration of your network interface card. This must be on “NetworkCategory: Private”
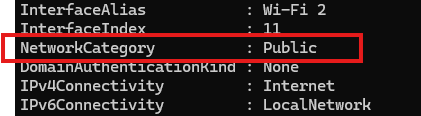
If this is Public, we need to run this command:
POWERSHELL
Set-NetConnectionProfile -InterfaceAlias "Wi-Fi 2" -NetworkCategory PrivateChange the Interface Alias to the output of your command and this will set the interface prfile to “Private” which is the least restrictive profile.
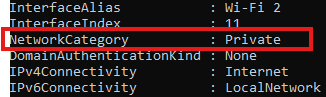
Now the profile is “Private”. Now we need to run another command to add the server to the Trustedhosts file of the workstation. We do this by executing this commands:
POWERSHELL
Start-Service -Name WinRMThis starts the WinRM service, now add the server:
POWERSHELL
Set-Item WSMan:\localhost\Client\TrustedHosts -Value *servername* -ForceChange the *servername* value to your configured servername. After that we can stop the WinRM service, as you might not want to have this running on your workstation.
POWERSHELL
Stop-Service -Name WinRMNow we would be able to connect to the server with Hyper-V.
Testing the connection
Open the Hyper-V Manager on your workstation:
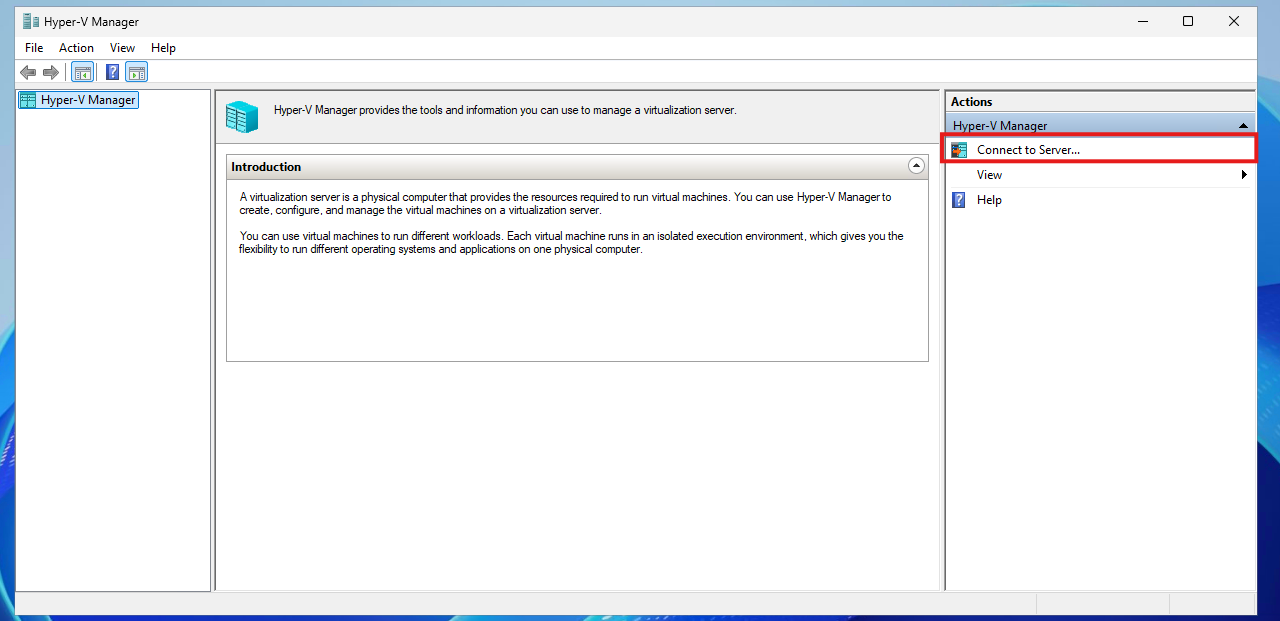
Click on “Connect to Server…” and the select another computer:
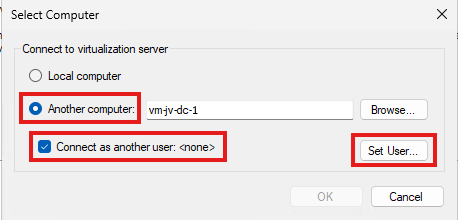
Type in the hostname of the external computer, select connect as another user and the set the user.
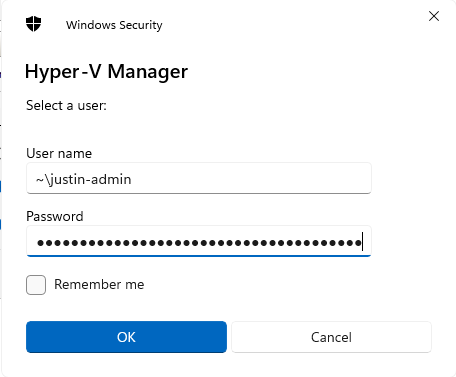
Use servername\username or ~\username which is basically the same and your password. Click OK now.
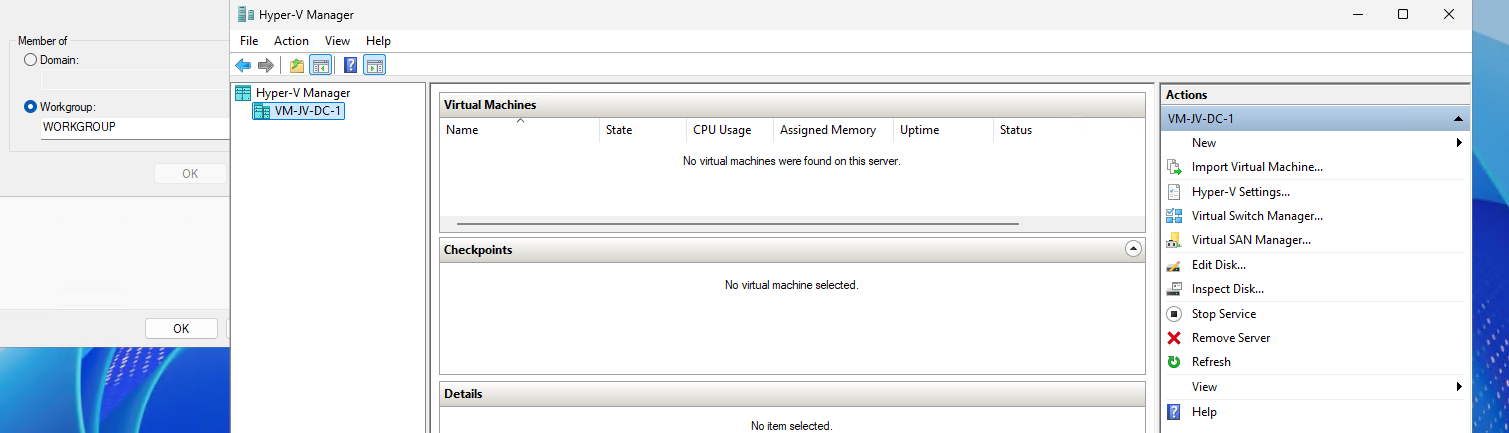
We will manage the Hyper-V server now while still being in a workgroup and non-domain joined environment.
If it still doesn’t work, you have to add the credentials to your credential manager on the workstation by running this command:
POWERSHELL
cmdkey /add:*servername* /user:justin-admin /pass:Pa$$W0rd!Summary
You see, setting this up is relatively easy. It’s somewhat more work but definitely worth it against other virtualization tools. When I had my own lab for the first time, this got me in some real errors. Fixing those is pretty easy.
Sources
These sources helped me by writing and research for this post;
- https://learn.microsoft.com/en-us/windows-server/virtualization/hyper-v/get-started/install-hyper-v?tabs=powershell&pivots=windows
- https://learn.microsoft.com/en-us/powershell/module/netconnection/get-netconnectionprofile?view=windowsserver2025-ps
End of the page 🎉
You have reached the end of the page. You can navigate through other blog posts as well, share this post on X, LinkedIn and Reddit or return to the blog posts collection page. Thank you for visiting this post.
If you think something is wrong with this post or you want to know more, you can send me a message to one of my social profiles at: https://justinverstijnen.nl/about/
If you find this page and blog very useful and you want to leave a donation, you can use the button below to buy me a beer. Hosting and maintaining a website takes a lot of time and money. Thank you in advance and cheers :)
The terms and conditions apply to this post.
Solved: August 2024 updates breaks GPO Item level targeting - user in group
Also impacted by the update where you can’t select users to filter your Group Policies (GPO)? Read this guide for a temporary solution.
If you are managing Windows Servers, Group Policies are a great way to distribute settings to your endpoints. However, a recent update of August 2024 in Windows Server 2022 and 2019 breaks user filtering in Group Policy (GPO) Item Level Targeting
The problem itself
When applying printers, registery settings or drive maps to users, we use Group Policy Item level targeting to filter users so only users with a group membership gets the policy applied.
Since the updates of August 2024 this isn’t working anymore:
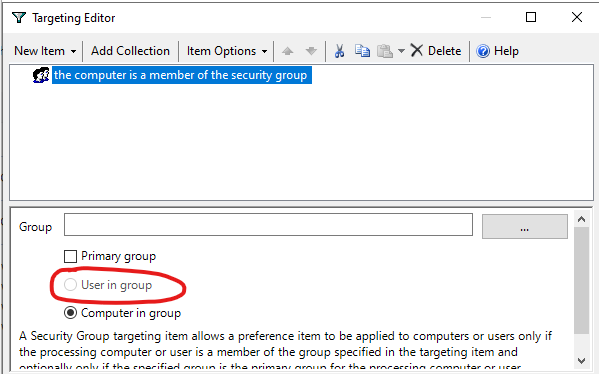
We cannot select “User in group”, only “computer in group”. This applies only to new and existing policies. If you already have policies in place with “User in group” selected before the updates, this will still work as expected.
The cause and solution of User GPO break
The cause of this problem are two updates which have to be removed to make it work again:
| Operating System | Update (KB) |
| Windows Server 2019 | KB5042350 |
| Windows Server 2022 | KB5041160 |
This update has to be removed on the server where you manage your Active Directory and/or Group Policies. You can keep the update installed on all other critical servers.
To remove this update, open Control Panel -> Programs and Features (appwiz.cpl)
Click on “View installed updates”
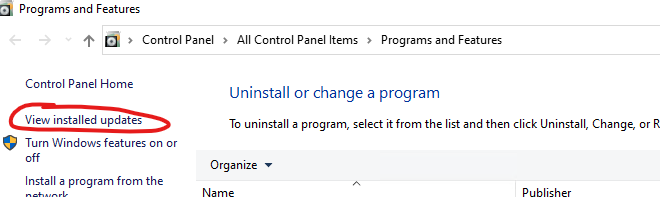
Select the right update for your OS and click “Uninstall”. After uninstalling the update the server has to be restarted. Make sure you perform this action in your maintenance window to decrease impact of this change.
Please note that this is a temporary solution, and not a persistent solution. Microsoft has to fix this in the coming update wave.
You can also check the latest installed updates through PowerShell:
PowerShell
(New-Object -ComObject Microsoft.Update.Session).CreateUpdateSearcher().QueryHistory(0,500) | Where-Object { $_.Operation -eq 1 -and $_.Title -match 'KB\d{6,7}' -and $_.Title -notmatch 'driver' } | Select-Object Date,@{Name='KB';Expression={[regex]::Match($_.Title,'KB\d{6,7}').Value}} | Group-Object KB | ForEach-Object { $_.Group | Sort-Object Date -Descending | Select-Object -First 1 } | Sort-Object Date -Descending | Format-Table -AutoSizeAnd then remove the update with this command:
Bash
wusa.exe /uninstall /kb:69696969My advice
My advice is to leave the update installed. Uninstalling a update can do more than letting it installed. My advice is to only remove the update when you must configure such policies. If all your policies are in place and working and you don’t have to change anything, my advice is to leave the server alone and wait for the next update wave and hope for a solution from Microsoft.
End of the page 🎉
You have reached the end of the page. You can navigate through other blog posts as well, share this post on X, LinkedIn and Reddit or return to the blog posts collection page. Thank you for visiting this post.
If you think something is wrong with this post or you want to know more, you can send me a message to one of my social profiles at: https://justinverstijnen.nl/about/
If you find this page and blog very useful and you want to leave a donation, you can use the button below to buy me a beer. Hosting and maintaining a website takes a lot of time and money. Thank you in advance and cheers :)
The terms and conditions apply to this post.
Migrate Group Policies to a new server or domain like a pro
Once in a while, we as IT administrators need to migrate our Group Policies of Windows Server to another server. Sometimes to…
Once in a while, we as IT administrators need to export and import our Group Policies of Windows Server to another server. Sometimes to copy a great policy you’ve built, or to migrate a customer to a new server.
By default, the only option Microsoft has built in into Group Policy Management (gpmc.msc) is the backup option. This creates some administrative tasks.
The Export and Import scripts
I have created two scripts with Powershell that fully exports and imports all Group Policy Objects (GPOs). This with 2 seperate scripts. These can be found and downloaded from my Github page:
Download Export script from GitHub Download Import script from GitHub
Using the Export script to migrate Group Policies
When having our Group Policies in place on a server, create a new folder on a preferred place like Desktop.
Save my Export script to a .ps1 file and place that into the newly created folder.
If you haven’t changed your Powershell script execution policy yet, do a shift + right click on a empty space in the folder, and run the command:
**POWERSHELL**
Set-ExecutionPolicy Unrestricted -Scope ProcessAfter that you can run the script by typing .\*tab button*
**POWERSHELL**
.\ExportGroupPolicies.ps1This will temporarily accept our script and other scripts till we close the Powershell window. This is the best and most secure way handling the Execution Policy of Powershell.
Now lets run our script to export all non-default Group Policy objects:
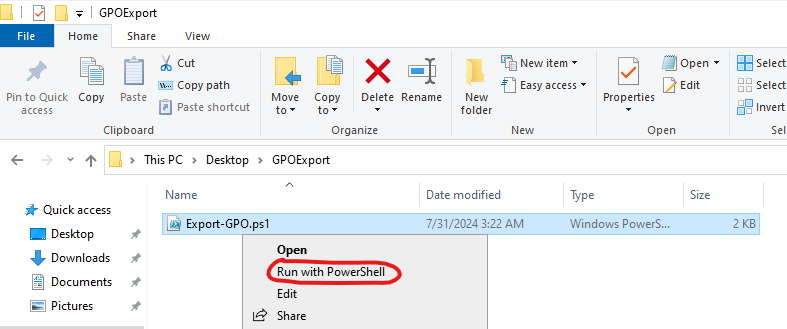
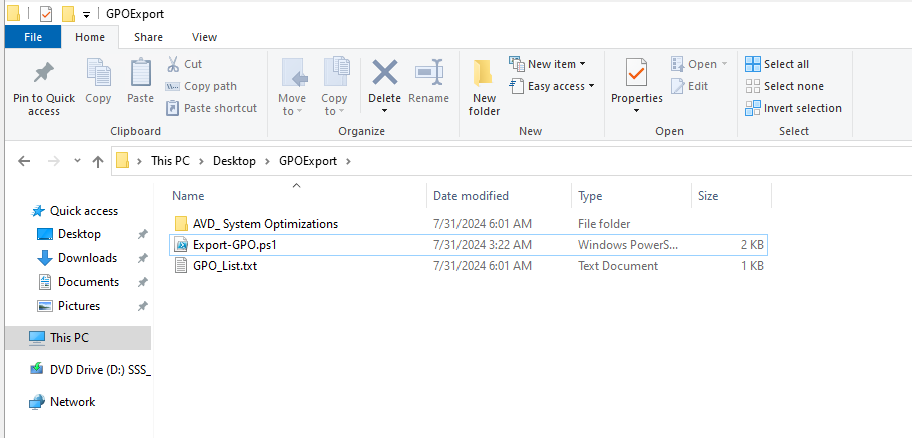
It will save all needed files in this folder, so you can copy the whole folder and start the importing process on the destination server:
Using the import script to migrate Group Policies
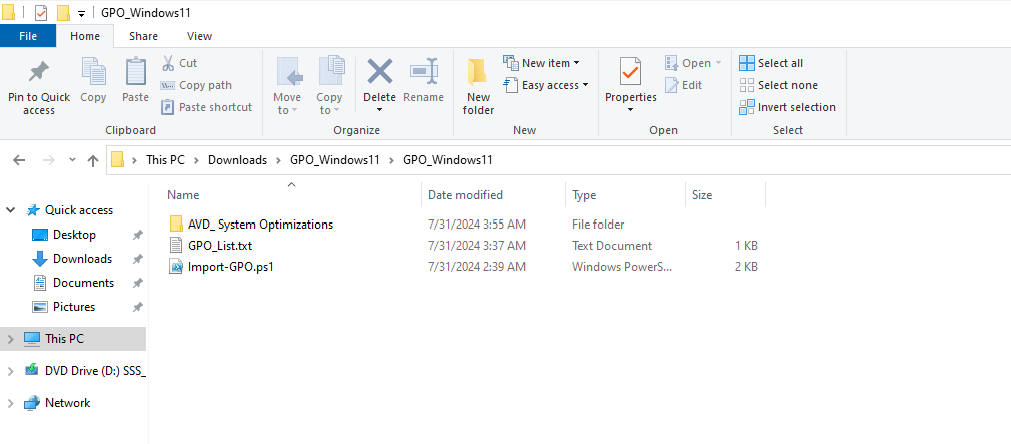
Lets say, we have just created our new forest and promoted our first server to a domain controller. We now want to import the GPOs we exported using this export script to this new server.
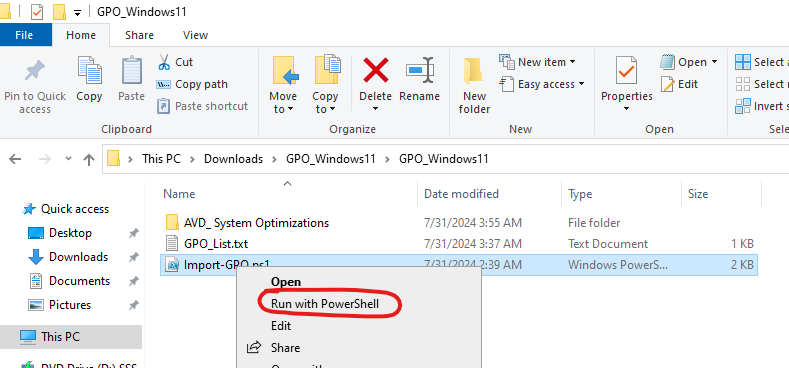
I have saved the script as .ps1 file for quick execution, and have saved in the same folder as my export script saved the GPO’s:
When checking our Group Policy Management console, it is completely empty and clean:

We now execute the script to import the Group Policies:
If you haven’t temporarily disabled your PowerShell execution policy yet, do this just like in the exporting action.
After succesfully executing the script, our GPO is available and ready to link to our OU. This is the only task what we have to do manually.

Summary
These 2 scripts will export and import our Group Policy easy for migration. Unfortunately Microsoft does not offer a native and easy solution for this.
I have used this script multiple times and I am very satisfied.
Thank you for reading this page and hope it was interesting and helpful.
End of the page 🎉
You have reached the end of the page. You can navigate through other blog posts as well, share this post on X, LinkedIn and Reddit or return to the blog posts collection page. Thank you for visiting this post.
If you think something is wrong with this post or you want to know more, you can send me a message to one of my social profiles at: https://justinverstijnen.nl/about/
If you find this page and blog very useful and you want to leave a donation, you can use the button below to buy me a beer. Hosting and maintaining a website takes a lot of time and money. Thank you in advance and cheers :)
The terms and conditions apply to this post.
Windows Server Backup Retention
For more information about the wbadmin tool, see:
https://learn.microsoft.com/en-us/windows-server/administration/windows-commands/wbadmin
The Script
With this small script based on wbadmin we can remove old backups while keeping the last 30 items for example. This retains the data for 30 days while also keeping your storage nice and clean.
The script itself consists of the following command:
POWERSHELL
wbadmin delete backup -keepVersions:30 -quietExplanation of the command
- wbadmin: The command-line tool that makes this solution possible. It is part of Windows Server Backup.
- delete: Indicates that a delete operation should be performed.
- backup: Specifies what should be deleted: backups.
- -keepVersions:30 Keeps the 30 most recent backups and deletes all older backups.
- -quiet: Prevents confirmation prompts (Y/N) and avoids showing a command window to interactive users.
You can change the amount of backups to keep according to your needs and storage by changing the 30 to a lower or higher number.
Scheduled Task
Using this script, you can create a scheduled task that runs the cleanup automatically at a fixed interval.
Make sure the task runs outside the regular backup window, as running it during an active backup may cause issues. Preferably before creating backups so the storage is cleaned prior to writing new data on it.
To open the Windows Task Scheduler:
- Type “Task Scheduler” in the Start menu, or
- Run taskschd.msc
The perform the following tasks:
- Configure the task schedule according to your maintenance window
- Configure the task action to run the batch file located in C:\Scripts
End of the page 🎉
You have reached the end of the page. You can navigate through other blog posts as well, share this post on X, LinkedIn and Reddit or return to the blog posts collection page. Thank you for visiting this post.
If you think something is wrong with this post or you want to know more, you can send me a message to one of my social profiles at: https://justinverstijnen.nl/about/
If you find this page and blog very useful and you want to leave a donation, you can use the button below to buy me a beer. Hosting and maintaining a website takes a lot of time and money. Thank you in advance and cheers :)
The terms and conditions apply to this post.
Change Evaluation version to Standard/Datacenter version
When you install a fresh Windows Server Evaluation installation from a .iso file, it will be installing the OS as a Evaluation version…
When you install a fresh Windows Server installation from a .iso file, it will be installing the OS as a Evaluation version. When you want to activate the installation with a key you need to rebuild the OS and set the edition to Standard.
Microsoft considers Standard and Standard Evaluation as different editions of Windows, because of this we have to change the edition before you can activate the installation. When you want to use the edition Datacenter, you can change the command to Datacenter which also works.
You can download the ISO file for Windows Server 2025 Evaluation here: https://www.microsoft.com/en-us/evalcenter/evaluate-windows-server-2025
Requirements
- A valid product key for Windows Server Standard
- 15 minutes of your time
Step 1: Install and prepare
You first have to install your instance of Windows Server Evaluation. After this you can install the latest updates and configure the rest of your needs.
Step 2: Upgrade Evaluation to Datacenter/Standard
After finishing up the configuration of your server, we need to run a command to upgrade the edition of Windows Server.
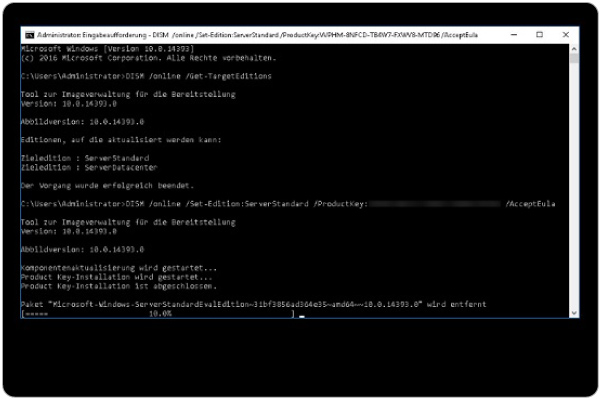
Open a command prompt window, and run the following command:
POWERSHELL
DISM /online /Set-Edition:ServerStandard /ProductKey:XXXXX-XXXXX-XXXXX-XXXXX-XXXXX /AcceptEulaHere you have to use your own product key for Standard/Datacenter depending on your version. Replace this with the XXXXX-XXXXX placeholder. Also, you can choose your target edition by changing the edition:
- Windows Server Standard: ServerStandard
- Windows Server Datacenter: ServerDatacenter
Summary
When installing a Windows Server instance, your edition could be an evaluation version. This is considered as a different edition, and for some features, it must be upgraded.
I hope I helped you upgrading your edition to a non-evaluation version.
End of the page 🎉
You have reached the end of the page. You can navigate through other blog posts as well, share this post on X, LinkedIn and Reddit or return to the blog posts collection page. Thank you for visiting this post.
If you think something is wrong with this post or you want to know more, you can send me a message to one of my social profiles at: https://justinverstijnen.nl/about/
If you find this page and blog very useful and you want to leave a donation, you can use the button below to buy me a beer. Hosting and maintaining a website takes a lot of time and money. Thank you in advance and cheers :)
The terms and conditions apply to this post.