Azure Stack HCI - Host your Virtual Desktops locally
Categories:
13 minute read
Introduction to Azure Stack HCI
Azure Stack HCI is a solution for Microsoft Azure to host Azure resources on your own hardware and location. This sounds traditional but can help to boost your Azure resources for your customer and/or use case.
For example, with Azure Stack HCI it is possible to host some Azure Virtual Desktop hosts in your own network to boost performance by decreasing latency. Also it is possible to use GPU enabled software on this.
Supported Azure Services
The supported Azure services at the moment of writing are:
- Windows and Linux VMs
- Azure Virtual Desktop session hosts
- Containers
- AKS (Azure Kubernetes Services)
- SQL
- Azure Functions
- Logic Apps
- Event Grid
- And more: https://azure.microsoft.com/en-us/products/azure-stack/hci/
Requirements to follow this guide
You need the following to follow this guide and make sure to minimize errors:
- 2 Physical/Virtual servers for Azure Stack HCI nodes (1 for the single node cluster setup further in this guide)
- 1 Domain Controller server
- Powershell module
AsHciADArtifactsPreCreationToolinstalled - Azure CLI installed
- Powershell module
- An ISO for Azure Stack HCI (Download from Azure Portal)
- An Azure subscription where you have the following permissions
- Key Vault Contributor
- Windows Admin Center Admin Login
- Contributor
- A resource group in Azure where you have the following permissions
- Key Vault Data Access Administrator
- Key Vault Secrets Officer
- Key Vault Contributor
- Storage Account Contributor
- A Azure storage account which is the cluster witness (needed for quorum)
In my guide, I will focus on creating a cluster with 2 nodes. I have included and tested the steps to create a single-server cluster too:
My environment
My environment consists of one physical server with 3 VMs on it. In a production environment it is better to physically segment the HCI cluster nodes to multiple fault domains. This setup is purely for educational purposes. In production environments, one hardware error will result in 100% outage
I create a Multi-node server cluster to experiment with Stack HCI. The environment looks like this.
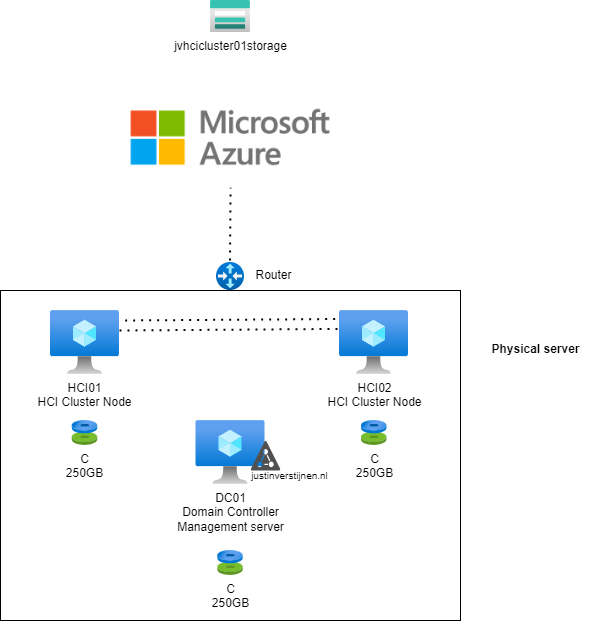
- 2 nodes (HCI01 and HCI02)
- 1 domain controller (DC01)
- In Azure: 1 storage account
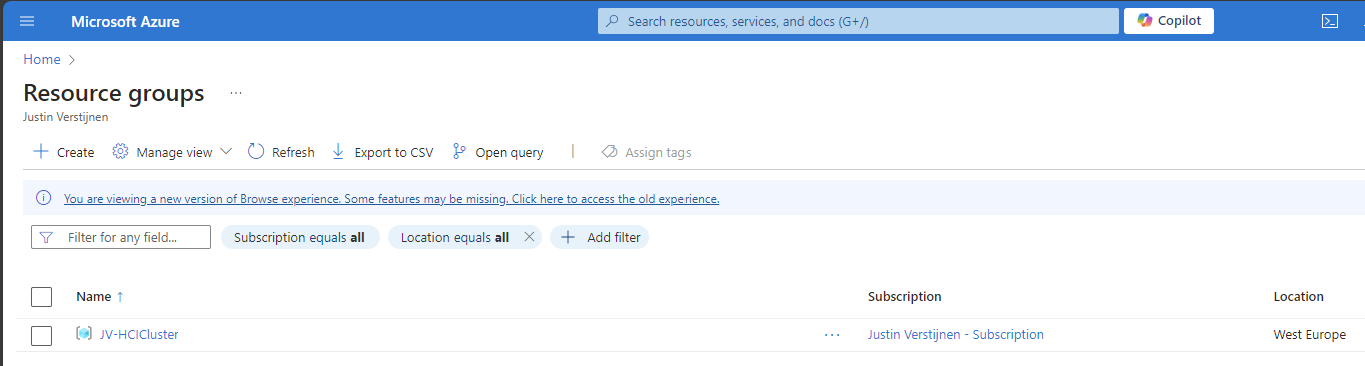
In Azure I have a single resource group where I want to deploy my cluster into:
1. Multi-node setup guide
1.1 Installing nodes for the cluster
The installation of Azure Stack HCI is very straight-forward, and the same as installing Windows 11 or Windows Server. At the time you follow this guide I think you understand how to do this.
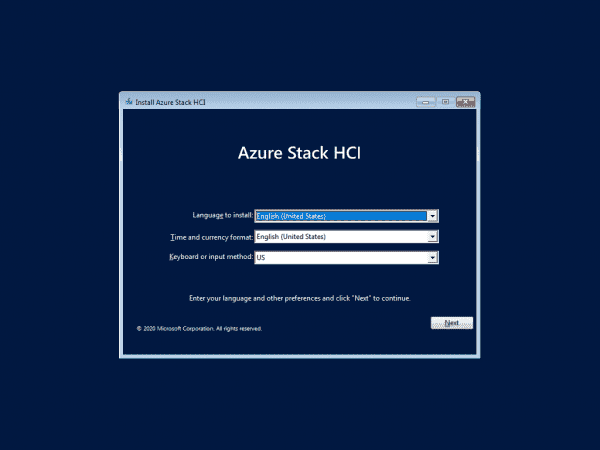
Install Azure Stack HCI on both of the nodes. Sit back or get a cup of coffee because this will take around 15 minutes :). To not waste time, my advice is to prepare the Active Directory during the installation.
1.2 Prepare Active Directory
We have to prepare our Active Directory for the coming change, the introduction of a new Cluster. This cluster will be settled in its own OU for future machines. Unfortunately, this OU cant be created through the GUI and has to be created with PowerShell.
Create a new Active Directoy forest when you don’t have one.
On the domain controller/management server, you have to first install the following Powershell module:
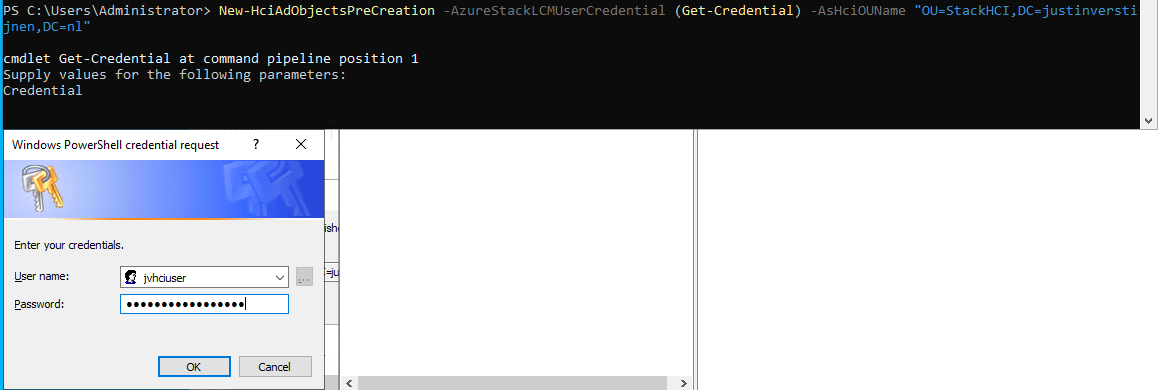
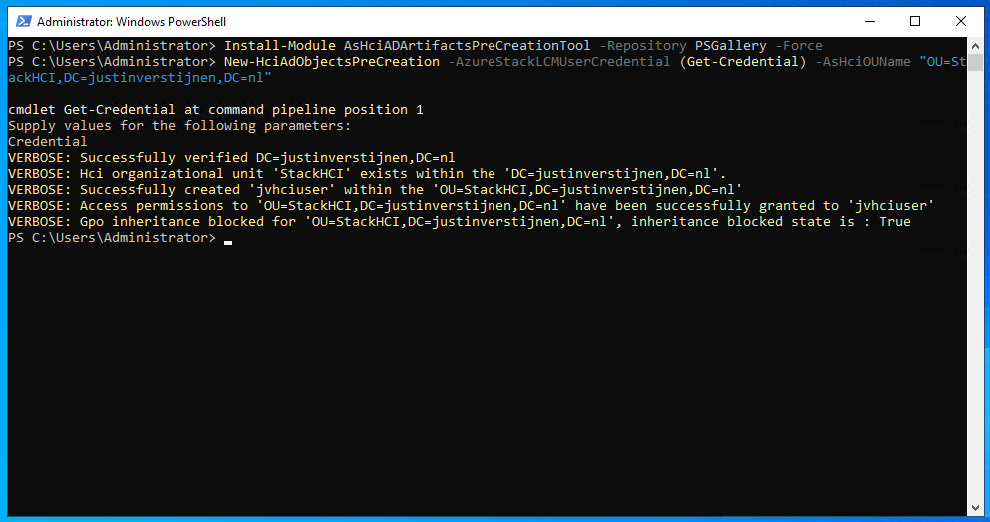
Install-Module AsHciADArtifactsPreCreationTool -Repository PSGallery -ForceAfter that, create a new OU for your HCI nodes by using the HCI module (only possible with this module). Change the name of your desired OU to your needs. I created it with the command below:
New-HciAdObjectsPreCreation -AzureStackLCMUserCredential (Get-Credential) -AsHciOUName "OU=StackHCI,DC=justinverstijnen,DC=nl"At the credential section, you have to specify a new user who can manage the HCI cluster and is used as service account. The user must comply with the following requirements:
- No special characters in username
- Password must me 12 characters at minimum
- Username may NOT be in DOMAIN\User or USER@DOMAIN format
I created my user like shown below:
The module accepted my account:
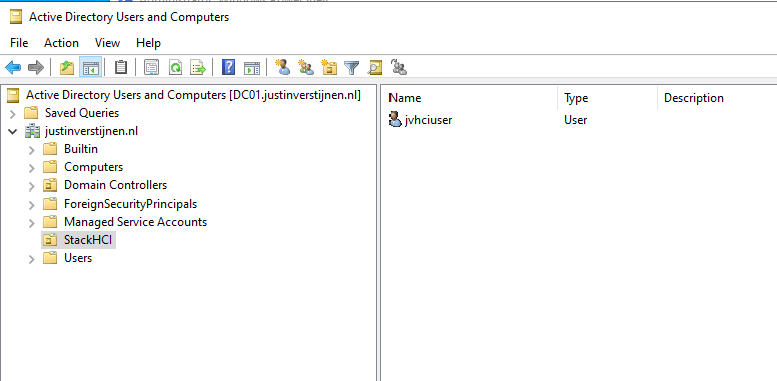
When going to the Active Directory Users and Computers center, you see the changes are processed succesfully:
Now we have configured the Active Directory and we can go on to configure the cluster nodes.
1.3 Preparing the cluster nodes
After the installation and preparation of the nodes we can perform a default configuration of the nodes through sconfig:
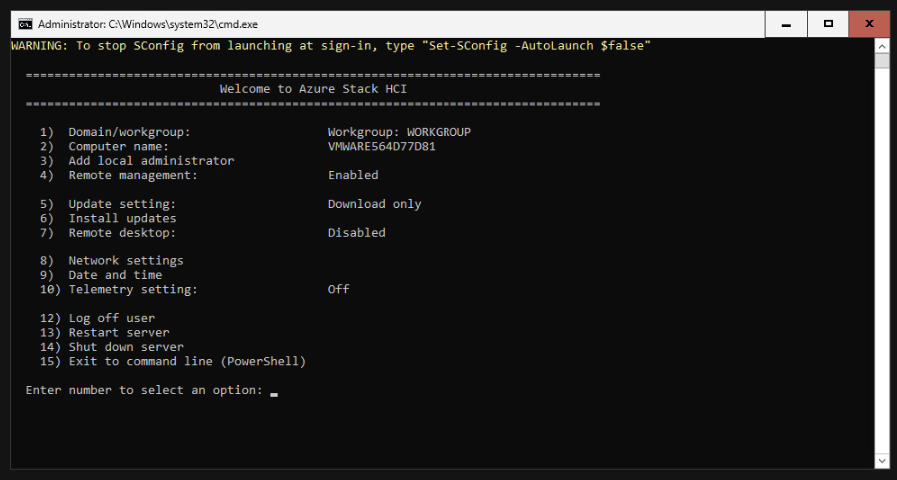
This menu is the same as on server-core installations of Windows Server. Navigate through the menu by using the numbers and the extra options you get afterwards.
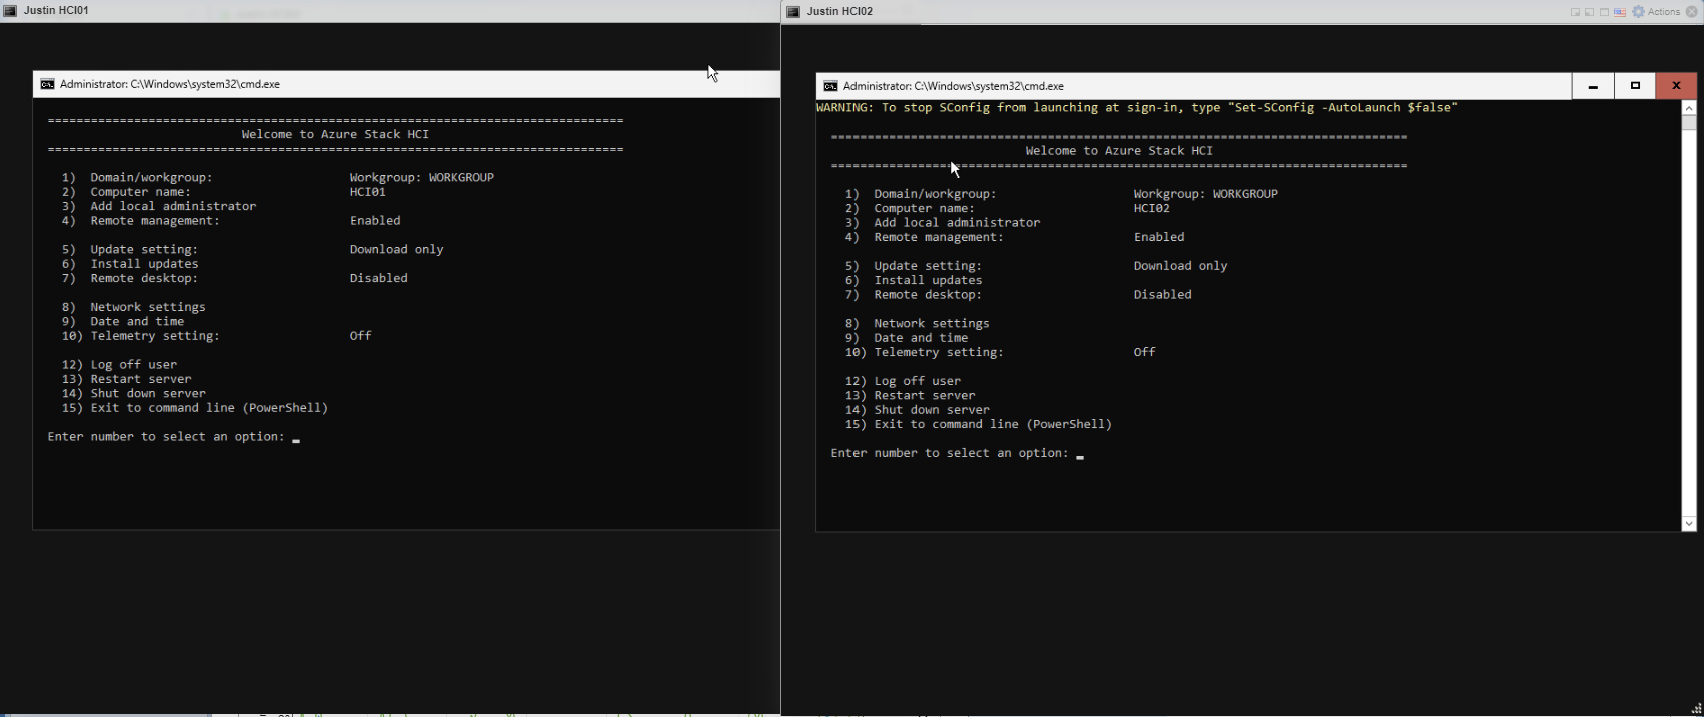
I have done the following steps on both of the nodes:
- Changed computer-name
- Downloaded the latest updates
- Enabled remote-management and enabled response to Ping (4 -> 3)
- Changed DNS server to:
- Preferred server: my domain controller
- Alternate server: DNS of my ISP provider
Note: do NOT join your nodes to Active Directory, otherwise the wizard to create a cluster will fail.
The result after these steps.
After the basic configuration of the nodes is complete, we have to do the following pre-configuration steps on every node:
Install Hyper-V (needed for virtualization purposes)
Enable-WindowsOptionalFeature -Online -FeatureName Microsoft-Hyper-V -AllAfter installation of this feature, restart the node. You can do this with the following command:
Restart-ComputerWhen the node is restarted, install the needed Powershell modules. Install these on all of the nodes.
Install-Module AzsHCI.ARCinstaller -Force
Install-Module Az.Accounts -Force
Install-Module Az.ConnectedMachine -Force
Install-Module Az.Resources -Force
After installing all the needed modules, we can register every node to Azure Arc. We can perform this by running the commands below and change the parameters:
$AzureSubscription = "SUBSCRIPTION ID"
$AzureTenantID = "TENANT ID"

Connect-AzAccount -SubscriptionId $AzureSubscription -TenantId $AzureTenantID -DeviceCode
Now you have to login via the Device code on a browser on your local computer or management server. This is because the Azure Stack HCI operating system doesn’t have a browser and doesn’t support interactive login.
Now we have to run another command with parameters:
$AzureResourceGroup = "Resource Group Name"
$AzureARMtoken = (Get-AzAccessToken).Token
$AzureAccountID = (Get-AzContext).Account.Id

Invoke-AzStackHciArcInitialization -SubscriptionId $AzureSubscription -ResourceGroup $AzureResourceGroup -TenantId $AzureTenantID -Region westeurope -ArmAccessToken $AzureARMtoken -AccountID $AzureAccountID -Cloud "AzureCloud"
Now the node will be registered to Azure Arc. This will take around 10 minutes.

After some minutes, the nodes appear in the Azure portal:
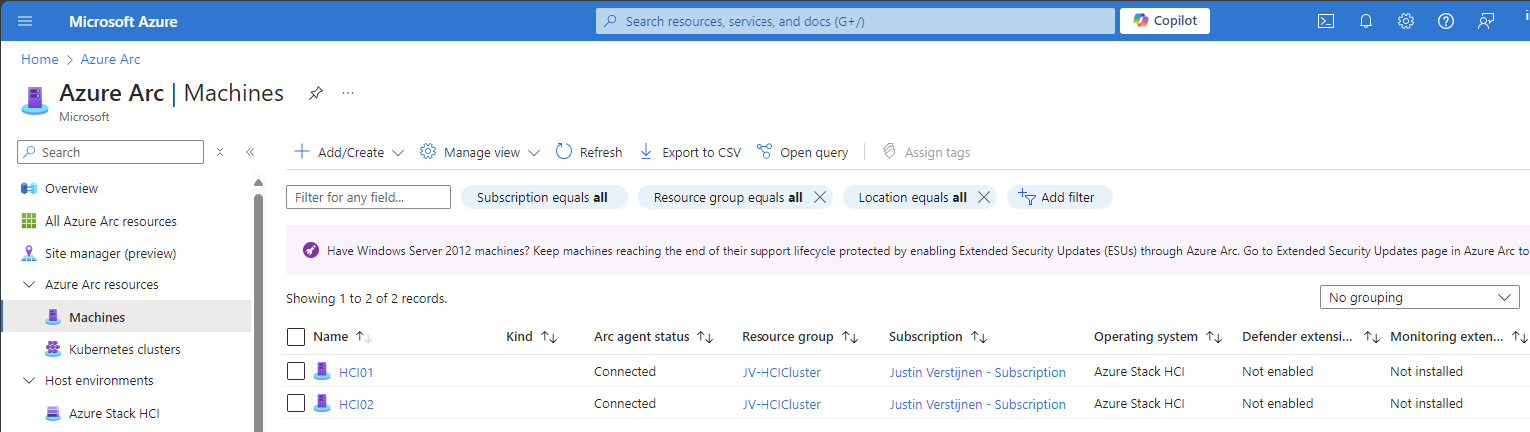
Now we have achieved this, we don’t need the nodes anymore and we can close the connections to it. The rest of the cluster/node configuration will be done in the Azure Portal. This was just the setup of the nodes itself.
After the machines appear in the Azure Portal, the service will install the needed extensions on all of the cluster nodes. You can’t go further before all the extensions are installed. You can follow the status by clicking on one of the cluster nodes and the open the blade “Extensions”.
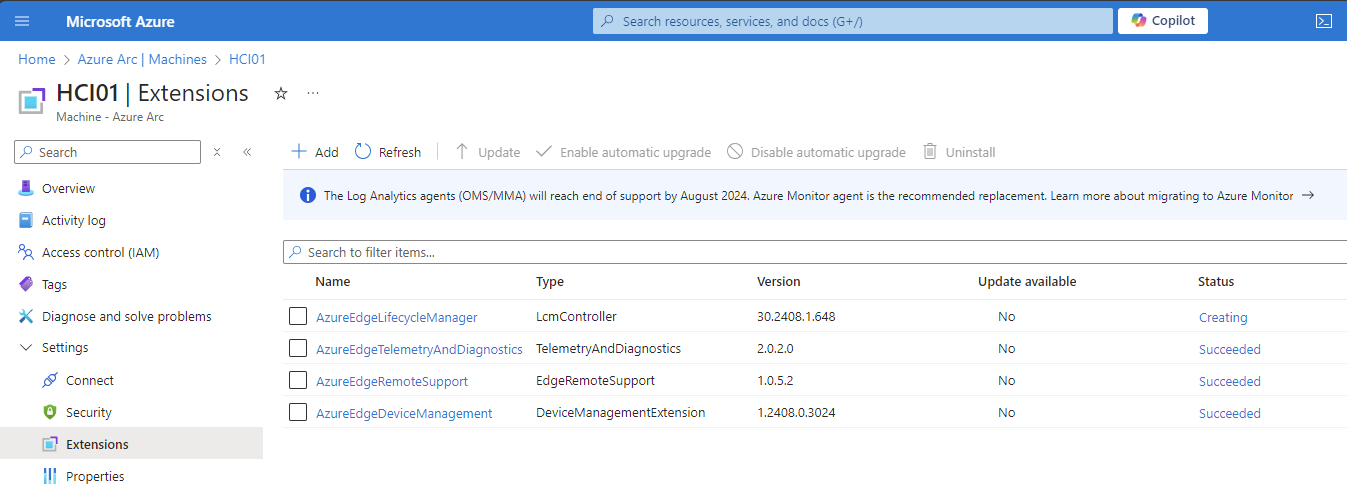
All of the nodes must have at least 3 extensions and the status must be “Succeded”.
1.4 Creating the cluster in the Azure Portal
Now we have prepared everything, and we can create the cluster in the Azure portal now.
Go to Azure Arc and open the blade “Azure Stack HCI”:
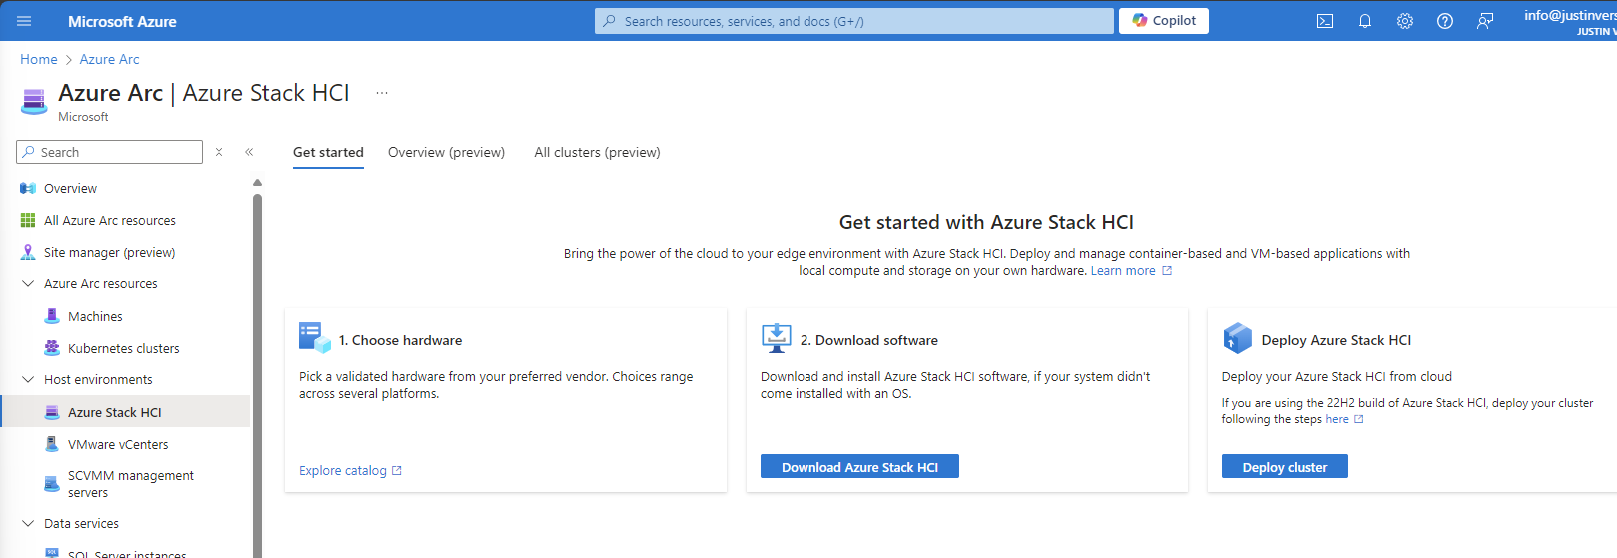
Select the option “Deploy cluster”
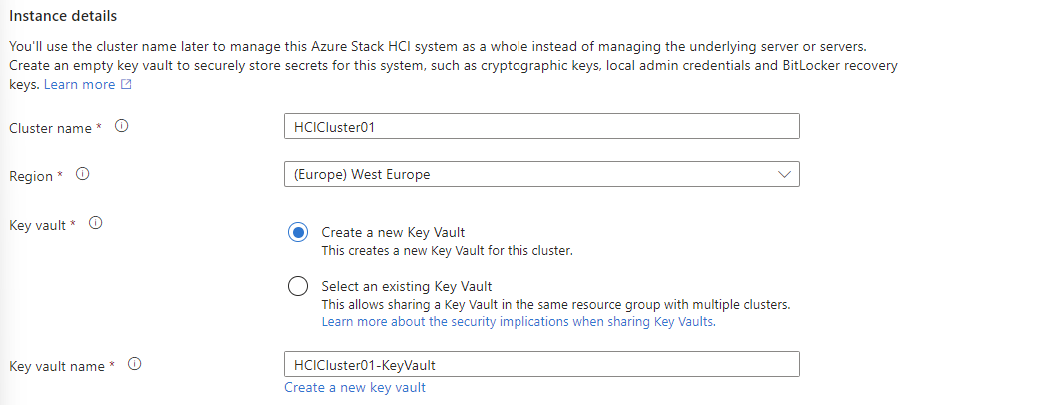
We now have to fill in some details. Next to a HCI cluster, Azure needs a Key Vault to store some secrets for encryption purposes. We have to create that in this wizard:
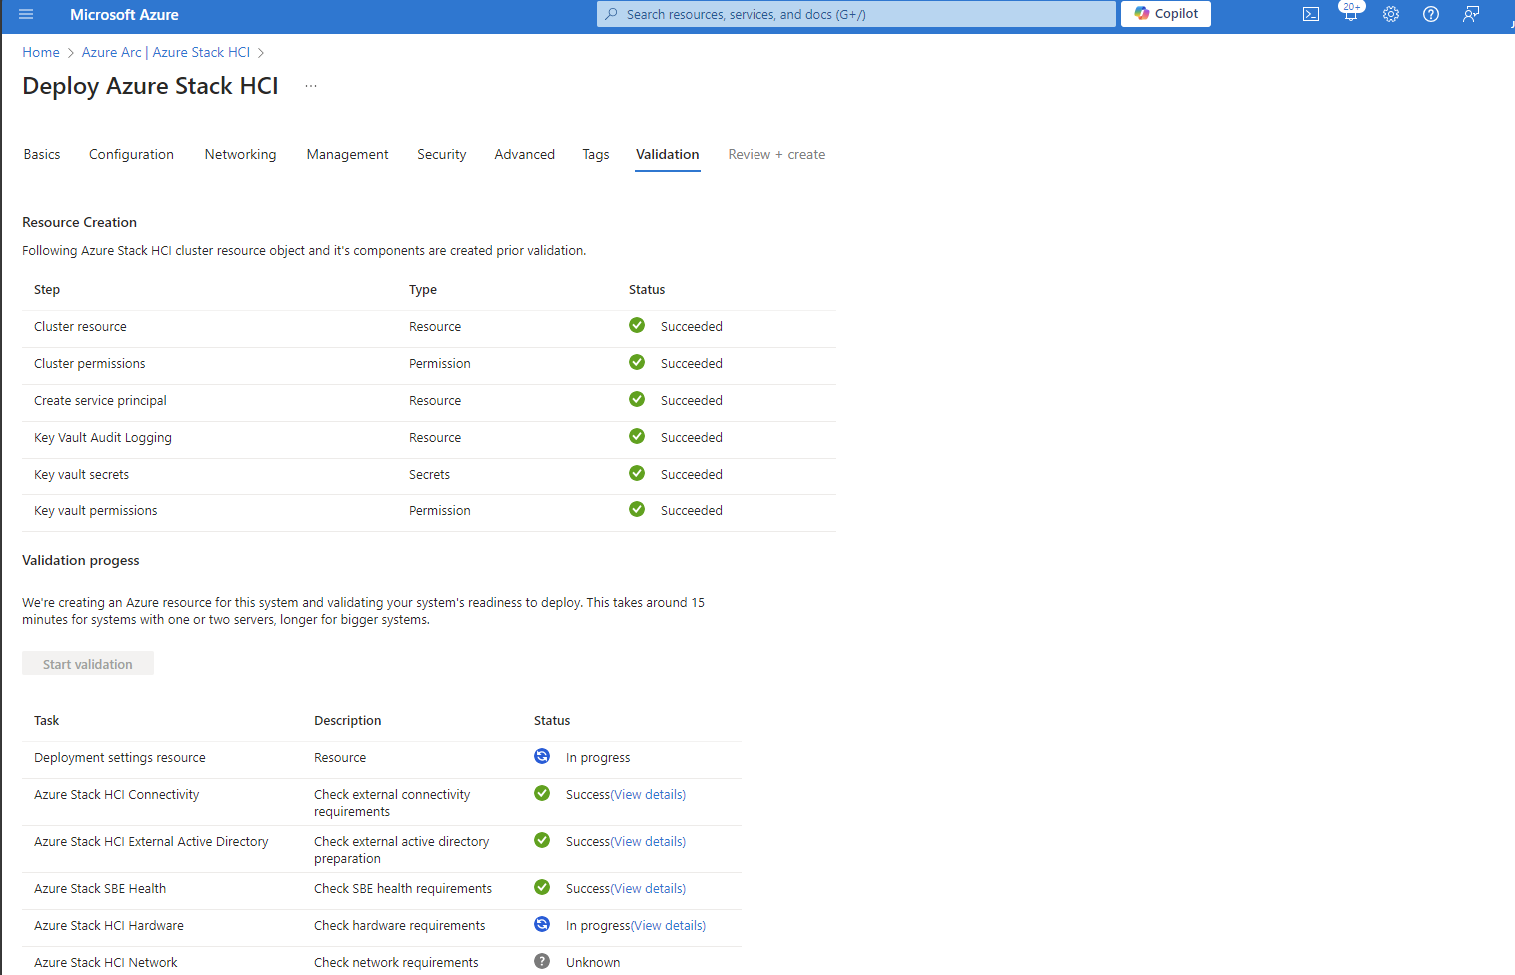
After that, we have to validate our cluster nodes by Azure to check if all pre-requisites are done:
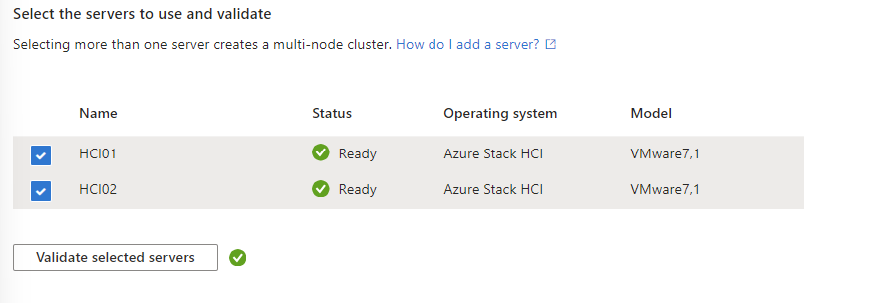
After succesfully validating the nodes, we can go further in the wizard.
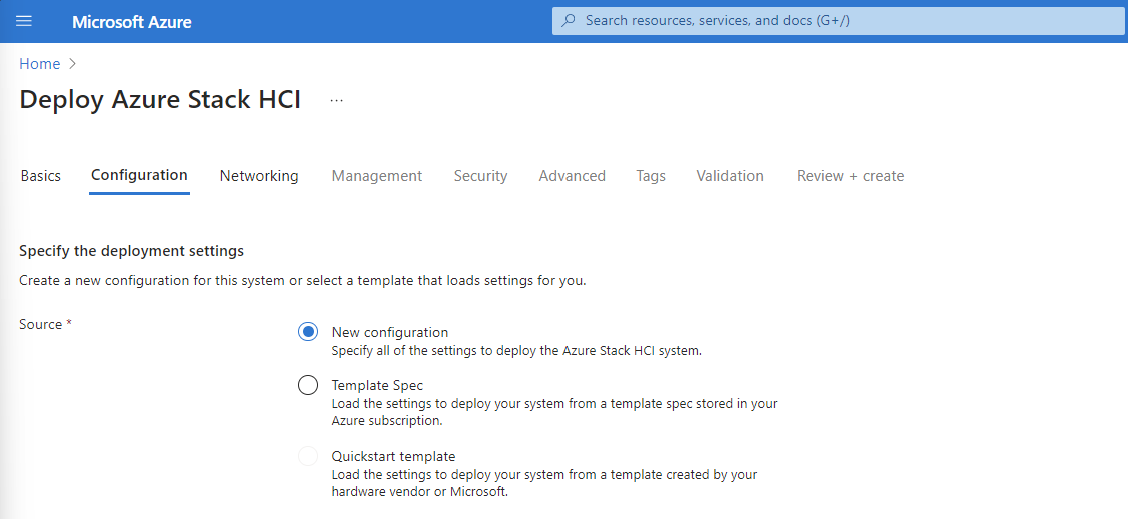
On the tab “Configuration”, I chose for a new configuration:
On the tab “Networking”, I chose for “Network switch for storage”. This means if there is a network switch between the servers. In my environment, I am using VMware as Hypervisor for my cluster nodes. This has a internal switching system and has no direct link to the PCIe connected network interface.
Further, you have the option to segment your cluster network by using different network links for:
- Management
- Traffic between nodes
- Storage network
In my environment I chose to group all traffic. In real world and business critical environments, it is often better to segment the traffic to increase performance and security.
After that step, we have to configure network connectivity. Select the network interface and at the IP configuration section, keep in mind at the DNS servers you need connection to your domain controller.
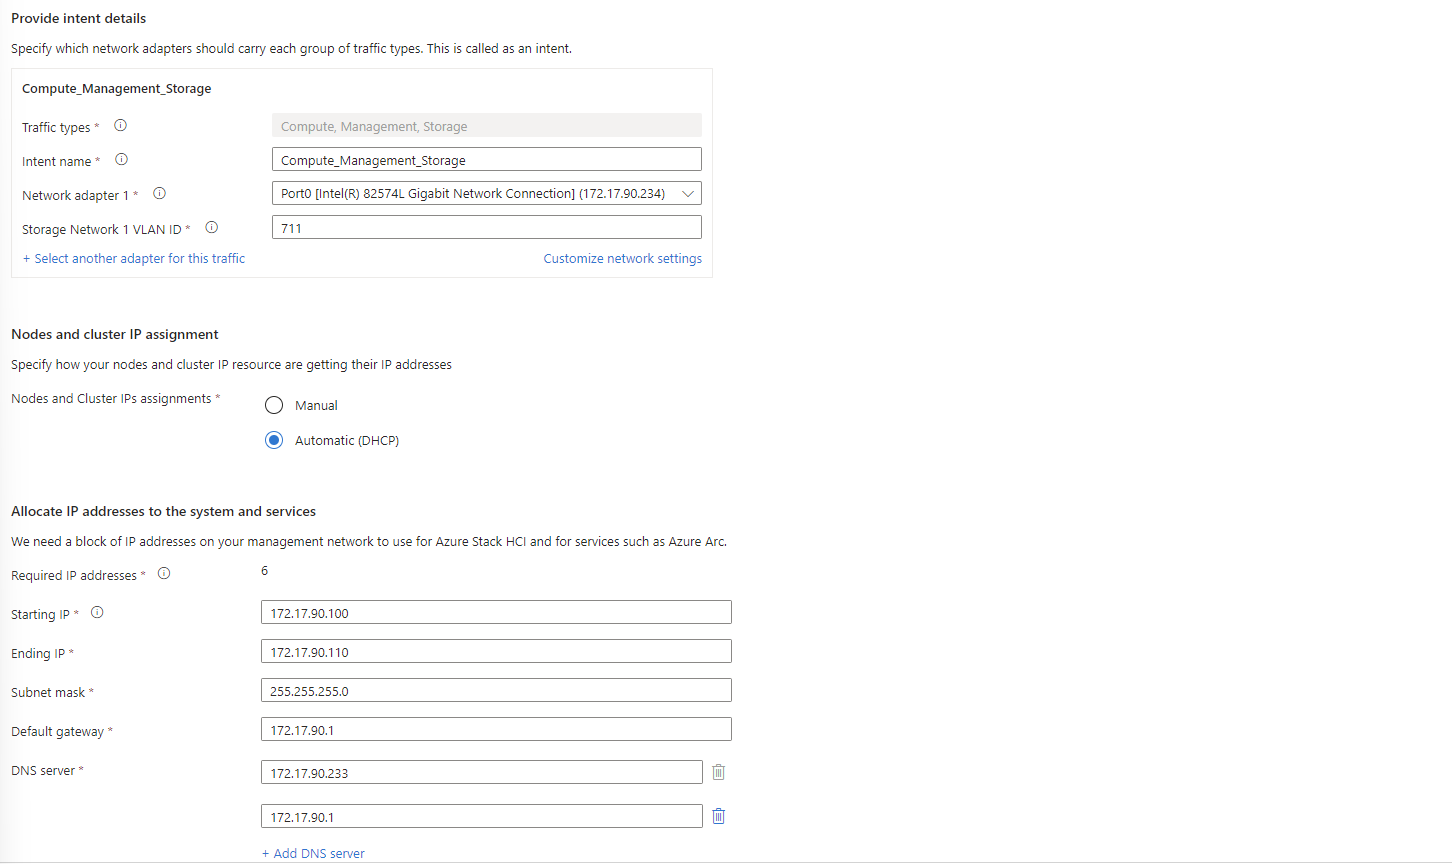
When everything is filled in correctly, we can advance to the “Management” tab.
At the Management Tab, you can define a location name tag. After that you need to define your storage account which will be used to keep the cluster online when a node is offline. In clustering, you always need to have your cluster online for 50% of your nodes + 1 witness.
Then we have to configure our Active Directory domain and OU. The OU has to be the distinguished name which you can find by using the “Attribute Editor” tab on a OU in Active Directory.
Also we have a deployment account and a local administrator account:
- Deployment account: is the account we created in step 1.2
- Local administrator: is the account on the cluster nodes we created after installation of Stack HCI OS
Fill in those details and click Next: Security
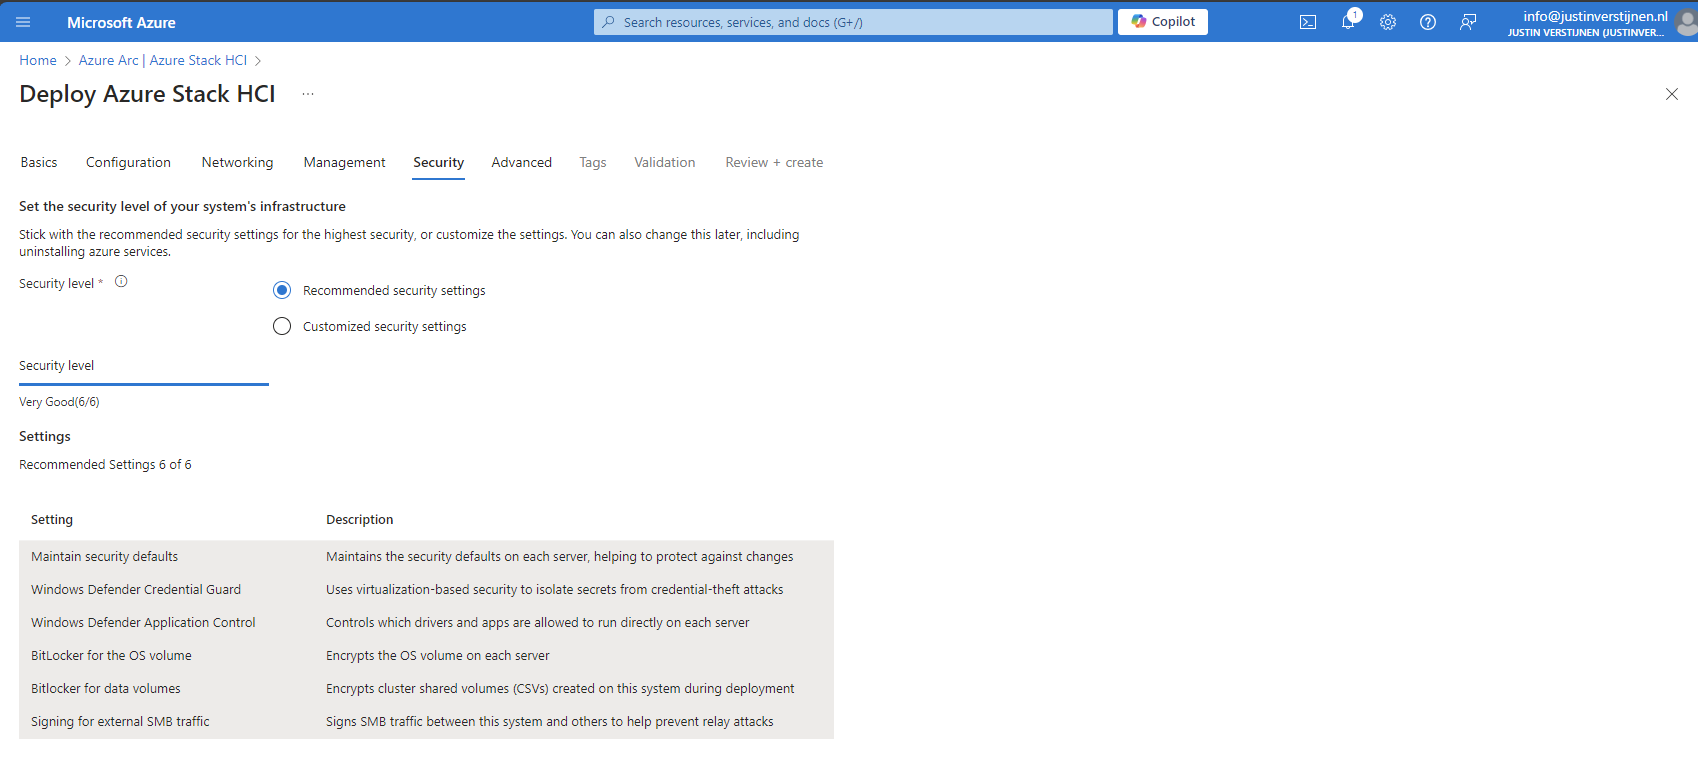
We want the highest level of security, so we choose the recommended settings:
After that we can go to the tab “Validation”. Here we have to validate the complete configuration of the cluster:
2. Steps for creating a single-node cluster
Microsoft doesn’t officially support a single node cluster, but you can create this. When you want to configure this, most of the steps must be done in PowerShell.
For testing, this is a great way to explore the service. My advice in a production environment is to use 2 or more nodes at minimum.
2.1 Testing cluster configuration prior to creating
To test your current configuration of all nodes, run a pre-creation check. A cluster has to succeed all the validation tests, otherwise the configuration is not supported by Microsoft and therefore not production-ready.
On the Management-server, run the following command:
Test-Cluster -Node HCI01 -Include "Storage Spaces Direct", "Inventory", "Network", "System Configuration"Te result I got is the following:
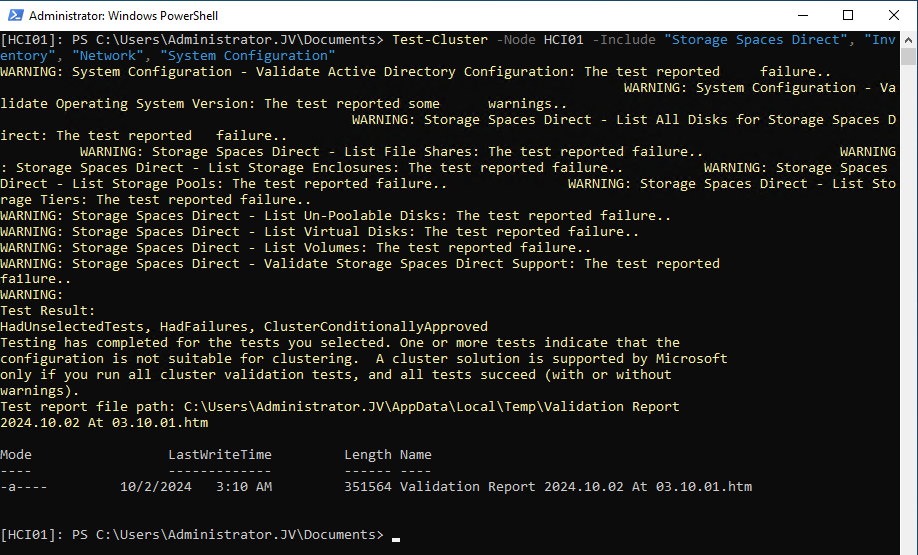
It gives us the steps we have to fix first before creating the cluster. We get the warnings because at this point we didn’t have everything configured. The following components needs configuration
- Active Directory
- Operating System version
- Storage Spaces Direct
2.2 Prepare Active Directory
Create a new Active Directoy forest when you don’t have one.
Then, install the needed HCI Powershell module when you don’t have it already:
Install-Module AsHciADArtifactsPreCreationTool -Repository PSGallery -ForceAfter that, create a new OU for your HCI nodes by using the HCI module (only possible with this module). Change the name of your desired OU to your needs. I created it with the command below:
New-HciAdObjectsPreCreation -AzureStackLCMUserCredential (Get-Credential) -AsHciOUName "OU=StackHCI,DC=justinverstijnen,DC=nl"At the credential section, you have to specify a new user who can manage the HCI cluster and is used as service account. The user must comply with the following requirements:
- No special characters in username
- Password must me 12 characters at minimum
- Username may NOT be in DOMAIN\User or USER@DOMAIN format
I created my user like shown below:
The module accepted my account:

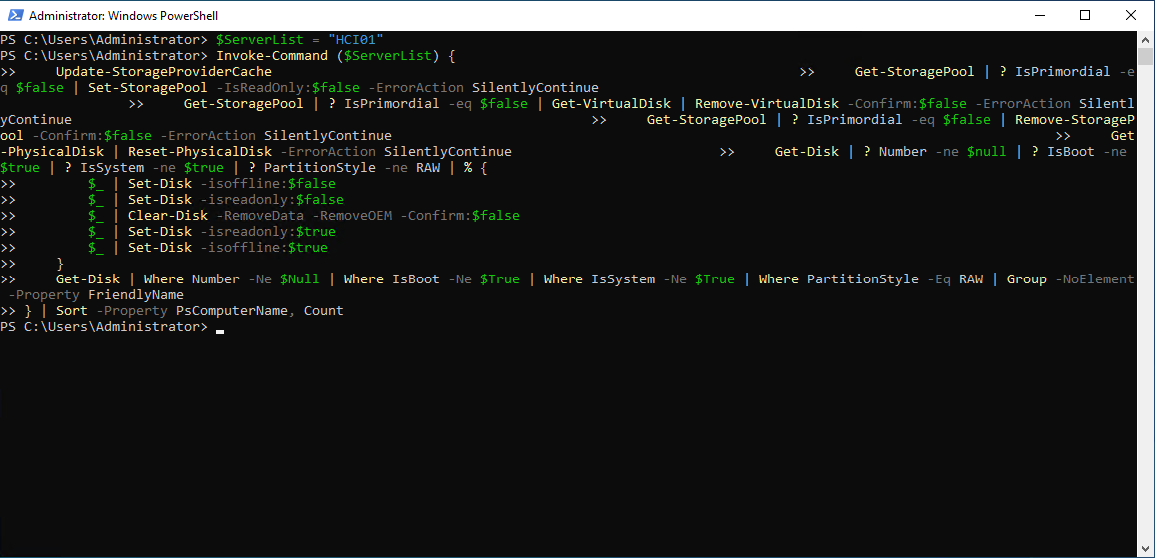
2.3 Prepare the drives
Before creating the cluster we have to prepare the drives for using Storage Spaces Direct. THis means, clearing them, setting them to read/write mode and setting them as “Primordial”
This can be done with the following commands:
On the management-server, define all your cluster nodes by using their computer name of Active Directory:
$ServerList = "HCI01"Then prepare the drives with these commands (run all at once) with the following commands:
Invoke-Command ($ServerList) {
    Update-StorageProviderCache
    Get-StoragePool | ? IsPrimordial -eq $false | Set-StoragePool -IsReadOnly:$false -ErrorAction SilentlyContinue
    Get-StoragePool | ? IsPrimordial -eq $false | Get-VirtualDisk | Remove-VirtualDisk -Confirm:$false -ErrorAction SilentlyContinue
    Get-StoragePool | ? IsPrimordial -eq $false | Remove-StoragePool -Confirm:$false -ErrorAction SilentlyContinue
    Get-PhysicalDisk | Reset-PhysicalDisk -ErrorAction SilentlyContinue
    Get-Disk | ? Number -ne $null | ? IsBoot -ne $true | ? IsSystem -ne $true | ? PartitionStyle -ne RAW | % {
        $_ | Set-Disk -isoffline:$false
        $_ | Set-Disk -isreadonly:$false
        $_ | Clear-Disk -RemoveData -RemoveOEM -Confirm:$false
        $_ | Set-Disk -isreadonly:$true
        $_ | Set-Disk -isoffline:$true
    }
    Get-Disk | Where Number -Ne $Null | Where IsBoot -Ne $True | Where IsSystem -Ne $True | Where PartitionStyle -Eq RAW | Group -NoElement -Property FriendlyName
} | Sort -Property PsComputerName, Count
This will give no output when succeeded:
2.4 Creating the cluster
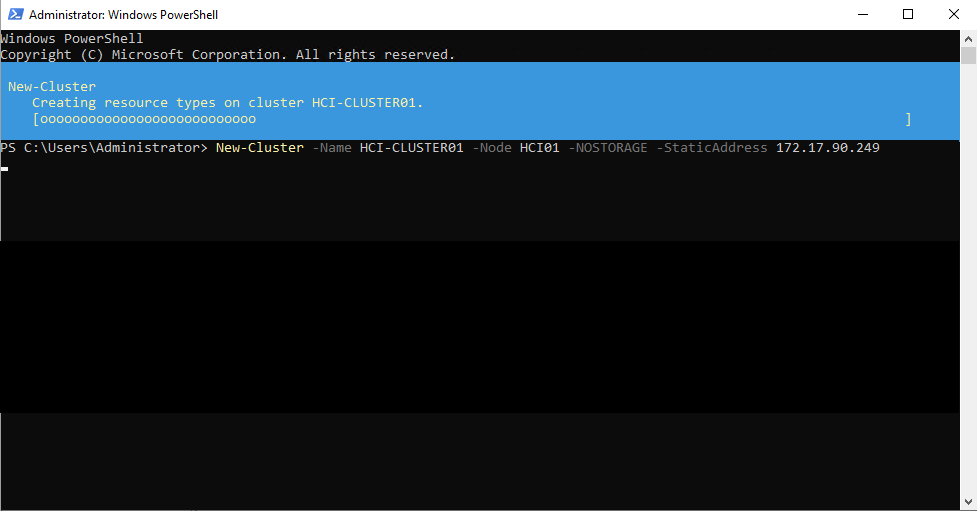
New-Cluster -Name HCI-CLUSTER01 -Node HCI01 -NOSTORAGE -StaticAddress 172.17.90.249After creating the cluster, we have to enable Storage Spaces Direct, but without Cache. We do this with the following command:
Enable-ClusterStorageSpacesDirect -CacheState Disabled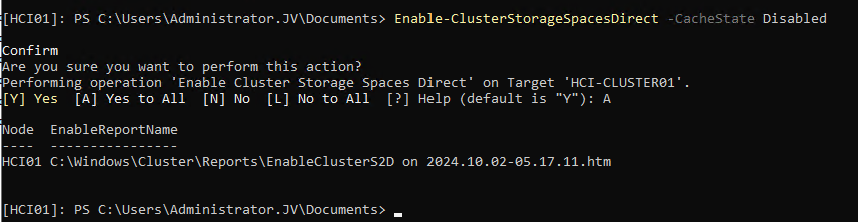
The output shows the command has been processed succesfully.
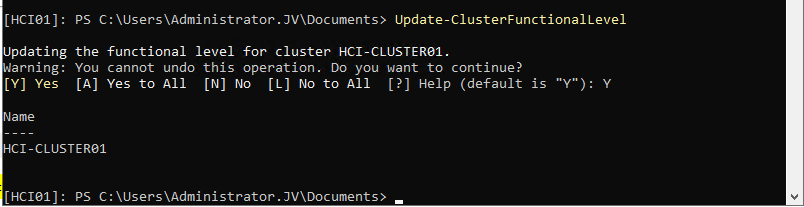
2.5 Update Cluster Functional Level
To fully let your cluster work, you have to update the functional level of the cluster. This is a version of the language the nodes use to speak with each other.
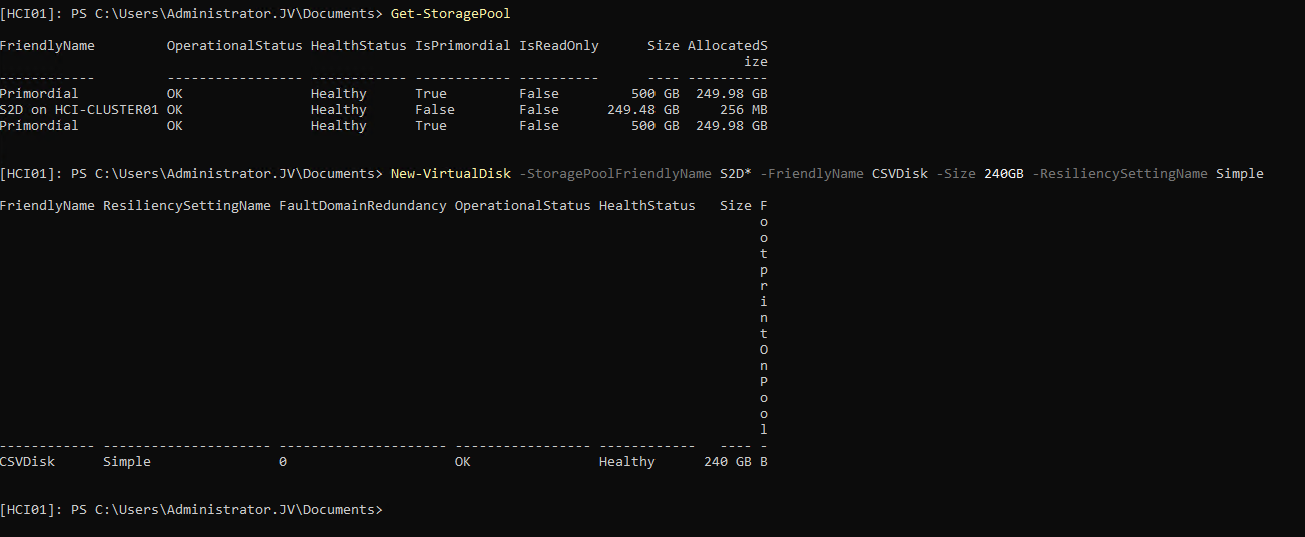
2.6 Creating Cluster Shared Volume
After everything for the cluster has been created, we have to create a Cluster Shared Volume (CSV). We can also do this from Powershell but can also be done with the Server Manager.
For Powershell, run the following command:
New-VirtualDisk -StoragePoolFriendlyName S2D* -FriendlyName CSVDisk -Size 240GB -ResiliencySettingName SimpleMy output was:
2.7 Register the cluster to Azure Stack HCI
After you configured everything of the local server we have to register the cluster to Azure Arc/Stack HCI. We can do this by following these steps:
First, register the needed resource providers in the Azure Portal. You can find this under your active subscription where you want to register the Cluster.
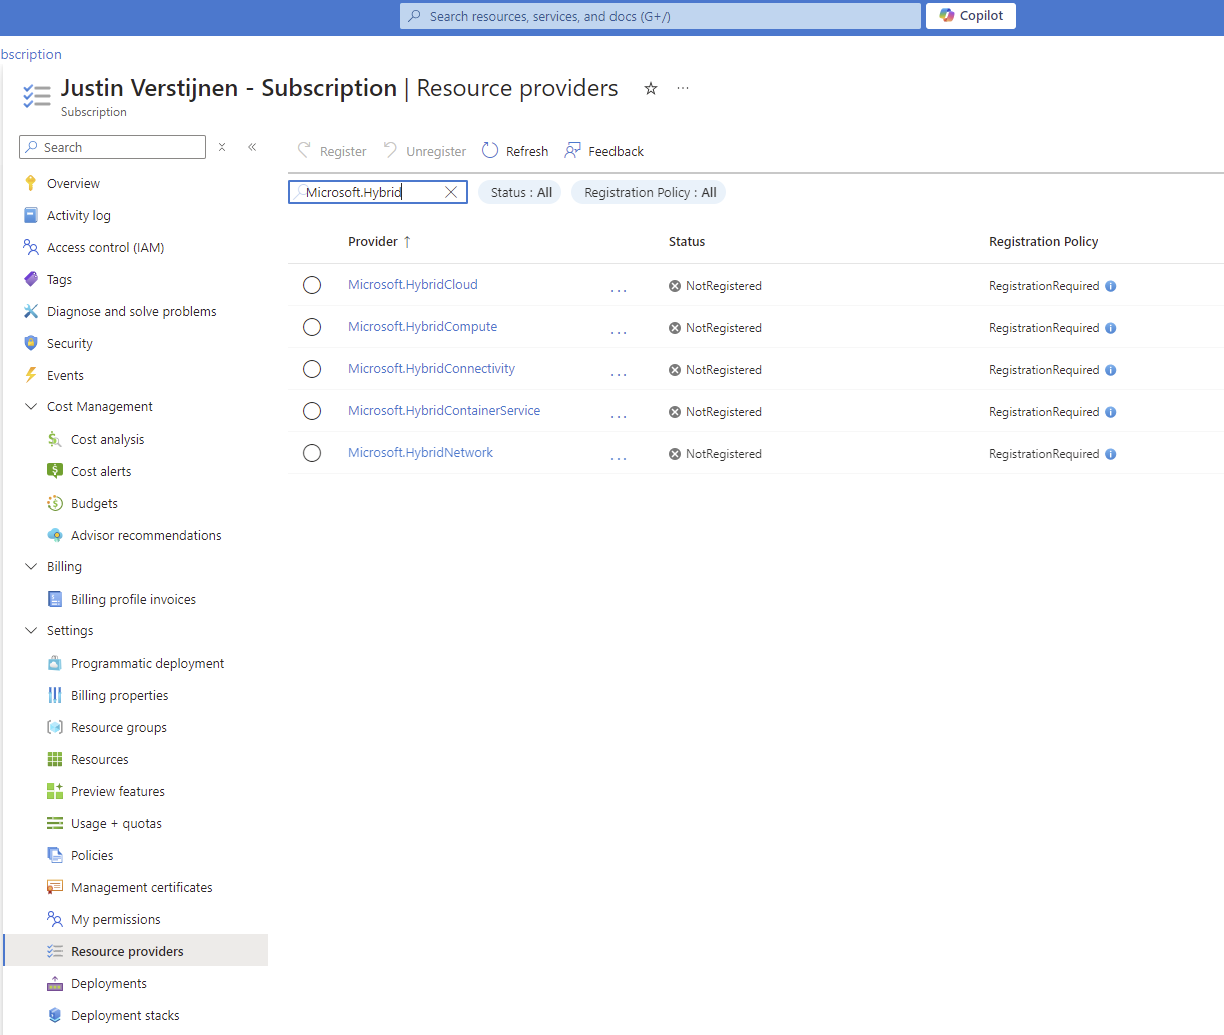
Register the following resource providers here:
- Microsoft.AzureStackHCI
- Microsoft.HybridCompute
- Microsoft.HybridConnectivity
- Microsoft.GuestConfiguration
By registering the resource providers, you enable every setting needed to use the service in your subscription. Microsoft does not enable everything by default to save its infrastucture from unneeded load.
After the Resource Providers are registered, we can finally register our cluster to Azure Arc. Go back to your HCI nodes and install the Azure StackHCI Powershell module:
Install-Module -Name Az.StackHCIAfter installing the module on every HCI cluster node, we can register the cluster node to Azure. You have to do this on every node, and this cannot be done through Powershell Remote.
Register-AzStackHCI -SubscriptionId "SUBSCRIPTION ID" -ResourceGroupName jv-test-stackhci -TenantId "TENANT ID" -Region westeurope -ResourceName HCI01Here you need to login via https://microsoft.com/devicelogin
After that step, you have to wait around 10 minutes for the registration to be done.
2.8 Azure Stack HCI in the Azure Portal
You can access Azure Stack HCI in the Azure Portal:
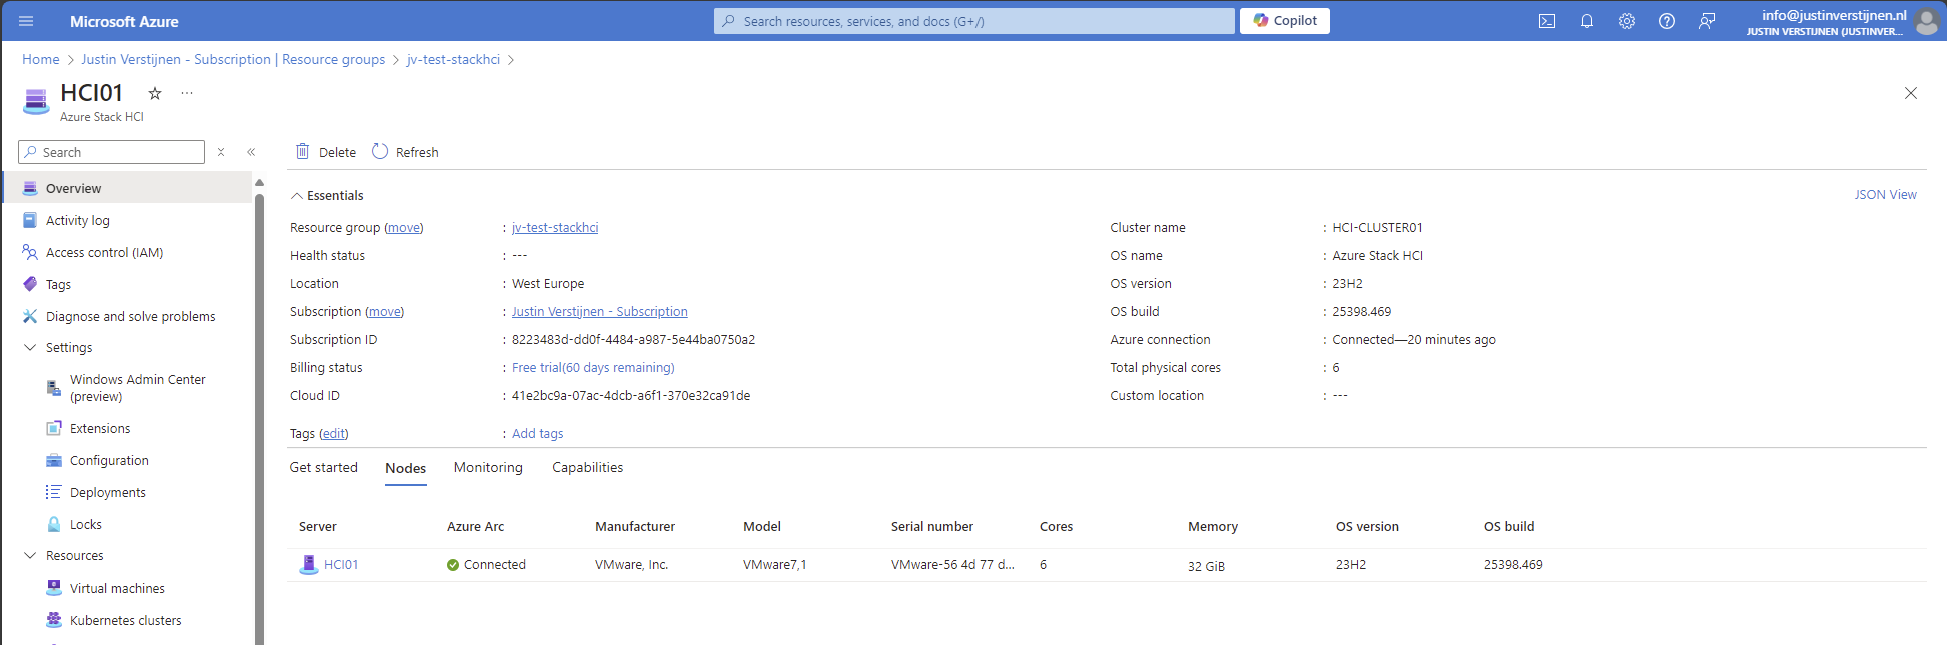
Here you can manage the nodes and clusters.
To actually create resources on the hardware on-premises through Azure Stack HCI, you have to configure a Arc Resource Bridge. This is a connection between the host OS of the cluster nodes and Azure. We can configure this through Windows Admin Center, which can be enabled on the cluster nodes.
Summary
Azure Stack HCI is the newest evolution in hybrid setups, where you want to leverage as much as possible from the Azure services, but want the flexibility of using your own hardware and increasing security and performance. Another pro of this setup is that you can save costs by not using the expensive servers on Azure with certain needs, like GPU-enabled machines.
End of the page 🎉
You have reached the end of the page. You can navigate through other blog posts as well, share this post on X, LinkedIn and Reddit or return to the blog posts collection page. Thank you for visiting this post.
If you think something is wrong with this post or you want to know more, you can send me a message to one of my social profiles at: https://justinverstijnen.nl/about/
If you find this page and blog very useful and you want to leave a donation, you can use the button below to buy me a beer. Hosting and maintaining a website takes a lot of time and money. Thank you in advance and cheers :)

The terms and conditions apply to this post.