Azure Virtual Desktop FSLogix and Native Kerberos authentication
Categories:
15 minute read
In this guide I will dive into how I configured an simple environment where I placed every configuration action in separate steps to keep it simple and clear to follow and also will give some describing information about some concepts and settings.
I also added some optional steps for a better configuration and security than this guide already provides for a better user experience and more security.
The solution described
The day has finally come; we can now build a Azure Virtual Desktop (AVD) hostpool in pooled configuration without having to host an Active Directory, and/or having to host an unsecured storage account by having to inject the Storage Access Key into the machines’ registry. This newer setup enhances performance and security on those points.
In this post we will build a simple Azure Virtual Desktop (AVD) setup with one hostpool, one session host and one storage account. We will use Microsoft Entra for authentication and Microsoft Intune for our session host configuration, maintenance and security.
This looks like this, where I added some session host to get a better understanding of the profile solution.
FSLogix is a piece of software that can attach a virtual disk from a network location and attach it to Windows at logon. This ensures users can work on any machine without losing their settings, applications and data.
In the past, FSLogix always needed an Active Directory or Entra Domain Services because of SMB and Kerberos authentication. We now finally got a solution where this is a thing of the past and go full cloud only.
For this to work we also get an Service Principal for your storage account, building a bridge between identity and storage account for Kerberos authentication for the SMB protocol.
1: Create Security Groups and configure roles
Before we can configure the service, we will first start with creating a security group to give users permissions to the FSLogix storage. Every user who will use FSLogix will need at least Read/write (Contributor) permissions.
Go to the Entra Admin center (https://entra.microsoft.com) and go to “Groups”.
Create a user group
Create a new security group here:
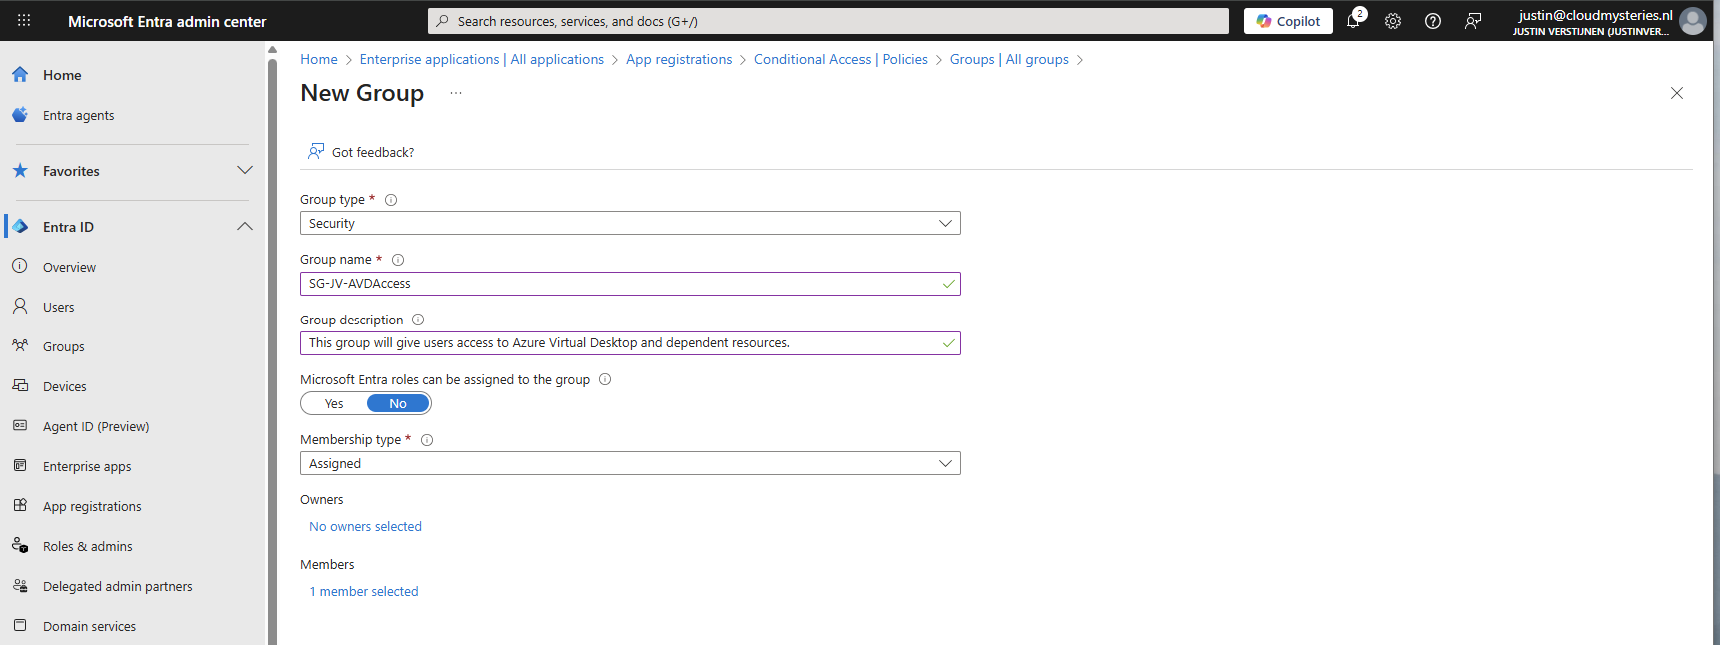
You can use a assigned group if you want to manage access, or you can use a dynamic group to automate this process. Then create the group, which in my case will be used for storage permissions and hostpool access.
Create a device group
If having a larger Intune environment, it is recommended to create a Azure Virtual Desktop device/session hosts group. This way you can apply computer settings to the hosts group in Intune.
You can create a group with your desired name and this can be an assigned or dynamic group. An examples of dynamic group rules can be this:
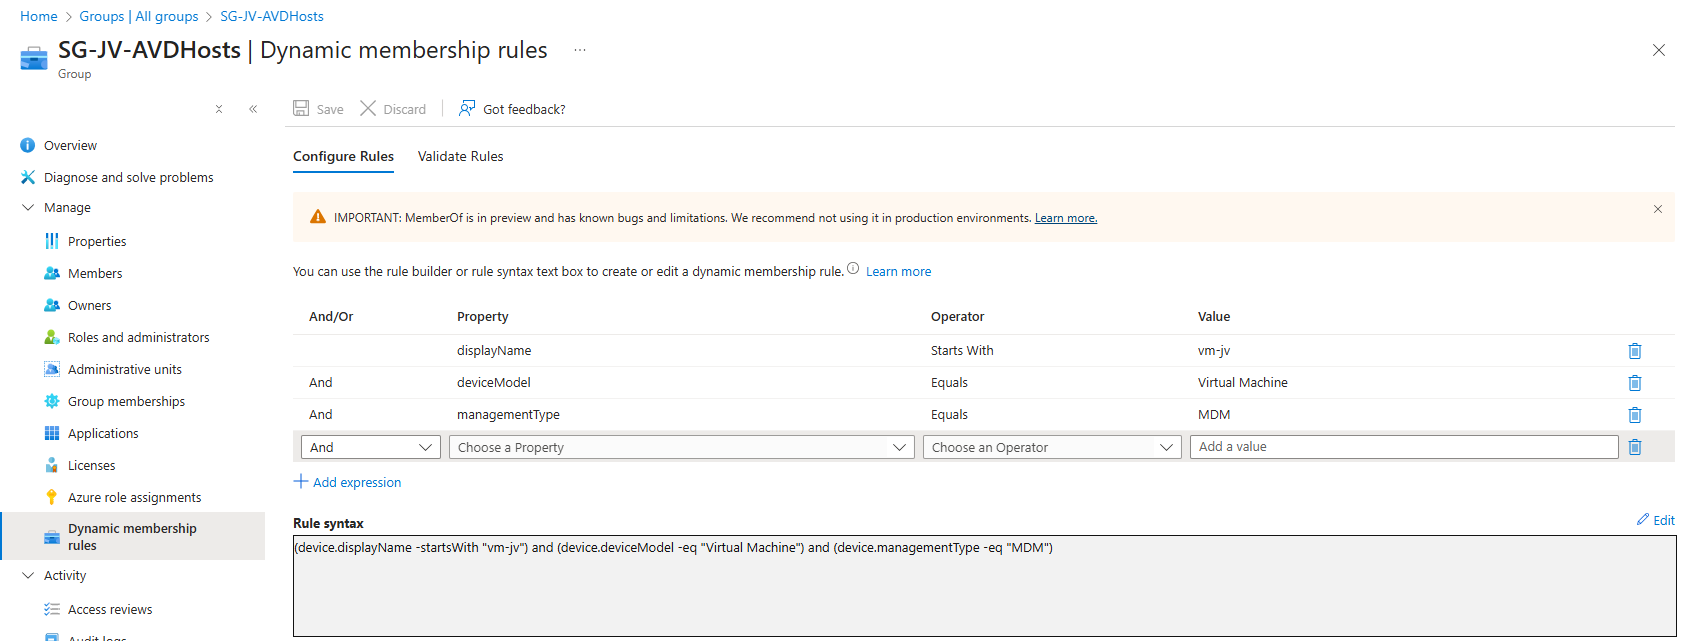
(device.displayName -startsWith "vm-jv") and (device.deviceModel -eq "Virtual Machine") and (device.managementType -eq "MDM")For AVD hosts, I really like dynamic groups, as you deploy more virtual machines, policies, scripts and such are all applied automatically.
Assign Virtual Machine login roles to users
After the group is created, we need to assign a role to the group. This role is:
- Virtual Machine User Login on all session hosts -> Resource group
- For default, non administrative users
- Virtual Machine Administrator Login on all session hosts -> Resource group
- For administrative users
We will use the role “Virtual Machine User Login” in this case for normal end users. Go to the resource group where your AVD hosts are and go to “Access control (IAM)”.
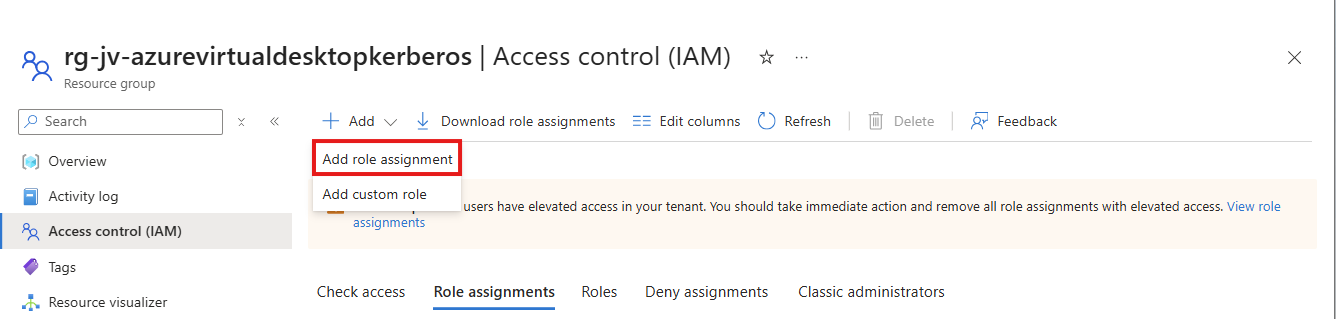
Click on “+ Add” and then “Add role assignment”.
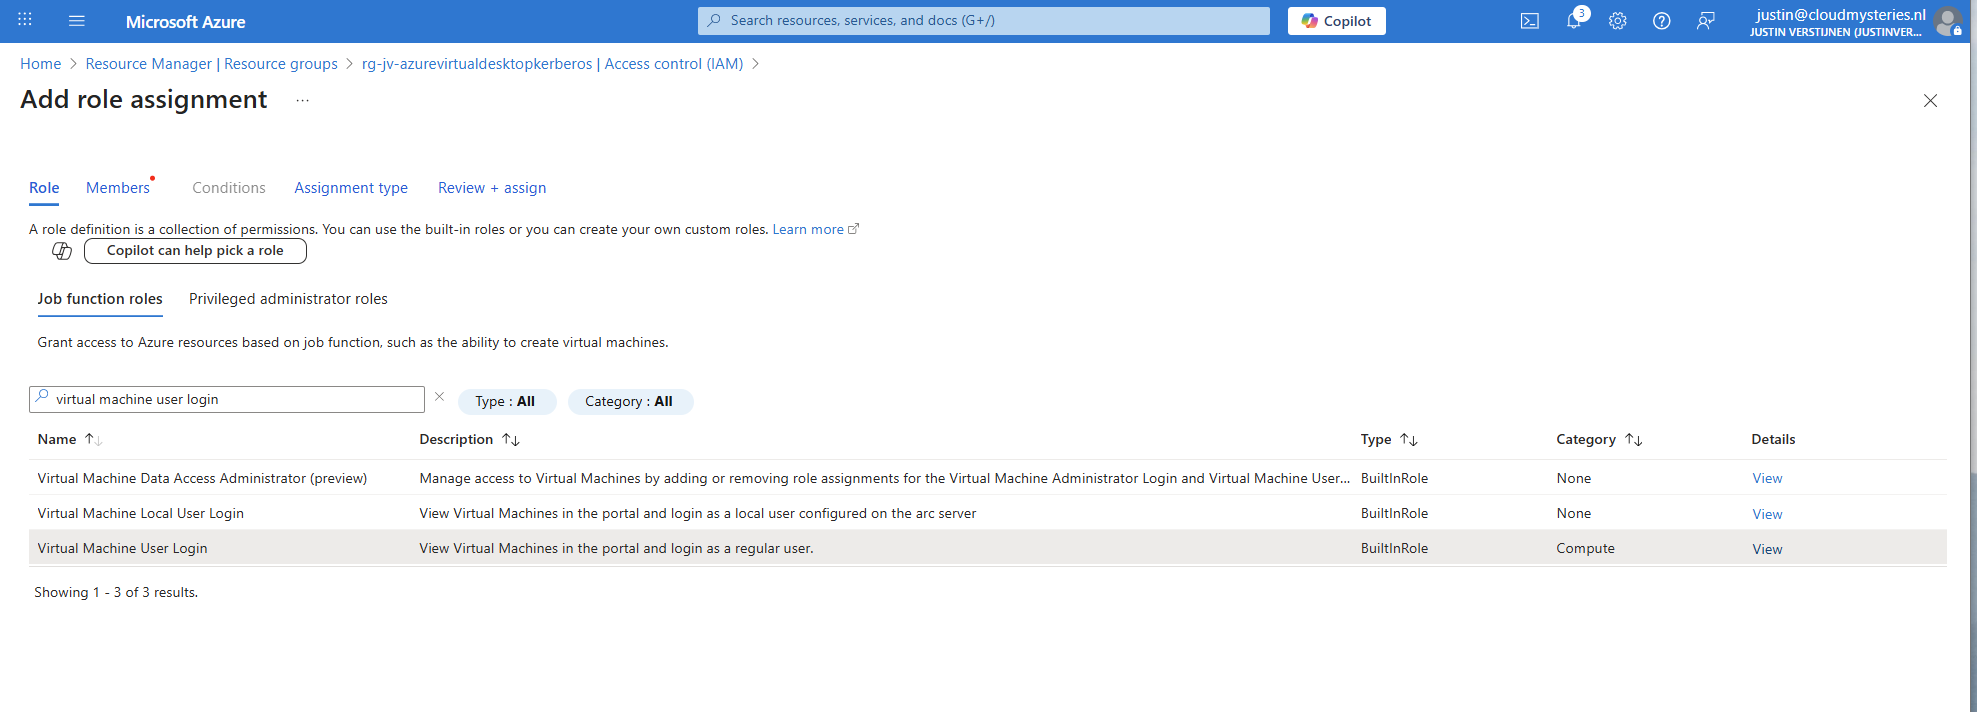
Select the role “Virtual Machine User Login” and click on “Next”. On the Members page, click on “+ Select members” and select the group with users you just created.
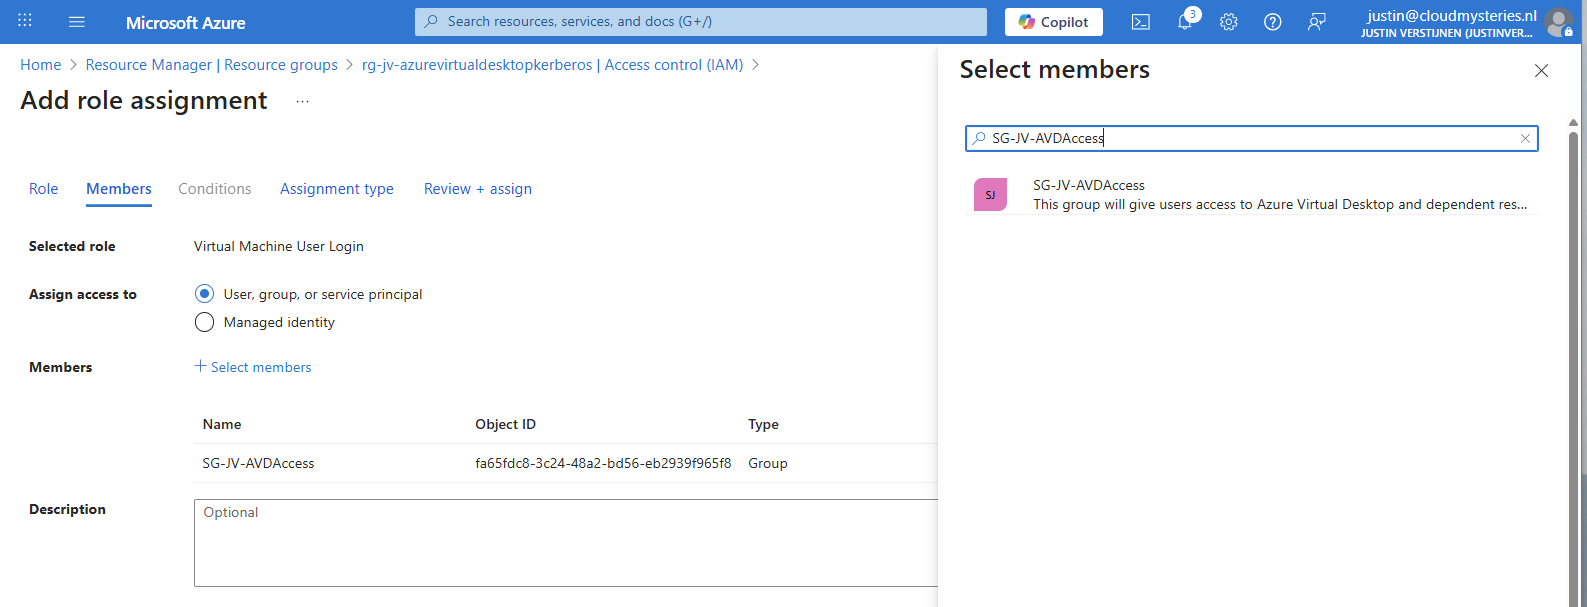
The role assignment is required because users will be loggin into a virtual machine. Azure requires the users to have the RBAC role for security.
You can do this on Resource, Resource Group and Subscription level, but mostly we will be placing similar hosts in the same resource group. My advice in such situation would be to use the resource group for the permissions.
2: Create Azure Virtual Desktop hostpool
Now we have to create a hostpool for Azure Virtual Desktop. This is a group of session hosts which will deliver a desktop to the end user.
In Microsoft Azure, search for “Azure Virtual Desktop”.

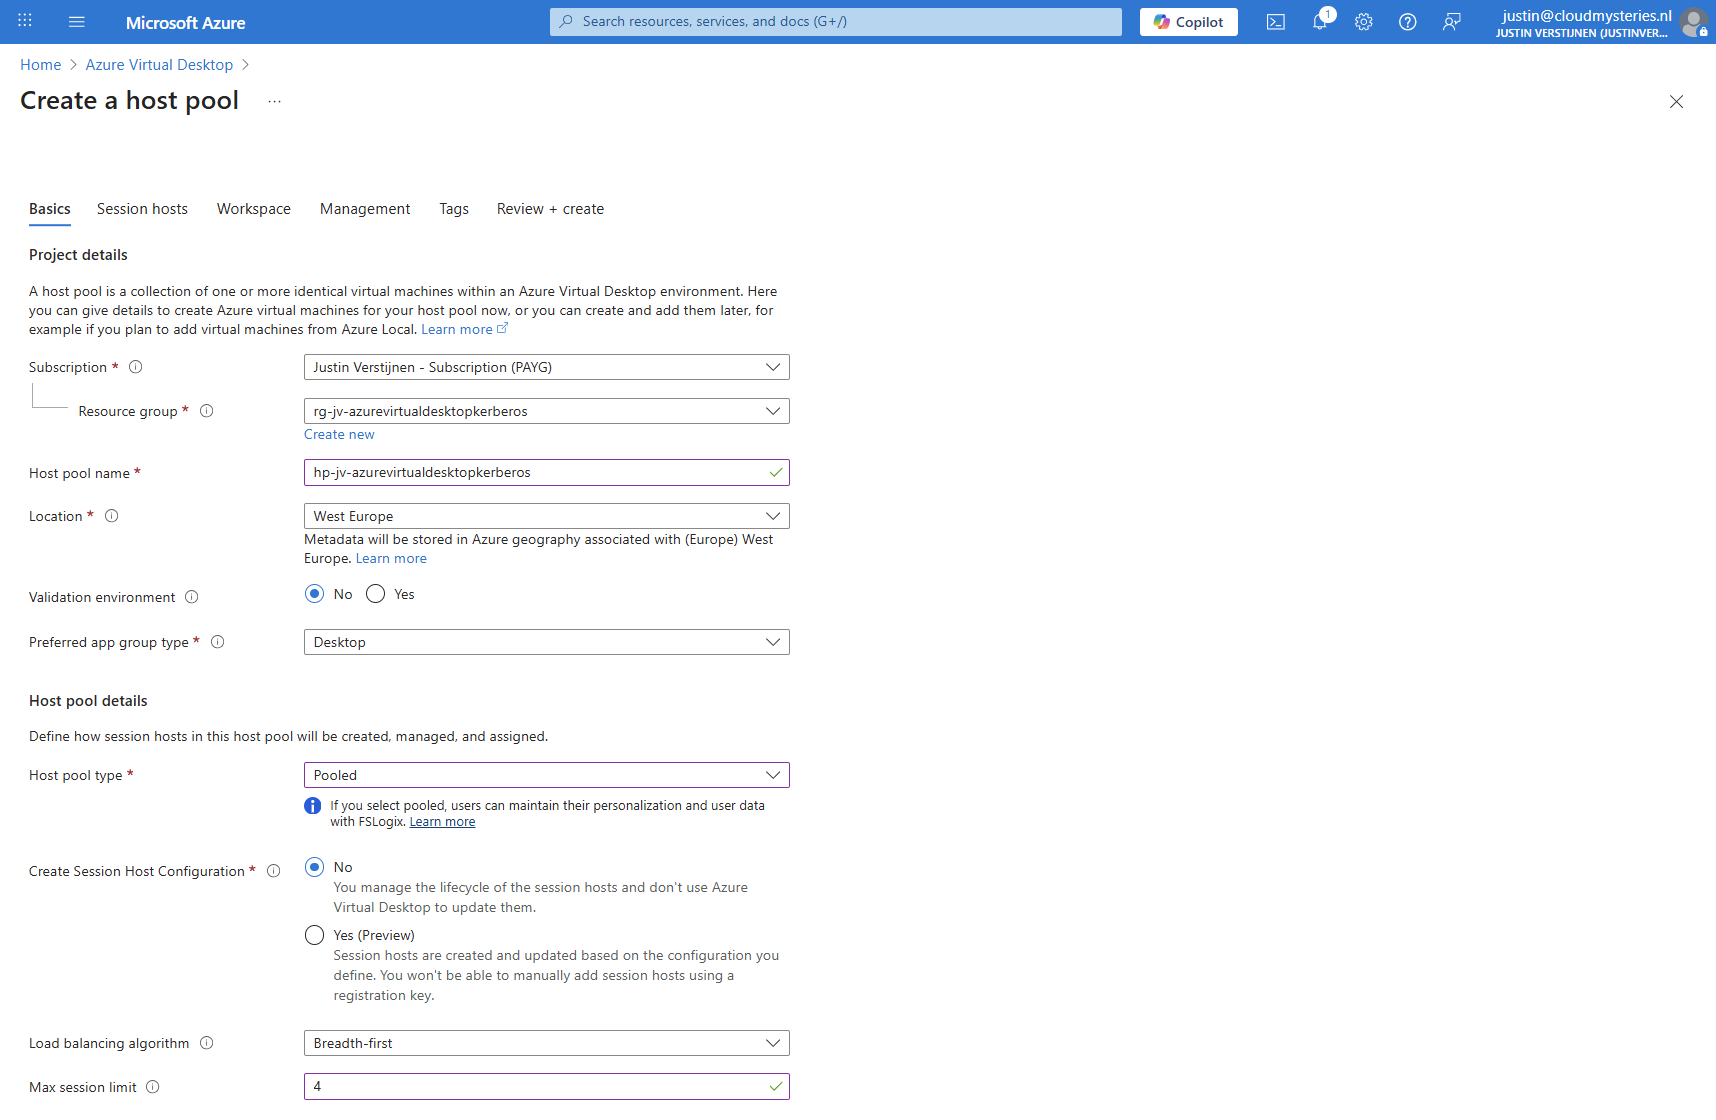
Then click on “Create a hostpool”.

Fill in the details of your hostpool like a name, the region you want to host it and the hostpool type. Assuming you are here for FSLogix, select the “Pooled” type.
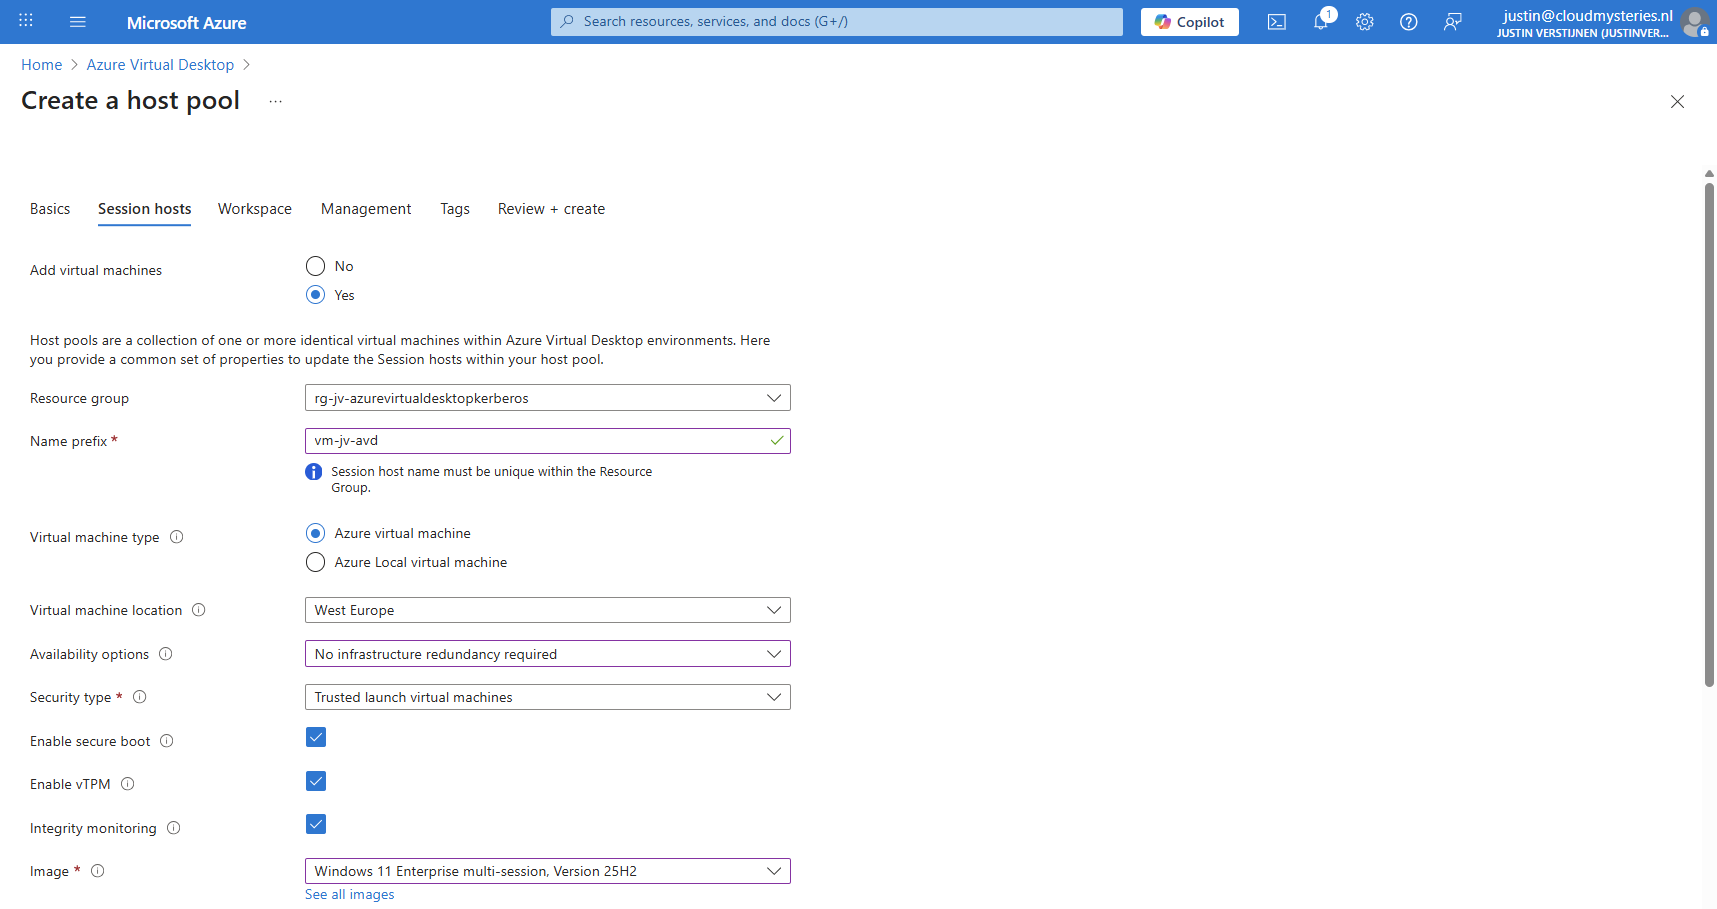
Then click “Next” to advance to the next configuration page. Here we must select if we want to deploy a virtual machine. In my case, I will do this.
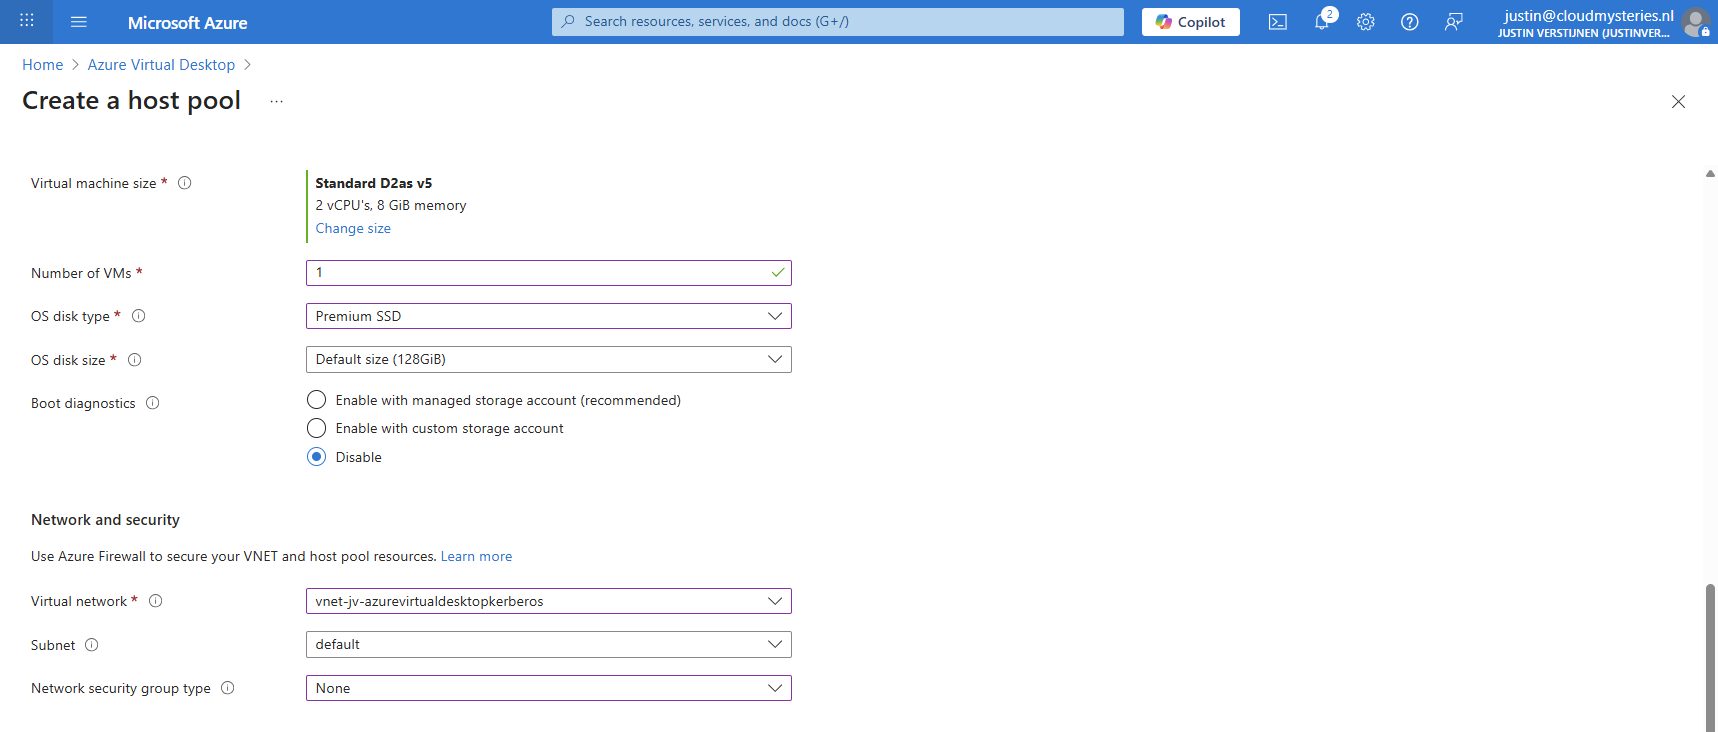
And at the end select the option “Microsoft Entra ID”.
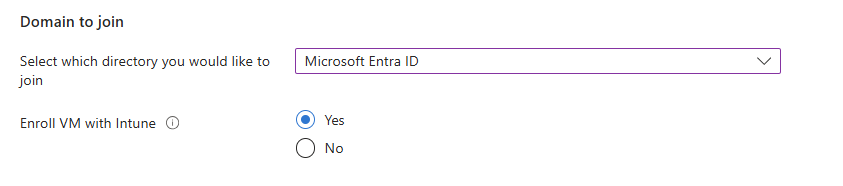
Create your local administrator account for initial or emergency access and then finish creating the hostpool.
3: Create Storage Account for FSLogix
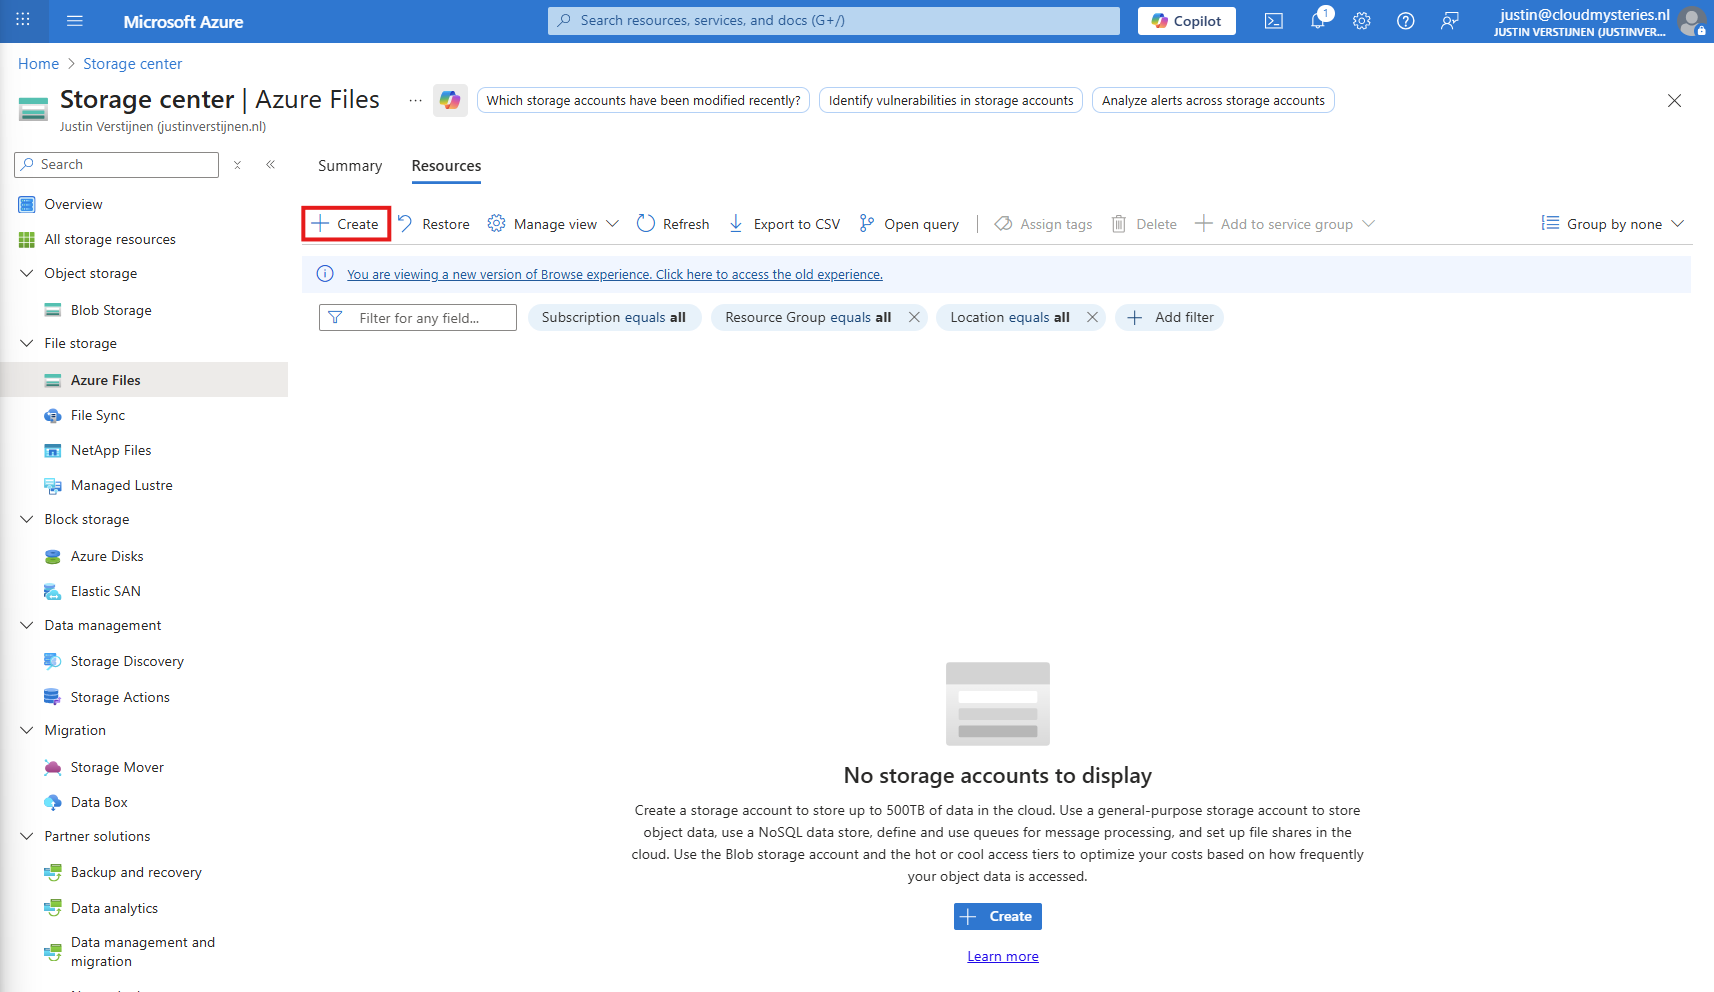
After having the hostpool ready and the machine deploying, we have to create a storage account and fileshare for storing the FSLogix profiles. In the Azure Portal, go to Azure Files and create a new storage account:
Then fill in the details of your storage account:
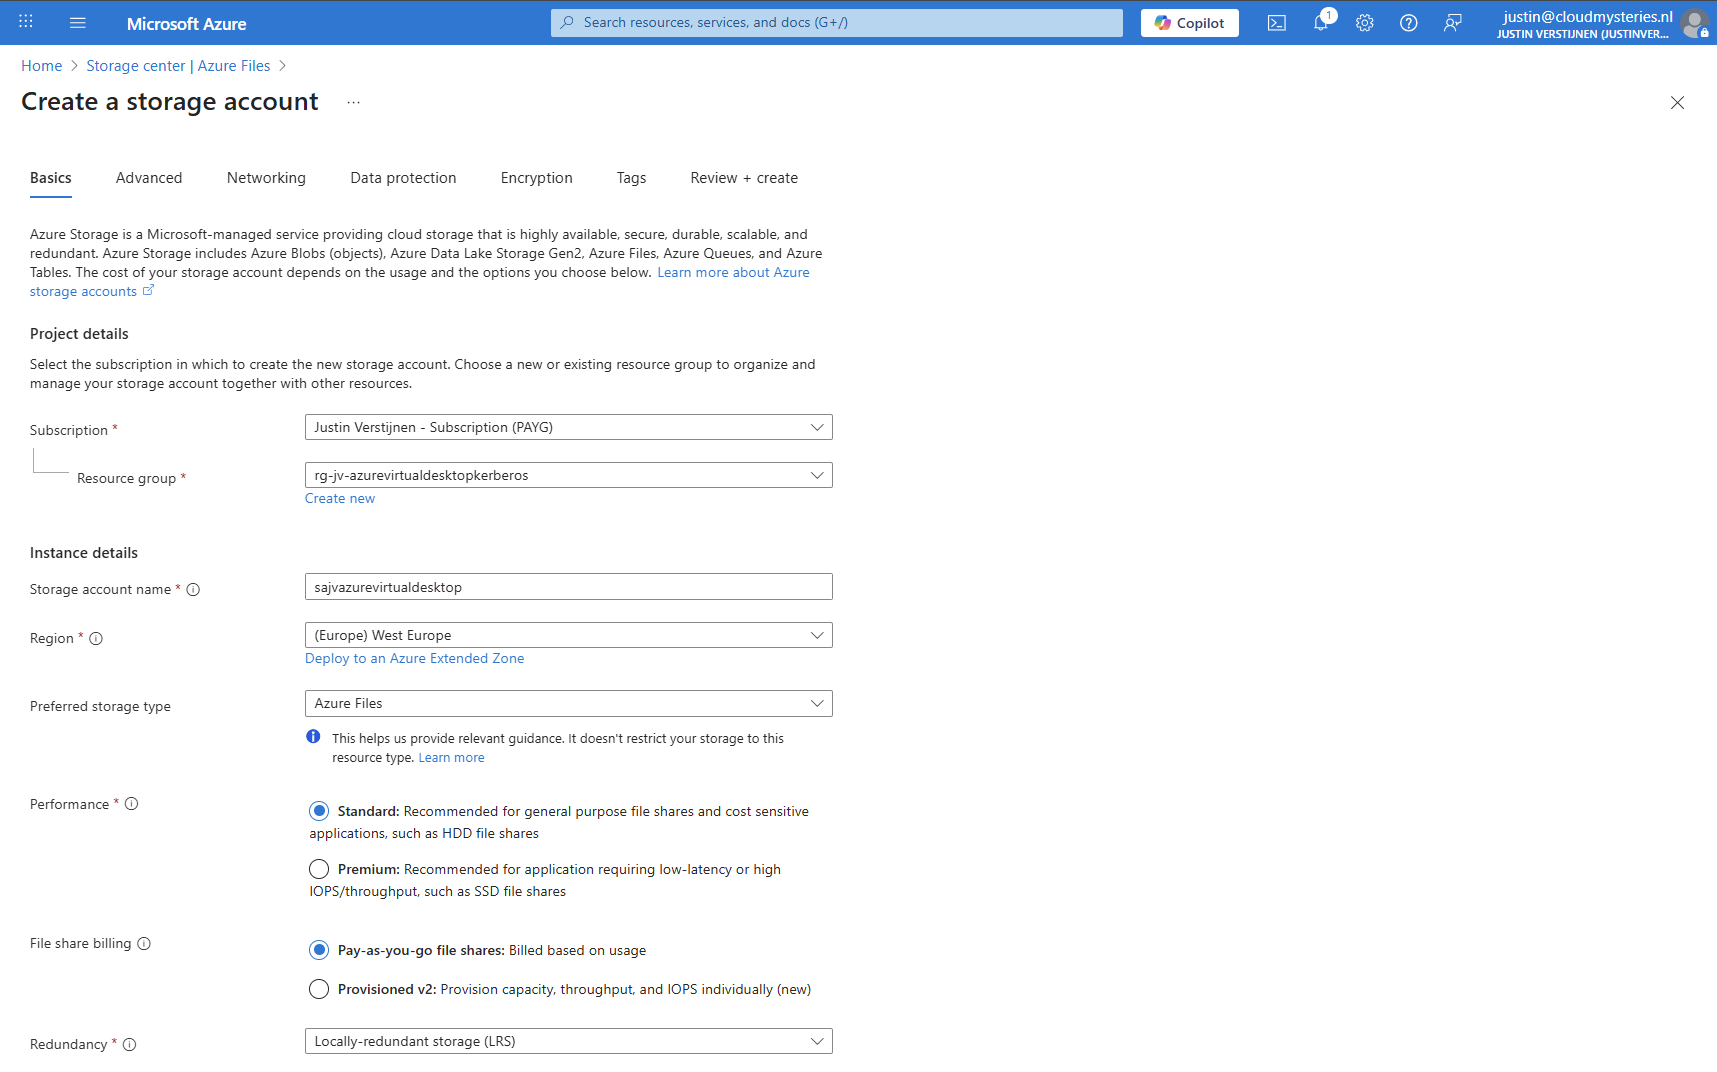
I chose the Azure Files type as we don’t need the other storages. We can skip to the end to create the storage account.
Storage account security
After creating the storage account, we must do some configurations. Go to the storage account and then to “Configuration”.
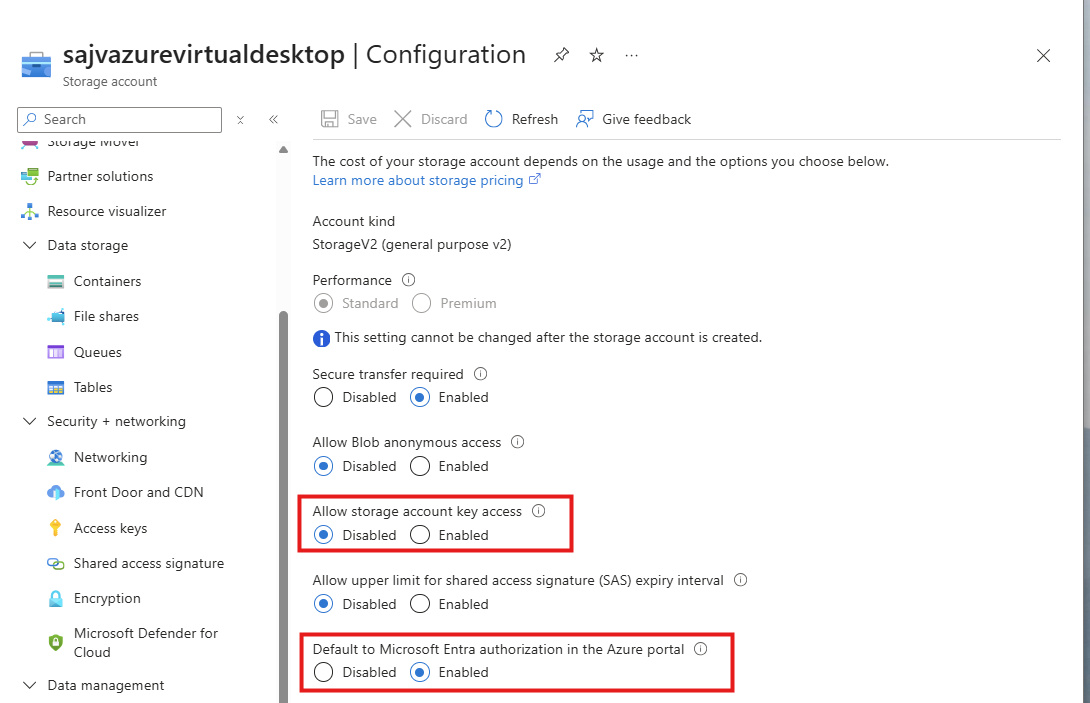
Set these two options to this setting:
- Allow storage account key access: Disabled
- Default to Microsoft Entra authorization in the Azure Portal: Enabled
Storage account firewall settings
Navigate in the Storage account to the blade “Networking”. We will limit the networks and IP addresses that can access the storage account which is by default the whole internet.
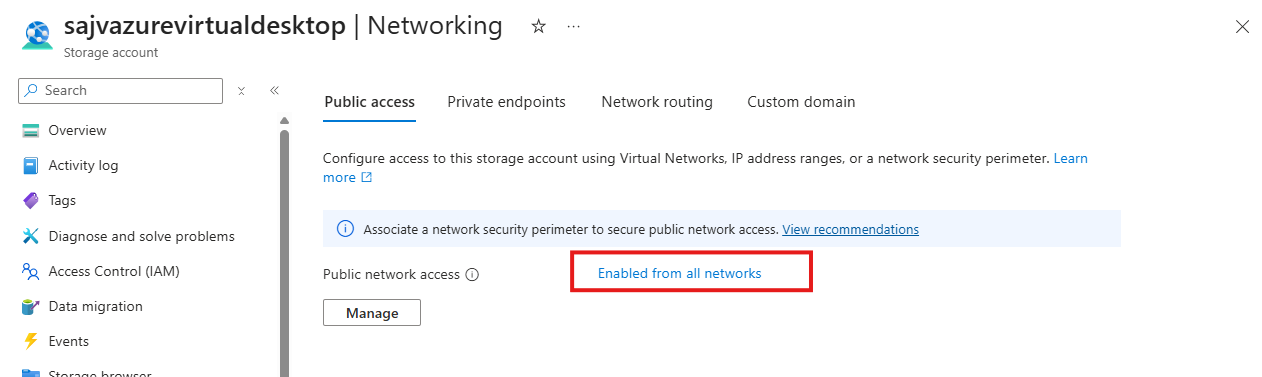
Click on “Enabled from all networks”.
Here select the “Enable from selected networks” option, and select your network containing your Azure Virtual Desktop hosts.
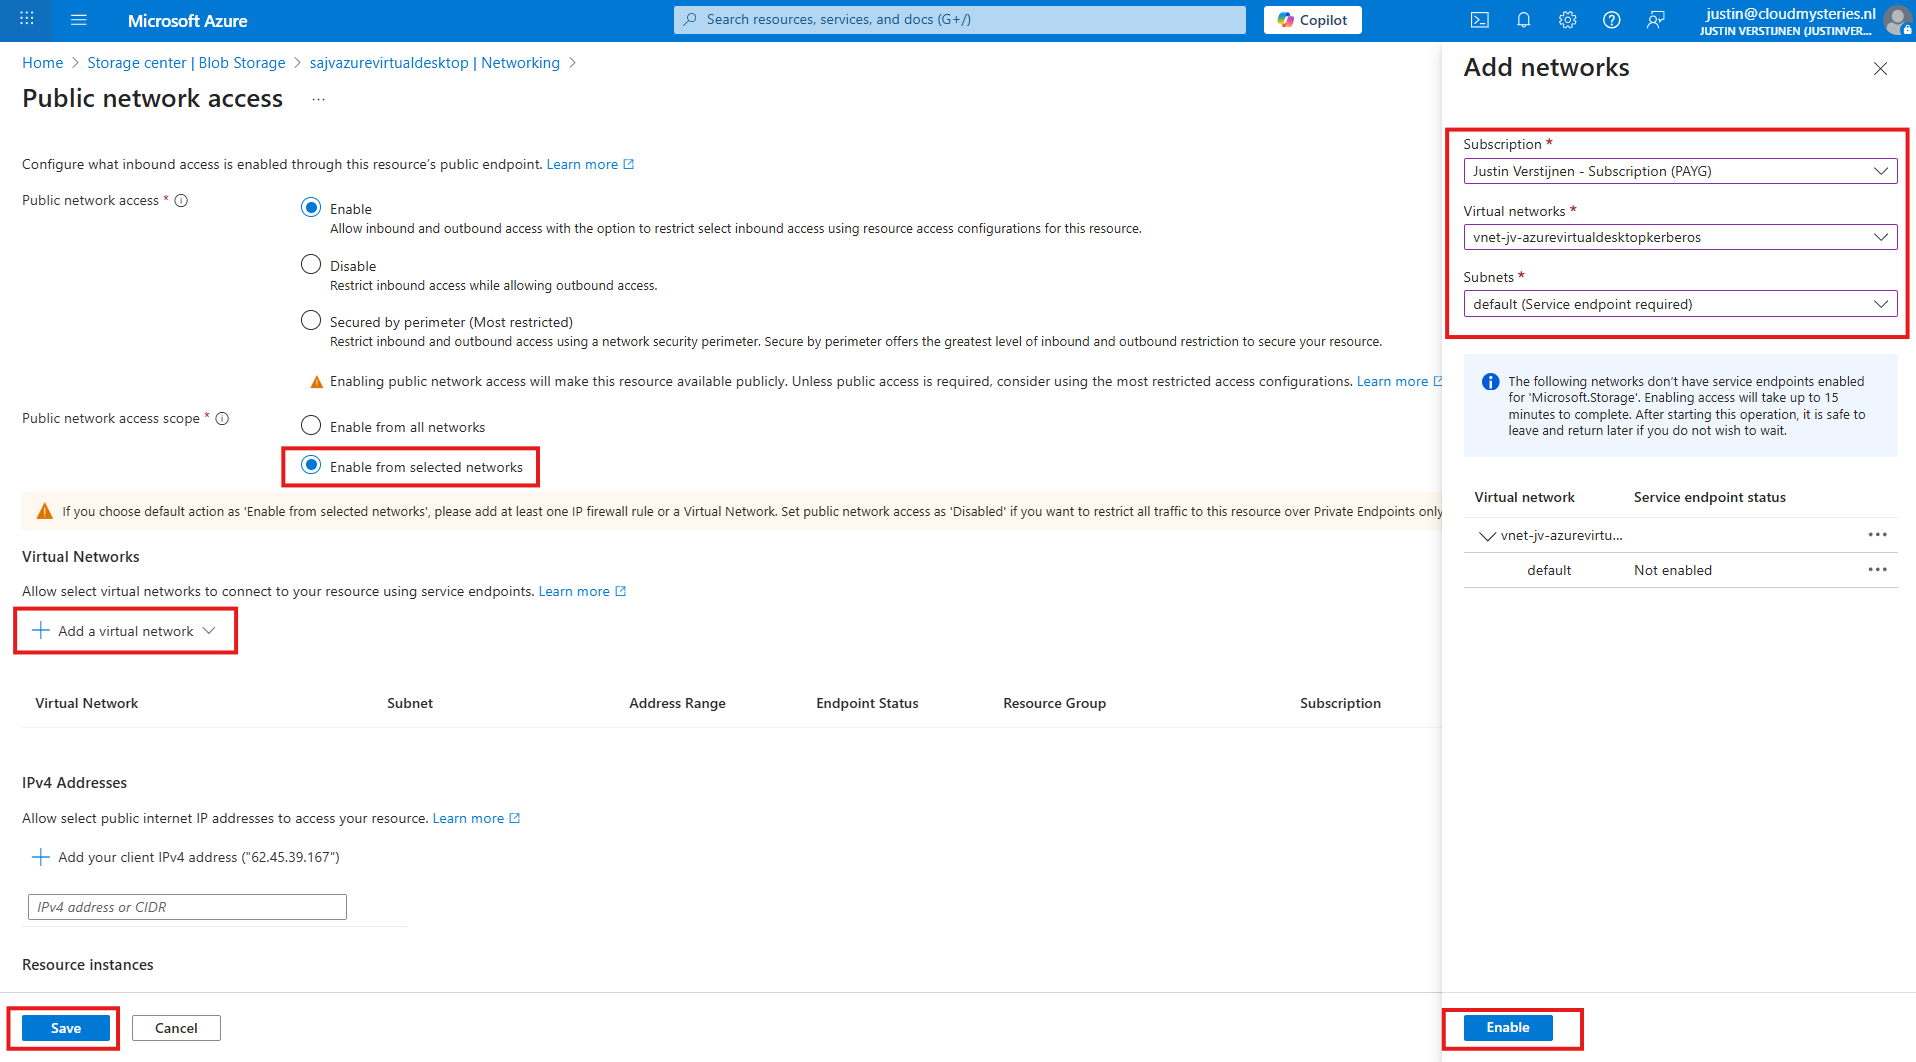
Click “Enable” to let Azure do some under the hood work (Creates a Service Endpoint for the AVD network to reach the Storage account).
Then click “Save” to limit access to your Storage Account only from your AVD hosts network.
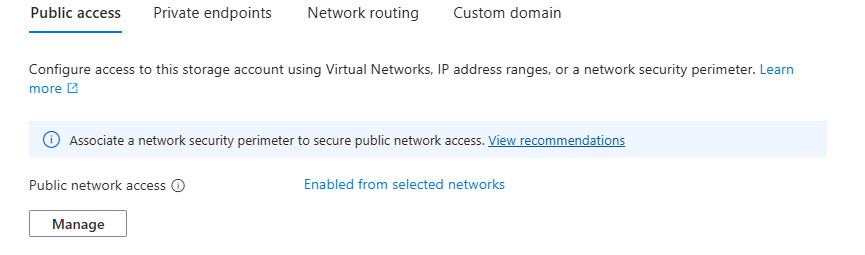
Configuring this shifts the option to “Enabled from selected networks”.
4: Create the File Share and Kerberos
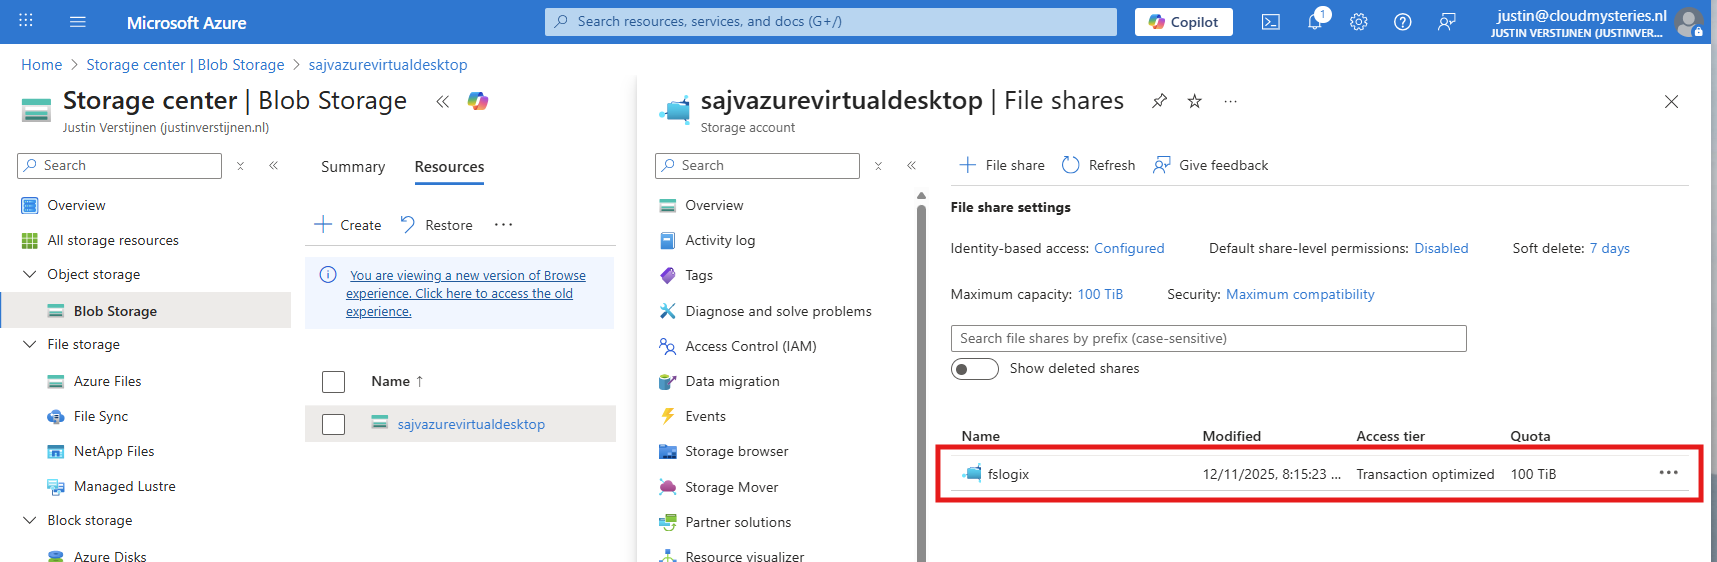
After creating, navigate to the storage account. We have to create a fileshare to place the FSLogix profiles.
Navigate to the storage account and create on “+ File share”.
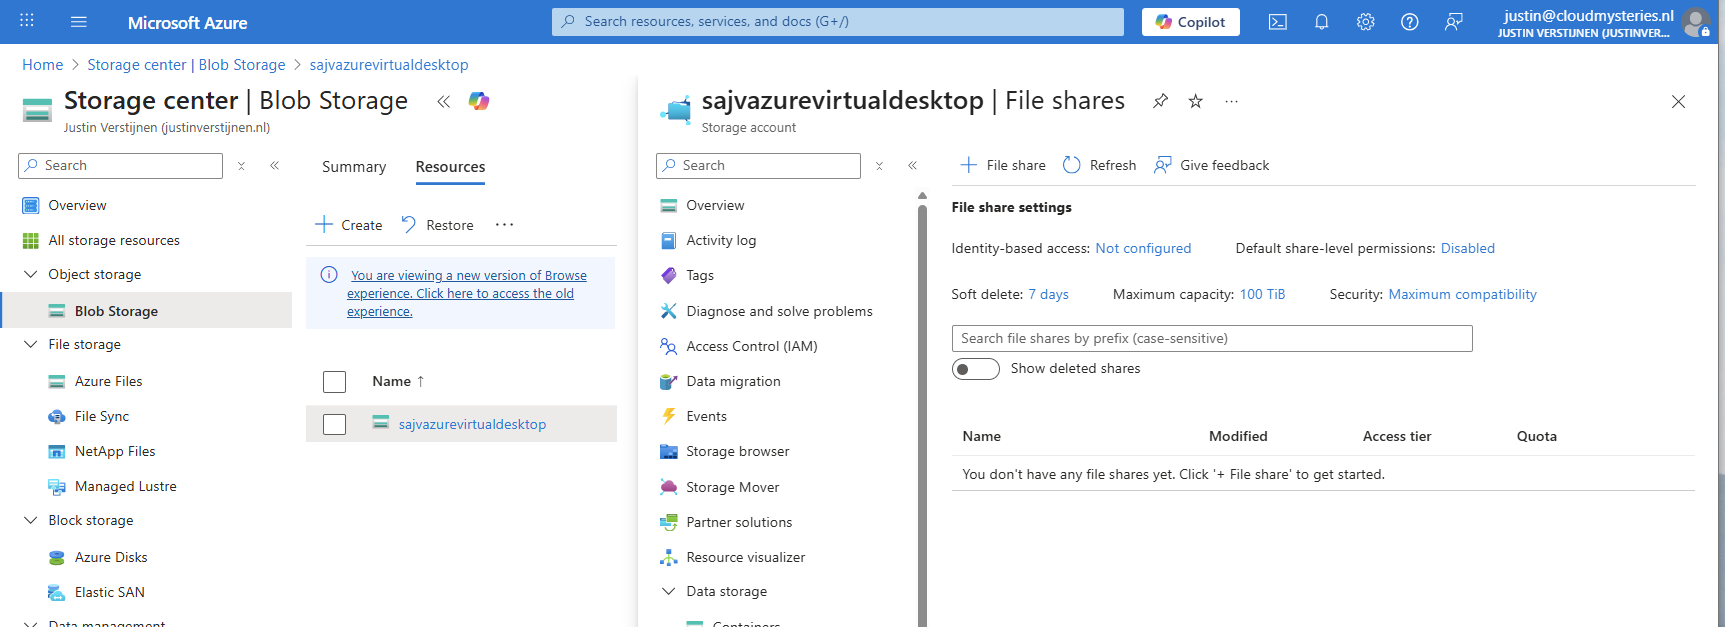
Give the file share a name and decide to use back-up or not. For production environments, this is highly recommended.
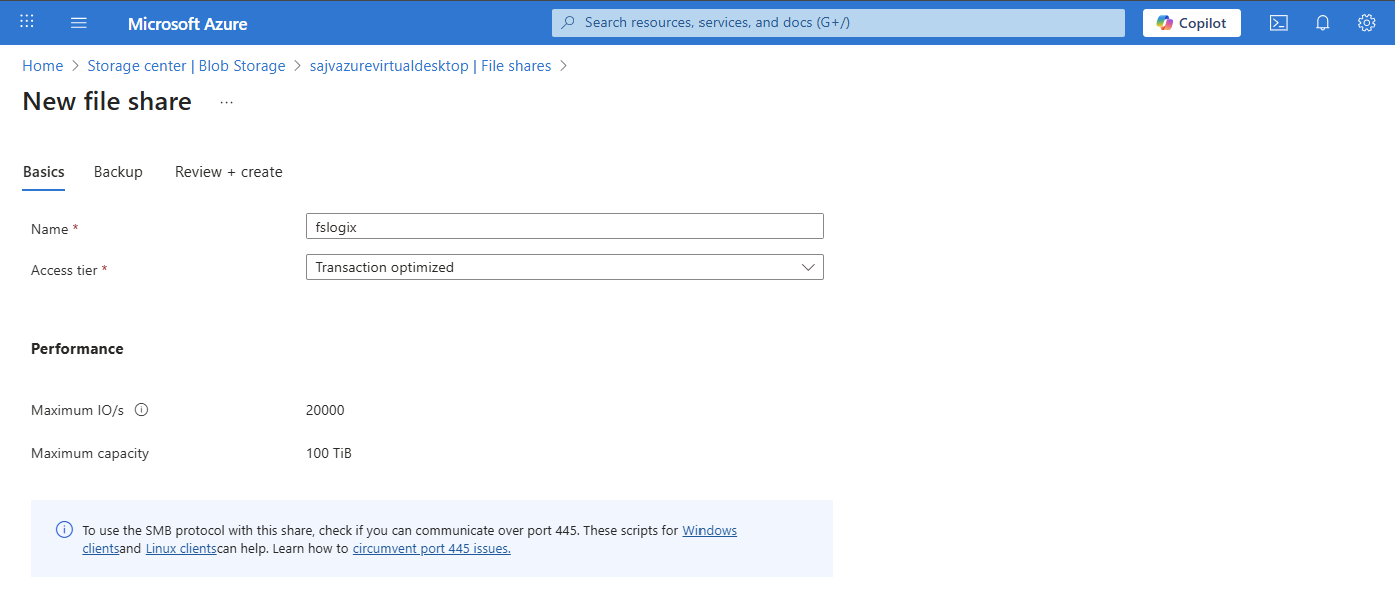
Finish the wizard to create the file share.
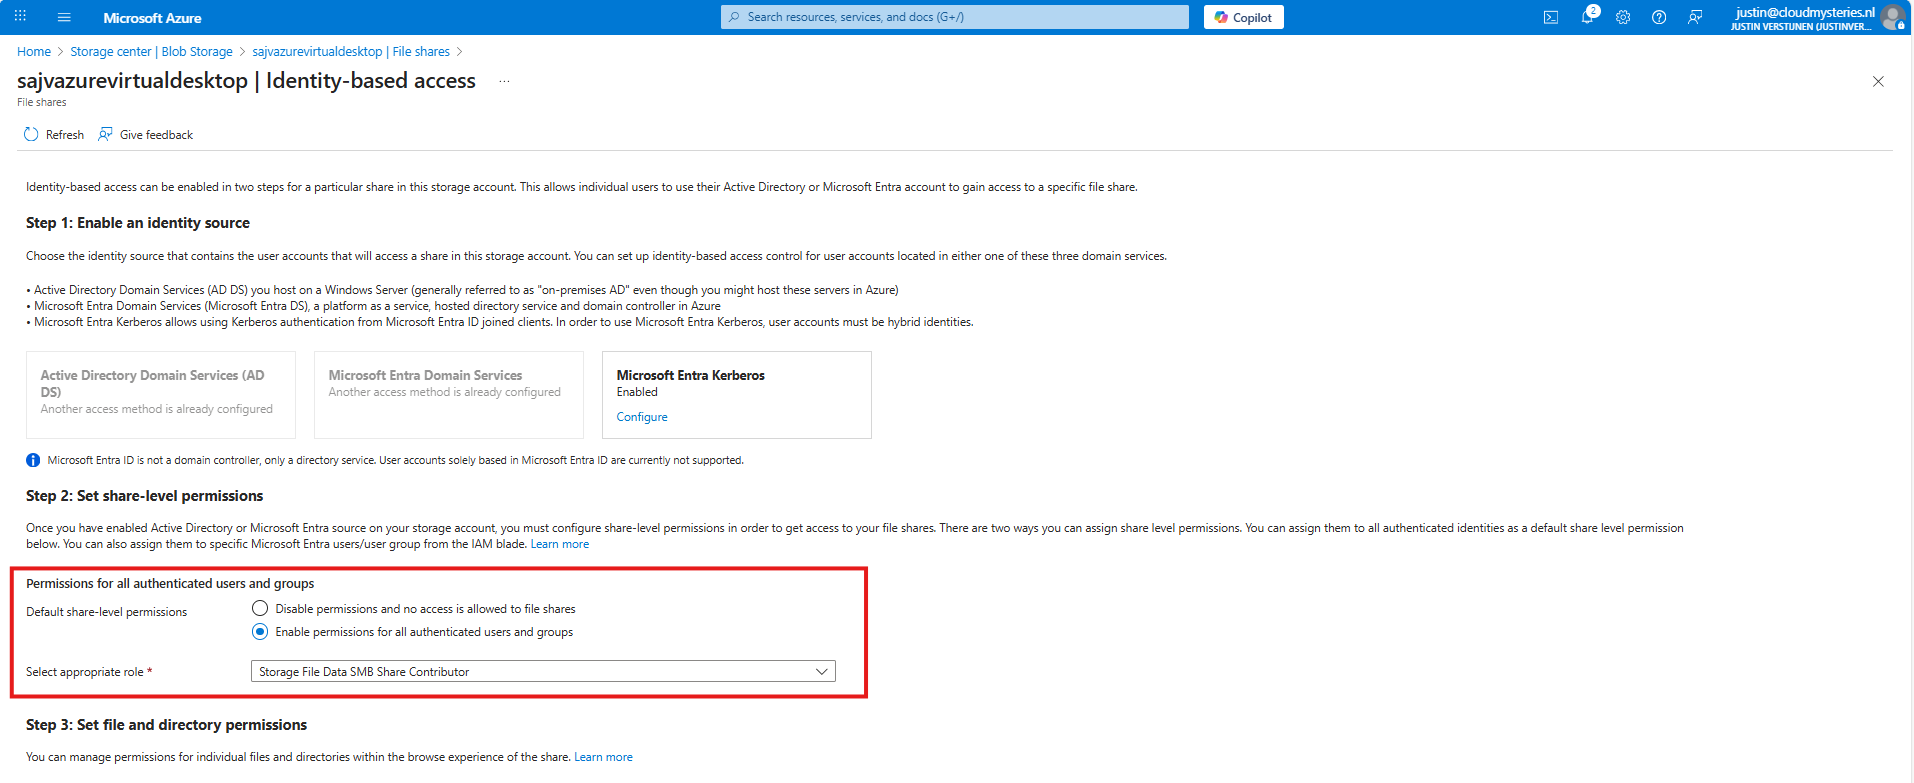
Now we have to configure the Microsoft Entra Authentication to authenticate against the file share. Go to the storage account, then “file shares” and then click on “Identity-based access”.
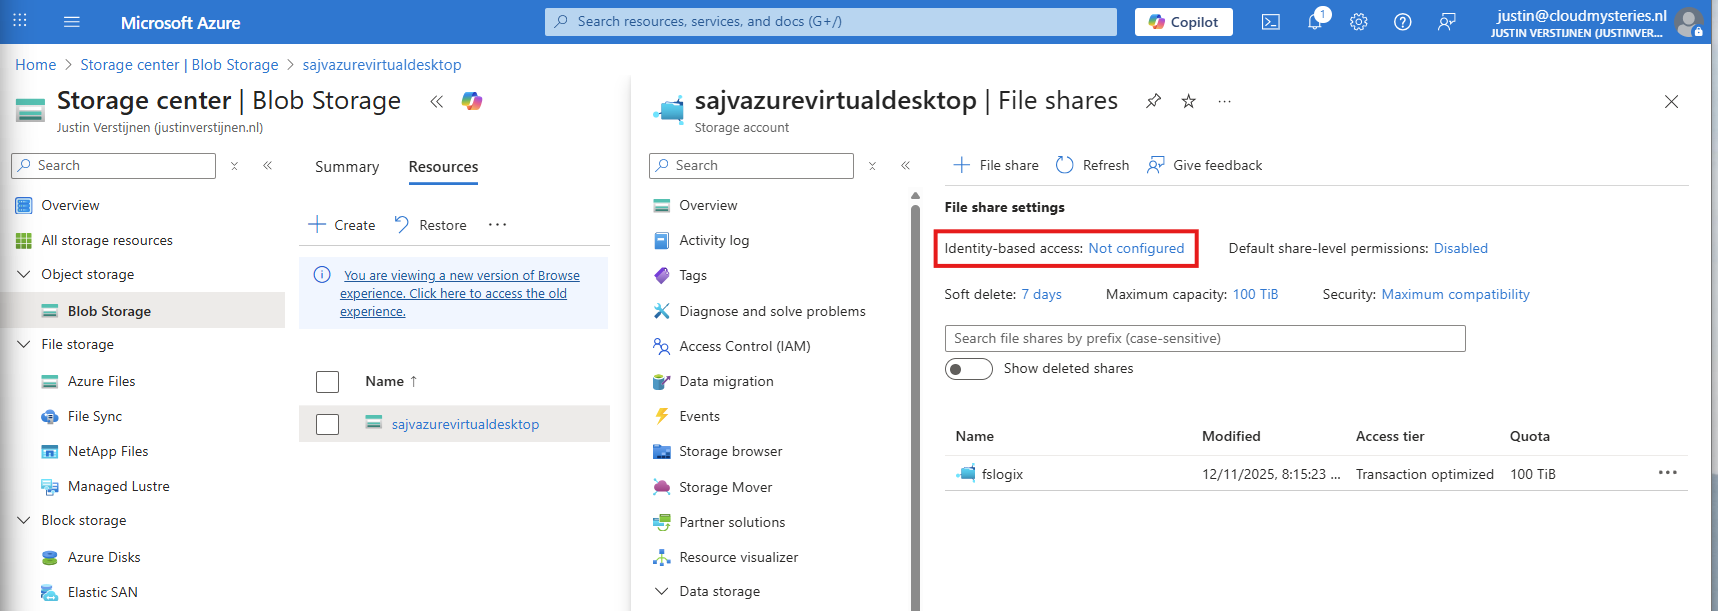
Select the option “Microsoft Entra Kerberos”.

Enable Microsoft Entra Kerberos on this window.
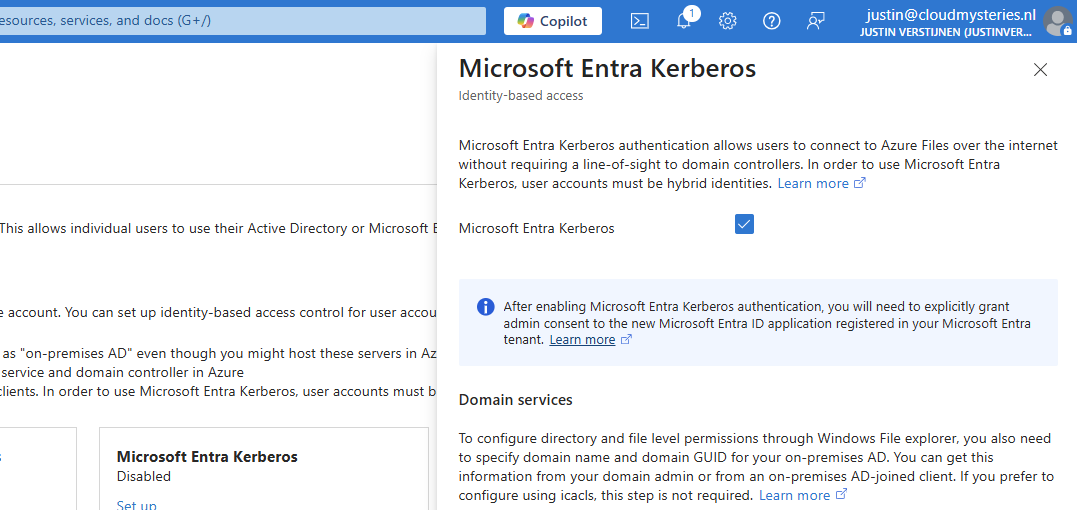
After enabling this option, save and wait for a few minutes.
Enabling this option will create a new App registration in your Entra ID.

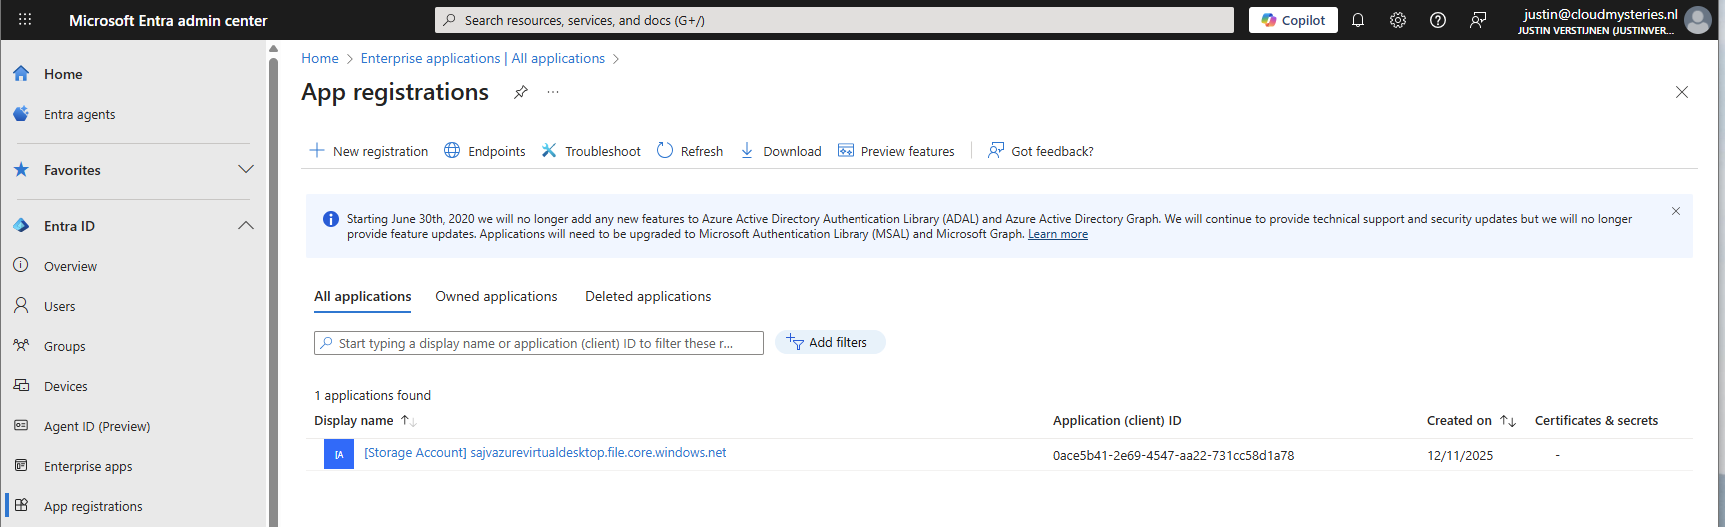
5: Configure the App registration
Now that we have enabled the Entra Kerberos option, an App registration will be created. This will be used as Service Principal for gaining access to the file share. This will be a layer between the user logging into Azure Virtual Desktop and the file share.
Go to the Microsoft Entra portal: https://entra.microsoft.com
Head to “App registrations” and open it. We need to give it some permissions as administrator.
Then head to “API permissions”.
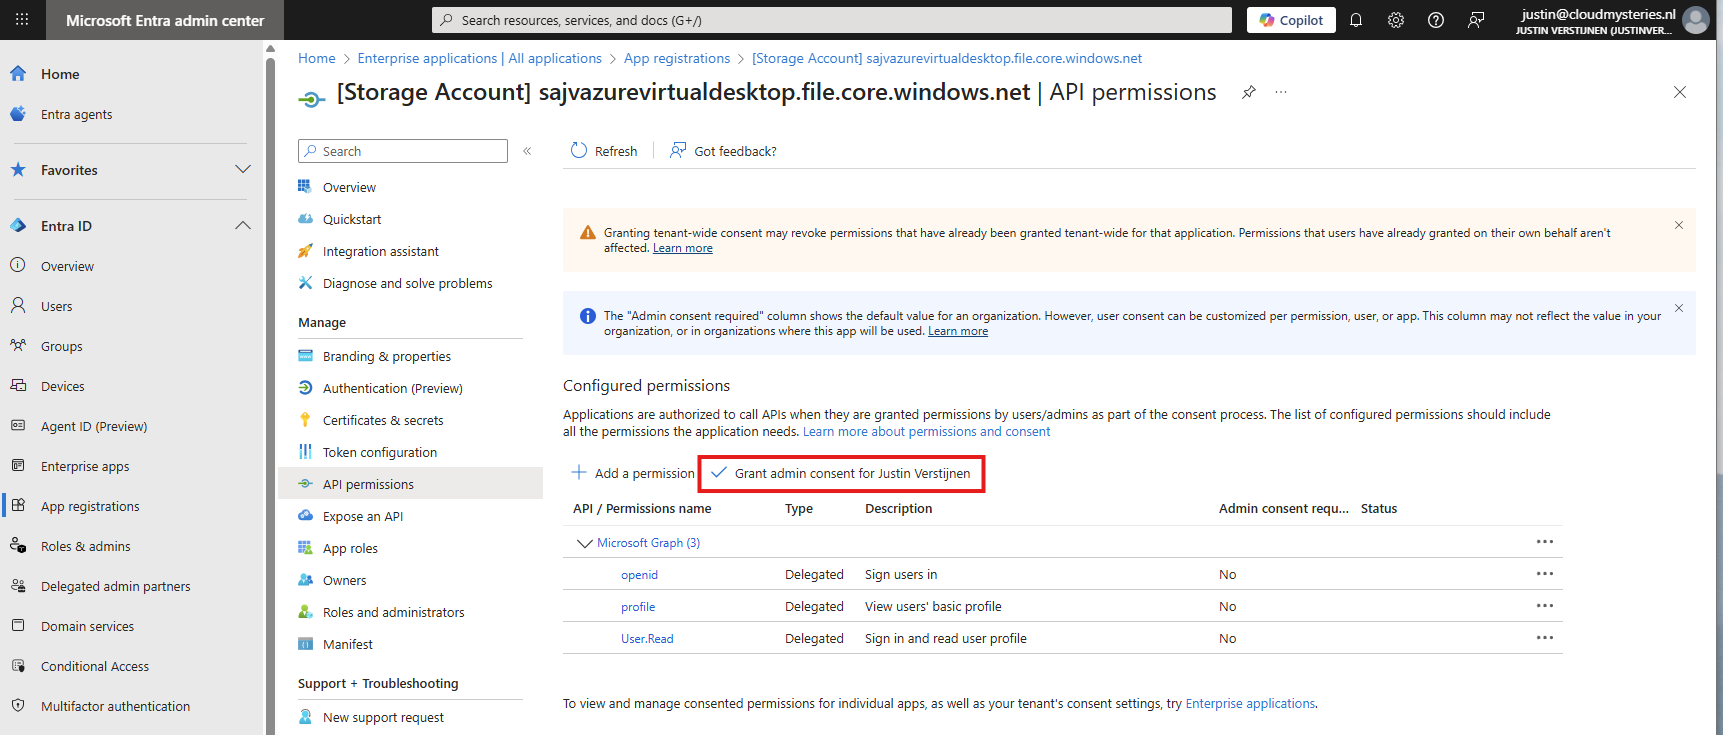
The required permissions are already filled in by Azure, but we need to grant admin consent as administrator. This means we tell Azure that it may read our users and can use it to sign in to the File share.

Click on “Yes” to accept the permissions.

Without granting access, the solution will not work. Even when it stated that admin consent is not required.
You also need to exclude the application from your Conditional Access policies. For every policy, add it as excluded resource:
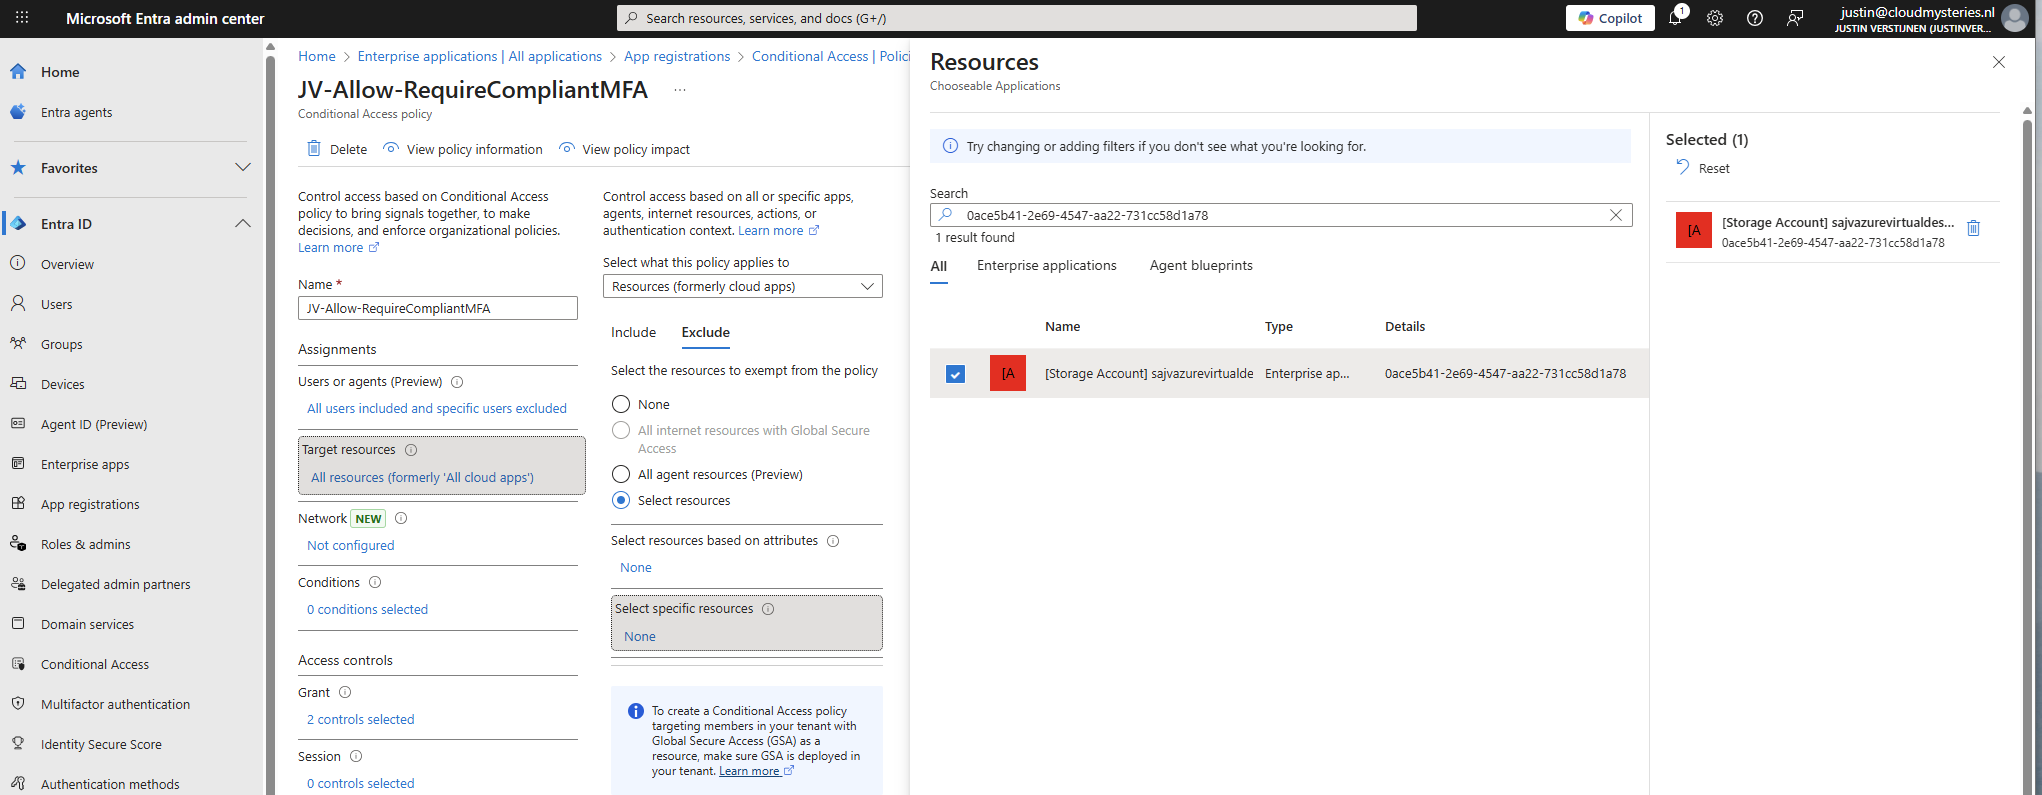
In my case, the name did not pop-up so I used the Application ID instead.
Add this to the excluded resource of every Conditional Access policy in your tenant to make sure this will not interrupt.
6: Configure storage permissions
To give users and this solution access to the storage account, we need to configure the permissions on our storage account. We will give the created security group SMB Contributor permissions to read and write the profile disks.
User permissions
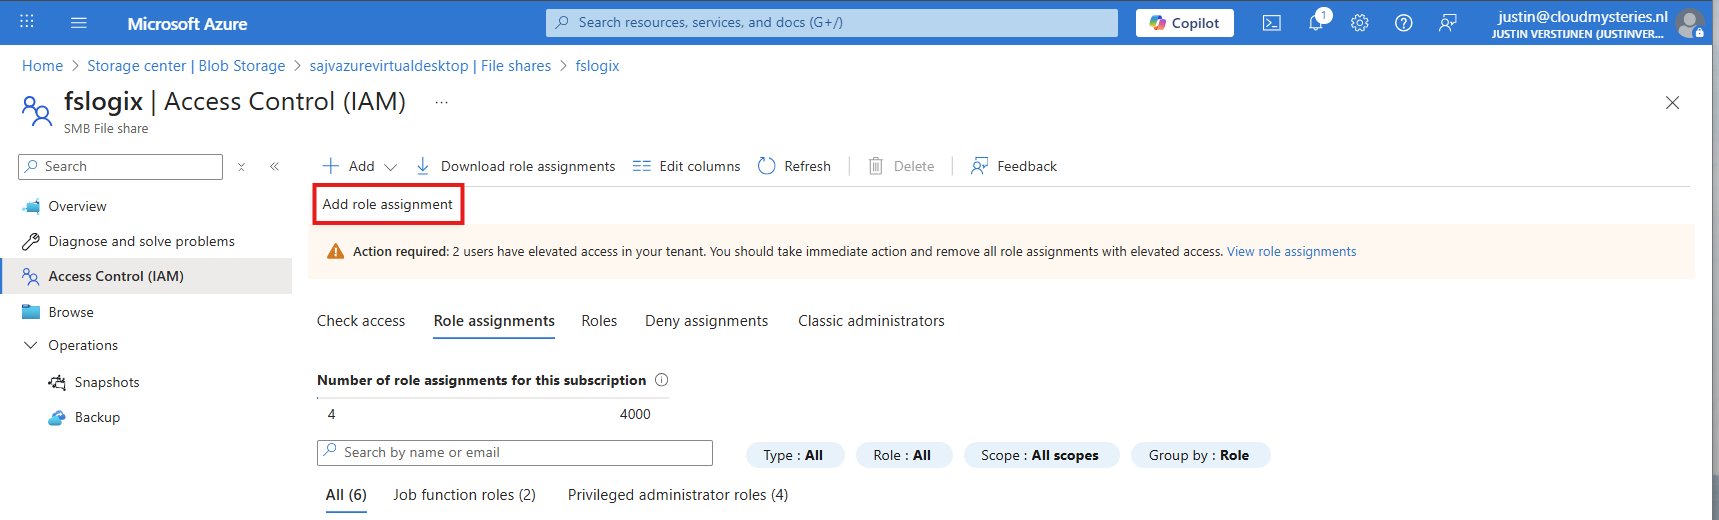
Go to the Storage account, then to the file share and open the file share. For narrow security, we will give only permissions on the file share we just created some steps earlier.
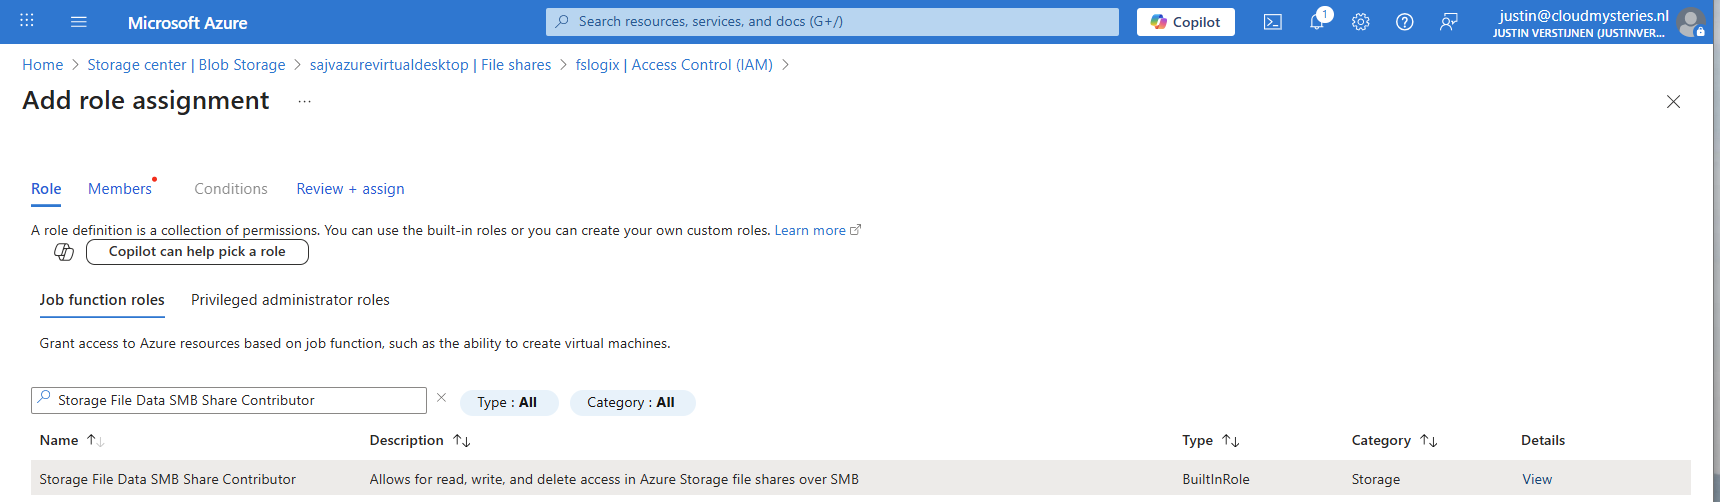
Open the file share and open the “Access Control (IAM)” blade and add a new role assignment.
Now search for the role named:
- Storage File Data SMB Share Contributor
This role gives read/write access to the file share, which is the SMB protocol. We will assign this role to our created security group.
Click “Next” to get to the “Members” tab.
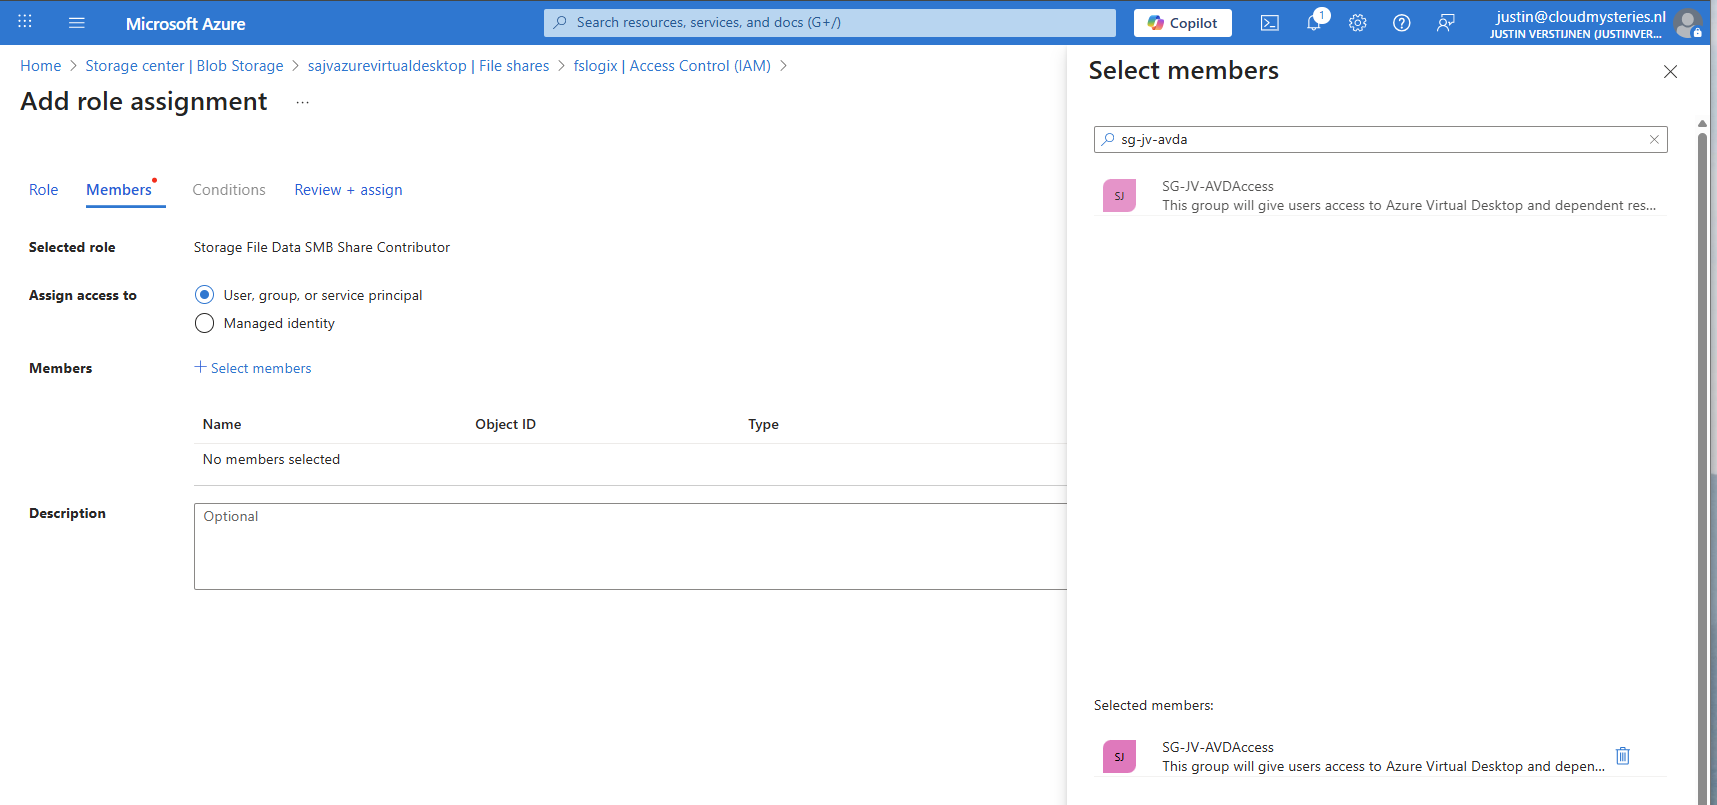
Search for your group and add it to the role. Then finish the wizard.
Administrator permissions
To view the profiles as administrator, we must give our accounts another role, this is to use Microsoft Entra authentication in the portal as we disabled the storage account key for security reasons.
Again, add a new role assignment:
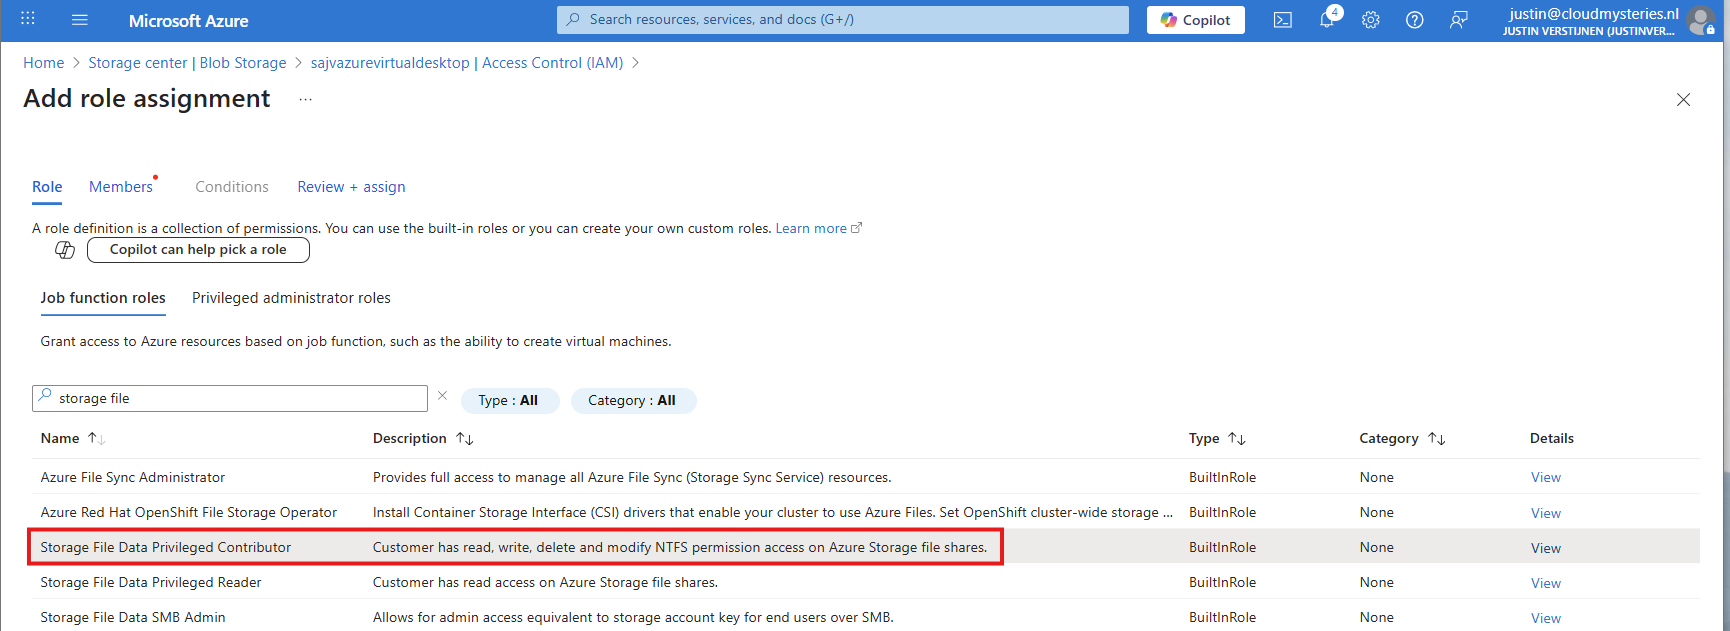
Search for the role: Storage File Data Privileged Contributor
Assign this to your administrator accounts:
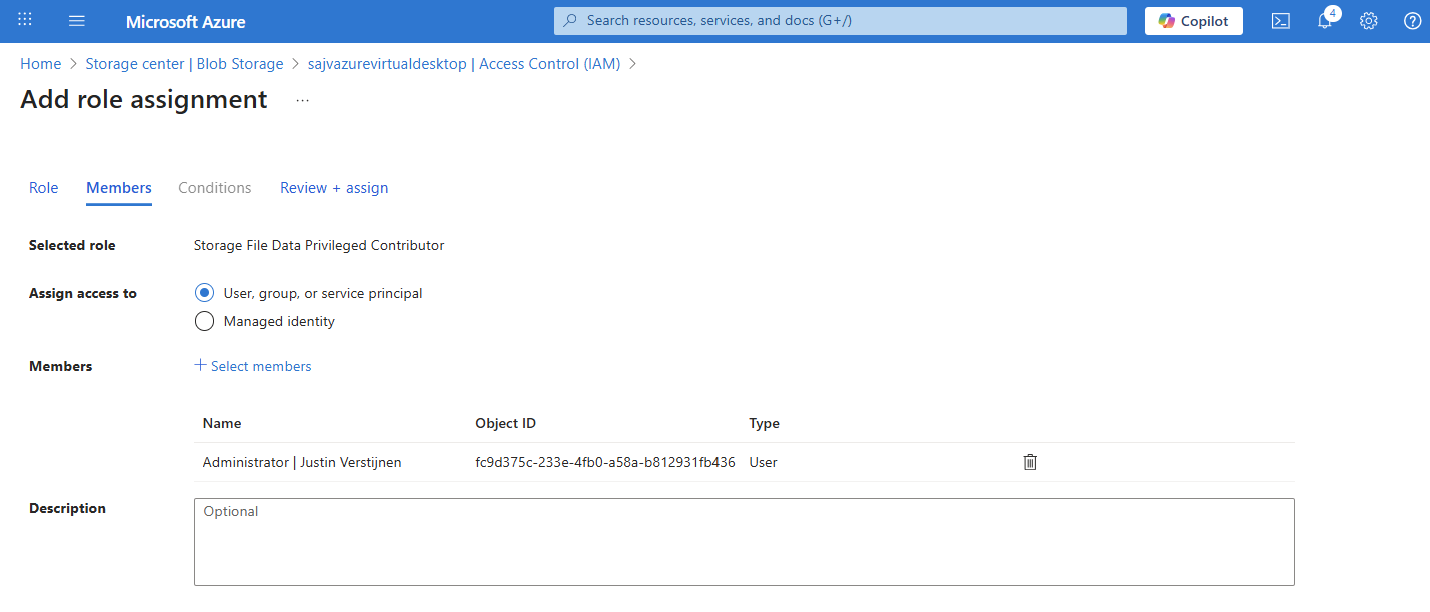
Finish the wizard to make the assignment active.
Default share-level permissions
We must also do one final configuration to the storage account permissions, and that is to set default share-level permissions. Is is a requirement of this Microsoft Entra Kerberos thing.
Go back to the storage account, click on FIle shares and then click on “Default share-level permissions”
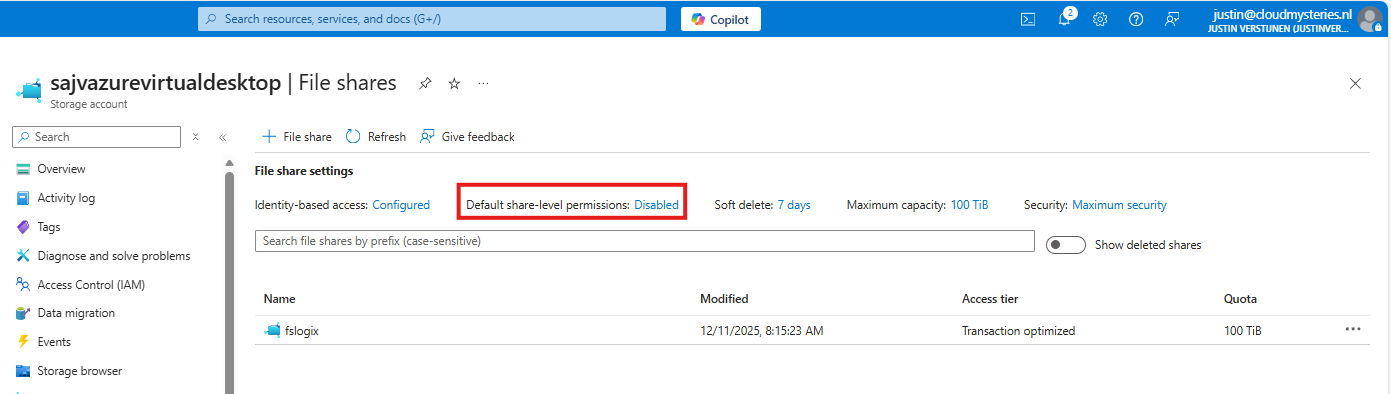
Set the share-level permissions to “Enable permissions for all authenticated users and groups”. Also select the “Storage File Data SMB Share Contributor” role, which includes read/write permissions.
Save the configuration, and we will now dive into the session host configuration part.
7: Intune configuration for AVD hosts
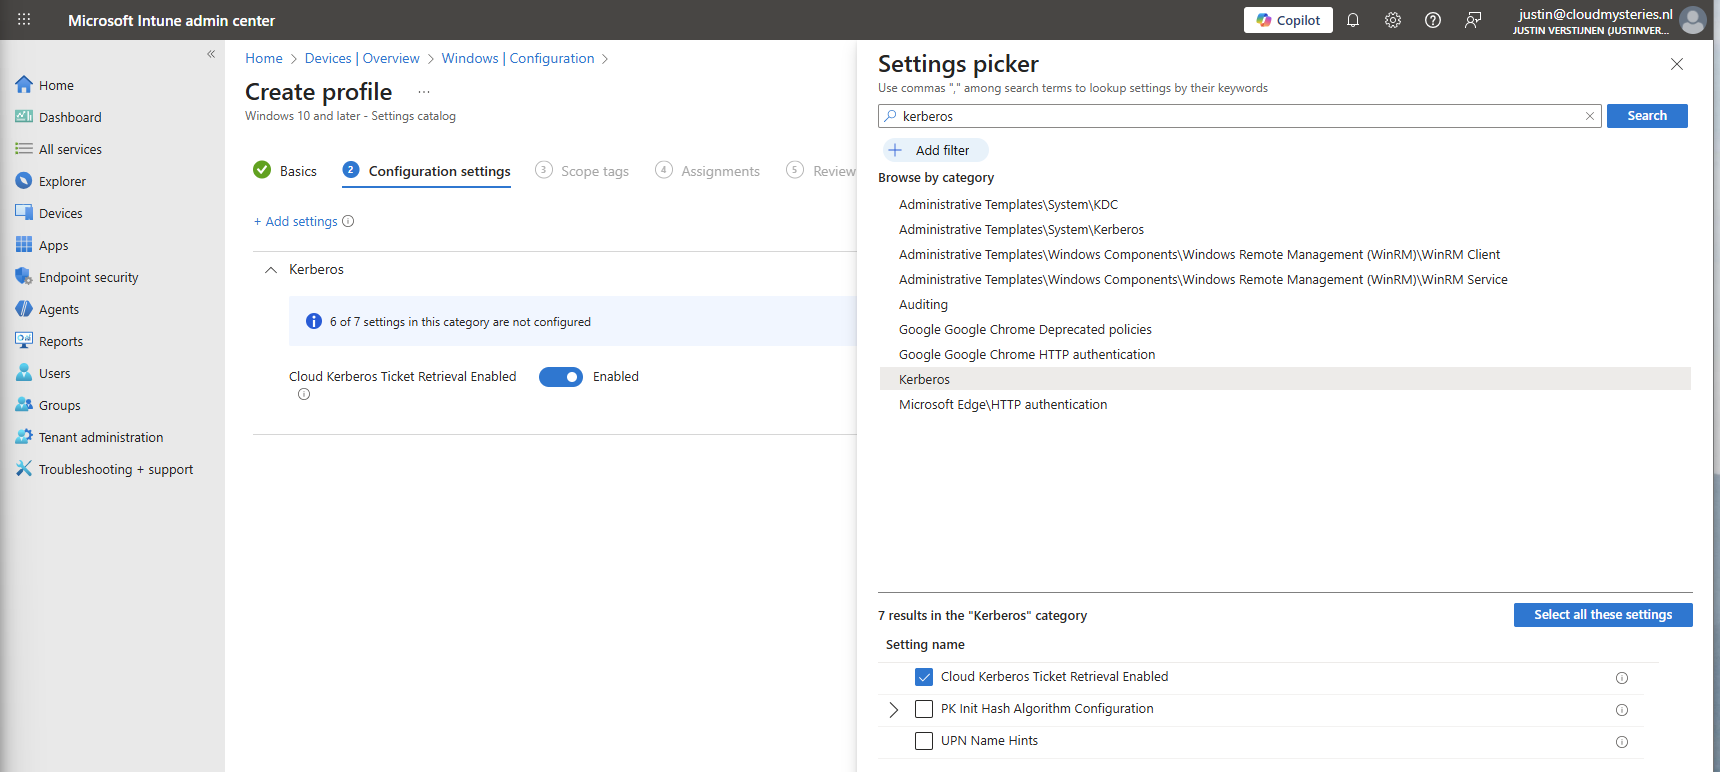
Now we need to configure the following setting for our AVD hosts in Intune:
- Kerberos Cloud Ticket Retrieval: This setting allows cloud devices to obtain Kerberos tickets from Microsoft Entra ID by using cloud credentials to use against SMB file shares
Go to the Intune Admin center (https://intune.microsoft.com). We need to create or change an existing configuration policy.
Search for “Kerberos” and search for the “Cloud Kerberos Ticket Retrieval” option and enable it.
Then assign the configuration policy to your AVD hosts to apply this configuration.
8: FSLogix configuration
We can now configure FSLogix in Intune. I do this by using configuration profiles from settings catalogs. These are easy to configure and can be imported and exported.
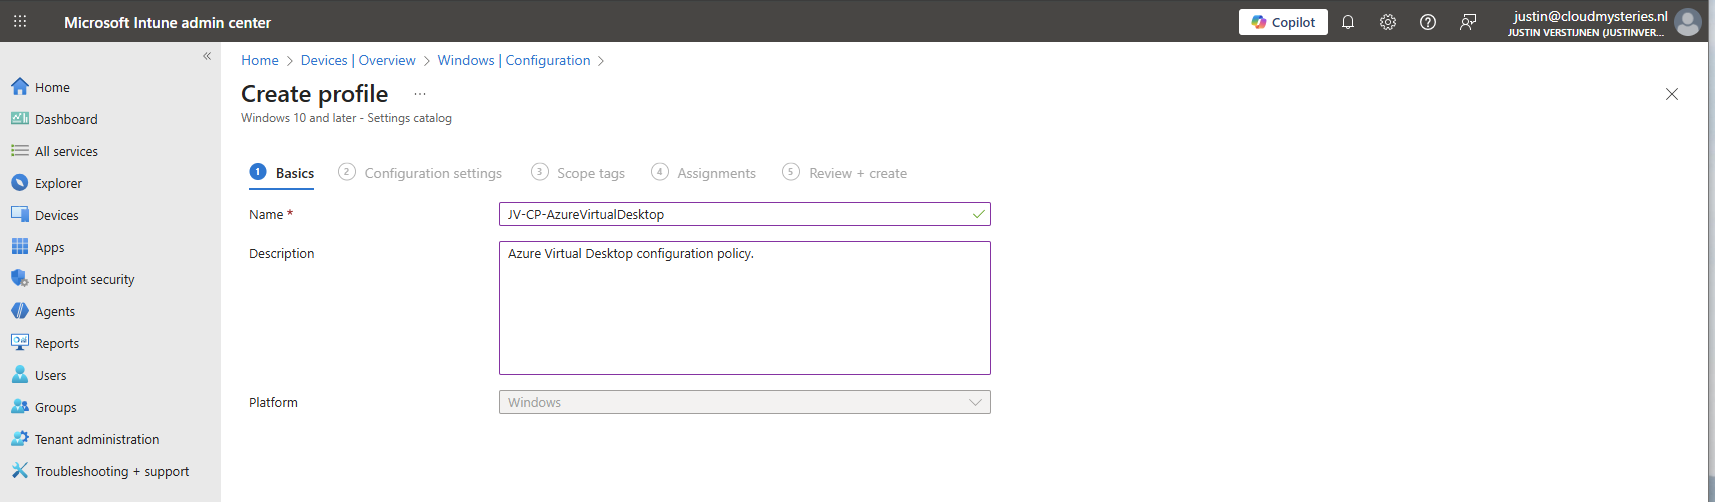
To configure this create a new configuration template from scratch for Windows 10 and higher and use the “Settings catalog”.
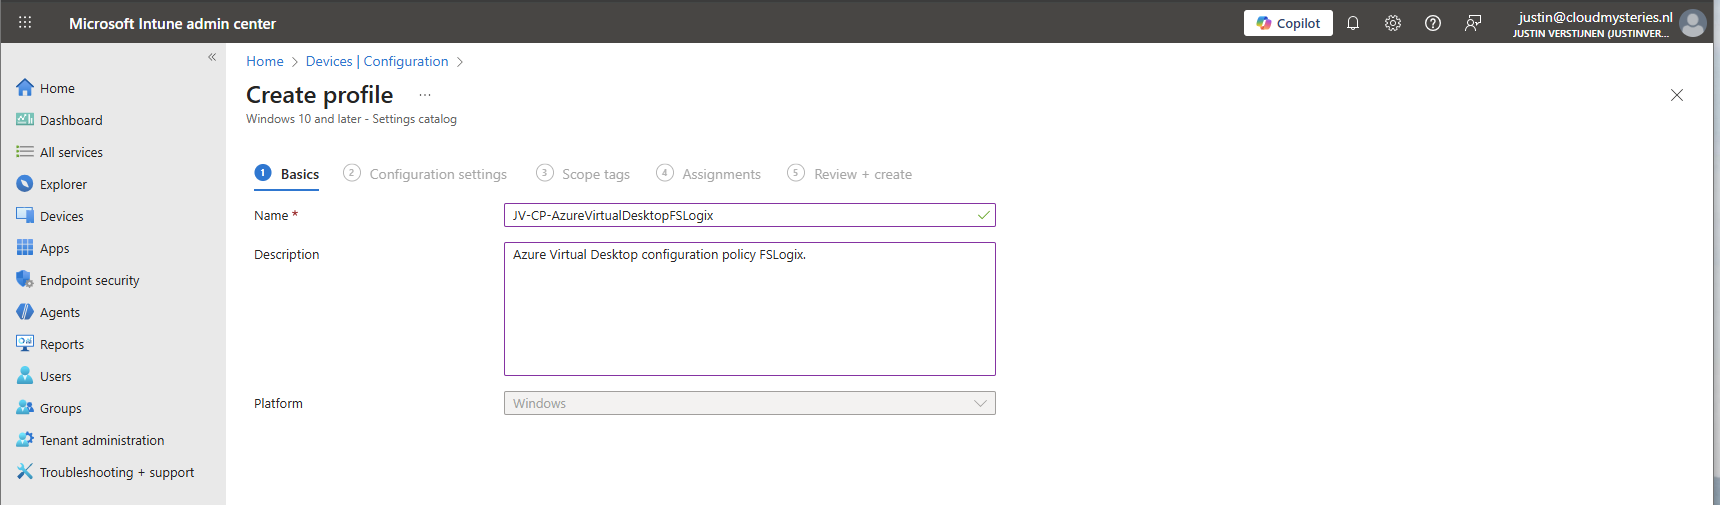
Give the profile a name and description and advance.
Click on “Add settings” and navigate to the FSLogix policy settings.
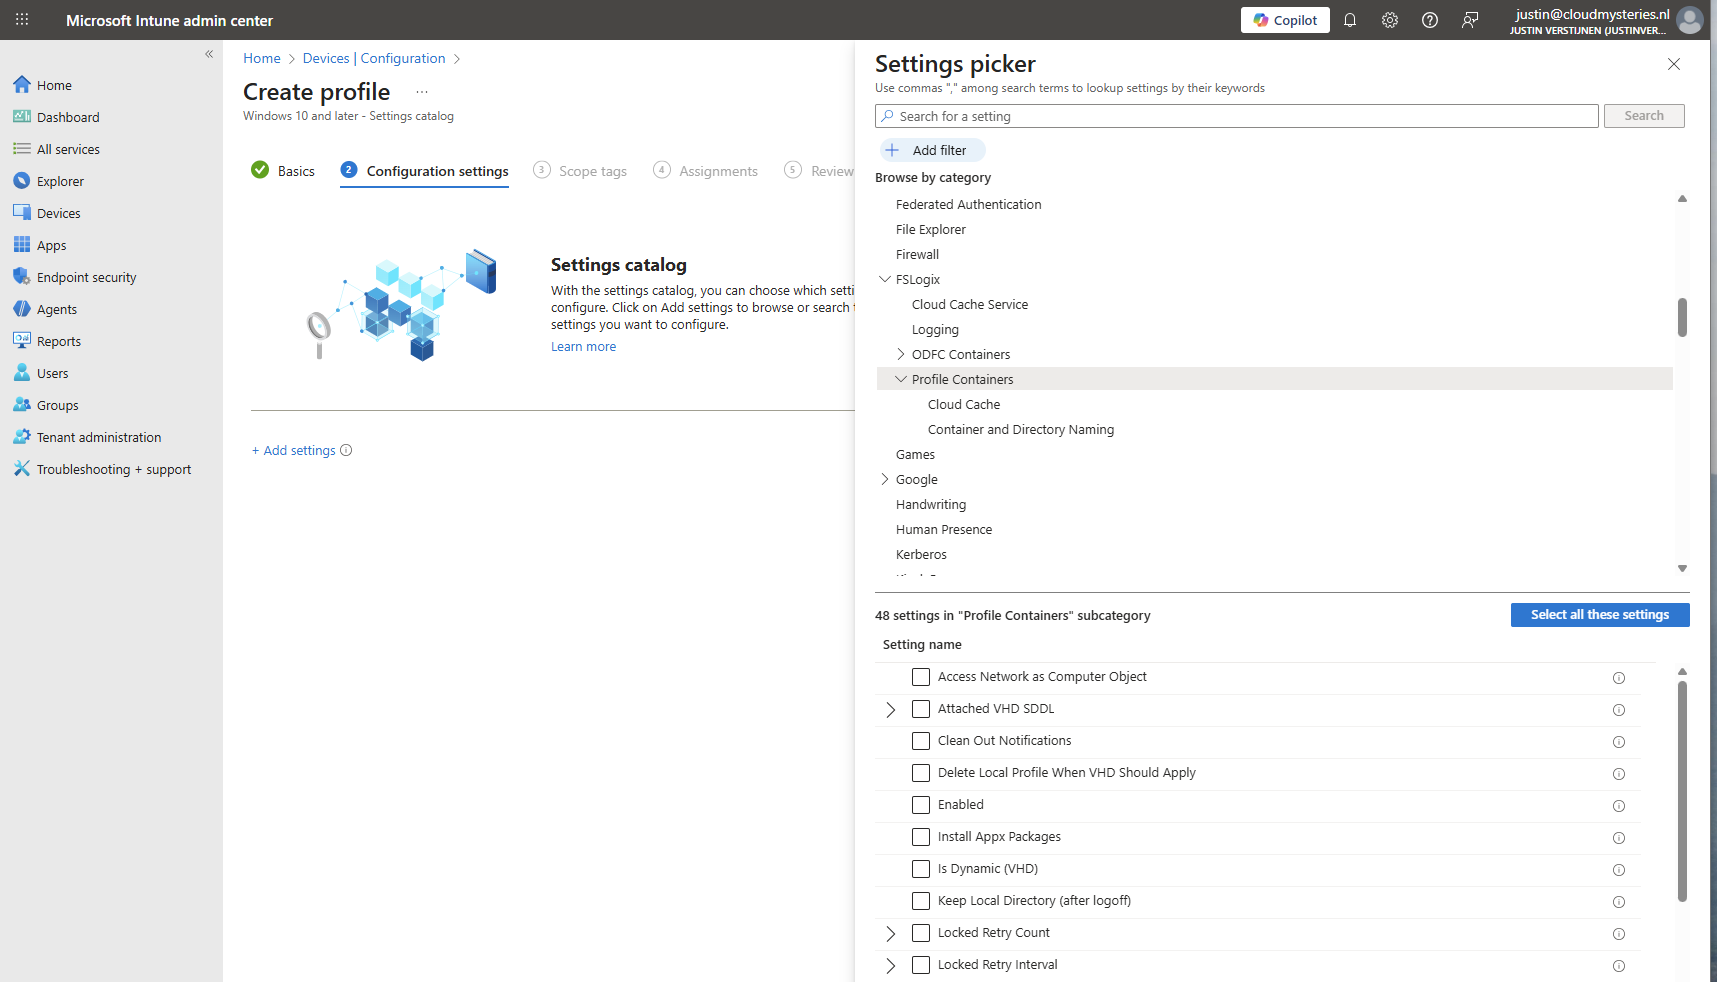
Profile Container settings
Under FSLogix -> Profile Containers, select the following settings, enable them and configure them:
| etting name | Value |
| Access Network as Computer Object | Disabled |
| Delete Local Profile When VHD Should Apply | Enabled |
| Enabled | Enabled |
| Is Dynamic (VHD) | Enabled |
| Keep Local Directory (after logoff) | Enabled |
| Prevent Login With Failure | Enabled |
| Roam Identity | Enabled |
| Roam Search | Disabled |
| VHD Locations | Your storage account and share in UNC. Mine is here: \sajvazurevirtualdesktop.file.core.windows.net\fslogix |
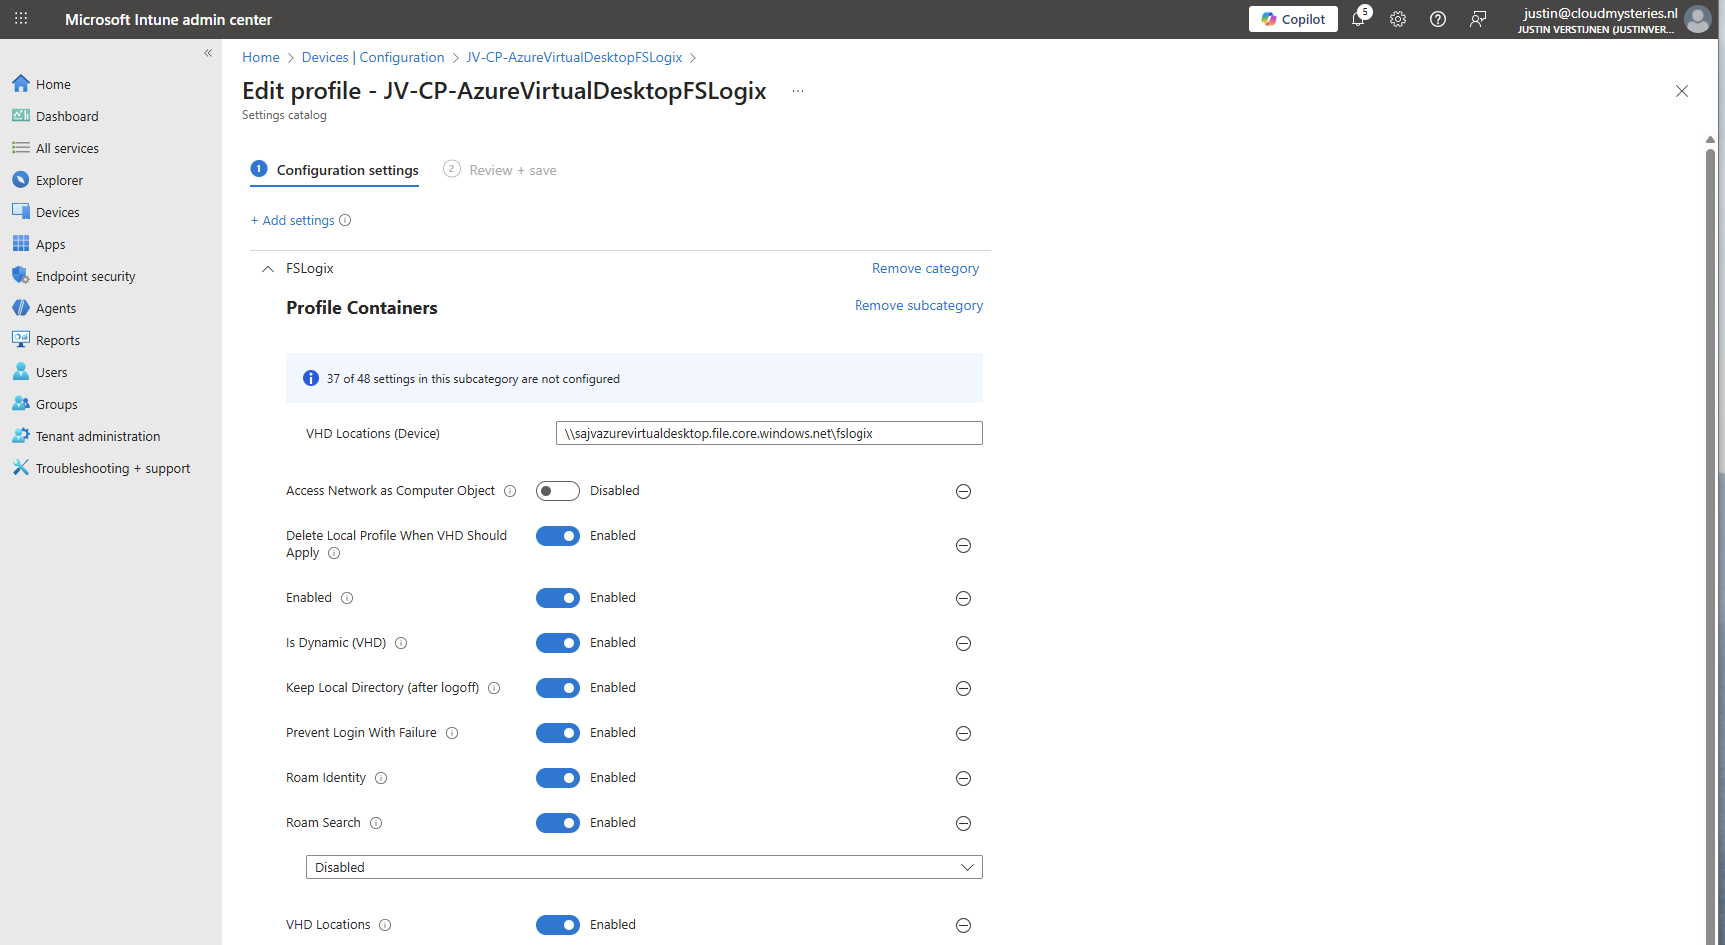
Make sure the option “Access Network as Computer Object” is Disabled, as this is a requirement for user authentication. Otherwise the solution will not work and sign in will result in a FSLogix “Error code: 0x000000035, Message: Impossibile to find network path” error.
Container naming settings
Under FSLogix -> Profile Containers -> Container and Directory Naming, select the following settings, enable them and configure them:
| Setting name | Value |
| No Profile Containing Folder | Enable |
| VHD Name Match | %username% |
| VHD Name Pattern | %username% |
| Volume Type (VHD or VHDX) | VHDX |
You can change this configuration to fit your needs, this is purely how I configured FSLogix to keep the configuration as simple and effective as possible.
Save the policy and assign this to your AVD hosts.
9: Preparing the hostpool
We need to do some small final configurations, gaining access to the virtual desktops by giving the permissions.
Go to the hostpool and then to Application Groups.
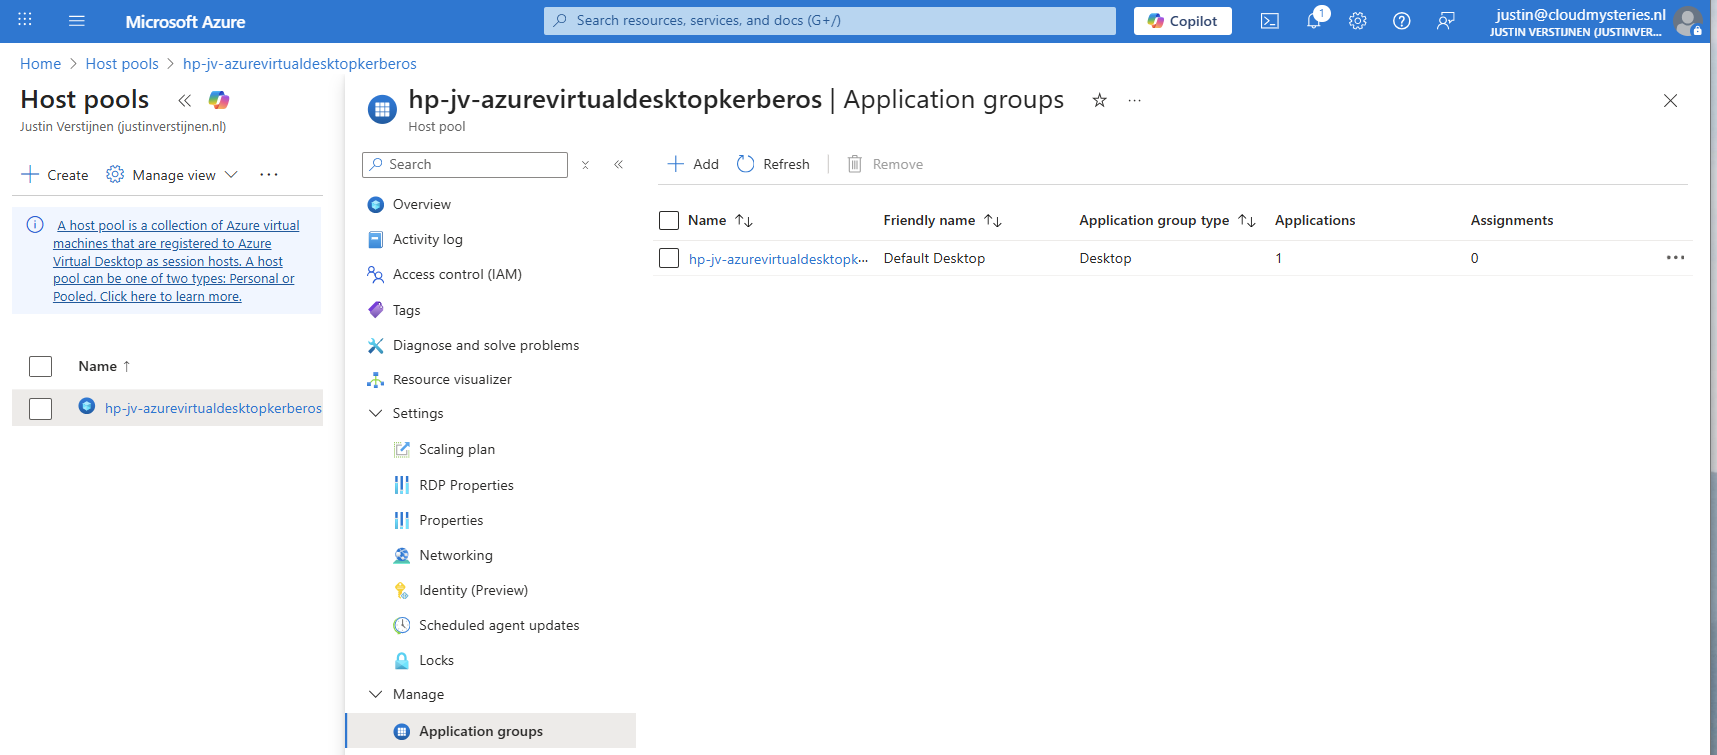
Then open the application group that contains the desktop. Then click on “Assignments”.
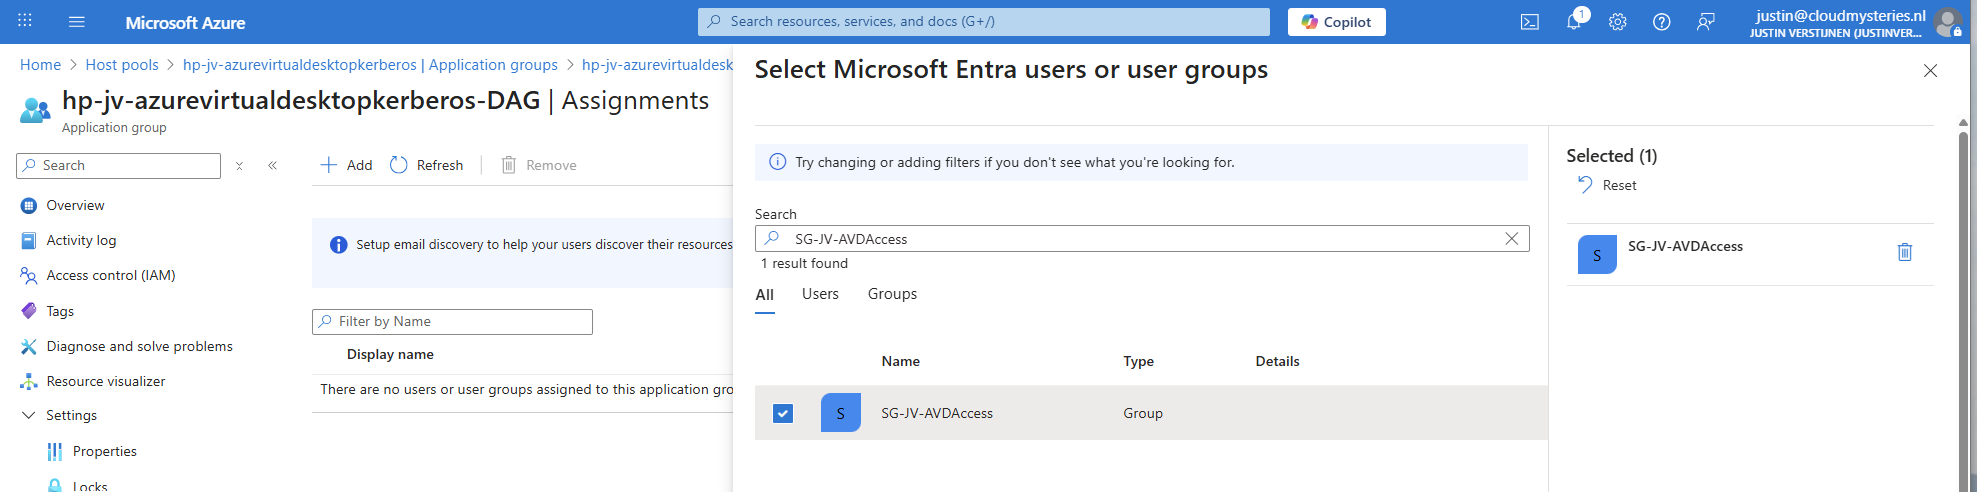
Select the group to give desktop access to the users. Then save the assignment.
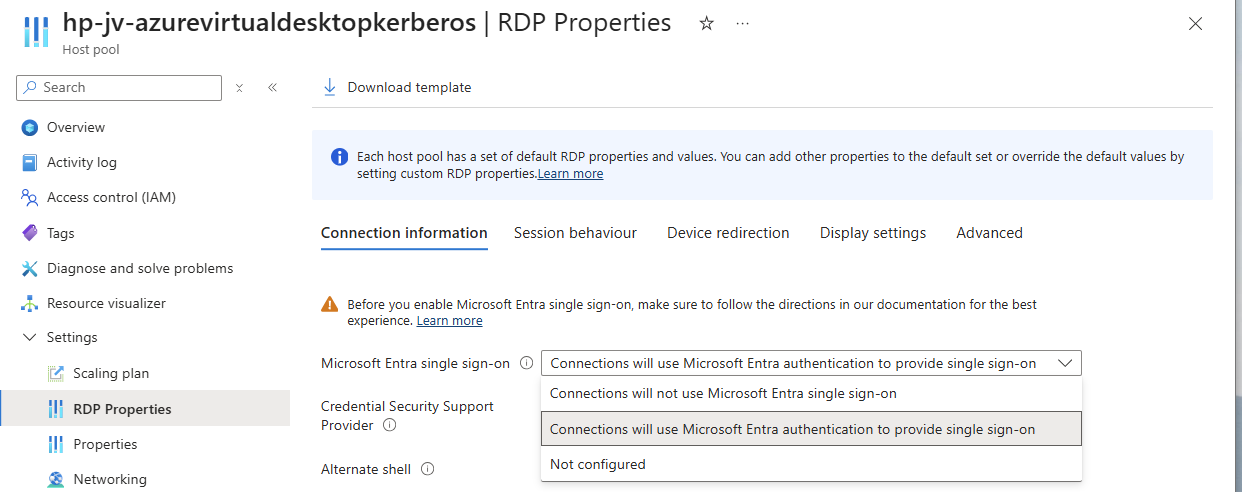
After assigning the group we would have to do one last configuration, enabling Single Sign On on the hostpool. Go to your hostpool and open the RDP Properties
For a comprehensive guide about Azure Virtual Desktop and RDP Properties, visit: https://justinverstijnen.nl/azure-virtual-desktop-rdp-properties/
On the “Connection Information” tab, select the “Microsoft Entra single sign-on” option and set this to provide single sign-on. Then save the configuration.
At this point, my advanced RSP Properties configuration is:
drivestoredirect:s:;usbdevicestoredirect:s:;redirectclipboard:i:0;redirectprinters:i:0;audiomode:i:0;videoplaybackmode:i:1;devicestoredirect:s:*;redirectcomports:i:1;redirectsmartcards:i:1;enablecredsspsupport:i:1;redirectwebauthn:i:1;use multimon:i:1;enablerdsaadauth:i:110: Connecting to the hostpool
Now we have everything ready under the hood, we can finally connect to our hostpool. Download the Windows App or use the webclient and sign into your account:
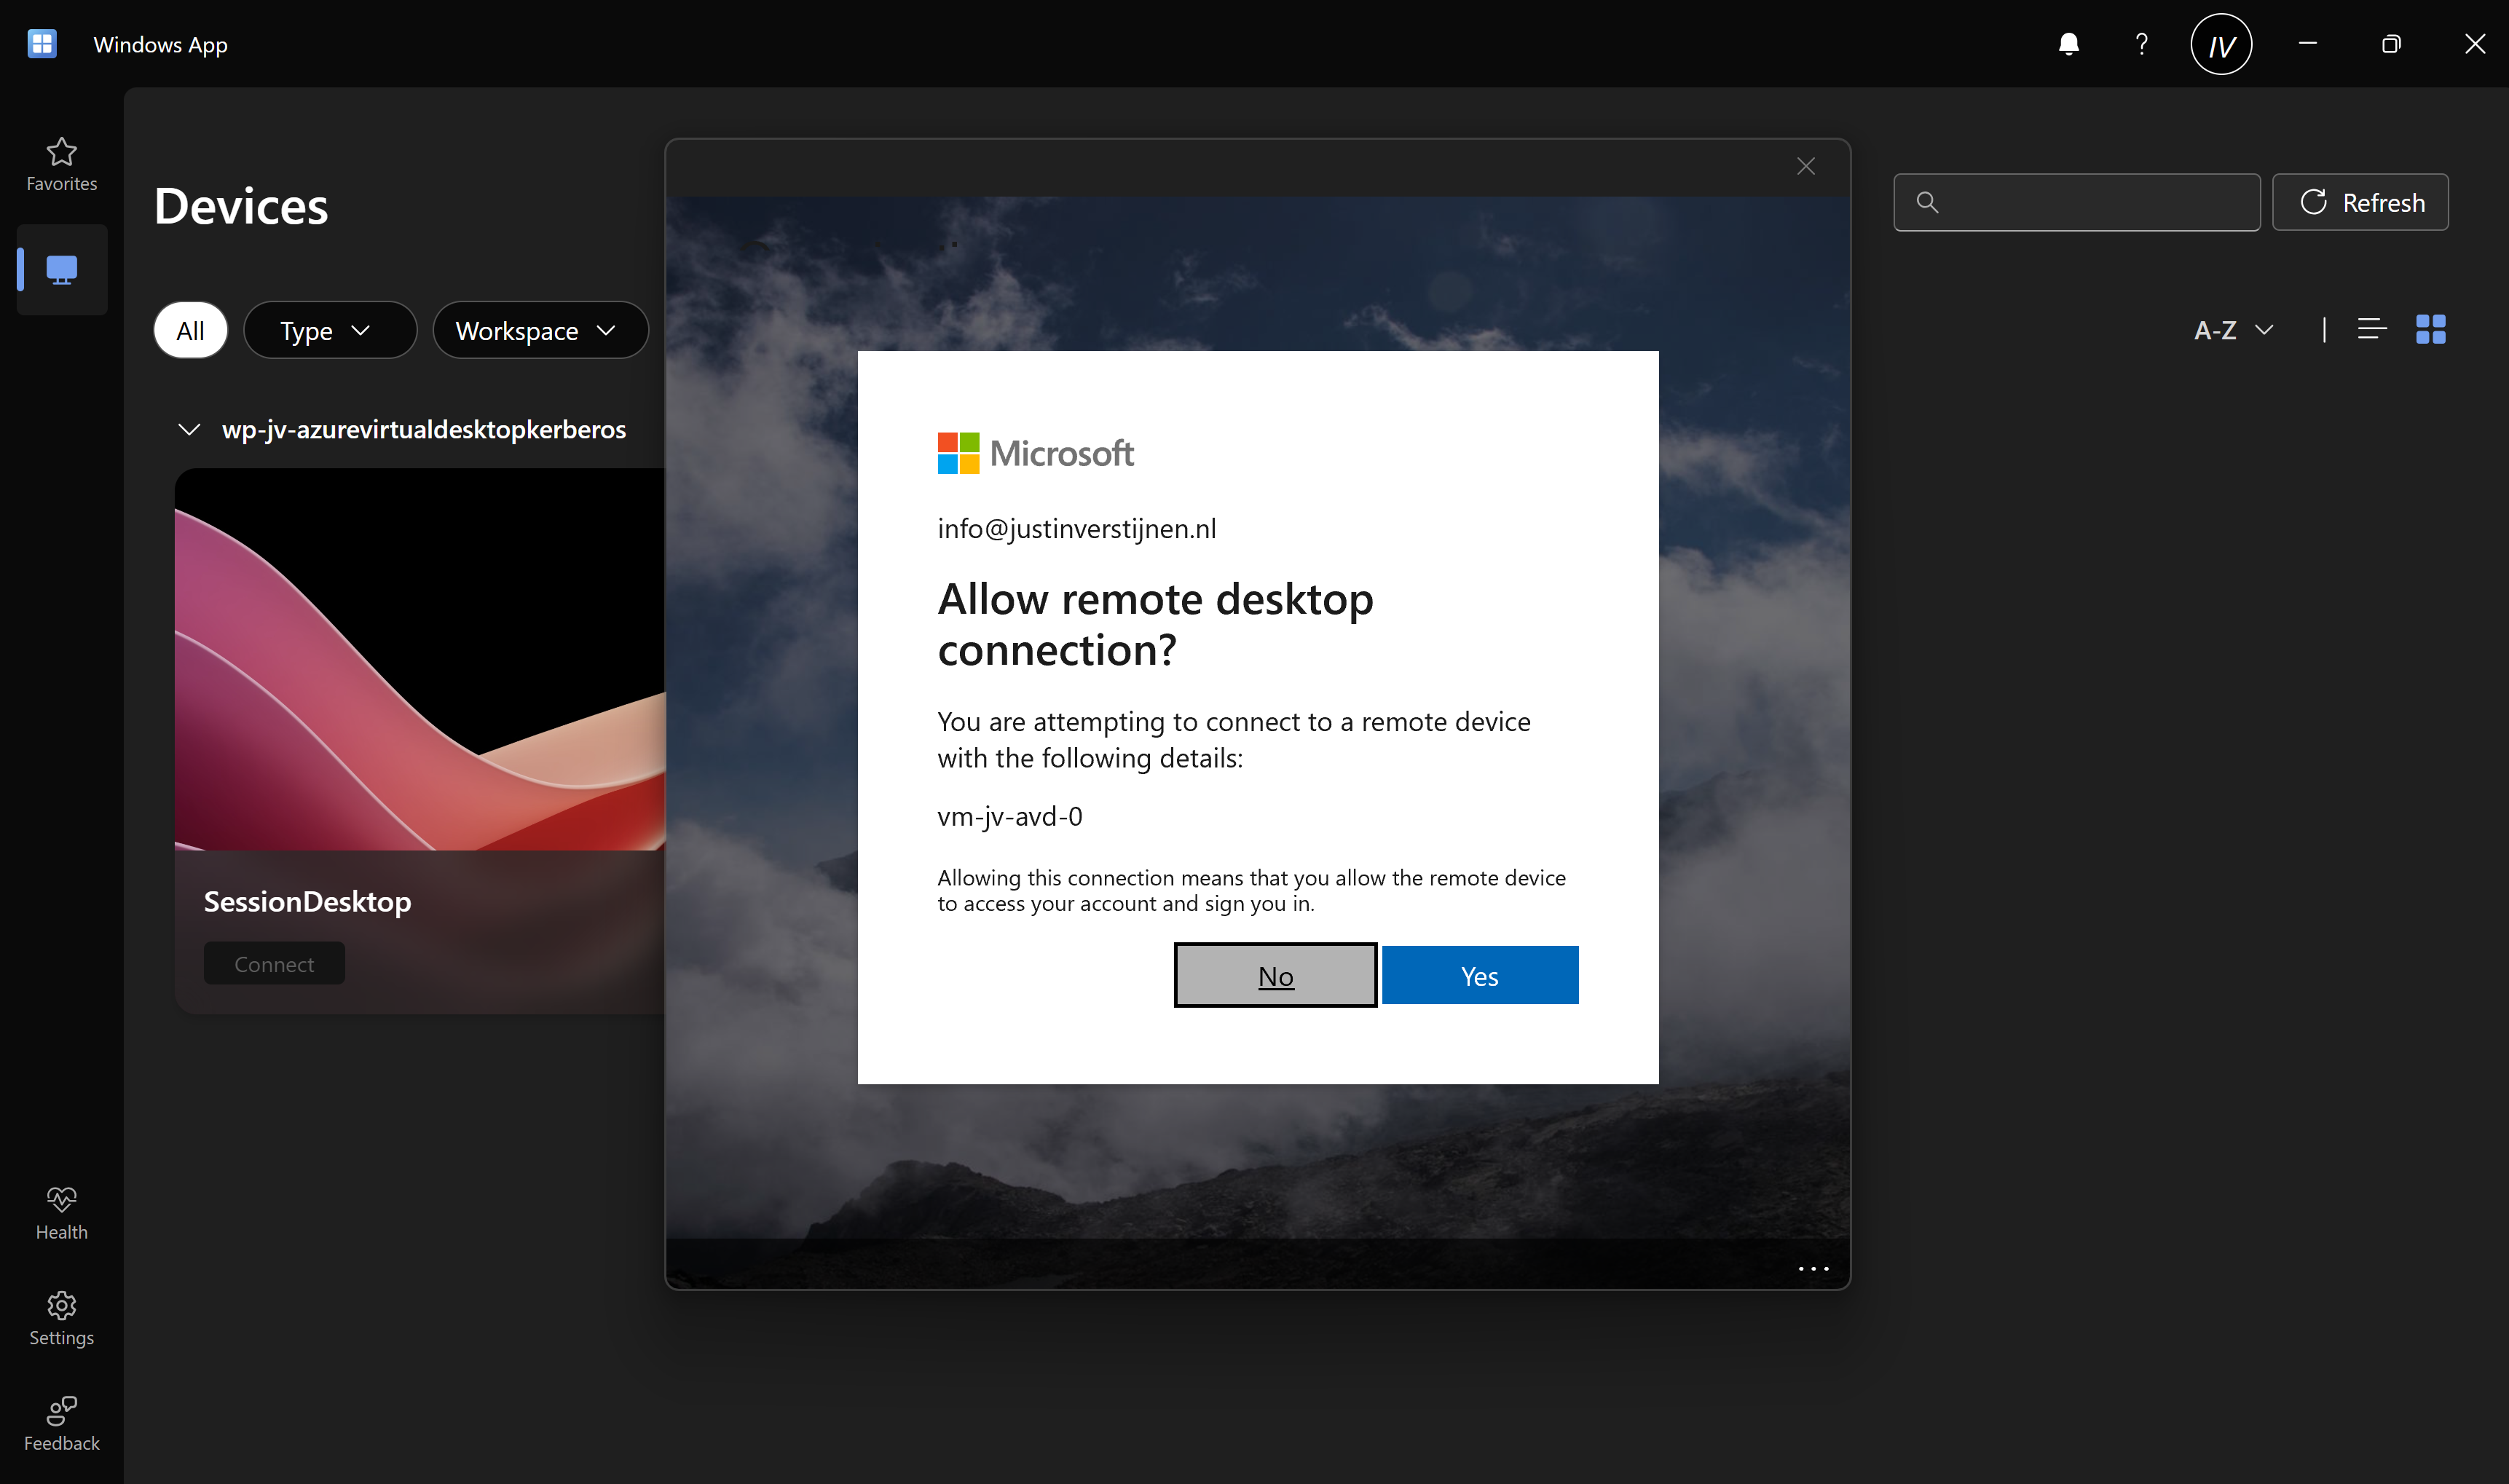
Also click on “Yes” on the Single sign-on prompt to allow the remote desktop connection.
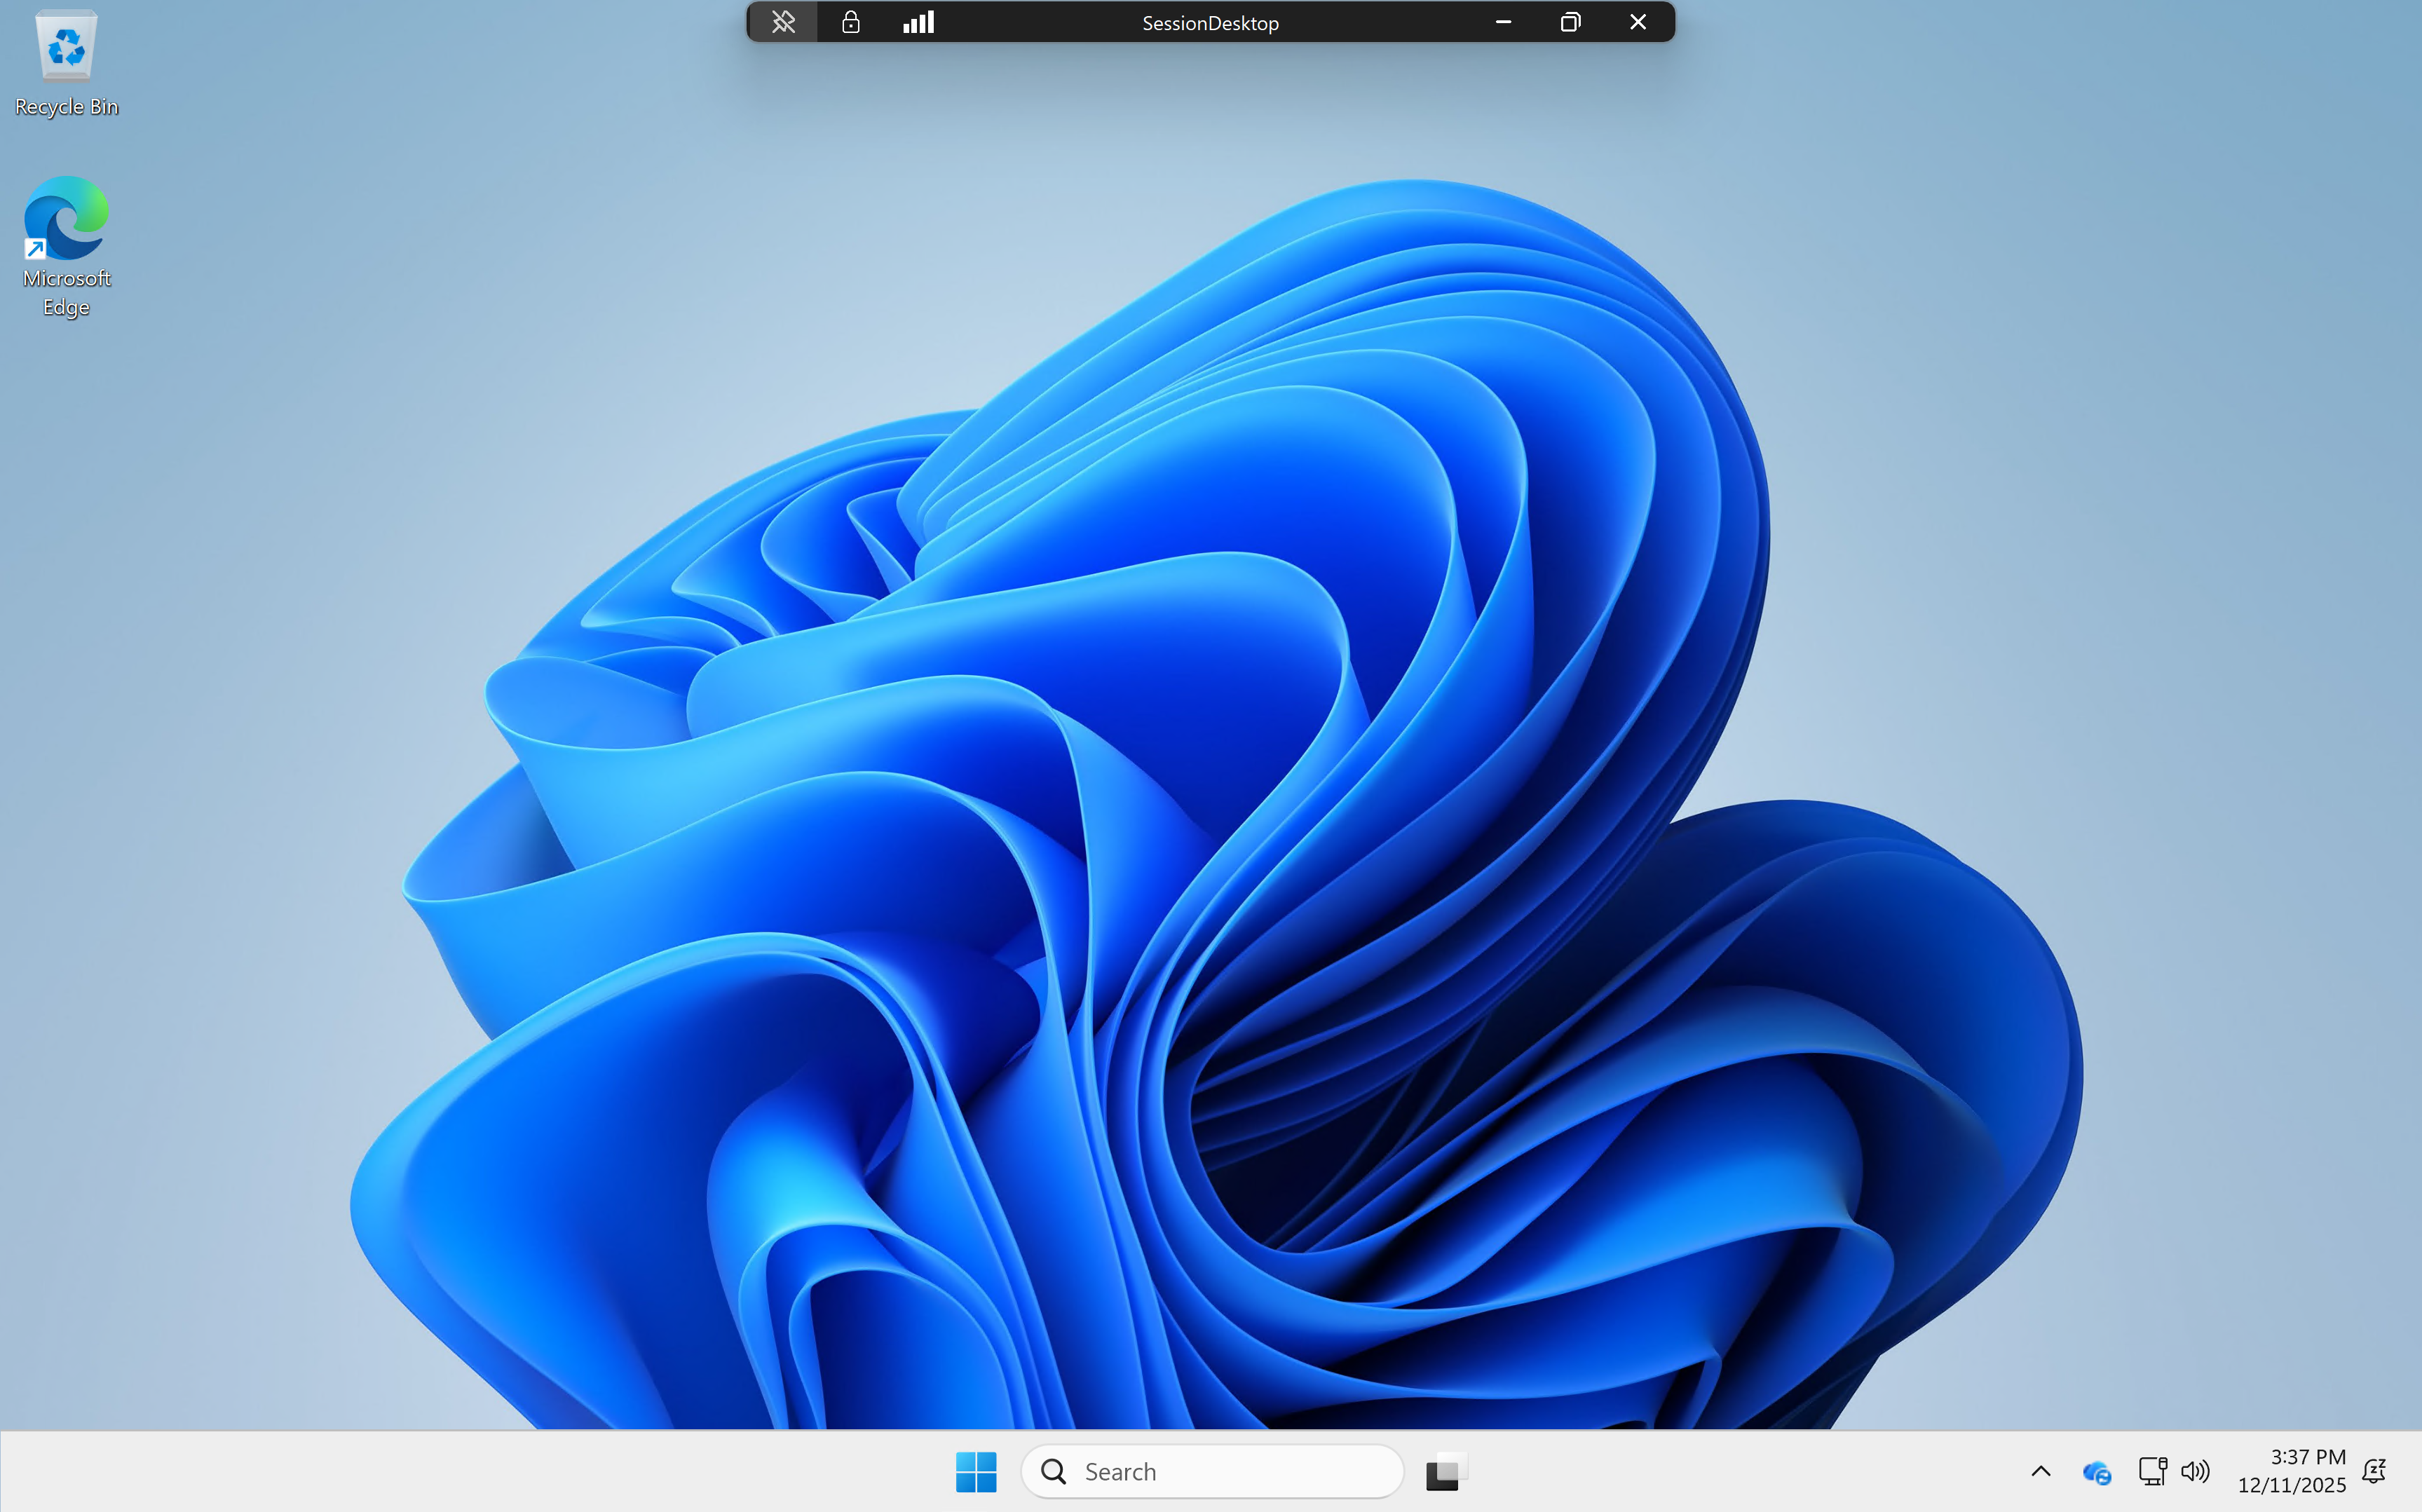
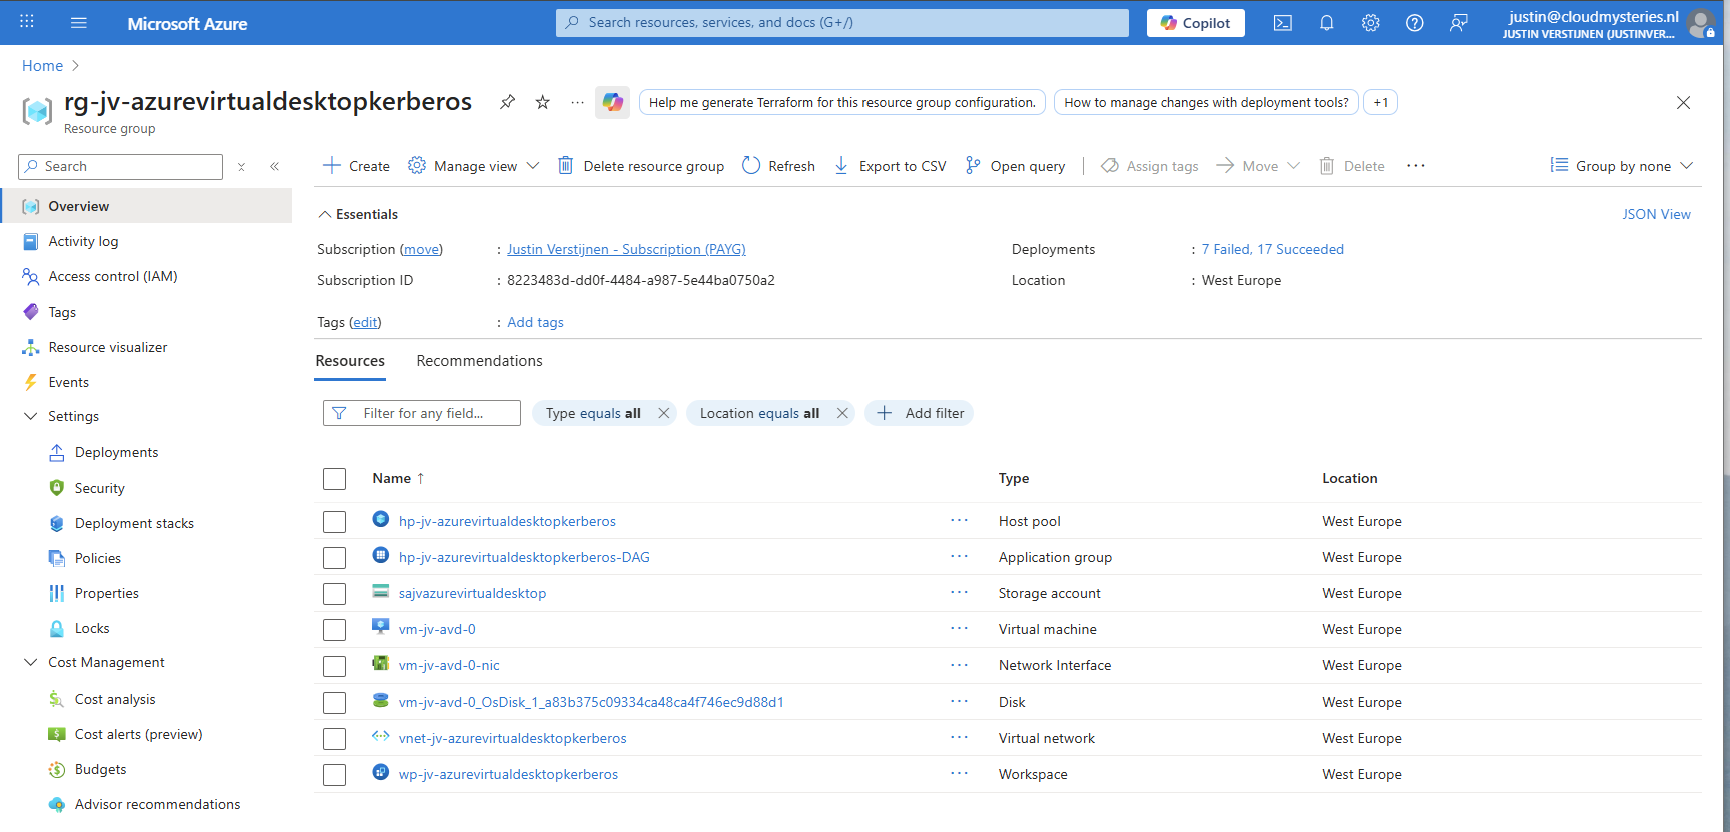
Here we are on our freshly created desktop. After connecting the FSLogix profile will be automatically created on the storage account.
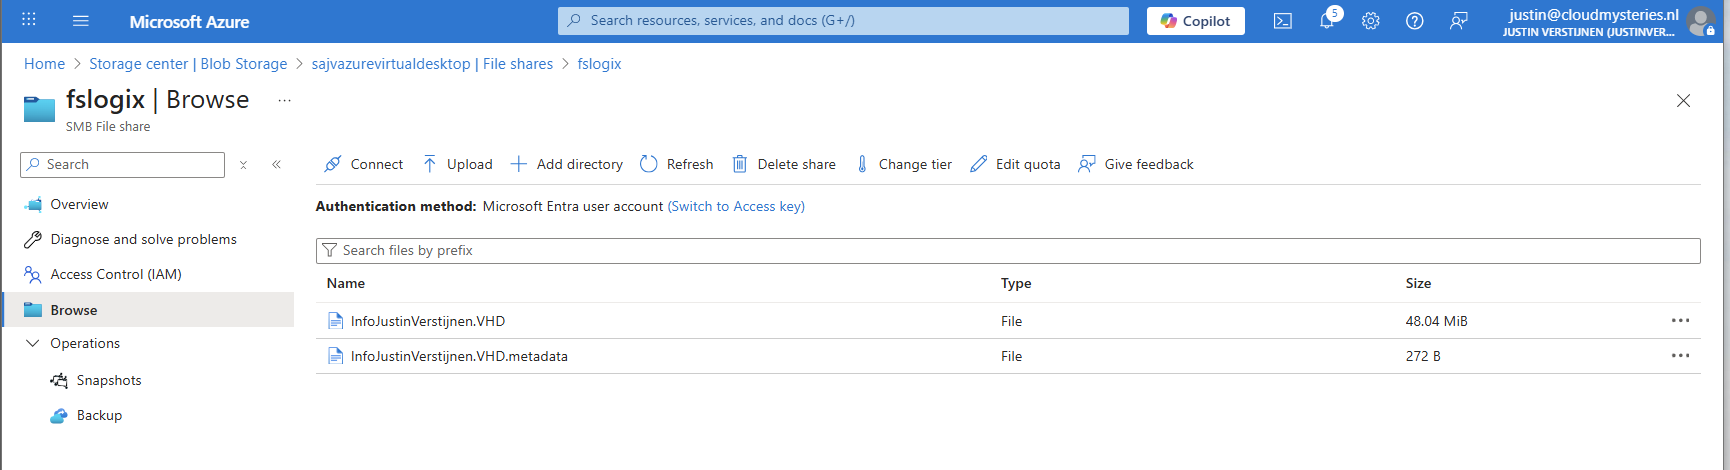
And this with only these resources:
11: Shaping your AVD Workspace (optional)
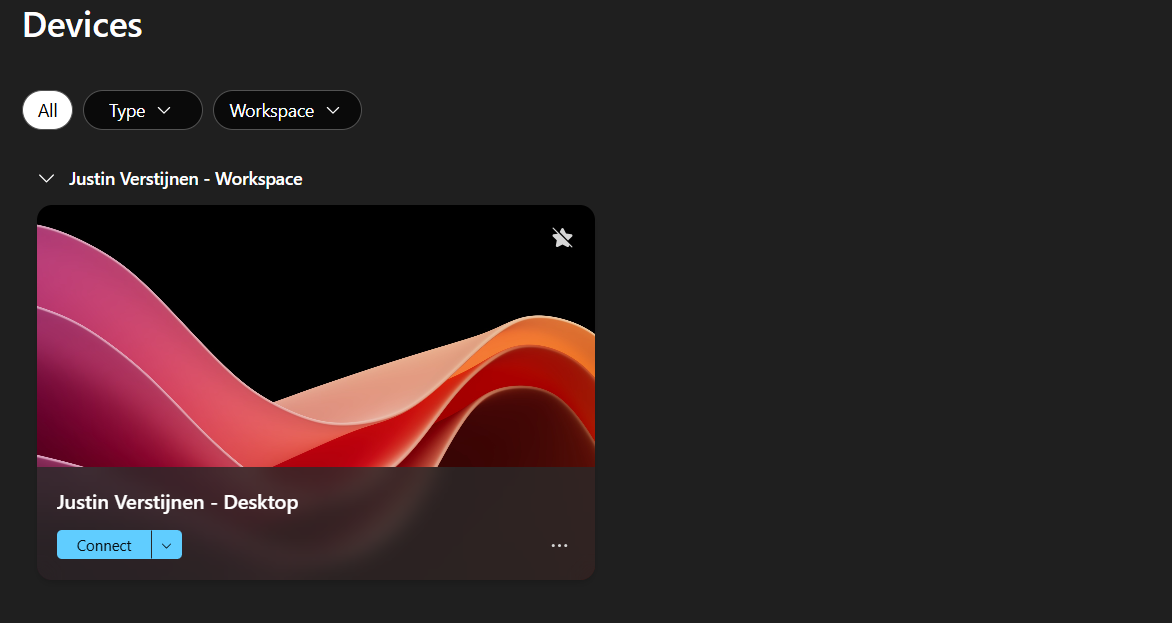
In the Windows app, you get a workspace to connect to your desktop. By default, these are filled in automatically but it is possible to change the names for a better user experience.
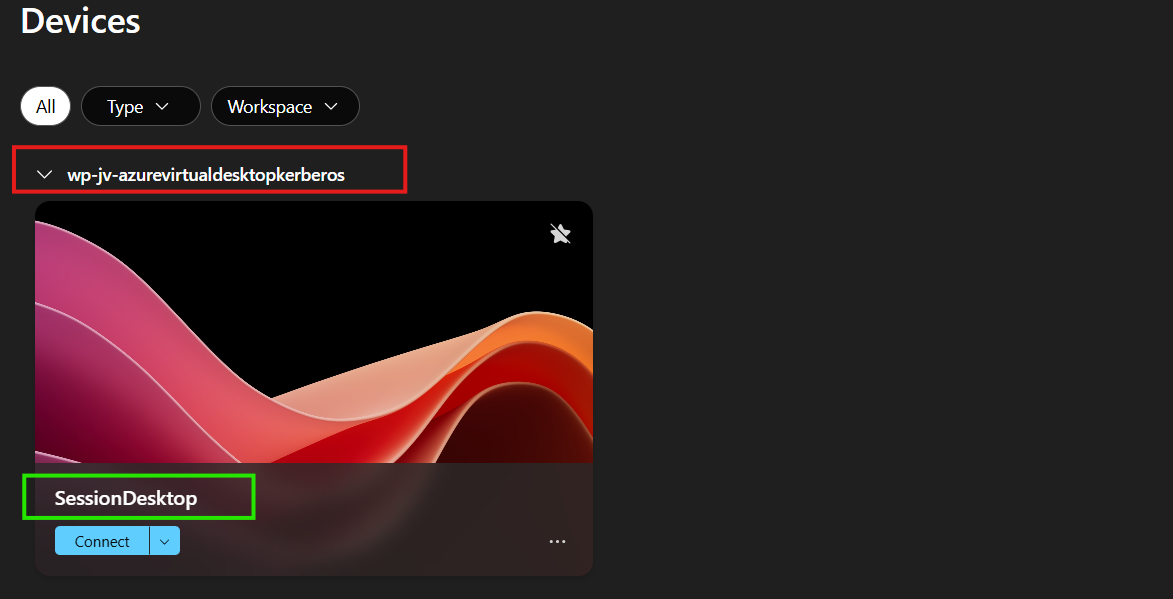
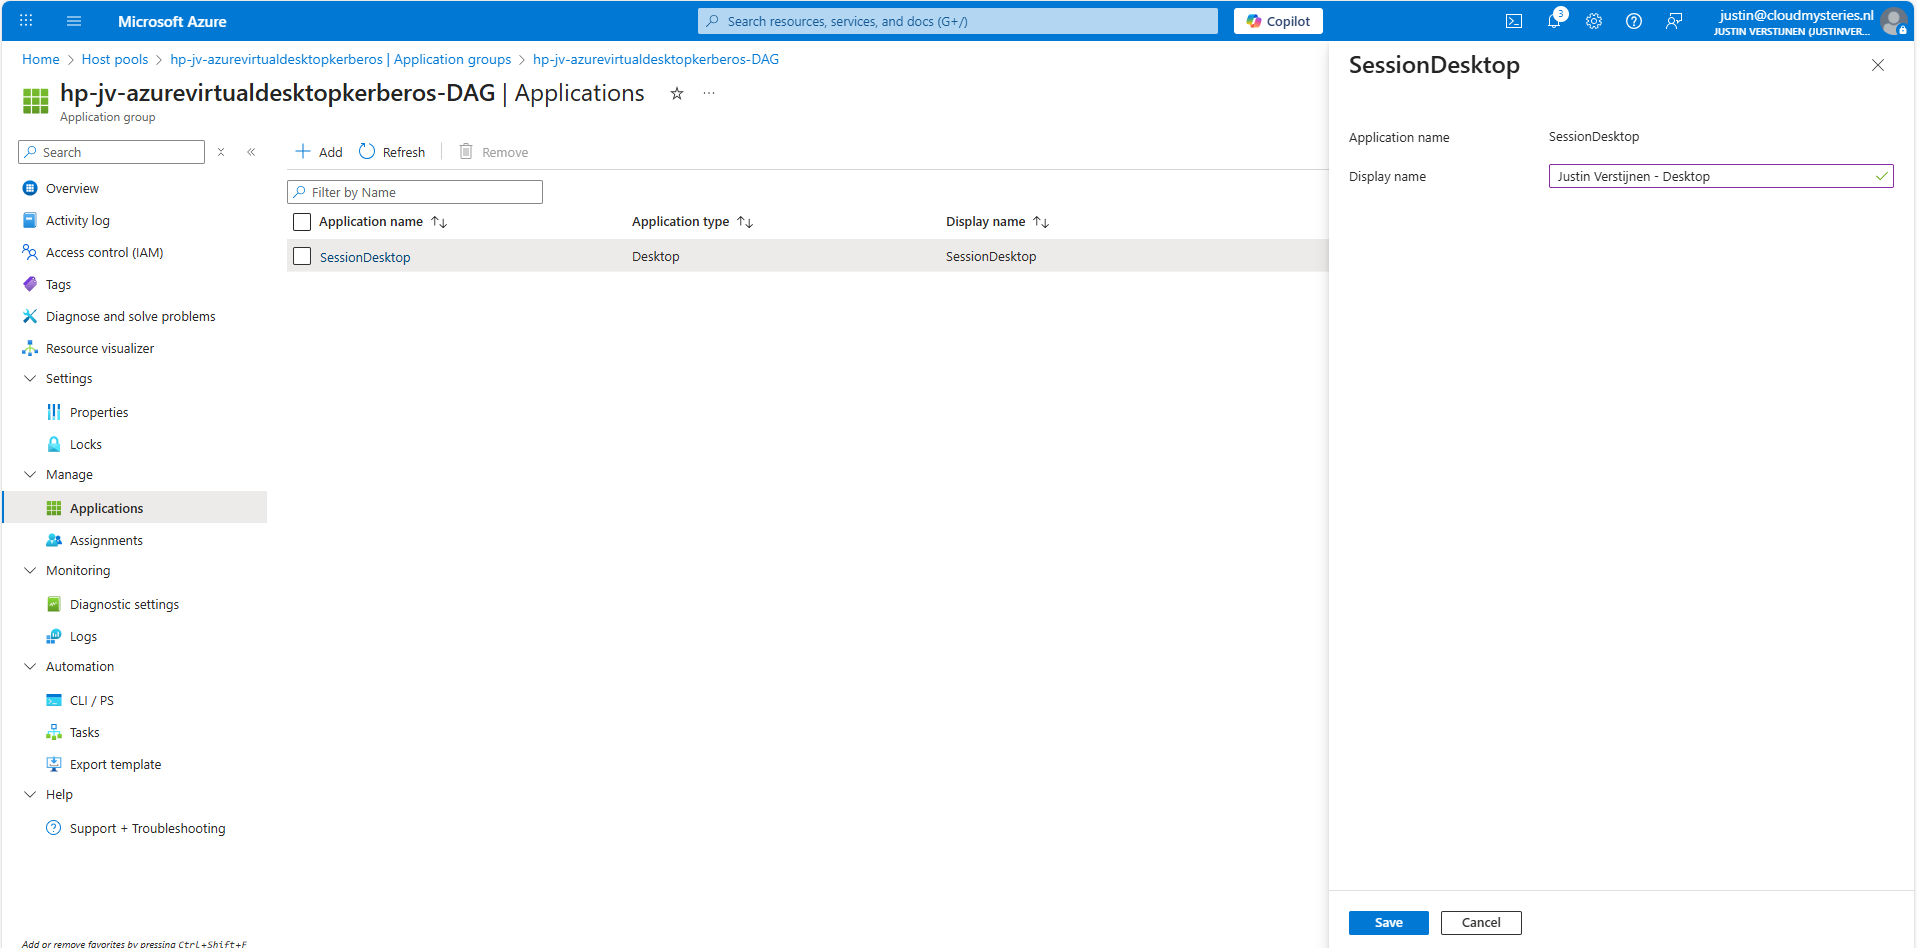
The red block can be changed in the Workspace -> Friendly name and the green block can be changed in the Application Group -> Application -> Session Desktop.
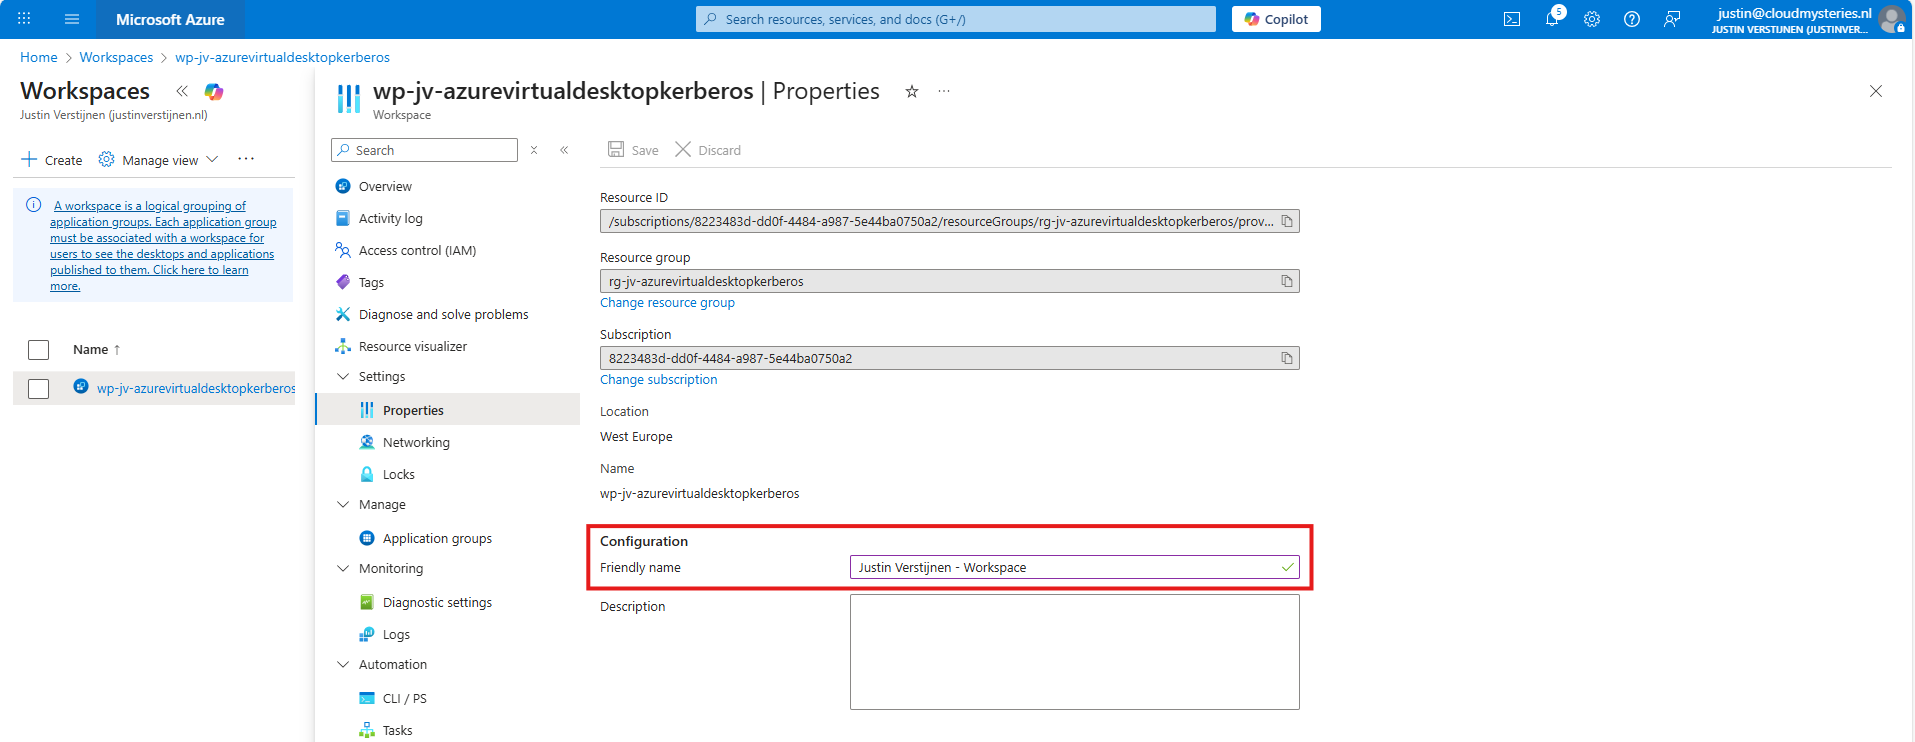
For the red block, go to your Workspace, then to Properties and change and save the friendly name:
For the green block, go to your application groups, and then the Desktop Application Group (DAG) and select the SessionDesktop application. You can change and save the name here.
After refreshing the workspace, this looks a lot better to the end user:
Building great solutions is having attention for the smallest details ;)
12: Setting maximum SMB encryption (optional)
This step is optional, but recommended for higher security.
In another guide, I dived into the SMB encryption settings to use the Maximum security preset of Azure Files. You can find that guide here:
Guide for maximum SMB encryption
Using the Maximum security preset for Azure Files ensures only the best encryption and safest protocols are being used between Session host and File share. For example, this only allows Kerberos and disables the older, unsafe NTLM authentication protocol.
13: Troubleshooting (optional)
It is possible that this setup doesn’t work at your first try. I have added some steps to troubleshoot the solution and come to the cause of the error.
FSLogix profile errors
If you get an error like below picture, the profile failed to create or mount which can have various different causes based on the error.
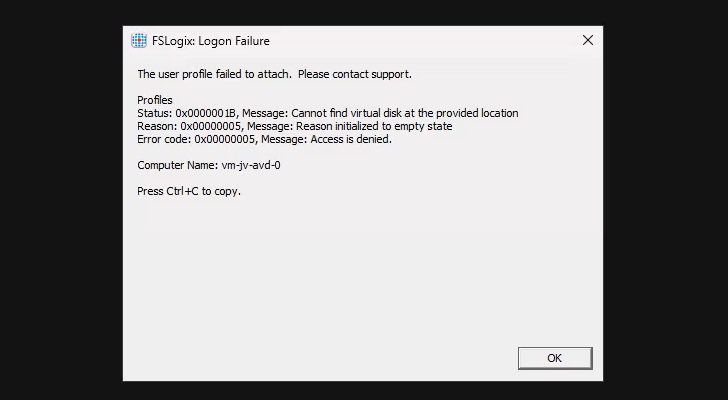
In this case, the error is “Access is denied”. This is true because I did this on purpose. Check the configuration of step 6.
When presented this type of errors, you are able to get to CMD by pressing CTRL+SHIFT+ESC and run a new task there, which is CMD.
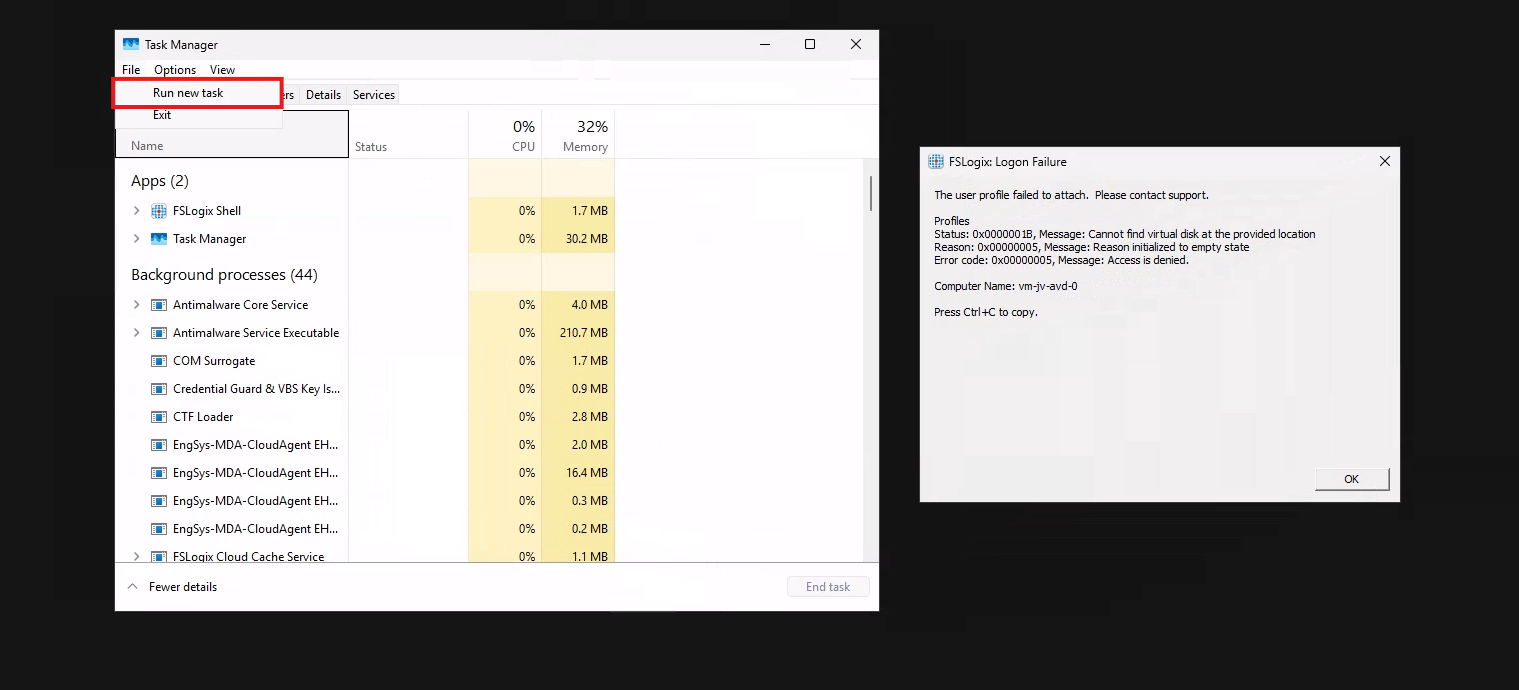
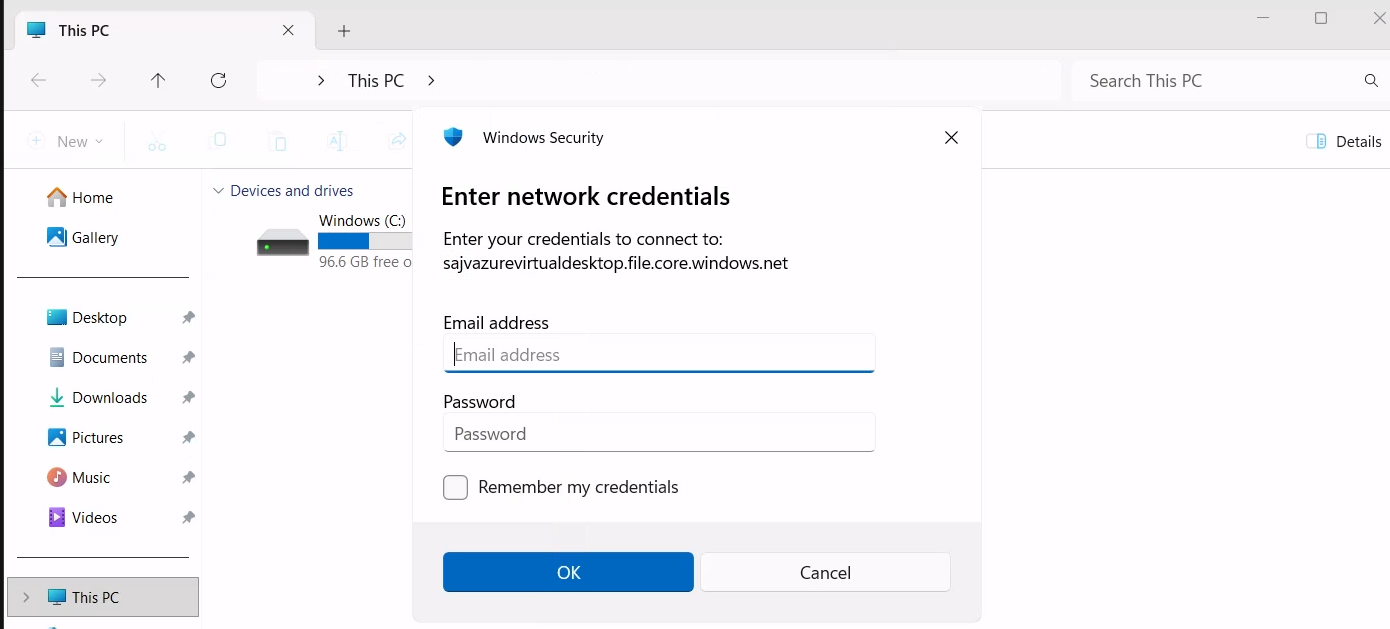
To check if you can navigate to the share, you can open explorer.exe here and navigate manually to the share to see if its working. If you get any authentication prompts or errors, this means that this is the reason FSLogix doesn’t work either.

If not getting any FSLogix error and no profile is created in the storage account after logging in, check your FSLogix configuration from step 8 and the assignments in Intune.
Kerberos errors
It is also possible that you get an error that the network path cannot be found. This states that the kerberos connection is not working. You can use this command to check the configuration:
dsregcmd /statusThis returns an overview with the desktop configuration with Entra and Intune.
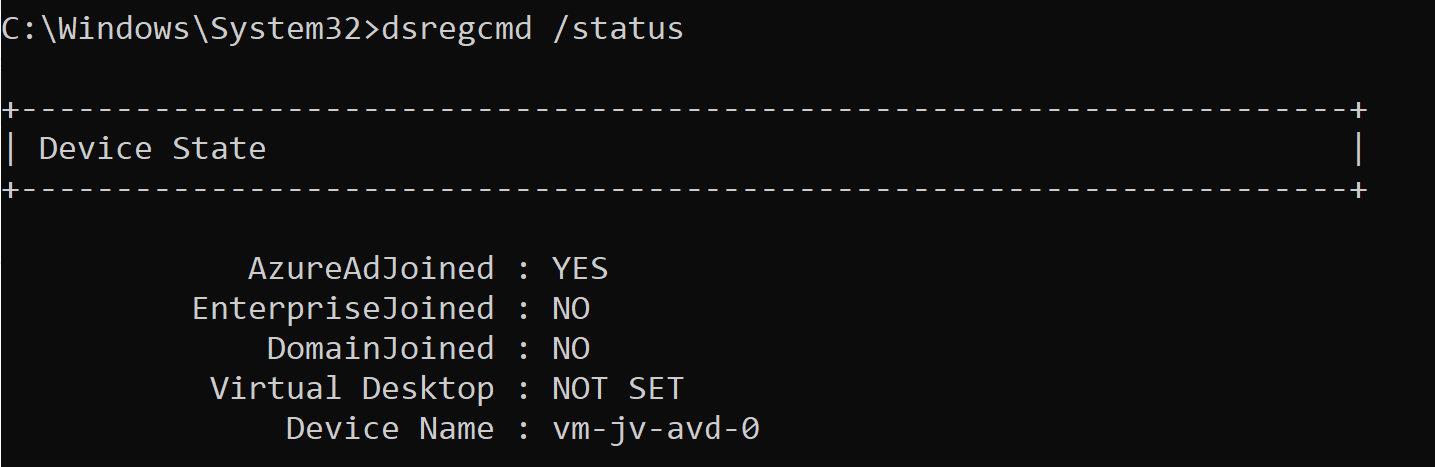
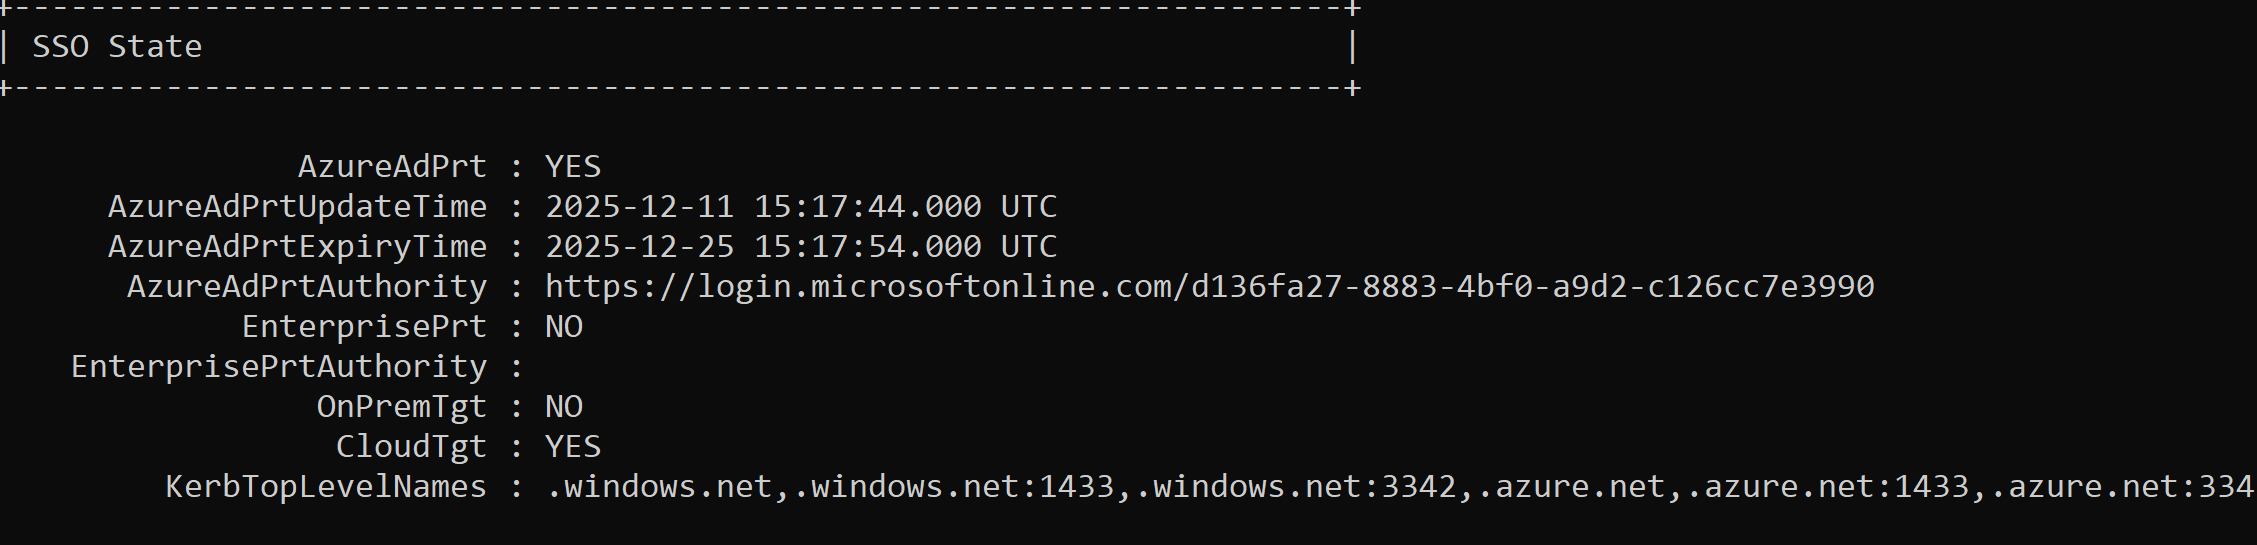
This overview shows that the Azure AD primary refresh token is active and that the Cloud TGT option is available. This must both be yes for the authentication to work.
And to check if the Kerberos tickets is given, you can run this command:
klist get cifs/sajvazurevirtualdesktop.file.core.windows.netChange the name to your storage account name.
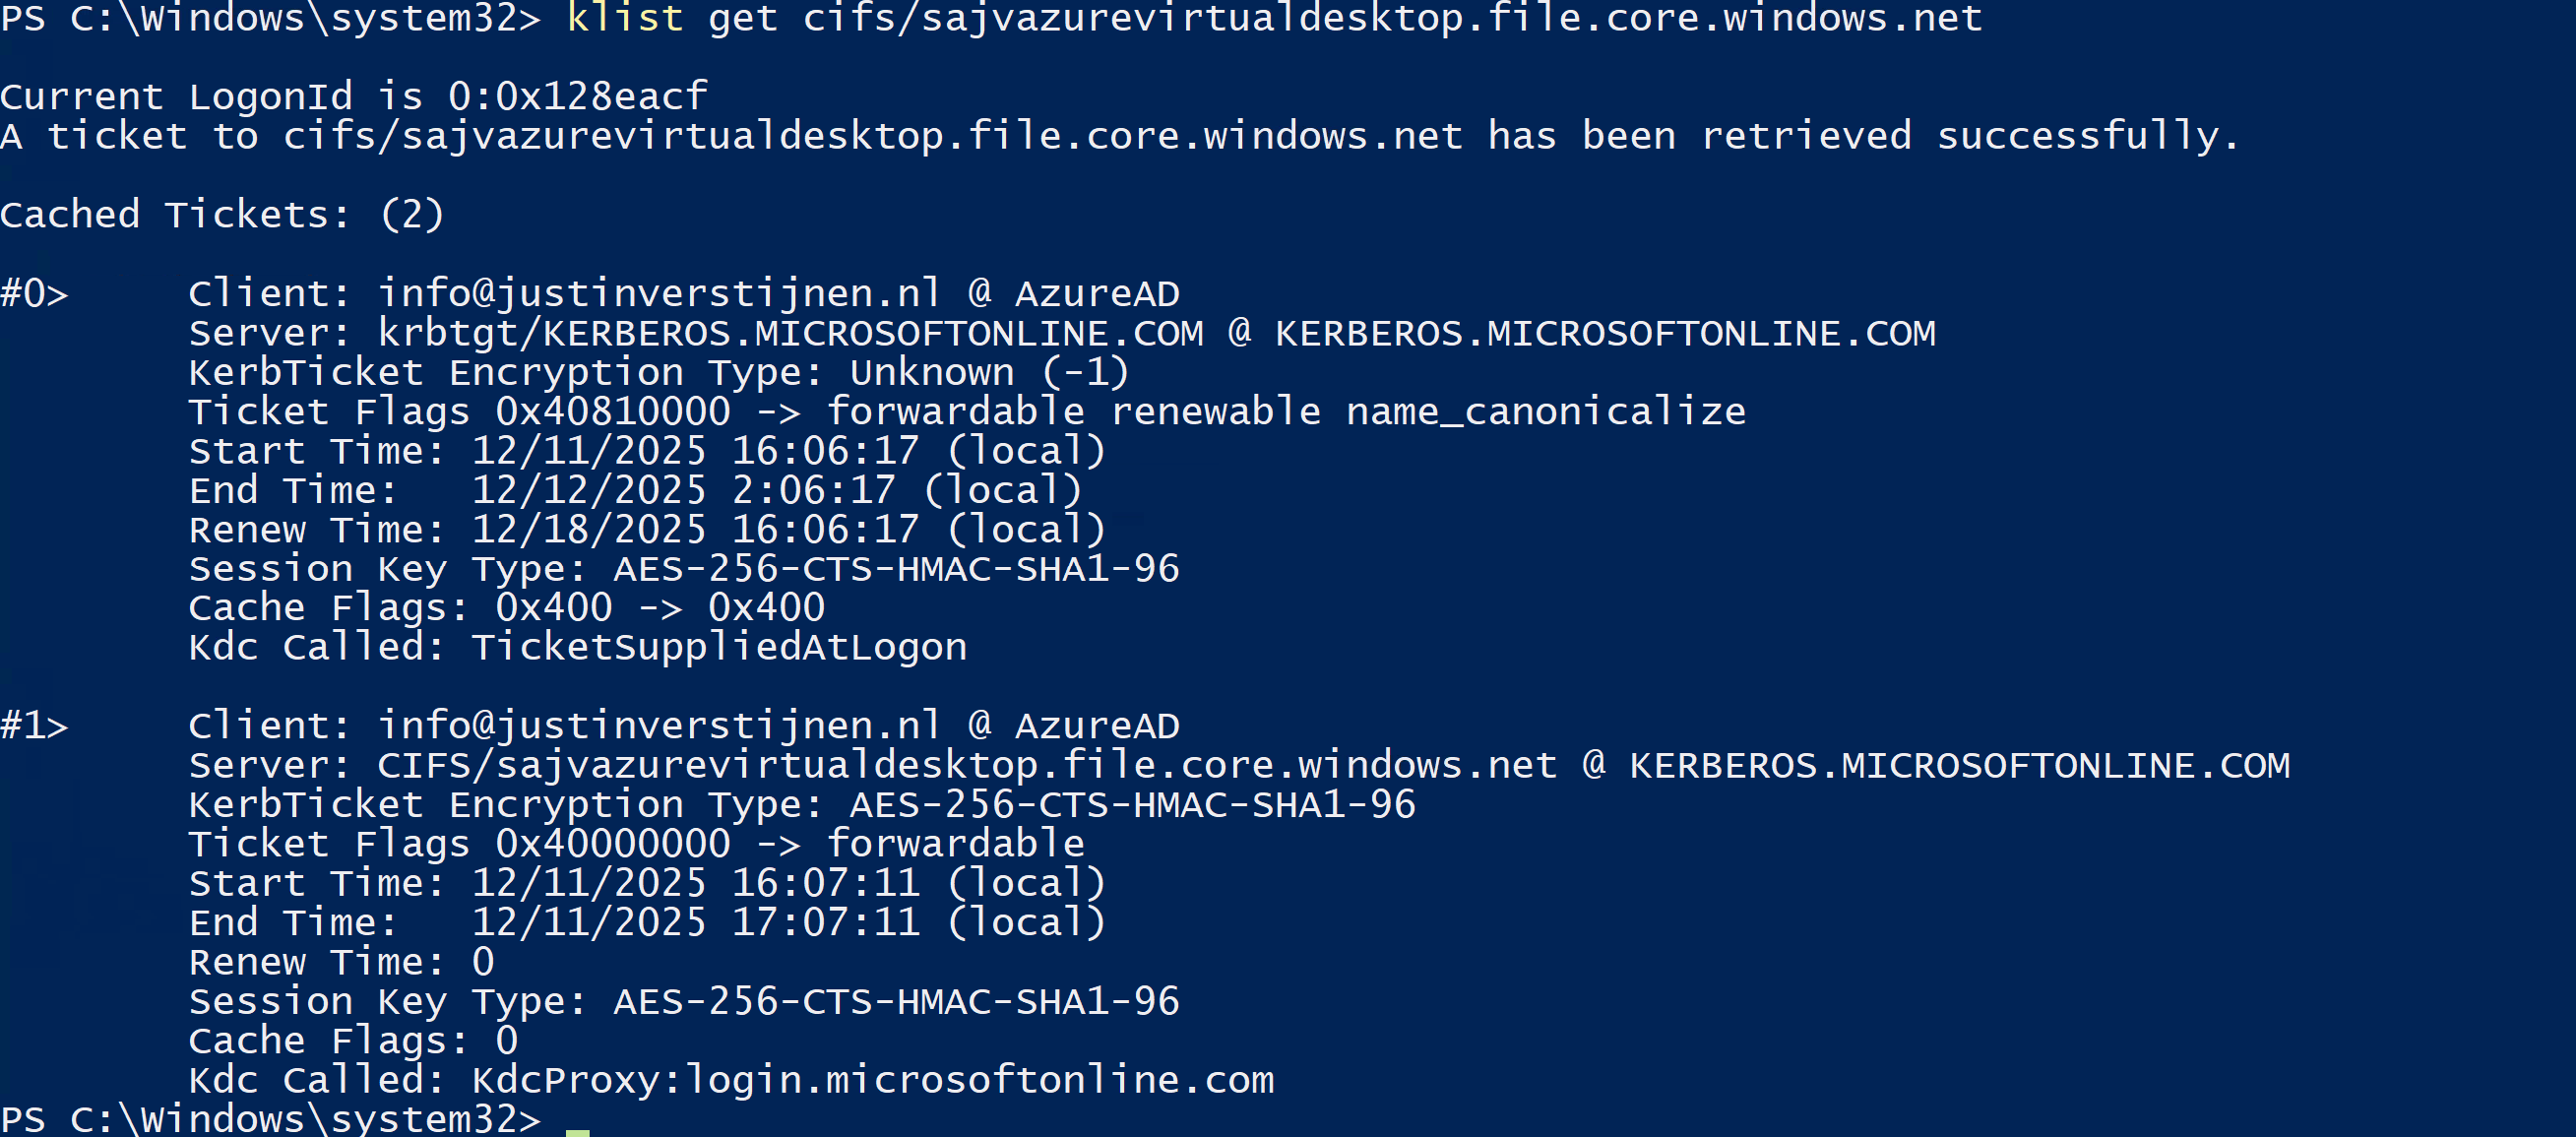
In my case, I get two tickets who are given to my user. If this shows nothing, there is anything wrong with your Kerberos configuration.
Knowledge check
This quiz needs JavaScript to show the questions and feedback.
Summary
This new (in preview at the time of writing) Microsoft Entra Kerberos option is a great way to finally host an Azure VIrtual Desktop environment completely cloud only and without the need for extra servers for a traditional Active Directory. Hosting servers is a time consuming and less secure manner.
Going completely cloud only enhances the manageability of the environement keeps things simple to manage. It also makes your environment more secure which are things we like.
Thank you for reading this page and I hope it was helpful.
Sources
These sources helped me by writing and research for this post;
- https://learn.microsoft.com/en-us/entra/identity/authentication/kerberos#how-microsoft-entra-kerberos-works
- https://learn.microsoft.com/en-us/microsoft-365/enterprise/manage-microsoft-365-accounts?view=o365-worldwide#cloud-only
- https://learn.microsoft.com/en-us/azure/storage/files/storage-files-identity-assign-share-level-permissions?WT.mc_id=Portal-Microsoft_Azure_FileStorage&tabs=azure-portal#choose-how-to-assign-share-level-permissions
End of the page 🎉
You have reached the end of the page. You can navigate through other blog posts as well, share this post on X, LinkedIn and Reddit or return to the blog posts collection page. Thank you for visiting this post.
If you think something is wrong with this post or you want to know more, you can send me a message to one of my social profiles at: https://justinverstijnen.nl/about/
If you find this page and blog very useful and you want to leave a donation, you can use the button below to buy me a beer. Hosting and maintaining a website takes a lot of time and money. Thank you in advance and cheers :)

The terms and conditions apply to this post.