Configure DNSSEC and SMTP DANE Microsoft 365
Categories:
6 minute read
Domain Name System Security Extensions (DNSSEC)
DNSSEC is a feature where a client can validate the DNS records received by a DNS server to ensure a record is originated from the DNS server and not manipulated by a Man in the Middle attack.
DNSSEC is developed to prevent attacks like in the topology below:
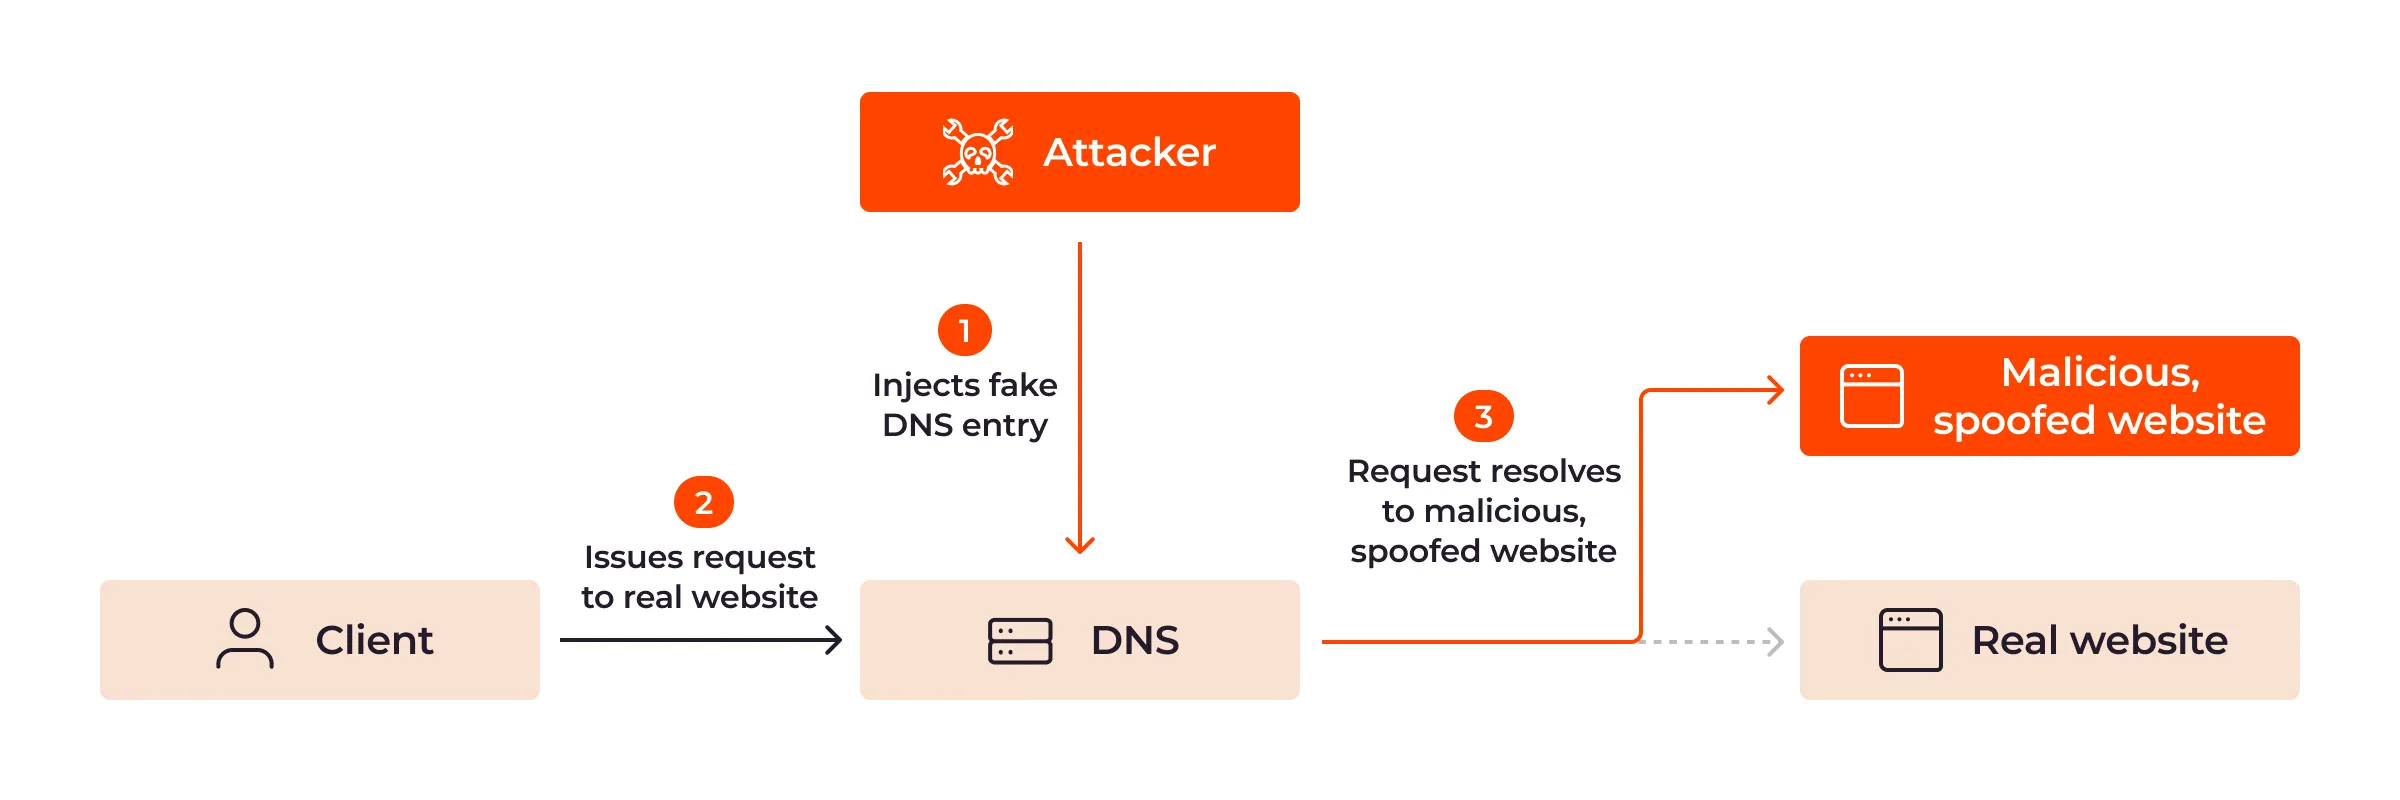
Here a attacker injects a fake DNS record and sends the user to a different IP-address, not the actual IP-address of the real website but a fake, mostly spoofed website. This way, a user sees for example https://portal.azure.com in his address bar but is actually on a malicious webserver. This makes the user far more vulnerable to credential harvesting or phising attacks.
With DNSSEC, the client receives the malicious and fake DNS entry, validates it at the authorative DNS server for the domain and sees its fake. The user will be presented a error message and we have prevented just another breach.
SMTP DNS Authentication of Named Entities (DANE)
SMTP DANE is an addition to DNSSEC which actually brings the extra security measures to sending email messages. It helps by performing 3 steps:
- When sending an email message, SMTP DANE requires a TLS connection and certificate and doesn’t send email when this is not possible
- SMTP DANE validates the emailserver to ensure an email message originates from the server of the given domain
- SMTP DANE doesn’t use external Certificate Authorities but uses the systems available to generate certificates which the receiver can validate.
SMTP DANE and DKIM (DomainKeys Identified Mail)
SMTP DANE and DKIM sounded the same security to me when I first read about it. However, both are needed to secure your outbound email traffic, but they help in another way:
- DKIM helps by generating a signature at sending the email which a receiver can validate through a public DNS record
- The receiver knows that the message is not modified by an attacker
- SMTP DANE helps securing the transport of the email, and ensures the connection itself is secure. See this like a HTTPS connection
- The receiver knows that the message and connection is not re-routed by an man in the middle.
Requirements
- A Microsoft 365 tenant
- A DNSSEC capable DNS-hosting or server
- Check here: https://tools.justinverstijnen.nl/dnsmegatool/
- Does your DNS hosting not support DNSSEC? Check out this guide: https://justinverstijnen.nl/what-is-mta-sts-and-how-to-protect-your-email-flow/
- Exchange Online PowerShell module
- Some basic knowledge about SPF/DKIM/DMARC
- Check out this page for a basic understanding: https://justinverstijnen.nl/configure-dnssec-and-smtp-dane-with-exchange-online-microsoft-365/
- 30 minutes of your time
Step 1: Check your DNSSEC configuration
When starting out, your DNS hosting must support and enabled DNSSEC on your domain. Without this, those protocols don’t work. You can check out your domain and DNSSEC status with my DNS MEGAtool:
https://tools.justinverstijnen.nl/dnsmegatool/
My domain is DNSSEC capable and a DS record is published from the registrar to the DNS hosting and is ready to go to the next phase:

You can find this on the last row of the table in the DNS MEGAtool. If the status is red or an error is in the value field, the configuration of your domain is not correct.
Step 2: Login into Microsoft Exchange Online Powershell
The only way to enable those features at this moment are to configure those on Exchange Online Powershell. The good part is, it is not that hard. Let me show you.
First, login into Exchange Online Powershell:
Connect-ExchangeOnlineLogin with your credentials, and we are ready.
Step 3: Enable DNSSEC
We have to enable DNSSEC to each of our domains managed in Microsoft 365. In my environment, I have only one domain. Run the following command to enable DNSSEC:
Enable-DnssecForVerifiedDomain -DomainName "justinverstijnen.nl"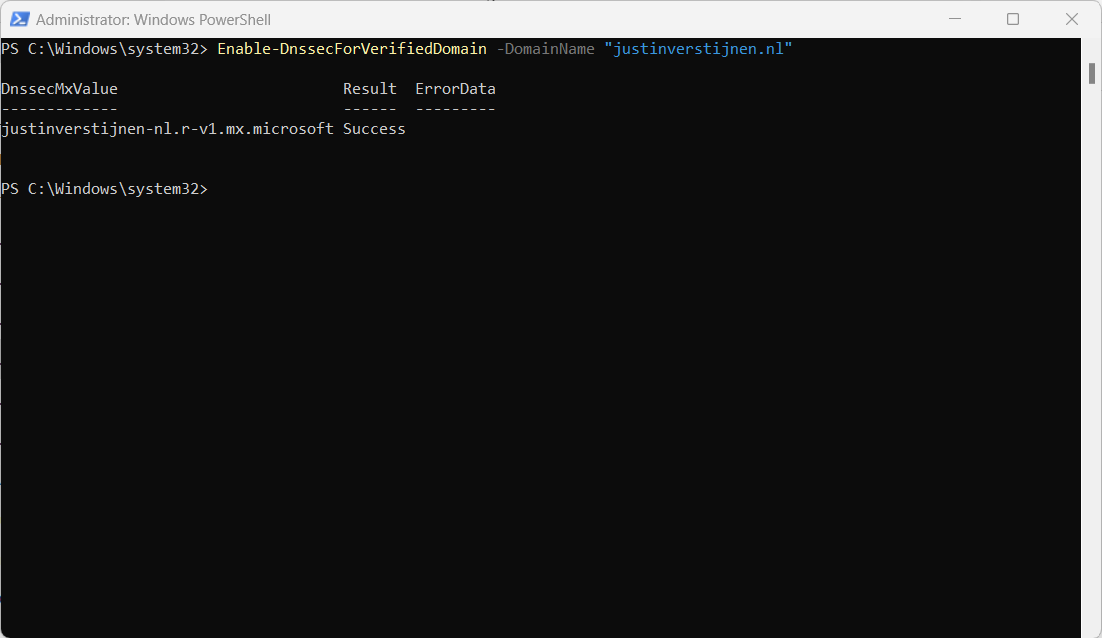
The output of the command gives us a new, DNSSEC enabled MX-record.
Step 4: Configure DNSSEC enabled MX record
Now PowerShell gives us a new MX record which we must configure. This is the new “DANE”-enabled MX-record
DnssecMxValue                         Result  ErrorData
-------------                         ------  ---------
justinverstijnen-nl.r-v1.mx.microsoft Success
Let’s change this in the DNS hosting of your domain and it has to be the new primary MX-record (the one with the highest priority -> lowest number). I added it to the list of DNS records with a priority of 5, and switched the records outside of business hours to minimize service disruption.
Here an example of my configuration before switching to the new DNSSEC enabled MX record as primary.

When you change your MX record it can take up to 72 hours before the whole world knows your new MX record.
Step 5: Test new DNSSEC MX record
We can test our new MX record and the working of our change with the following tool: https://testconnectivity.microsoft.com/tests/O365InboundSmtp/input
Fill in your emailaddress and log into the service:
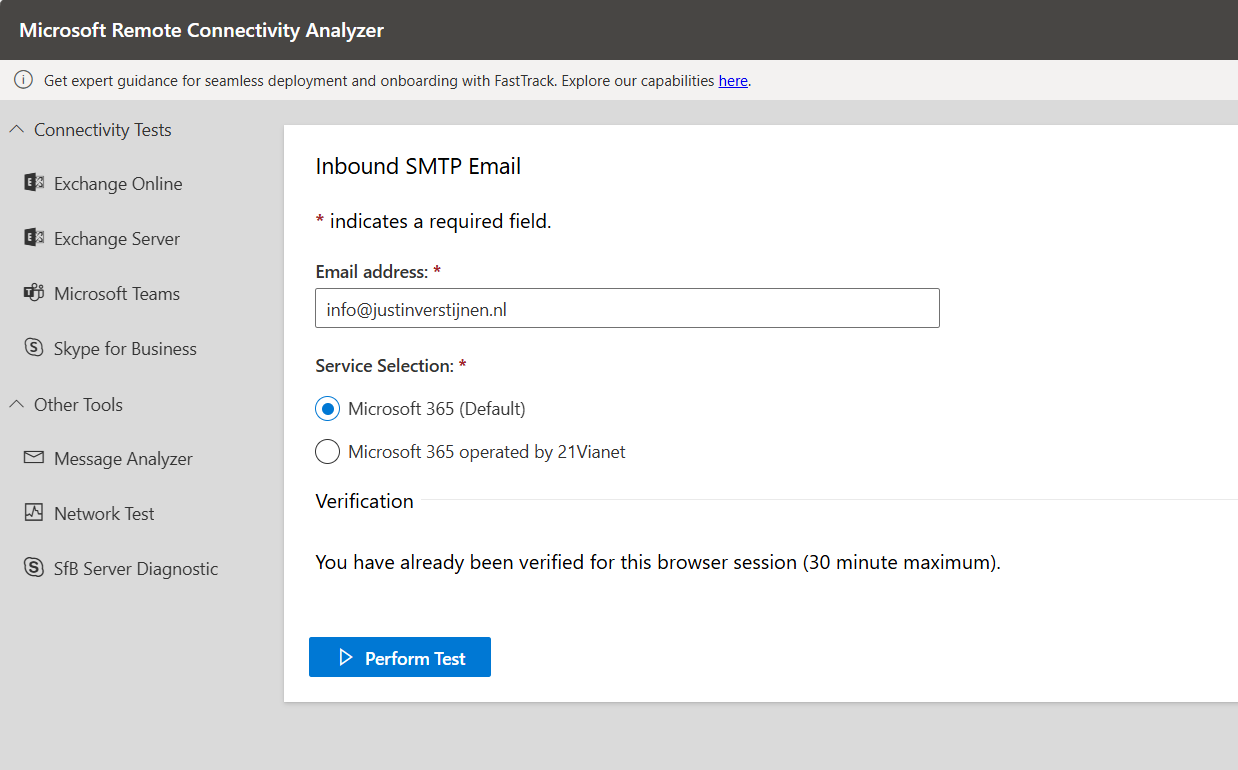
After that you get an test report:

I did this test before flipping the MX records. You can test this anytime.
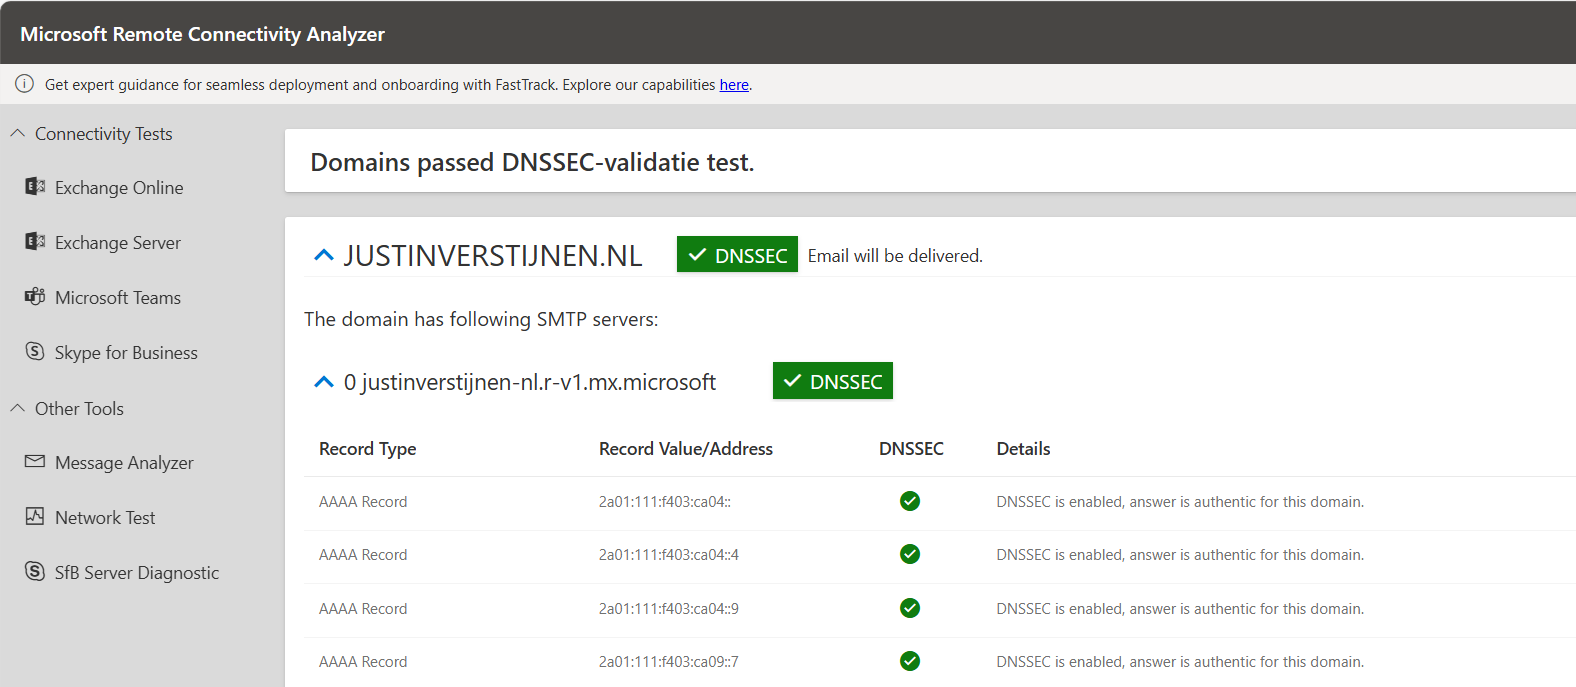
After the MX records are fine, we can test our DNSSEC. The DNSSEC enabled MX record has to be primary at this point.
After the test is completed you get the results and possible warnings and errors:
Step 6: Enable SMTP DANE
After we configured DNSSEC, we can enable SMTP DANE in the same Exchange Online Powershell window by using the following command:
Enable-SmtpDaneInbound -DomainName "justinverstijnen.nl"
This is only a command to enable SMTP DANE for inbound email, here is no additional DNS change needed.
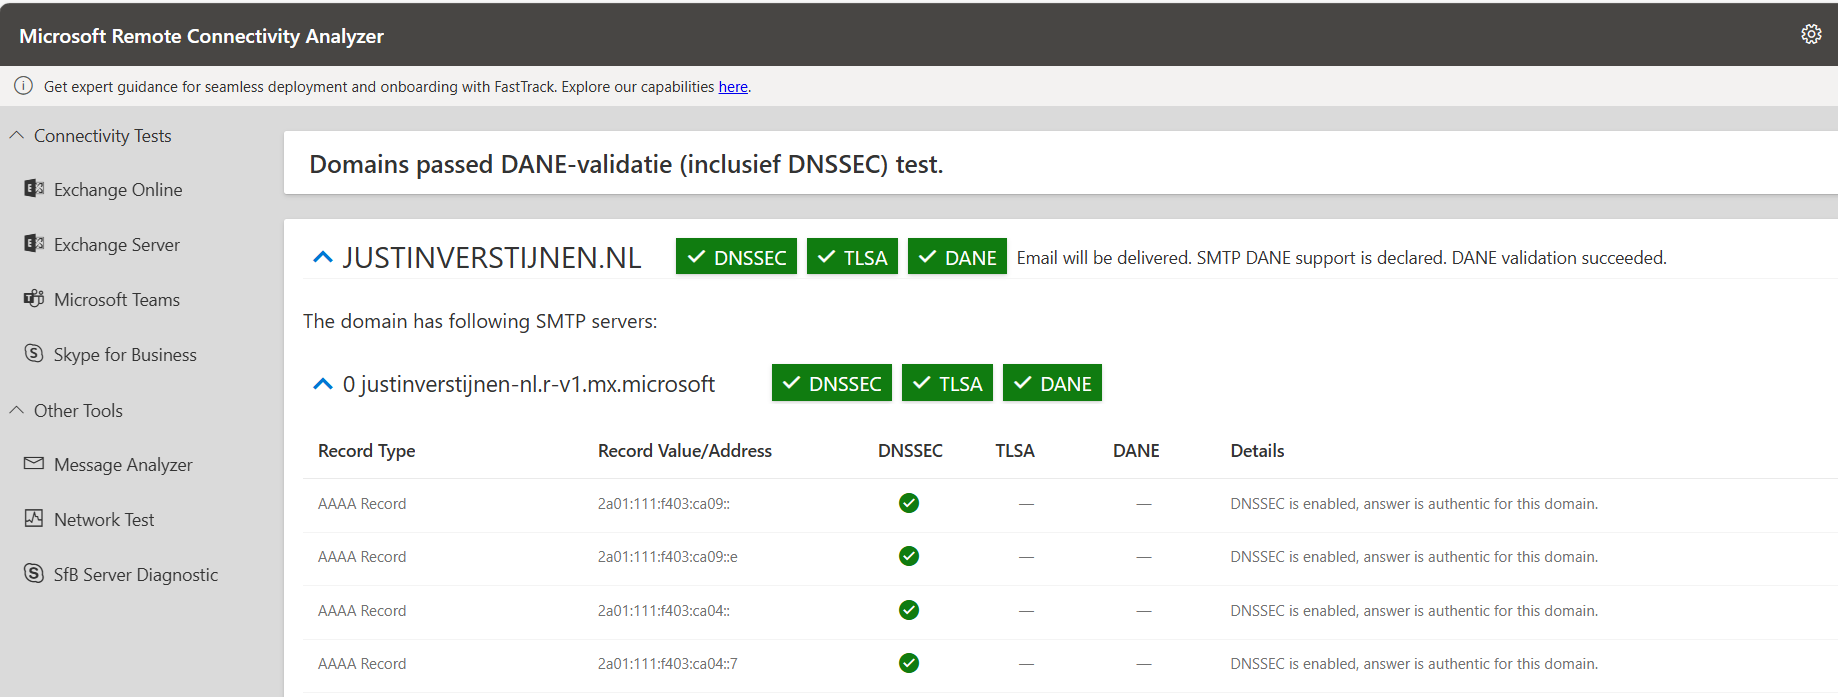
Step 7: Test inbound SMTP DANE
After enabling the SMTP DANE option, you will have to wait some time to fully enable and make it work on the internet. It can take up to an hour, but in my case it took around 10 minutes.
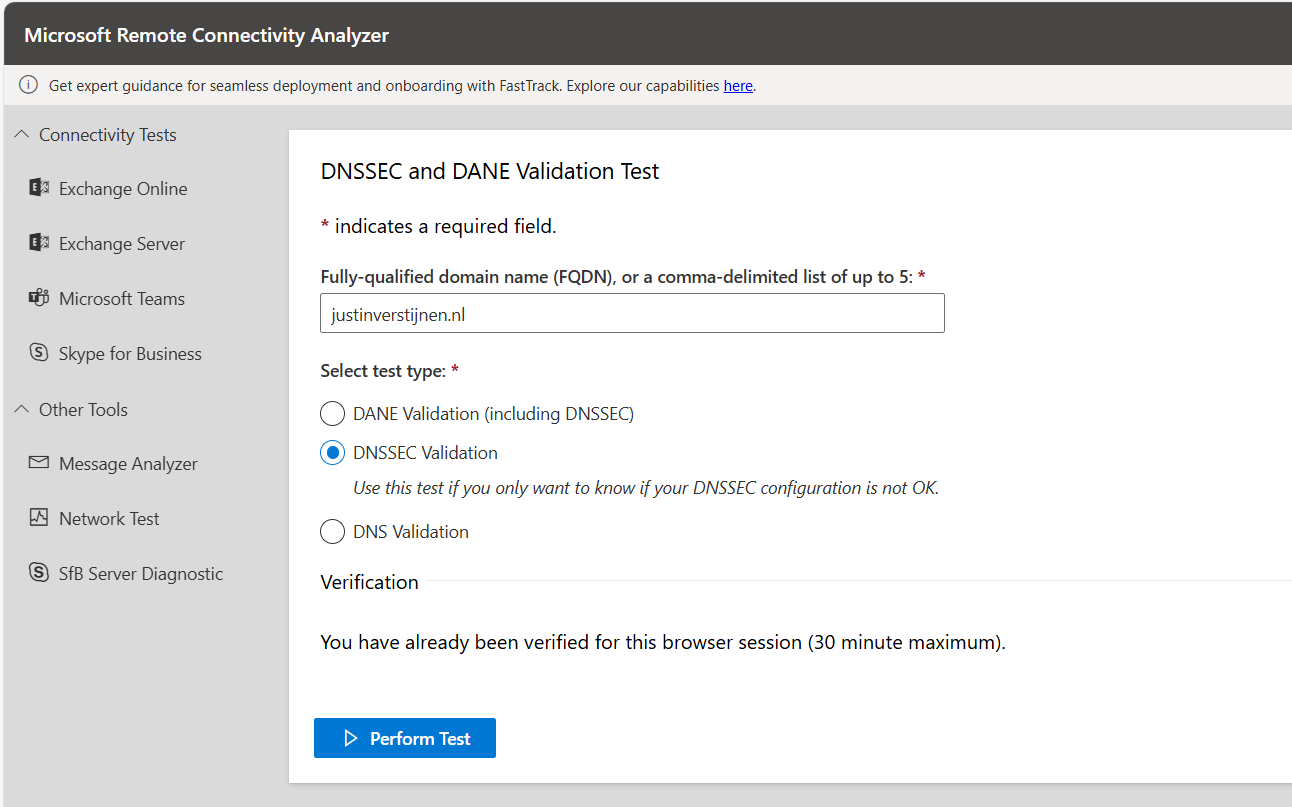
You can test the outcome by using this tool: https://testconnectivity.microsoft.com/tests/O365DaneValidation/input
Fill in your domain, and select the “DANE-validation” including DNSSEC to test both of your implemented mechanisms:
Knowledge check
This quiz needs JavaScript to show the questions and feedback.
Summary
After this guide you are using DNSSEC and SMTP DANE on your Exchange Online environment. This improves your security posture at that point. My advice is to enable this options when possible. When DNSSEC is not an option, I highly recommend to configure this: https://justinverstijnen.nl/what-is-mta-sts-and-how-to-protect-your-email-flow/
Thank you for reading this post and I hope I helped you out securing your email flow and data in transfer.
End of the page 🎉
You have reached the end of the page. You can navigate through other blog posts as well, share this post on X, LinkedIn and Reddit or return to the blog posts collection page. Thank you for visiting this post.
If you think something is wrong with this post or you want to know more, you can send me a message to one of my social profiles at: https://justinverstijnen.nl/about/
If you find this page and blog very useful and you want to leave a donation, you can use the button below to buy me a beer. Hosting and maintaining a website takes a lot of time and money. Thank you in advance and cheers :)

The terms and conditions apply to this post.