Enhance email security with SPF/DKIM/DMARC
Categories:
12 minute read
Microsoft announced that starting from May 5, 2025: SPF, DKIM and DMARC will become mandatory for inbound email delivery. Not configuring all three can result in your emails not being delivered correctly.
These 3 techniques are:
- SPF: Sender Policy Framework
- DKIM: Domain Keys Identified Mail
- DMARC: Domain-based Message Authentication Reporting and Conformance
When using Microsoft 365 as your messaging service, I also highly recommend to configure SMTP DANE. A detailed guide of configuring this can be found here: https://justinverstijnen.nl/configure-dnssec-and-smtp-dane-with-exchange-online-microsoft-365/
In this guide, we will cover those 3 techniques, how they work, how they can help you and your company to reduce email delivery problems and how we can configure those in Microsoft 365. By configuring SPF, DKIM and DMARC right you help creating a more safe internet. Not only for your own company but also for other companies.
Why bother about those techniques
You will recognise this in your work. You send an email to a party or expecting an incoming email, but it appears in your junk folder. Or you send a advertisement email to your customers but most of the customers will not receive this properly and the mail will appear in the junk folder which will not be checked that regularly. This can result in some huge income loss.
This will happen because the receiving party checks reputation of the sending party. Based on that reputation there will be a decision on the receiving email service which can place the email in the normal folder or in the junk folder.
In the last 3 years, almost every emailing service (Hotmail/Exchange Online/Gmail/Yahoo) has forced to have SPF configured. If not configured properly, all received email will be placed in the junk folder at the recipient side. In addition to this, also configuring DKIM can further reduce the odds of an email received in the junk folder so configuring these protocols is key to good deliverability of your sent email messages.
Configuring these 3 techniques helps with:
- Improving email deliverability of your domain
- Decreases changes of your domains being spoofed
- And so, increases security
- Not only for your own company but for others also
Tip: Use my DNS MEGAtool to verify if your domain or other domains already use these techniques: https://tools.justinverstijnen.nl/dnsmegatool
What is a MX record?
Every domain on the internet can have multiple MX records. This record tells a sender on which server the email message must be delivered. A MX record for 365 can look like this:
0 justinverstijnen-nl.mail.protection.outlook.comAfter configuring DNSSEC and SMTP DANE from this guide, your MX record looks like this:
0 justinverstijnen-nl.r-v1.mx.microsoftMX records have a priority number in front of them, this tells the priority of the servers. Messages will be delivered first at the number closest to “0” which represents a higher priority. After this server doesn’t accept the message or a outage is ongoing, other servers will be tried to deliver the message.
If managing your own emailing server, the SSL certificate must be valid at all times which may sound logical. If using 3rd party services to send and receive emails like Microsoft 365, Google Workspace or such solutions, then this certificate will be automatically renewed.
SPF - Sender Policy Framework
Sender Policy Framework (SPF) is an email authentication method designed to prevent email spoofing. It allows domain owners to specify which mail servers are permitted to send emails on behalf of their domain. Receiving mail servers use SPF records of the sending party to verify if an incoming email comes from an authorized source.
It works by publishing a DNS record as a sending party that states when an email from the sending domain can be trusted. The receiving party then can lookup the sending party if the email is send through a trusted service. This DNS record is an TXT-type record and looks like this:
v=spf1 mx ip4:123.123.123.123 include:spf.protection.outlook.com -allIn this record you state all the emailing services, emailserver as IP address or add “mx” to always trust mails sent from your primary MX record-service.
SPF policies
In a SPF record, you always have a ~all, ?all or -all at the end of the record. This is the policy of what the SPF record will do:
| SPF Policy | Description | Effect | Security level |
|---|---|---|---|
| ?all | No action taken | All emails are delivered normally without intervention | Low |
| ~all | Softfail | All email is still being sent and delivered, but in the Junk folder | Low to moderate |
| -all | Hardfail | Email sent from your domain but not by trusted service in SPF means a very high spam score and most of the time rejecting the email. | High |
My advice is to always use the Hardfail (-all) and ensuring your emailsystems are always trusted by SPF. This means almost nobody could misuse your domain to send unauthorized email. Of course, this excludes security breaches into accounts.
Advantages of configuring SPF
The advantages of configuring SPF records are:
- Spoofing attacks through your domain name is much harder
- Much less false positives
- Higher chance of your email actually reaching the receiver
DKIM - Domain Keys Identified Mail
DKIM (Domain Keys Identified Mail) is an email authentication method that allows senders to digitally sign their emails using cryptographic signatures. This helps receiving partys verify that an email was sent from an authorized source and that it was not altered during transit.
Exactly like in SPF, the sending party publishes a DNS record with an public key for the receiving party. Every email then will be signed with an private key so an receiver can match those keys and check if the message is altered on it’s way. The last what we want is an virus of other threat injected into an email and getting that in our inbox.
DKIM records must be configured for every sending domain, and every service that sends email from the domain. Basically, it’s a TXT record (or CNAME) that can look like this:
v=DKIM1; p=4ea8f9af900800ac9d10d6d2a1d36e24643aeba2This record is stating that it uses DKIM version 1 (no new version available) and has a public key. In this example case, it is “justinverstijnen.nl” in SHA1.
When using Microsoft 365, DKIM consists of 2 DNS records which has to be added to the DNS records of your domain. After adding those records, we still need to activate DKIM for every domain. I will show this in depth further in this guide.
Advantages of configuring DKIM
- Man in the middle attack-detection
- Better security
- Higher chance of your email actually reaching the receiver
DMARC - Domain-based Message Authentication Reporting and Conformance
DMARC is an email verification and reporting protocol that helps domain owners prevent email spoofing, phishing, and unauthorized use of their domains for sending emails by attackers. It takes advantage of the SPF and DKIM checks to ensure that only legitimate emails are delivered while unauthorized emails are rejected or flagged.
DMARC policies
DMARC uses the SPF and DKIM checks as a sort of top layer to determine if a sender is spoofing a domain. If the SPF check or DKIM check fails, we can decice what to do then by configuring one of the 3 available DMARC policies to decide what to do:
| DMARC Policy | Description | Effect |
| p=none | No action taken, just collect reports | All emails are delivered normally |
| p=quarantine | Suspicious emails are sent to spam | Reduces phishing but still delivers spoofed emails to end users Junk box |
| p=reject | Strict enforcement: email sent without SPF or DKIM check are blocked | Maximum protection against spoofing and phishing |
So DMARC isn’t really a protocol that states what email inbound on your emailing service should be blocked. It tells other servers on the internet when they receive an email from your domain, what they should do. You then can choose to receive reports from other emailing services what
DMARC is configured per domain, just as all other techniques and helps reducing the amount of SPAM emails that can be sent from your domains. My advice is to configure a reject policy on all domains you own, even when not using for any email. If every domain on the world configures a reject policy, spoofing will be decreased by at least 95%.
Configuring DMARC
DMARC must be configured by configuring a TXT record on your public DNS. An example of a very strict DMARC record looks like this:
_dmarc v=DMARC1; p=reject;To have a step-by-step guide to configure this into your DNS, please go down to: Configuring DMARC step-by-step
In production domains, I highly recommend only using the “reject” policy. Each email that does not pass through SPF and DKIM must not be delivered in a normal manner to employees as they will click on anything without proper training.
Monitoring using DMARC
We can get 2 types of reports from DMARC which can be used for monitoring malicious activity or to get an better understanding about rejected email-messages:
- Aggregate Reports (RUA): Provides an overview of email authentication results, showing which sources sent emails on behalf of your domain and whether they passed SPF and DKIM checks
- Forensic Reports (RUF): Contains detailed information on individual failed messages, including sender IP, authentication failures, and subject lines
You can configure this by adding the options to the DMARC record:
- For Aggegation Reports (RUA): rua=mailto:rua-reports@justinverstijnen.nl;
- For Forensic Reports (RUF): ruf=mailto:ruf-reports@justinverstijnen.nl;
- When using forensic reports, also add fo=1; to receive SPF and DKIM fails
Of course replace with your own email adresses and add the options to the DMARC record, my record will look like this:
v=DMARC1; p=reject; rua=mailto:reports@justinverstijnen.nl; ruf=mailto:reports@justinverstijnen.nl;Advantages of configuring DMARC
- Monitor email activity
- Enhance email authentication
- Protect your organization from spoofed emails
Configuring SPF with Microsoft 365 step-by-step
To configure SPF for your domain with Microsoft 365, follow these steps:
Log in to your DNS-hosting service where you can create and change DNS records.
Now check if there is already an existing SPF record, otherwise create a new one. This is always the same for each domain:
| Type | Name | Value |
| TXT-record | @ | v=spf1 include:spf.protection.outlook.com -all |
When using more than only Microsoft 365 for emailing from your domain, ensure that you don’t overwrite the record but add those services into the record. Also, the maximum number of DNS lookups in your SPF record is 10.
This configuration must done for all your domains.
Configuring DKIM with Microsoft 365 step-by-step
To configure DKIM for your domain in Microsoft 365, go to the Security center or to this direct link: https://security.microsoft.com/dkimv2
Then, under “Email & Collaboration” go to “Policies & Rules”.
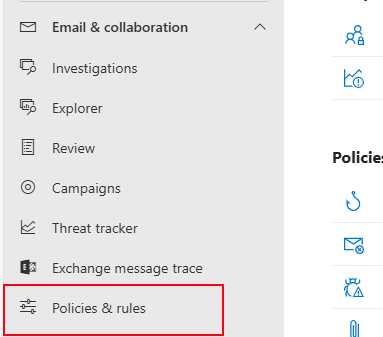
Click on “Threat policies”.
Then on “Email authentication settings”.
Here you will find all your domains added to Microsoft 365 and the status of DKIM. In my case, I already configured all domains to do DKIM signing.
If you have a domain that has DKIM disabled, you can click on the domain-name. This opens an fly-in window:
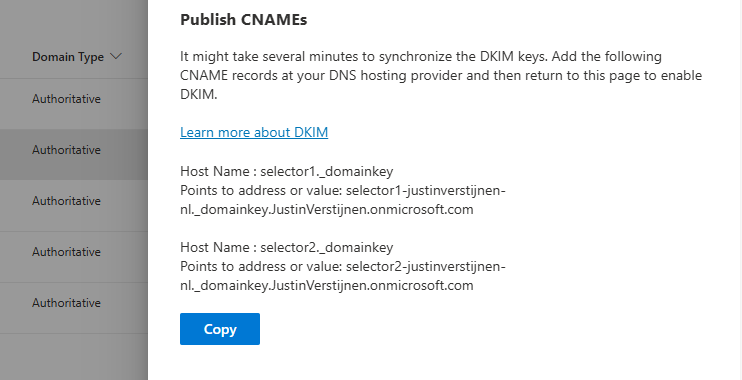
The window tells us how to configure the records in our DNS service. In my case I have to configure 2 CNAME type DNS records. Microsoft 365 always use this 2 CNAME-configuration.
Log in to your DNS-hosting service where you can create and change DNS records.
Create those 2 records in your DNS hosting service. In my case this configured:
| Type | Name | Value | TTL |
| CNAME-record | selector1._domainkey | selector1-justinverstijnen-nl._domainkey.JustinVerstijnen.onmicrosoft.com | Provider default |
| CNAME-record | selector2._domainkey | selector2-justinverstijnen-nl._domainkey.JustinVerstijnen.onmicrosoft.com | Provider default |
For reference;

Some DNS hosting providers requires you to end external domain-record values with a dot “.”
Save the DNS records, and check in Microsoft 365 if DKIM can be enabled. This may be not directly but should work after 15 minutes.
This configuration must done for all your domains.
Configuring DMARC step-by-step
Configuring DMARC is done through DNS records. This guide can be used to configure DMARC for most emailing services.
- Log in to your DNS-hosting service where you can create and change DNS records
- Now determine, according to the information in the theoretical part how you want to configure the record
- In my case, this will be the most restricting option, because we don’t want failed SPF or DKIM emails delivered to the normal inbox of our collegues
- Also, I don’t use any reporting tools for DMARC
My record looks like this:
v=DMARC1; p=reject;We have to create or change an existing record to make this DMARC policy effective. The full record can look like this:
| Type | Name | Value | TTL |
| TXT-record | _dmarc | v=DMARC1; p=reject; | Provider default |
My configured record for reference:

This configuration must done for all your domains.
When implementing the reject policy in real world domains, double check all systems who send email from your domain, as this change can disrupt deliverability when not configured correctly.
Ensure all systems are defined in SPF and use DKIM.
Configure DMARC for your .onmicrosoft.com domain(s)
It’s also possible to configure DMARC on your Microsoft Online Email Routing Address (MOERA) domain, which is more widely known as your .onmicrosoft.com domain. I highly recommend doing this as this is practically also a domain that looks like your brand.
To configure this, go to Microsoft 365 Admin Center and head to the domains section:

Open your domain and then open the “DNS records” tab. Create a new record here:
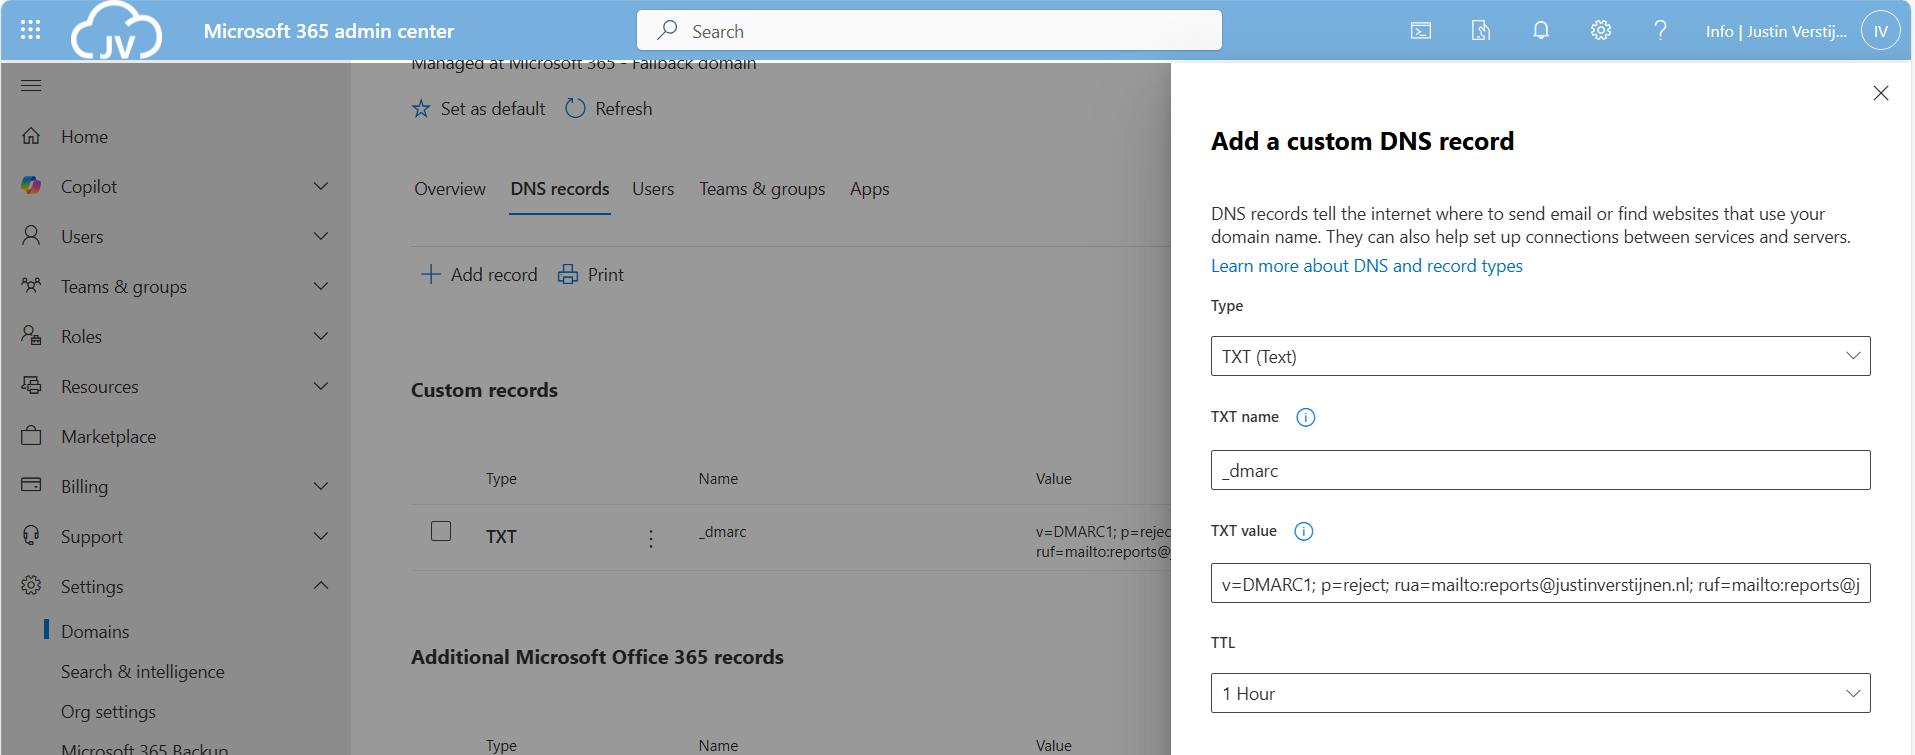
Use the following parameters:
- Type: TXT
- TXT name: _dmarc
- TXT value: your constructed DMARC record
Then save your configuration.
Knowledge check
This quiz needs JavaScript to show the questions and feedback.
Summary
Configuring SPF, DKIM and DMARC nowadays must to be a standard task when adding a new domain to your email sending service like Microsoft 365. Without them, almost all of your sent email will be delivered to “Junk” or even rejected. In larger companies, this can directly result in income loss which we definitely want to avoid.
For short, these 3 techniques do:
- SPF is a “trusted sender” whitelist for a domain. Only if a server is in the SPF record -> its trusted
- DKIM is a PKI system that signs your sent email so a receiver can check if an email really came from the domain it says by verifying the public key in DNS
- DMARC is a top-level system where you can decide what other emailing servers on the internet must do if an email from your domain fails the SPF or DKIM check
My advice is to always have those 3 techniques configured, and when using Microsoft 365 I again highly recommend to configure SMTP DANE also. This can be configured using this guide: https://justinverstijnen.nl/configure-dnssec-and-smtp-dane-with-exchange-online-microsoft-365/
Thank you for reading this page and I hope I helped you.
End of the page 🎉
You have reached the end of the page. You can navigate through other blog posts as well, share this post on X, LinkedIn and Reddit or return to the blog posts collection page. Thank you for visiting this post.
If you think something is wrong with this post or you want to know more, you can send me a message to one of my social profiles at: https://justinverstijnen.nl/about/
If you find this page and blog very useful and you want to leave a donation, you can use the button below to buy me a beer. Hosting and maintaining a website takes a lot of time and money. Thank you in advance and cheers :)

The terms and conditions apply to this post.