Entra ID Authentication on Azure Windows VM
Categories:
7 minute read
Prerequisites
Before starting, ensure the following requirements are met:
- The AADLoginForWindows VM extension is installed
- The required users have an applicable role for VM login
- A System Assigned Managed Identity is enabled
- A RDP whitelist is configured
- A public DNS A record exists pointing to the public IP address of the server
- The full FQDN is configured on the server
- Internet login is enabled in the RDP client
- The VM name nay not exceed 15 characters
I will guide you through all these steps to get a good understanding of what these requirements actually are.
The solution described
The solution we are going to implement works as follows:
- Extension : On the virtual machine in Azure we install an extension. Extensions are small add ons which can be deployed from the Azure Portal or ARM tools to alter the working of a VM instance. In this case, it enables it to do Entra ID authentication.
- Managed Identity : It uses this extension alongside a Managed Identity, which is the identity of the virtual machine in Entra ID, to authenticate you as user.
- IAM Permissions : Before the user can be fully authenticated, it needs some IAM permissions as the access control is now done through the Azure Portal.
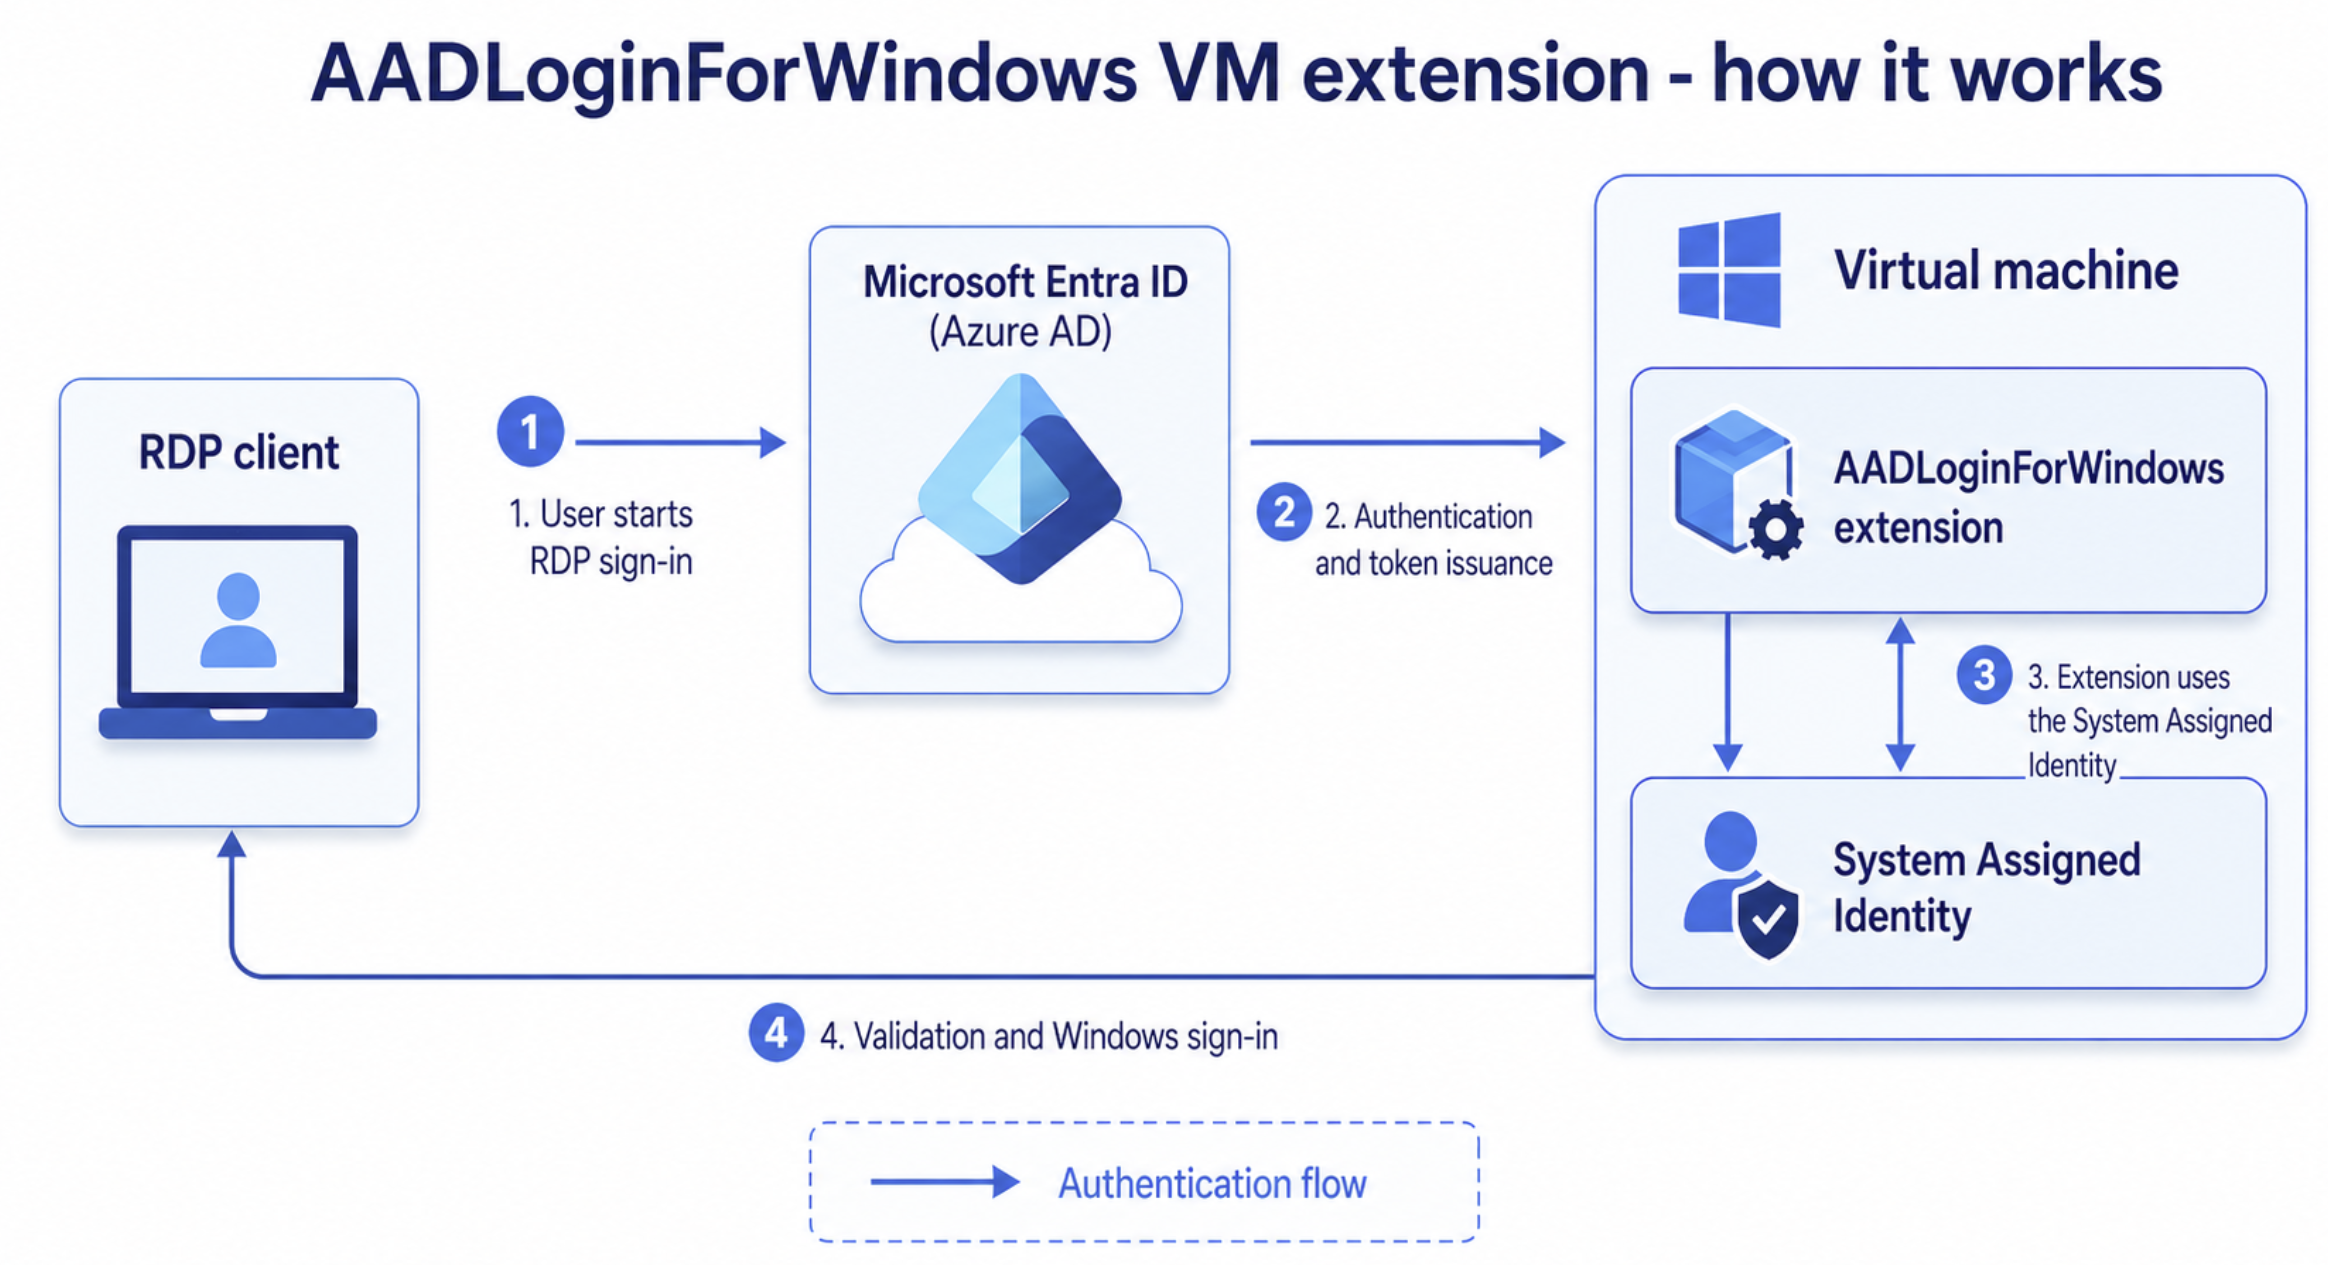
Step 1: Install the AADLoginForWindows Extension
We first need to install the required extension for Entra ID authentication. This extension can be installed via the Azure Portal.
Go to the Virtual Machine and open the “Extensions + applications” blade.
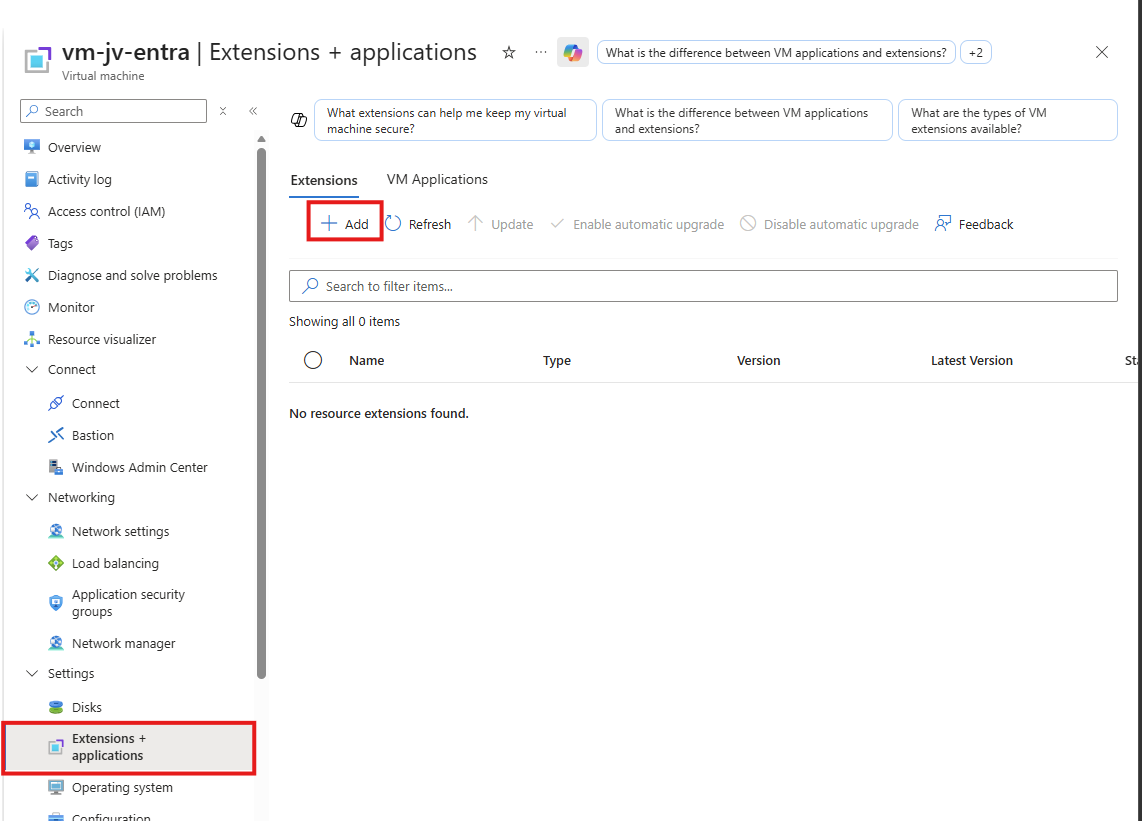
Click on “+ Add” here to add a new extension to the Virtual Machine instance.
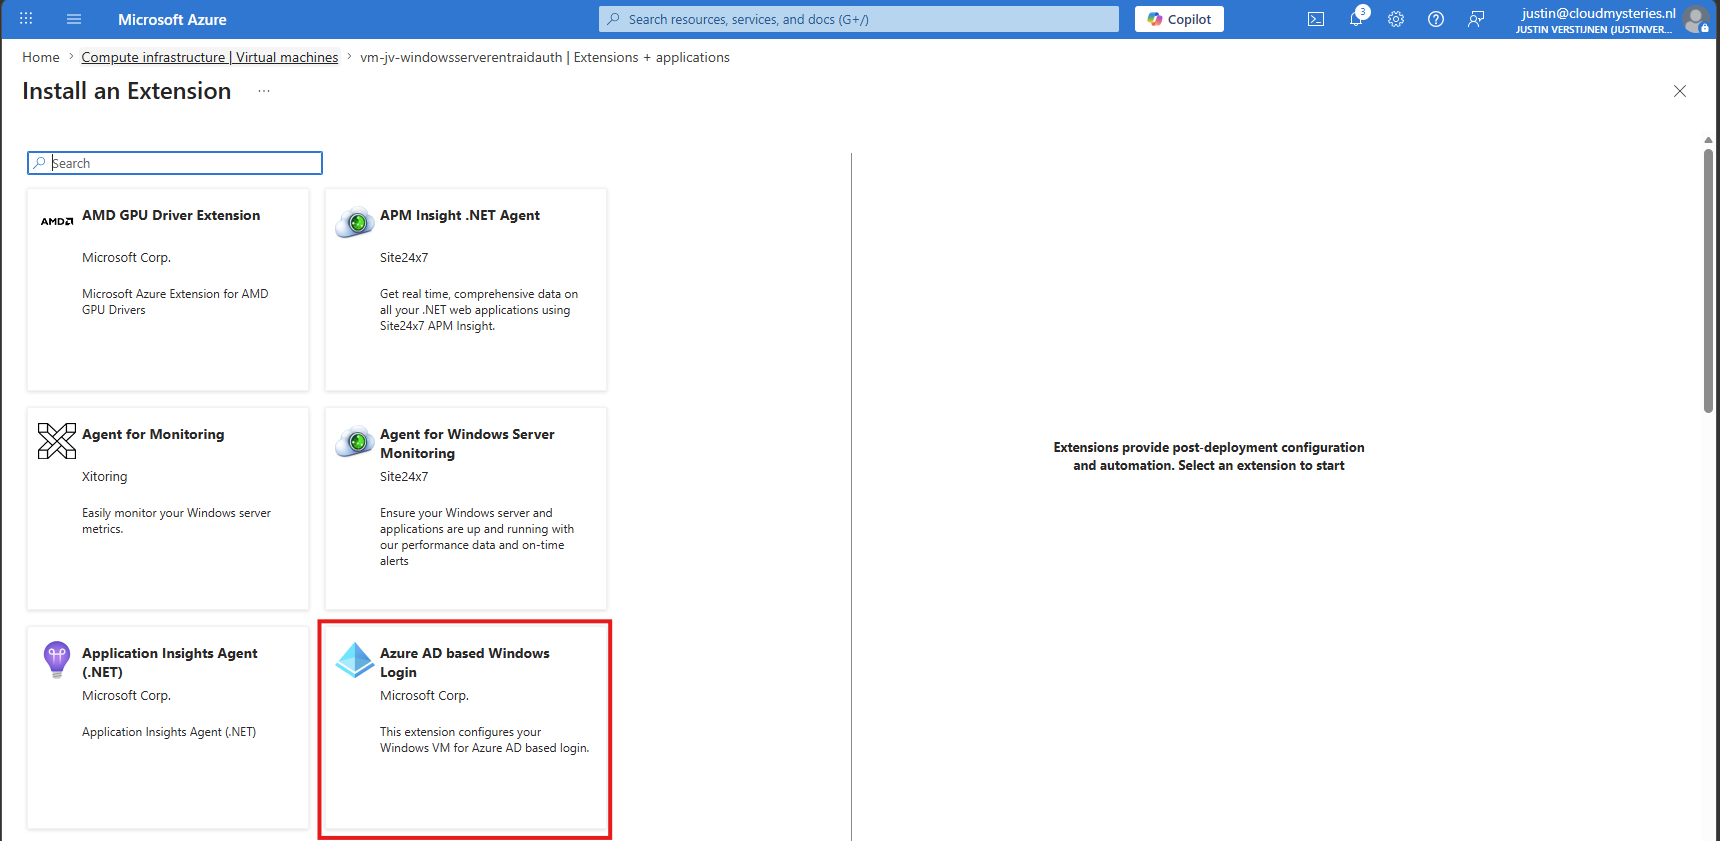
Select the “Azure AD based Windows Login” extension here. This is the old name of Entra ID as you already know. Then finish the wizard by advancing 3 times through the wizard.
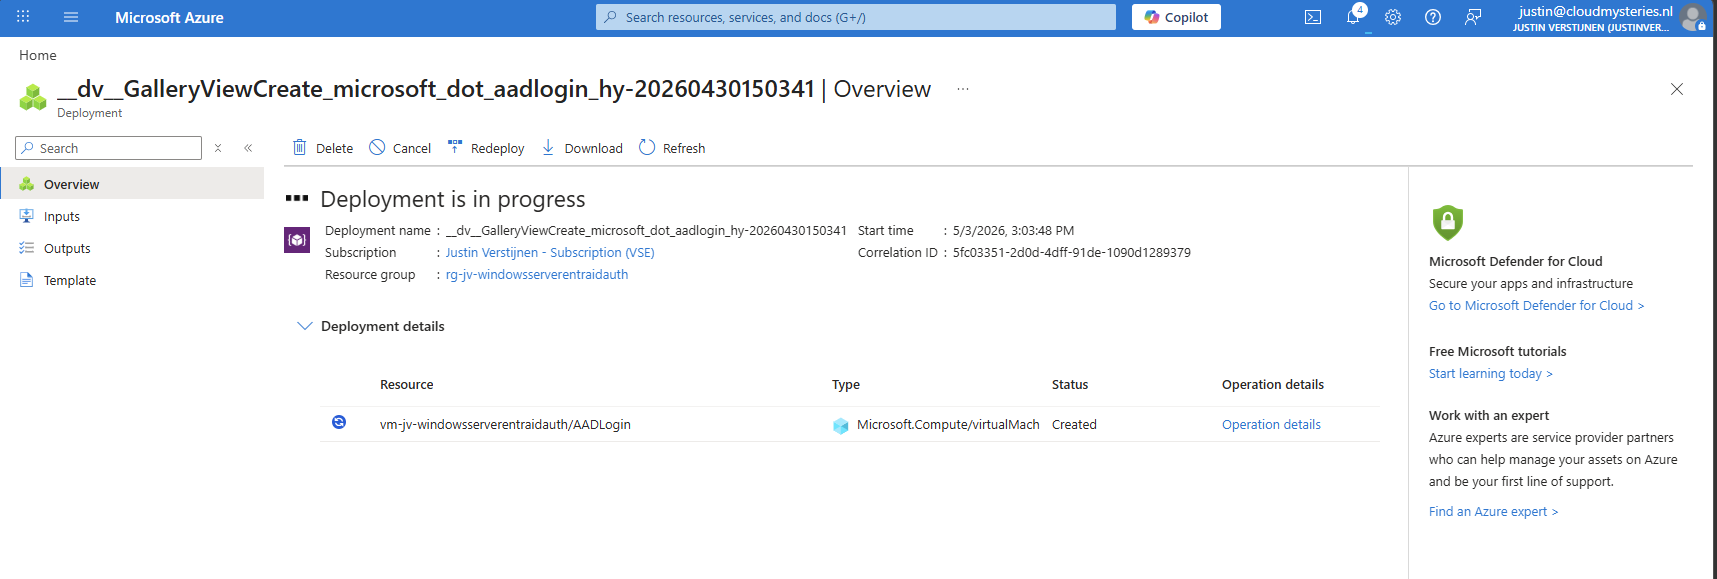
At this point, the Azure VM should have the extension installed. You can also configure the extension when initially deploying an Azure VM. Then you can find it on the Management tab:
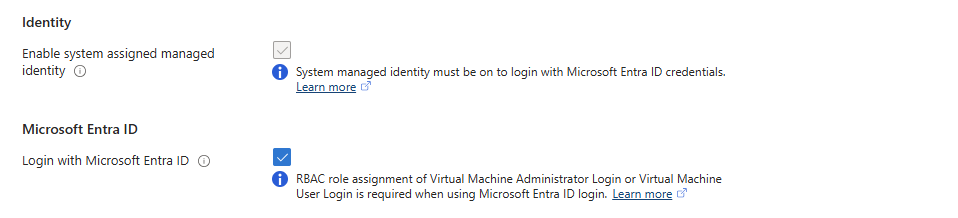
As you can see, the Managed Identity will also be configured for this machine to actually have access to Entra ID.
-Login with Microsoft Entra ID: Enabled
Step 2: Configure IAM Roles
We must now configure which users are allowed to login to the virtual machine. This is done by Azure RBAC roles.
To learn more about Azure RBAC roles and scopes, check out this guide.
In the Azure Portal, go to the virtual machine instance and open the “Access control (IAM)” blade. Then click “+Add” and add role assignments here.
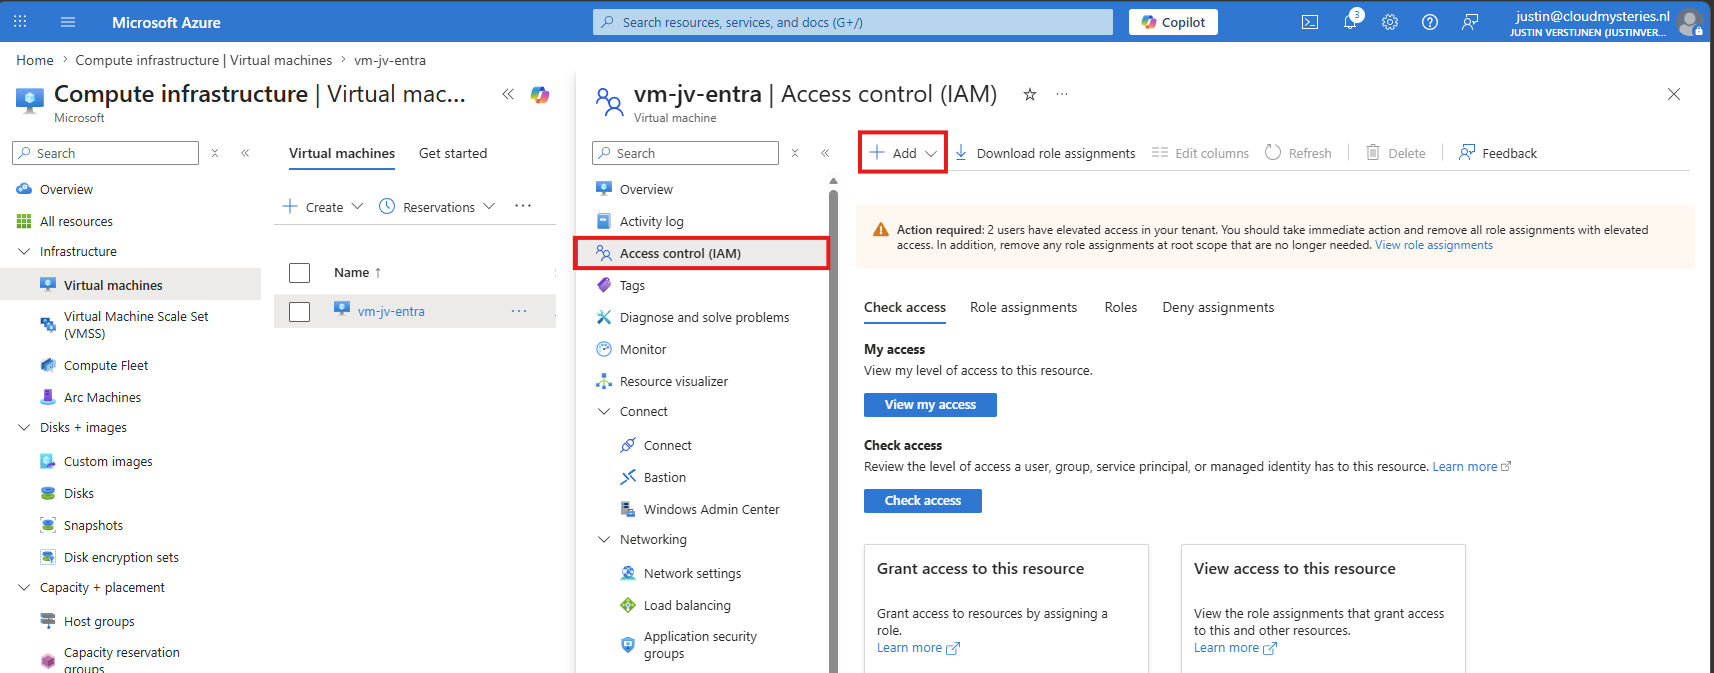
Now you need to assign the right roles. We have two options: normal user and Admin login:
-Normal user: Virtual Machine User Login
-Admin user: Virtual Machine Administrator Login
In my case, I assign the Virtual Machine Administrator Login to my account. Having Owner on a inheriting scope is unfortunately not enough as access to a VM is categorized as “Data” role and there stops this kind of inheritance.
If having multiple VMs with this cause in one resource group, you can also assign this role on the resource group level. This eliminates having to add those roles to every VM.
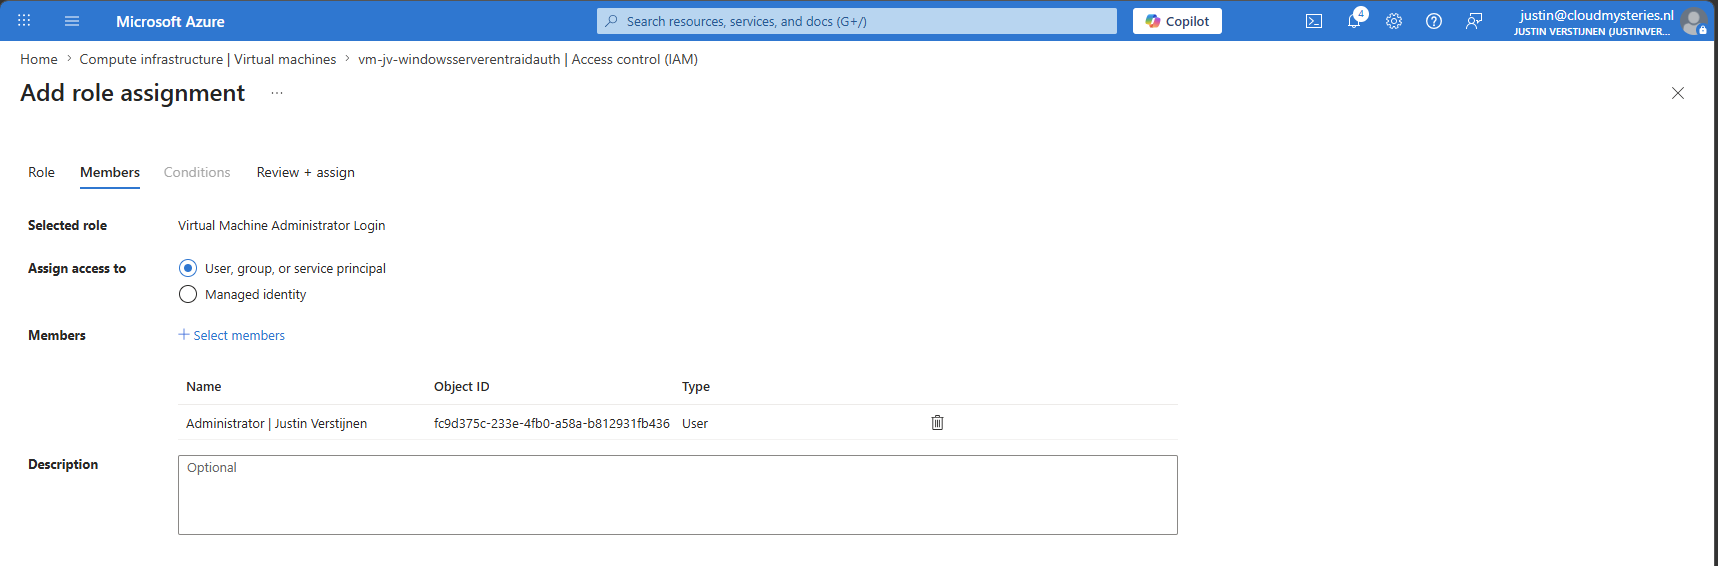
Step 2 is now completed.
Step 3: Enable the System Assigned Managed Identity
To allow this server to authenticate against Entra ID, a System Assigned Managed Identity must be enabled. This is an identity which represents the Virtual Machine instance in Entra ID and makes it possible to assign Azure RBAC roles to the VM itself. For the purpose of this solution its needed to partly join the virtual machine to your Entra ID environment and making this communication possible.
In the Azure Portal, open your Virtual Machine and open the “Identity” blade.
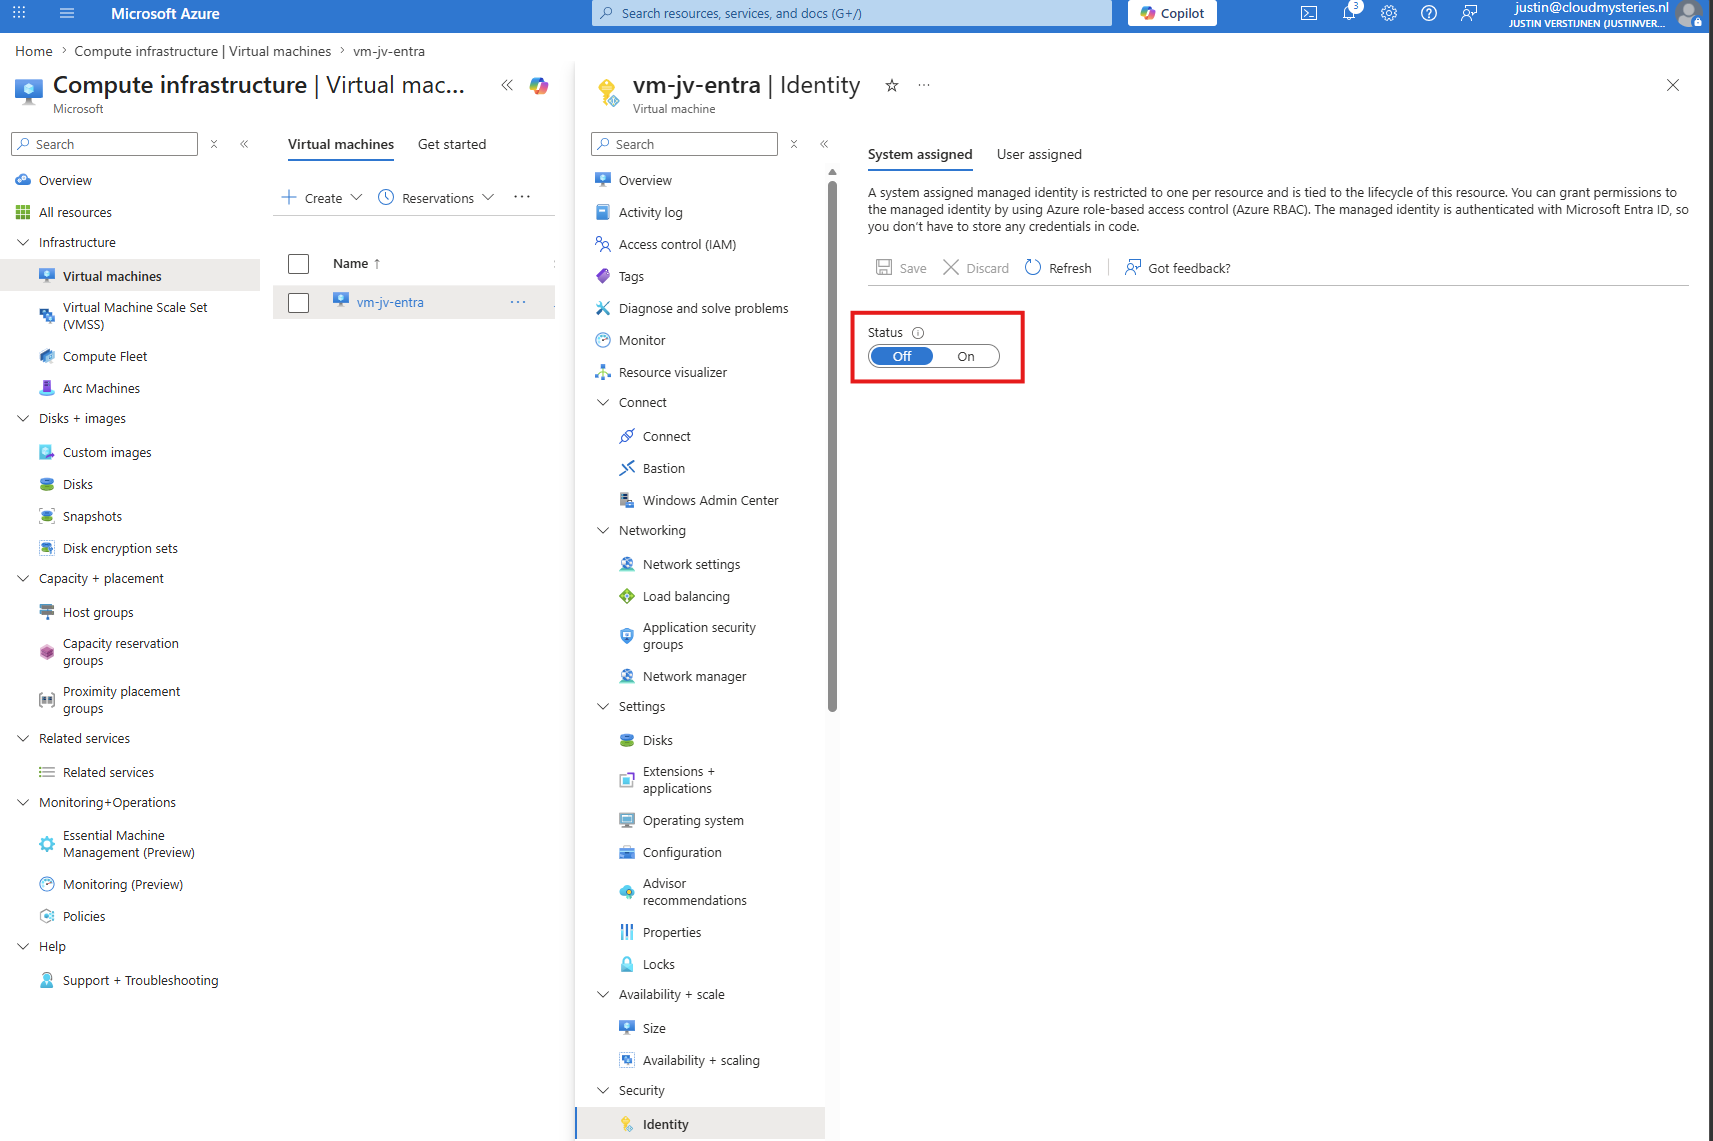
Switch this button from Off to On to enable the identity and save the changes.
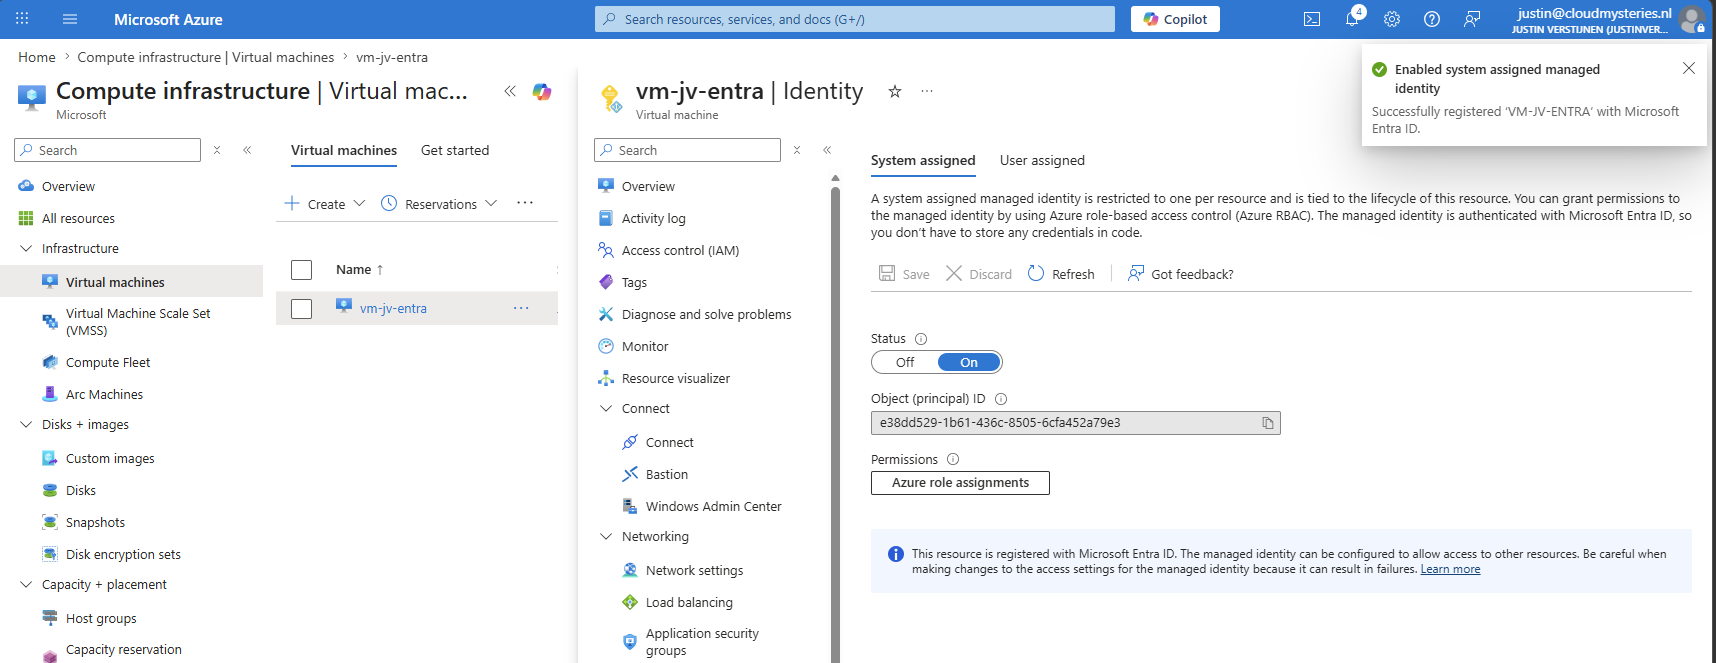
This is how we want it to be. Step 3 completed.
Step 4: Configure Inbound RDP network rule (DNAT)
If not already done so, let’s configure the virtual machine to only be reachable from trusted networks. As RDP is a highly sensitive port which is actively scanned by attackers we want to only allow certain IP addresses we trust.
While this step may vary for every person or organization, let me show you how to add multiple fictional IP addresses.
In the Azue Portal, open the virtual machine and the the “Network settings”.
This already shows the unsafe RDP rule being opened to the whole internet to attack. We will now add two fictional IP addresses to limit access to only 2 of the possible 4+ billion IP addresses, as known as the full internet.
-12.34.56.78
-78.56.34.12
Click on the “RDP” inbound network rule.
Set the source to “IP Addresses” and fill your IP addresses in here. This must be comma separated, a range or a CIDR network.
12.34.56.78,78.56.34.12This should be like this:
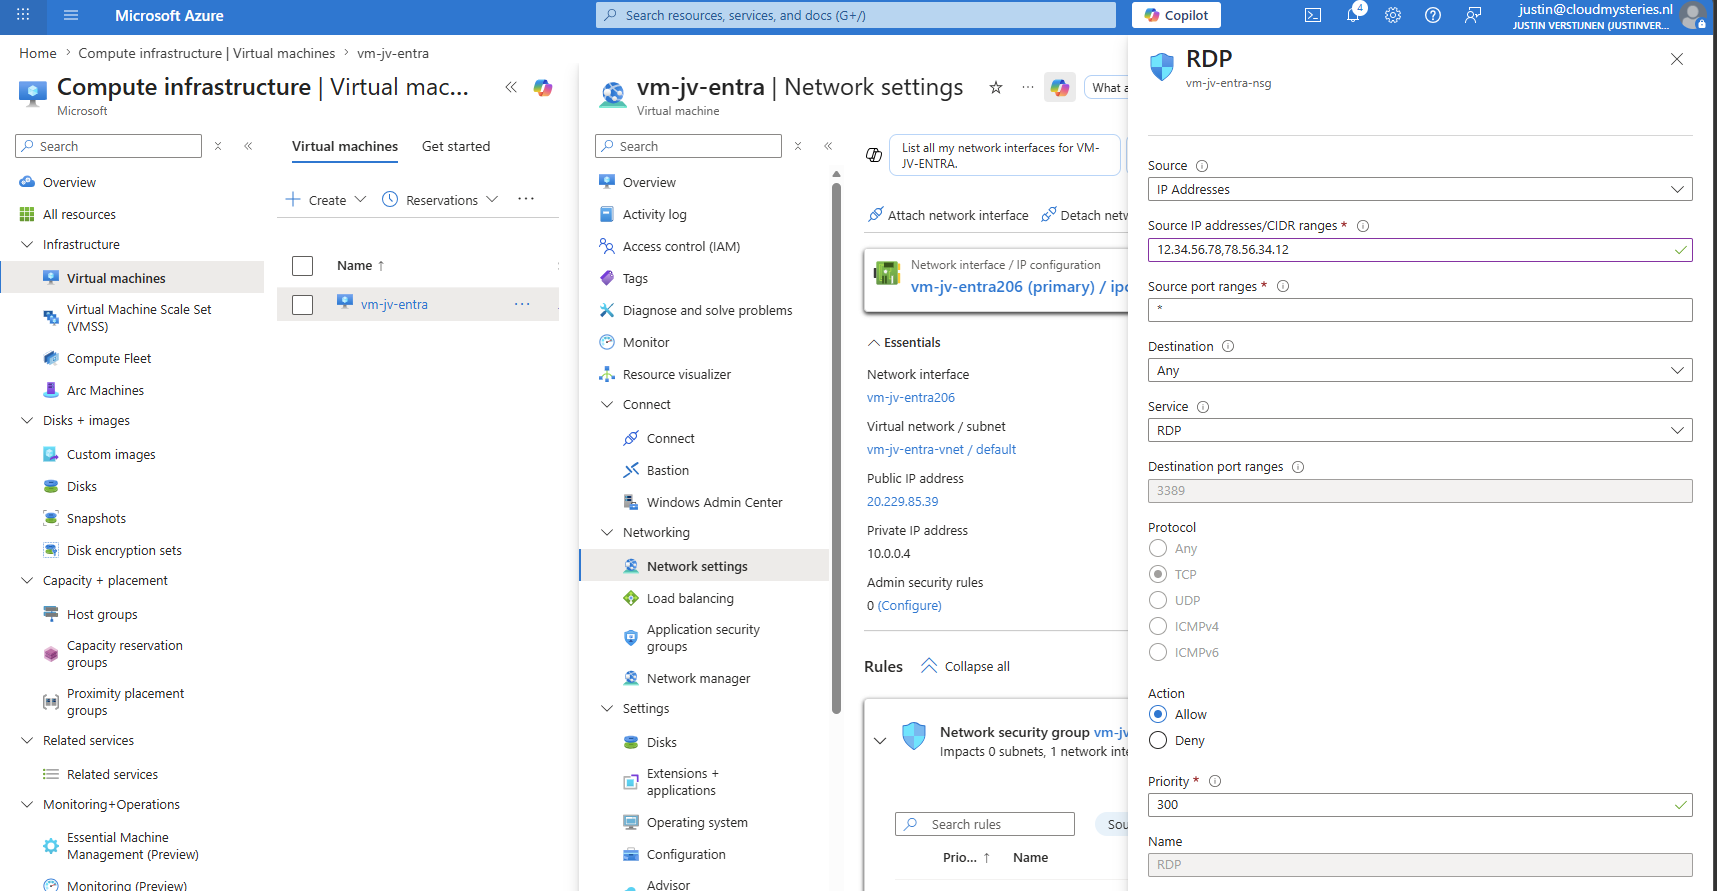
Now we can save the RDP rule and made the machine 99,9% more safe against RDP attacks.
Step 5: Create a Public A Record
To make Entra ID authentication and your RDP client word, A public DNS (A record) must be created on your domain. Create this record at the DNS provider of the domain and verify it resolves correctly using the ping command in CMD or PowerShell.

Let’s test it after configuring:
ping vm-jv-entra.justinverstijnen.nlPinging vm-jv-entra.justinverstijnen.nl [20.229.85.39] with 32 bytes of data:
Request timed out.
It doesn’t have to actually reply as we did not configure that. Just the translation from name to IP is enough.
Step 6: Configure the Full FQDN on the Server
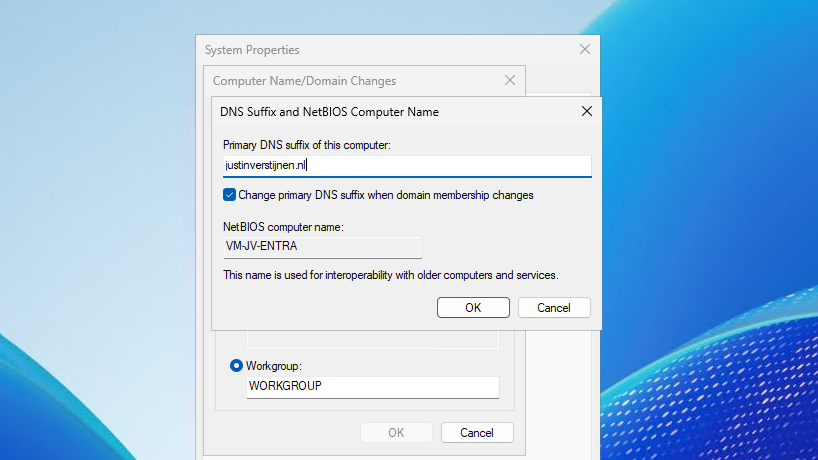
Now that we have almost everything in place, we must login to the virtual machine but still with the locally created administrator account. We must configure a Primary DNS Suffix name on the machine so it knows what FQDN to listen to. The FQDN is a combination of host and domain name. In my case: vm-jv-entra.justinverstijnen.nl
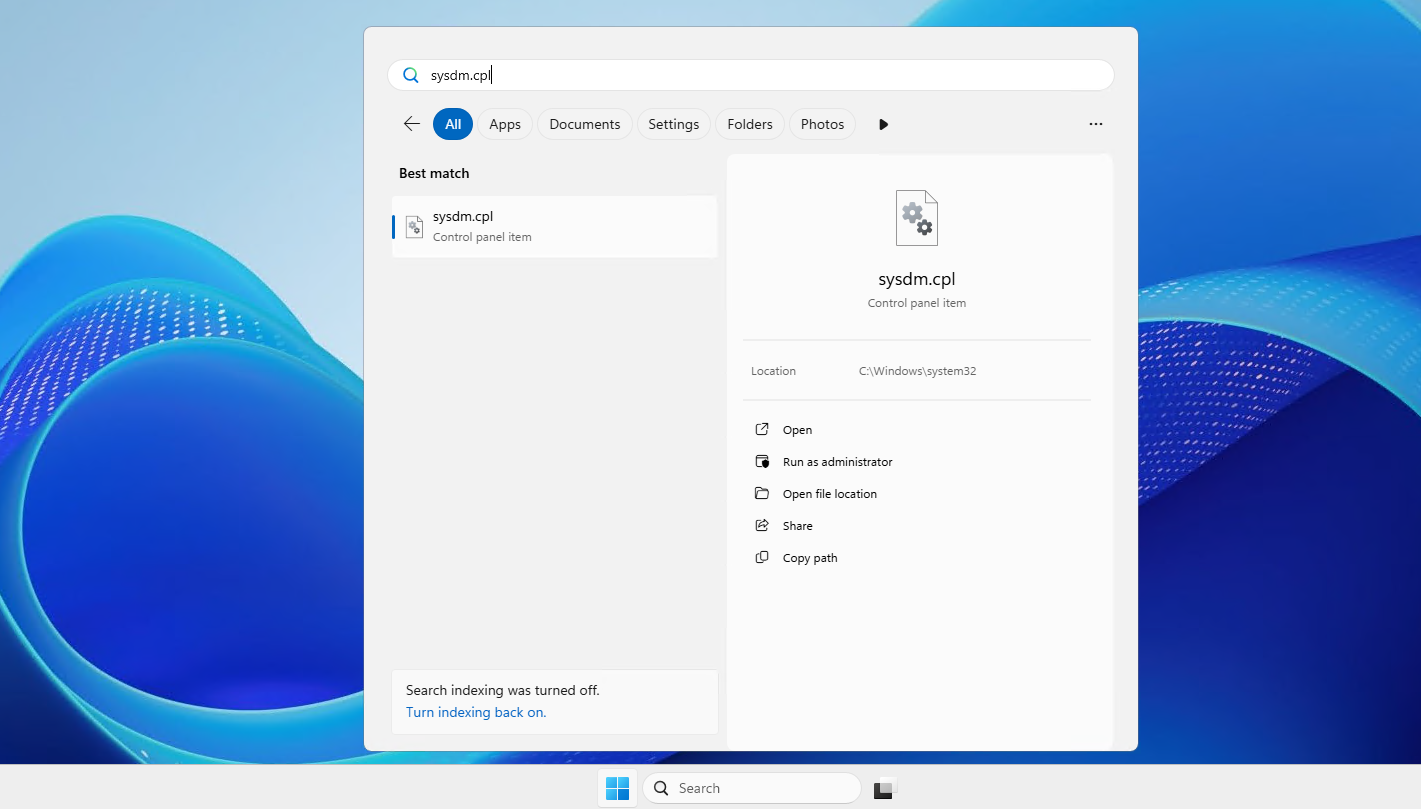
Login to the virtual machine using the local administrator login and open the control panel section sysdm.cpl.
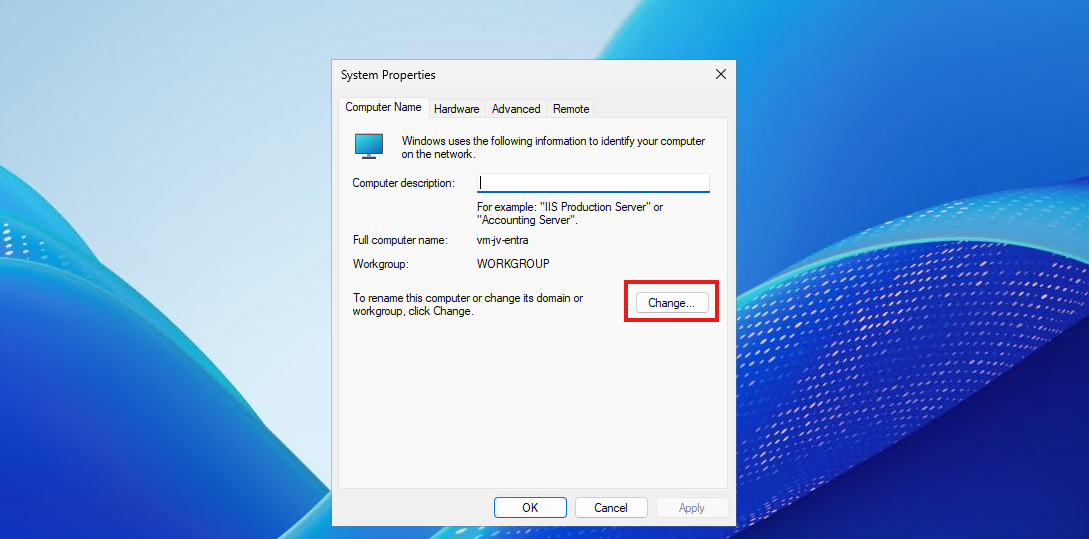
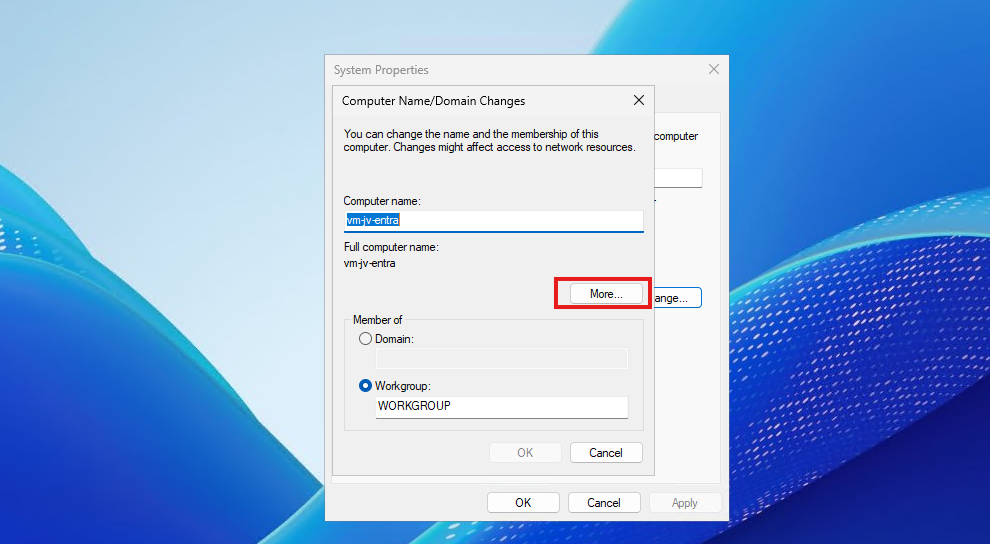
Then click on “Change” at the Computer Name tab.
Then click the “More…” button.
Fill in the domain part of the FQDN of the server here. This will then be added to the hostname of the VM creating the FQDN we just created.
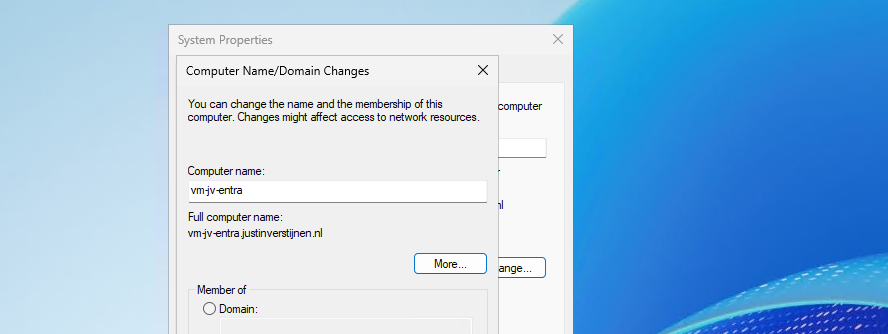
It must look like this when you have saved the configuration:
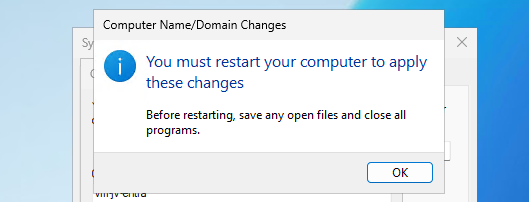
Now apply the changes and restart the server to apply this change.
Step 7: Enable Internet Login in the RDP File
Now we must enable internet login for the RDP client. This changes the Kerberos authentication to Entra ID authentication.
This can be done in the MSTSC client of Windows at the “Advanced” tab.
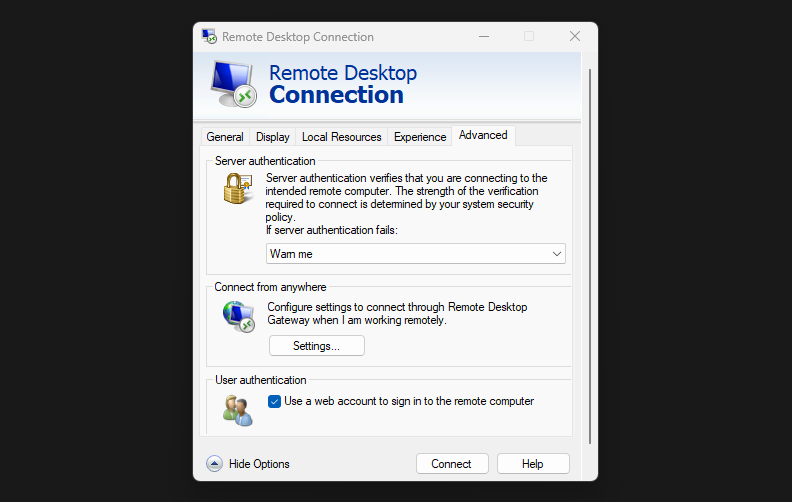
Enable the option “Use a web account to sign in to the remote computer”. If using RDP files, you can add or change this line in your configuration to the line below:
-enablerdsaadauth:i:1
Now connect to your server using the FQDN hostname: vm-jv-entra.justinverstijnen.nl in my case. After authentication, you should get a prompt to allow the RDP connection in Entra ID context. Click OK now.
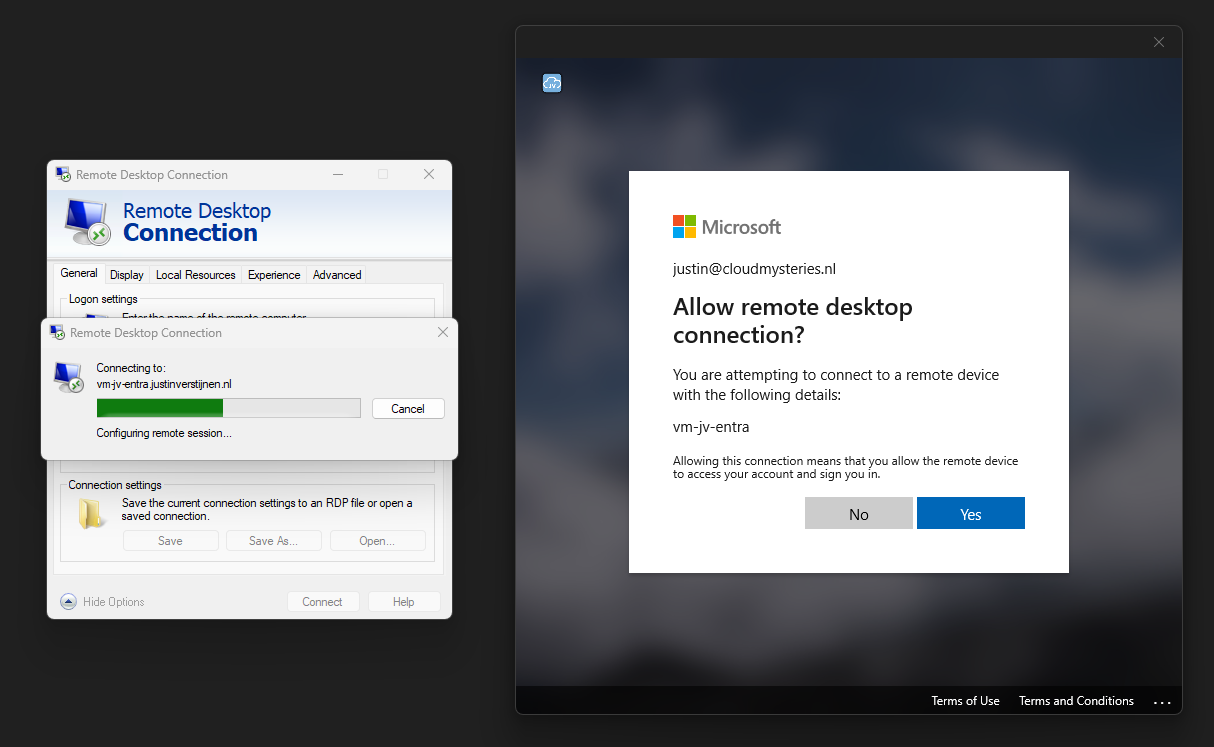
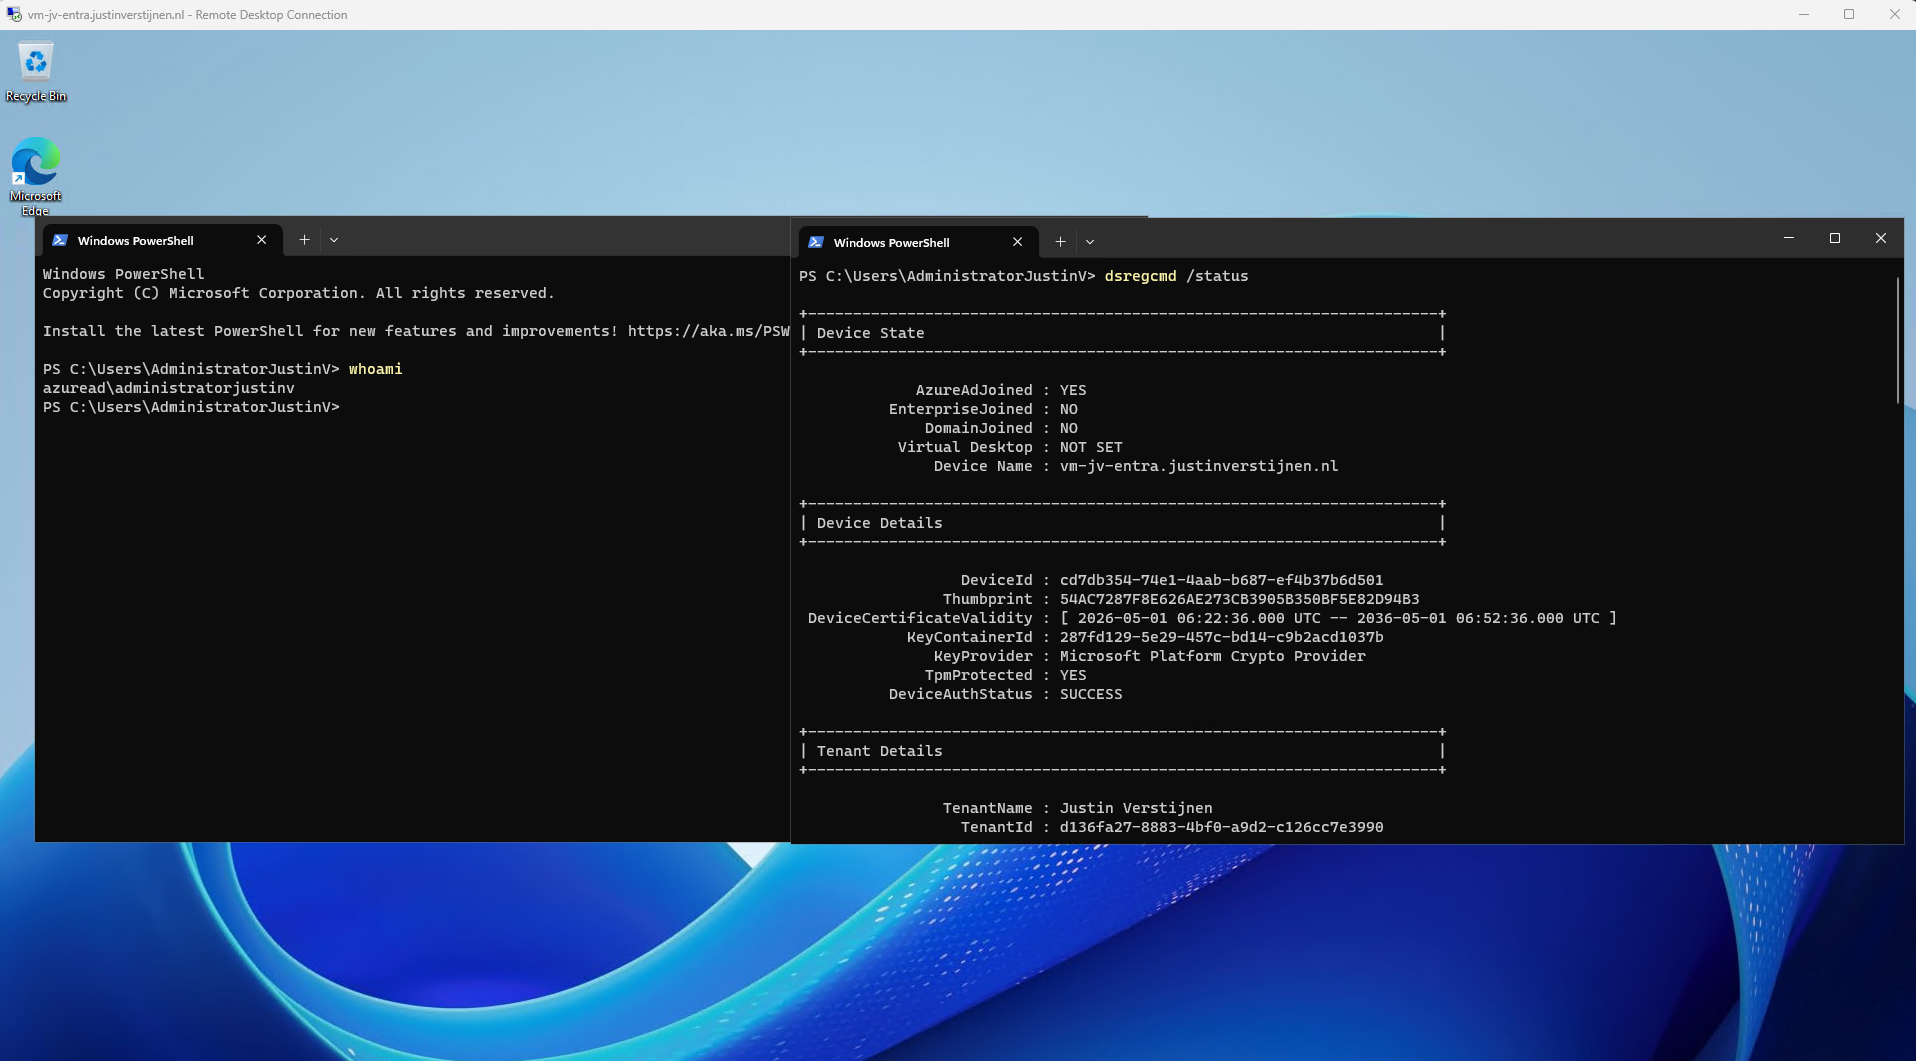
Now we will be logged into the virtual machine. We can check the Entra ID status by firing this command:
dsregcmd /statusThis shows that the machine is actually Entra ID joined now:
Summary
This guides describes how you can enable Entra ID authentication into your Azure VMs which can be useful in some situations. This enables multiple users to login with their own account instead of using local account. You can then manage all user accounts in the Entra ID and Azure Portal. Most of it is done through initial configuration.
Sources
These sources helped me by writing and research for this post;
https://learn.microsoft.com/en-us/entra/identity/authentication/overview-authentication
https://learn.microsoft.com/en-us/entra/identity/devices/howto-vm-sign-in-azure-ad-windows
End of the page 🎉
You have reached the end of the page. You can navigate through other blog posts as well, share this post on X, LinkedIn and Reddit or return to the blog posts collection page. Thank you for visiting this post.
If you find this page and blog very useful and you want to leave a donation, you can use the button below to buy me a beer. Hosting and maintaining a website takes a lot of time and money. Thank you in advance and cheers :)

The terms and conditions apply to this post.