Match AD users using Entra Connect Sync and MSGraph
Categories:
4 minute read
The difference between soft and hard matching
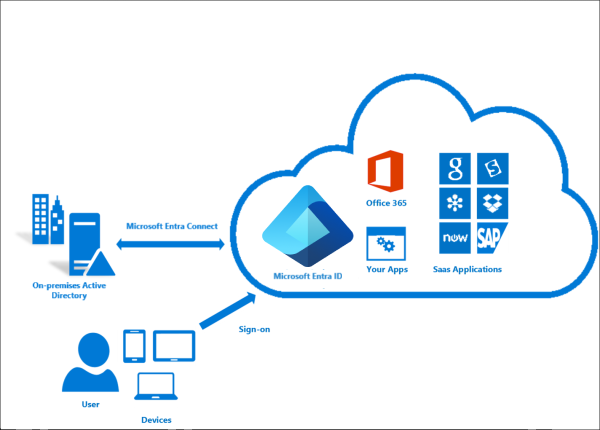
Most of the time the system itself will match the users automatically using soft-matching. Here the service will be matching users in both Entra ID and Active Directory by using known attributes like UserPrincipalName and ProxyAddresses.
In some cases, especially when you use different Active Directory and Entra ID domains, we need to give the final tip to Entra ID to match and AD user to an Entra ID users. We will tell Entra ID what the GUID of the on-premises user is by getting that value and encode it into Base64. Then we pass Entra ID this value so it understands what local user to link with what cloud user. This process is called “hard-matching”, as we have to do this by hand or by scripting.
The process described
The steps to hard-match an Entra ID and Active Directory user are in short:
- Determine the local and cloud user you want to match
- On the on-premises Active Directory, run the command “Get-ADUser *username*”
- Copy the GUID value
- Run the command “[Convert]::ToBase64String([guid]::New(”*GUID*").ToByteArray())" with *GUID* replaced by the GUID from step 3
- Copy the Base64 value
- Connect to Microsoft 365 by using “Connect-MSOLService”
- Run the command “Set-MsolUser -UserPrincipalName user@domain.com -ImmutableId *BASE64*
- Run a Entra Connect Sync
Step 1: Fetching Active Directory GUID
To merge an existing on-premises user and an existing cloud user into one unified user account under the hood, follow these steps:
Log in to your Active Directory management server
Open PowerShell.
Execute the following command:
Get-ADUser -Identity *username*Replace *username* by the username of the user you want to match.
The output of the command above will be something like this:
DistinguishedName : CN=administrator,OU=Users,DC=justinverstijnen,DC=nl
Enabled           : True
GivenName         : Administrator
Name              : administrator
ObjectClass       : user
ObjectGUID        : c97a6c98-ded8-472c-bfb6-87ed37d324f5
SamAccountName    : administrator
SID               : S-1-5-21-1534517208-3616448293-1356502261-1244
Surname           : Administrator
UserPrincipalName : administrator@justinverstijnen.nl
Copy the value of the ObjectGUID, in this case:
c97a6c98-ded8-472c-bfb6-87ed37d324f5Because Active Directory uses GUID for a unique identifier of the user and Entra ID uses a Base64 value for a unique identifier, we need to convert the GUID string to a Base64 string. We can do this very easy with Powershell too:
[Convert]::ToBase64String([guid]::New("c97a6c98-ded8-472c-bfb6-87ed37d324f5").ToByteArray())We get a value like this:
mGx6ydjeLEe/toftN9Mk9Q==Now we have the identifier Entra ID needs. We change the ID of the cloud user to this value. This way the system knows which on-premises user to sync with which cloud user.
Step 2: Logging into Entra ID with Microsoft Graph
To actually match the users, we need to login to Microsoft Graph in PowerShell, as we can there perform the actions. For installation instructions of the Microsoft Graph PowerShell module: https://www.powershellgallery.com/packages/Microsoft.Graph
Run the following command to login to Microsoft Entra ID with Microsoft Graph:
Connect-MgGraph -Scopes "User.ReadWrite.All"Login with your Microsoft Entra ID administrator account.
Step 3: Set the new Immutable ID in Microsoft Entra
After succesfully logging into Microsoft Graph, run the command to set a (new) Immutable ID for your cloud user:
Update-MgUser -UserId "administrator@justinverstijnen.nl" -OnPremisesImmutableId "mGx6ydjeLEe/toftN9Mk9Q=="Now the user is hard matched. You need to run a Entra Connect synchronization to finish the process.
Log in to the server with AD Connect/Entra Connect sync installed and run the command:
Start-ADSyncSyncCycle -PolicyType DeltaNow your on-premises user and cloud user have been matched!
Summary
Hardmatching users is relatively easy, but requires some steps that are good to know. After doing this around 3 times you will perform this completely on “auto-pilot”.
Sources
These sources helped me by writing and research for this post;
End of the page 🎉
You have reached the end of the page. You can navigate through other blog posts as well, share this post on X, LinkedIn and Reddit or return to the blog posts collection page. Thank you for visiting this post.
If you think something is wrong with this post or you want to know more, you can send me a message to one of my social profiles at: https://justinverstijnen.nl/about/
If you find this page and blog very useful and you want to leave a donation, you can use the button below to buy me a beer. Hosting and maintaining a website takes a lot of time and money. Thank you in advance and cheers :)

The terms and conditions apply to this post.