Microsoft Secure Score - Apps
Categories:
16 minute read
Before we begin
I collected all the options of the Microsoft Secure Score for Apps on this page, and we I address them all. I also added some industry-accepted options which are not in the secure score framework but are really helpful in avoiding or minimizing attacks in your environment. You can use all options, or only a subset. The more of the options you implement, the higher your score.
Remember, having a secure score of 100% doesn’t mean 100% security. This only means you are using 100% of the security toolbox of Microsoft.
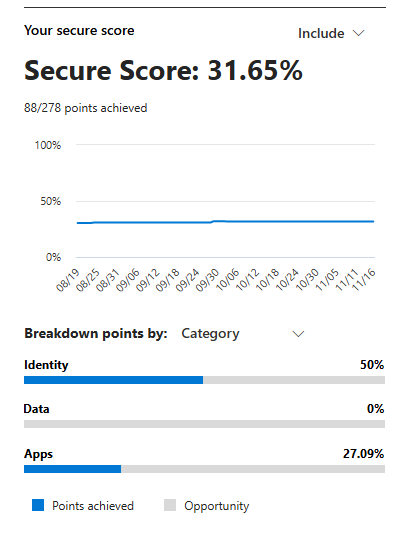
At the start of this page, my current Secure Score overview looks like this:
The Apps recommendations
Let’s check first which requirements we have to address. Go to https://security.microsoft.com/securescore and select Apps to only get the “Apps” category recommendations.
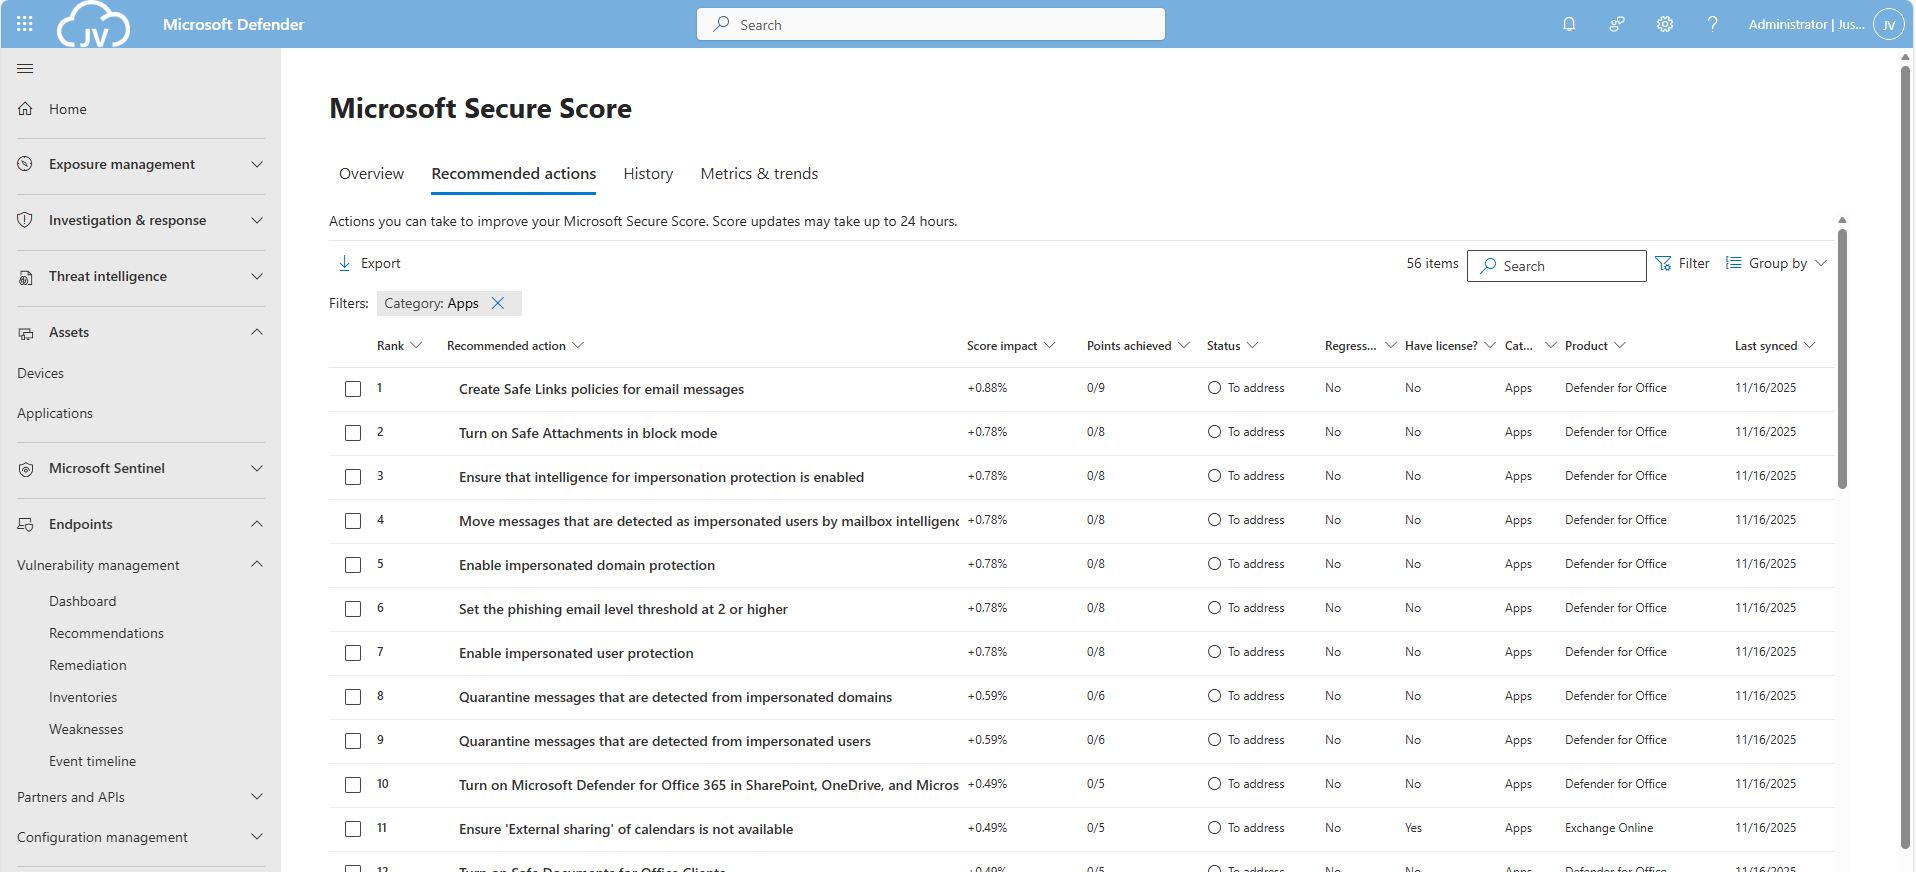
This gets us 56 recommendations, where around 20 are already addressed by the default settings. We still have 36 recommendations to so which we will do per application.
The Exchange Online recommendations
We can select the Exchange Online recommendations only in the filter:
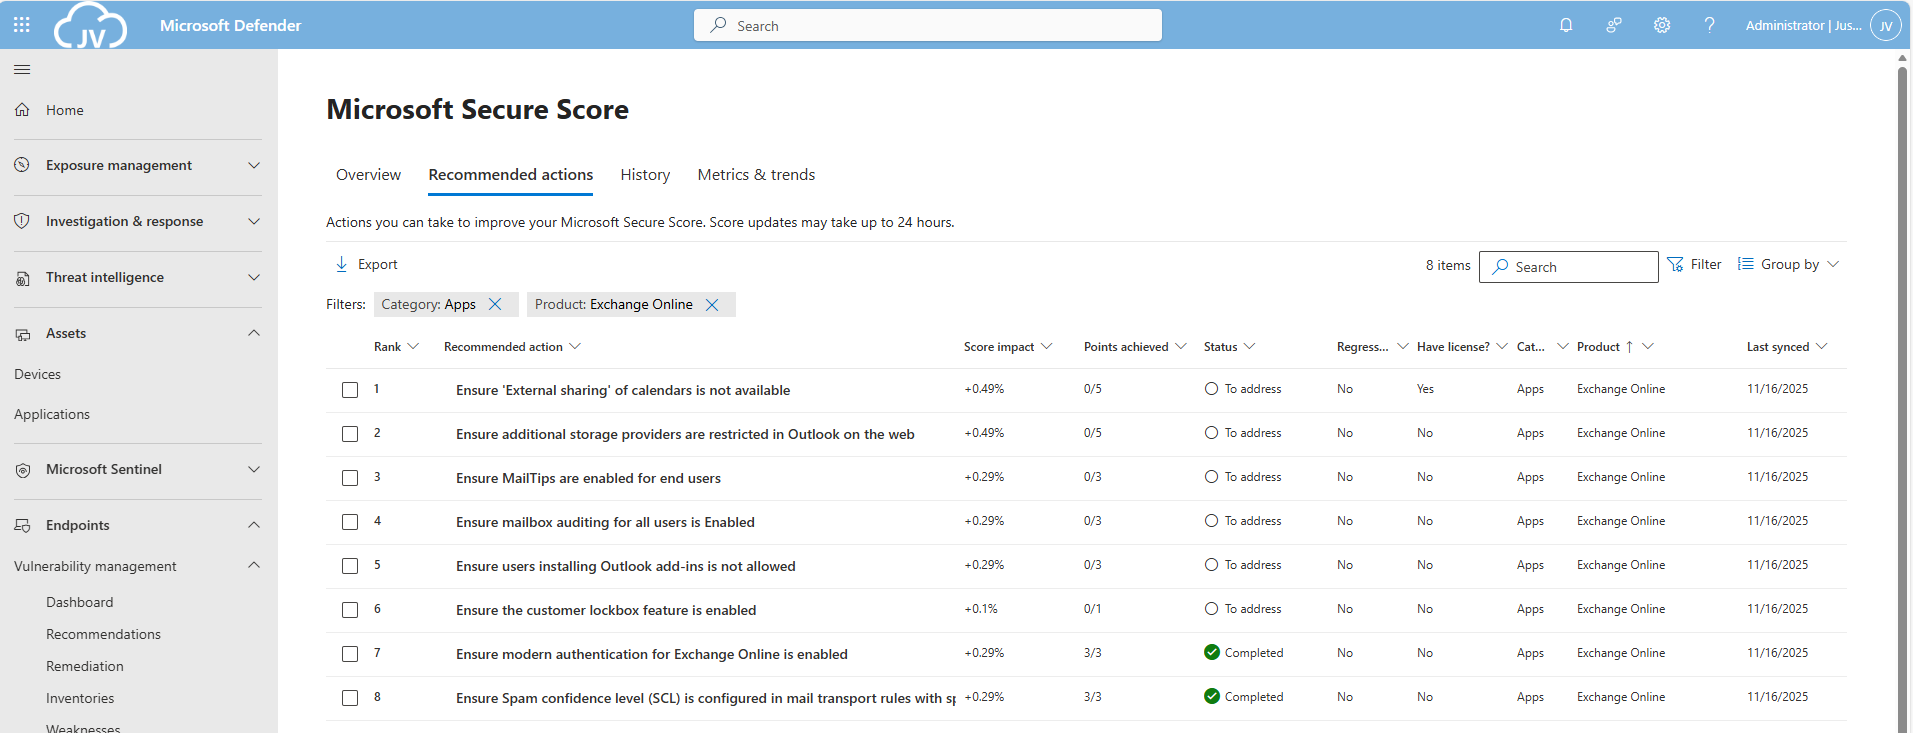
This are 8 recommendations which we will perform now. Most of these recommendations are setting which we will have to set. They can have impact on end-users so be aware of that.
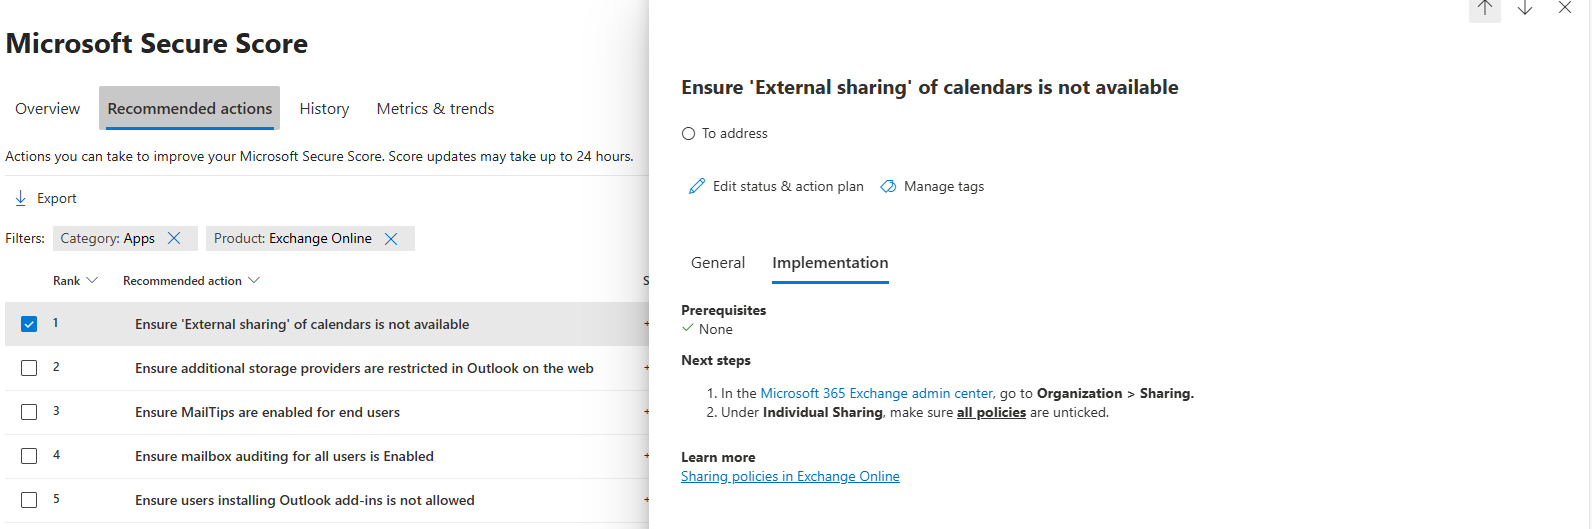
EO 1: Ensure ‘External sharing’ of calendars is not available
Go to the Exchange Online admin center: https://admin.exchange.microsoft.com
Then head to “Organization” and then “Sharing”. Open the tab “Individual Sharing”.
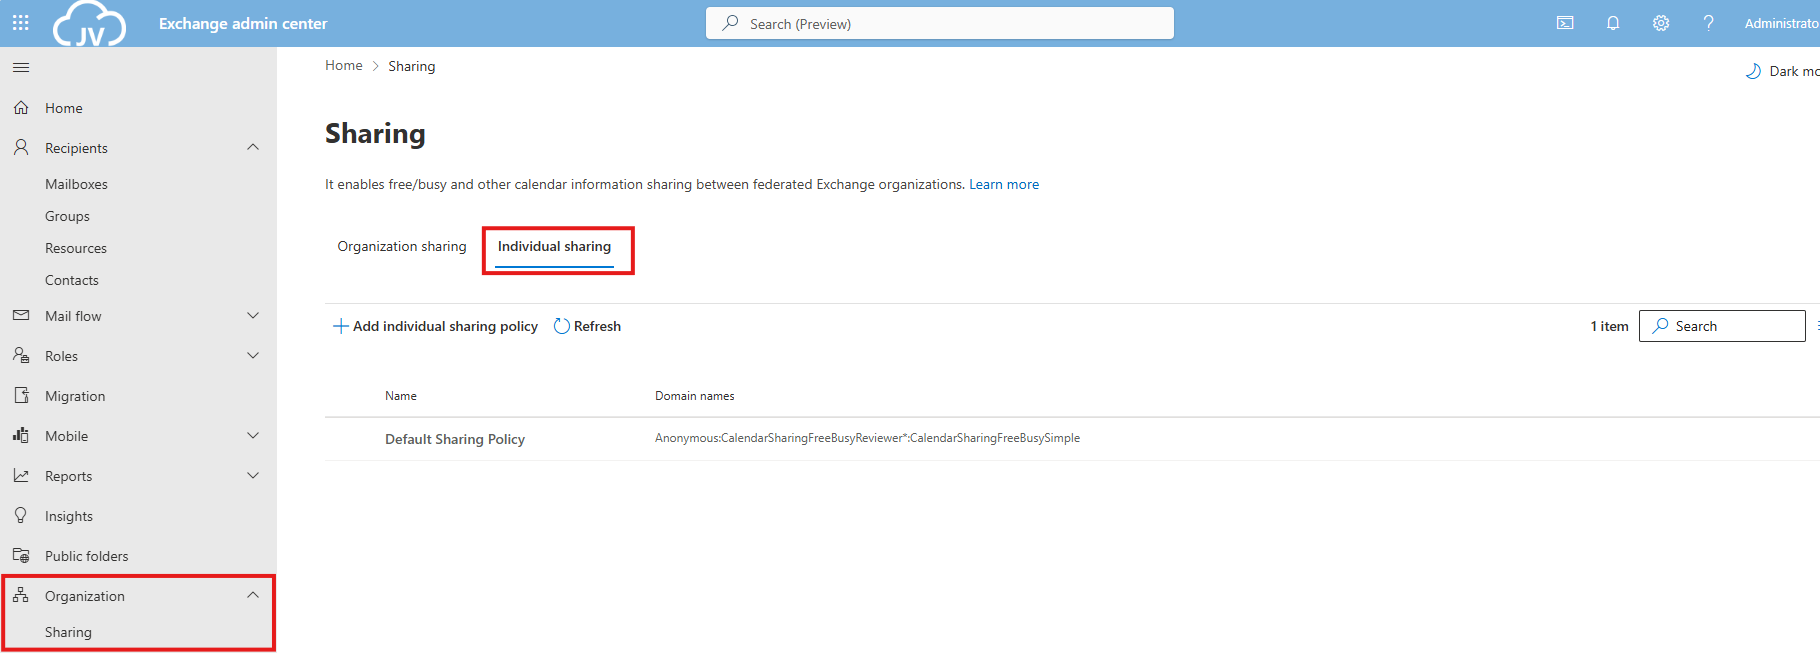
Select the default Sharing Policy, then click on “Manage domains”.
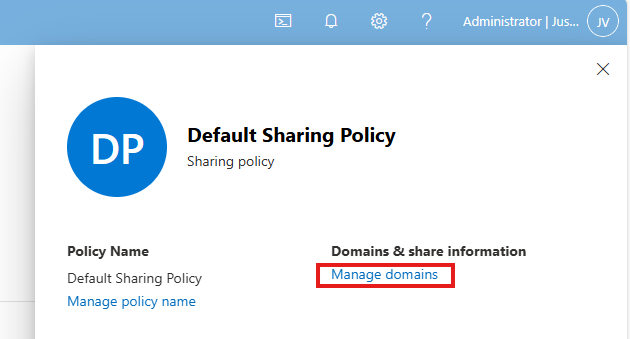
Delete every rule and select the Anonymous rule. Then deselect every option and save the policy. This disables the possibility to share calendars and contacts with users from other tenants. This can be potentially dangerous and even leak (sensitive) data.
EO 2: Ensure additional storage providers are restricted
This recommendation states that users are unable to use other storage providers in Outlook Web App. They can only use OneDrive/SharePoint after this is done.
This recommendation requires us to fire up Exchange Online PowerShell. You can install this module if you don’t already have it: https://www.powershellgallery.com/packages/ExchangeOnlineManagement/3.2.0
Connect-ExchangeOnlineThen execute this command:
Set-OwaMailboxPolicy -Identity OwaMailboxPolicy-Default -AdditionalStorageProvidersAvailable $falseThis will if runned correctly give no feedback. You can then check if this worked like we wanted:
Get-OwaMailboxPolicy | Format-Table Name, AdditionalStorageProvidersAvailableThis will return the actual state of this command.

Keep the Exchange Online PowerShell window opened, as we have to do more in that PowerShell session.
EO 3: Ensure MailTips are enabled for end users
MailTips are information boxes in Outlook that warn users about possible actions. For example; they will send an email to 300 recipients, or send email messages to external email addresses. With Mailtips enabled, Outlook will hint the user that this is not possible.
This recommendation requires us to fire up Exchange Online PowerShell. You can install this module if you don’t already have it: https://www.powershellgallery.com/packages/ExchangeOnlineManagement/3.2.0
Connect-ExchangeOnlineThen execute this command:
Set-OrganizationConfig -MailTipsAllTipsEnabled $true -MailTipsExternalRecipientsTipsEnabled $true -MailTipsGroupMetricsEnabled $true -MailTipsLargeAudienceThreshold '100'This command is now perfectly in line with the maximum outbound emails setting I described on the Identity page. Selecting more than 100 recipients will now warn the user that the email will be blocked. Perfectly in line with my recommendation here: https://justinverstijnen.nl/?p=5338&preview=true&_thumbnail_id=5707#tip-3-restrict-amount-of-outbound-email-messages

Keep the Exchange Online PowerShell window opened, as we have to do more in that PowerShell session.
EO 4: Ensure mailbox auditing for all users is Enabled
Mailbox auditing ensures every action within a mailbox is audited. This is very useful for Shared Mailboxes where multiple users can access one single mailbox. For example; move or delete actions will be recorded.
This recommendation requires us to fire up Exchange Online PowerShell. You can install this module if you don’t already have it: https://www.powershellgallery.com/packages/ExchangeOnlineManagement/3.2.0
Connect-ExchangeOnlineThen execute this command:
Set-OrganizationConfig -AuditDisabled $falseThen enable Auditing for every current shared mailbox:
Get-Mailbox -Filter * | Set-Mailbox -AuditEnabled $true
Keep the Exchange Online PowerShell window opened, as we have to do more in that PowerShell session.
EO 5: Ensure users installing Outlook add-ins is not allowed
This recommendations states that a user may not install any Outlook add-ins. These add-ins are mostly made by 3rd parties and are potentially harmful and can steal sensitive data from your users and organization.
To disable this, go to Exchange Online admin center: https://admin.exchange.microsoft.com
Then go to “Roles” and then “User Roles”.

Click on the “Default Role Assignment Policy” and click on “Manage permissions”.
Uncheck the following three options:
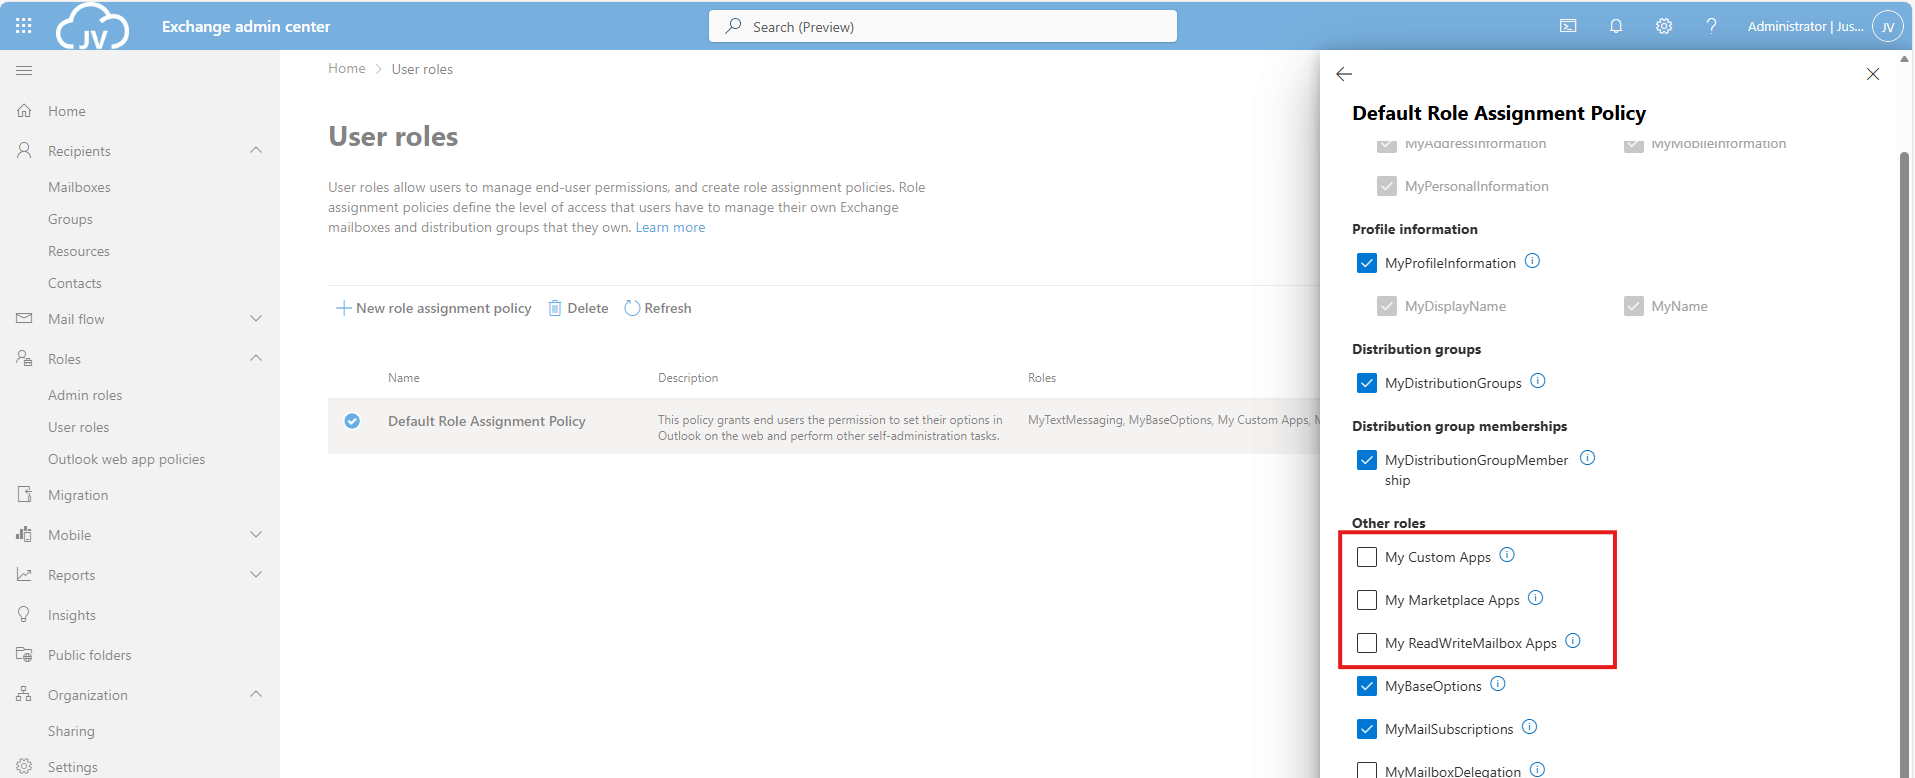
- My Custom Apps
- My Marketplace Apps
- My ReadWriteMailbox Apps
Then save the policy.
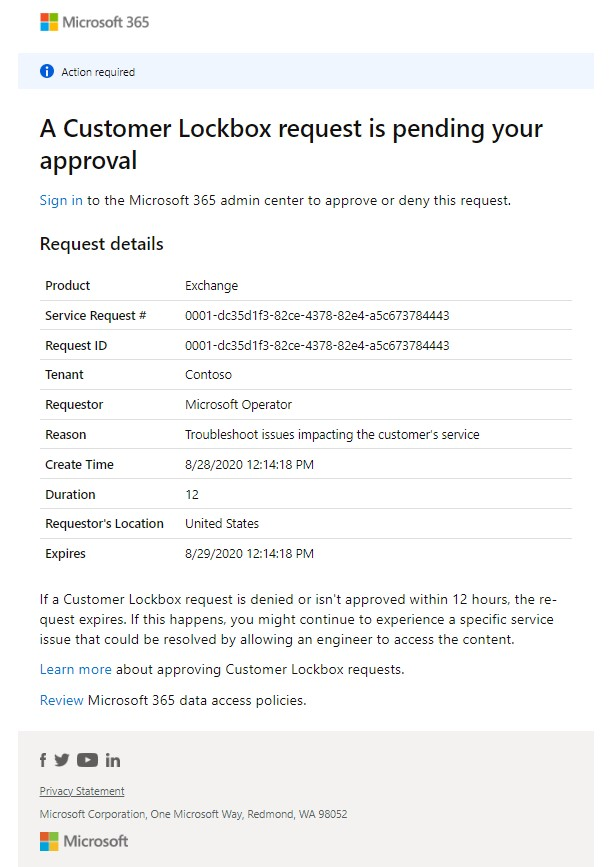
EO 6: Ensure the customer lockbox feature is enabled
The Customer Lockbock feature is a feature that allows Microsoft Engineers to access your tenant and data in case of support is needed. Without this enabled, Microsoft will always have access to your data, of course using strict policies and security. This feature greatly enhanced data security of your tenant, and also those requests are audited.
It is true that before a support engineer can access your data, you must approve this access request and this request is given temporarily.
This recommendation requires us to fire up Exchange Online PowerShell. You can install this module if you don’t already have it: https://www.powershellgallery.com/packages/ExchangeOnlineManagement/3.2.0
Connect-ExchangeOnlineThen execute this command to enable it:
Set-OrganizationConfig -CustomerLockboxEnabled $trueOr execute this command to disable it:
Set-OrganizationConfig -CustomerLockboxEnabled $falseThe Microsoft Teams recommendations
We can find the Microsoft Teams recommendations in the same window by selecting “Apps” in the filter and then “Microsoft Teams”:
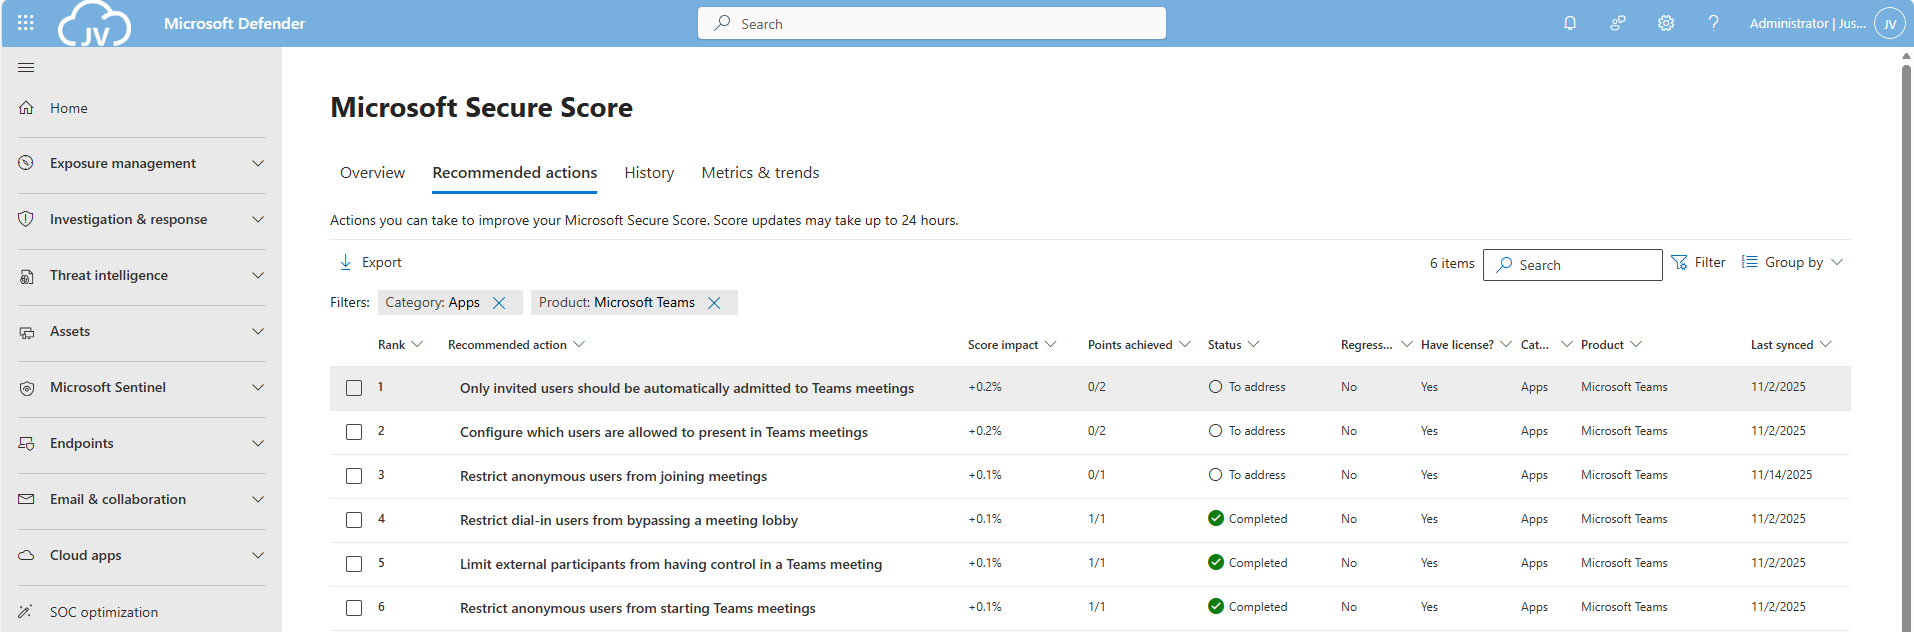
Teams 1: Only invited users should be automatically admitted to Teams meetings
This option disables that uninvited people can join your teams meeting. Only invited people can join your Teams meeting and are admitted automatically.
This recommendation requires us to fire up Microsoft Teams PowerShell. You can install this module if you don’t already have it: https://www.powershellgallery.com/packages/MicrosoftTeams/7.3.0
Connect-MicrosoftTeamsTo see the status of this setting, run the following command:
Get-CsTeamsMeetingPolicy -Identity Global | Format-List AutoAdmittedUsersThen execute this command to set the option to match the recommendation:
Set-CsTeamsMeetingPolicy -Identity Global -AutoAdmittedUsers InvitedUsers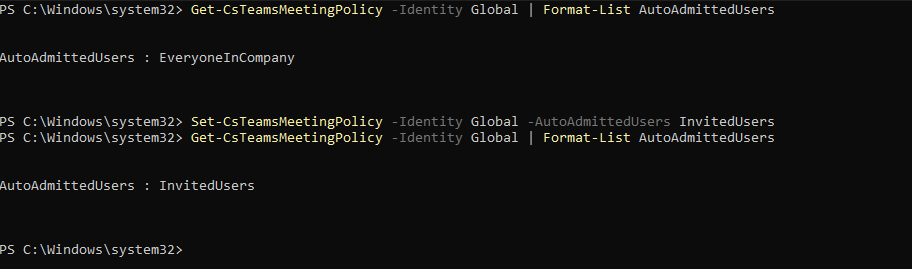
Now only invited users will be admitted to the Team meetings.
Keep the MS Teams PowerShell window opened, as we have to do more in that PowerShell session.
Teams 2: Configure which users are allowed to present in Teams meetings
This recommendation says that only the organizer of the meeting may present/share content in Teams meetings. This can reduce the risk of sensitive data loss.
This recommendation requires us to fire up Microsoft Teams PowerShell. You can install this module if you don’t already have it: https://www.powershellgallery.com/packages/MicrosoftTeams/7.3.0
Connect-MicrosoftTeamsTo see the status of this setting, run the following command:
Get-CsTeamsMeetingPolicy | Format-Table Identity, DesignatedPresenterRoleModeTo actually restrict other users from presenting in your Teams meetings, run this command:
Set-CsTeamsMeetingPolicy -Identity Global -DesignatedPresenterRoleMode "OrganizerOnlyUserOverride"Keep the MS Teams PowerShell window opened, as we have to do more in that PowerShell session.
Teams 3: Restrict anonymous users from joining meetings
This recommendation restricts other users than invited users from joining your meetings. As Teams meeting URLs are public, they could be intercepted or accidentaly sent to 3rd parties. We want to restrict this for only the users we have invited.
This recommendation requires us to fire up Microsoft Teams PowerShell. You can install this module if you don’t already have it: https://www.powershellgallery.com/packages/MicrosoftTeams/7.3.0
Connect-MicrosoftTeamsTo see the status of this setting, run the following command:
Get-CsTeamsMeetingPolicy -Identity Global | Select-Object AllowAnonymousUsersToJoinMeetingThen execute this command to set the option to match the recommendation:
Set-CsTeamsMeetingPolicy -Identity Global -AllowAnonymousUsersToJoinMeeting $False
This now forbids uninvited users from accessing your Teams meetings.
The Microsoft SharePoint recommendations
We can find the Microsoft Teams recommendations in the same window by selecting “Apps” in the filter and then “SharePoint Online”:
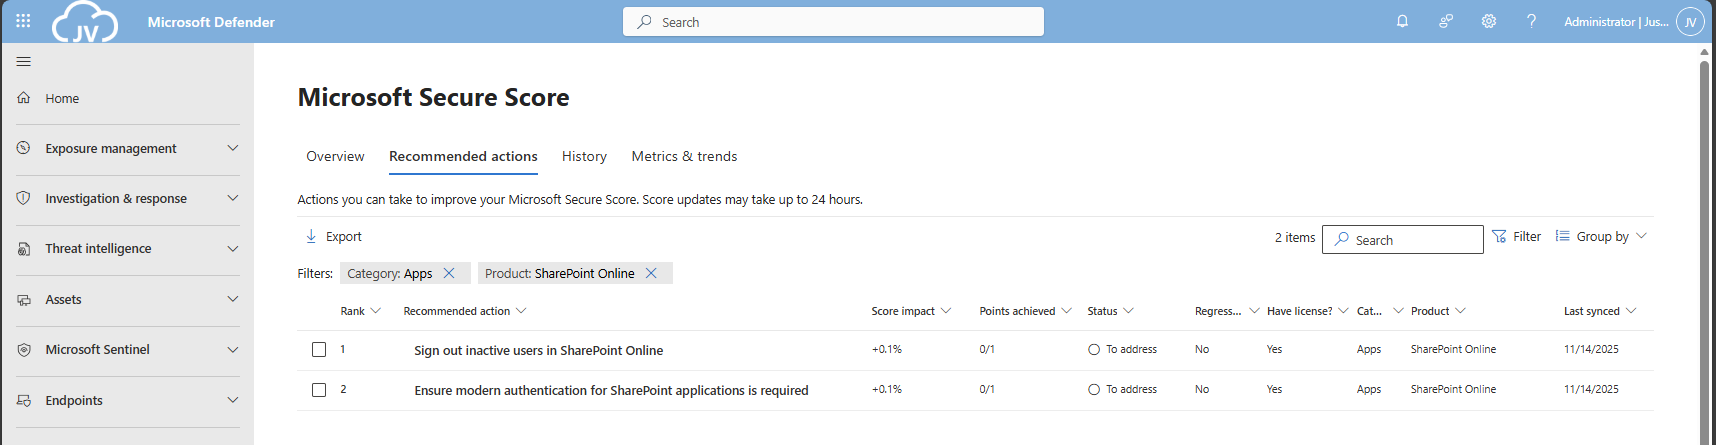
These are only 2 recommendations we have to solve, which will take about 5 minutes.
SharePoint 1: Sign out inactive users in SharePoint Online
The first recommendation states that we have to automatically sign-out inactive users from SharePoint Online. This means if they have the SharePoint Online window opened, they will be automatically signed-out after X time of inactivity.
We can configure this using the SharePoint Online Admin center. As administrator, head to https://portal.office.com/sharepoint
You will be directed to the SharePoint admin center. Open up “Policies” and then “Access control”.
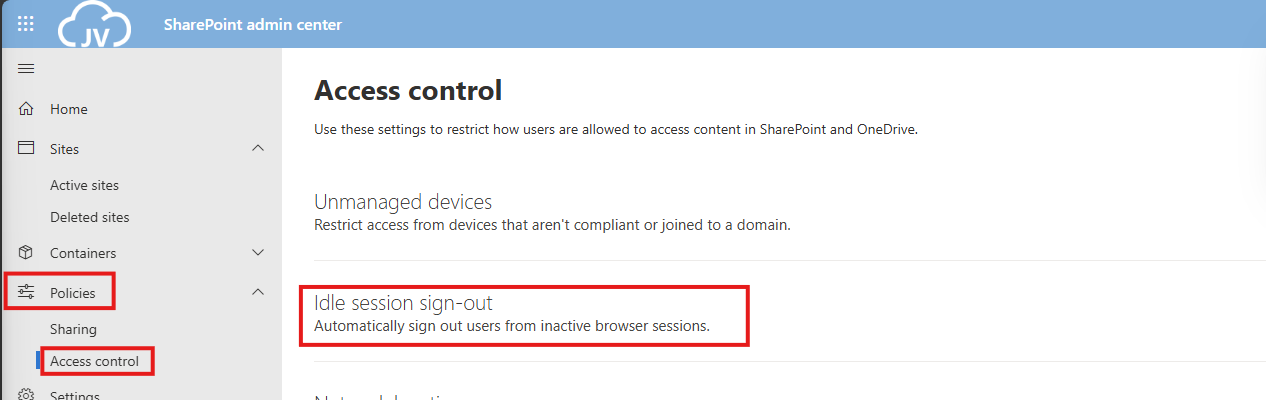
Click on “Idle session sign-out”. and enable this option.
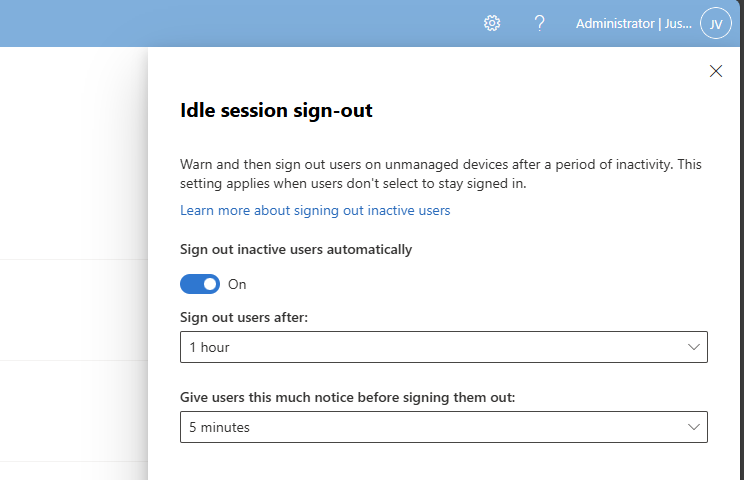
You can define yourself how strict this policy must be. The default is sign ou after 1 hour, but for businesses this could be somewhat short.
In my case, I will use the default options and save the settings.
SharePoint 2: Ensure modern authentication is required
This recommendation states that if you use SharePoint Applications, the authentication being used must be Modern Authentication. For example, If you still had Office 2010 or older apps that do not support Modern Authentication, we can block this application from being used.
Now this sounds like something we already tackle using Conditional Access, but disabling this also on application level is a good idea.
We can configure this using the SharePoint Online Admin center. As administrator, head to https://portal.office.com/sharepoint
You will be directed to the SharePoint admin center. Open up “Policies” and then “Access control”.
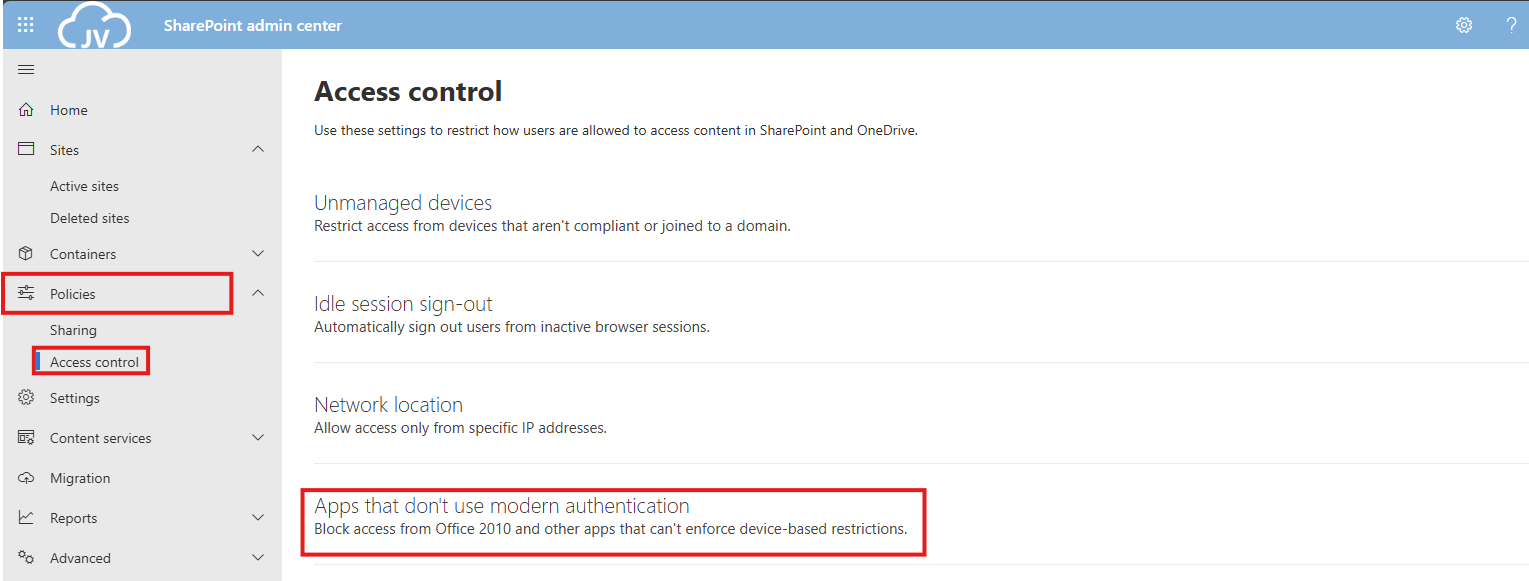
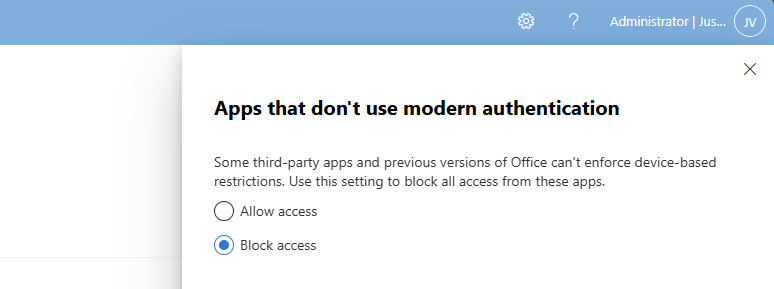
Click on “Apps that don’t use modern authentication”.
Select “Block access” and save the settings to make them active.
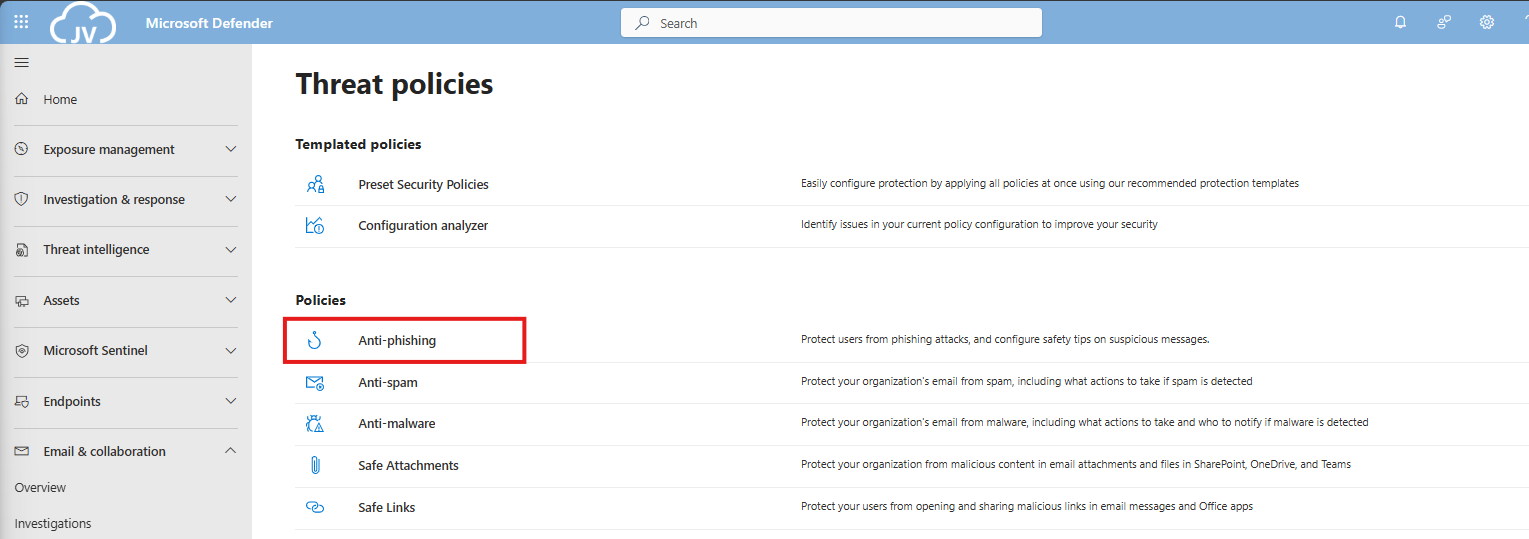
The Defender for Office 365 recommendations
For Defender for Office 365 recommendations, I enabled the Strict policies tenant-wide to do a great part of the job already, but I will also manually configure all of the recommendations to give a better understanding of what Microsoft has to offer.
After that, let’s take a look into the specific recommendations:
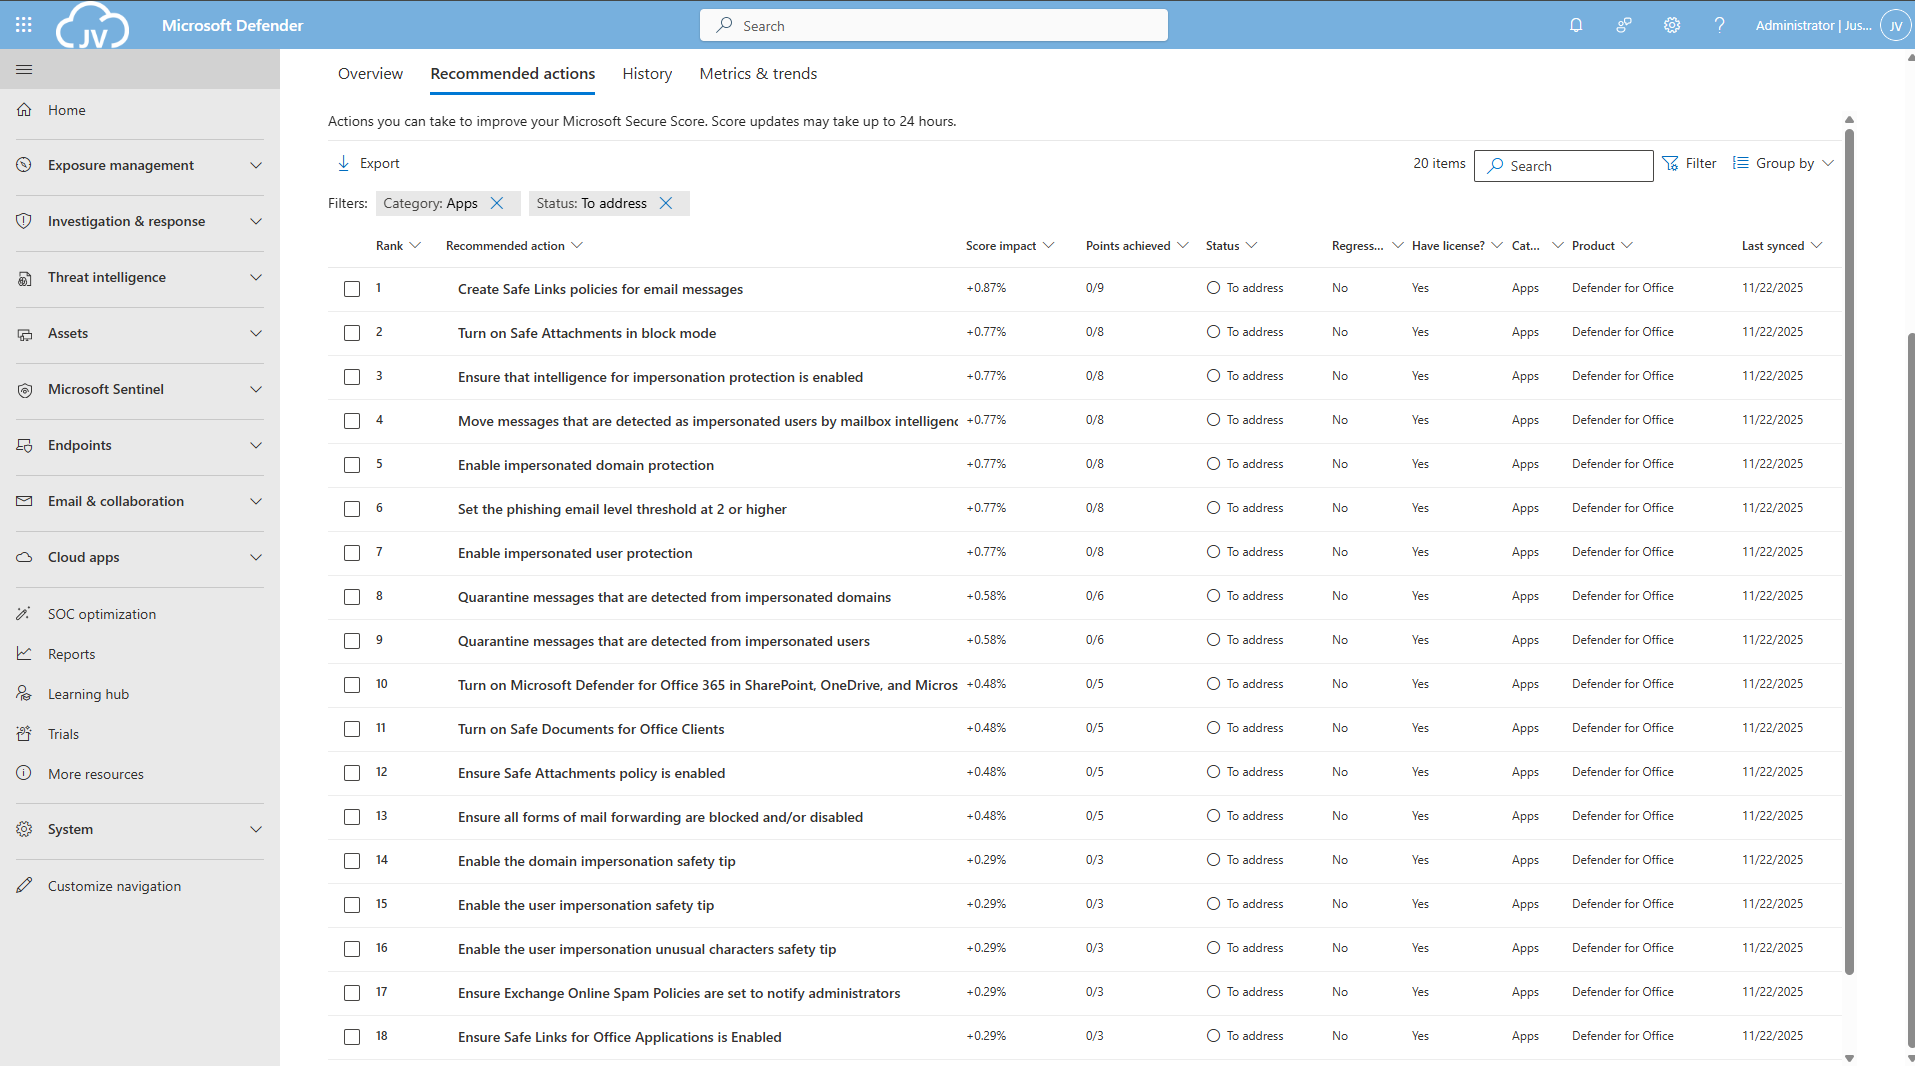
There are still around 20 items that have to be configured manually. I have categorized them by hand to make it easy to configure them all if you want. I also placed the headings of the policies so you can choose which requirement to configure.
Safe Links recommendations
- DO365 #1: Create Safe Links policies for email messages
- DO365 #2: Ensure Safe Links for Office Applications is Enabled
Safe Attachments recommendations
- DO365 #3: Turn on Safe Documents for Office Clients
- ****DO365 #4: Turn on Microsoft Defender for Office 365 in SharePoint; OneDrive; and Microsoft Teams
- DO365 #5: Ensure Safe Attachments policy is enabled
- DO365 #6: Turn on Safe Attachments in block mode
Anti-phishing recommendations
- DO365 #7: Ensure that an anti-phishing policy has been created
- DO365 #8: Set the phishing email level threshold at 2 or higher
- DO365 #9: Enable impersonated user protection
- DO365 #10: Enable impersonated domain protection
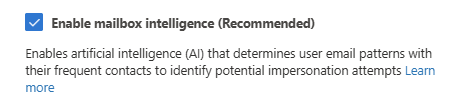
- DO365 #11: Ensure that intelligence for impersonation protection is enabled
- DO365 #12: Quarantine messages that are detected from impersonated users
- DO365 #13: Quarantine messages that are detected from impersonated domains
- DO365 #14: Move messages that are detected as impersonated users by mailbox intelligence
- DO365 #15: Enable the user impersonation safety tip
- DO365 #16: Enable the domain impersonation safety tip
- DO365 #17: Enable the user impersonation unusual characters safety tip
Anti-spam recommendations
- DO365 #18: Ensure all forms of mail forwarding are blocked and/or disabled
- DO365 #19: Ensure Exchange Online Spam Policies are set to notify administrators
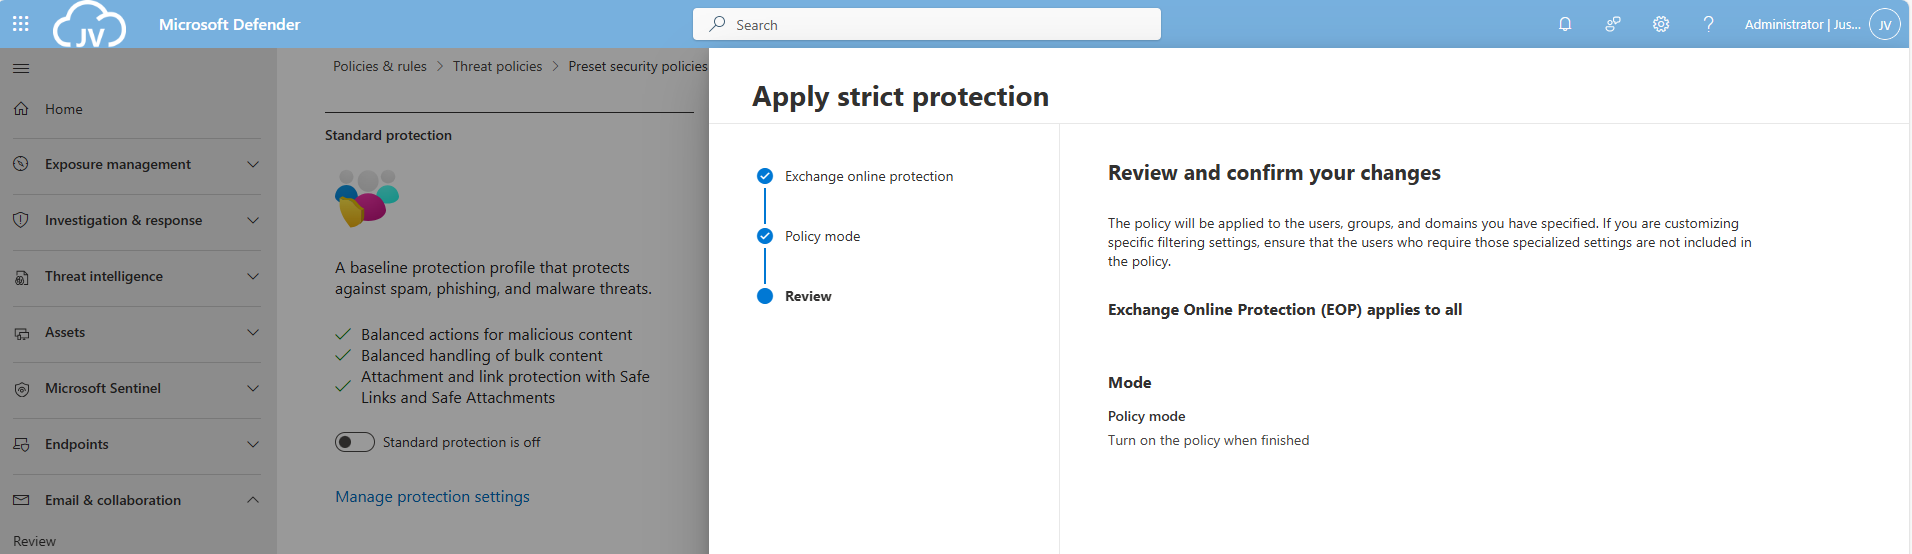
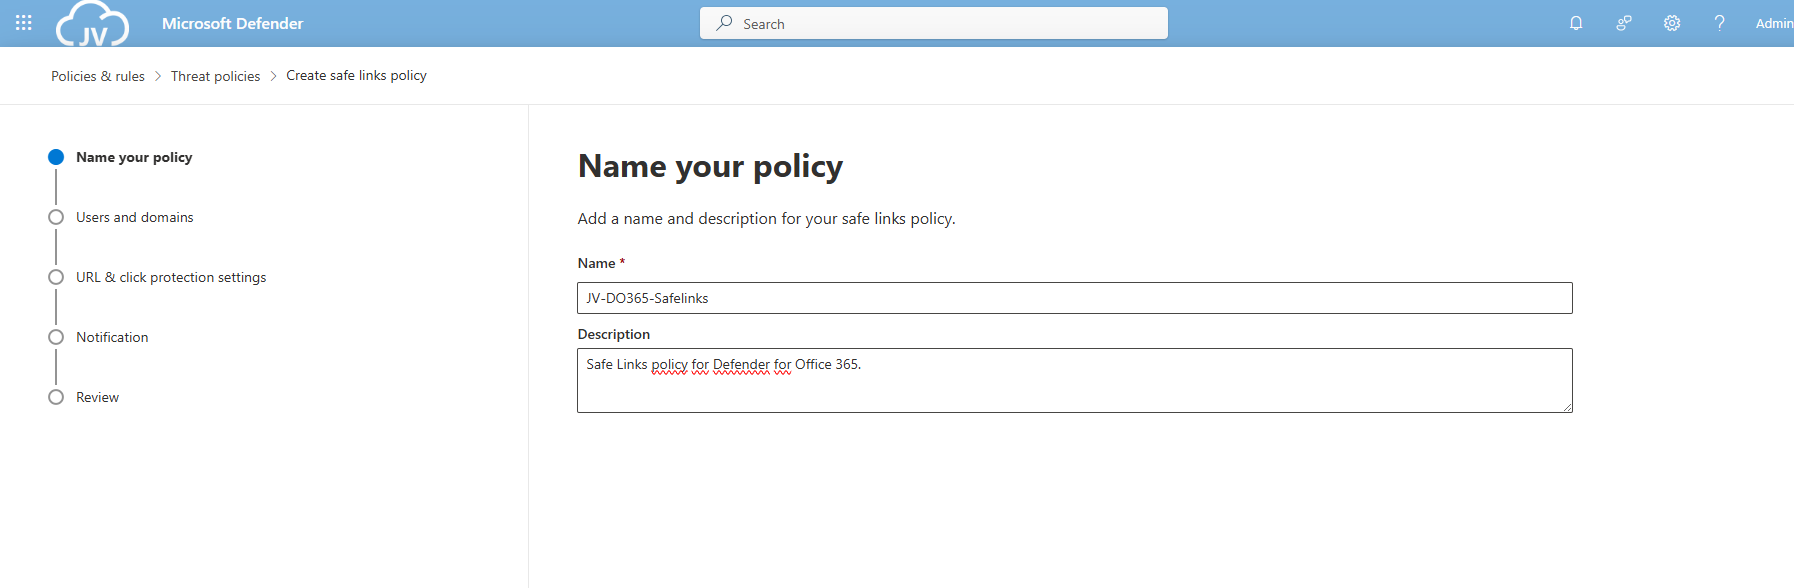
DO365 #1: Create Safe Links policies for email messages
This requirement wants us to create policies for safe links in email messages. This means that links you’ll receive will automatically be scanned.
Open the Microsoft Defender portal (https://security.microsoft.com)
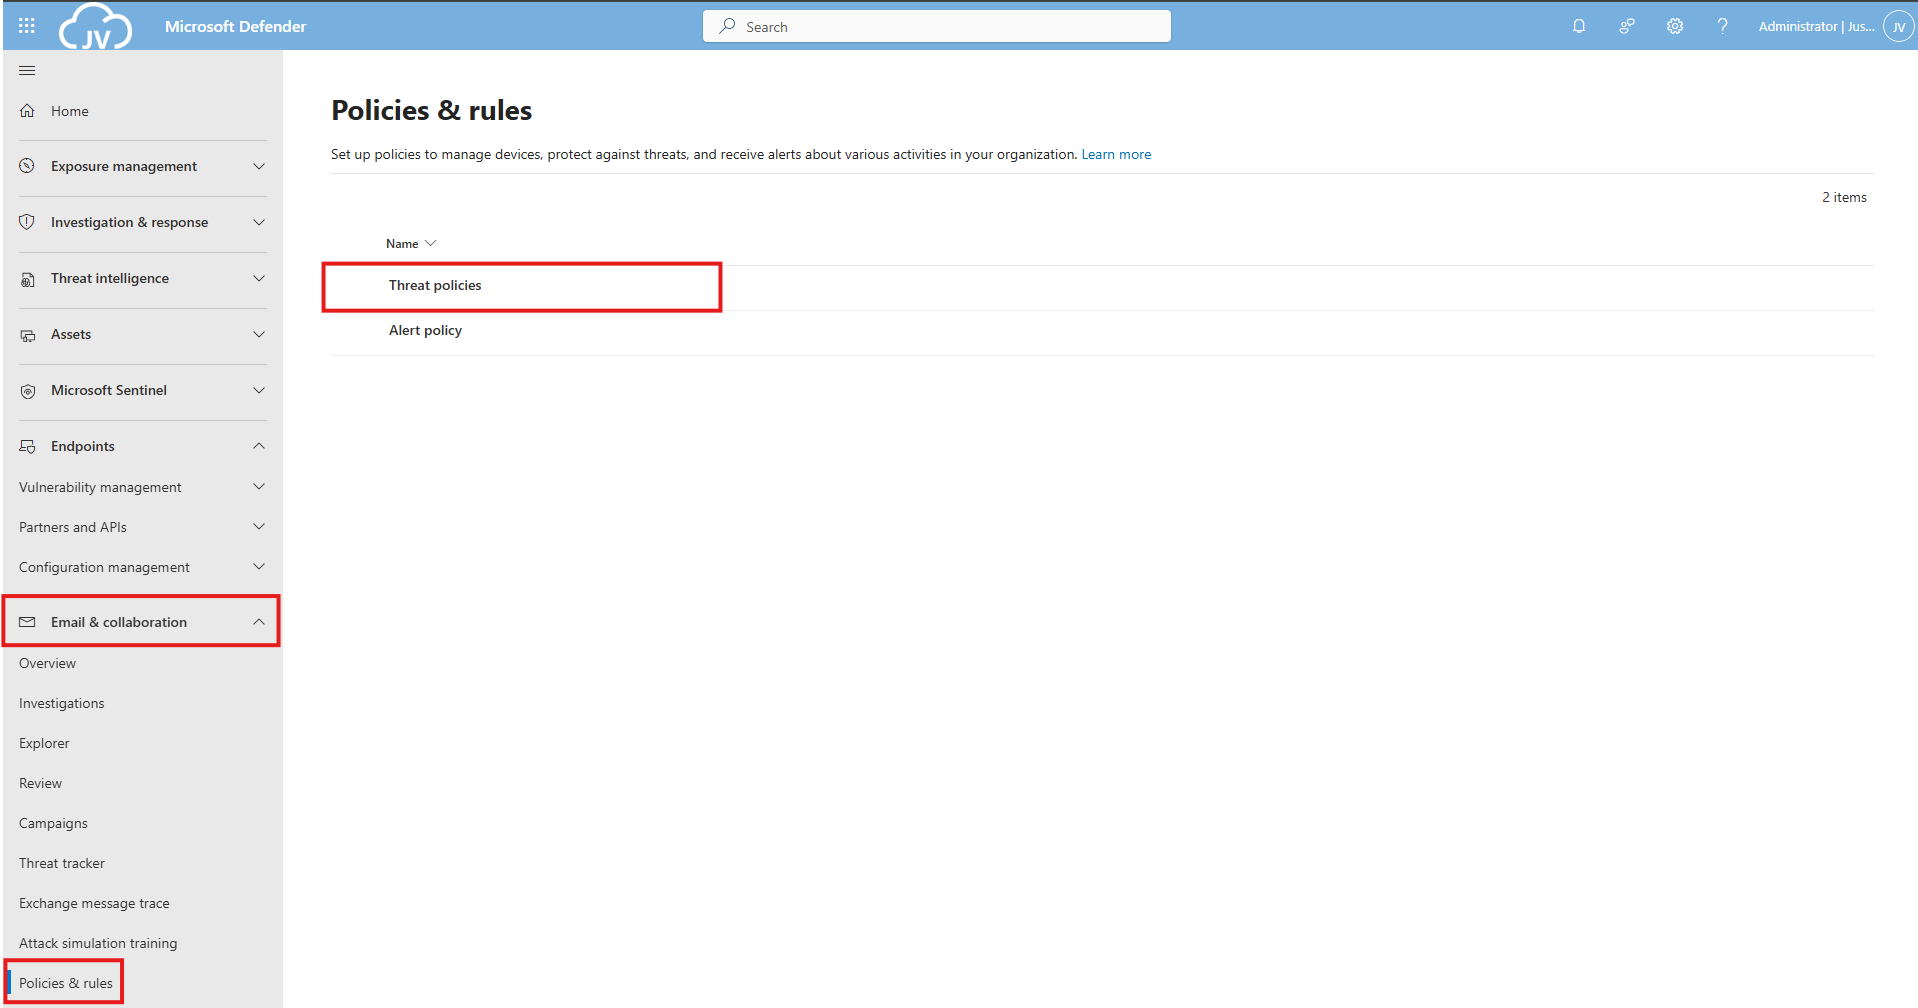
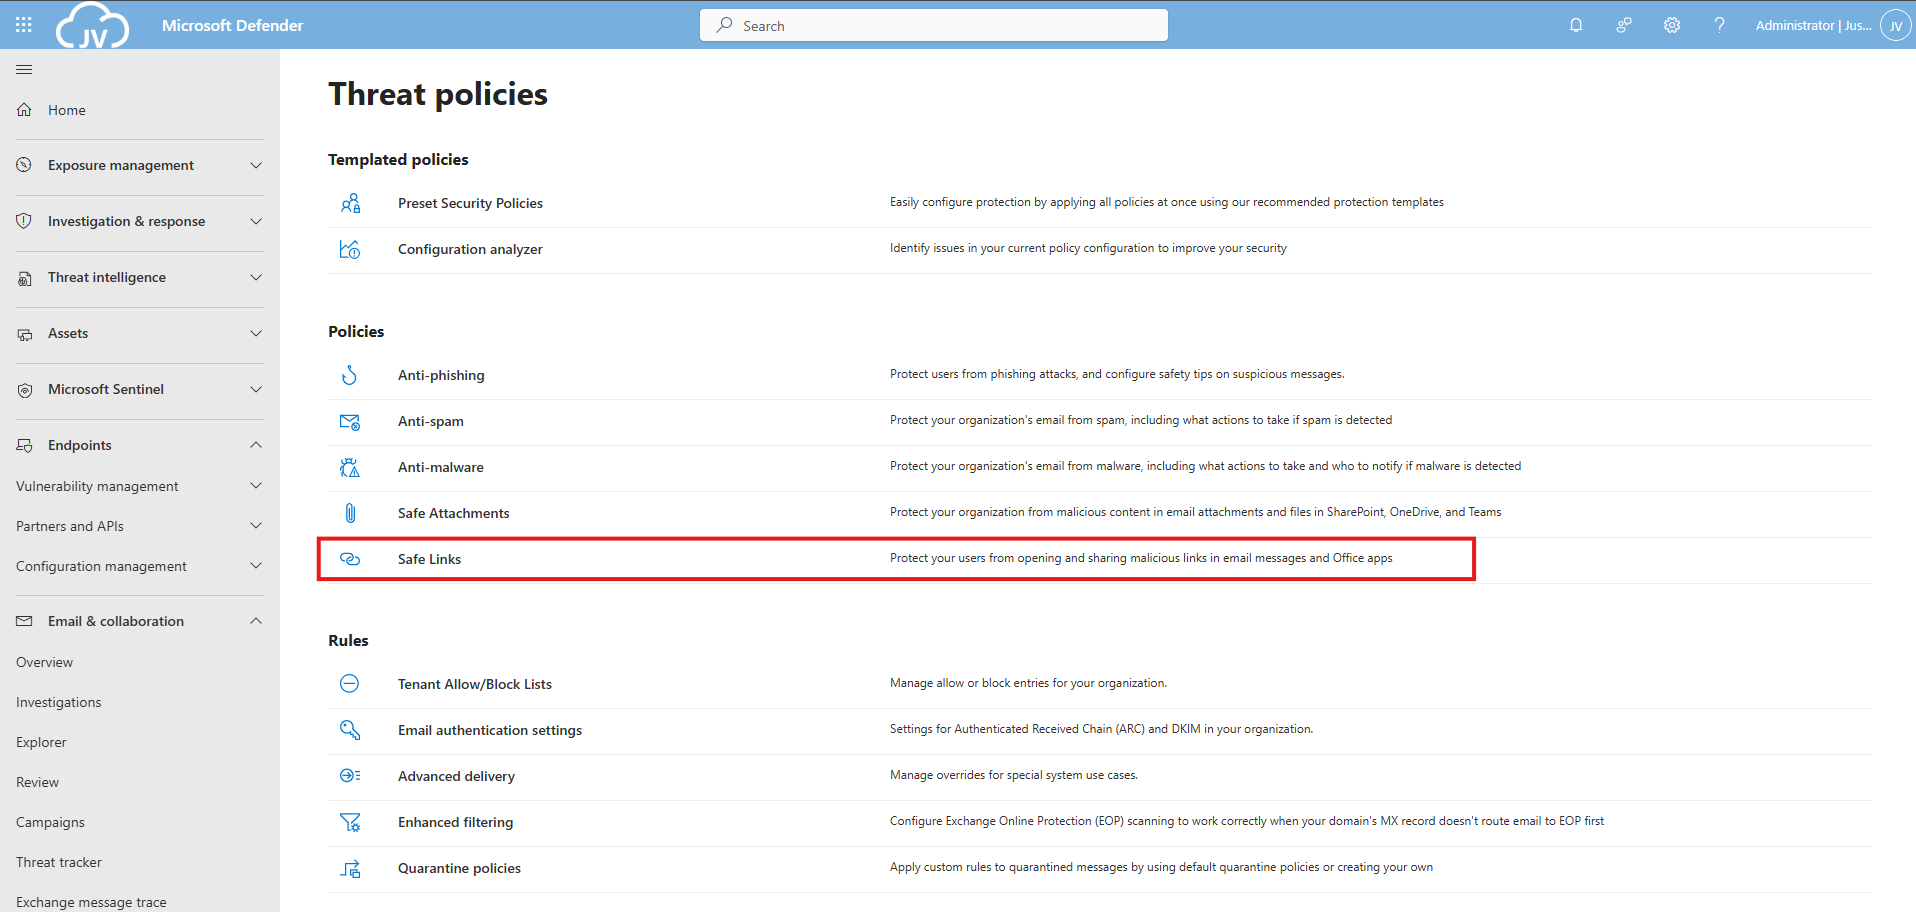
Go to “Email & collaboration” and click on “Policies & rules”, then click on “Threat policies”
Then click on “Safe Links”.
Create a new policy here. Give this a good name and description:
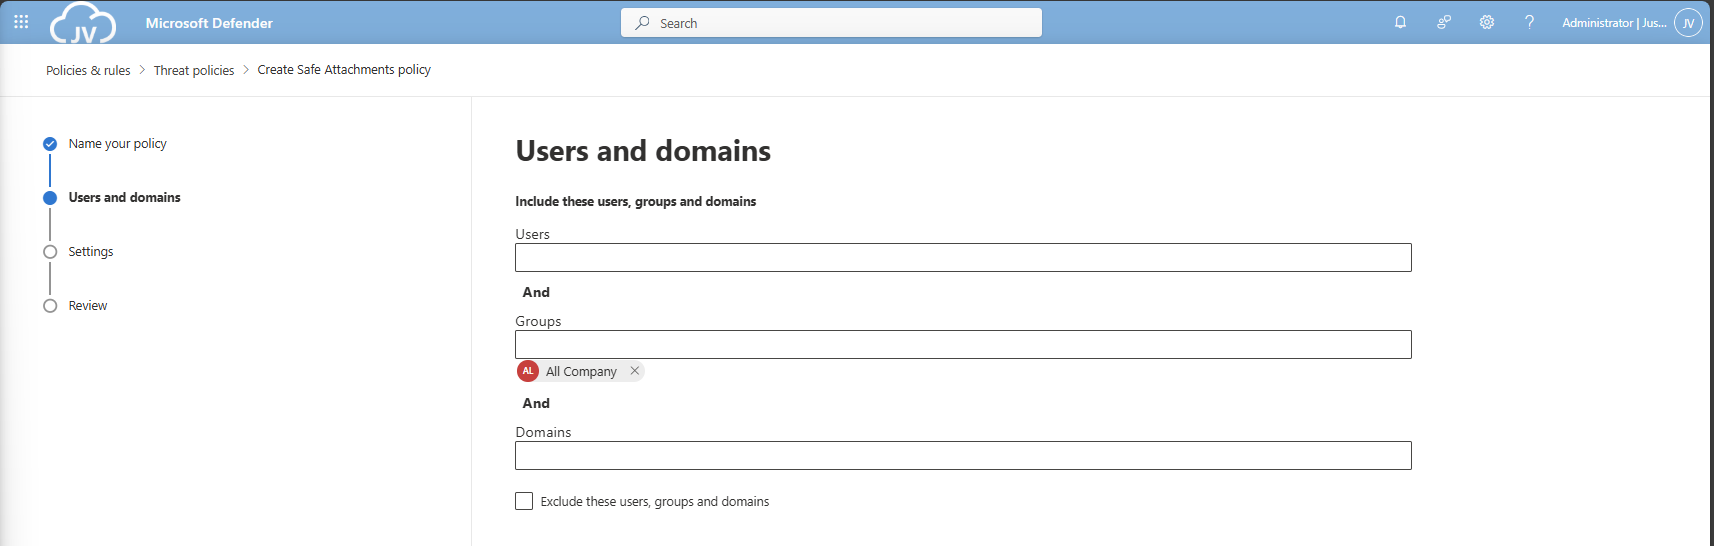
Advance to the next page. My advice here is to link this to the “All Company” default dynamic group. This makes the policy active for newly created users and domains as well.
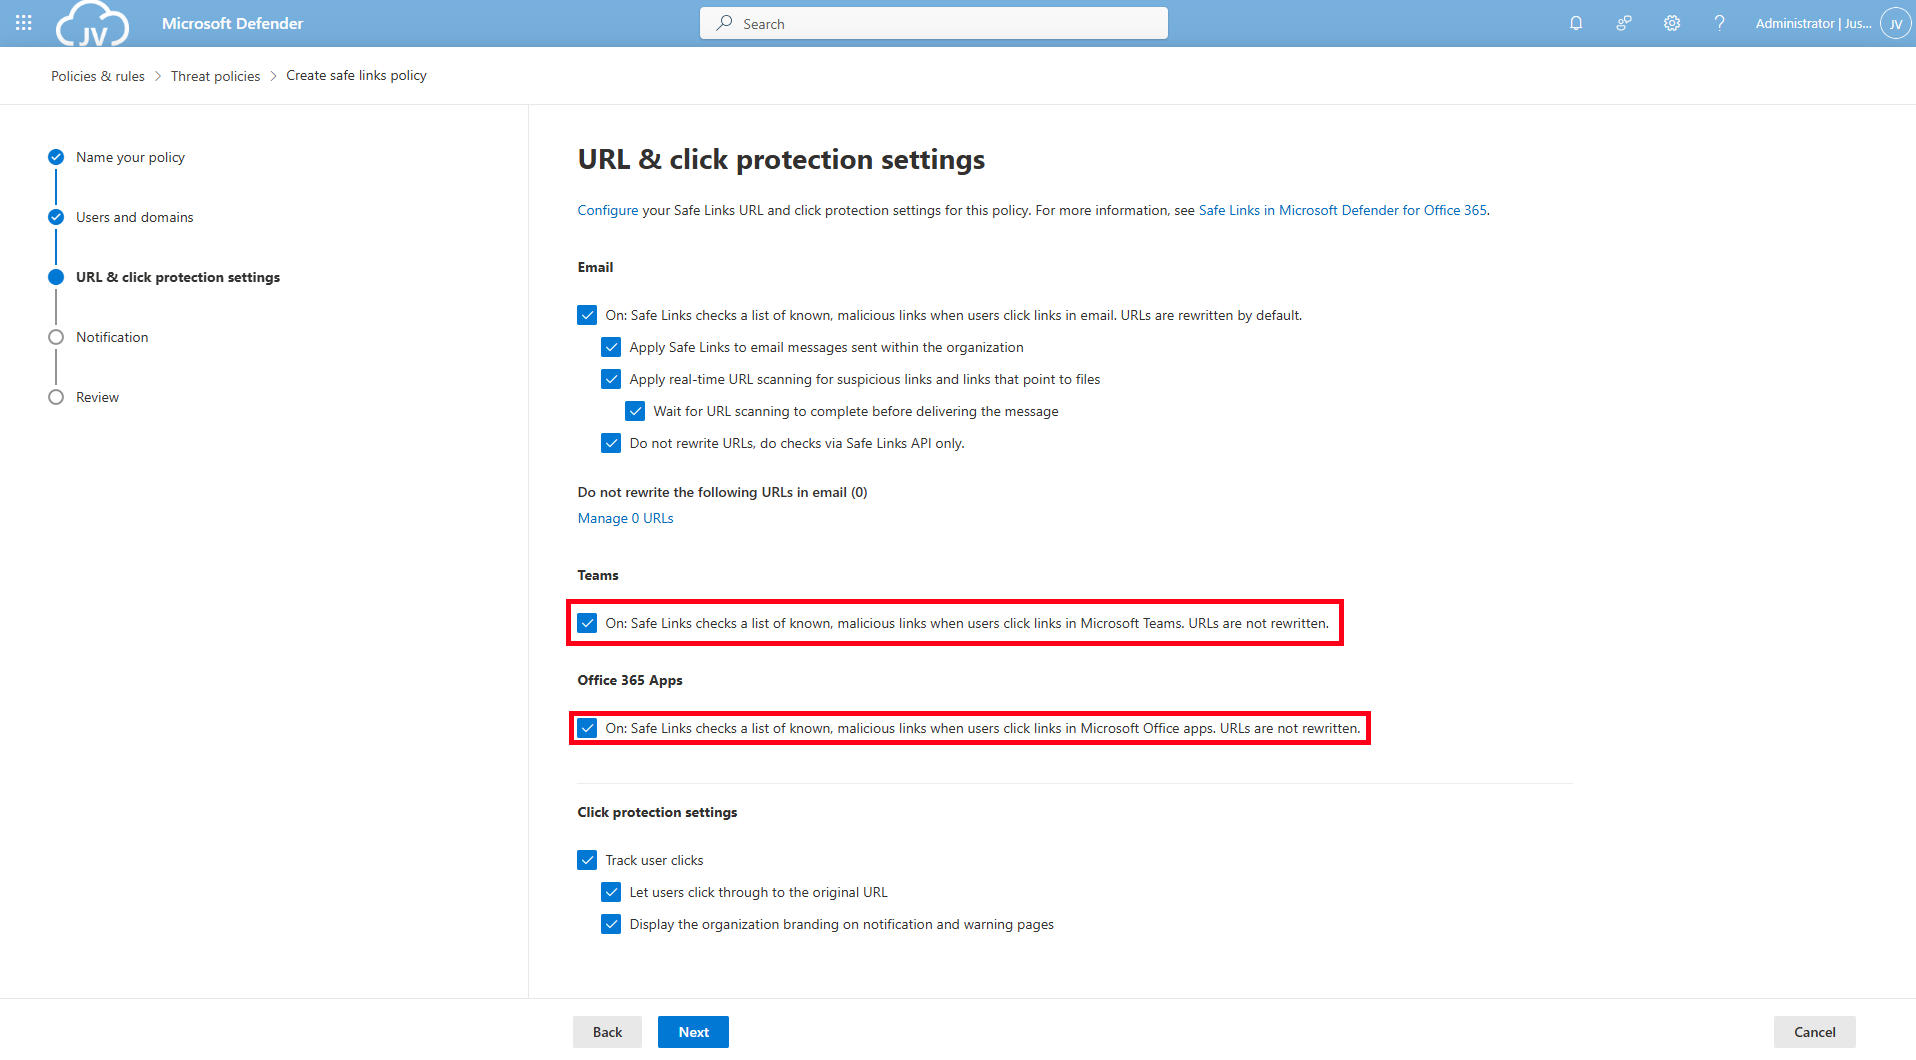
Click to the next page. Here is where all the settings are presented to you. Most of the default settings are okay which you can review. For my environment, I only enabled “Display the organization branding” at the bottom.
DO365 #2: Ensure Safe Links for Office Applications is Enabled
Make sure you enable the Safe Links for Teams and Office 365 Apps at this page for requirement DO365 #2. Then click “Next”.
On this page you could put in a custom text for your users for warning about links in their email before opening them and potentially harm their devices and accounts or even worse.
Then finish creating the policy, and that should be it for the first 2 requirements.
DO365 #3: Turn on Safe Documents for Office Clients
This requirement wants us to enable a setting that enables Safe Documents for Office Clients. This setting can be found by following the steps below (or the fast pass: https://security.microsoft.com/safeattachmentv2)
Open the Microsoft Defender portal (https://security.microsoft.com)
Go to “Email & collaboration” and click on “Policies & rules”, then click on “Threat policies”. Open the “Safe attachments” menu here.
Click on “Global Settings”

Enable this option and that should be it for this requirement.
DO365 #4: Turn on Microsoft Defender for Office 365 in SharePoint, OneDrive and Microsoft Teams
If you are on this page already, also enable “Turn on Microsoft Defender for Office 365 in SharePoint, OneDrive and Microsoft Teams”.

DO365 #5: Ensure Safe Attachments policy is enabled
This requirement wants us to enable an Safe Attachments policy in our tenant. This means we configure what will happen to attachments sent through email and teams. Potentially malicious content can be removed and according to requirement DO365 #5, we must block this to get the highest secure score.
Open the Microsoft Defender portal (https://security.microsoft.com)
Go to “Email & collaboration” and click on “Policies & rules”, then click on “Threat policies”. Open the “Safe attachments” menu here.
Create or modify an existing policy here.
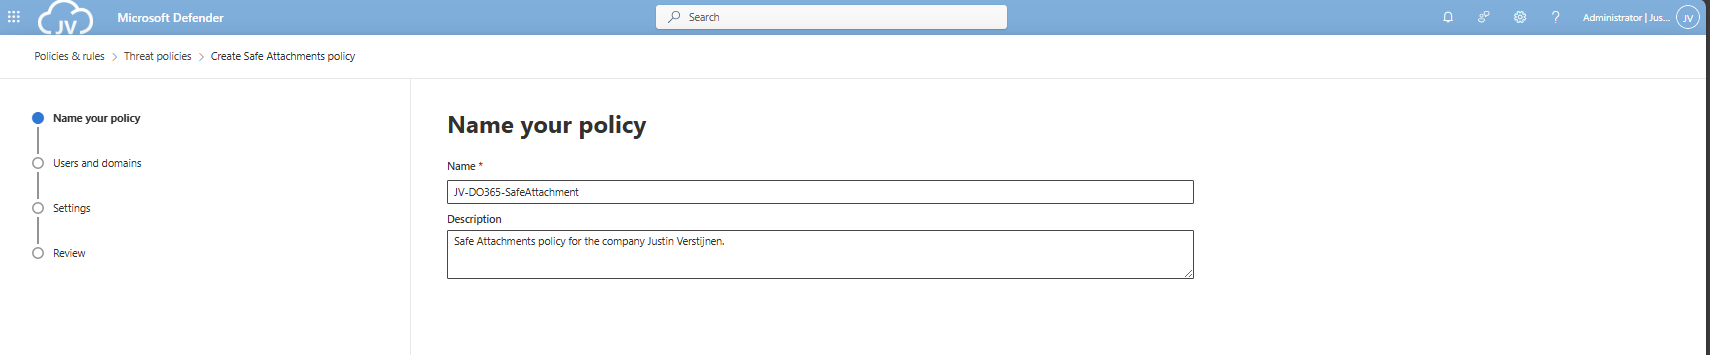
Give the policy a name and a description.
Advance to the next page. My advice here is to link this to the “All Company” default dynamic group. This makes the policy active for newly created users and domains as well.
Click “Next”.
DO365 #6: Turn on Safe Attachments in block mode
On the next tab we have to select the Block mode of Safe Attachments, and the best quarantine policy here would be AdminOnly.
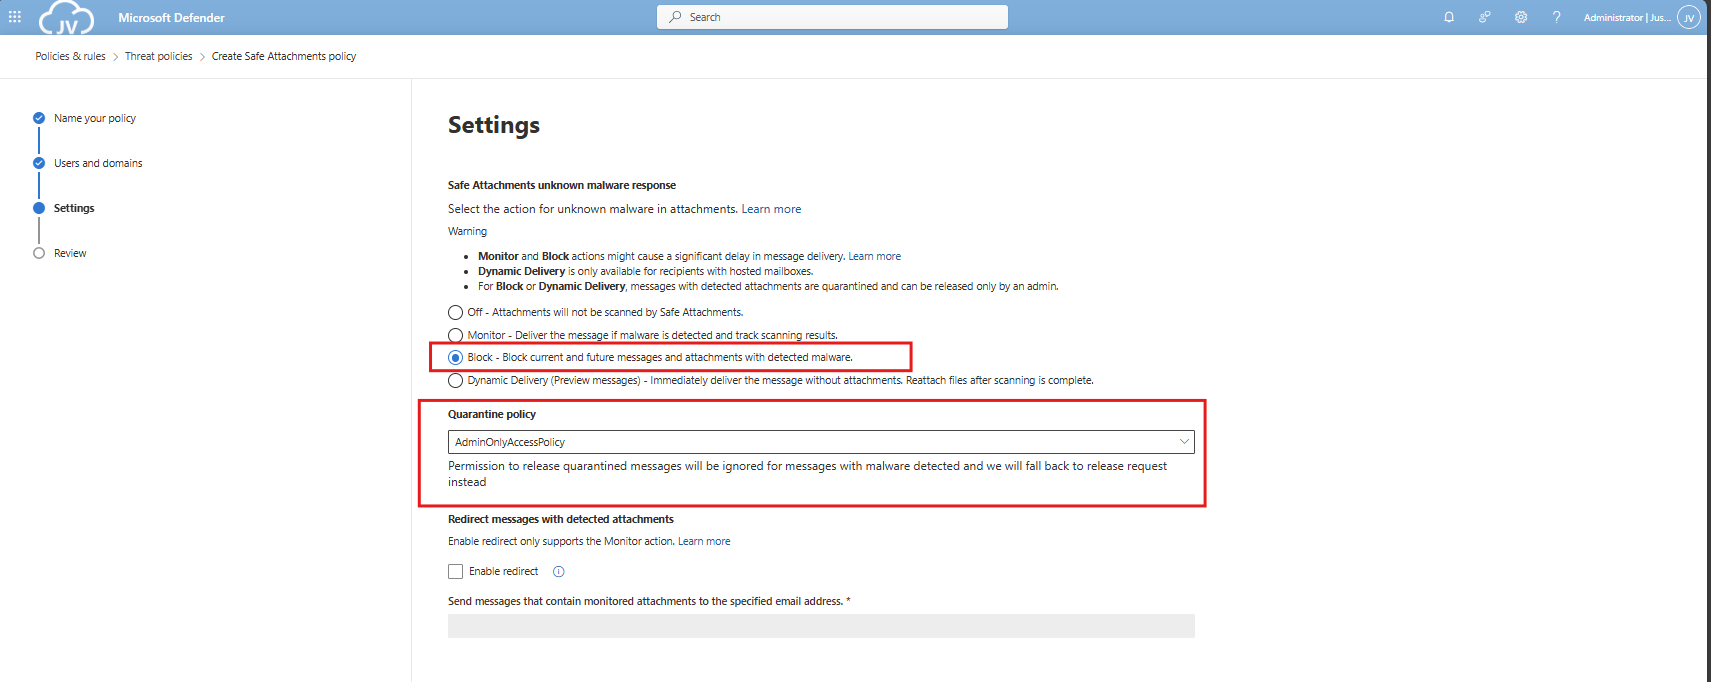
Finish the policy and make sure its enabled.
DO365 #7: Ensure that an anti-phishing policy has been created
Now we will have to create one policy to rule all anti-phishing requirements. This will also be the policy where we will configure all the anti-phising requirements in (DO365 #7-#17). You can also choose to create multiple policies, but for demonstration and managability, one policy is better.
This requirement wants us to enable mailbox intelligence and impersonation protection for email messages.
Open the Microsoft Defender portal (https://security.microsoft.com)
Go to “Email & collaboration” and click on “Policies & rules”, then click on “Threat policies”
Then click on “Anti-phishing”.
Create a new policy here, and give it a good name and description, and click “Next”.
Advance to the next page. My advice here is to link this to the “All Company” default dynamic group. This makes the policy active for newly created users and domains as well.
Click “Next”.
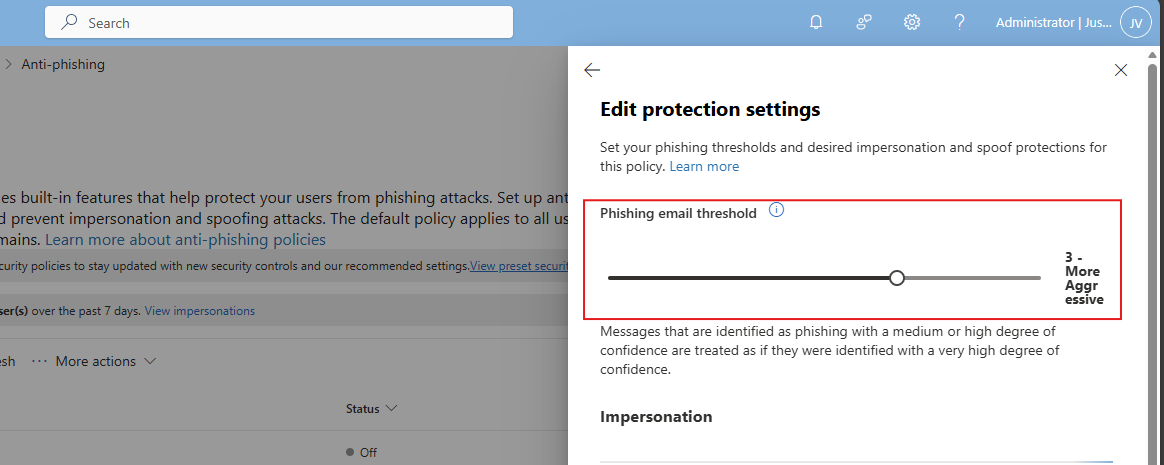
Set the Phishing email threshold to at least 3, and select the users/domains to protect using this setting. Ensure that the “Mailbox intelligence” setting is enabled.
Then create the policy.
DO365 #8: Set the phishing email level threshold at 2 or higher
This requirement wants us to set the Phishing email slider to at least 2. In my environment, I have set this to 3.
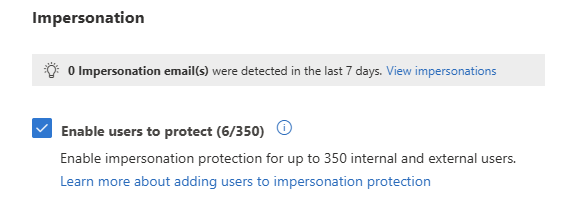
DO365 #9: Enable impersonated user protection
This requirement wants us to enable impersonated user protection. This enables us to decide what to do if impersonation happens and so true-like email is sent to our users.
Enable this setting here:
DO365 #10: Enable impersonated domain protection
This requirement wants us to enable impersonated domain protection. This is somewhat the same as our users but then on domain-level.
Enable this setting here:
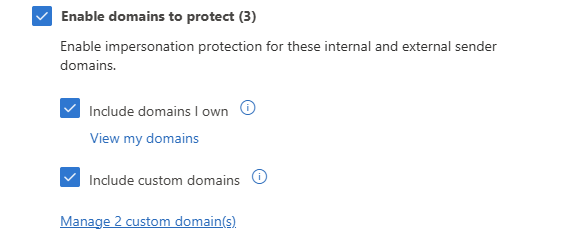
You can also add custom domains to trust them also, or enable the 2 suboptions to make it active for all domains.
DO365 #11: Ensure that intelligence for impersonation protection is enabled
This requirement wants us to enable the Intelligence option for impersonation protection, which can be found here:
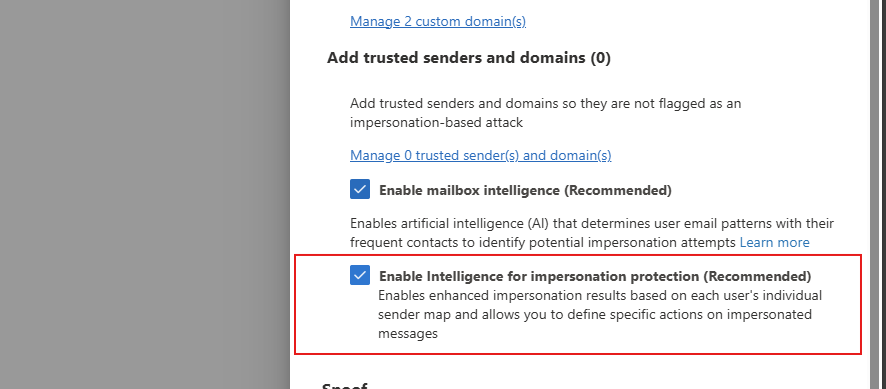
Enable this option in your policy to get the score.
DO365 #12: Quarantine messages that are detected from impersonated users
This requirement wants us to change the quarantine policy of messages received by impersonated users. These can be changed in the anti-phishing policy here:
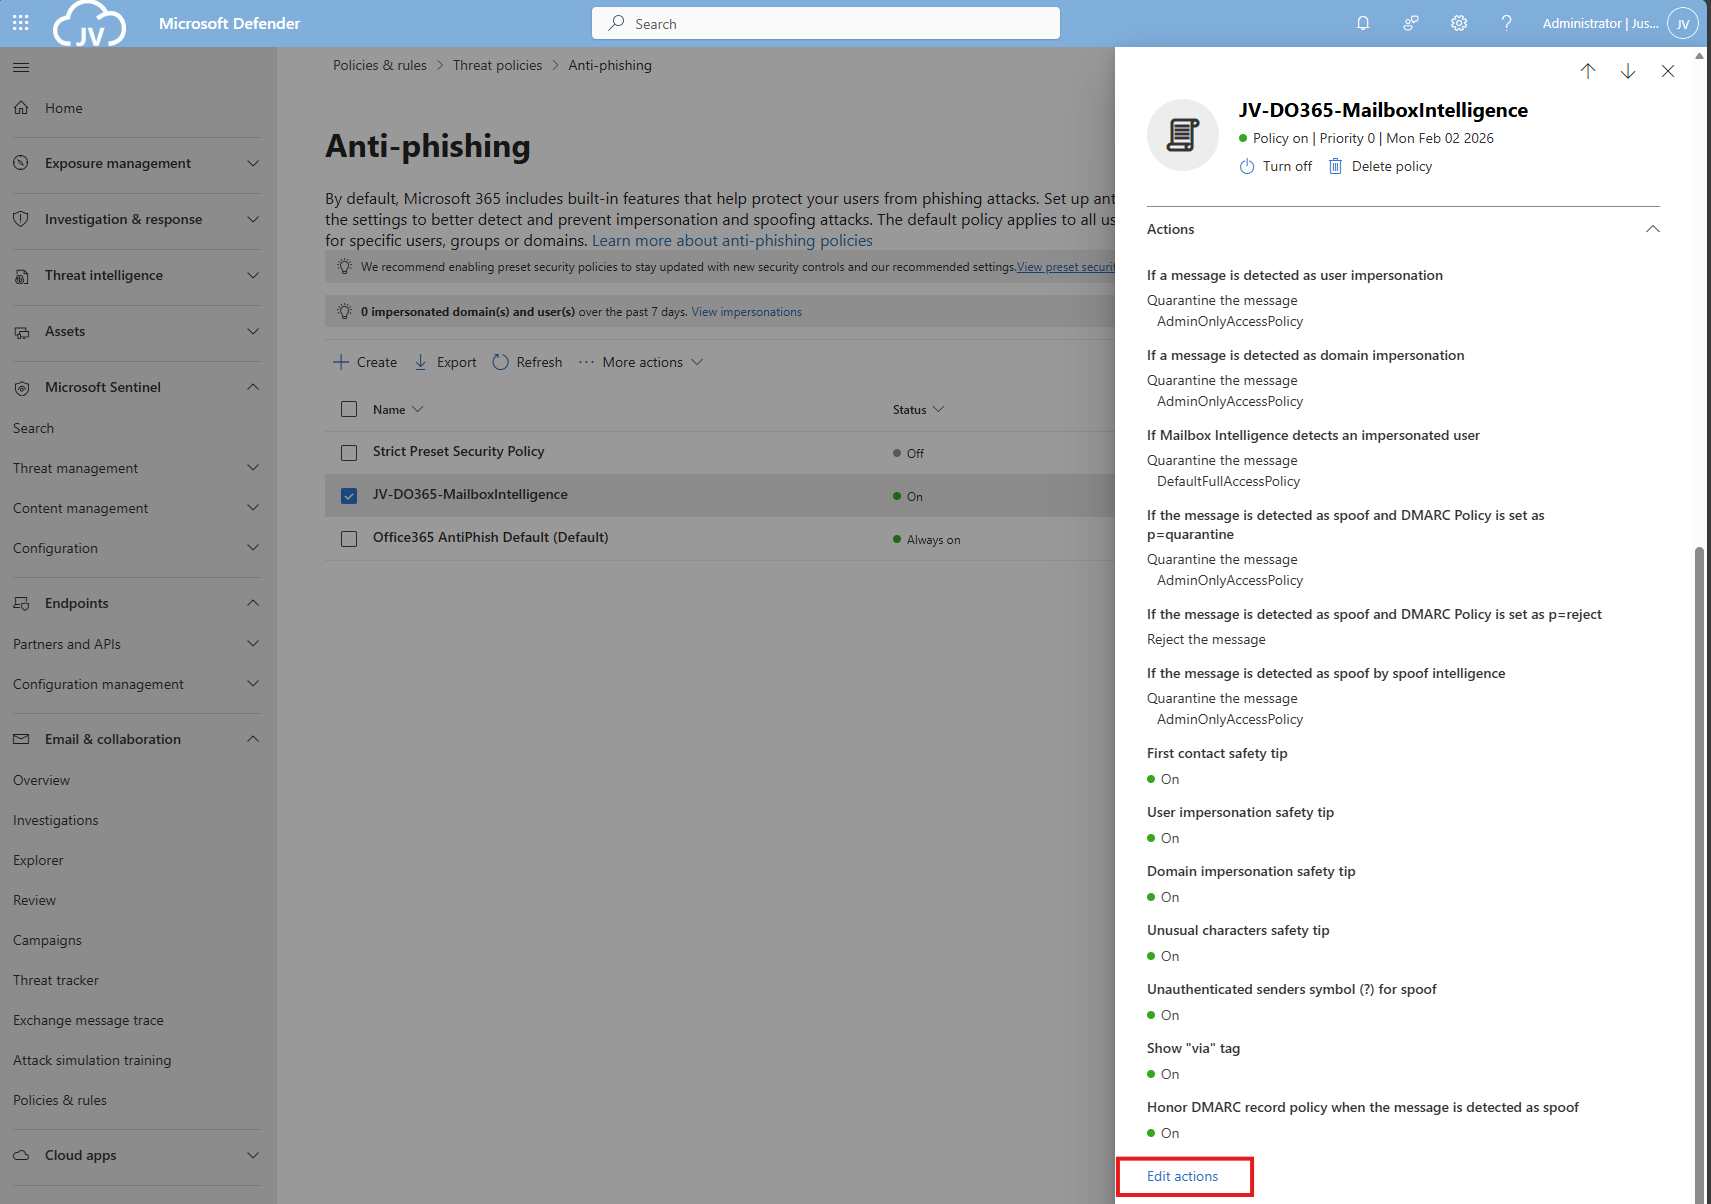
Then search for this option, and set it als following:
- If a message is detected as user impersonation: Quarantine the message
- Apply quarantine policy: AdminOnlyAccessPolicy
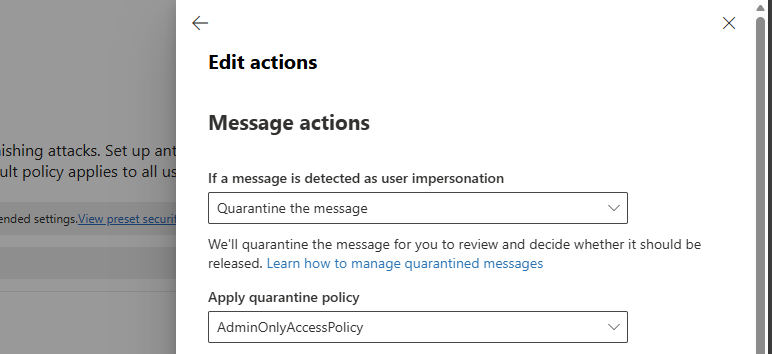
Thats all for this requirement, but do not click this window away yet.
DO365 #13: Quarantine messages that are detected from impersonated domains
This requirement wants us to set the settings directly below DO365 #12.
Search for this option, and set it als following:
- If a message is detected as domain impersonation: Quarantine the message
- Apply quarantine policy: AdminOnlyAccessPolicy
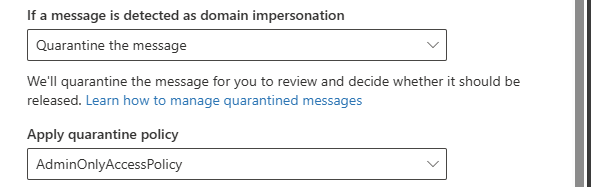
Thats all for this requirement, but do not click this window away yet.
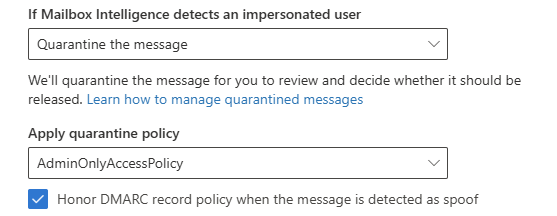
DO365 #14: Move messages that are detected as impersonated users by mailbox intelligence
This requirement wants us to set the settings directly below DO365 #13.
Search for this option, and set it als following:
- If Mailbox Intelligence detects an impersonated user: Quarantine the message
- Apply quarantine policy: AdminOnlyAccessPolicy
- Honor DMARC record policy: Enabled
DO365 #15: Enable the user impersonation safety tip
This requirement wants us to set the settings below DO365 #14. Scroll down to “Safety tips & indicators” for this setting.
Enable this setting:

- Show user impersonation safety tip
DO365 #16: Enable the domain impersonation safety tip
This requirement wants us to set the settings below DO365 #15.
Enable this setting:
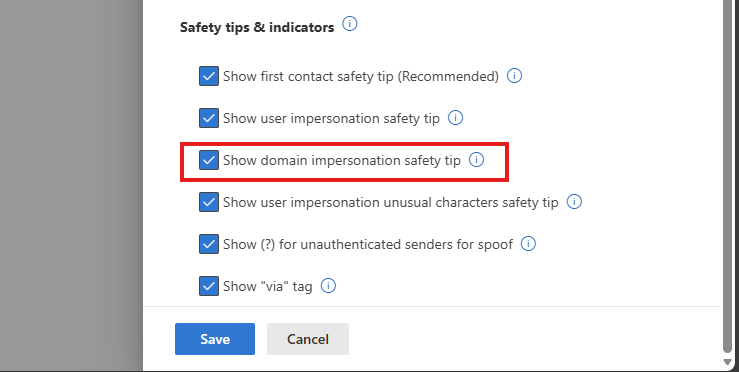
- Show domain impersonation safety tip
DO365 #17: Enable the user impersonation unusual characters safety tip
This requirement wants us to set the settings below DO365 #16.
Enable this setting:
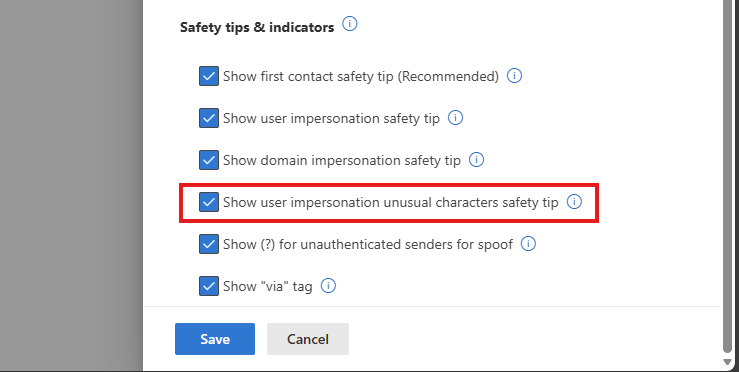
- Show user impersonation unusual characters safety tip
Thats all for the anti-phishing recommendations, you can save the policy now.
DO365 #18: Ensure all forms of mail forwarding are blocked and/or disabled
This requirement wants us to disable forwarding to outbound emailaddresses, which means email addresses outside of the organization/tenant.
Open the Microsoft Defender portal (https://security.microsoft.com)
Go to “Email & collaboration” and click on “Policies & rules”, then click on “Threat policies”. Open the “Anti-spam” menu here.
Click the “Anti-spam outbound policy” and make sure this setting is disabled:
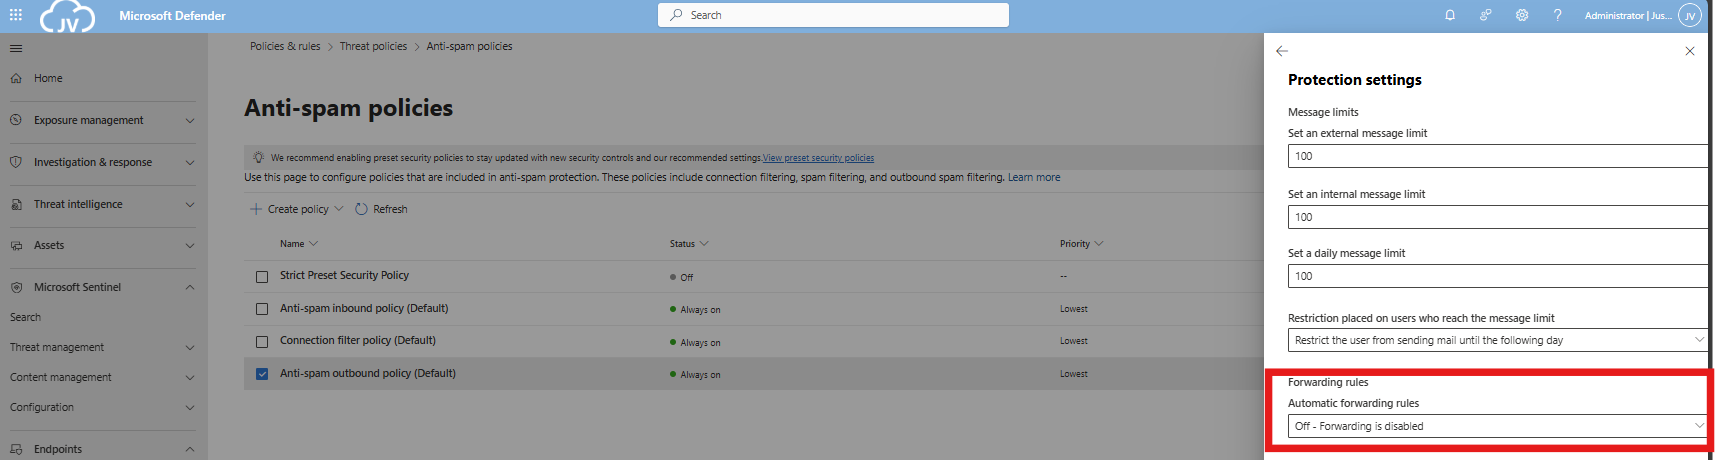
You can also define here the limits of email that a user can send every hour/day. My advice is to limit this down to around 100 or 200. For more information about this: https://justinverstijnen.nl/microsoft-secure-score-identity/tip-3-restrict-amount-of-outbound-email-messages
DO365 #19: Ensure Exchange Online Spam Policies are set to notify administrators
In this requirement we hae to set notifications for certain spam that is being sent by users in your organization. You can do this also on the same page as requirement DO 365 #18.
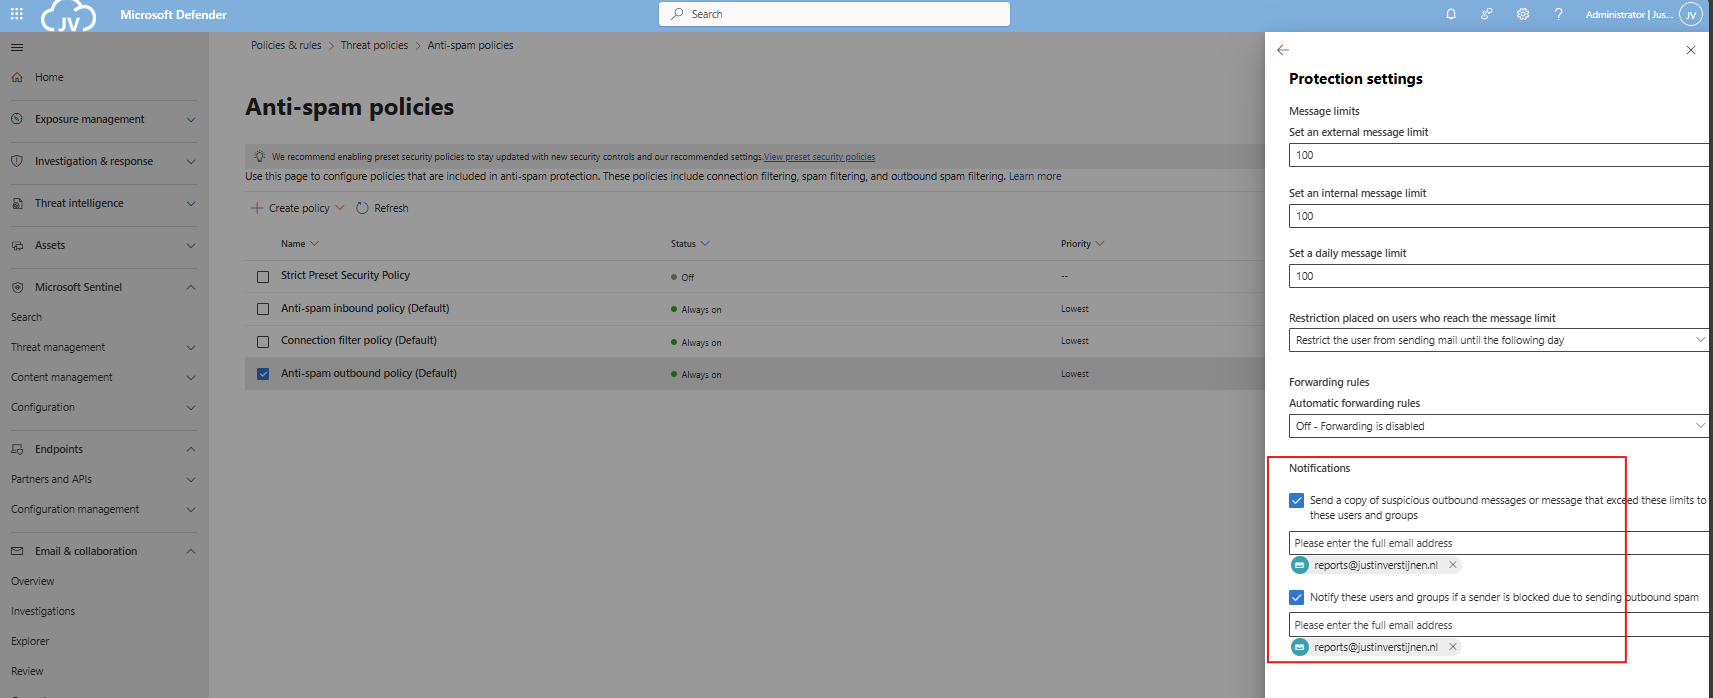
You can set here some email addresses to receive notifications about users exceeding their limits and sending spam. This is great for SOCs.
Secure score after the recommendations
In my environment, the secure score looks like this after setting all these recommendations.
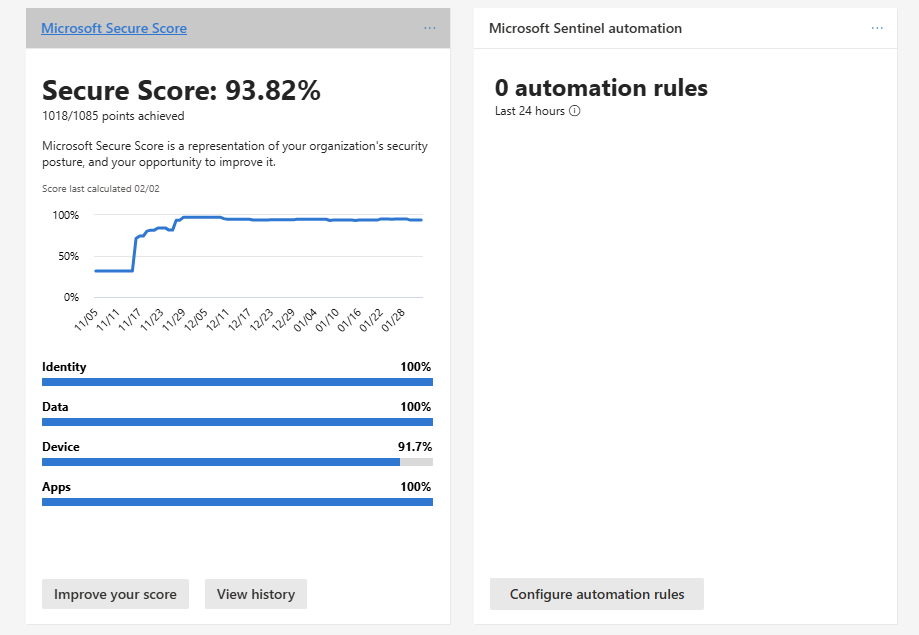
At least 100% for the Apps section :)
End of the page 🎉
You have reached the end of the page. You can navigate through other blog posts as well, share this post on X, LinkedIn and Reddit or return to the blog posts collection page. Thank you for visiting this post.
If you think something is wrong with this post or you want to know more, you can send me a message to one of my social profiles at: https://justinverstijnen.nl/about/
If you find this page and blog very useful and you want to leave a donation, you can use the button below to buy me a beer. Hosting and maintaining a website takes a lot of time and money. Thank you in advance and cheers :)

The terms and conditions apply to this post.