Setup a GitHub Pages Blog
Introduction
In this post, I will dive deeper into this website you’re now visiting and my lesser known Flight blog. In the first quarter of 2026 I have migrated those websites from WordPress to GitHub Pages, because I wanted to have a more future-proof and open-source website with more options to customize. A great advantage of GitHub Pages is that open-source hosting is completely free, so this isn’t a barrier anymore.
I will dive into these topics:
- General overview of the different components
- Find a theme that suit your needs
- Setup a GitHub Repository and hosting
- Hosting images and media files on Azure Blob Storage
- Writing about topics in Markdown
- General post management
Overview of the website
As every website will and can be different, I will describe how my blogs are working. Sure thing is that they are all HTML based and we write in Markdown but for example my theme, Docsy, uses Hugo to generate HTML pages from the markdown text you write.
The components of my website are:
- GitHub Pages: This is the place where my website runs and is maintained using all built-in functions of GitHub, and some scripts and configuration files are hosted on their separate repositories to keep everything centralized and online
- Docsy: Docsy is the GitHub Pages theme I am currently using and delivers the foundation and functions (framework) of the website, where I have done some additions and customizations to make it more to my likings
- Hugo: Hugo is a document generator which converts your Markdown to static HTML pages in the theme you are using, lets say the engine of the theme
- Umami: This tool I use to analyze the traffic on my website. Basically a visitor counter with a lot of options I don’t use. This tool is much more privacy friendly than Google’s counterpart
- Azure Blob Storage: Azure Blob Storage is in use for hosting the images and other media files. For video’s, I am using Youtube with embedding as that video player is much better than browsers’ builtin player and saves a lot of storage.
In this diagram, I visualized the overall website and the different components. From Markdown article to Github Pages and generation to Website which is readable for the user. Also how different media files and different other files are injected into the website.
Step 1: Setup a GitHub Repository and hosting
The first step into hosting a blog website is to create a GitHub account if you don’t have an existing account and to create a repository to host your website. This is completely free with GitHub Pages, if you want to have your source code publicly available.
I already described this process in an earlier blog post, so for Step 1, I will refer to that guide to keep my content as much as up-to-date as possible.
Visit the Setup GitHub Pages tutorial
Step 2: Find a theme for GitHub Pages
Before you can further create a website, you need to select a GitHub Pages-compatible theme. This also decides which further actions must be taken. You can search this websites below on the different themes which are available. Some themes have more extra’s like built-in Table of Contents, or different shortcodes.
In my research on GitHub Pages, I was very happy with the Docsy theme. This catched my eye and has a lot of different options and features available by default. It’s also very lightweight and fast and clear, so I decided to pick that one. It’s available here:
Step 3: Create GitHub Action
After we created a repository and have our domain name linked to the GitHub Pages instance and we have our theme ready, we can configure a GitHub Action to generate the website. This works by re-generating the website every time a commit is done to the repository. After the commit is done, a GitHub Action with the Hugo component will build the website, and then deployed to the GitHub Pages hosting slot.
To create your GitHub Action, copy the contents of this code and change the repository name on line 119:
https://gist.github.com/JustinVerstijnen/bf80883f2c03d3b6e1b8fd331da91c12
Then create a folder named .github, then create another folder workflows in it and then the file build-site.yml and paste the contents. You can create a new file in the web interface from the root and directly type/paste this: .github/workflows/build-site.yml
This automatically creates a GitHub Action in the repository which builds and deploys the current content into a website and places it into the hosting slot.
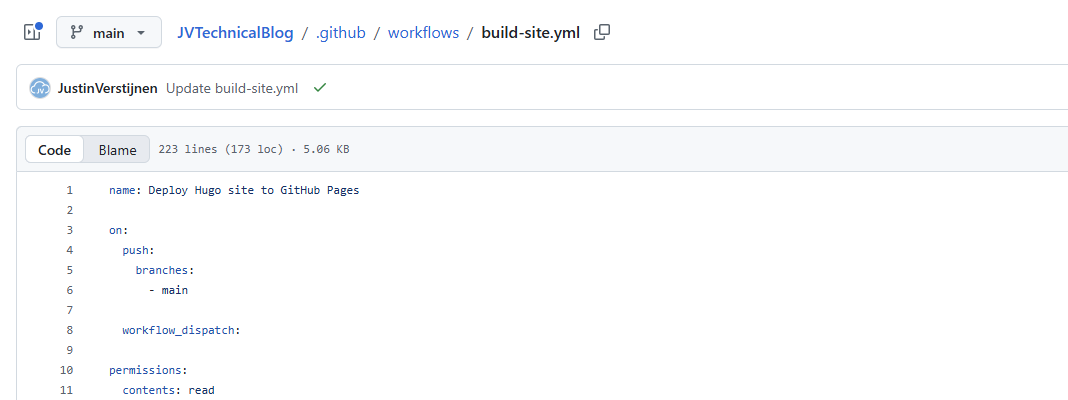
After creating this file, we must configure GitHub Pages to deploy with this GitHub Action instead of building the site directly. Head to Settings and then to Pages. This is where you also configured the custom domain name in the GitHub Pages setup.
Here select the Build and deployment method GitHub Actions to let the just created action build and deploy your site to the hosting slot. From now, every commit on the repository triggers the GitHub Action to build the site and only deploys the site if its correctly built.
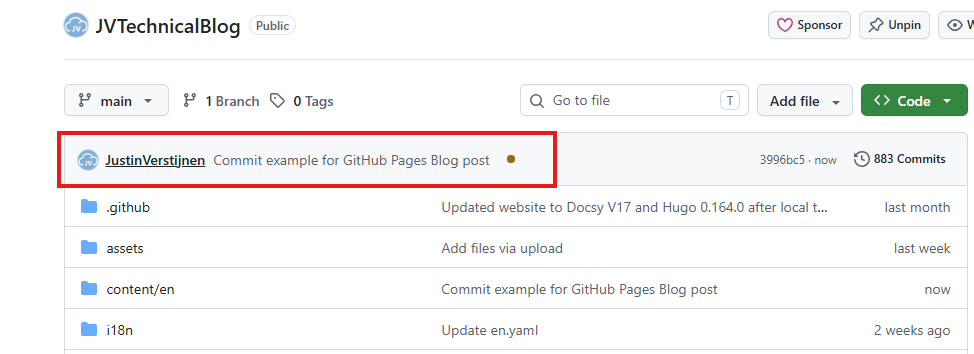
Step 4: General maintenance and Post Management
After we have our repository correct, we can dive into how to manage the repository. While there are multiple ways of doing this, I will explain how I do these tasks.
Management tool
I have Visual Studio Code installed which is free, and I use the GitHub Repos extension. This is a cool way to have a code view, Markdown visual view and Git built in. We can also do our commits from Visual Studio Code, which looks like this:
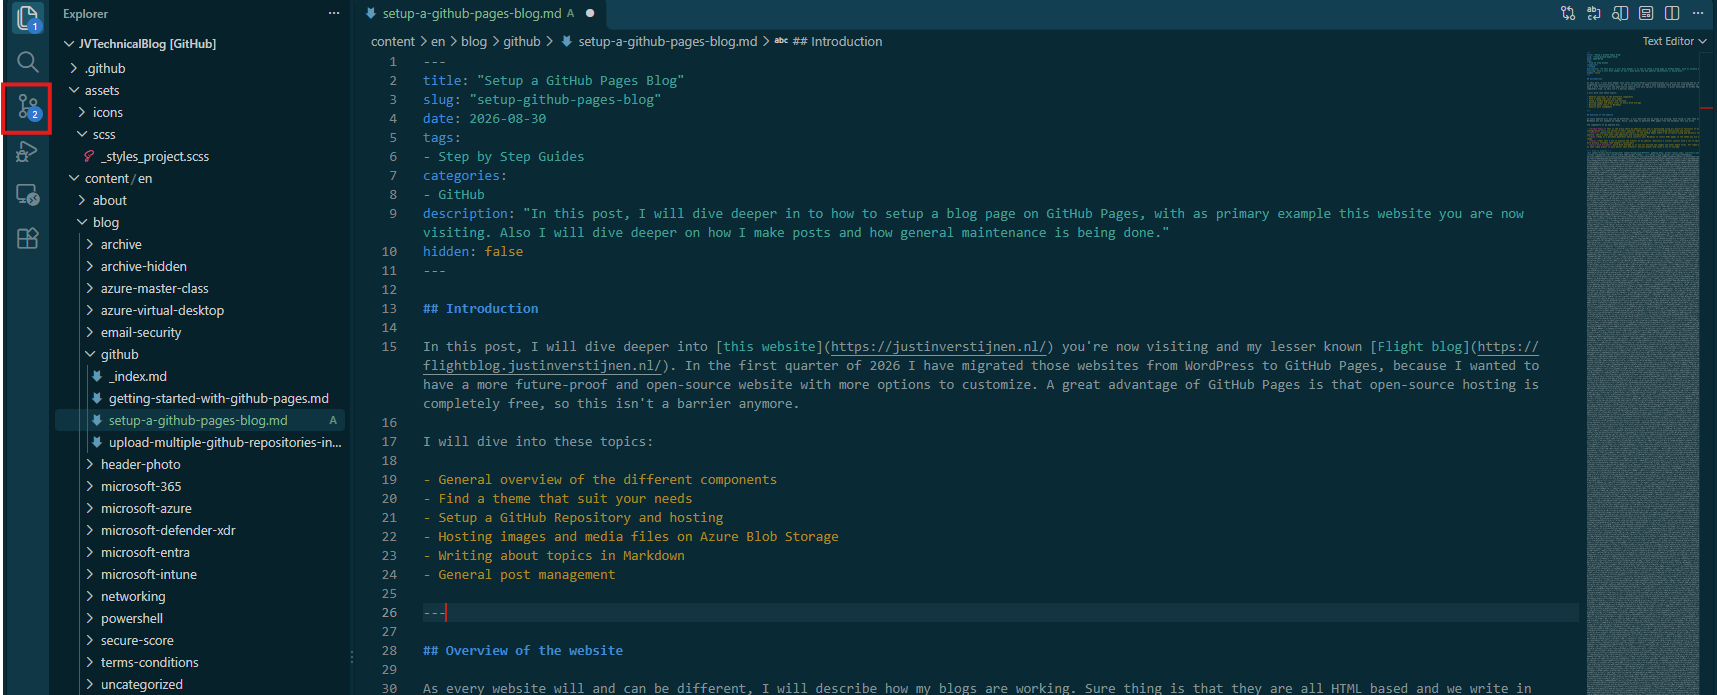
After changing files, we can commit the changes from the left on Source Control and commit the changes there:
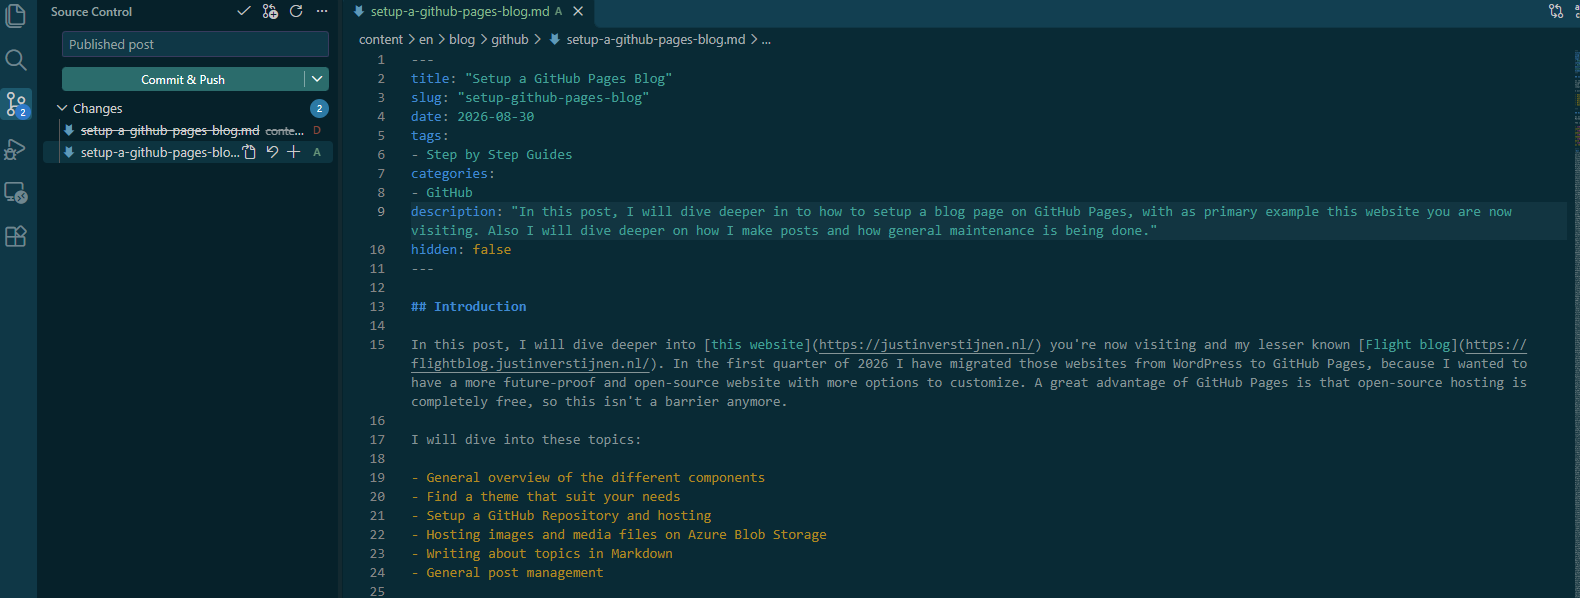
Here we commit the changes which is “saving the file” and put a custom commit message to it which is shown at the bottom of any Docsy site, like my website.

Posts location and folders
The posts and content are saved into the folder /content/en/blog. Here you can create folders for the categories, which also must have a _index.md file, stating the details of the folder. Here you can name the folder as shown on the site, including a weight number. This makes the order hardcoded, where a higher number is shown more on the bottom.
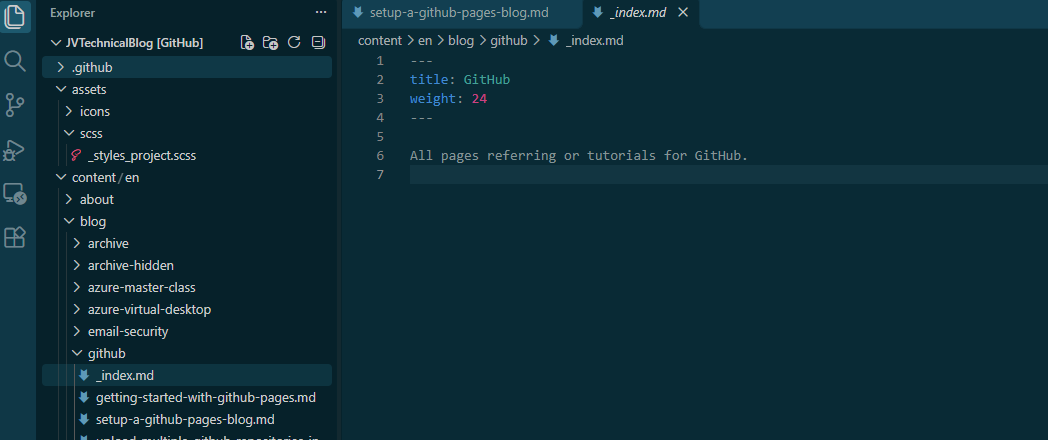
More parameters are available, which is called “Front matter”
Categories and Tags
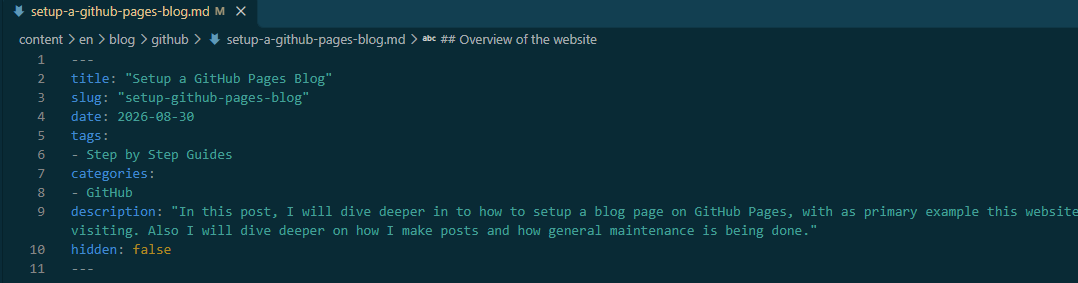
In the theme I use, Docsy, the Categories are different from the folders on the left. I just copied everything exactly to match both to each other. We can also use Tags on different posts which can be used for various different use cases. I don’t use them too much but use them to give a simple explaination of what to expect in the post.
The categories and tags are stated in the “Front matter” on the top of the post:
General maintenance
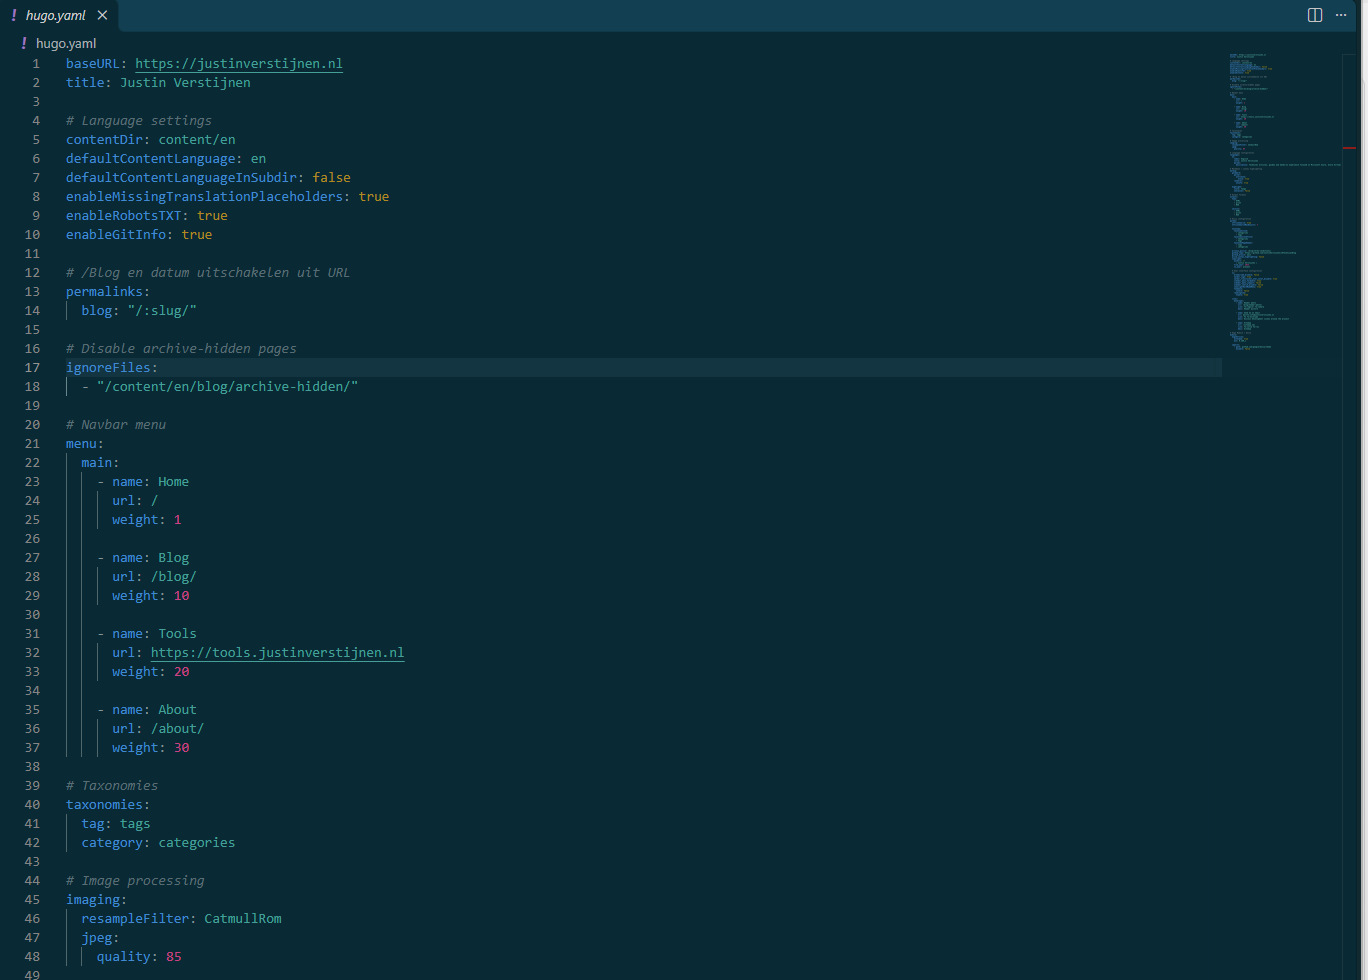
In Docsy, we have a full overview configuration file called hugo.yaml which contains a full configuration file of the website. Here you can set some variables like the name of the site, the GitHub repo, the menu items on top, what image quality is being used, which outputs are generated, like printable/printer-friendly versions of your posts and such.
Project layout
The full layout of the folders of my Docsy/Hugo project and explaination is here:
| Folder name | Folder description |
|---|---|
| .github | Folder for the project workflows. |
| .well-known | Folder for different website add-ons like security.txt. |
| assets | Folder containing different additional CSS and Logos. |
| content | Folder containing all categories and pages. |
| i18n | Folder containing translation-files. |
| layouts | Folder containing custom pages, shortcodes, layouts and suffixes. |
| public | Folder containing fallback assets needed for building the website. |
| resources | Folder containing resources needed for building the website. |
| static | Folder containing add-ons to the original CSS and Javascript. |
Step 5: Writing topics in Markdown
For GitHub Pages our content must be in the Markdown format. Markdown is a very popular and more easy to write version of HTML, where text is made up using syntaxes. I will show you an example:
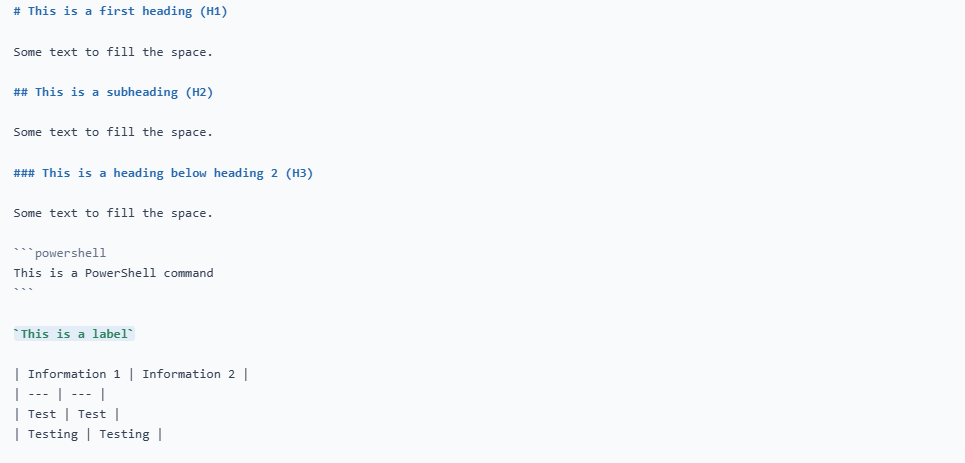
This will be translated by GitHub Pages to this visually:
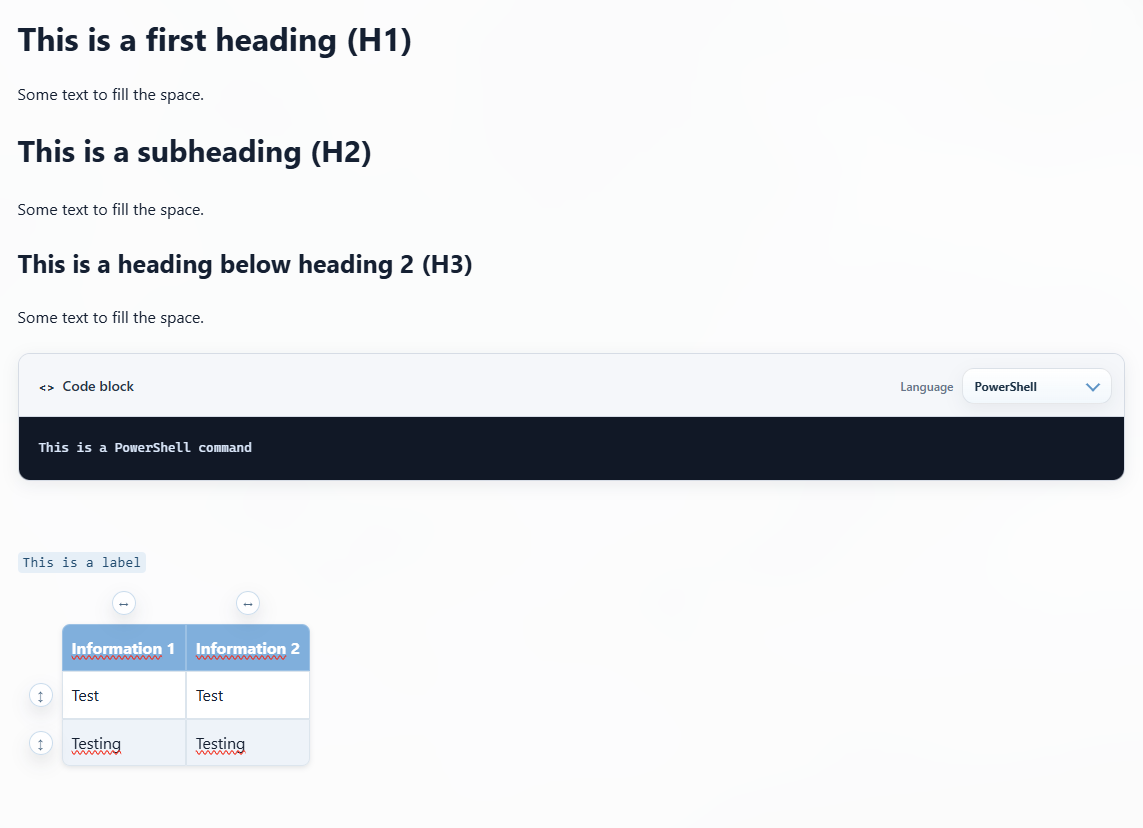
This is a switch in writing some content. You can use any tool which visualizes Markdown text and gives you access to the code. I am using my own Markdown Editor tool for this which can be found here:
This tool gives you a nice interface with some blocks and gives you directly access to the underlying code. I use this tool to write my guides and to automatically upload the images to Azure Blob Storage.
To actually learn Markdown syntaxes, you can use this website:
Step 6: Hosting media files on Azure Blob Storage
If you want to host your image files on Azure Blob Storage which is easy and relatively cheap, you can check out this guide I wrote earlier. This describes exactly the steps needed to host the files and make them publicly accessible.
Visit the Setup Azure Blob Storage tutorial
Of course, you are not limited to this option. Any publicly available repository will do the trick. Azure Blob Storage is a very cheap option and is easy to manage and setup. My advice is to not use the GitHub repository for hosting the images as the repository will grow very fast, and we are limited to 1GB of storage in the free tier, so we want to
My Azure Blob Storage account contains about 3.500 image files (1,2GB) and cost me around 50 cents a month.
Step 7: The conversion steps
For converting the older Wordpress pages I have wrote from founding the website till the day I have migrated are converted by AI to Markdown with the correct shortcodes. At the time, I had around 140 pages which is not-done to do fully by hand. I stared with some of the posts where I was the most proud of and contained the most different blocks, and when I found that AI converted them to my likings, I converted the rest. With a plugin in Wordpress I was able to export all image files from the Wordpress database and then uploaded to Azure Blob Storage.
This sounds really easy but think of 140 articles which are converted and then checked by hand, and corrected in much ways. I like the use of AI, use it where possible but me as a human must have the latest hand on such actions in my opinion. This process took me the most time.
Wordpress has a great Code editor option in the visual editor, this helped me significantly has all posts can be saved as text, then placed into the right folders and then converted to Markdown.
Summary
In this post, I gave a good understanding of the technical aspects of my website and the process I went through. I described the different components I use and how to configure everything.
Every project is different, and maybe this post will not fit your requirements for a fully 100% but I hope to give you a good understanding on where to start your GitHub Pages and blogging journey.
Thank you for visiting my website and I hope it was helpful.
These sources helped me by writing and research for this post;
End of the page 🎉
You have reached the end of the page. You can navigate through other blog posts as well, share this post on X, LinkedIn and Reddit or return to the blog posts collection page. Thank you for visiting this post.
Support the blog
