Set up a Site-to-Site VPN between Azure and UniFi
Categories:
9 minute read
Introduction
In Azure, you can use a Virtual Network Gateway to create a Site-to-Site VPN connection with a hardware firewall. This allows you to connect a company’s local network to your network in Azure. As this configuration involves two systems, I will describe the configuration for each system separately.
The protocol used for this is IPsec with IKEv2. Most firewalls support this.
1. Azure-side guide
This section explains the configuration on the Azure side. Existing configurations that are currently in use also comply with these settings.
Step 1.1: Create the GatewaySubnet
We start by creating a GatewaySubnet in the virtual network where the Virtual Network Gateway will be placed. Open the virtual network, then go to Settings and Subnets from the left.
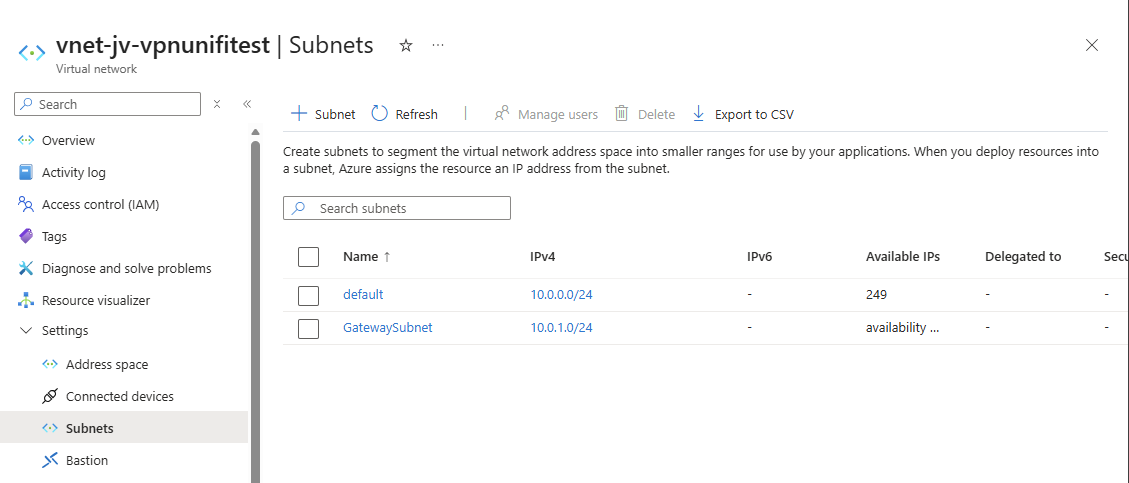
Check whether the virtual network already has a subnet named GatewaySubnet. If it does not, follow these steps:
- Click on
+ Subnet - Under
Subnet purpose, selectVirtual Network Gateway. This acts as a template for the subnet - Adjust the IP address range as required
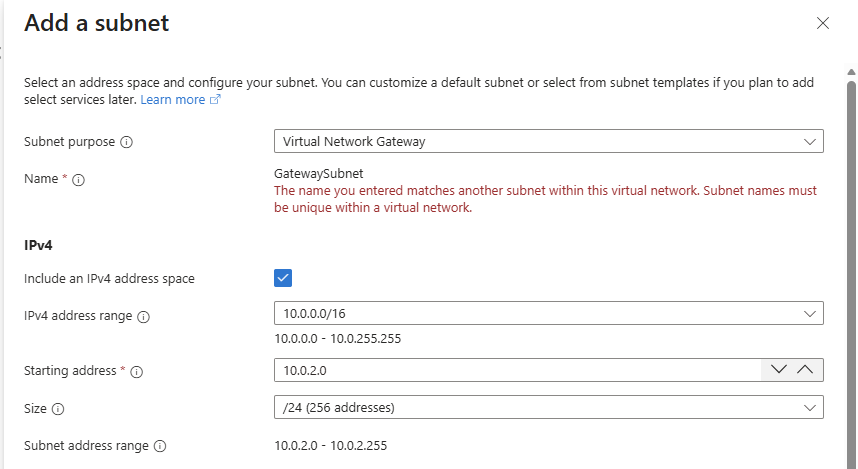
In my case the subnet already exists, but for the purpose of this guide, you should be able to create the subnet this way.
For the IP range, my advice is to select an address range that is well outside the range you may use for future expansion. For example, for the network 10.69.0.0/16, you could use 10.69.255.0 as the range. This leaves ranges 0 through 254 available for possible growth.
For the VPN Gateway configuration used in this guide, the subnet must be at least /27. A prefix closer to /0 creates a larger subnet, while a prefix closer to /32 creates a smaller subnet based on the number of available addresses.
Save the subnet and check the settings. Then continue with Step 1.2.
Step 1.2: Create the Virtual Network Gateway
In Azure, you need to create a resource called a Virtual Network Gateway. This is the resource type with the blue lock icon:
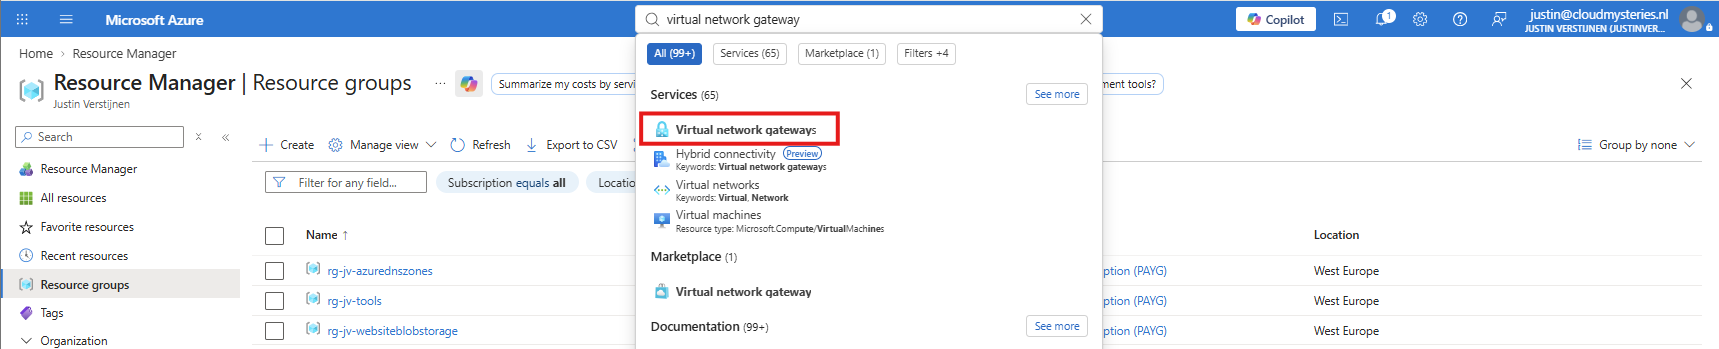
If your virtual network does not yet have a Virtual Network Gateway, we have to create one. A VNet can have only one Virtual Network Gateway, but you can use peerings to connect multiple VNets to a hub network where a Virtual Network Gateway is deployed.
Creating a Virtual Network Gateway takes approximately 45 minutes. This is why I start with the Azure configuration, so you can use part of the time to configure UniFi in the meantime.
On the Virtual Network Gateway page, click + New to create a new gateway for your network.
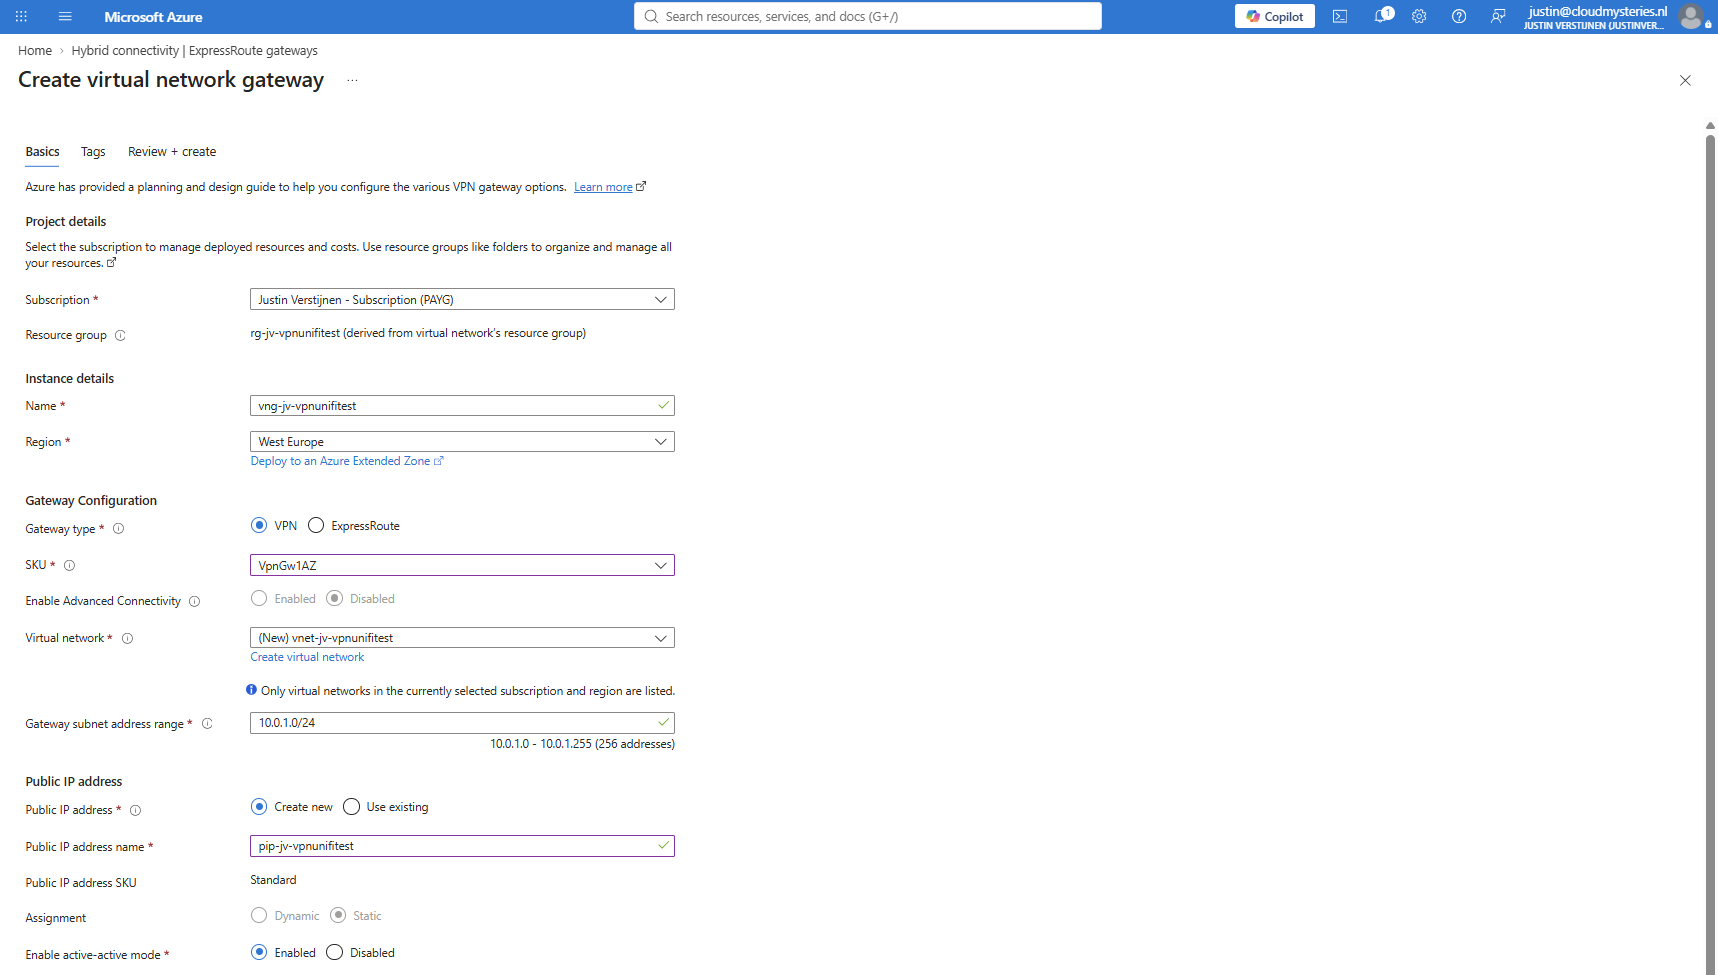
After creating the gateway, the deployment will take around 45 minutes to complete. You can continue to follow the steps, but you will not be able to create the connection itself yet.
Step 1.3: Create the Local Network Gateway
Once you have a Virtual Network Gateway ready or deploying, search for Local Network Gateway and create one for the company. A Local Network Gateway represents a physical site and contains the WAN IP address and the local network address ranges which are available in your UniFi environment:
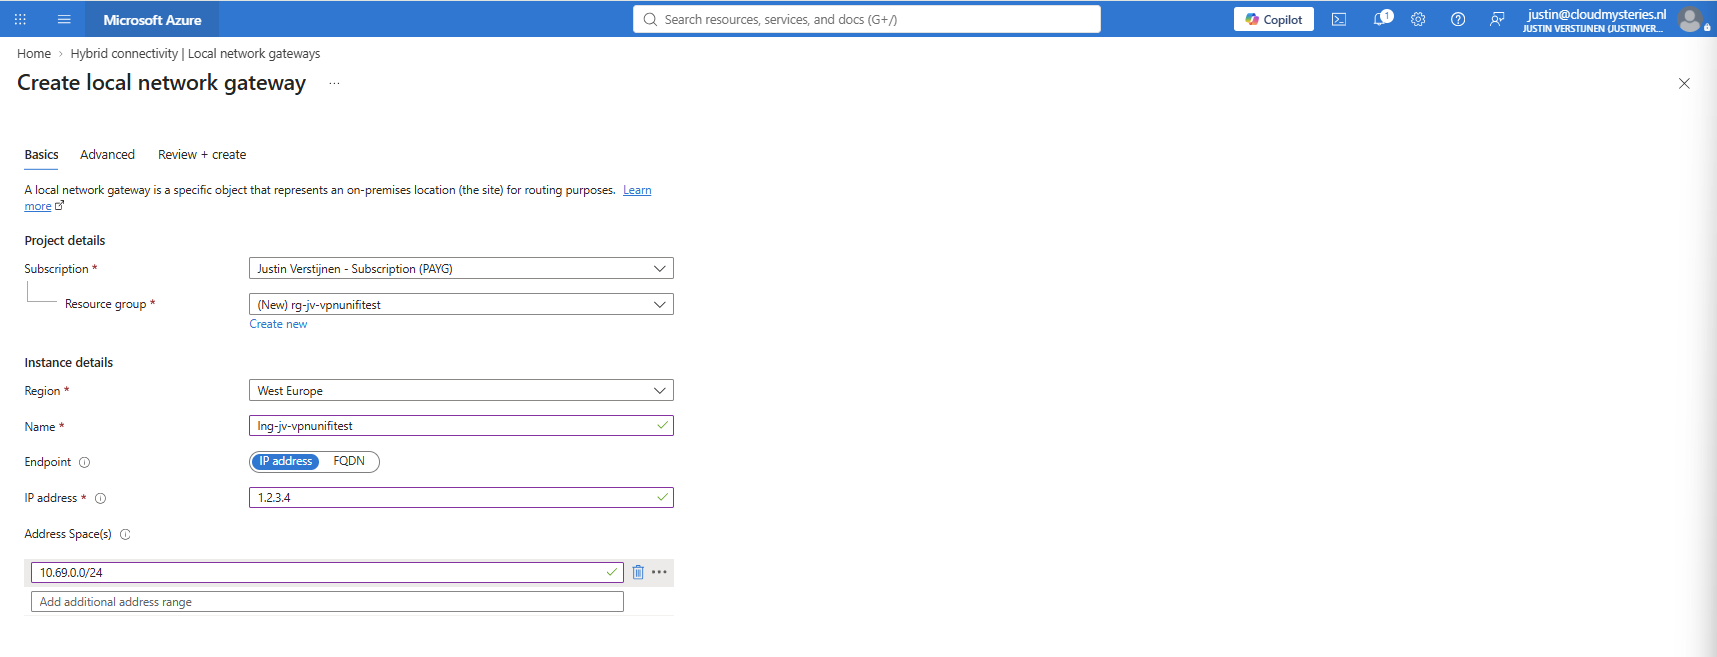
In this example, my UniFi IP range is 10.69.0.0/24 and the WAN IP address is 1.2.3.4. Then create the Local Network Gateway.
Step 1.4: Create the connection
If your Virtual Network Gateway is deployed and ready, you can create the VPN connection and finish this step. If the deployment is not ready yet, continue the guide and we will do this again in Step 3.
Open your Virtual Network Gateway:
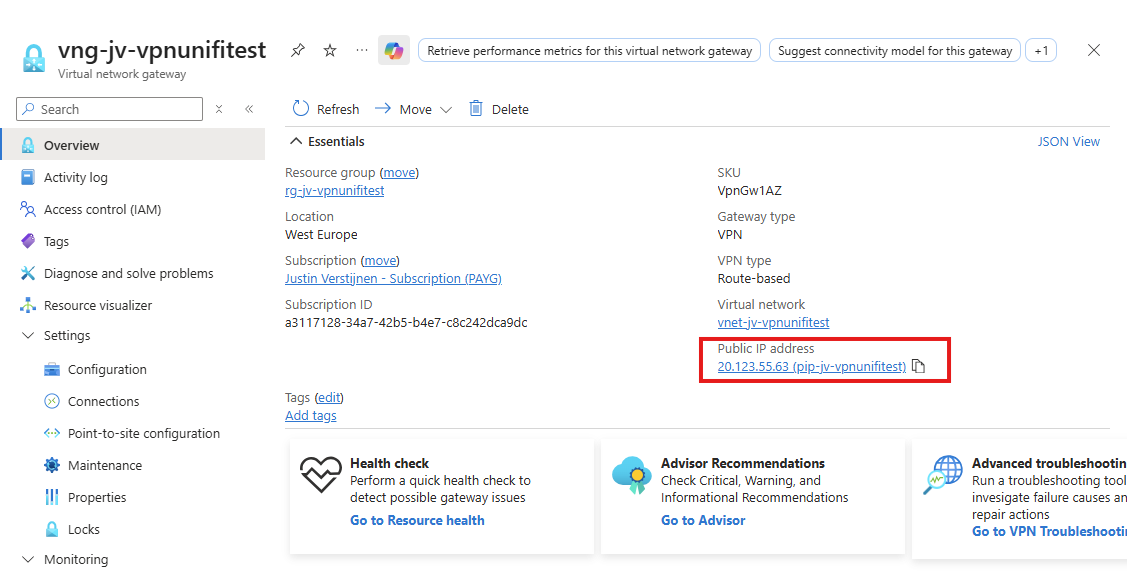
Make a note of the following value:
- The public IP address of the Virtual Network Gateway, as shown on the screenshot above
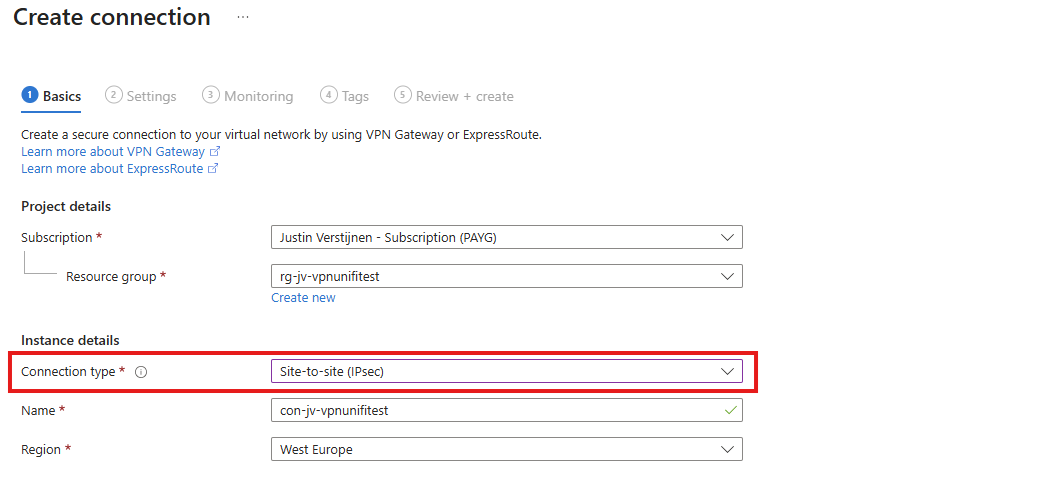
To create the connection, under Settings, go to Connections. Click + Add to add a VPN connection. Select the correct resource group and choose Site-to-Site (IPsec) as the Connection type:
Give the connection an appropriate name according to the naming policy, then continue to the Settings tab.
Select the Virtual Network Gateway and Local Network Gateway that you want to use for the connection:
Generate a complex pre-shared key (PSK) containing different character types and with a length of 50 to 64 characters. UniFi has a maximum limit of 64 characters, so let’s stay under this value. Store the PSK in a good and safe place like a password manager. You will also need it when configuring UniFi. The PSK acts as a connection password and prevents just anyone on the internet from connecting to your VPN router.
Select IKEv2 as the IKE protocol and for IPsec / IKE policy, select Custom. The default settings in UniFi and Azure are different. We therefore do not use either platform’s defaults and configure the same, stronger policy on both sides.
Configure the settings as shown below:
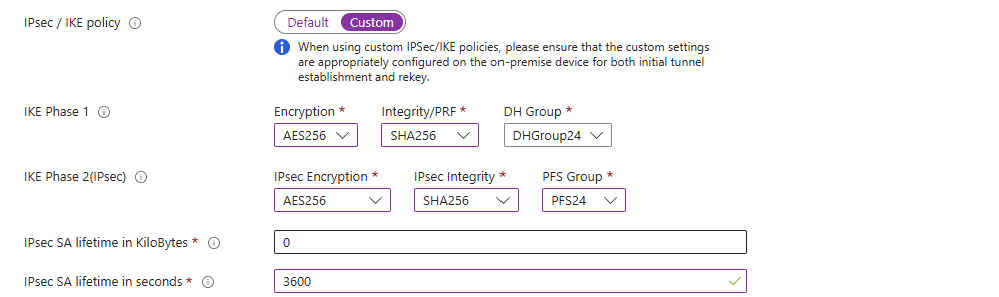
| IKE Phase | Encryption | Integrity | DH & PFS Group |
|---|---|---|---|
| Phase 1 | AES256 | SHA256 | DHGroup24 |
| Phase 2 | AES256 | SHA256 | PFS24 |
Then set IPsec SA lifetime in seconds to 3600, which is one hour. Leave the remaining settings unchanged. The complete setup should now look like this:
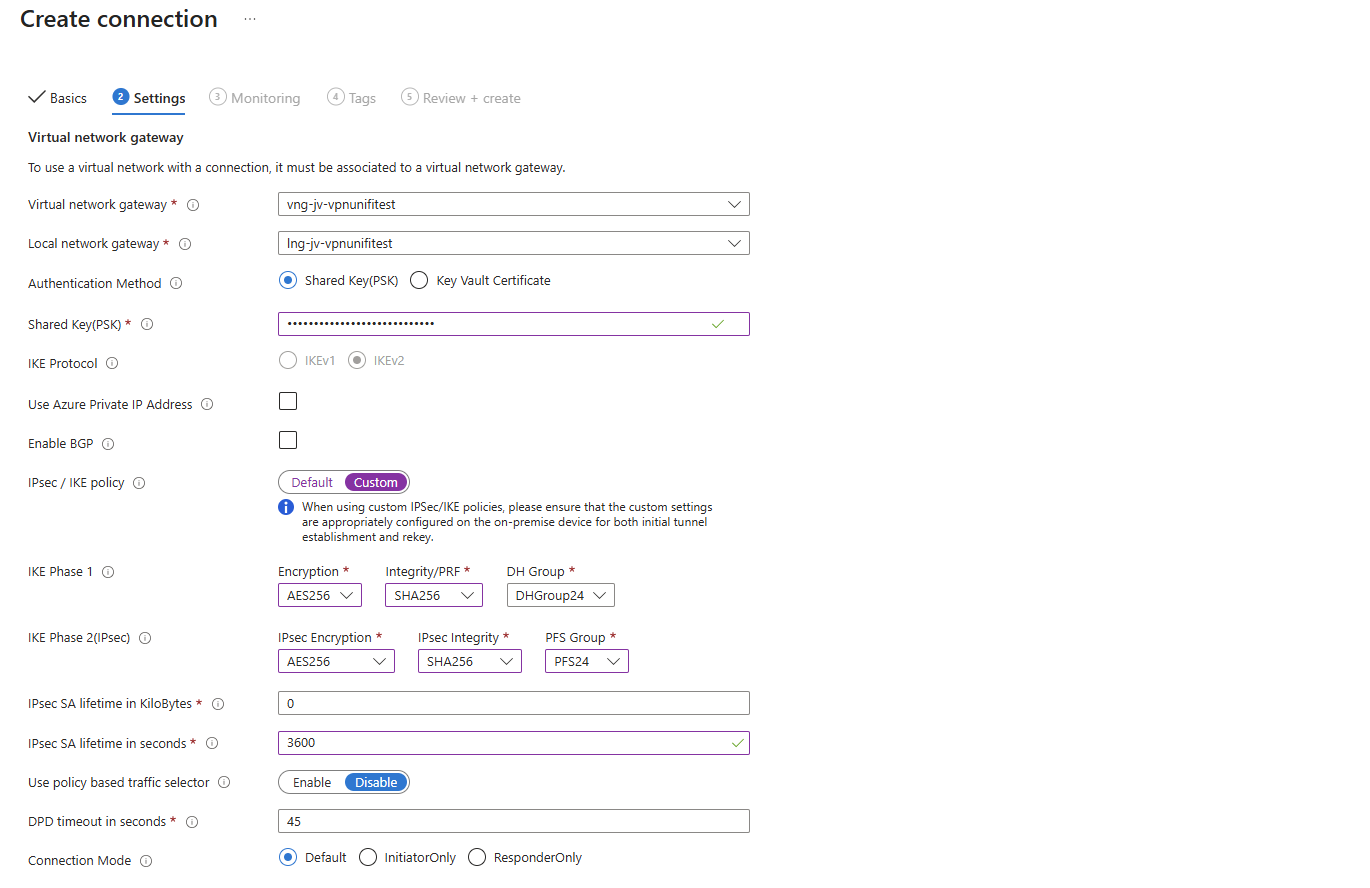
Incorrect settings on either side will result in no VPN connection or no IP traffic. Check all settings carefully before continuing. Then create the connection in Azure, which will take approximately 60 seconds. You can immediately continue with the UniFi configuration for now as we have now done the first half of the configuration.
2. UniFi-side guide
The following steps must be completed in UniFi, so open up your UniFi environment and follow these steps to configure the VPN tunnel in UniFi.
Step 2.1: Create the VPN tunnel
In UniFi, go to Settings, then to VPN and select Site-to-Site VPN. Here we can configure a new VPN tunnel to our Azure environment.
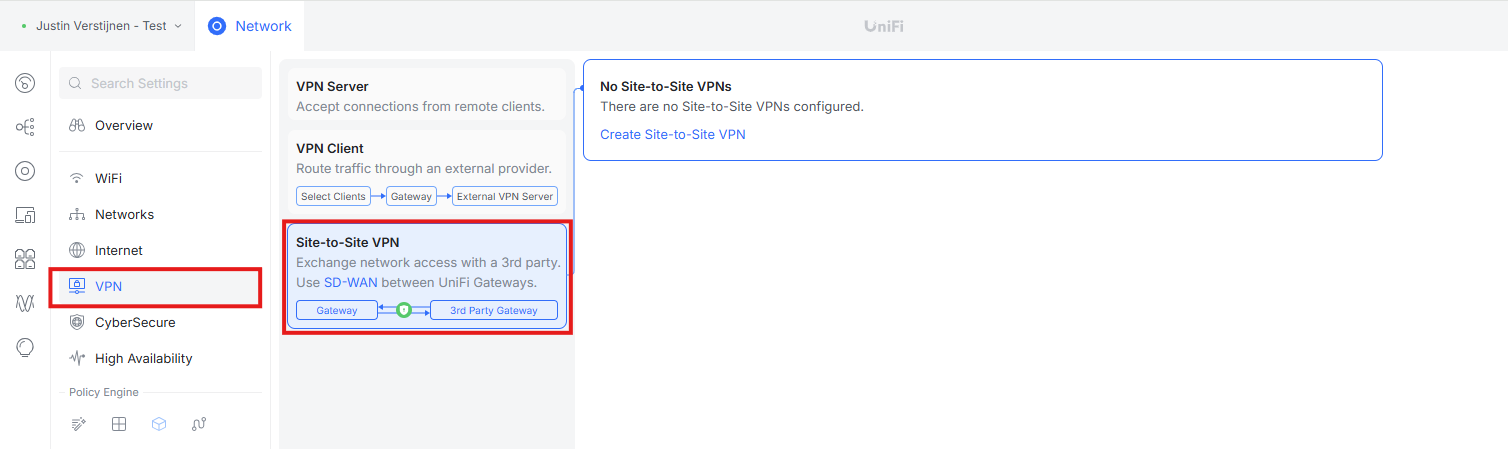
Click on Create Site-to-Site VPN, give the tunnel a name and select the primary WAN connection:
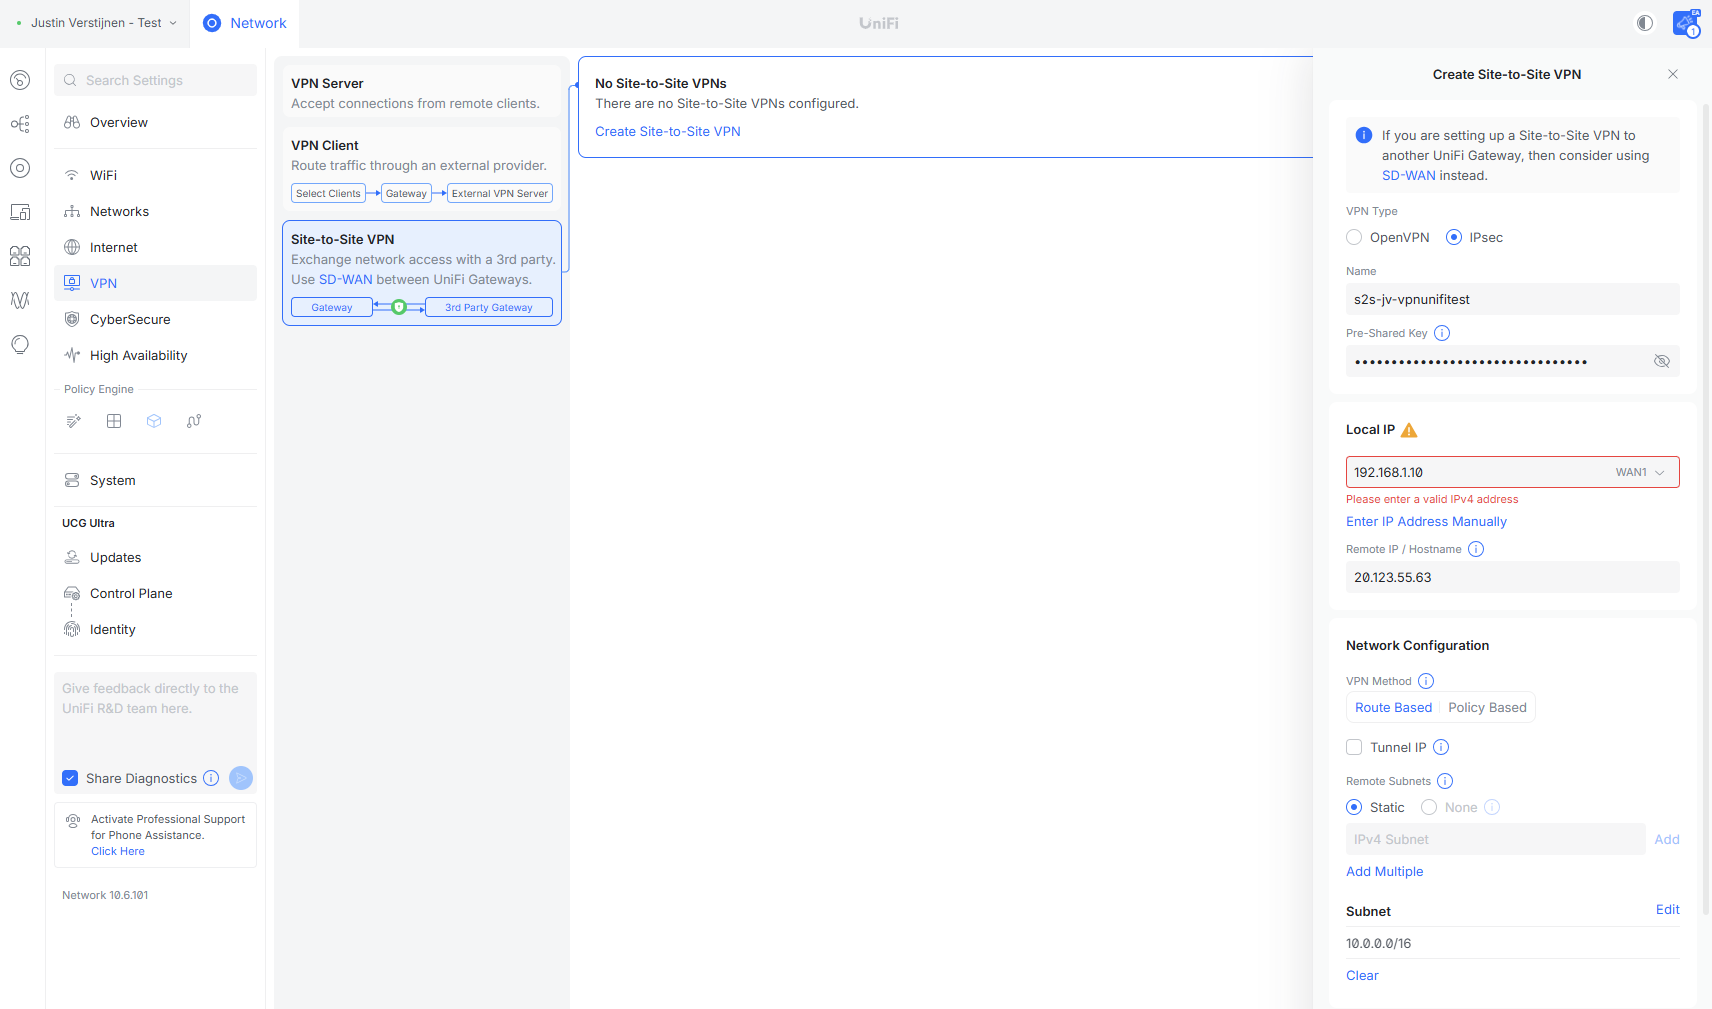
- The VPN connection type must be IPsec
- Give the tunnel a name and enter the same pre-shared key (PSK) that you configured in Azure
- The local IP should correspond to the WAN connection of your UniFi gateway
- Under
Remote IP / Hostname, enter the public IP address of the Azure Virtual Network Gateway - The VPN method must be
Route-based - Add all your Azure subnets to the subnets section. You can also choose to add the whole address space including all subnets
In Step 2.2 we will configure the advanced cryptographic settings.
Step 2.2: Configure the advanced cryptographic settings
In UniFi, we now need to copy the IPsec policy that we configured in Azure because the cryptographic algorithms and key parameters must be compatible on both sides. Azure treats SA lifetimes as local values that do not have to match exactly, but in this guide we use the same lifetimes on both sides for consistency. Otherwise, incompatible settings can prevent the tunnel from coming online or forwarding traffic.
IPsec works in two phases:
Phase 1: Establishing the connection
- The devices establish the IKE Security Association (SA) and exchange keying information to create a secure tunnel.
Phase 2: Protecting data traffic
- The devices establish the IPsec Security Association used to encrypt and authenticate traffic through the tunnel.
Let’s configure these phases now. The tunnel’s cryptographic settings must be configured as shown below. Scroll down on the tunnel configuration page and set Advanced to Manual.
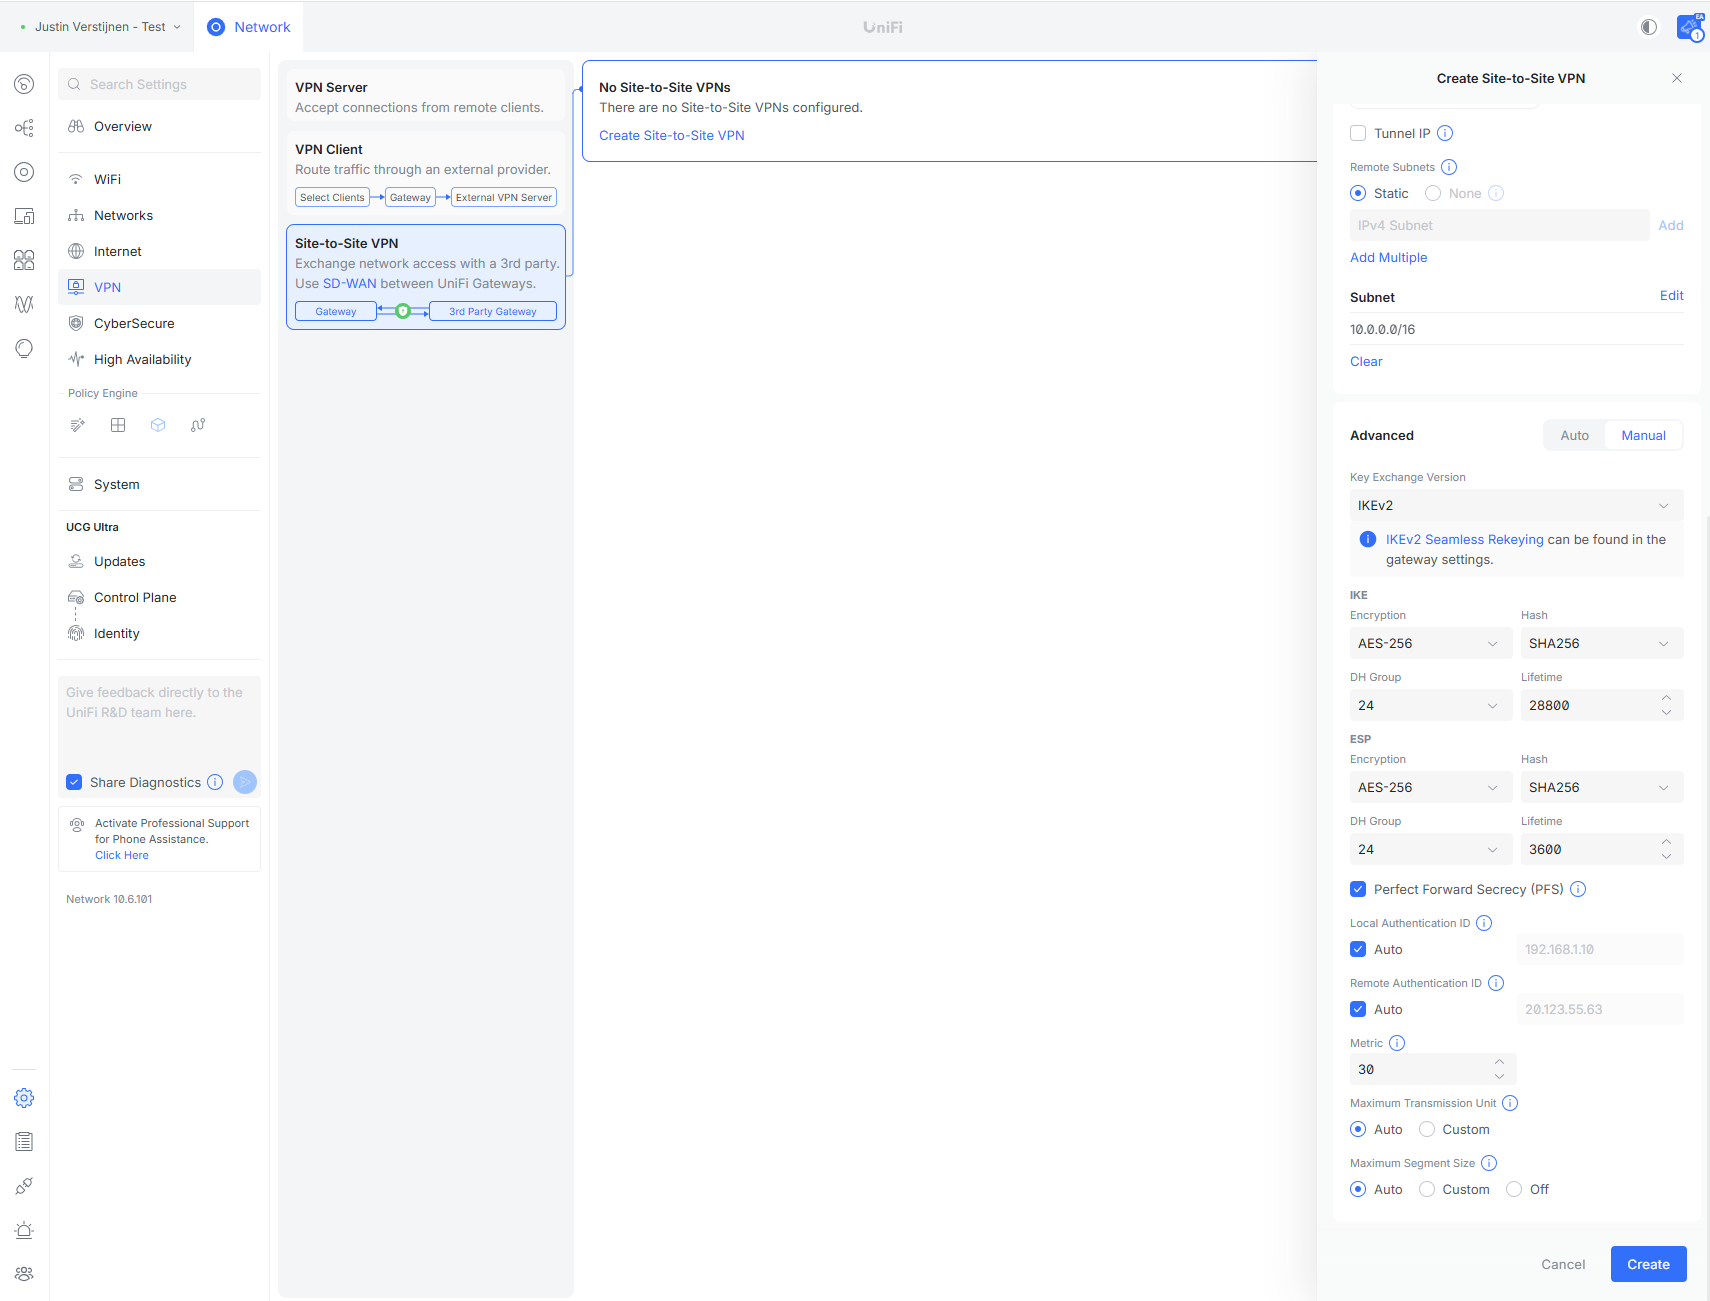
Set the connection to use IKEv2.
Under IKE, select the following options:
- AES-256 for encryption.
- SHA256 for hashing.
- DH group 24.
- Lifetime:
28800seconds, which is 8 hours.
Under ESP, select the following options:
- AES-256 for encryption.
- SHA256 for hashing.
- DH group 24.
- Lifetime:
3600seconds, which is 1 hour.
At the bottom of the page, enable Perfect Forward Secrecy (PFS). Other settings can be left at their defaults. Then save the connection in UniFi.
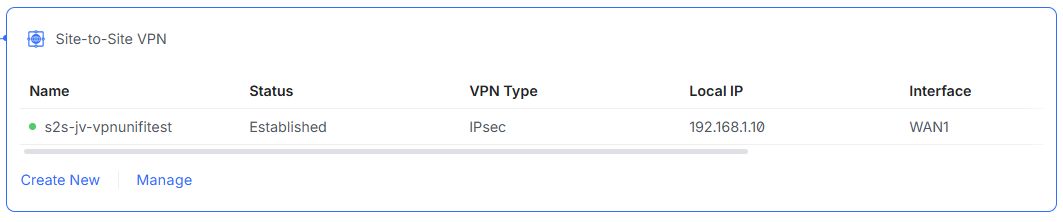
Wait approximately 30 seconds and the connection should come online if the connection is already created in Azure. If not, first follow Step 3 to create this connection afterwards.

Once the connection has been established, it looks like this:
Step 3: Create the connection (optional)
If you continued with the UniFi configuration while the Virtual Network Gateway was still deploying and therefore skipped Step 1.4: Create the connection, create the Azure connection now. Head back to Step 1.4 and complete it. After that, continue with Step 4 to test the connection. You can view the status of the connection in both systems.
Step 4: Testing the connection
Seeing Online or Connected on both the Azure and UniFi side does not automatically mean that traffic is passing through the tunnel successfully. Test several things to confirm that the VPN connection works correctly.
Step 4.1: Basic network testing
You can test the connection by pinging from local to Azure and in reverse. This can fail or time out based on the settings of the endpoints.
Step 4.2: Test an Azure service from the local network
Test a service hosted on an Azure server from a local device. This is especially useful when ping is disabled or does not work. A server is often used as a print server, file server or web server. Test one of these services.
In my case, the test server is an IIS web server with a simple website to test a service on Azure.
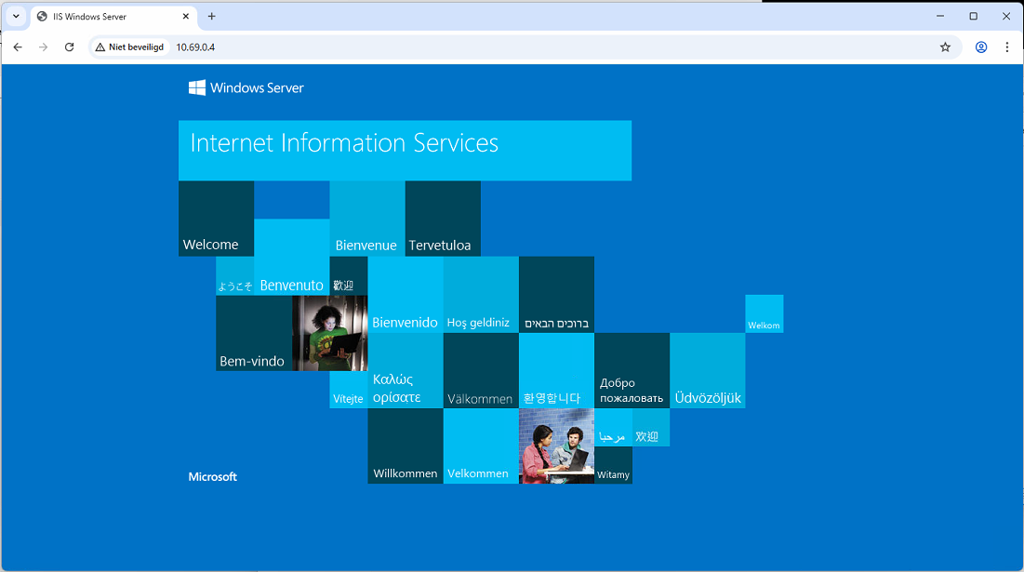
If ping works and you can access a service on the Azure server, the connection has been configured successfully and is working as expected.
Summary
In this guide we created a route-based Site-to-Site VPN between an Azure Virtual Network Gateway and a UniFi gateway. Both sides use matching IPsec and IKEv2 settings, and the connection has been tested in both directions. This is mostly how I configure these tunnels but some things can be done differently. Also, if using other firewall solutions, some steps may differ from the steps above, but this guide gives a basic understanding of how to configure this tunnel.
This connection allows systems at the physical site to communicate securely with selected Azure networks and services. This means linking your local network to your cloud network in a safe and easy way.
Thank you for reading this post and I hope it was helpful!
Sources
- https://learn.microsoft.com/en-us/azure/vpn-gateway/vpn-gateway-about-vpngateways
- https://learn.microsoft.com/en-us/azure/vpn-gateway/tutorial-site-to-site-portal
- https://learn.microsoft.com/en-us/azure/vpn-gateway/vpn-gateway-ipsecikepolicy-rm-powershell
- https://help.ui.com/hc/en-us/articles/7983431932439-UniFi-Gateway-Site-to-Site-IPsec-VPN-with-Third-Party-Gateways-Advanced
End of the page 🎉
You have reached the end of the page. You can navigate through other blog posts as well, share this post on X, LinkedIn and Reddit or return to the blog posts collection page. Thank you for visiting this post.
If you find this page and blog very useful and you want to leave a donation, you can use the button below to buy me a beer. Hosting and maintaining a website takes a lot of time and money. Thank you in advance and cheers :)

The terms and conditions apply to this post.