The art of Dynamic Groups in Microsoft Entra
Dynamic Groups are really great for automating certain things. They are basically like groups like we know them for several years but they always required some sort of manual action or assignment. Dynamic Groups will help us eliminating this. I will give some examples how I implemented certain actions in production. I will also share the rules syntaxes which can be used directly into your environment and can be changed to your likings.
How to create a Dynamic Group
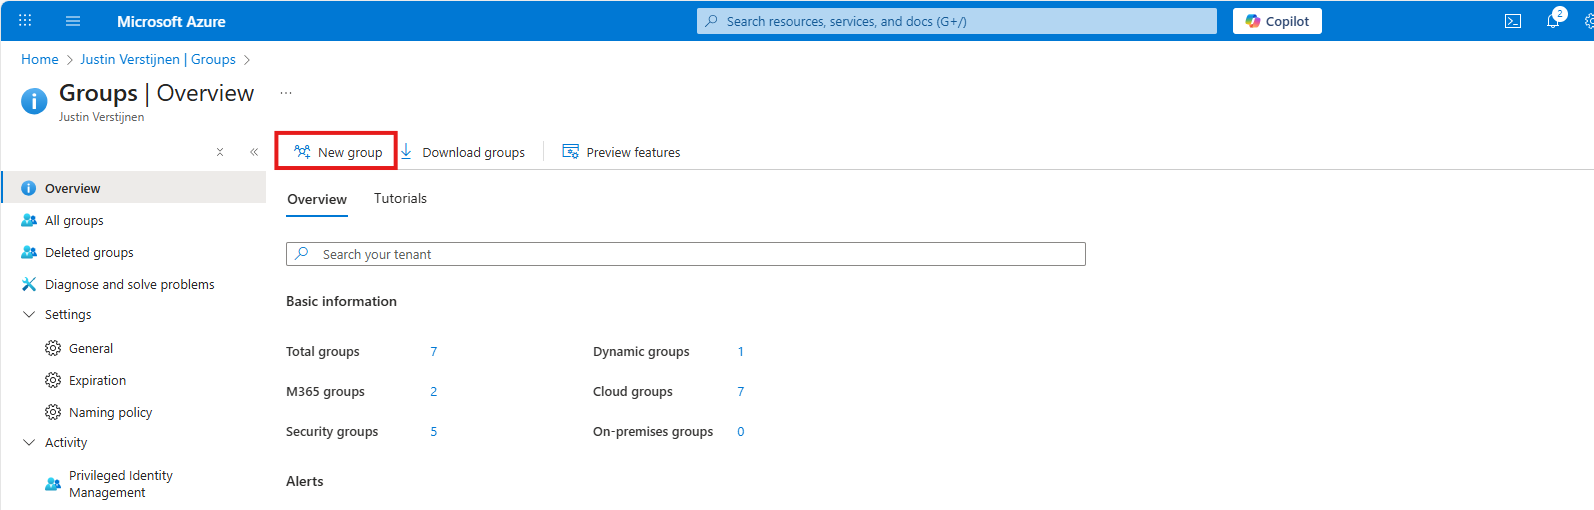
In Microsoft Entra, you can create a Dynamic Group by heading to “Groups” and then click “+ New group”:
Then click on the “Membership type”:
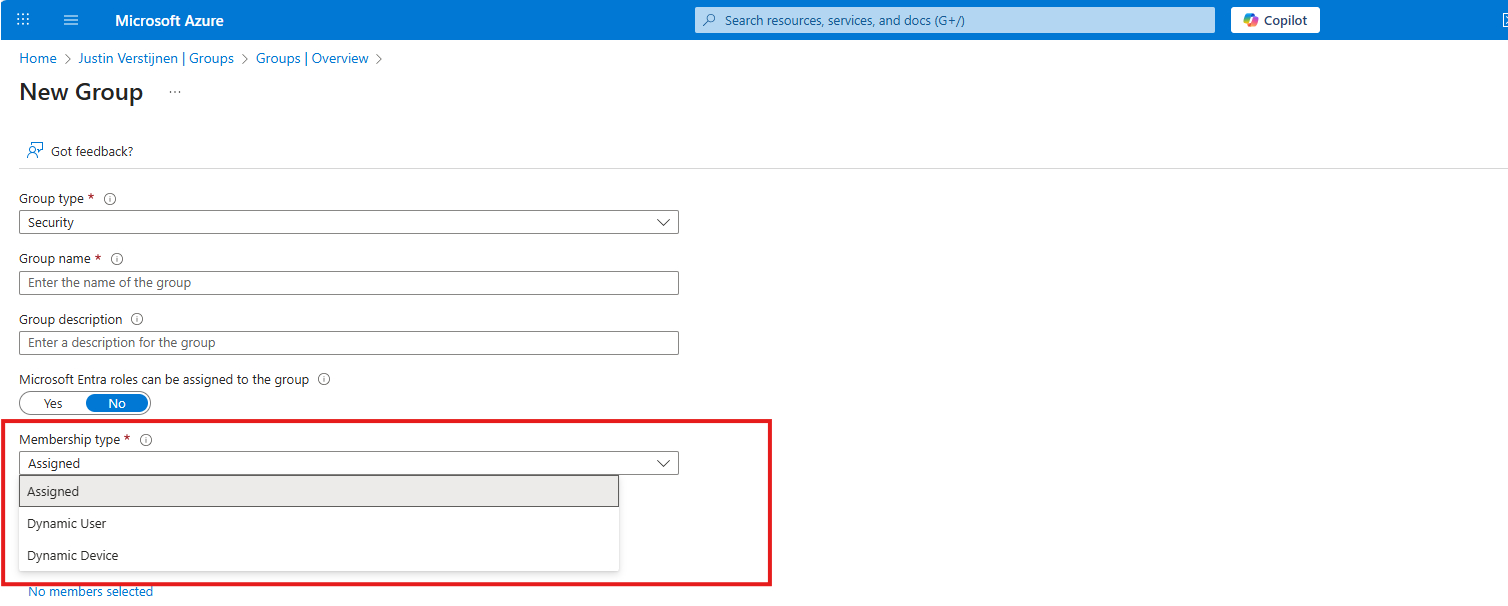
Here we can select 3 options:
- Assigned: Basically like traditional groups, manual assignment required
- Dynamic User: A dynamic group for Users
- Dynamic Device: A dynamic group for Devices
For creating and using Dynamic Groups, you need at least one Microsoft Entra P1 license (included from 365 Business Premium and up).
Rule syntaxes and membership check
To change the rules of the dynamic group, head to “Dynamic membership rules”:
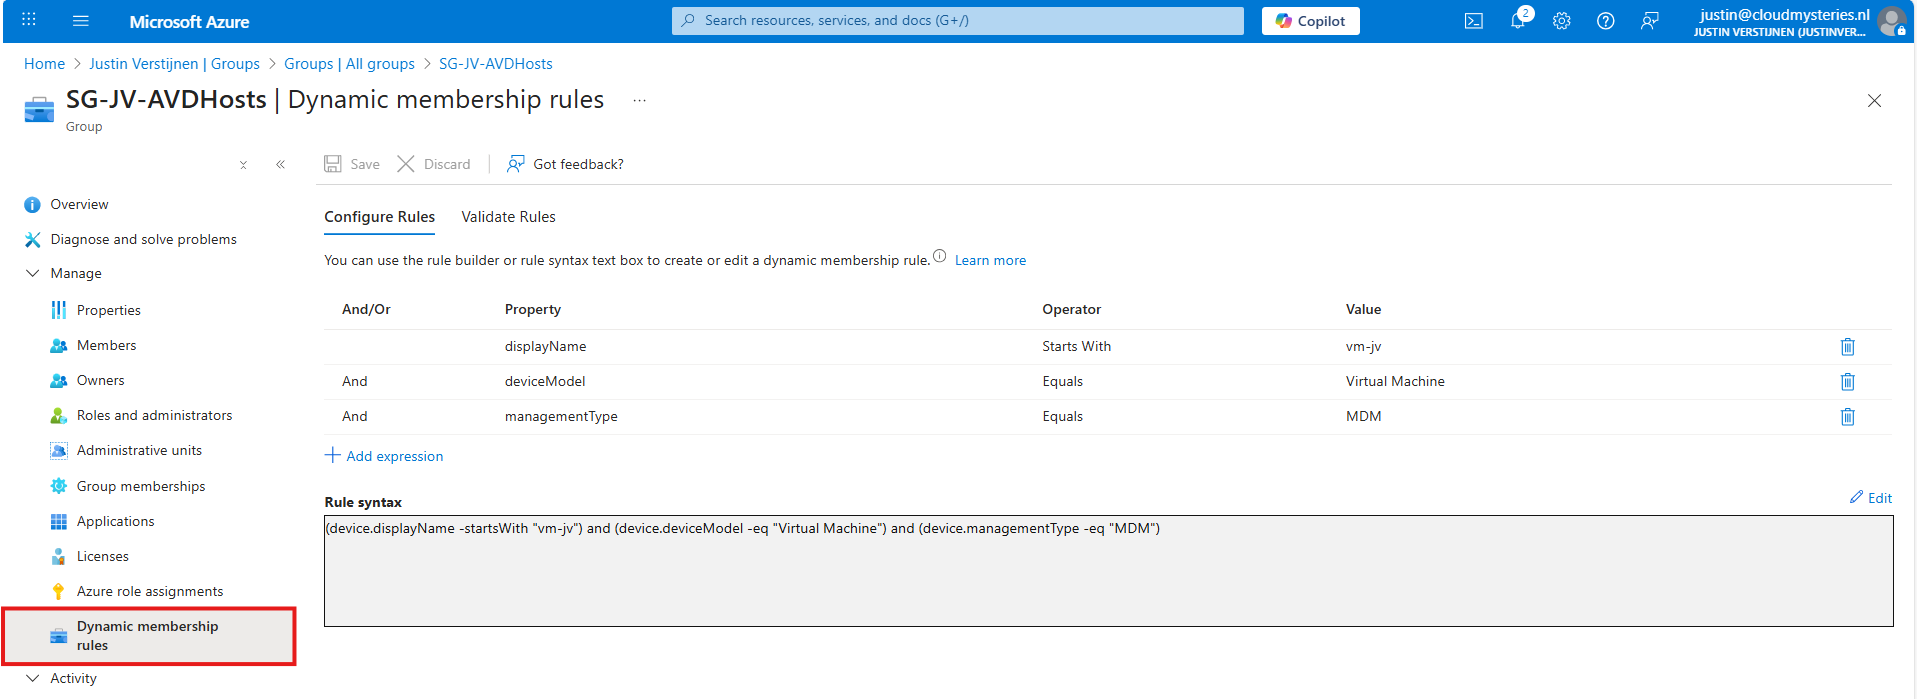
Here are 3 rules where a device must comply with to be added to the group:
- The displayname has to begin with “vm-jv”
- The device must be a Virtual Machine (rules out any physical device accidentaly being member)
- The device must be MDM/Intune managed
To check if a device we want to be menber actually is added to the group, we can use the “Validate rules” tool:
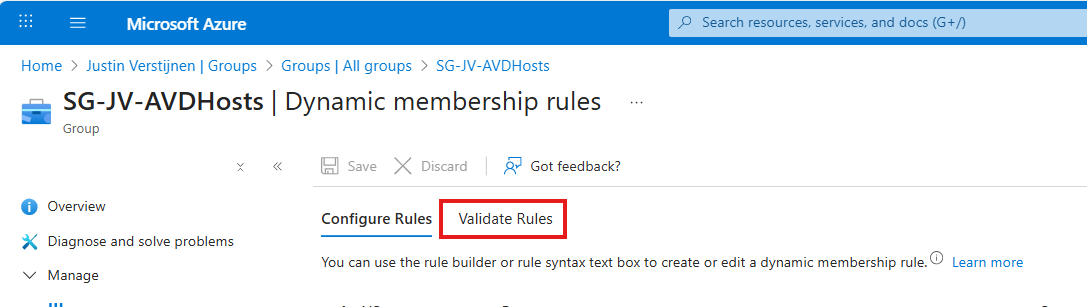
This is basically a Yes/No tool where you can add any device (or user) and check the membership:

This shows exactly which devices will be meber and which not. You can also click on “View details” to view the rules and appliance:
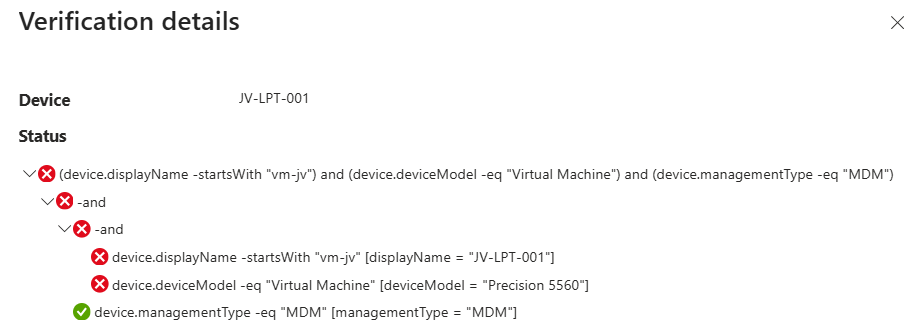
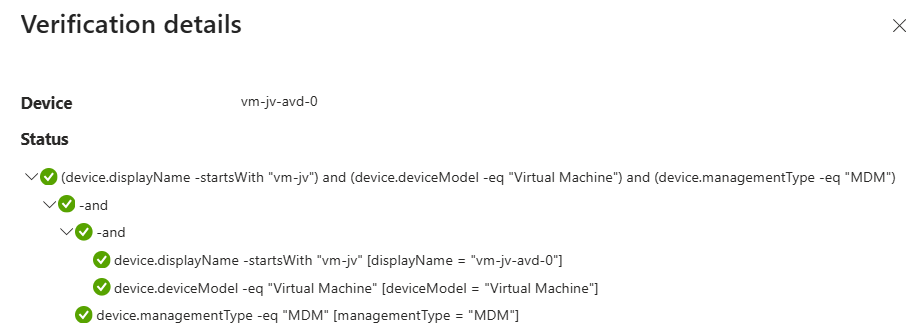
Really great overview of the rules and why a device will be member of the group.
Option 1: Azure Virtual Desktop hosts
I have done multiple Azure Virtual Desktop implementations that needed a group for all the hosts. This for policies and other settings/scripts and FSLogix settings. Creating a Dynamic Group instead of an assigned group helps you with automation and avoids a manual action when enrolling a new machine and potentially forgetting this step, and then asking yourself why some policies are not applying.
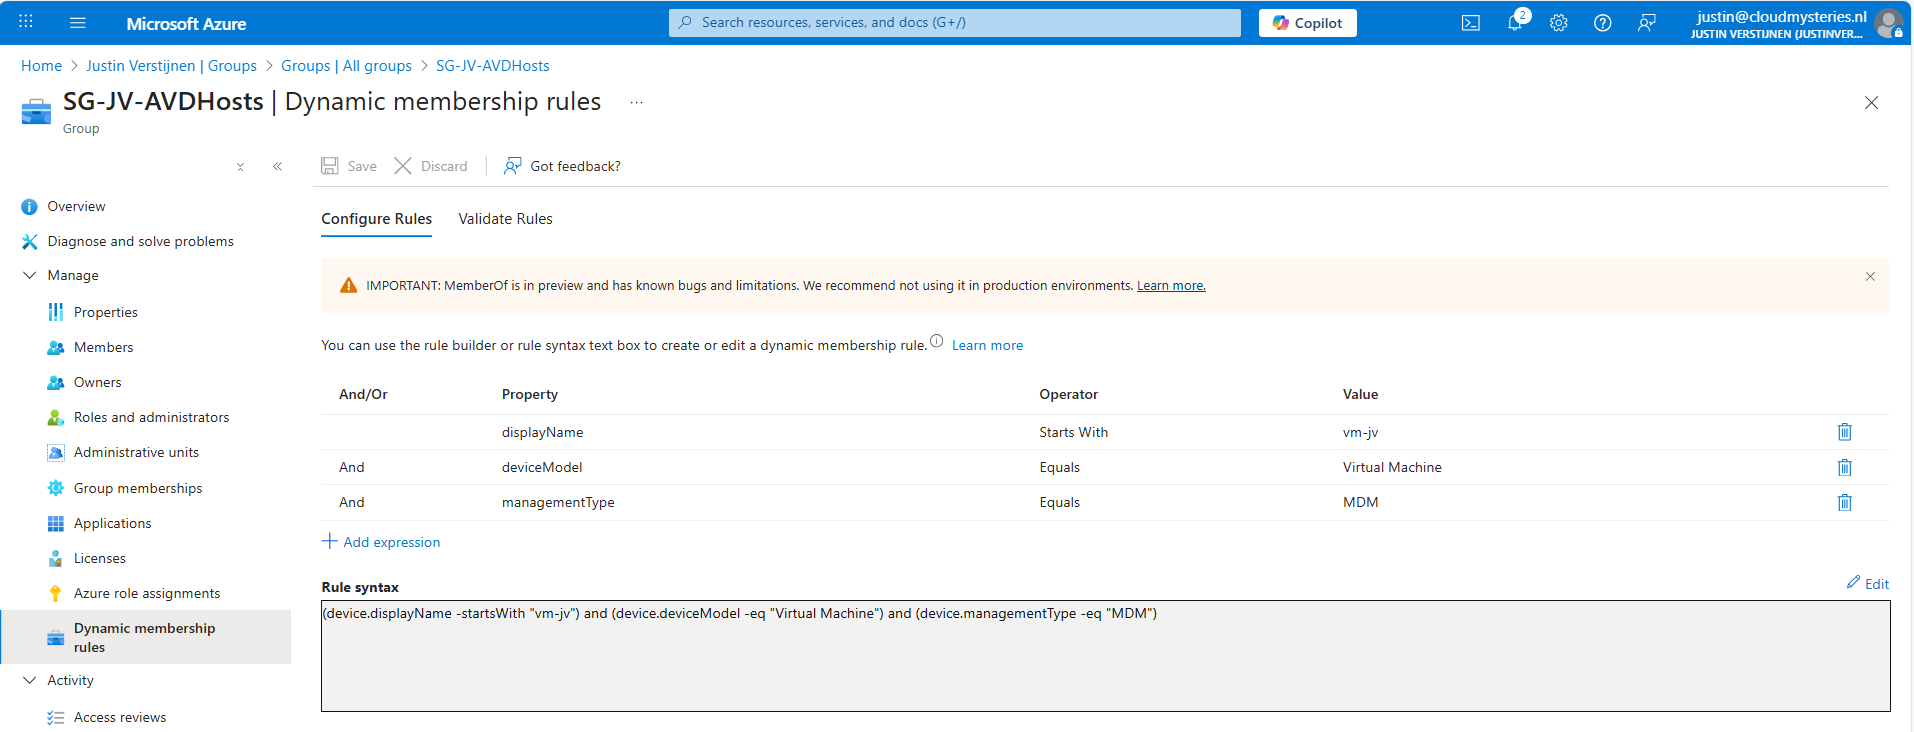
This rule syntax is built up in these 3 rules:
- The displayname has to begin with “vm-jv”
- The device must be a Virtual Machine (rules out any physical device accidentaly being member)
- The device must be MDM/Intune managed
To use it in your environment

Change the “displayname” property to the starting string of your AVD hosts.
(device.displayName -startsWith "vm-jv") and (device.deviceModel -eq "Virtual Machine") and (device.managementType -eq "MDM")Above rule syntax can be copied to your group.
Option 2: All enabled internal users (exclude guests and shared mailboxes)
This group will contain all active internal employees. Guests, shared mailboxes and disabled accounts are automatically excluded from this group.
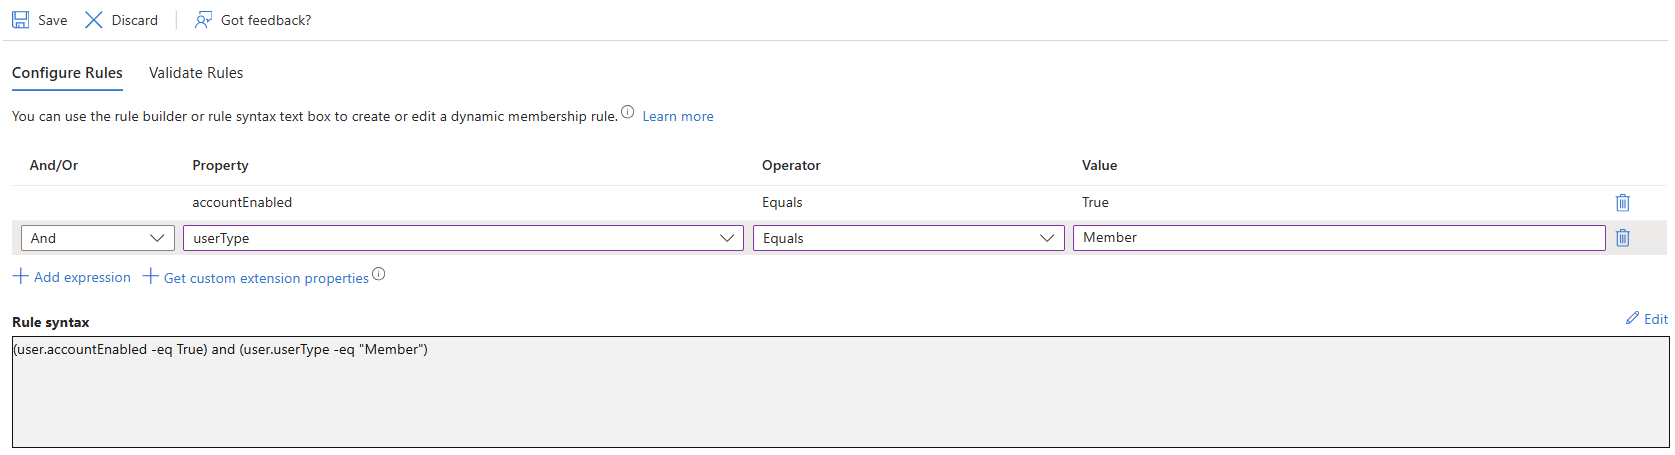
The rule syntax is built up in these rules:
- The account must be enabled
- The User-type must be “Member” (rules out shared mailboxes and guest accounts)
To use it in your environment
(user.accountEnabled -eq True) and (user.userType -eq "Member")Option 3: Specific domain name
In some cases, we need to have all accounts ending with a specific domain name in a group. We can do this with the options below:
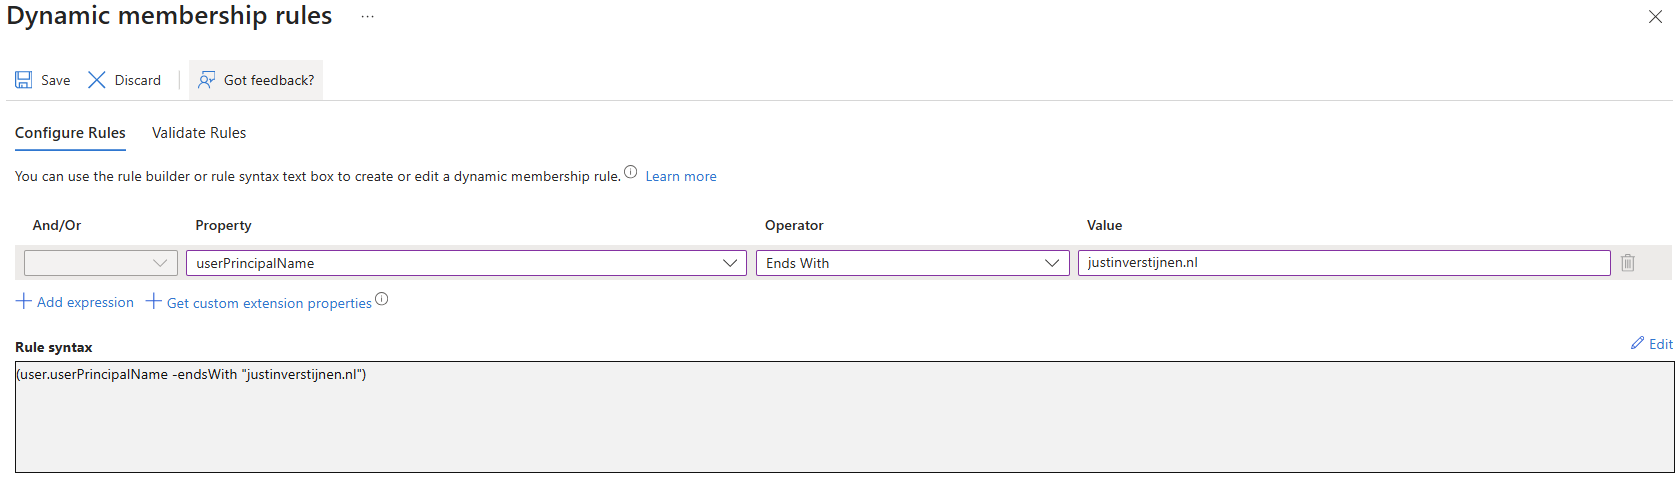
The rule syntax is built up in these rules:
- The User Principal Name (Username+domain) must end with the domain confgured
To use it in your environment
(user.userPrincipalName -endsWith "justinverstijnen.nl")Option 4: Department
We can also do group memberships based on the department of the user. This makes it possible to create different access packages on groups based on te department.
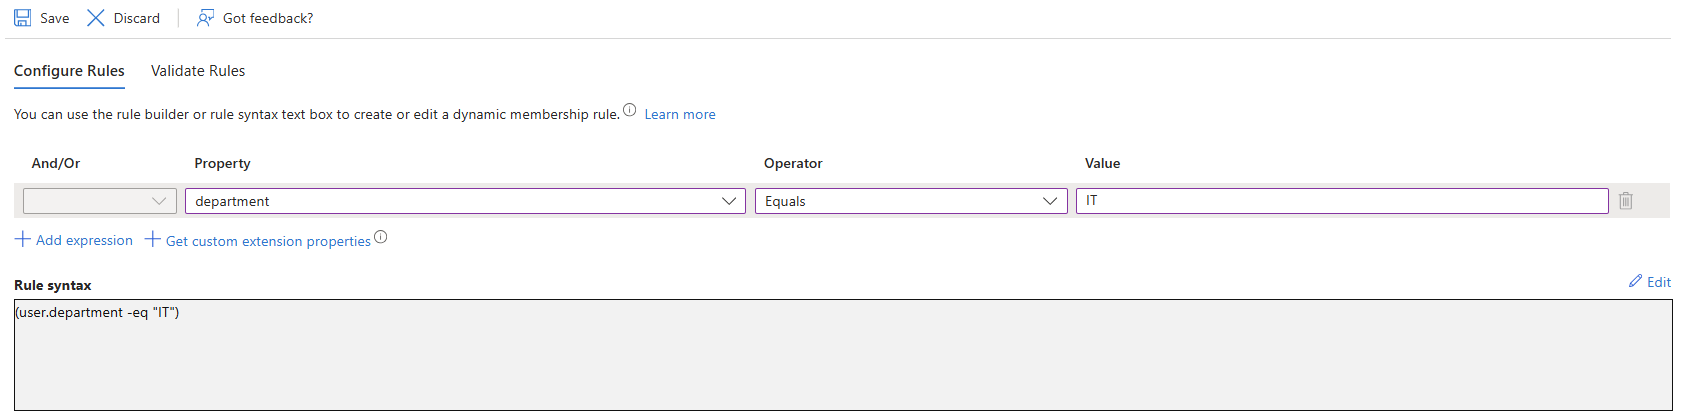
The rule syntax is built up in these rules:
- Department of the user must be “IT”
To use it in your environment
(user.department -eq "IT")Option 5: Synced using Entra Connect
We can also put all synchronized user accounts in a group if they are being synced using Entra Connect Sync.
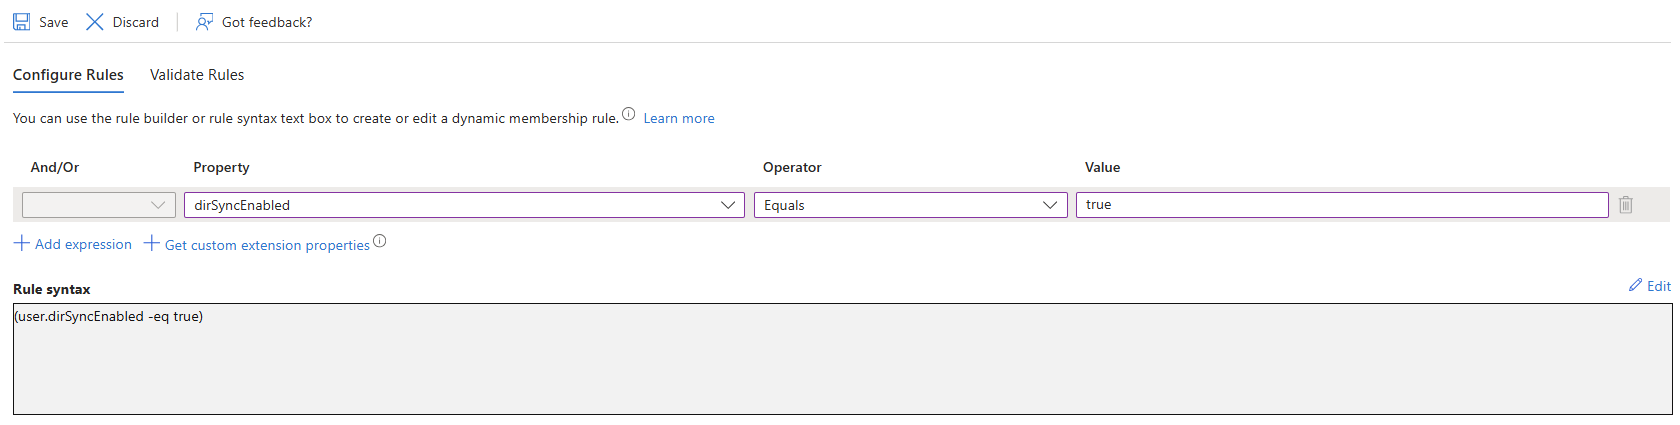
The rule syntax is built up in these rules:
- The dirSyncEnabled flag must be: true
To use it in your environment
(user.dirSyncEnabled -eq true)Option 6: Location or branch
We can create rules to only have members from certain locations. We can use different options for this as well:
- Country
- Postal code
- State
- Street address
- City
- Usage location (Country)
I know a case where a company has multiple branches and needed this for security controls and access to certain applications. In this way we could have all users from a specific branch in a group and apply policies and access to the application specific to that branch.
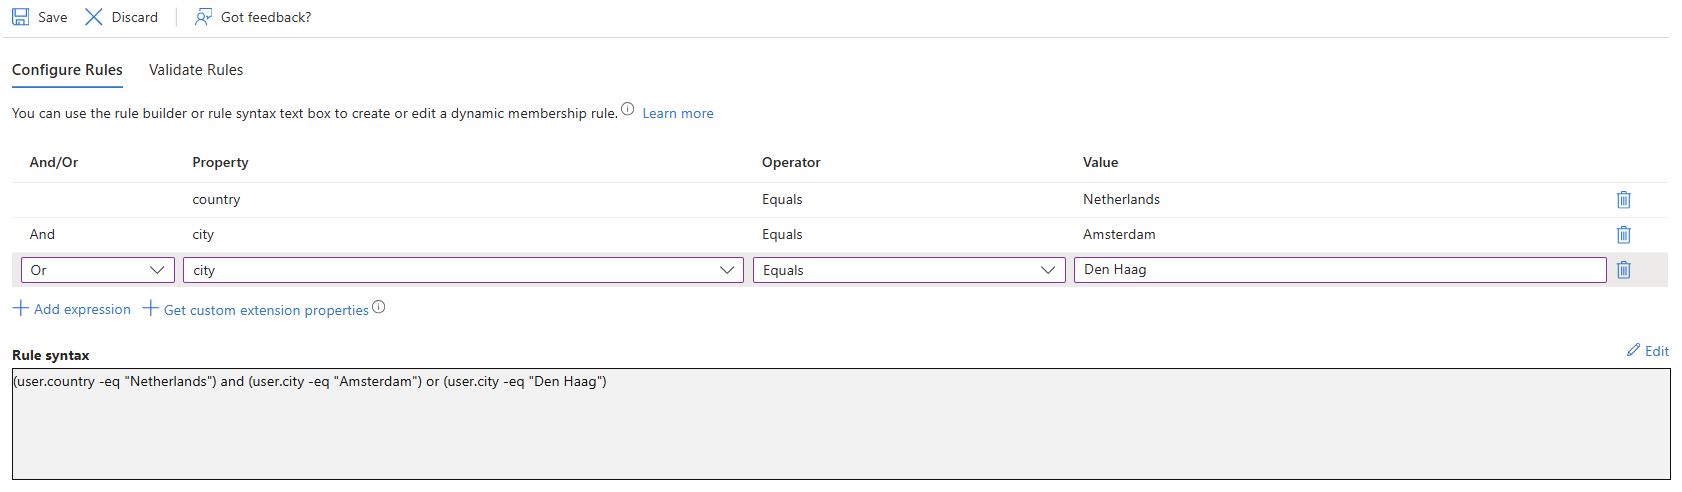
The rule syntax is built up in these rules:
(user.country -eq "Netherlands") and (user.city -eq "Amsterdam") or (user.city -eq "Den Haag")Option 7: Users time based (EmployeeHireDate)
We can also do group memberships based on the time they are hired. This is the field “Employee Hire Date”.
I don’t know an actual use case for this but it can be used for time-based group memberships for temporary workers.
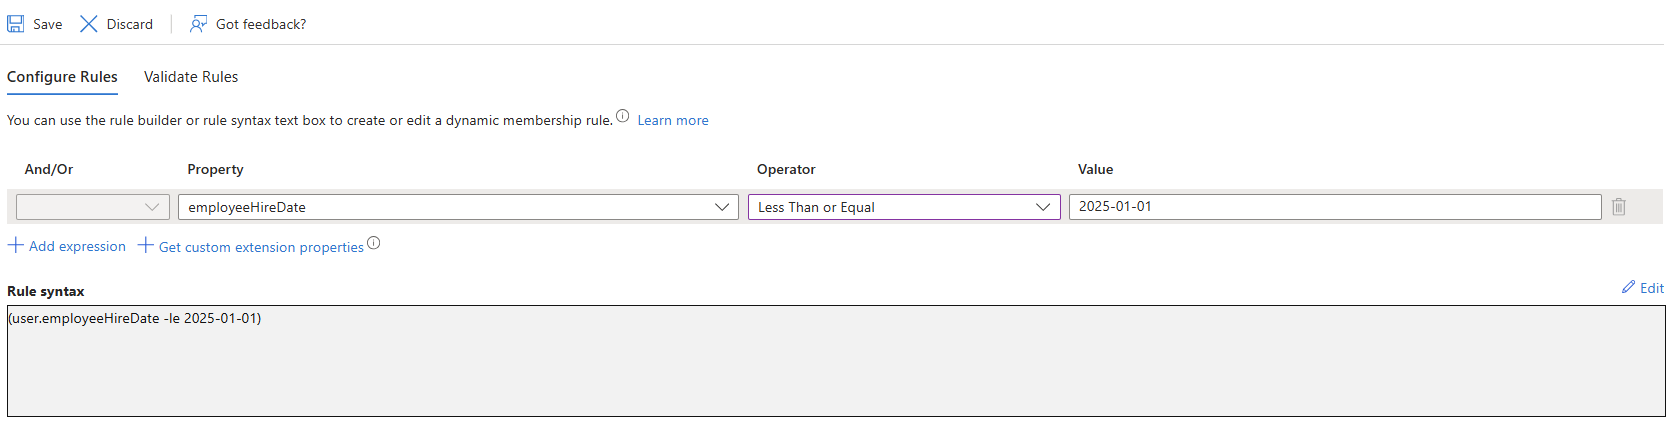
The rule syntax is built up in these rules:
- User is member if created January 1 2025 or later (greater means later in this context)
To use it in your environment
(user.employeeHireDate -ge 2025-01-01)Option 8: Based on OS
We can do memberships based on the OS of the device. In this example, I created a rule set to get Windows devices into a group and only if they have a version equal or higher than configured:
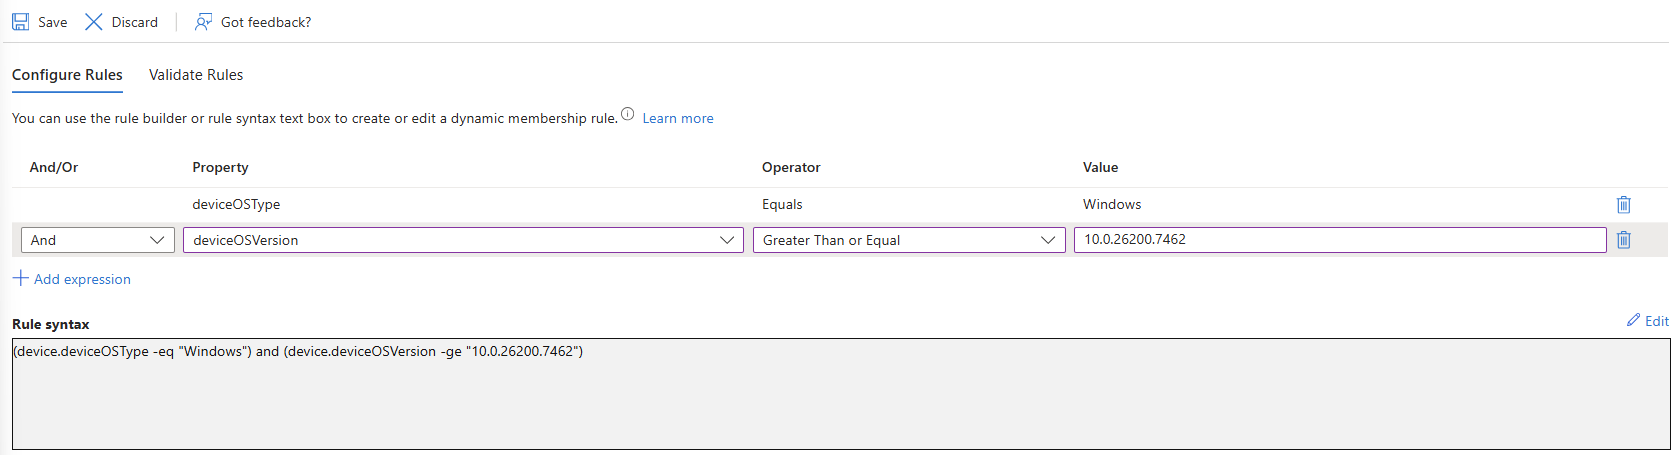
The rule syntax is built up in these rules:
- The OS must be Windows
- The version must be 10.0.26200.7462 or higher
To use it in your environment
(device.deviceOSType -eq "Windows") and (device.deviceOSVersion -ge "10.0.26200.7462")Option 9: Device Manufacturer
We can also filter on different device manufacturers to only be member. This is a great addition to the OS. Sometimes, we need to have all Windows devices but want to exclude other devices like Windows based scanners or Teams Rooms devices. In this case we can filter this out.
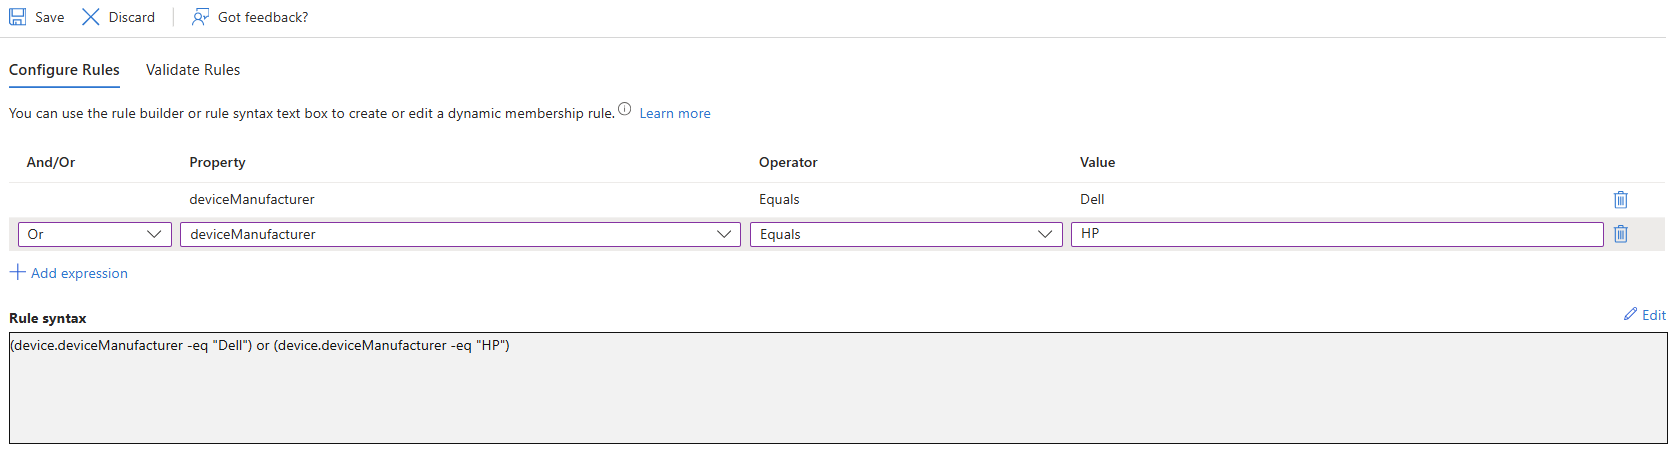
The rule syntax is built up in these rules:
- Manufacturer must be “Dell”
- OR Manufacturer must be “HP”
To use it in your environment
(device.deviceManufacturer -eq "Dell") or (device.deviceManufacturer -eq "HP")Option 10: User groups based on assigned license (Windows 365)
We can build a dynamic group query based on users’ assigned licenses. Instead of the friendly name of a license, we will use the Service Plan ID, which is a GUID:
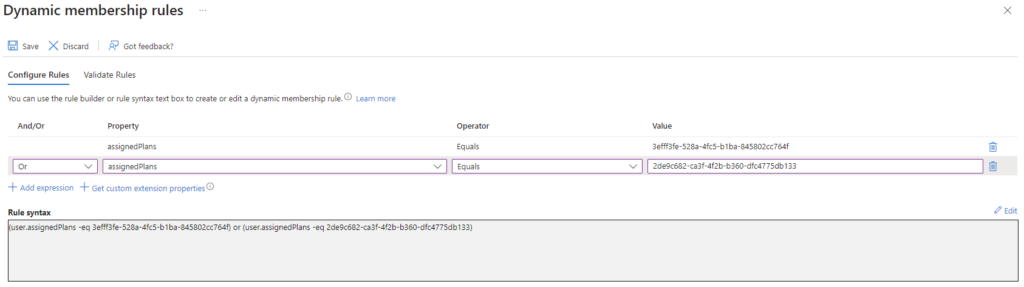
I have done this multiple times for Windows 365 environments, where we want a machine automatically to be deployed when a license is assigned. By default, after assigning a license, you have to assign the user to a group before a machine will deploy (Enrollment profile).
For more information about this setup, visit: https://justinverstijnen.nl/dynamic-group-for-access-to-windows-365/
Before you can make a query to find your service plans, you need to find the service plan id in your environment, you can find this by following these steps:
How to find Service Plan ID’s in my environment?
Now is the page of Microsoft filled with every single Service Plan ID available which is a mess. You can find all Service Plan ID’s in your environment easily with Azure AD Powershell. I will tell you how.
Log into Azure AD with Powershell:
Connect-AzureADWe can find all licenses and referring Service Plan ID’s which your environment is subscribed to by using the following command:
Get-AzureADSubscribedSku | Select-Object -ExpandProperty ServicePlansYou can also search all Service Plans referring to Windows 365 Cloud PC with the following commands (or different licenses by changing the search string):
$searchstring = "*CPC*"
Get-AzureADSubscribedSku | Select-Object -ExpandProperty ServicePlans | Where-Object {$_.ServicePlanName -like $searchstring} | Select-Object ServicePlanId, ServicePlanName
You will get a output like this with the Service Plan ID’s you need.
ServicePlanId ServicePlanName
------------- ---------------
3efff3fe-528a-4fc5-b1ba-845802cc764f CPC_2
2de9c682-ca3f-4f2b-b360-dfc4775db133 CPC_E_4C_16GB_128GBAs you can see, I did this for Windows 365, but you can perform this action with every license available in your environment.
(user.assignedPlans -any (assignedPlan.servicePlanId -eq "3efff3fe-528a-4fc5-b1ba-845802cc764f" -and assignedPlan.capabilityStatus -eq "Enabled"))And you can use multiple licenses by adding -OR rules:
(user.assignedPlans -any (assignedPlan.servicePlanId -eq "2de9c682-ca3f-4f2b-b360-dfc4775db133" -and assignedPlan.capabilityStatus -eq "Enabled")) -or (user.assignedPlans -any (assignedPlan.servicePlanId -eq "9ecf691d-8b82-46cb-b254-cd061b2c02fb" -and assignedPlan.capabilityStatus -eq "Enabled"))Summary
Dynamic Groups are an excellent way to automate some things in your Microsoft Entra tenant. The more we can automate, the better. I also hope I gave you a better idea of how those groups work and how they can increase value to your environment.
Thank you for visiting this website!
These sources helped me by writing and research for this post;
End of the page 🎉
You have reached the end of the page. You can navigate through other blog posts as well, share this post on X, LinkedIn and Reddit or return to the blog posts collection page. Thank you for visiting this post.
Support the blog
