Microsoft 365 Backup ensures that your data, accounts and email is safe and backed up into a separate storage space. A good and reliable back-up solution is crucial for any cloud service, even when having versioning and recycle bin options. Data in SharePoint or OneDrive stays data in one central place and any minor error is made within seconds.
In this guide, I will explain how Microsoft 365 Backup works and how you can start using it.
Table of Contents
- Requirements
- What is Microsoft 365 Backup?
- Microsoft 365 Backup Pricing
- Required permissions for Microsoft 365 Backup
- Step 1: Create a designated resource group
- Step 2: Create a Billing policy
- Step 3: Connect Microsoft 365 Backup service to billing policy
- Step 4: Configure Microsoft 365 Backup for SharePoint
- Step 5: Configure Microsoft 365 Backup for OneDrive
- Step 6: Configure Microsoft 365 Backup for Exchange
- Step 7: Restoring a full SharePoint Site
- Step 8: Restoring a single file on OneDrive
- Downsides of Microsoft 365 Backup
- Summary
📖 Estimated read time: 13 minutes
🔄 Page last updated on: April 3, 2026 🆔 Post ID: 8069Requirements
- A Microsoft 365 environment with Global Administrator permissions
- An Azure Subscription with PAYG capabilities
- Around 30 minutes of your time
- Basic knowledge of Microsoft 365
What is Microsoft 365 Backup?
Microsoft 365 Backup is an integrated solution of Microsoft to backup Microsoft 365 items. This applies to these items:
- Exchange Mailboxes
- OneDrive accounts
- SharePoint sites/Teams
Microsoft 365 Backup can be used to extend the retention period of certain data. By default, spaces like SharePoint sites have a retention of 93 days if you count the recycle bin and versioning. But this is not really a backup, only some techniques to quicky restore a single file or folder. This doesn’t include things like permissions, which Microsoft 365 Backup does.
If having any site-wide problems, data loss or change in permissions, you will be doomed.

Microsoft 365 Backup has the following details:
- Retention up to 1 year
- 10 minute backup retention of 14 days
- Weekly backup retention of 365 days
- Backup frequency of every 10 minutes (RPO)
- 1TB to 3TB restore speed (RTO)
Microsoft 365 Backup Pricing
The pricing of Microsoft 365 Backup is $0,15 per month per stored gigabyte. This means every gigabyte that is protected is being billed. This is billed using the payment method of Azure and will be on that invoice. You could also create a separate subscription to receive a separate invoice.
For example:
- 5 Mailbox of 25GB including deleted items
You will pay 5 x 25 x $0,15 per month which is $18,75 per month. The duplicate data that is being saved is not billed, as deduplication techiques are being used: Incremental backups.
An example of forecasted costs for an environment with backups enabled can be (with low and heavy users):
| Type | SharePoint size | Onedrive size | Mailboxes size | Total costs/month* |
| 5 users (low) | 25GB | 32,5GB | 32,5GB | $ 13,50 ($2,70/user) |
| 5 users (heavy) | 100GB | 125GB | 125GB | $ 52,50 ($10,50/user) |
| 25 users (low) | 100GB | 125GB | 125GB | $ 52,50 ($2,10/user) |
| 25 users (heavy) | 500GB | 625GB | 625GB | $ 262,50 ($10,50/user) |
| 250 users (low) | 500GB | 625GB | 625GB | $ 262,50 ($1,05/user) |
| 250 users (heavy) | 5000GB | 6.250GB | 6.250GB | $ 2.625,- ($10,50/user) |
As you can see, it totally depends on how many data is backed up, and selecting only crucial sites/users is crucial. You have to create a cost estimate based on the items you need the extra retention for. Maybe for most of the users, like frontline workers or people with only an email address and some OneDrive, the recycle bin and versioning options with 93 days of retention is more than enough.
You can find currect usage easily through the Microsoft 365 Admin center (https://admin.cloud.microsoft) and then to “Reports” and then “Usage”:
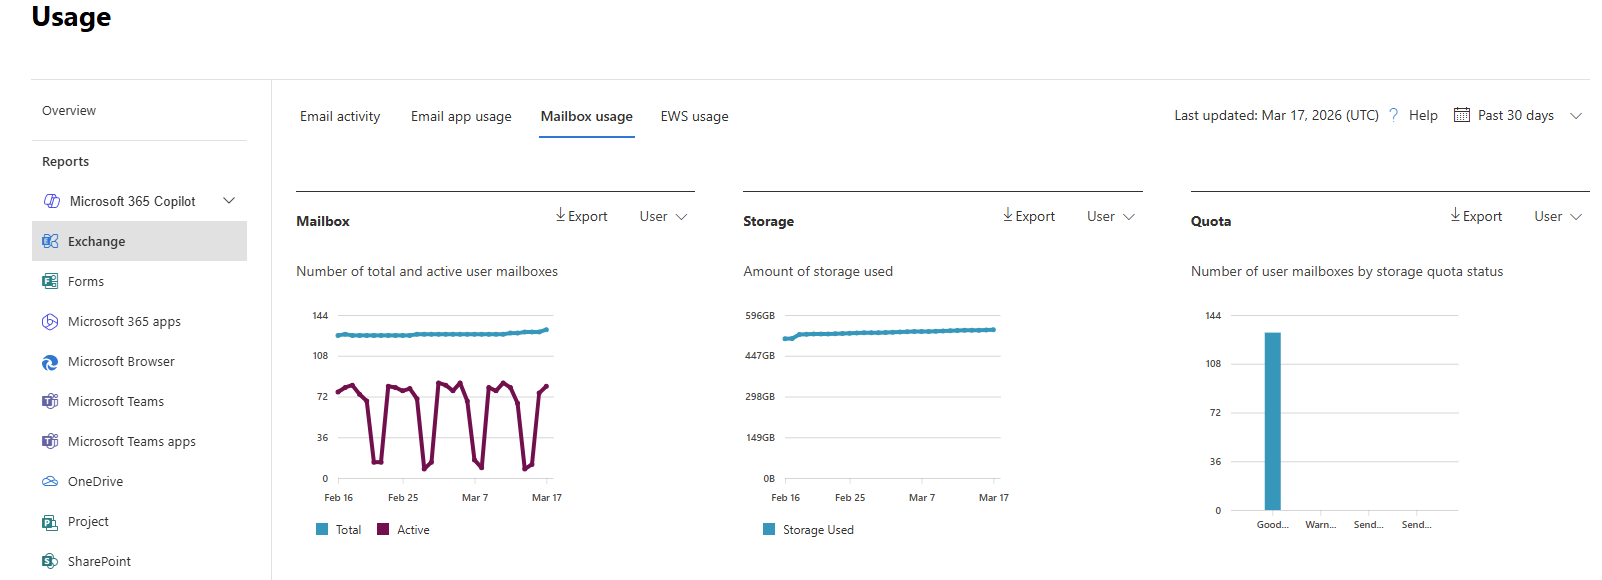
Tip: Calculate your actual data usage with this PowerShell scripts of Microsoft: https://learn.microsoft.com/en-us/microsoft-365/backup/backup-pricing?view=o365-worldwide#finding-the-sizes-of-stored-data
Required permissions for Microsoft 365 Backup
To be more prepared, let’s review the permissions/roles you need to configure and restore with Microsoft 365 Backup.
- SharePoint Administrator (least-privileged)
- Global Administrator (the boss of the tenant)
If you want to use the file level restore options, you need to have these roles assigned, even with Global Administrator permissions already assigned, keep this in mind:
- SharePoint Backup Administrator
- Exchange Backup Administrator

Step 1: Create a designated resource group
First we will creeate a separate resource group for our Microsoft 365 Backup policy. Go to the Azure Portal (https://portal.azure.com).
Then create a new resource group in your subscription:
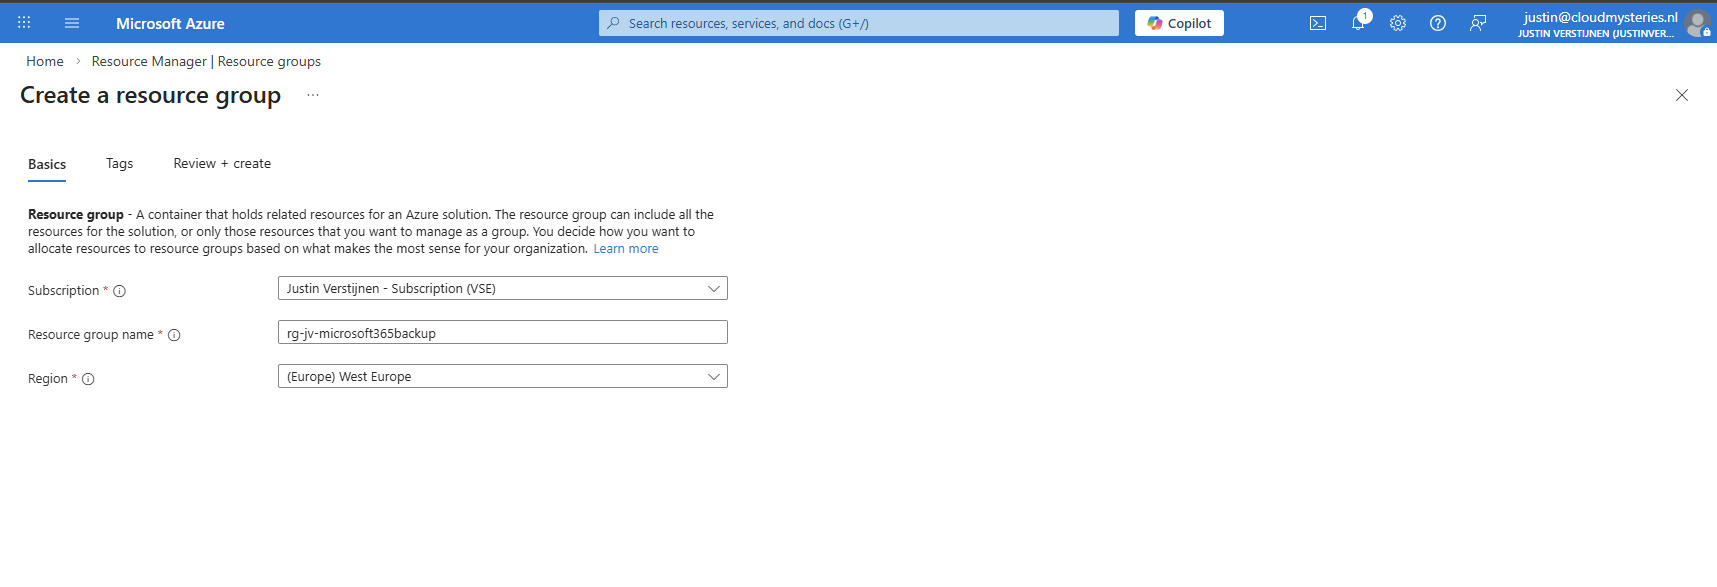
After creating the resource group, it will be ready to deploy resources into.
Step 2: Create a Billing policy
Now we can start by preparing Microsoft 365 Backup in your tenant. Go to the Microsoft 365 Admin center (or directly to: https://admin.cloud.microsoft/?#/Settings/enhancedRestore)
Then go to Settings -> Microsoft 365 Backup
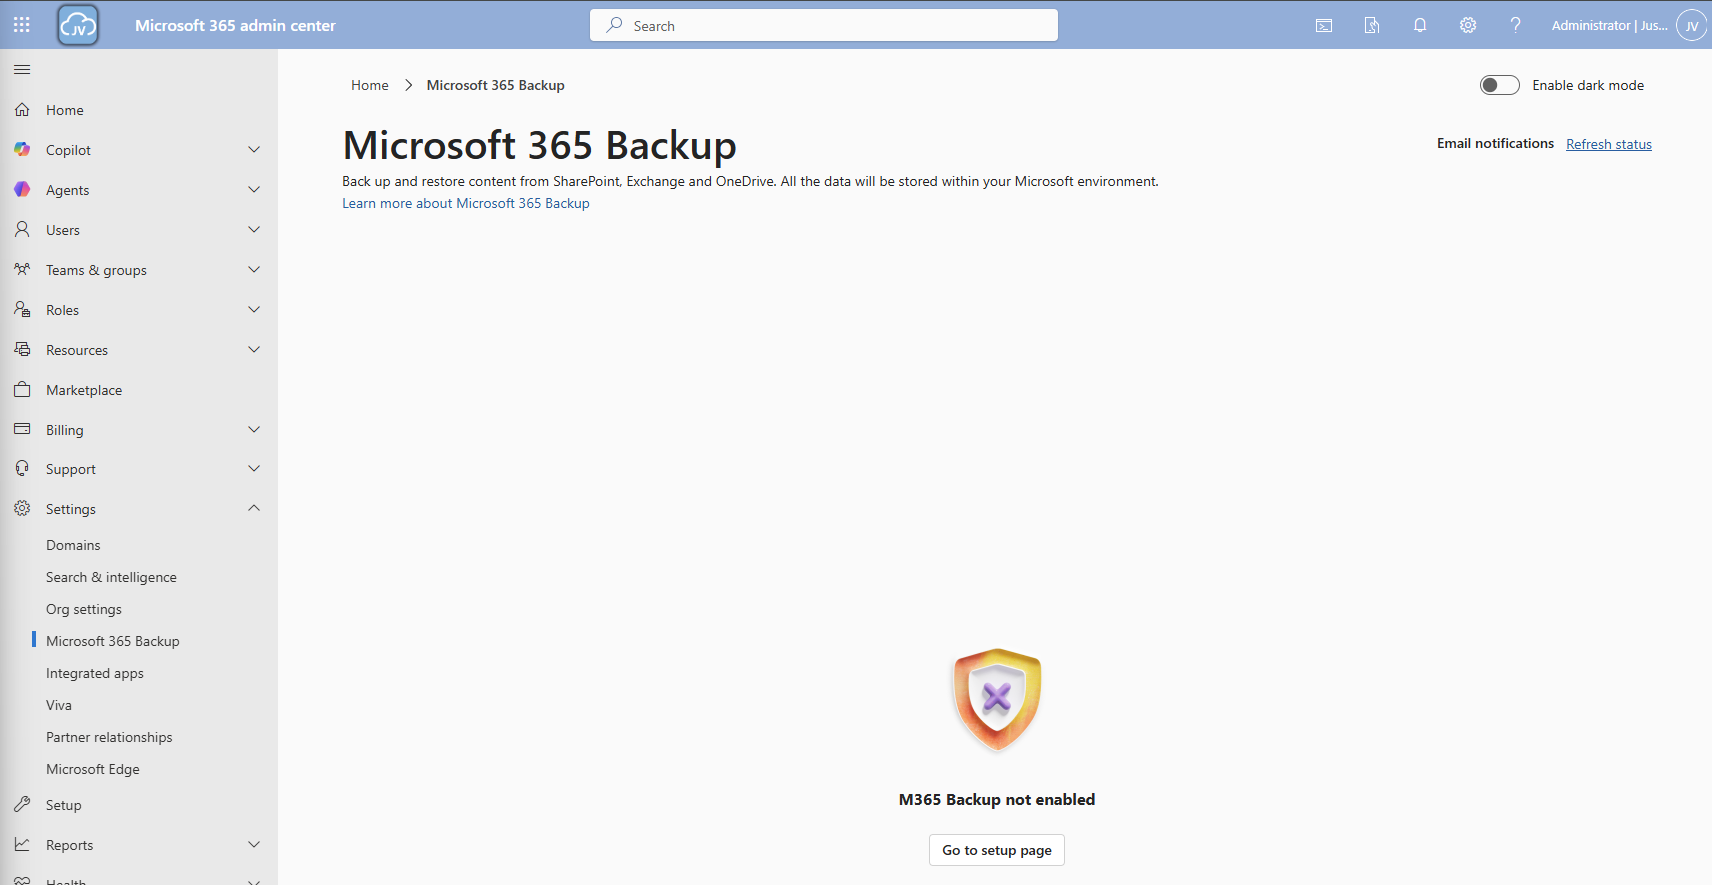
Then click on the “Go to setup page” button and you will be redirected to the billing options.
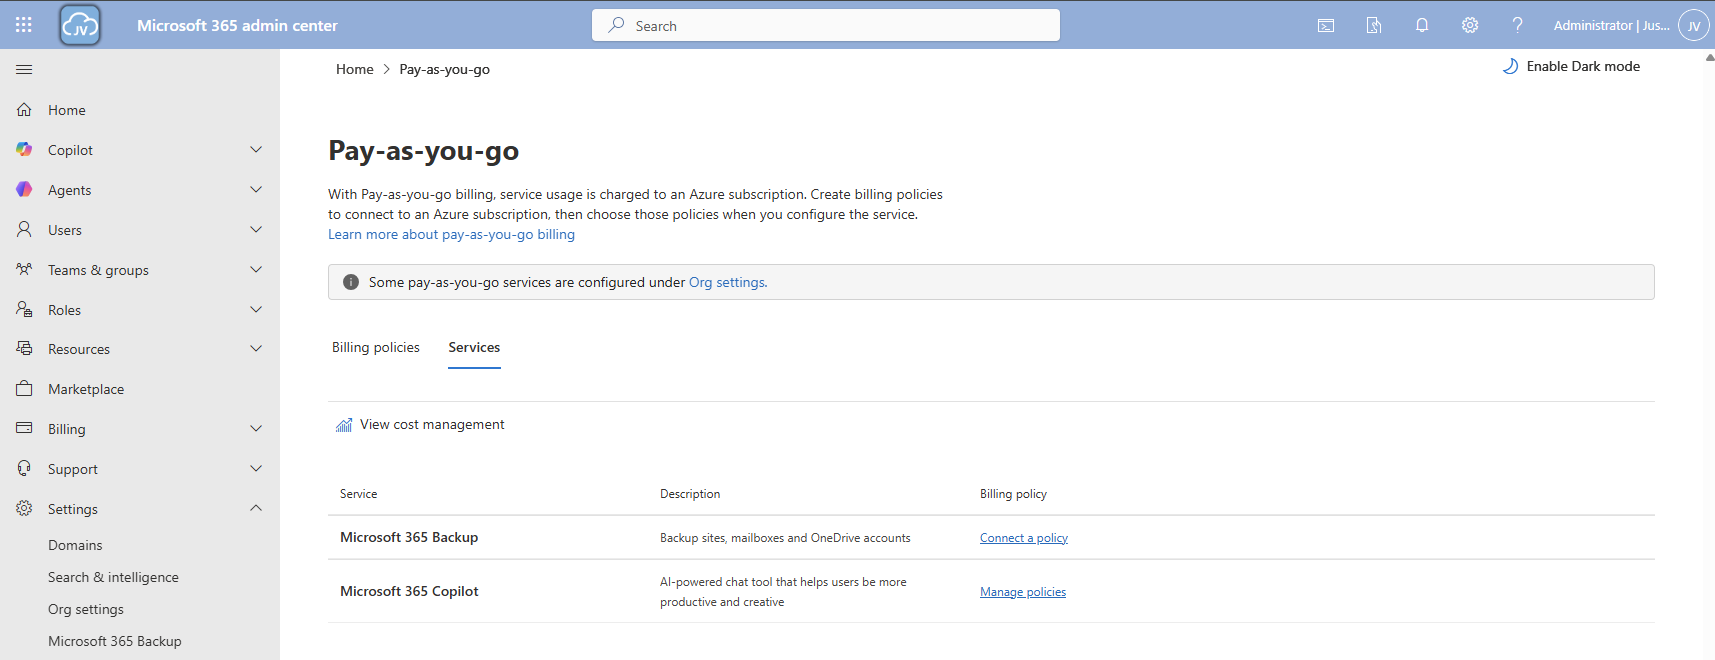
Click on the “Services” tab here and there we have Microsoft 365 Backup. To actually use Microsoft 365 Backup, we need to create a billing policy.
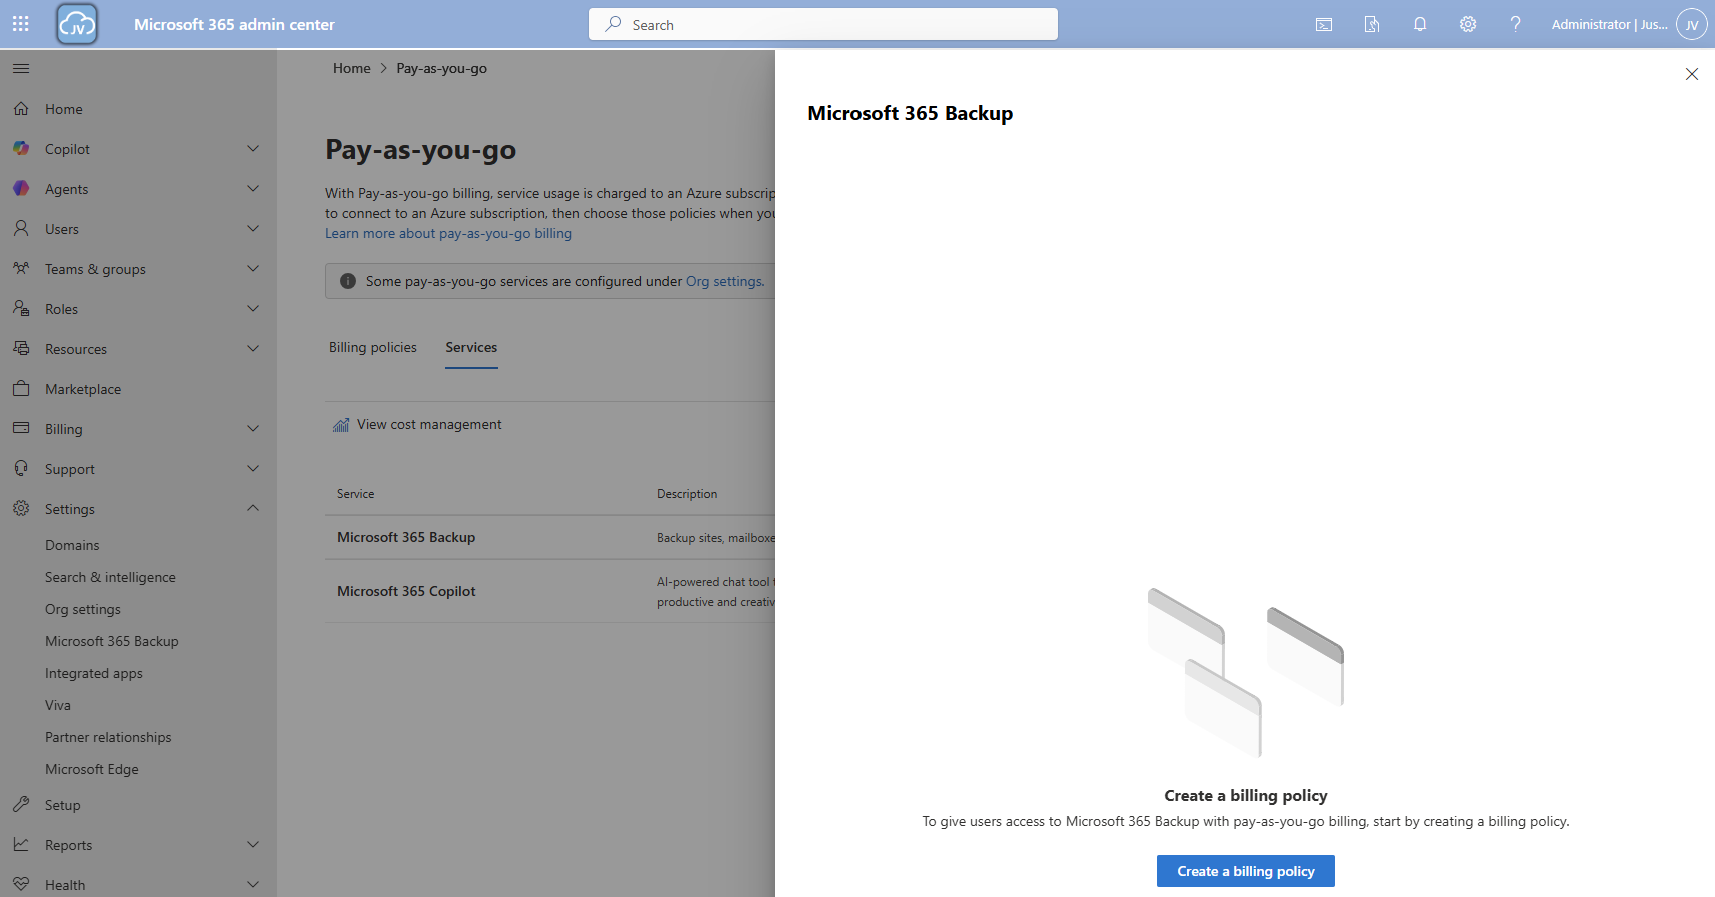
Click the “create a billing policy” button to create one.

Fill in the details, and select your Azure subscription and just created resource group. The region can be any region of choice. Preferrably the closest one to you or what you need in terms of regulatory compliance.
Click “Next”.
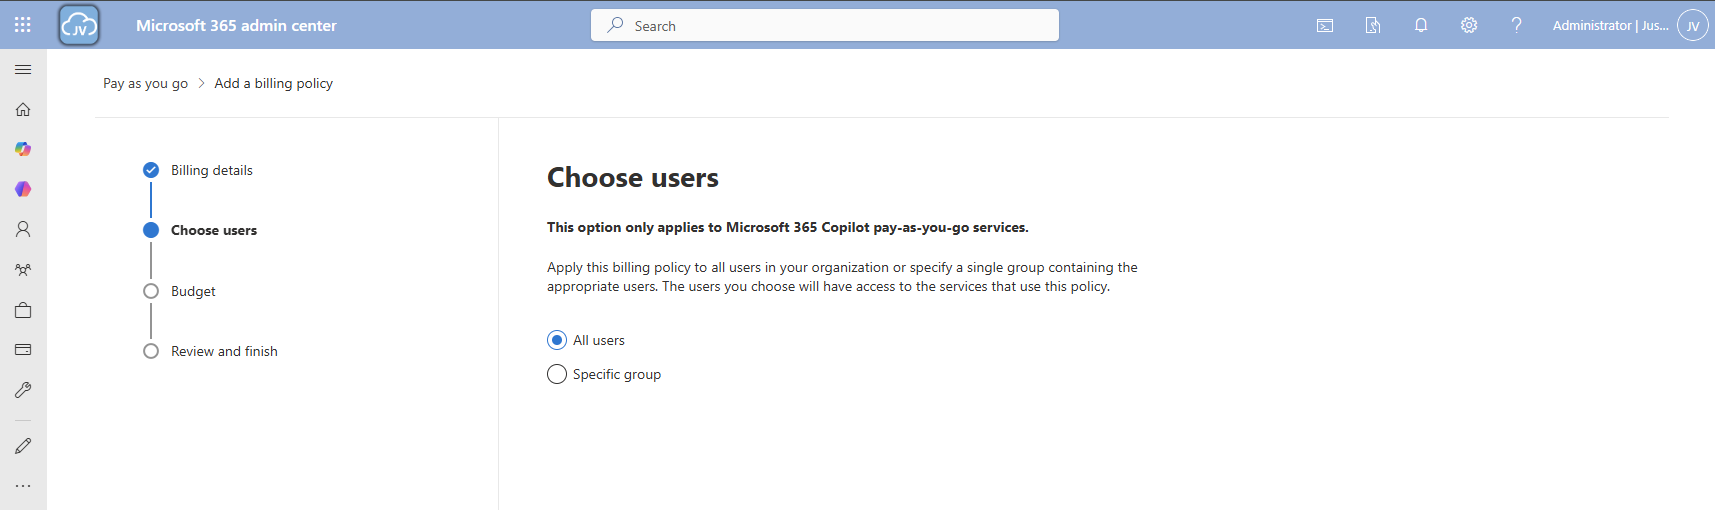
On the “Choose users” page choose one of the two options. I chose “All users”. Then click “Next”.
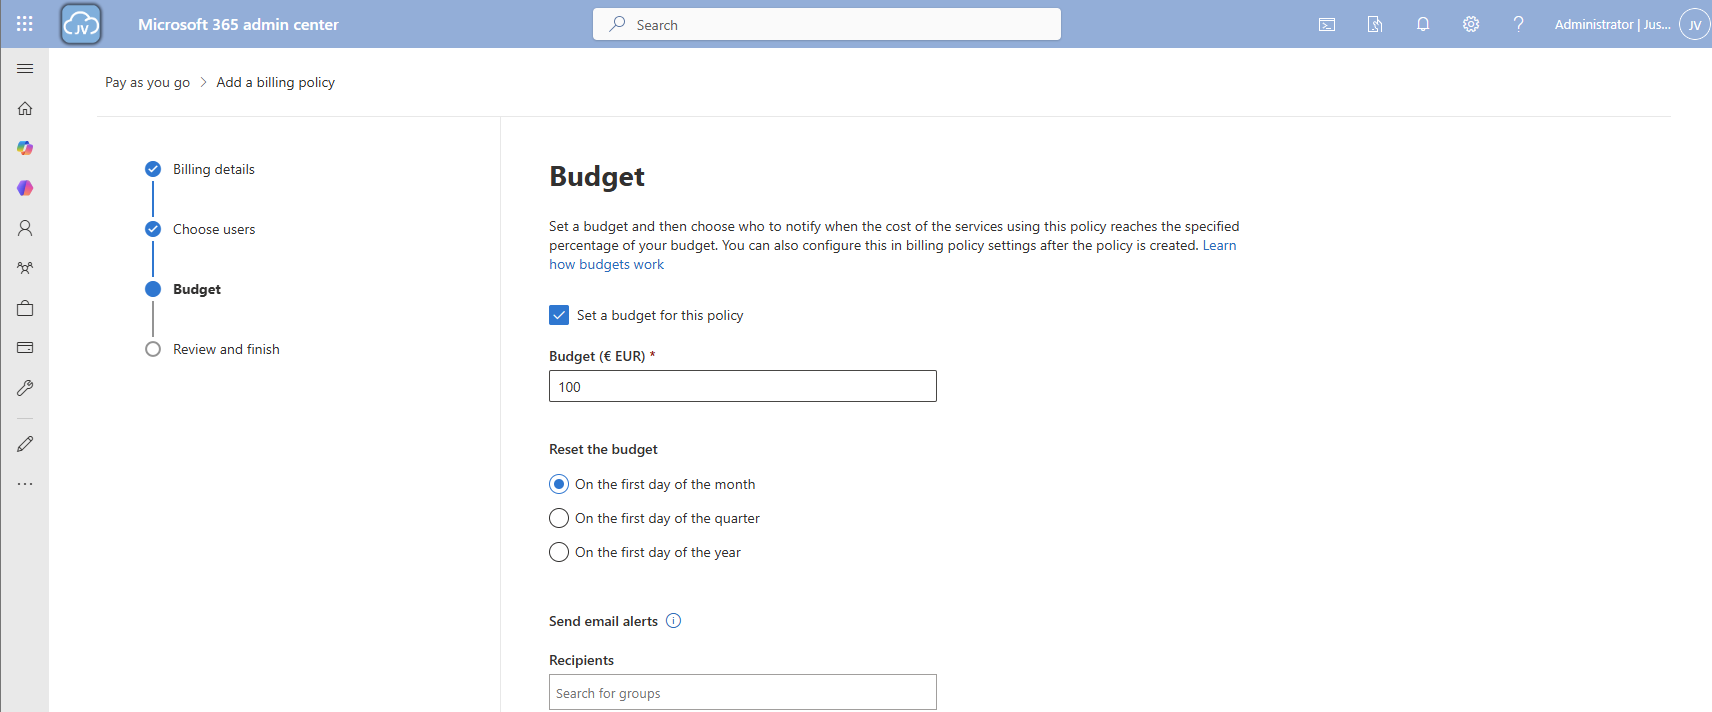
On the “Budget” page, you can set a budget, or maximum amount of money you want to spend on this solution.

Finish the policy and we are ready to go.
Step 3: Connect Microsoft 365 Backup service to billing policy
Now that we have our billing policy in place, we can now connect the Microsoft 365 Backup service to this policy. On the “Billing policies page, click “Services” and then “Microsoft 365 Backup”.
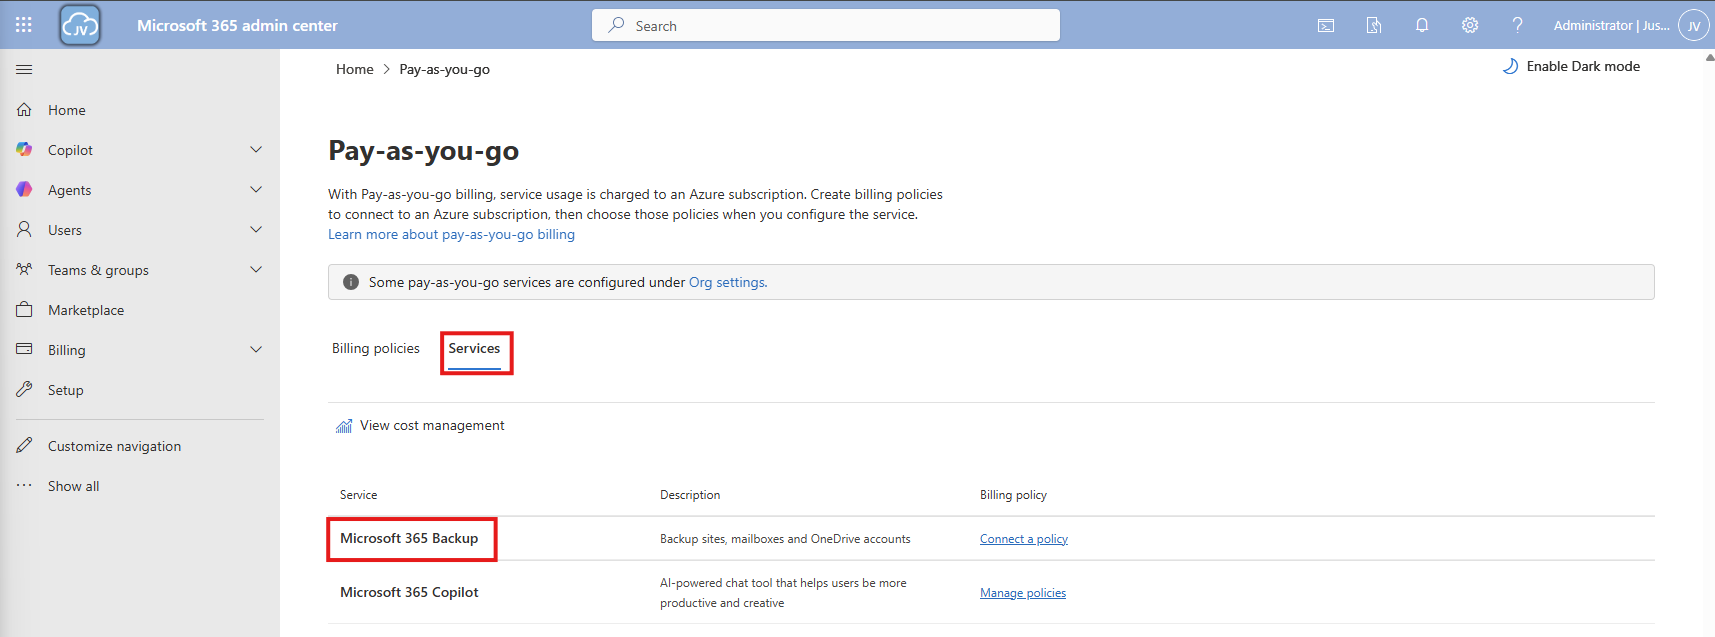
A blade will now come from the right. Select the “Billing policies” tab there and enable the switch to connect the service to your created billing policy.

After enabling this and saving, the service is now linked to your billing policy.

And as we can see in Azure, a policy is now deployed to our resource group:

Step 4: Configure Microsoft 365 Backup for SharePoint
Now that we have connected the service to our Azure subscription, we actually enabled the service but without any configuration. By going again to the Microsoft 365 Backup blade, we will be shown this:

We will first configure a policy for SharePoint. Click on “+ Set up policy”. After that, click Next on the SharePoint backup policy page.

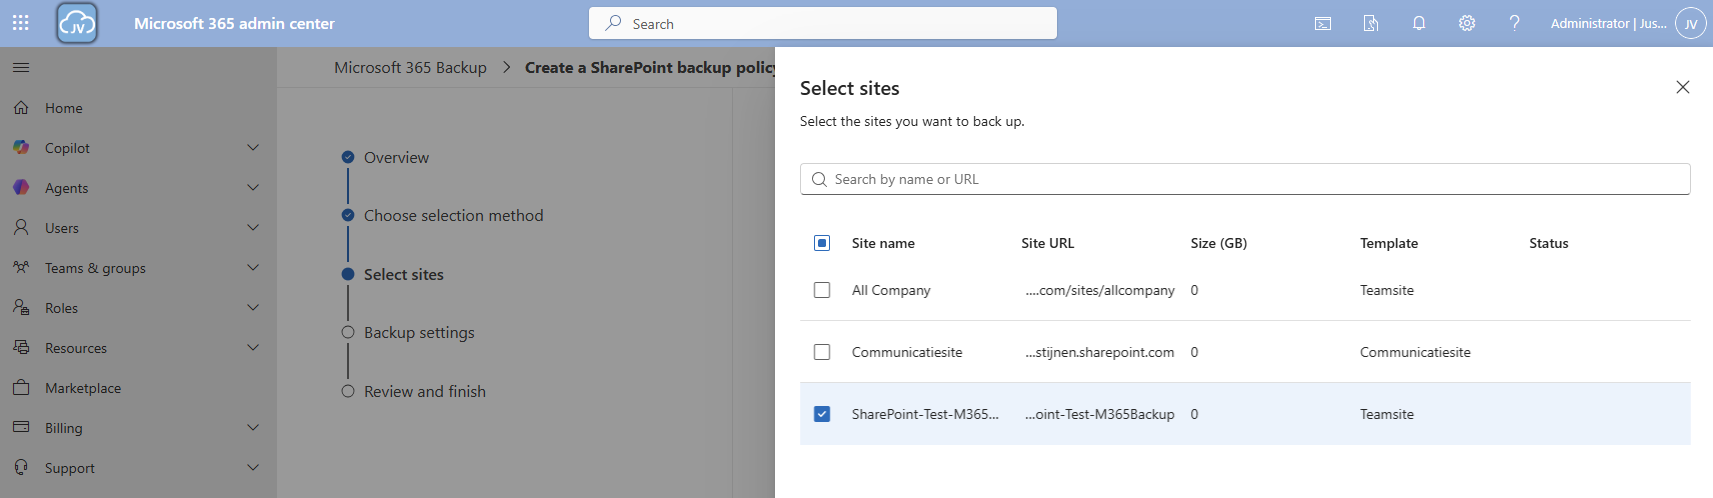
You can use the “filters” option, but you always need to add new sites manually. This is not a dynamic option. Therefore, the “Individual” option is more easy.
Here we can select how we want to select our SharePoint sites. I will use the “Individual” option here. Then select the sites you want to backup.
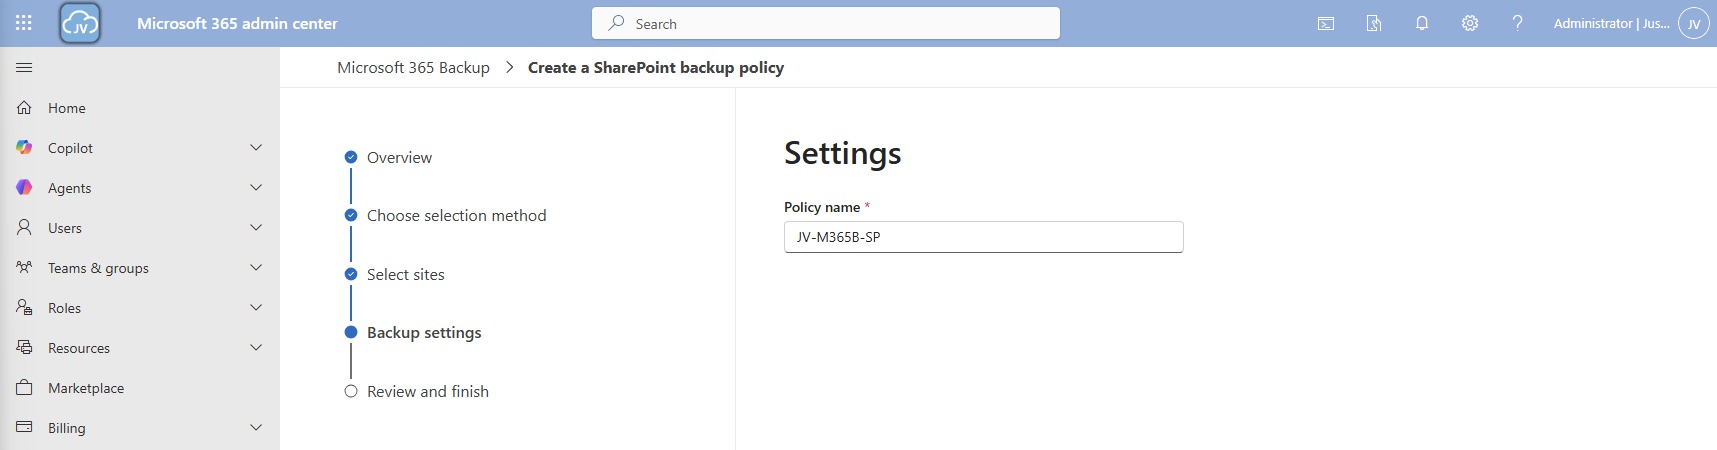
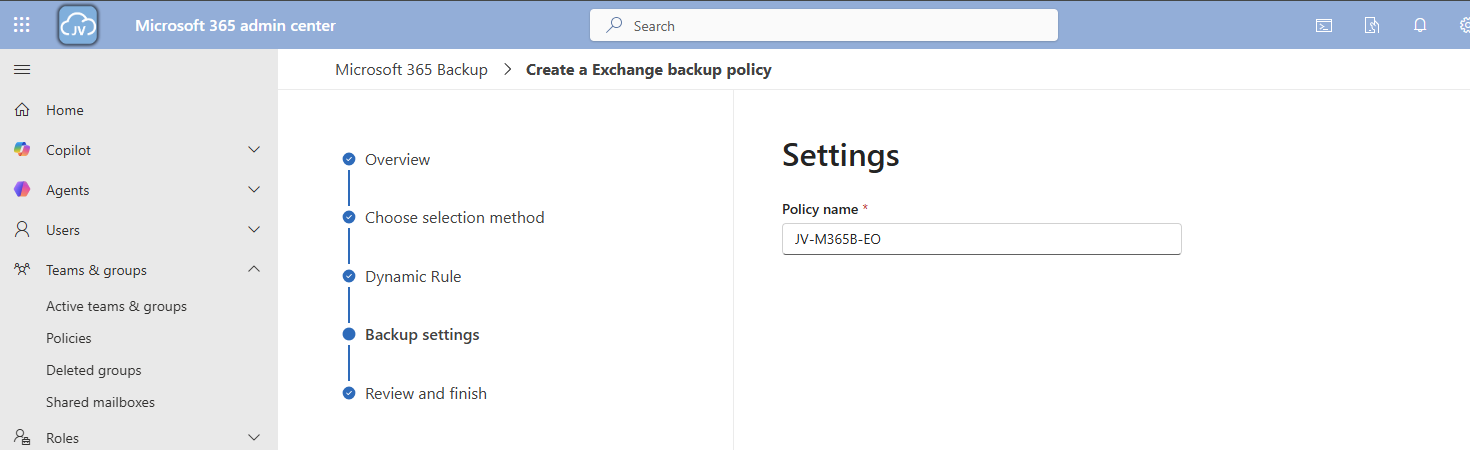
Then proceed to the “Backup settings” and give your policy a name.
Then finish the wizard. The policy will directly start backing up your data:

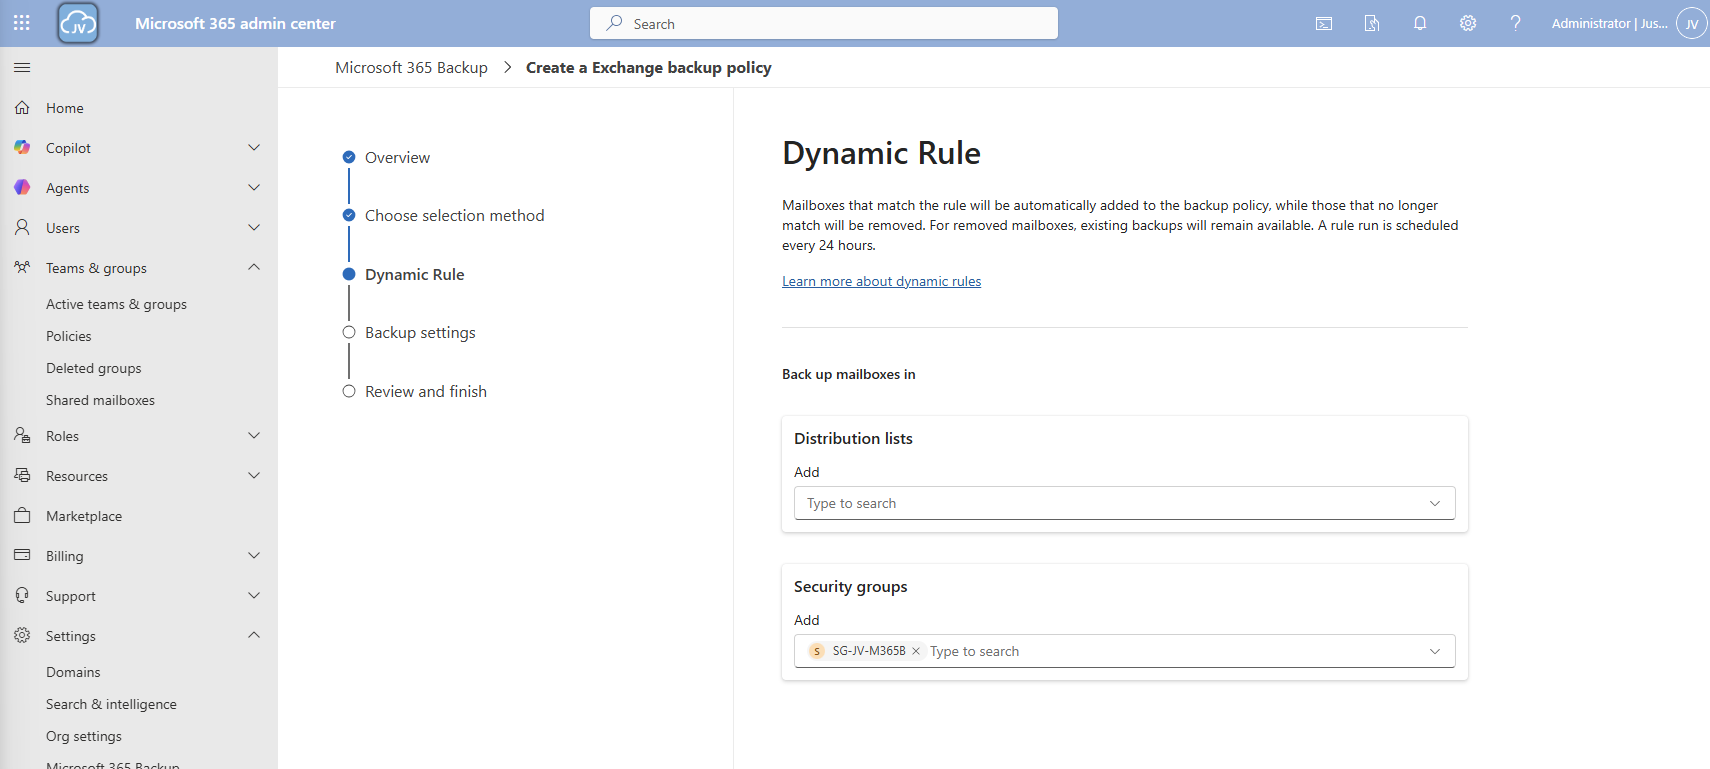
Step 5: Configure Microsoft 365 Backup for OneDrive
Now we can configure the backup for OneDrive accounts. Click on the “+ Set up policy” button under “OneDrive”. Proceed to the wizard.
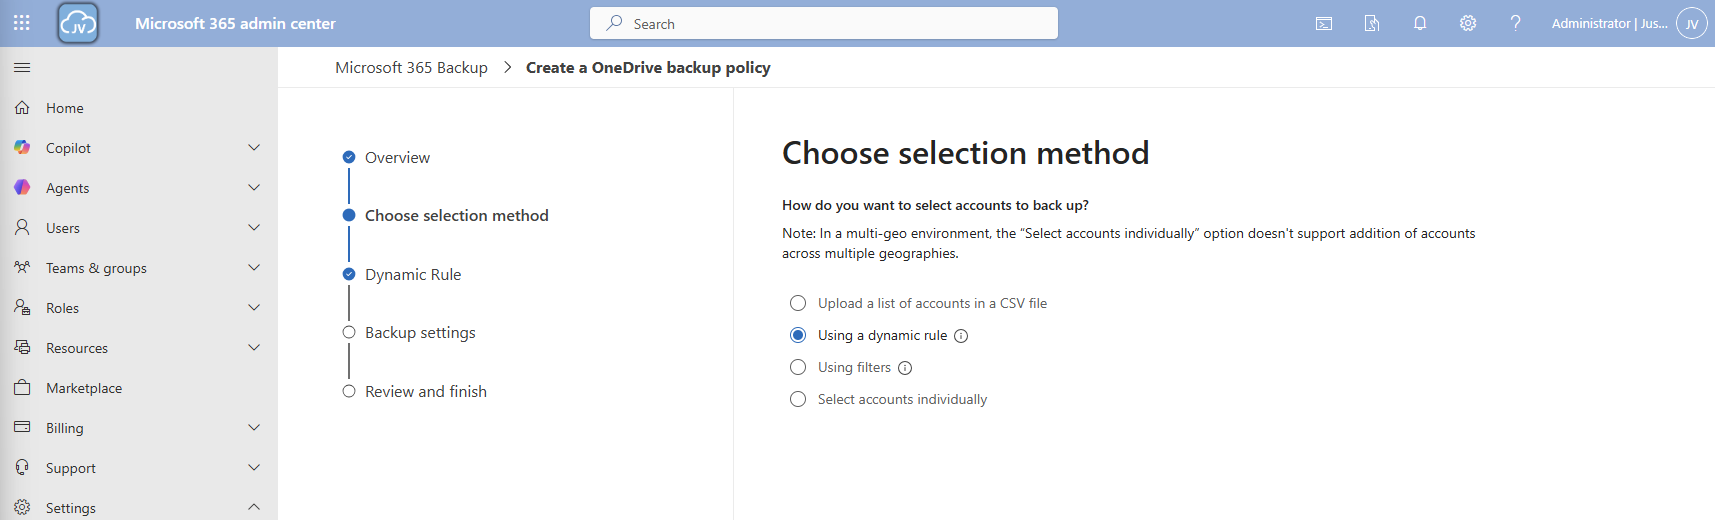
At the “Choose selection method” select the “Dynamic rule” option, as we want to automatically backup new accounts instead of changing the scope every time.
We can select two types here:
- Distribution lists
- Security groups

In my case, I created a dynamic security group containing all users. Then click “Next”.

Give the policy a name and finish the wizard.
Now we have 2 policies in place:

Step 6: Configure Microsoft 365 Backup for Exchange
Now we can configure the backup for Exchange accounts. Click on the “+ Set up policy” button under “Exchange”. Proceed to the wizard.
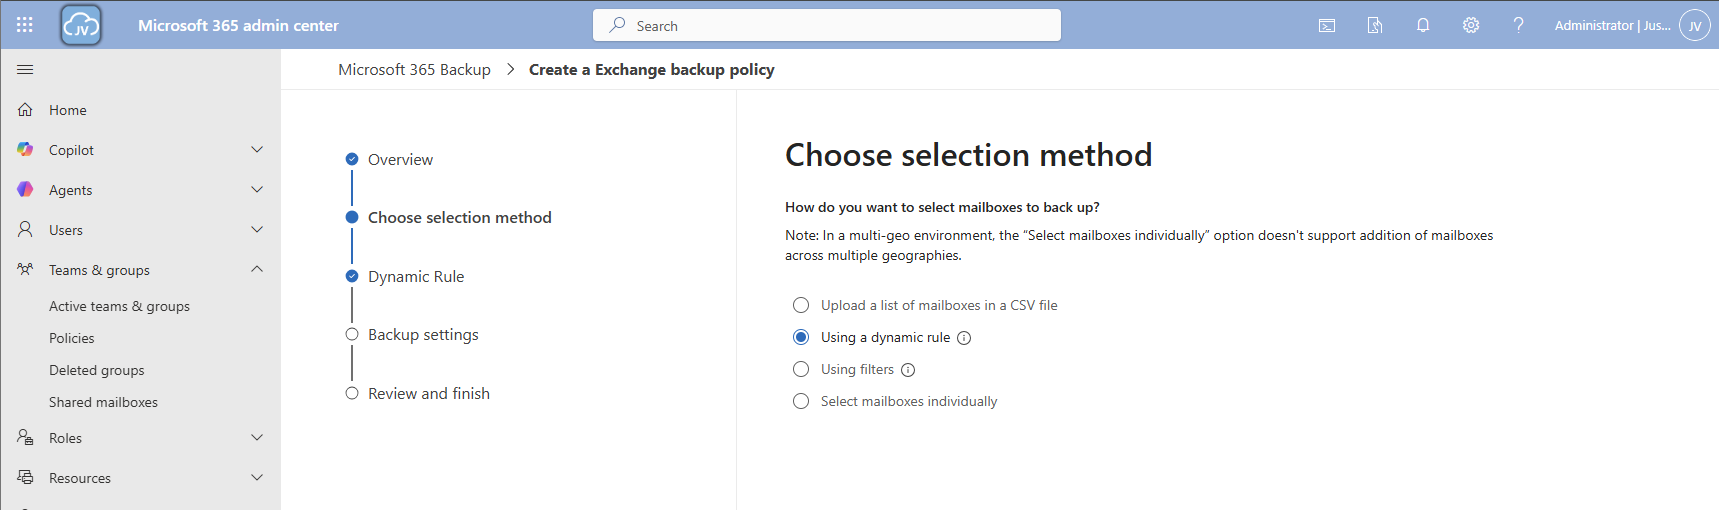
I once again use the dynamic rule option, to actually backup newly created accounts.
Here we can select two types of user sources similar to the OneDrive accounts:
- Distribution lists
- Security groups
In my case, I created a dynamic security group containing all users. Then click “Next”.
Click “Next”.
Give the policy a name and finish the wizard.
Now we have 3 policies in place:

Step 7: Restoring a full SharePoint Site
To actually test the backup method, we will place a file on the SharePoint site and restore the site. I placed a .zip file of around 200MB on the site I just selected and wait for Microsoft 365 Backup to backup the site:

After around 10 minutes, this starts backing up:

And waiting for a few minutes will ensure the task has been completed:

Now we will delete the file from the SharePoint site:


And let’s head back to Microsoft 365 Backup to actually restore the file. Under “SharePoint” I clicked on “Restore”

Follow the wizard by selecting your site where you want to recover files

Select your desired restore point, which will be obviously before any error or problem occurred. In my case, I deleted the file after 10:30 AM.
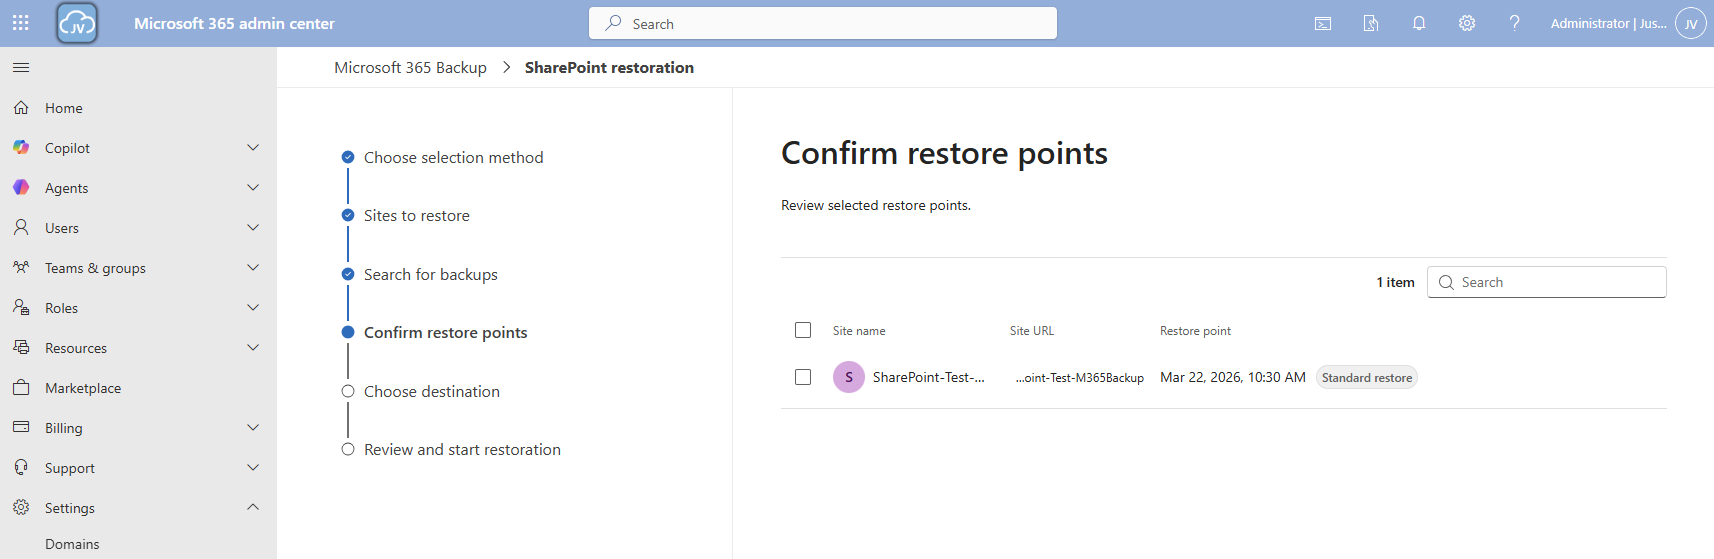
I selected this restore point and clicked “Next”.

Now you can select to create a new copy SharePoint site with all the filed in it or to just restore it to the current site.

Now the restore action will be executed. In my case this took a while. Actually, around 3 hours:

And as you can see, the file is back:

Step 8: Restoring a single file on OneDrive
Because we want also be able to restore a single file, let’s try to restore one single file in a OneDrive folder either.
Once again the reminder that your account needs these permissions to perform single-file restore actions for OneDrive:
- SharePoint Backup Administrator
In the Microsoft 365 Backup pane, under “Onedrive” click on “Restore”:

Use the “Restore specific files or folders” option.
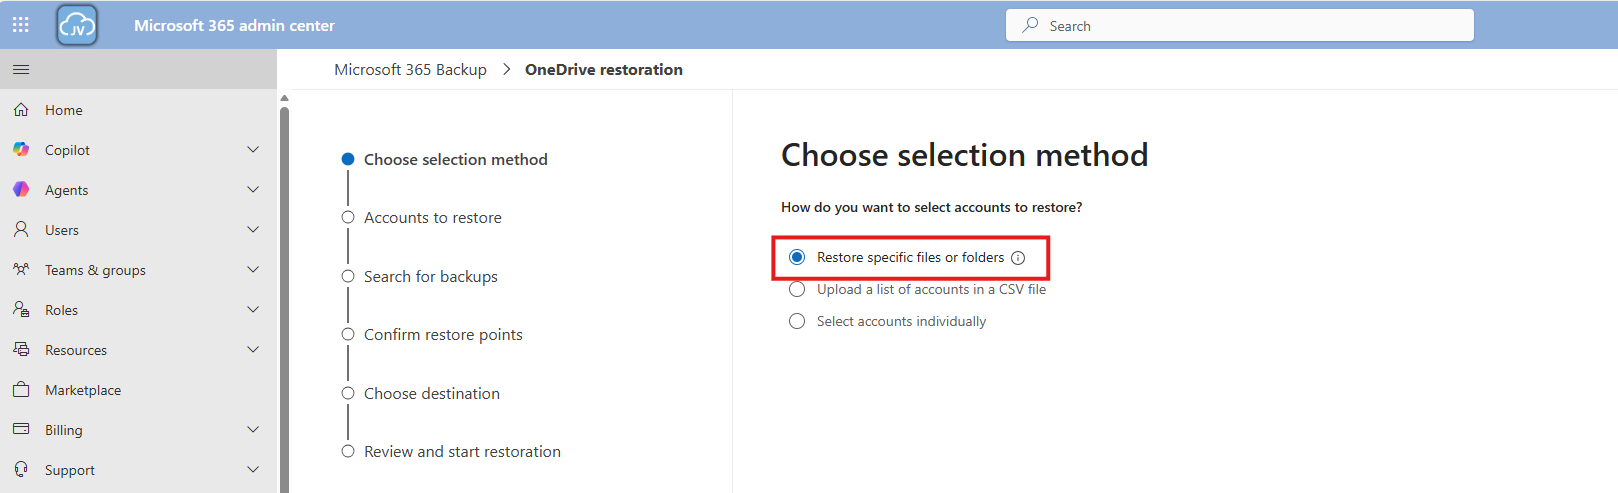
Then navigate to the account, desired restore point and file/folder. This would be pretty straight forward.
For the demonstration, I will delete the top folder (called Post 1462 – SPF-DKIM-DMARC), containing some files of an earlier blog post (around 40MB):
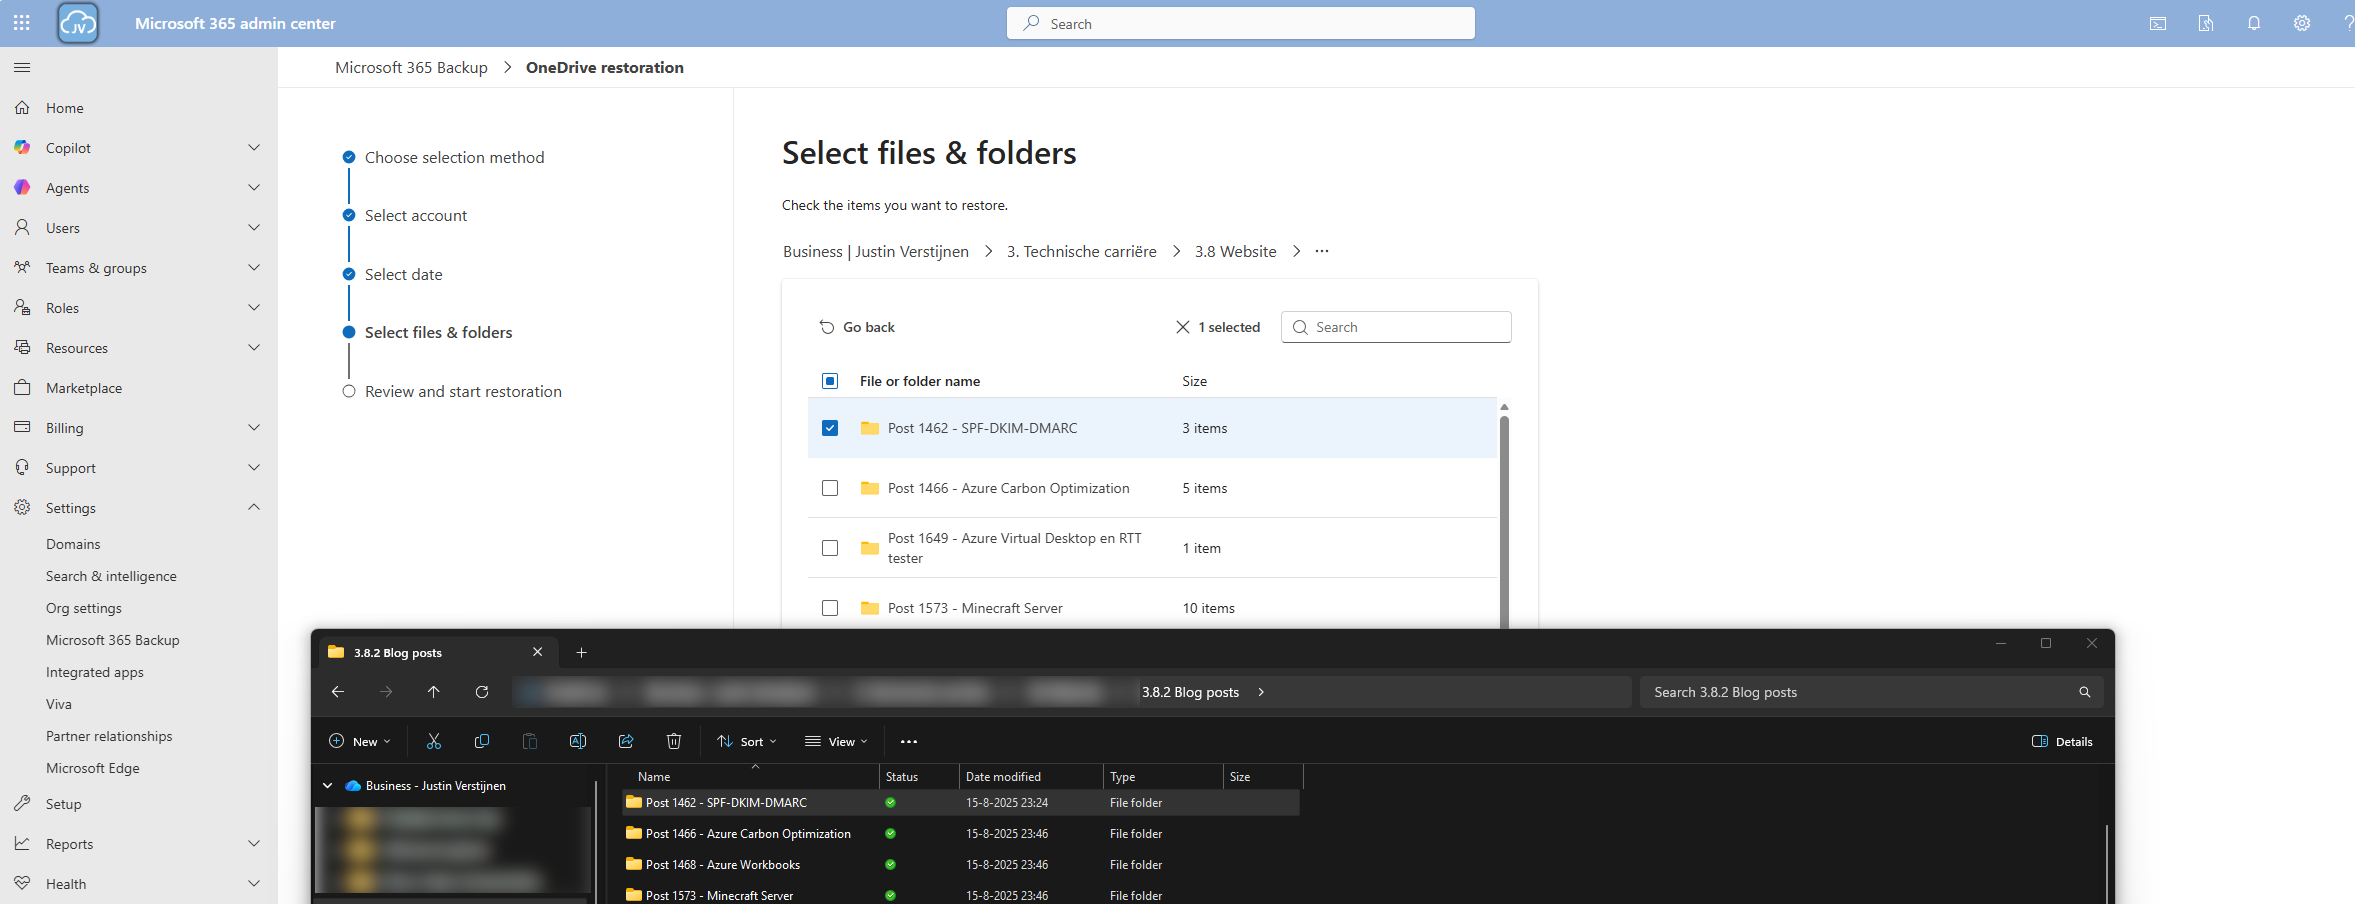
Thats gone.

Now let’s resume the restore action in the Microsoft 365 Backup portal.

And the portal will inform us the restoration task has been started.

Now we can review the status of the restore action under the tab “Restorations”.

After a minute, the service has placed our files in a new folder in the root of the OneDrive folder, allowing us to manually place back the files. This is by design to prevent data loss.

And the folder contains our selected folder:

Downsides of Microsoft 365 Backup
As I researched this solution, I wanted to know the upsides and downsides of this solution. As no solution is perfect, you have to align with what you want and need for your workloads. I came with the following downsides of Microsoft 365 Backup:
- SharePoint sites must be selected manually, even when using dynamic filters
- Restore actions of a complete site are a bit slow
- Pricing is based on usage, where price per user would be more predictable
- This can be cheaper than 3rd party solutions but also more expensive
- As this is an integrated solution, this can be seen (by regulatory compliance) as single point of failure. Locked out of your tenant means no access to backups either
Summary
Microsoft 365 Backup is a great solution for organizations and people that need more restore options than the default recycle bin (93 days) and versioning. It greatly integrates with your Microsoft 365 environment and is easy to setup, using your current Azure subscription as billing method.
I honestly see this as a last resort, when actions are too destructive to rely on the built in recycle bin options where you want to restore a complete account/mailbox/site. If within 93 days of deletion, the recycle bin would be a much faster option. But its a great feature to extend the retention from 93 days to 365 days for organizations who need this.
Thank you for visiting this page and I hope it was helpful.
Sources
These sources helped me by writing and research for this post;
- https://learn.microsoft.com/en-us/microsoft-365/backup/backup-pricing?view=o365-worldwide
- https://learn.microsoft.com/en-us/microsoft-365/backup/backup-setup?view=o365-worldwide
- https://learn.microsoft.com/en-us/microsoft-365/backup/backup-restore-data?view=o365-worldwide&tabs=onedrive
End of the page 🎉
You have reached the end of the page. You can select a category, share this post on X, LinkedIn and Reddit or return to the blog posts collection page. Thank you for visiting this post.
- Azure Master Class (12)
- Azure Virtual Desktop (23)
- Flying (15)
- Intune (6)
- Microsoft 365 (14)
- Microsoft Azure (34)
- Microsoft Defender XDR (4)
- Microsoft Entra (13)
- Networking (5)
- Powershell (20)
- Secure Score (1)
- Uncategorized (2)
- Windows 365 (3)
- Windows Server (14)
If you think something is wrong with this post or you want to know more, you can send me a message to one of my social profiles at: https://justinverstijnen.nl/about/
If you find this page and blog very useful and you want to leave a donation, you can use the button below to buy me a beer. Thank you in advance and cheers 🙂


The terms and conditions apply to this post.
Page visitors: No page-counter data available yet.
0 Comments