When deploying Microsoft Office apps to (pooled) Virtual Desktops, we mostly need to do some optimizations to the installation. We want to optimize performance on pooled and virtual machines, or maybe we want to enable shared computer activation because multiple users need the apps.
In this guide I will show you how to customize the installation of Office apps, primarily for Virtual Desktops, but can be used on any Windows machine.
Table of Contents
- Requirements
- What is the Office Configuration Tool?
- Choosing 32-bit or 64-bit version
- Office version and additional products
- Update channel
- Selecting the apps to install
- Default and additional languages
- Installation options
- Automatically accepting EULA
- Shared Computer Activation
- Set your Company name
- Enabling advanced options in Office
- Set Office XML/OpenDocument option and downloading configuration
- Installing Office on Windows
- Let’s check the configured settings
- Summary
📖 Estimated read time: 9 minutes
🔄 Page last updated on: August 21, 2025Requirements
- Around 30 minutes of your time
- A Microsoft 365 tenant with Global Administrator, Security Administrator or Office Apps Admin permissions
- A Windows machine to test the installation
- Basic knowledge of Virtual Desktops and Office Apps
What is the Office Configuration Tool?
The Office Configuration Tool (config.office.com) is a customization tool for your Office installation. We can some custom settings and define which settings we want, how the programs must behave and include and exclude software we don’t need.
Some great options of using this tool are:
- Automatically accepting the EULA at first start (saves a click for every new user)
- Choosing x32 or x64 version
- x64 is always preferred, only use x32 if you need it because of some shitty add-in or 3rd party applications
- Automatically selecting Office XML or OpenDocument setting (saves a click for every new user)
- Enabling Shared Computer Activation for pooled machines
- Users need Microsoft 365 Business Premium or higher to use the apps
- Selecting monthly or semi annual update channel
- Include Visio or Project
- Include extra language packs
- Defining your company name to save with the documents
- Choosing the preview version (not preferred for production environments)
- Customizing the selection of apps
- Enabling or disabling Hardware Acceleration
To use the Office Configuration tool, use the following link:
Then start by creating a new configuration:

Choosing 32-bit or 64-bit version
The wizard starts with asking whether to use 32-bit (x86) or 64-bit (x64). Choose the version you’ll need, while keeping in ming x64 is always the preferred option:

Then advance below.
Office version and additional products
If you need additional products or a different version like LTSC or Volume Licensing, you can select this now:

You can also select to include Visio, Project.
Update channel
You can now select what update channel to use:

These channels define how much your apps are updated. I advice to use the monthly enterprise channel or the semi annual enterprise channel, so you’ll get updates once a month or twice a year. We don’t want to update too much and we also don’t want preview versions in our production environments.
In smaller organizations, I had more success with the monthly channel so new features like Copilot or such are not delayed for at least 6 months.
Selecting the apps to install
Now we can customize the set of applications that are being installed:
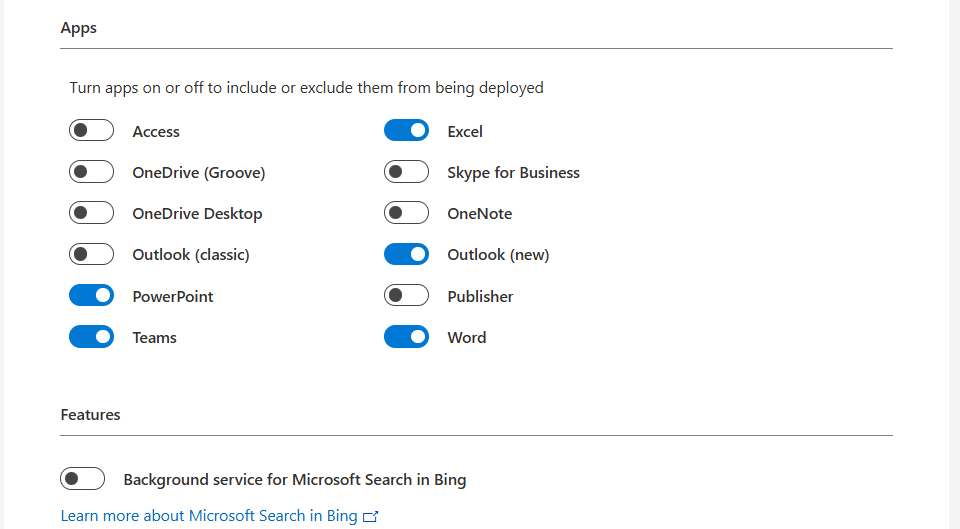
Here we can disable apps our users don’t need like the old Outlook or Access/Publisher. Not installing those applications saves some on storage and compute power. Also we can disable the Microsoft Bing Background service. No further clarification needed.
I prefer to install Onedrive manually myself to install it machine-wide. You do this by downloading Onedrive and then executing it with this command:
OneDriveSetup.exe /allusersDefault and additional languages
When you have users from multiple countries in your Virtual Desktops, we can install multiple language packs for users. These are used for display and language corrections.

You can also choose to match the users’ Windows language.
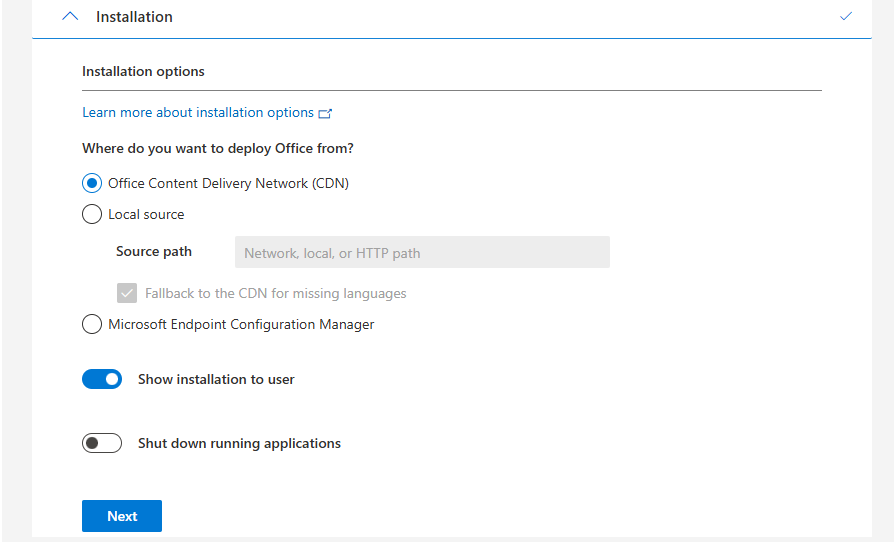
Installation options
At this step you could host the Office installation files yourself on a local server, which can save on bandwidth if you install the applications 25 times a day. For installations happening once or twice a month, I recommend using the default options:
Automatically accepting EULA
Now we have the option to automatically accept the EULA for all users. This saves one click for every user who opens the Microsoft Office apps:

Shared Computer Activation
Now we have the option to enable Shared Computer Activation, which is required for using on machines where multiple users are working simultaneously.

If using Azure Virtual Desktop or Remote Desktop Services as pooled, choose Shared Computer, otherwise use User based or Device based if having an Enterprise Agreement and the proper licenses.
Set your Company name
At this step we can set a company name to print in every Office document:

Enabling advanced options in Office
Now we have finished the normal wizard and we have the chance to set some advanced options/registry keys.
Disabling Hardware acceleration
We could disable hardware acceleration on Virtual Desktops, as we mostly don’t have a GPU on board. DirectX software rendering will then be used as default to make the software faster.

- Do not use hardware graphics acceleration
Disabling Animations
We could also disable the animations to save some on compute power:

- Disable Office animations
- No need to change the “Menu animations” setting as we completely disabled animations
Disabling Macros from downloaded files
And we can also set some security options, like disable macros for files downloaded from the internet:

- Block macros from running in Office files from the internet
- Be aware, you must configure this for every Office application you install
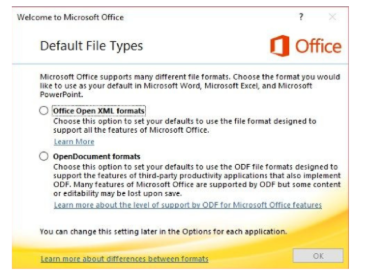
Set Office XML/OpenDocument option and downloading configuration
We can set the Office XML or OpenDocument setting in this configuration, as this will be asked for every new user. I am talking about this window:
We can set this in our configured office by saving the configuration and then downloading it:

Click OK and your XML file with all customizations will be downloaded:

Installing Office on Windows
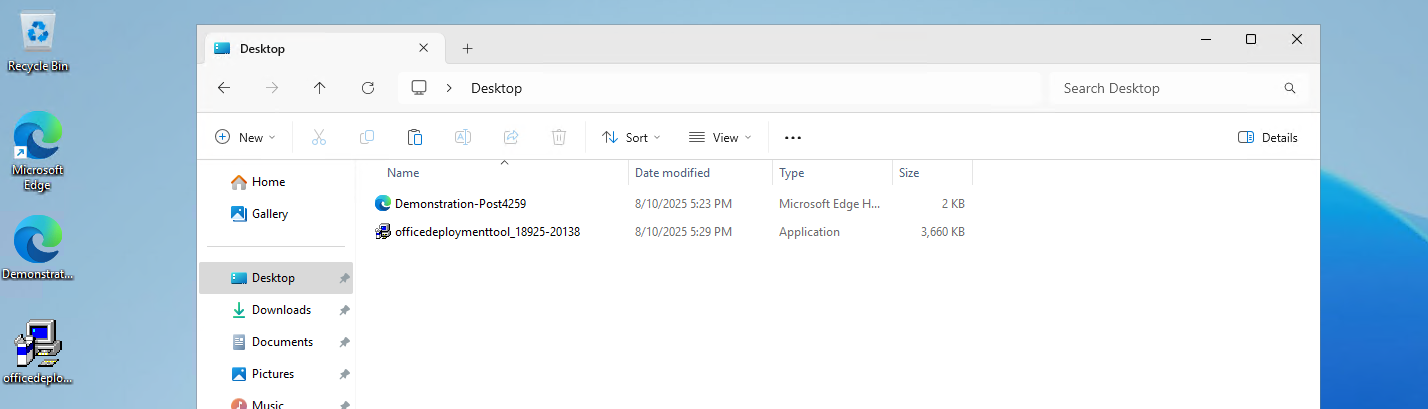
Now we can install Office with our customizations. We first need to download the Office Deployment Toolkit (ODT) from https://aka.ms/odt
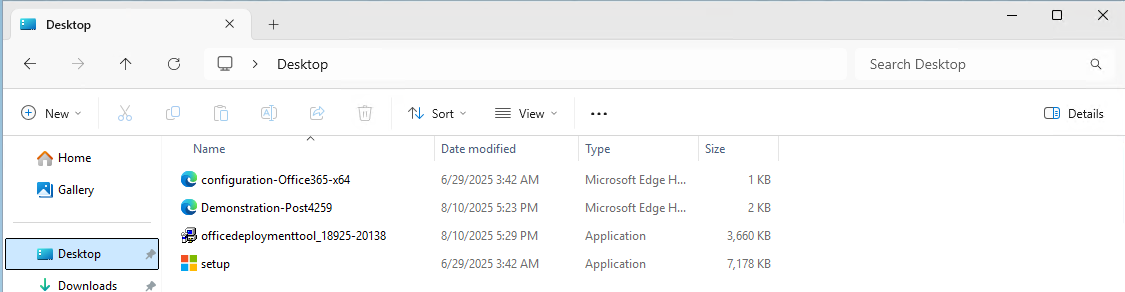
After you downloaded the Office Deployment Toolkit, we end up having 2 files:
Now run the Office Deployment Toolkit and extract the files in the same folder:

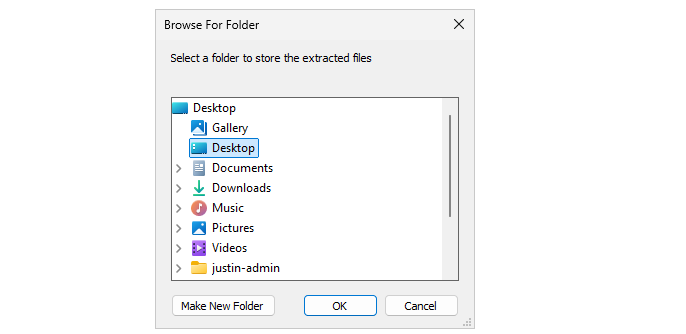
Select the folder containing your customized XML file:
Now we have around 4 files, with the official Office setup now extracted and comes with a default configuration:
We will now execute the setup using our customized file. Don’t click on setup yet.
Click on the address bar of the File Explorer, type”cmd” and hit Enter.

This opens CMD directly in this folder:

Now execute this command:
setup.exe /configure *yourcustomizedfile*.xmlAt the filename, you can use TAB to auto-complete the name. Makes it easier 🙂

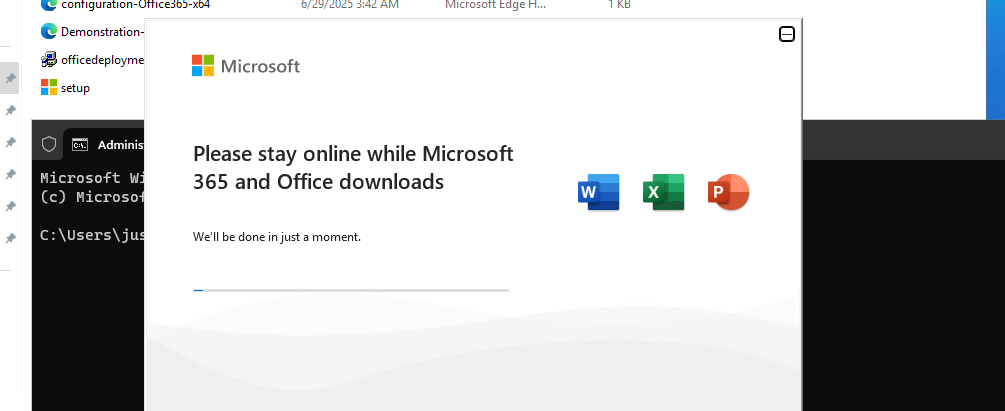
Now the setup will run and install Office applications according to your custom settings:
Let’s check the configured settings
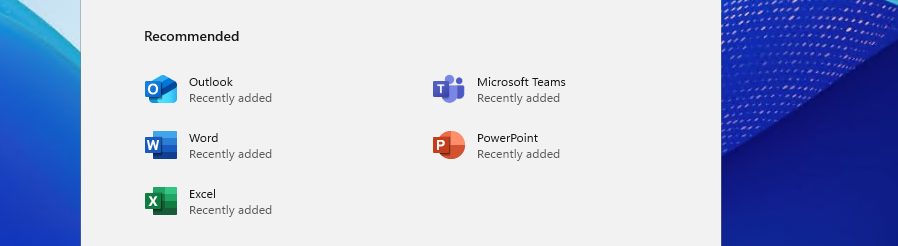
Now the installation of Office is done and I will click through the applications to check the outcome of what we have configured:


As we have Shared Computer Activation enabled, my user account needs a Microsoft 365 Business Premium or higher license to use the apps. I don’t have this at the moment so this is by design.
Learn more about the licensing requirements of Shared COmputer Activation here:
Summary
The Office Deployment Toolkit is your go-to customization toolkit for installing Office apps on Virtual Desktops. On Virtual Desktops, especially pooled/shared desktops it’s very critical that applications are as optimized as possible. Every optimization does save a few bits of compute power which will be profit for end users. And if one thing is true, nothing is as irritating as a slow computer.
Thank you for reading this guide and I hope it was helpful.
Sources
These sources helped me by writing and research for this post;
- https://learn.microsoft.com/en-us/microsoft-365-apps/admin-center/overview-office-customization-tool
- https://learn.microsoft.com/en-us/microsoft-365-apps/licensing-activation/device-based-licensing
- https://learn.microsoft.com/en-us/microsoft-365-apps/licensing-activation/overview-shared-computer-activation#how-to-enable-shared-computer-activation-for-microsoft-365-apps
End of the page 🎉
You have reached the end of the page. You can select a category, share this post on X, LinkedIn and Reddit or return to the blog posts collection page. Thank you for visiting this post.
- Azure Master Class (12)
- Azure Virtual Desktop (16)
- Flying (12)
- Intune (2)
- Microsoft 365 (11)
- Microsoft Azure (26)
- Microsoft Defender XDR (4)
- Microsoft Entra (9)
- Networking (5)
- Powershell (17)
- Uncategorized (1)
- Windows 365 (2)
- Windows Server (11)
If you think something is wrong with this post or you want to know more, you can send me a message to one of my social profiles at: https://justinverstijnen.nl/about/
The terms and conditions apply to this post.
Page visitors: No page-counter data available yet.