WordPress. Its maybe the best and easiest way to maintain a website. This can be run on any server, and in Azure, we also have great possibilities to run WordPress. In this guide I will show you how to do this, how to enhance the experience and what steps are needed to build the solution. I will also tell more about the theoretical stuff to get a better understanding of what we are doing.
Table of Contents
- Requirements
- What is WordPress?
- Different Azure WordPress offerings
- Pricing of WordPress on Azure (Linux)
- Architecture of the WordPress solution
- Backups of WordPress
- Step 1: Preparing Azure
- Step 2: Deploy the WordPress solution
- Step 3: Logging into WordPress and configure the foundation
- Step 4: Configure a custom domain
- Step 5: Configure Single Sign On with Entra ID
- Summary
📖 Estimated read time: 16 minutes
🔄 Page last updated on: November 5, 2025Requirements
- An Azure subscription
- A public domain name to run the website on (not required, but really nice)
- Some basic knowledge about Azure
- Some basic knowledge about IP addresses, DNS and websites
- Around 45 minutes of your time
What is WordPress?
For the people who may not know what WordPress is; WordPress is a tool to create and manage websites, without needing to have knowledge of code. It is a so-called content management system (CMS) and has thousands of themes and plugins to play with. This website you see now is also running on WordPress.

Different Azure WordPress offerings
When we look at the Azure Marketplace, we have a lot of different WordPress options available:

Now I want to highlight some different options, where some of these offerings will overlap or have the same features and architecture which is bold in the Azure Marketplace:
- Virtual Machine: This means WordPress runs on a virtual machine which has to be maintained, updated and secured.
- Azure Service: This is the official offering of Microsoft, completely serverless and relying the most on Azure solutions
- Azure Application: This is an option to run WordPress on containers or scale sets.
In this guide, we will go for the official Microsoft option, as this has the most support and we are Azure-minded.
Pricing of WordPress on Azure (Linux)
We have the following plans and prices when running on Linux:
| Plan | Price per month | Specifications | Options and use |
| Free | 0$ | App: F1, 60 CPU minutes a day Database: B1ms | Not for production use, only for hobby projects. No custom domain and SSL support |
| Basic | ~ 25$ (consumption based) | App: B1 (1c 1,75RAM) Database: B1s (1c 1RAM) No autoscaling and CDN | Simple websites with same performance as free tier, but with custom domain and SSL support |
| Standard | ~ 85$ per instance (consumption based) | App: P1v2 (1c 3,5RAM) Database: B2s (2c 4RAM) | Simple websites who also need multiple instances for testing purposes. Also double the performance of the Basic plan. No autoscaling included. |
| Premium | ~ 125$ per instance (consumption based) | App: P1v3 (2c 8RAM) Database: D2ds_V4 (2c 16RAM) | Production websites with high traffic and option for autoscaling |
For the Standard and Premium offerings there is also an option to reserve your instance for a year for a 40% discount.
Architecture of the WordPress solution
The WordPress solution of Microsoft looks like this:
We start with Azure Front Door as load balancer and CDN, then we have our App service instances (1 to 3), they communicate with the private databases and thats it. The app service instances has their own delegated subnet (appsubnet) and the database instances have their own delegated subnet (dbsubnet).
This architecture is very flexible, scalable and focusses on high availability and security. It is indeed more complex than one virtual machine, but it’s better too.
Backups of WordPress
Backups of the whole WordPress solution is included with the monthly price. Every hour Azure will take a backup from the App Service instance and storage account, starting from the time of creation:

I think this is really cool and a great pro that this will not take an additional 10 dollars per month.
Step 1: Preparing Azure
We have to prepare our Azure environment for WordPress. We begin by creating a resource group to throw in all the dependent resources of this WordPress solution.
Login to Microsoft Azure (https://portal.azure.com) and create a new resource group:
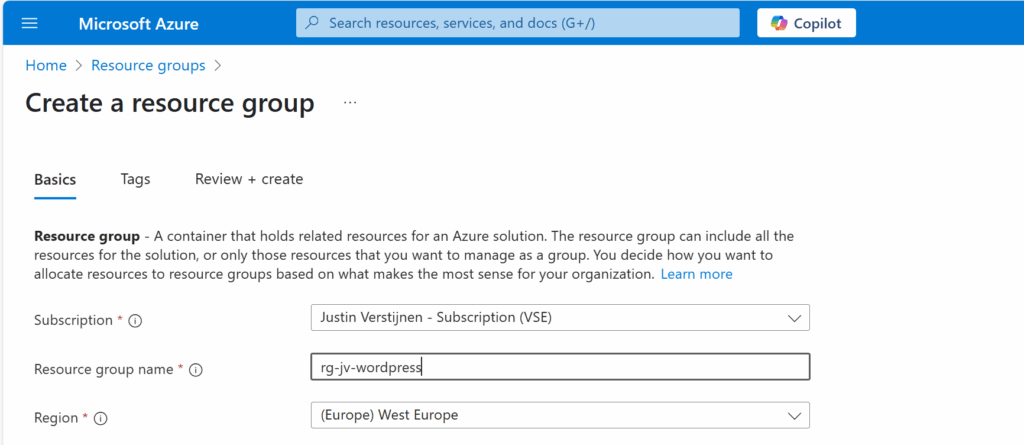
Finish the wizard. Now the resource group is created and we can advance to deploy the WordPress solution.
Step 2: Deploy the WordPress solution
We can go to the Azure Marketplace now to search for the WordPress solution published by Microsoft:

In this guide, we will use the Microsoft offering. You are free to choose other options, but some steps will not align with this guide.
Now after selecting the option, we have 4 different plans which we can choose. This mostly depends on how big you want your environment to be:
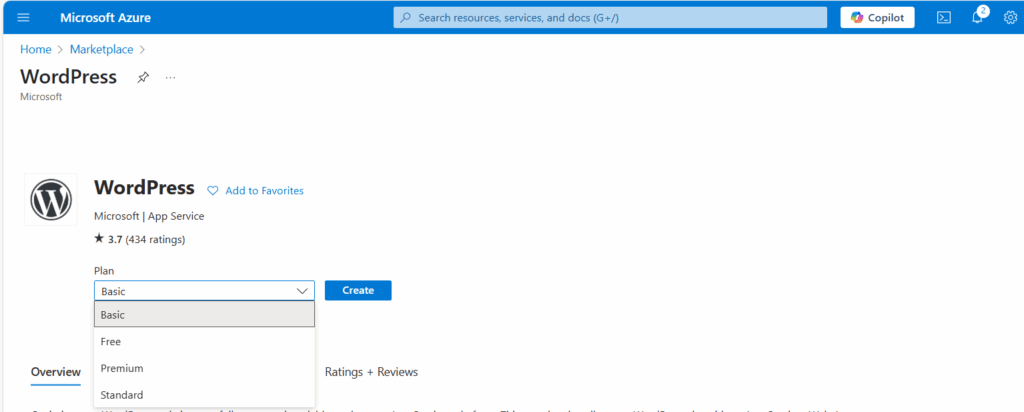
For this guide, we will choose the Basic as we want to actually host on a custom domain name. Select the free plan and continue.
Resource group and App Service plan

Choose your resource group and choose a resource name for the Web app. This is a URL so may contain only small letters and numbers and hyphens (not ending on hyphen).
Scroll down and choose the “Basic” hosting plan. This is for the Azure App Service that is being created under the hood.
WordPress setup
Then fill in the WordPress Setup menu, this is the admin account for WordPress that will be created. Fill in your email address, username and use a good password. You can also generate one with my password generator tool: https://password.jvapp.nl/

Click on “Next: Add ins >”
Add-ins
On the Add-ins page, i have all options as default but enabled the Azure Blob Storage. This is where the media files are stored like images, documents and stuff.
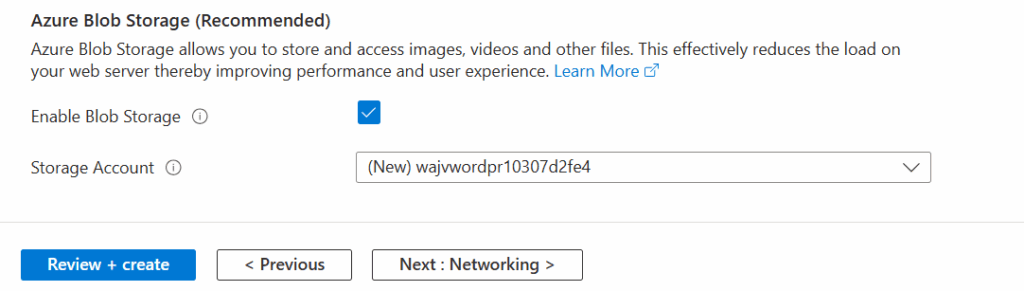
This automatically creates an storage account. Then go to the “Networking” tab.
Networking

On the networking tab, we have to select a virtual network. This is because the database is hosted on a private, non public accessible network. When using a existing Azure network, select your own network. In my case, I stick to the automatic generated network.
When using your own network, you have to create 2 subnets:
- appsubnet
- dbsubnet
Click on “Next”. And finish the wizard. For the basic plan, there are no additional options available.


You will see at the review page that both the App service instance and the Database are being created.
Deployment in progress

Now the deployment is in progress and you can see that a whole lot of resources are being created to make the WordPress solution work. The nice thing about the Marketplace offerings is that they are pre-configured, and we only have to set some variables and settings like we did in Step 2.
The deployment took around 15 minutes in my case.
Step 3: Logging into WordPress and configure the foundation
Now we are not going very deep into WordPress itself, as this guide will only describe the process of building WordPress on Azure. I have some post-installation recommendations for you to do which we will follow now.
Now that the solution is deployed, we can go to the App Service in Azure by typing it in the bar:

There you can find the freshly created App Service. Let’s open it.

Here you can find the Web App instance the wizard created and the URL of Azure with it. My URL is:
- wajvwordpress.azurewebsites.net
We will configure our custom domain in step 4.
WordPress Website
We can navigate to this URL to get the template website WordPress created for us:

WordPress Admin
We want to configure our website. This can be done by adding “/wp-admin” to our URL:
- wajvwordpress.azurewebsites.net/wp-admin
Now we will get the Administrator login of WordPress:

Now we can login to WordPress with the credentials of Step 1: WordPress setup
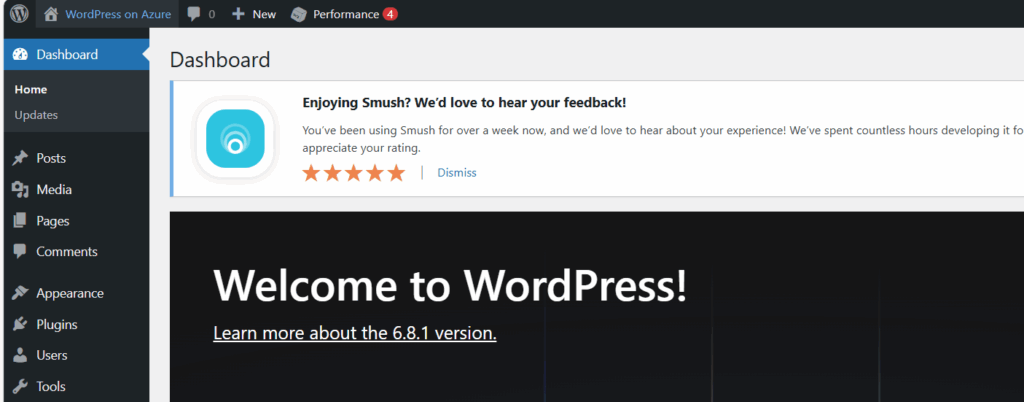
After logging in, we are presented the Dashboard of WordPress:

Updating to the latest version
As with every piece of software, my advice is to update directly to the latest version available. Click on the update icon in the left top corner:
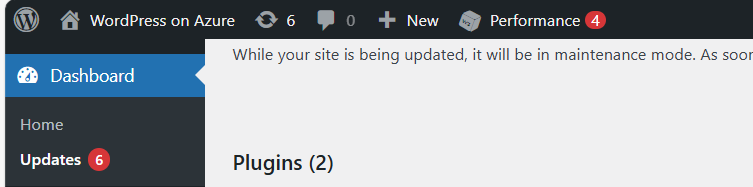
Now in my environment, there are 3 types of updates available:
- WordPress itself
- Plugins
- Themes
Update everything by simply selecting all and clicking on the “Update” buttons:

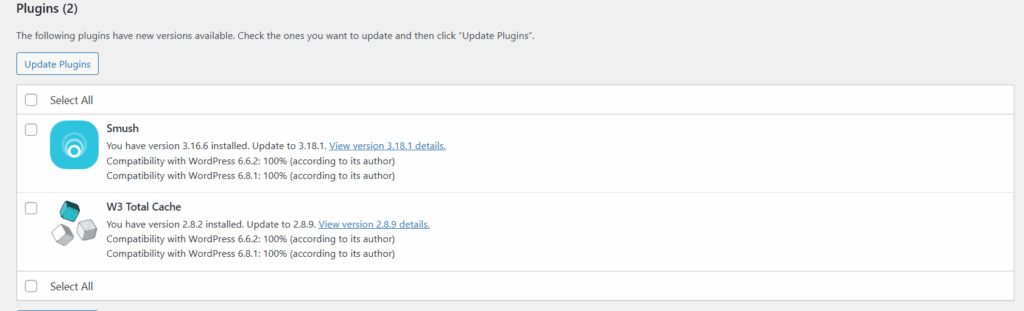

After every update, you will have to navigate back to the updates window. This process is done within 10 minutes, the environment will be completely up-to-date and ready to build your website.
All updates are done now.
Step 4: Configure a custom domain
Now we can configure a custom, better readable domain for our WordPress website. Lets get back to the Azure Portal and to the App Service.
Under “Settings” we have the “Custom domains” option. Open this:

Click on “+ Add custom domain” to add a new domain to the app service instance. We now have to select some options in case we have a 3rd-party DNS provider:

Then fill in your desired custom domain name:

I selected the name:
- wordpresstest.justinverstijnen.nl
This because my domain already contains a website. Now we have to head over to our DNS hosting to verify our domain with the TXT record and we have to create a redirect to our Azure App Service. This can be done in 2 ways:
- When using a domain without subdomain: justinverstijnen.nl -> use a ALIAS record
- When using a subdomain: wordpresstest.justinverstijnen.nl -> use a CNAME record
In my case, I will create a CNAME record.

Make sure that the CNAME or ALIAS record has to end with a “.” dot, because this is a domain outside of your own domain.
In the DNS hosting, save the records. Then wait for around 2 minutes before validating the records in Azure. This should work instantly, but can take up to 24 hours for your records to be found.

After some seconds, the custom domain is ready:
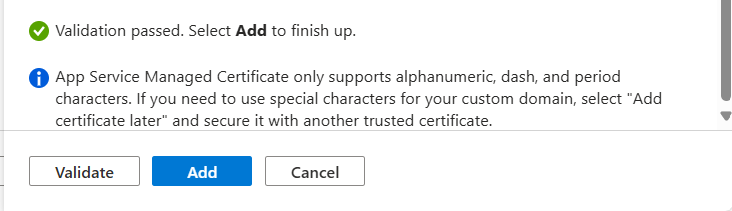
Click on “Add” to finish the wizard. After adding, a SSL certificate will be automatically added by Azure, which will take around a minute.
Now we are able to use our freshly created WordPress solution on Azure with our custom domain name:

Let’s visit the website:

Works properly! 🙂
We can also visit the WordPress admin panel on this URL now by adding /wp-admin:
- https://wordpresstest.justinverstijnen.nl/wp-admin

Step 5: Configure Single Sign On with Entra ID
Now we can login to WordPress but we have seperate logins for WordPress and Azure/Microsoft. It’s possible to integrate Entra ID accounts with WordPress by using this plugin:
- All-in-One Microsoft Office 365 Apps + Azure/EntraID Login
- https://wordpress.org/plugins/login-with-azure/
Head to WordPress, go to “Plugins” and install this plugin:

After installing the plugin and activating the plugin, we have an extra menu option in our navigation window on the left:

We now have to configure the Single Sign On with our Microsoft Entra ID tenant.
Create an Entra ID App registration
Start by going to Microsoft Entra ID, because we must generate the information to fill in into the plugin.
Go to Microsoft Entra ID and then to “App registrations”:

Click on “+ New registration” to create a new custom application.

Choose a name for the application and select the supported account types. In my case, I only want to have accounts from my tenant to use SSO to the plugin. Otherwise you can choose the second option to support business accounts in other tenants or the third option to also include personal Microsoft accounts.
Scroll down on the page and configure the redirect URL which can be found in the plugin:
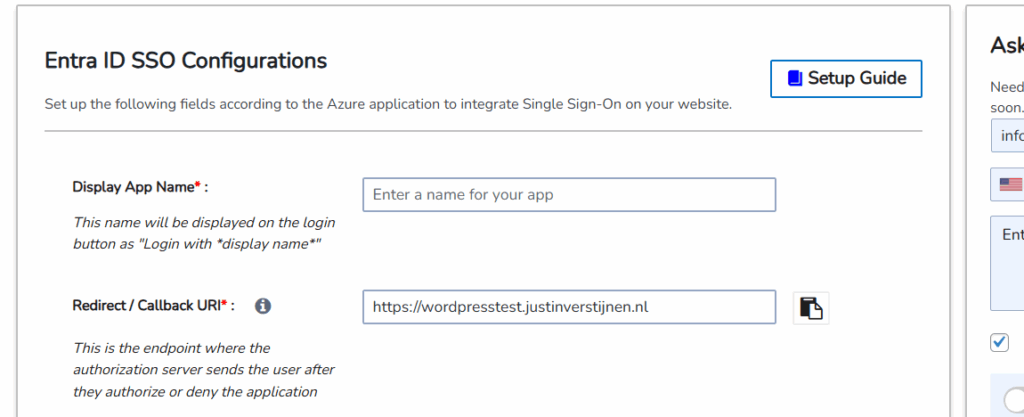
Copy this link, select type “Web” and paste this into Entra ID:

This is the URL which will be opened after succesfully authenticating to Entra ID.
Click register to finish the wizard.
Create a client secret
After creating the app registration, we can go to “Certificates & Secrets” to create a new secret:

Click on “+ New client secret”.

Type a good description and select the duration of the secret. This must be shorter than 730 days (2 years) because of security. In my case, I stick with the recommended duration. Click on “Add” to create the secret.
Now please copy the information and place it in a safe location, as this will be the last option to actually see the secret full. After some minutes/clicks this will be gone forever and a new one has to be created.
My advice is to always copy the Secret ID too, because you have a good identifier of which secret is used where, especially when you have like 20 app registrations.

Collect the information in Microsoft Entra ID
Now that we have finished the configuration in ENtra ID, we have to collect the information we need. This is:
- Client ID
- Tenant ID
- Client Secret
The Client ID (green) and Tenant ID (red) can be found on the overview page of the app registration. The secret is saved in the safe location from previous step.

Configure WordPress plugin
Now head back to WordPress and we have to fill in all of the collected information from Microsoft Entra ID:
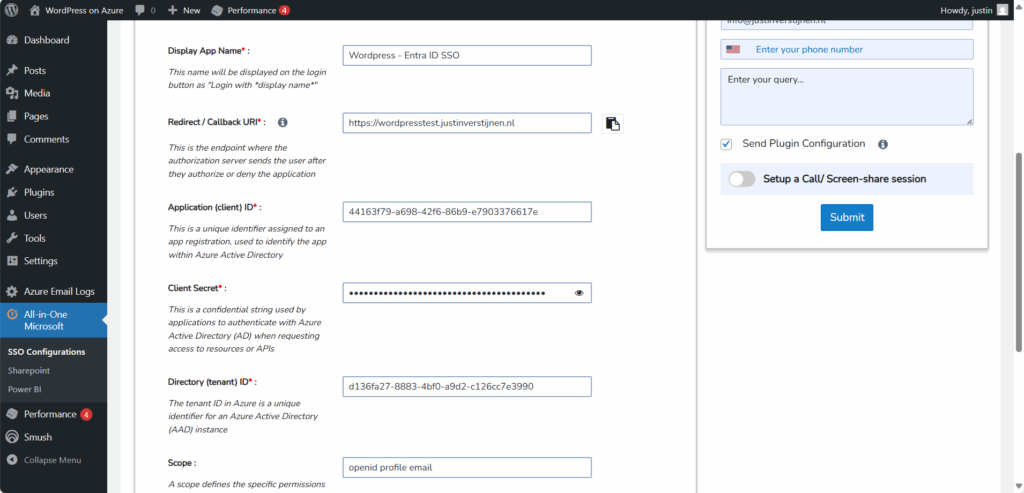
Fill in all of the collected information, make sure the “Scope” field contains “openid profile email” and click on “Save settings”. The scope determines the information it will request at the Identity Provider, this is Microsoft Entra ID in our case.
Then scroll down again and click on “Test Configuration” which is next to the Save button. An extra authentication window will be opened:
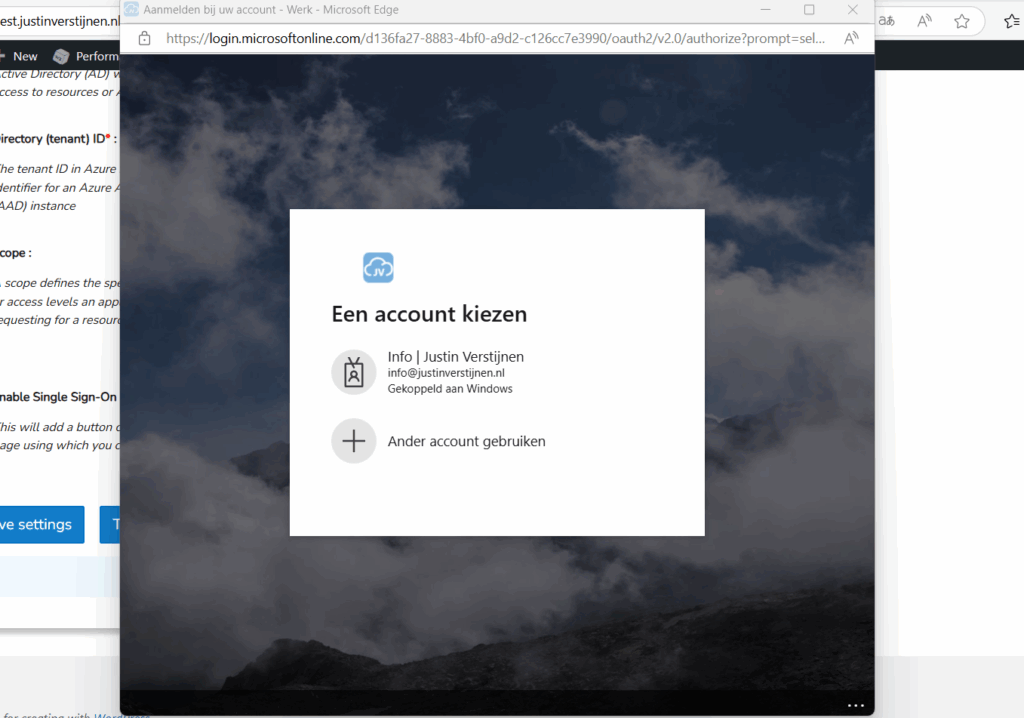
Select your account or login into your Entra ID account and go to the next step.

Now we have to accept the roles the application wants and to permit the application for the whole organization. For this step, you will need administrator rights in Entra ID. (Cloud Application Administrator or Application Administrator roles or higher).
Accept the application and the plugin will tell you the information it got from Entra ID:

Now we have to click on the “Configure Username” button or go the tab “Attribute/Role Mapping”.
In Entra ID, a user has several properties with can be configured. In identity, we call this attributes. We have to tell the plugin which attributes in Entra ID to use for what in the plugin.
Start by selecting “email” in the “Username field”:

Then click on “Save settings”.
Configure WordPress roles for SSO
Now we can configure which role we want to give users from this SSO configuration:

In my case, I selected “Administrator” to give myself the Administrator permissions but you can also chosse from all other built-in WordPress roles. Be aware that all of the users who are able to SSO into WordPress will bet this role by default.
Test WordPress SSO
Now we can test SSO for WordPress by loggin out and again going to our WordPress admin panel:
- https://wordpresstest.justinverstijnen.nl/wp-admin
We have the option to do SSO now:

Click on the blue button with “Login with WordPress – Entra ID”. You will now have to login with your Microsoft account.
After that you will land on the homepage of the website. You can manually go to the admin panel to get there: (unfortunately we cannot configure to go directly to the admin panel, this is a paid plugin option).
- https://wordpresstest.justinverstijnen.nl/wp-admin

Summary
WordPress on Azure is a great way to host a WordPress environment in a modern and scalable way. It’s high available and secure by default without the need for hosting a complete server which has to be maintained and patched regularly.
The setup takes a few steps but it is worth it. Pricing is something to consider prior, but I think with the Basic plan, you have a great self hosted WordPress environment for around 25 dollars a month and that is even with a hourly Backup included. Overall, great value for money.
Thank you for reading this guide and I hope it was helpful.
End of the page 🎉
You have reached the end of the page. You can select a category, share this post on X, LinkedIn and Reddit or return to the blog posts collection page. Thank you for visiting this post.
- Azure Master Class (12)
- Azure Virtual Desktop (16)
- Flying (12)
- Intune (2)
- Microsoft 365 (11)
- Microsoft Azure (26)
- Microsoft Defender XDR (4)
- Microsoft Entra (9)
- Networking (5)
- Powershell (17)
- Uncategorized (1)
- Windows 365 (2)
- Windows Server (11)
If you think something is wrong with this post or you want to know more, you can send me a message to one of my social profiles at: https://justinverstijnen.nl/about/
The terms and conditions apply to this post.
Page visitors: No page-counter data available yet.